1
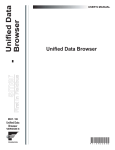
smar - Global Aliasing First in Fieldbus USER’S MANUAL Global Aliasing MAY / 06 Global Aliasing VERSION 8 TM FOUNDATION P V I E WG A L M E www.smar.com Specifications and information are subject to change without notice. Up-to-date address information is available on our website. web: www.smar.com/contactus.asp Table of Contents TABLE OF CONTENTS CHAPTER 1 - STARTING THE GLOBAL ALIASING CONFIGURATION .................................................................. 1.1 INTRODUCTION TO GLOBAL ALIASING................................................................................................................. 1.1 WHAT IS A GLOBAL ALIAS?....................................................................................................................................................1.2 ALIAS RESOLUTION AND THEMES........................................................................................................................................1.2 THEME SCOPE ........................................................................................................................................................................1.3 IMPLEMENTATION IN GRAPHWORX .....................................................................................................................................1.7 IMPLEMENTATION IN TRENDWORX......................................................................................................................................1.8 IMPLEMENTATION IN ALARMWORX......................................................................................................................................1.8 STARTING THE GLOBAL ALIASING CONFIGURATOR.......................................................................................... 1.9 CREATING CONFIGURATION DATABASES ........................................................................................................... 1.9 CREATING A MICROSOFT ACCESS CONFIGURATION DATABASE..................................................................................1.10 CREATING A MICROSOFT SQL SERVER CONFIGURATION DATABASE .........................................................................1.12 ADDING A CONFIGURATION DATABASE TO AN EXISTING SQL SERVER DATABASE...................................................1.15 TOOLBARS .............................................................................................................................................................. 1.20 STANDARD TOOLBAR...........................................................................................................................................................1.20 DATA MANIPULATION TOOLBAR .........................................................................................................................................1.21 MENUS..................................................................................................................................................................... 1.22 FILE MENU .............................................................................................................................................................................1.22 DATABASE CONNECTION PROPERTIES ............................................................................................................................1.22 EXPORTING CONFIGURATION DATA ..................................................................................................................................1.23 IMPORTING CONFIGURATION DATA...................................................................................................................................1.25 EDIT MENU.............................................................................................................................................................................1.28 MULTIPLYING ITEMS.............................................................................................................................................................1.28 VIEW MENU............................................................................................................................................................................1.29 SELECTING LANGUAGES .....................................................................................................................................................1.30 GO MENU ...............................................................................................................................................................................1.30 TOOLS MENU.........................................................................................................................................................................1.31 SETTING THE WORKING DIRECTORY ................................................................................................................................1.31 OPTIONS.................................................................................................................................................................. 1.31 GENERAL TAB .......................................................................................................................................................................1.32 GLOBAL ALIASING ENGINE TAB ..........................................................................................................................................1.33 GLOBAL ALIASING CLIENT TAB ...........................................................................................................................................1.34 GLOBAL ALIASING ENGINE ..................................................................................................................................................1.35 COMPACTING AND REPAIRING MS ACCESS DATABASES...............................................................................................1.36 RELOADING THE CONFIGURATION ....................................................................................................................................1.36 HELP MENU............................................................................................................................................................................1.37 CHAPTER 2 - CONFIGURING GLOBAL ALIASES..................................................................................................... 2.1 OVERVIEW OF ALIAS CONFIGURATION................................................................................................................ 2.1 ICONS IN ALIASES TREE CONTROL......................................................................................................................................2.2 CREATING NEW ALIAS FOLDERS .......................................................................................................................... 2.2 CONFIGURING ALIAS FOLDER PROPERTIES ......................................................................................................................2.3 CREATING NEW ALIASES........................................................................................................................................ 2.5 CONFIGURING ALIAS PROPERTIES ......................................................................................................................................2.6 CREATING NEW ALIAS VALUES ............................................................................................................................. 2.8 CONFIGURING ALIAS VALUE PROPERTIES .........................................................................................................................2.9 CHAPTER 3 - CONFIGURING THEMES ..................................................................................................................... 3.1 OVERVIEW OF THEMES .......................................................................................................................................... 3.1 CREATING NEW THEMES........................................................................................................................................ 3.1 CONFIGURING THEME PROPERTIES....................................................................................................................................3.2 BROWSER FIELD .....................................................................................................................................................................3.3 CREATING NEW THEME ITEMS .............................................................................................................................. 3.4 CONFIGURING THEME ITEM PROPERTIES ..........................................................................................................................3.5 BROWSER FIELD .....................................................................................................................................................................3.6 CHAPTER 4 - GLOBAL ALIAS BROWSER ................................................................................................................ 4.1 USING THE GLOBAL ALIAS BROWSER.................................................................................................................. 4.1 III Global Aliasing IV Chapter 1 STARTING THE GLOBAL ALIASING CONFIGURATION Introduction to Global Aliasing The Global Aliasing System is a powerful feature implemented in ProcessView clients and servers, GraphWorX, TrendWorX, and AlarmWorX. Global aliases are stored in the central global database (Microsoft SQL Server and Microsoft Access) and can be accessed over the network from miscellaneous clients. To provide a reasonable performance, the local clients do not connect directly to the database (Global Aliasing Engine Server), but they communicate with a Global Aliasing Client, which will obtain the requested information and cache it locally. The figure below shows the Global Aliasing System architecture. NOTE For examples of how Global Aliasing is used in GraphWorX displays, see the example files in the Program Files\Smar\ ProcessView\Examples\Global Aliasing Examples directory. Global Aliasing OLE DB (using SQL commands) Global Alias Engine (out-of-process COM) Configuration DB (MS Access or SQL server) Global Aliasing - server part OLE DB (using SQL commands) GenBroker Global Alias Engine Configurator (based on Configurator library) Global Aliasing - client part GenClient Global Alias Client (out-of-process COM) Global Alias Browser (in-process automation COM) "new template " notification Template Selector (in-process automation COM) Genesis or other Apps Global Aliasing System Architecture 1.1 Global Aliasing What Is a Global Alias? A global alias is a data string that enables you to reference multiple data sources (e.g. a trend pen in TrendWorX or a process point in GraphWorX) with one unique name. Because you can reference multiple data sources from a single location, global aliasing can reduce the overall number of individual display files you need to create. The Global Aliasing System provides global storage for a string of aliases and resolves the aliases in runtime. The aliases can be used in OPC tags, menu items, file names, etc. The figure below shows how a global alias links to multiple OPC tags in a GraphWorX display, for example. The data values with which the global aliases are associated are called alias values. All global aliases and alias values are created and configured in the Global Aliasing Configurator. Single Alias for Multiple Data Sources Alias Resolution and Themes Alias resolution is the process of assigning a specific tag value to an alias. You can assign one of multiple tags to the alias (e.g. Tag 1), as shown in the figure below. Aliasing Multiple Tags Each global alias can be associated with a theme. A theme links a global alias to one or more data values (e.g. tags). The Global Aliasing database allows you to assign to aliases different values based on the currently selected theme. The themes can change dynamically, either programmatically through automation API or by a GraphWorX pick action. The figure below shows how a generic single alias can be used, for example, to link multiple tags to a single process point in GraphWorX. The Global Aliasing Engine Server resolves the alias values and theme items that are associated with the data values (e.g. tags), as shown in the figure below. 1.2 Starting the Global Aliasing Configuration Alias Resolution Each theme can have one or more theme items associated with it, and each alias value can be associated with a theme item. A theme item allows you to switch between the data values that are linked to the theme, as shown in the figure below. For example, if you have one theme with three theme items, and each theme item is associated with a tag, you can toggle between the theme items (and therefore the tags). Thus, you have a single process point associated with three different values, as shown in the figure below. All themes and theme items are created and configured in the Global Aliasing Configurator. In addition, a single alias can be read by many different applications (e.g. GraphWorX, TrendWorX, and AlarmWorX), as shown in the figure below. You can also associate multiple aliases with a single theme. Using Theme Items to Switch Between Data Values Theme Scope The resolution of aliases is controlled by the theme scope (i.e. on what level a theme is applied to your application). The Global Aliasing system supports three different levels of aliases, as shown in the figure below: • Machine-Level: Applies to the whole computer. • Process-Level: Applies to the current process (e.g. GraphWorX with pop-up windows, a TrendWorX pen, or an AlarmWorX Viewer). • Document-Level: Applies only to the current document/display and its embedded controls (e.g. a GraphWorX pop-up window). NOTE Document level aliasing is available only in GraphWorX. It does not apply to the TrendWorX and AlarmWorX Viewer ActiveX controls. Global aliases use the following syntax: <#global_alias_name#>. 1.3 Global Aliasing In GraphWorX, you can have multiple levels of documents, or pop-up windows, as shown in the figure below. Overview of Theme Scopes The document level theme scope is defined in the GraphWorX Display Properties. To define the default theme scope in GraphWorX: 1. Select Display Properties from the Format menu, as shown in the figure below. Opening the Display Properties in GraphWorX 1.4 Starting the Global Aliasing Configuration 2. This opens the Display Properties dialog box. Click on the Runtime Advanced tab, as shown in the figure below. Display Properties in GraphWorX 3. To select a global alias start theme, either type a theme name in the text field under Global Alias Start Themes or click the ... button to select a theme from the Themes dialog box, as shown in the figure below. Choosing a Global Alias Start Theme 4. To define the theme scope, highlight a theme and click the Edit button. This opens the Theme Editor dialog box, as shown in the figure below. Select a Theme Item (e.g. "Room1") to associate with the start theme. Under Theme Scope, you can specify an Absolute theme scope (e.g. machine level, process level, or document level). Alternatively, you can specify a scope for the theme that is relative to the current document level (e.g. main display, pop-up window 1, pop-up window 2, etc.). Click OK. 1.5 Global Aliasing Specifying the Theme Item and Scope 5. The selected Theme Item and Theme Scope are now indicated in the Themes dialog, as shown in the figure below. Click OK. Theme Scope Indicated 6. The selected themes appear under Global Alias Start Themes in the Display Properties dialog box, as shown in the figure below. 1.6 Starting the Global Aliasing Configuration Global Alias Themes Added to Display Properties Implementation in GraphWorX GraphWorX supports Global Aliasing by interfacing to the Smar Global Aliasing Server. Global aliasing is integrated into the following GraphWorX features: Support for visible objects (rectangles, ellipses, lines, etc.) o Description o Custom command o Global Alias Browser for general page Support for dynamics (size, location, rotation, etc.) o OPC Tag, High Range and Low Range o Description o Custom command o Global Alias Browser for expressions and connections Support for text objects (text, button, etc.) o Label o Global Alias Browser for label and descriptions Support for display buttons o Display file (supported automatically by inheritance from PICK) o Label (supported automatically by inheritance from Text) o Global Alias Browser for labels and descriptions Support for state fields o StateValue o StateString o Default Value Access the Global Alias Browser from the description and language edit boxes for Analog Selector, Animator, Color, ColorAnalog, and Digital Selector Flash, Hide, Location, Pick, Process Points, Rotation, Size, Time/Date State Fields and connected the code behind the pages. 1.7 Global Aliasing o Added browse buttons to Local Variables - InitVal, LoRange, HiRange, DisplayTabs, Windows Properties Display Properties o Caption o Download Value 2x o Toggle Value 3x New pick action Select GAS (Global Aliasing System) Theme Command Line Support: GraphWorX allows you to set the initial global alias themes using a command line argument: -Themes="MACHINE=<Buildings=Building1" The syntax conforms to pick action Select GAS (Global Aliasing System) Theme syntax. Implementation in TrendWorX The TrendWorX Viewer supports Global Aliasing by interfacing to the Smar Global Aliasing Server. The following strings can be aliased: Title o Title Ranges o Hi Tag, Lo Tag, Format, Format XY Details o Format Pen Point Name, Hi Tag, Low Tag, Description, Units, Details Format, Ranges Format, Persistent Group Name URL Path o Configured in the General tab of the TrendWorX Viewer ActiveX Properties dialog box. Expressions o In the Expression Editor, click the Tags button and select Global Aliases from the pop-up menu to open the Global Aliases tab of the Unified Browser. o Currently the TrendWorX Viewer supports machine-level and process-level aliasing. All fields, which support aliasing, have been interfaced to the Global Alias Browser dialog, which is evoked by clicking on the … button. The user first connects a real time, persistent, or historical tag and then has the option to alias the entire pen string or part of it. Global aliasing is also supported also for drag-and-drop operations as well as related OLE automation methods. What is NOT supported: o Runtime editing of aliased fields o Aliases resulting in new global aliases (i.e. a resolved alias is also an alias) o Local settings saving if Global Aliases are used. Implementation in AlarmWorX The AlarmWorX Viewer supports Global Aliasing by interfacing to the Global Aliasing Server. Currently the AlarmWorX Viewer supports machine-level and process-level aliasing. All fields that support aliasing have been interfaced to the Global Alias Browser dialog, which is evoked by clicking on the … button in the configuration. In addition, the AlarmWorX Viewer now has an integrated Global Alias Browser. When specifying a global alias in the Alarm Viewer ActiveX Properties dialog box, you can also select a global alias from the Global Aliases tab of the Unified Browser, which includes all global aliases in the Global Aliasing System database. This eliminates the need to manually type in the alias name. The Global Alias Browser is available for the following: 1.8 Starting the Global Aliasing Configuration • Title, Configuration File and URL Path sections of the Alarm Viewer ActiveX and Alarm Report ActiveX Properties dialog box General tab • Alarm filtering via the Expression Editor • Event Subscriptions dialog box: Server, Areas, and Sources • Alarm Report ActiveX records filtering Starting the Global Aliasing Configurator To start the Global Aliasing Configurator: 1. From the Windows Start menu, select Programs > Smar ProcessView > Tools > Global Aliasing Configurator. 2. This opens the Global Aliasing Configurator, as shown in the figure below. The screen consists of a split window with a tree control view in the left-hand pane and a configuration view in the right-hand pane. The Configurator provides a standard format for the configuration database, as well as a sample (default) Global Aliasing configuration project. The Configurator also includes a toolbar and menus with many command functions. Global Aliasing Configurator Screen Creating Configuration Databases The Configurator provides a Configuration Database Wizard for creating new Microsoft Access and SQL Server configuration databases. To create a new configuration database in the Configurator: 1. Select New from the File menu, as shown in the figure below. 1.9 Global Aliasing Creating a Configuration Database 2. The introduction screen for the Configuration Database Wizard appears. Click the Next button to continue. 3. You have two options for creating your new database, as shown in the figure below: • Create a new Microsoft Access configuration database: For a Microsoft Access database, the Configurator uses a single .mdb file. • Create a Microsoft SQL Server database: The Configurator uses Universal Data Link (.udl) files to connect to a Microsoft SQL Server or MSDE database. Select the database type you want to create, and then click Next. Choosing the Type of Database To Create Creating a Microsoft Access Configuration Database To create a new Microsoft Access configuration database in the Configurator: 1. Select New from the File menu, as shown in the figure below. 1.10 Starting the Global Aliasing Configuration Creating a Configuration Database 2. The introduction screen for the Configuration Database Wizard appears. Click the Next button to continue. 3. You have two options for creating your new database, as shown in the figure below. Select Create new configuration in MS Access database. Click the Next button to continue. Creating a New Microsoft Access Database 4. Specify the directory path and file name for the new database, as shown in the figure below. Click the ... button to browse for a directory. If you want this new database to be the active configuration database, check Make Database Active. 1.11 Global Aliasing Naming the New Access Database 5. Click the Finish button. The new database is created and opened in the Configurator. Creating a Microsoft SQL Server Configuration Database To create a new Microsoft SQL Server configuration database in the Configurator: 1. Select New from the File menu, as shown in the figure below. Creating a Configuration Database 2. The introduction screen for the Configuration Database Wizard appears. Click the Next button to continue. 3. You have two options for creating your new database, as shown in the figure below. Select Create new configuration in MS SQL Server database. Click the Next button to continue. 1.12 Starting the Global Aliasing Configuration Creating a New Microsoft SQL Server Database 4. To connect to a SQL Server database, either select an existing database from the Database Name drop-down list, or a type a new name to create a new database, as shown in the figure below. If you choose to use an existing database, you have the option of adding (autoappending) the configuration to the existing database. (For more information about the autoappend function, please see "Adding the Configuration to an Existing Database.") In the SQL Server Name field, select the local SQL Server on which to create the database. If necessary, enter a user name and password to log on to the SQL Server. (It is recommended that you use Windows NT integrated security.) NOTE Usually you have only one instance of SQL Server running on the local node. In this case, the drop-down list under SQL Server Name has only one option: "(local)." However, it is possible to run multiple SQL Server instances on the local node, in which case the SQL Server field lists all those SQL Server instances: "(local)" for the default instance and "node_name/instance_name" for all others. The drop-down list may show SQL Server instances on other nodes as well. 1.13 Global Aliasing Connecting to a SQL Server Database 5. Specify a directory path location in which to create the database, as shown in the figure below. You can either use the default SQL Server database folder, or you can click the ... button and browse for a specific folder. Specifying the Database Location and Properties Under the Database Properties section, specify an initial size for the database, which should be as large as possible. You can also specify a Database Growth option (in megabytes) or as a percentage of the total size. MSDE servers are capable of growing the database on the fly to store more data. However, if this operation is performed frequently, the overall system performance may decrease. Choosing an initially large database size and a corresponding database growth option can drastically improve system performance. Under the Log File Properties section, you can also modify the settings for the database 1.14 Starting the Global Aliasing Configuration transaction log file. Specify a Log File Growth option (in megabytes) or as a percentage of the total size. Again, a sufficient initial size setting can greatly improve performance. The default options should be adequate for most applications with a small to medium size load. Click the Next button to create the new SQL Server database. 6. The Configurator uses Universal Data Link (.udl) files to connect to the Microsoft SQL Server database. These .udl files contain OLE database connection information that allows the Configurator to create and manage connections to OLE databases. Enter a name and directory path for the new .udl file in the Data Link File Name field, as shown in the figure below. You can browse for a directory by clicking the … button to the right of this field. Click the Next button to continue. If you want this new database to be the active configuration database, check Make Database Active. Creating a Universal Data Link File 7. Click the Finish button. The new database is created and opened in the Configurator. Adding a Configuration Database to an Existing SQL Server Database The Configuration Database Wizard also gives you the option to add the configuration database structure to an existing Microsoft SQL Server database: 1. Select New from the File menu, as shown in the figure below. Creating a Configuration Database 1.15 Global Aliasing 2. The introduction screen for the Configuration Database Wizard appears. Click the Next button to continue. 3. You have two options for creating your new database, as shown in the figure below. Select Create new configuration in MS SQL Server database. Click the Next button to continue. Creating a Microsoft SQL Server Database 4. To connect to a SQL Server database, select the existing database from the drop-down list, as shown in the figure below. Check the Auto-append configuration into existing database check box. In the SQL Server field, select the local SQL Server on which to create the database. Type a name for the database in the Database Name field. If necessary, enter a user name and password to log on to the SQL Server. (Note: It is recommended that you use Windows NT integrated security.) Click the Next button to continue. NOTE Usually you have only one instance of SQL Server running on the local node. In this case, the drop-down list under SQL Server Name has only one option: "(local)." However, it is possible to run multiple SQL Server instances on the local node, in which case the SQL Server field lists all those SQL Server instances: "(local)" for the default instance and "node_name/instance_name" for all others. The drop-down list may show SQL Server instances on other nodes as well. 1.16 Starting the Global Aliasing Configuration Connecting to an Existing SQL Server Database 5. If the existing database already has configuration tables, you have the following options, as shown in the figure below: • Select a different database name (recommended): This option allows you to rename the database without affecting the existing database as well as create a new Data Link (.udl) file. • Use the existing database structure: This option preserves the content of the existing database and allows you to create a new Universal Data Link (.udl) file. • Override all existing configuration tables: This option expunges the content of the existing database and allows you to create a new Universal Data Link (.udl) file. NOTE Overriding the database may disable other applications that also use the database. Click the Next button to continue. 1.17 Global Aliasing Adding the Configuration to an Existing SQL Server Database 6. If you chose Select a different database name (recommended), you are directed back to the SQL Server Database Connection dialog box, as shown in the figure below. Enter a new name for the database, and then click Next. Renaming the Existing SQL Server Database 1.18 Starting the Global Aliasing Configuration 7. Specify a directory path location in which to create the database, as shown in the figure below. You can either use the default SQL Server database folder, or you can click the ... button and browse for a specific folder. Specifying the Database Location and Properties Under the Database Properties section, specify an initial size for the database, which should be as large as possible. You can also specify a Database Growth option (in megabytes) or as a percentage of the total size. MSDE servers are capable of growing the database on the fly to store more data. However, if this operation is performed frequently, the overall system performance may decrease. Choosing an initially large database size and a corresponding database growth option can drastically improve system performance. Under the Log File Properties section, you can also modify the settings for the database transaction log file. Specify a Log File Growth option (in megabytes) or as a percentage of the total size. Again, a sufficient initial size setting can greatly improve performance. The default options should be adequate for most applications with a small to medium size load. Click the Next button to create the new SQL Server database. 8. The Configurator uses Universal Data Link (.udl) files to connect to the Microsoft SQL Server database. These .udl files contain OLE database connection information that allows the Configurator to create and manage connections to OLE databases. Enter a name and directory path for the new .udl file in the Data Link File Name field, as shown in the figure below. You can browse for a directory by clicking the … button to the right of this field. Click the Next button to continue. If you want this new database to be the active configuration database, check Make Database Active. NOTE If you chose to Use the existing database structure or to Override all existing configuration tables, you will still need to create a new Data Link file. 1.19 Global Aliasing Creating a Universal Data Link File 9. Click the Finish button. The new database is created and opened in the Configurator. Toolbars The Global Aliasing Configurator contains two toolbars: a Standard toolbar and a Data Manipulation toolbar. Standard Toolbar To show or hide the Standard toolbar, select Toolbars > Standard Buttons from the View menu. The Standard toolbar, shown below, contains the following command buttons. 1.20 Starting the Global Aliasing Configuration New: Creates a new configuration database. Open: Opens an existing configuration database. Export Data: Exports configuration data to a text file (.txt) or a Microsoft Excel file (.csv). Import Data: Imports configuration data from a text file (.txt) or a Microsoft Excel file (.csv). Back: Moves the cursor back to the previously selected item in the tree control. Next: Moves the cursor to the next item in the tree control. Up One Level: Moves up one level in the tree control. Cut: Deletes current selection, sending it to the clipboard. Copy: Copies the current selection to the clipboard. Paste: Pastes the current contents of the clipboard. Large Icons: Displays items as large icons. Small Icons: Displays items as small icons. List: Displays items as a list. Details: Displays items as a list with details. Dialog View: Displays additional configuration options. Aliases: Moves the cursor to the Aliases tree control. Themes: Moves the cursor to the Themes tree control. Global Refresh: Refreshes the data for the entire Configurator screen. Reload Configuration: Cleans out the global aliasing data cache in runtime. About: Displays information about the application. Help: Displays context-sensitive help. Help Topics: Launches online Help for the application. Data Manipulation Toolbar To show or hide the Data Manipulation toolbar, select Toolbars > Data Manipulation Buttons from the View menu. The Data Manipulation toolbar, shown below, contains the following command buttons. New Theme: Creates a new alias theme group under the Themes tree control. New Theme Item: Creates a new theme item under the selected alias theme. New Folder: Inserts a new folder under the Aliases tree control. New Alias: Creates a new global alias under the Aliases tree control. New Alias Value: Creates a new global alias value for the selected alias. 1.21 Global Aliasing Menus The menu bar of the Global Aliasing Configurator contains the following menus: • File • Edit • View • Go • Tools • Help NOTE You can also access many of the menu commands by right-clicking items in the tree control of the Configurator and selecting command functions from the pop-up menus. File Menu The File menu commands are listed in the table below. File Menu Commands New SHORTCUT KEYS CTRL+N Open CTRL+O COMMAND Save As Connection Properties Export CSV Import CSV XML Export XML Export Schema XML Import XML Validate Make Active Exit FUNCTION Creates a new configuration database. Opens a Microsoft Access (.mdb) or Microsoft Data Link (.udl) file, which allows you to connect to any OLE database source, such as a SQL database. Saves the current database under a different name as a Microsoft Access (.mdb) or Microsoft Data Link (.udl) file. Displays the current database connection properties (see below). Exports configuration data from your database to a text file (.txt) or a Microsoft Excel file (.csv). You can specify the delimiters and what to export. Imports data into your configuration database from a text file (.txt) or a Microsoft Excel file (.csv). You can then specify the delimiters and choose from the import settings. Exports configuration data to an XML file. Exports configuration data to an XML Schema file. Imports configuration data from an XML file. This feature does not import an XML data file, but it will try to validate its structure using stored XML schema. Once it passes this validation, the XML file is acceptable for import by the Configurator. Makes the current database active for use by the global aliasing engine. If this command is not available, then the current database is already the active database. Closes the application. Database Connection Properties Selecting Connection Properties from the File menu opens the Database Connection Properties dialog box, shown below, which lists the initialization properties for the current database connection. 1.22 Starting the Global Aliasing Configuration Database Connection Properties Dialog Box Exporting Configuration Data Exporting Data to a Text or CSV File The Configurator offers the flexibility of exporting data from your configuration database to a text (.txt) file or a Microsoft Excel (.csv) file. To export data, select Export CSV from the File menu. This opens the Export Configuration Data to File dialog box, as shown in the figure below. You can then specify the delimiters for exporting the data. Unless you specify delimiters in the Export Configuration Data to File dialog box, the file uses Commas as delimiters by default. Each group contains headings and columns that provide information about each item, such as descriptions and associated translations and expressions. It also provides the "tree" pathway for each item. Choose the directory to which you want to export the data from your database. In the Save As Type field, choose the file type (.txt or .csv) that you would like to save. 1.23 Global Aliasing Exporting Configuration Data Exporting Data to an XML File The Configurator also allows you to export data from your configuration database to an XML file. The XML export/import functionality was mainly developed for Windows platforms that do not support databases (e.g. Windows CE and Windows Embedded). XML has the following advantages over the CSV import/export function: • XML has a standardized format, unlike the text/CSV format, which uses various delimiters (e.g. TAB instead of commas, strings could not accept all characters, etc.) • XML is language-independent, whereas CSV converts date/time, floats, and currency fields according to local settings in Windows. For example, using CSV, you cannot export data on German Windows and import it on English Windows without making changes • Windows has an installed automation object that has the capability to work with XML. Thus, programmers can create/modify their configurations outside the Configurator using Visual Basic, if desired. • XML supports schemas. A schema is a special XML file that specifies the data structure of an XML data file. To export data, select XML Export from the File menu. This opens the Export XML File dialog box, as shown in the figure below. Give the file a name, and then choose the directory to which you want to export the data from your database. Click Save. NOTE You can also export configuration data to an XML schema file by selecting XML Export from the File menu. 1.24 Starting the Global Aliasing Configuration Exporting Configuration Data to an XML File Importing Configuration Data Importing Data From a Text or CSV File The Configurator offers the flexibility of importing data from a text (.txt) file or a Microsoft Excel (.csv) file to your configuration database. To import data, select Import CSV from the File menu. This opens the Import Configuration Data From File dialog box, shown below. You can then specify the delimiters and choose from the following import settings: • Create new items. When the import file contains items that are not yet in the configuration database, then it creates them. Otherwise it skips these items. • Update existing items. When the import file contains items that are in the configuration database, then it updates them using data from the import file. Otherwise it skips these items. NOTE Either Create new items or Update existing items must be selected. Otherwise there is nothing to import. • Display errors. When this item is checked, the Configurator shows a dialog box if an error occurs, and then asks you if you want to proceed with the import. When it is not checked, it skips all items where an error occurred. 1.25 Global Aliasing Import Configuration Data From File Dialog Box When you have selected a file to import, click Open. When the import is completed, the File Import Results dialog box opens, as shown below. This shows the import settings, including the input file name. It also provides a summary of the import, including how many items were inserted, updated, or rejected, and shows how many errors occurred. Click the ... button to the right of each field to get the details view of the import results, as shown below. This view shows the specific items that were inserted, updated, or rejected, as well as a description of any errors that occurred. File Import Results Dialog Box 1.26 Starting the Global Aliasing Configuration Importing Data From an XML File The Configurator allows you to import data from your configuration database to an XML file. The XML export/import functionality was mainly developed for Windows platforms that do not support databases (e.g. Windows CE and Windows Embedded). XML has the following advantages over the CSV import/export function: • XML has a standardized format, unlike the text/CSV format, which uses various delimiters (e.g. TAB instead of commas, strings could not accept all characters, etc.) • XML is language-independent, whereas CSV converts date/time, floats, and currency fields according to local settings in Windows. For example, using CSV, you cannot export data on German Windows and import it on English windows without making changes • Windows has an installed automation object that has the capability to work with XML. Thus, programmers can create/modify their configurations outside the Configurator using Visual Basic, if desired. • XML supports schemas. A schema is a special XML file that specifies the data structure of an XML data file. To import data, select XML Import from the File menu. This opens the Import XML File dialog box, as shown in the figure below. Give the file a name, and then choose the directory from which you want to import the data. You can then specify the delimiters and choose from the following import settings. Click Open. • Create new items. When the import file contains items that are not yet in the configuration database, then it creates them. Otherwise it skips these items. • Update existing items. When the import file contains items that are in the configuration database, then it updates them using data from the import file. Otherwise it skips these items. NOTES Either Create new items or Update existing items must be selected. Otherwise there is nothing to import. Selecting XML Validate from the File menu does not import an XML data file, but it will try to validate its structure using stored XML schema. Once it passes this validation, the XML file is acceptable for import by the Configurator. Importing Configuration Data From an XML File 1.27 Global Aliasing Making the Database Active Once your configuration is complete, you need to make sure that it is the active database. The database that is currently active is the one that the server uses. To make the current database active, select Make Active… from the File menu. If the Make Active… selection is grayed out, then the current database is already the active database. A dialog box appears showing both the current active database and database that is currently being edited, as shown in the figure below. To set the edited database as the active database, click the Yes button. Making the Database Active Edit Menu The Edit menu commands are listed in the table below. Edit Menu Commands COMMAND SHORTCUT KEYS New Rename CTRL+R Multiply CTRL+M Delete CTRL+DEL Cut CTRL+X Copy Paste CTRL+C CTRL+V Select All CTRL+A Invert Selection FUNCTION Creates a new item depending on what is selected in the tree control. Renames the selected item. Opens the Multiply Item dialog box (see below), which allows you to multiply an item in the tree control. Deletes the selected object. Cuts the selected object from the view and places it on the clipboard. Copies the selected object to the clipboard. Pastes the last object placed on the clipboard. Selects all objects in a list. The selection is shown in the upper-right-hand section of the viewer. Unselects all selected items and selects all unselected items in a list in the upper-right-hand section of the viewer. Multiplying Items The Global Aliasing Configurator allows you to multiply items in the tree control, including aliases, folders, alias values, themes, and theme items. Multiplication provides a simple way of developing Global Aliasing configurations where there are many similar items in a given category. To multiply an item: 1. Select the item in the tree control that you wish to multiply. 2. Either right-click the item and select Multiply from the pop-up menu, or select Multiply from the Edit menu. This opens the Multiply Item dialog box, shown below. 1.28 Starting the Global Aliasing Configuration Multiply Item Dialog Box 3. When the items are multiplied, they are all given a base name followed by a number. The default base text is the name of the item selected for multiplication. To modify the base text, change the Base Text field appropriately. 4. In the First Number field, specify the number to appear next to the first multiplied item. 5. In the Number of Items field, specify how many items you wish to create. 6. In the Numeric Places field, specify the minimum length of each number to append. Values that take up less space than the specified amount of numeric places will have zeros before the number. 7. If you want to multiply all subfolders as well, check the Including Subtree check box. 8. Click the OK button to do the multiplication. The example configuration shown in the Multiply Item dialog box above creates three new items with the following names: • Floor001 • Floor002 • Floor003 All subfolders will also be multiplied. View Menu The View menu commands are listed in the table below. View Menu Commands COMMAND SHORTCUT KEYS Toolbars Status Bar Large Icons Small Icons List F7 F8 F9 Details F10 Dialog View F11 Sort By Show/Hide Columns Select Language FUNCTION Toggles the standard and data manipulation toolbars. Toggles the status bar. Displays items as large icons. Displays items as small icons. Displays items as a list. Displays items as a list along with detailed information about the configuration of each item. Toggles the configuration window (right-hand pane). Displays a list of options for sorting the columns in the righthand pane of the screen. The options listed depend on the level within the view. Displays a list of options that you can choose to show or hide in the view. Opens the Select Language dialog box (see below). Choose the language you wish to use for your system (Unicode version only) and click OK. For navigation 1.29 Global Aliasing COMMAND SHORTCUT KEYS Global Refresh F5 Subtree Refresh CTRL+F5 FUNCTION purposes, use the buttons and check boxes in the List section. Refreshes the data for the entire Configurator screen. Refreshes only the data contained in the currently selected subtree. Selecting Languages The Select Language function on the View menu allows you to choose which language to use in your display. Choosing Select Language from the View menu opens the Select Language dialog box, shown in the figure below. NOTE A language resource .dll is required for language switching. Select Language Dialog Box Define the parameters listed in the table below. Then click OK to return to the work area. Select Language Parameters PARAMETER List Installed Locales Only Available Language Translations Only DESCRIPTION Lists available languages. Depending on which item you have selected, the view on the left will change. If English is checked, the languages will appear as their English name. If Localized is checked, the languages will appear with the native country in parentheses (for languages with several dialects only). When Native is checked, the languages are displayed the way they would be written in that language. If this is checked, local languages appear in the box. Checking this box allows you to choose from available language translations only. Go Menu The Go menu commands are listed in the table below. 1.30 Starting the Global Aliasing Configuration Go Menu Commands COMMAND Back Forward SHORTCUT KEYS CTRL+ALT+ Left Arrow CTRL+ALT+ Right Arrow Up One Level Next Item Previous Item Expand Item Collapse Item Page Up Page Down Home End Aliases Themes Next Pane Previous Pane ALT+Down Arrow ALT+Up Arrow ALT+Left Arrow ALT+Right Arrow ALT+PgUp ALT+PgDown ALT+Home ALT+End F2 F3 F6 SHIFT+F6 FUNCTION Moves the cursor back to the previously selected item in the tree control. Moves the cursor forward to the previously selected item in the tree control. Moves the cursor up one level in the tree control. Moves the cursor to the next item down in the tree control. Moves the cursor to the next item up in the tree view. Expands an item that contains a submenu. Collapses an item that contains a submenu. Moves the cursor up to the first item in the tree. Moves the cursor down to the last visible item in the tree. Moves the cursor up to the first item in the tree. Moves the cursor down to the last visible item in the tree. Moves the cursor to the Aliases tree control. Moves the cursor to the Themes tree control. Moves the cursor to the next pane. Moves the cursor to the last pane used. Tools Menu The Tools menu commands are listed in the table below. Tools Menu Commands COMMAND Set Working Directory Options Compact/Repair MS Access Database Reload Configuration FUNCTION Sets a working directory for all files relating to the saved configuration. Launches the Options dialog box. Opens the Compact/Repair MS Access Database dialog box. Cleans out the cache in the Global Aliasing Engine Server. Setting the Working Directory Selecting Set Working Directory from the Tools menu opens the Set Working Directory dialog box, shown below, which enables you to configure a custom directory in which all application configuration files will be stored and retrieved. Click Browse to select the directory. Set Working Directory Dialog Box Options To choose additional settings, select Options from the Tools menu. This opens the Options dialog box, which contains the following tabs: • General • Global Aliasing Engine • Global Aliasing Client 1.31 Global Aliasing General Tab The General tab of the Options dialog box, shown in the figure below, sets the startup and workspace parameters for the Global Aliasing Configurator. Options Dialog Box: General Tab Startup Settings The Startup Settings options allow you to save regional settings in the registry so that they are applied each time you start the Global Aliasing Configurator. This applies to the language settings as well as time and date settings. Select one of the following startup settings: • Open the active file: Launches the currently active database upon startup. • Open the most recently used file: Launches the recently opened database. • Open a specific file: Specifies a Microsoft Access (.mdb) or Microsoft Datalink (.udl) database to launch upon startup. To select a database, click the ... button next to the text box and browse for the file. When this option is selected, the "active" database is overridden by the specified database. Workspace Settings The following Workspace Settings are available: 1.32 • Auto-apply editor changes: Checking this option allows changes to the configuration database to be saved each time you switch dialogs without clicking on the Apply button or being shown a message asking if you would like to apply changes. • Auto-test Make Active before closing the database: When this option is checked, each time you exit a currently open (nonactive) database you are asked whether you want to make the database active. Starting the Global Aliasing Configuration • Enable hover selection: Checking this option allows you to highlight an item by moving the mouse pointer over that item and keeping it there for a specified amount of time (in milliseconds). Global Aliasing Engine Tab The Global Aliasing System Engine Server is located on the local node by default, but it can also be located on a remote node and accessed over an intranet or the Internet. The Global Aliasing Engine tab of the Options dialog box, shown in the figure below, specifies the following settings for the Global Aliasing Engine Server when the Global Aliasing Engine Server is located on a remote node. Options Dialog Box: Global Aliasing Engine Tab Cache Settings The Global Aliasing Engine Server has a built-in data cache that temporarily stores global aliasing data during runtime mode. The Cache Settings specify the parameters for the following caches: • Alias Cache: Cache used to resolve global aliases during runtime mode. • Browse Cache: Cache used for the global alias browser. The Alias Cache and the Browse Cache are disabled by default, but you can enable each cache by checking Enable Cache. When a cache is enabled, you can also check Apply Cache Size Limit and specify a size limit (in kilobytes) for each cache memory. NOTE It is recommended that you specify a cache size limit. If no size limit is specified for a cache, the cache database will continue to grow indefinitely. If the specified size limit is exceeded, the "firstin-first-out" rule applies; data are deleted from the cache from oldest to most recent (i.e. the oldest data are deleted first). 1.33 Global Aliasing Viewing and Testing the Database Connection The Database Connection settings specify the current Microsoft Access (.mdb) or Microsoft Datalink (.udl) configuration database for the Global Aliasing Configurator: • File Name: To select a database, click the ... button next to the text box under File Name and browse for the file. • Use Specific ID and Password: Checking this option allows you to protect the configuration database with a User Name and Password. Read/write access is allowed only for the specified user. If you do not want to password-protect the configuration database, check Use Blank Password to disable the Password field. • View Connection String: To see the string used to connect the configuration database, click the View connection string button on the Global Aliasing Engine tab of the Options dialog box. This opens the connection string dialog box, shown in the figure below, which lists the data source and other database properties. Viewing the Connection String • Test Connection: Click the Test Connection button to verify the database connection, as shown in the figure below. Testing the Database Connection Global Aliasing Client Tab The Global Aliasing Client tab of the Options dialog box, shown in the figure below, specifies the following settings for the Global Aliasing Client (which is located on the local machine only). 1.34 Starting the Global Aliasing Configuration Options Dialog Box: Global Aliasing Client Tab Cache Settings The Global Aliasing Client has a built-in data cache that temporarily stores global aliasing data during runtime mode. The Cache Settings specify the parameters for the following caches: • Alias Cache: Cache used to resolve global aliases during runtime mode. • Browse Cache: Cache used for the global alias browser. The Alias Cache and the Browse Cache are disabled by default, but you can enable each cache by checking Enable Cache. When a cache is enabled, you can also check Apply Cache Size Limit and specify a size limit (in kilobytes) for each cache memory. NOTE It is recommended that you specify a cache size limit. If no size limit is specified for a cache, the cache database will continue to grow indefinitely. If the specified size limit is exceeded, the "firstin-first-out" rule applies; data are deleted from the cache from oldest to most recent (i.e. the oldest data are deleted first). Global Aliasing Engine The Global Aliasing Engine Server is located on the local node by default, but it can also be located on a remote node and accessed over an intranet or the Internet. Specify the location of the Global Aliasing Engine Server by selecting a node from the drop-down list under Network Node Name. NOTE The Network Node Name field is available only when OPC Communications is selected in the GenBroker Configurator. When GenBroker Communications is selected in the GenBroker Configurator, the Global Aliasing Engine Server uses the GenBroker configuration settings, and the Network Node Name field becomes unavailable. 1.35 Global Aliasing Compacting and Repairing MS Access Databases You can compact Microsoft Access databases, which can be either configuration databases or historical databases, using the Compact/Repair MS Access Database dialog box, shown in the figure below. To open this dialog box, select Compact/Repair MS Access Database from the Tools menu. Microsoft Access–based databases are subject to database fragmentation over time, and the support for the database will compact the target database, reclaim unused space, and drastically improve database performance. NOTE It is critical that no users or client applications are connected to the database at the time of compacting and that, if the Backup Original Database option is selected, there is plenty of available hard disk space. Compact/Repair MS Access Database Dialog Box Reloading the Configuration Selecting Reload Configuration from the Tools menu cleans out the global aliasing data cache in the Global Aliasing Engine Server while in runtime. A message box appears asking if you want to continue. Click Yes to clean out the cache. If Notify clients is checked, global aliases are also reloaded in all client applications (e.g. GraphWorX, AlarmWorX, TrendWorX). Reloading the Configuration 1.36 Starting the Global Aliasing Configuration Help Menu The Help menu commands are listed in the table below. Help Menu Commands COMMAND Help Topics What's This? About Application SHORTCUT KEYS F1 SHIFT+F1 FUNCTION Launches the online Help for the Configurator. Displays context-sensitive help. Launches the About Box, which contains information about the product version number, copyright, and available disk space. It also contains contact information. 1.37 Global Aliasing 1.38 Chapter 2 CONFIGURING GLOBAL ALIASES Overview of Alias Configuration In the Global Aliasing Configurator, the parameters for global aliases are set up in the Aliases tree control, as shown in the figure below. When configuring global aliases, you can: • Create folders to organize aliases. • Create new aliases. • Create new alias values. • Enable or disable aliases and folders. • Add folders and aliases to the Global Alias Browser. • Determine how folders and aliases are displayed and described in the Global Aliases tab of the Unified Browser. • Associate aliases with themes. • Associate alias values with theme items. • Specify default alias values. Aliases Tree Control The structure of the tree control is mimicked in the Global Aliases tab of the Unified Browser, as shown in the figure below. Selecting a Global Alias From the Unified Browser 2.1 Global Aliasing Icons in Aliases Tree Control Each global alias under the Aliases tree control in the Global Aliasing Configurator is marked with an icon that indicates the status of the alias, as shown in the figure below. Aliases With Status Icons The different kinds of alias icons and their meanings are listed in the table below. Icons in Aliases Tree Control ICON MEANING No theme and no default value are specified for the alias. Constant value (e.g. an OPC tag) is assigned to alias; no dependency on theme settings. Alias is linked to other alias(es). All alias values for the alias are completely associated with a theme (i.e. all theme items for the theme are assigned to the alias). Alias values for the alias are only partially associated with a theme (i.e. not all theme items for the theme are assigned to alias). Alias value is not properly linked to theme. No alias value is specified. Creating New Alias Folders To create a new alias folder: 1. Right-click Aliases on the tree control of the Configurator and select New > Folder from the pop-up menu, as shown in the figure below. Creating a New Global Alias Folder 2.2 Overview of Alias Configuration 2. The properties dialog box for the new folder appears in the right-hand pane of the Configurator, as shown in the figure below. Setting the Properties for the New Global Alias Folder 3. In the Name field, type a name for the new folder. 4. In some cases, you may want to use an alternate or abbreviated name for the folder that will appear in the Global Alias Browser. 5. When you have finished configuring the folder properties, click the Apply button. The new folder appears under the tree control, as shown in the figure below. New Alias Folder Added to Tree Control Configuring Alias Folder Properties Configure the following parameters for alias folders, as shown in the figure below. 2.3 Global Aliasing Configuring Alias Folder Properties Name: The name should have the following characteristics: • The first character in the name must be a letter or an underscore. • The last character in the name can be a number. • The name should be as short as possible to maximize the efficiency of the Global Aliasing Engine Server. Enable: When not checked, the folder is inactive and does not appear in the Global Alias Browser. When not checked on the folder level, all aliases and subfolders are also disabled. NOTE When you re-enable a folder by checking the Enable check box, select Reload Configuration from the Tools menu. This cleans out the global aliasing data cache in the Global Aliasing Engine Server. A message box appears asking if you want to continue. Click Yes to clean out the cache. If Notify clients is checked, global aliases are also reloaded in all client applications (e.g. GraphWorX, AlarmWorX, TrendWorX). Reloading the Configuration Description: Type in a description for the alias folder. Any text you type in the Description field is also shown in the Global Alias Browser. Alias Browser Field The following settings in the Alias Browser Field determine how the alias will be displayed in the Global Alias Browser: • Display in Alias Browser: Check this box if you want the folder to appear in the Alias Browser. • Use Alternate Name: Specifies a name for the folder that will appear in the Alias Browser only. • Use Alternate Description: Specifies a description for the folder that will appear in the Alias Browser only. NOTE In the Unicode version, you can select a language alias to use as an alternate name or description. Click the ... button to open the Language Aliases tab of the Unified Browser, as shown in the figure below. Select an alias, and then click OK. 2.4 Overview of Alias Configuration Selecting a Language Alias to Use As an Alternate Name or Description Creating New Aliases To create a new alias: 1. Right-click Aliases (or an alias folder) on the tree control of the Configurator and select New > Alias from the pop-up menu, as shown in the figure below. Creating a New Global Alias 2. The properties dialog box for the new alias appears in the right-hand pane of the Configurator, as shown in the figure below. Setting the Properties for the New Global Alias 2.5 Global Aliasing 3. In the Name field, type a name for the new alias. 4. In some cases, you may want to use an alternate or abbreviated name for the alias that will appear in the Global Alias Browser. 5. When you have finished configuring the alias properties, click the Apply button. The new alias appears under the tree control, as shown in the figure below. New Alias Added to Tree Control Configuring Alias Properties Configure the following parameters for aliases, as shown in the figure below. Configuring Alias Properties Name: The name should have the following characteristics: • The first character in the name must be a letter or an underscore. • The last character in the name can be a number. • The name should be as short as possible to maximize the efficiency of the Global Aliasing Engine Server. Enable: When not checked, the alias is inactive and does not appear in the Global Alias Browser. NOTE When you re-enable an alias by checking the Enable check box, select Reload Configuration from the Tools menu. This cleans out the global aliasing data cache in the Global Aliasing Engine Server. A message box appears asking if you want to continue. Click Yes to clean out the cache. 2.6 Overview of Alias Configuration If Notify clients is checked, global aliases are also reloaded in all client applications (e.g. GraphWorX, AlarmWorX, TrendWorX). Reloading the Configuration Description: Type in a description for the alias. Any text you type in the Description field is also shown in the Alias Browser. Theme: Select a Theme Item from the drop-down list only if the alias is related to the theme. Alias Browser Field The following settings in the Alias Browser Field determine how the alias will be displayed in the Global Alias Browser: • Display in Alias Browser: Check this box if you want the alias to appear in the Alias Browser. • Use Alternate Name: Specifies a name for the alias that will appear in the Alias Browser only. • Use Alternate Description: Specifies a description for the alias that will appear in the Alias Browser only. NOTE In the Unicode version, you can select a language alias to use as an alternate name or description. Click the ... button to open the Language Alias Browser, as shown in the figure below. Select an alias, and then click OK. Selecting a Language Alias to Use As an Alternate Name or Description Default Alias Value A Default Alias Value may be used when: • No theme is associated with the alias. • No default theme item is specified. • No alias values are specified for the alias. 2.7 Global Aliasing To specify a default alias value type in a value in the Default Alias Value text box, or click the button to the right of the text box to select a value from the OPC Tag Browser, the Global Alias Browser, the Language Browser, the File Browser, or another computer on the network, as shown in the figure below. Specifying a Default Alias Value Creating New Alias Values To create a new alias value for an alias: 1. Right-click the alias on the tree control of the Configurator and select New > Alias Value from the pop-up menu, as shown in the figure below. NOTE In order to create an alias value for an alias, a theme must be specified for the alias. You can automatically create an alias value for each item in the selected theme by selecting New > All Alias Values. Creating a New Alias Value 2. 2.8 The properties dialog box for the new alias appears in the right-hand pane of the Configurator, as shown in the figure below. Overview of Alias Configuration Setting the Properties for the New Alias Value 3. Select a Theme Item from the drop-down list. 4. In the Alias Value text box, type in a value or click the button to the right of the box to select a value from the OPC Tag Browser, the Global Alias Browser, the Language Browser, the File Browser, or another computer on the network, as shown in the figure above. 5. When you have finished configuring the alias value properties, click the Apply button. The new alias value appears under the tree control, as shown in the figure below. New Alias Value Added to Tree Control Configuring Alias Value Properties Configure the following parameters for alias values, as shown in the figure below: • Theme Item Name: Select a theme item from the drop-down list. The list includes all theme items for the theme that is assigned to the alias. • Alias Value: In the Alias Value text box, type in a value or click the button to the right of the box to select a value from the OPC Tag Browser, the Global Alias Browser, the Language Browser, the File Browser, or another computer on the network, as shown in the figure below. • Description: Type in a description for the alias value. 2.9 Global Aliasing Configuring Alias Value Properties Alias Information The Alias Info section references the following properties that are configured for the alias: 2.10 • Alias Name: Name of the alias for which the value is created. • Alias Description: Shows the description per the alias properties. • Alias Default Value: Displays the default alias value specified in the alias properties. • Theme Item Description: Shows the description per the theme item properties. Chapter 3 CONFIGURING THEMES Overview of Themes In the Global Aliasing Configurator, the parameters for themes are set up in the Themes tree control, as shown in the figure below. When configuring themes, you can: • Create new themes. • Create new theme items. • Specify a default theme item for each theme. • Enable or disable themes and theme items. • Add themes and theme items to the Theme Browsers. • Determine how themes and theme items are displayed and described in the Theme Browsers. Themes Tree Control Creating New Themes To create a new theme: 1. Right-click Themes on the tree control of the Configurator and select New > Theme from the pop-up menu, as shown in the figure below. Creating a New Theme 3.1 Global Aliasing 2. The properties dialog box for the new folder appears in the right-hand pane of the Configurator, as shown in the figure below. Setting the Properties for the New Theme 3. In the Name field, type a name for the theme. 4. In some cases, you may want to use an alternate or abbreviated name for the theme that will appear in the Theme Browser. 5. When you have finished configuring the theme properties, click the Apply button. The new theme appears under the tree control, as shown in the figure below. New Theme Added to Tree Control Configuring Theme Properties Configure the following parameters for themes, as shown in the figure below. 3.2 Configuring Themes Configuring Theme Properties Name: The name should have the following characteristics: • The first character in the name must be a letter or an underscore. • The last character in the name can be a number. • The name should be as short as possible to maximize the efficiency of the Global Aliasing Engine Server. Enable: When not checked, the theme is inactive and does not appear in the Theme Browser. All theme items for that theme are also disabled. NOTE When you re-enable a theme by checking the Enable check box, select Reload Configuration from the Tools menu. This cleans out the global aliasing data cache in the Global Aliasing Engine Server. A message box appears asking if you want to continue. Click Yes to clean out the cache. If Notify clients is checked, global aliases are also reloaded in all client applications (e.g. GraphWorX, AlarmWorX, TrendWorX). Reloading the Configuration Description: Type in a description for the theme. Any text you type in the Description field is also shown in the Theme Browser. Browser Field The following settings in the Browser field determine how the theme will be displayed in the Theme Browser: • Display in Theme Browser: Check this box if you want the theme to appear in the Theme Browser. • Use Alternate Name: Specifies a name for the theme that will appear in the Theme Browser only. • Use Alternate Description: Specifies a description for the theme that will appear in the Theme Browser only. 3.3 Global Aliasing NOTE In the Unicode version, you can select a language alias to use as an alternate name or description. Click the ... button to open the Language Aliases tab of the Unified Browser, as shown in the figure below. Select an alias, and then click OK. Selecting a Language Alias to Use As an Alternate Name or Description Creating New Theme Items To create a new theme item: 1. Right-click a theme on the Themes tree control of the Configurator and select New > Theme Item from the pop-up menu, as shown in the figure below. Creating a New Theme Item 2. The properties dialog box for the new theme item appears in the right-hand pane of the Configurator, as shown in the figure below. 3.4 Configuring Themes Setting the Properties for the New Theme Item 3. In the Name field, type a name for the new theme item. 4. For each theme, you can designate one theme item as the default item by checking the Default theme item check box. 5. In some cases, you may want to use an alternate or abbreviated name for the folder that will appear in the Theme Items Browser. 6. When you have finished configuring the theme item properties, click the Apply button. The new theme item appears under the tree control, as shown in the figure below. New Theme Item Added to Tree Control Configuring Theme Item Properties Configure the following parameters for theme items, as shown in the figure below. Configuring Theme Item Properties 3.5 Global Aliasing Name: The name should have the following characteristics: • The first character in the name must be a letter or an underscore. • The last character in the name can be a number. • The name should be as short as possible to maximize the efficiency of the Global Aliasing Engine Server. Enable: When not checked, the theme item is inactive and does not appear in the Theme Items Browser. NOTE When you re-enable a theme by checking the Enable check box, select Reload Configuration from the Tools menu. This cleans out the global aliasing data cache in the Global Aliasing Engine Server. A message box appears asking if you want to continue. Click Yes to clean out the cache. If Notify clients is checked, global aliases are also reloaded in all client applications (e.g. GraphWorX, AlarmWorX, TrendWorX). Reloading the Configuration Description: Type in a description for the theme item. Any text you type in the Description field is also shown in the Alias Browser. Default Theme Item: Check this box to make this item the default theme item. For each theme, you can designate one theme item as the default item. The default theme item is indicated by a check mark icon, as shown in the figure below. Default Theme Item Indicated by Check Mark Icon Browser Field The following settings in the Browser field determine how the theme item will be displayed in the Theme Items Browser: 3.6 • Display in Theme Items Browser: Check this box if you want the theme to appear in the Theme Items Browser. • Use Alternate Name: Specifies a name for the theme that will appear in the Theme Items Browser only. • Use Alternate Description: Specifies a description for the theme that will appear in the Theme Items Browser only. Configuring Themes NOTE In the Unicode version, you can select a language alias to use as an alternate name or description. Click the ... button to open the Language Aliases tab of the Unified Browser, as shown in the figure below. Select an alias, and then click OK. Selecting a Language Alias to Use As an Alternate Name or Description 3.7 Global Aliasing 3.8 Chapter 4 GLOBAL ALIAS BROWSER Using the Global Alias Browser Throughout the ProcessView client applications, such as GraphWorX, TrendWorX, and AlarmWorX, you can use global aliases in certain data fields (e.g. process points and trend pens). To select global aliases, you can open the Global Aliases tab in the Unified Browser, shown in the figure below. Select a global alias from the Unified Browser, which includes all global aliases in the global alias database. This eliminates the need to manually type in the alias names. All global aliases that are configured in the Global Aliasing Configurator are conveniently available to choose from inside the browser. The tree control of the Global Aliasing Configurator is mimicked in the tree control of the Browser. Global aliases use the following syntax: <#global_alias_name#>. Select a global alias by doubleclicking the alias name (e.g. "Floor" in the figure below). The alias name <#floor#> appears at the top of the browser, which automatically adds the <# and #> delimiters to the alias name. Click the OK button. Selecting a Global Alias From the Unified Browser 4.1 Global Aliasing 4.2