1
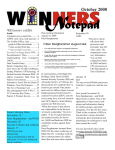
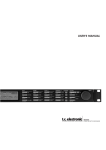
BITS AND BYTES
October 2014
http://mcc.apcug.org/
GENERAL CLUB MEETING
7:00 P.M.
4th Wednesday of the month at the
Midland Community Center
2001 George St., Midland, MI
This month’s date:
October 22, 2014
This month’s topics:
Top 15 Social Media Sites
OReilly free eBooks
Windows 10
What you missed!
September - Windows 8.1
Program Coordinators
Howard Lewis
[email protected]
Bill Tower
[email protected]
Please let Howard or Bill know of topics you
would like covered at future meetings.
HP and Compaq:
AC Power cord safety recall for notebook
computers and accessories e.g., docking
stations, sold from September 2010 to June
2012.
Check this website to find out if power cord
is subject to recall:
https://h30652.www3.hp.com/
President Piper’s Ponderings
The October meeting is a triple-header.
Joe Lykowski will talk on Windows 10,
Larry Piper will talk on social media.
Carol Picard will explain the mysteries
of O’Reilly’s books.
Last month’s discussion on Windows 8
has prompted me to load it on a computer. Once you get
all the updates loaded, your PC on 8.1 looks a lot like Win
7. You will soon get used to moving around the desktop
and loading new programs.
November will be about Chromebook. Lynn Walker will
tell us how he uses his Chromebook. We will also show
how the Chrome OS can be run on Windows.
After 5-6 years of using our projector, we discovered that
it also plays sound. Actually, Gary Ensing made the
discovery. Now we can show videos and YouTube with
sound. That brings me to our December meeting. Besides
just eating, maybe we can have a video-fest. Everyone
can suggest their favorite video.
I came up with a giveaway that you will think is either
great or really useless. Come and see if you can have a
winning ticket.
Microsoft has a big update Tuesday in October. Be sure
to get them--18 in all. It will take 15 minutes, and your PC
will reboot twice when it is restarted.
As always, bring you ideas, your problems, your
questions and your experiences to share with the other
members. That way we can all learn from each others
mistakes and victories.
See you on October 22.
(The above comments are the opinion of the author and
do not necessarily reflect the views of the Midland
Computer Club.)
Bits and Bytes
October 2014
2014 MCC OFFICERS
President Larry Piper
Vice Pres. Joe Lykowski
Treasurer Jan Ensing
Membership Gary Ensing
Editor
Carol Picard
Webmaster
[email protected]
[email protected]
[email protected]
[email protected]
[email protected]
Special Interest Groups:
PROGRAM COORDINATORS
Howard Lewis
Bill Tower
[email protected]
[email protected]
PUBLICITY
Al Adams
[email protected]
Board Meeting
First Thursday of the month
7:00 PM
Chapel Lane Presbyterian Church,
5501 Jefferson Ave., Midland MI
Page 2
Useful, useless and strange (in no particular
order) Web Sites: (submitted by Howard Lewis)
Since this is an election year, here are some websites to
help you in your decision. A number of individual candidates
have their own website which can be found by entering their
name into a search engine.
http://www.gop.com/ Republican Party
http://www.migop.org/ Michigan Republican Party
http://www.democrats.org/ Democratic Party
http://www.michigandems.com/ Michigan Democratic Party
http://www.gp.org/index.php Green Party
http://www.migreenparty.org/ Michigan Green Party
http://www.lp.org/ Libertarian Party
http://michiganlp.org/ Michigan Libertarian Party
http://www.constitution-party.net/ Constitution Party
http://www.ustpm.org/ Michigan US Tax Party (affiliated
with the Constitution Party)
http://judgepedia.org/Michigan_judicial_elections,_2014
Information on judicial candidates in Michigan
http://www.politicalresources.net/usa1.htm Political
resources on the net
http://www.politics1.com/parties.htm A guide to the political
parties
http://www.followthemoney.org/ Find out who is donating
money
http://www.factcheck.org/ Verify if what the candidates say
is true
http://www.politifact.com/ Another site for checking
candidates claims
http://www.lwvmi.org/ Michigan League of Women Voters
http://www.vote411.org/ Non-partisan information on the
election and the candidates
http://votesmart.org/ Bills itself as the voters self-defense
system
http://www.stateintegrity.org/ How transparent is your state
government?
Membership Enrollment Form
NAME _______________________________________
PHONE __________________
ADDRESS ___________________________________________________
CITY
__________________
EMAIL ADDRESS
ZIP _______________
___________________________________________
Membership dues FAMILY ($20)
STUDENT ($15)
New Member ____
Renewal ____
Please fill out the above form and mail it along with payment of check or money order to :
MIDLAND COMPUTER CLUB
1816 Bauss Ct
Midland, MI 48642-4023
Attn: Membership Chairman
You may also pay for membership at a regular club meeting
Bits and Bytes
October 2014
Page 3
Tips, Tricks & Techniques (submitted by Carol Picard)
Windows 8 Desktop Background
Windows 8 provides several options for desktop backgrounds, including the ability to access many
backgrounds from Microsoft.
Here are some tips if you want to use your own picture(s) and have them centered on the desktop, so you
can arrange shortcuts/icons around the picture(s).
First step is to check and possibly change the resolution of pictures in relation to the display resolution.
For example, if display resolution is 1600x900 and picture(s) you are using also have 1600x900
resolution, they will fill the screen no matter which option is selected for Picture position. Pictures with a
resolution of 600x450 worked well in this instance.
Next, if you have a lot of pictures in your Pictures Library, may want to create a separate folder for
background pictures and put copies of pictures in that folder
When you are ready to set the desktop background:
•
Right click on desktop, left click Personalize, left click Desktop Background
•
For Picture location, click down pointing arrow and choose Pictures Library or click Browse if
picture(s) you want to use are located somewhere else. You can have multiple pictures in the folder
and click to check just the pictures you want to use, or just select one if you don't want a slide show
effect
•
For Picture position, chose the option that works best for you - Fit or Center
•
If selecting multiple pictures, can choose whether to change picture after a set amount of time
(options range from 10 seconds to one day), and whether to show them in sequence or check shuffle
to show randomly
•
Can check option to pause the slide show to save power, when using laptop or tablet on battery
•
Change background color by clicking Change background color and selecting color choice (default is
black). Click OK to save.
•
click Save changes
Android device wireless connection
When connecting to a wireless network with an Android tablet, it is usually a straightforward process
• Settings
• WiFi
• Tap network you want to connect to
• Enter passphrase/security code, if required
However, some networks, e.g., Midland Community Center, may require additional step. After
connecting to Community Center public network, it showed Connected but was unable to access
websites through a browser. In notification area (generally upper left corner of display) there was a (?)
icon. Checked notification and it opened a website prompting for usage agreement acceptance. Read
and accepted agreement and was then able to access websites, Google Play Store, etc.
APCUG 2014 Fall Virtual Technology Conference
Saturday, November 1, 2014:
See last page of newsletter for information.
Bits and Bytes
October 2014
Page 4
ARTICLE INDEX
Articles in this Newsletter have been obtained from APCUG with the authors’ permission for publication
by APCUG member groups. The Midland Computer Club has not verified the information contained in the
articles nor tested procedures or hardware/software. Articles do not necessarily reflect the views of the
Midland Computer Club.
I Want It Now! -- Page 4
Greg Skalka, President, Under the Computer Hood User Group, CA
A New Android Tablet — Now What? -- Page 6
Phil Sorrentino, Staff Writer, The Computer Club, Inc., Sun City Center, FL
3 Word Tools That Provide Quick Help -- Page 8
Nancy DeMarte, 1st VP, Sarasota Technology Users Group, Florida
Now We Have a High Tech Way to Get to Know Your Neighbors -- Page 10
Sandy Berger, CompuKISS,
Password Managers: What They Are and How to Use One -- Page 10
Mike Morris, President / Editor, Front Range PC Users Group, Fort Collins, CO
I Want It Now!
By Greg Skalka, President, Under the Computer Hood User Group, CA
February 2014 Issue, Drive Light, www.uchug.org, president (at) uchug.org
This may sound like the utterance of a tantrum-happy young child, but it also seems to be the mantra of
the modern computer and technology user. Our popular culture today is all about instant gratification, and
this is spilling over into our technology. Everyone wants instant access to information, communications,
finance and commerce wherever they are and no matter what they are doing. While this is a rather tall
order, tech companies are doing their best to grant us this wish. We are getting more connected and
interconnected all the time. While this can provide great benefits, increasing our knowledge and security
and saving us time and money, it can also be detrimental to us in many of the same ways. Are we trading
away important aspects of our lives like privacy and individuality for speed and convenience?
The engine that drives all the increases in convenience in our lives is the Internet. Computers and tablets
are powerful devices but are of relatively little use if not connected to the Internet. The Internet is the
connection medium through which all our modern communications and access to information flow. The
telecommunication (phone) system was once the most powerful and far-reaching network in the world,
but its demotion can be seen in the low percentage of time that the typical smart phone user spends in
voice calls. The average smart phone is now being used mostly to check email, monitor social media,
play games and provide directions, functions which utilize the Internet. Our desire for increased
connectedness and higher connection speeds continues to be met by our service providers, be they
cable, telecom or cellular. The promises of online conveniences like streaming entertainment, security
camera monitoring and video conferencing cannot be met without broadband Internet connections that
are always live. Remember the days when you had to wait until the home phone line was free so you
could use your modem to make your dial-up Internet connection? A down or even slow connection is now
exasperating to the individual and death to a business. Today almost anyone in the United States can
have a broadband connection. Cable companies have upgraded their systems, the phone companies
have added fiber and the cellular providers have upped their “G’s” or generations in data networking
capabilities. Even those living off the beaten path in rural areas outside the reach of cable can get
broadband through satellite connections, using technology developed by our local company, ViaSat. All
this capability comes at a price, however.
Naturally users were not satisfied to be connected only at home, so our tech industry gave us laptops to
travel with. We wanted more portability, so they gave us Wi-Fi, tablets and smartphones. All this new stuff
Bits and Bytes
October 2014
Page 5
meant we had to buy more hardware (often of multiple kinds for multiple needs) and probably also get a
cellular data plan. Now most connected folks pay around $100 combined for home broadband and cellular
data, and even more for a family. Though connection speeds keep increasing, so too do rates for service.
Comcast buying Time Warner Cable can’t be good for consumer costs. And we in this country pay more
and get less bandwidth than a lot of other countries. Some countries may not have good water or sewer
systems, but even the poor there have cell phones and five bars. We are getting Google Fiber in an
additional 34 major U.S. cities soon, however (but still not in San Diego; I want it now!).
We couldn’t get online while onboard, so the airlines are rolling out more in-flight Internet access (for a
price). Google knew we’d find tablets and smartphones were not convenient enough, so they developed
Google Glasses, and others are working on their own wearable computing devices. Our homes and
appliances will soon be connected to the Internet (the IoT, or Internet of Things), so we can monitor our
homes remotely and have our fridge tell us when we are low on milk. What these new devices will cost us
in privacy and other social and civil issues is yet to be determined.
We wanted instant access to our money and finances, and so the banks gave it to us. Now we can get
cash anytime from an ATM machine, make purchases without cash by using credit or debit cards and get
instant access to our account information at any time. If we want to deposit a check right now, we don’t
even have to drive to a bank branch or ATM. We can now just take a photo of the check with our smart
phone and deposit it through a banking app.
With all of our financial information available online, it was just a matter of time before criminal elements
took notice. Now you have to protect and remember lots of unique and complex passwords for all the
banking, e-commerce and other online accounts you use, so you can keep your money and identity safe.
Unfortunately it is not only in your hands to protect. Financial institutions and merchants that store your
information on their computers can be targets for data theft. There is a lot the institutions could do to
increase security, like multi-factor authentication and smart chip credit cards, but these things cost money.
A few things they have been doing to help prevent fraud are useful but put the onus on the account
holder. Most bank and credit card companies encourage their customers to set up alerts on their accounts
to help flag suspicious transactions. I have set these up on my accounts and find them very useful.
I have my credit cards alert me, through an email and/or a text message, when a purchase is made
without the card being presented to the merchant, as in an online purchase. This can help alert you to
fraudulent account activity as soon as it happens. My Visa card is set up to send me an alert when a gas
pump purchase is made. I use this card often at a particular low-cost gas station and am amazed at how
quickly I am notified. After I swipe my card, enter my zip code and press the Enter button on the pump, I
can’t count to five before I feel my cell phone vibrating in my pocket with a text informing me of the
transaction and location. That is pretty cool!
When we want to purchase something, we want it now. E-commerce has allowed the shopper to buy a
much wider array of products online than is typically available in neighborhood stores, often at much lower
prices. The one advantage for brick and mortar stores is the instant gratification of walking out with your
purchase. Online merchants are working hard to minimize delivery time, offering one or two-day delivery
for a premium. Amazon’s Prime service provides two-day delivery for many items for an annual
subscription fee. Amazon knows we want even more and is looking at using predictive algorithms to preposition products you are likely to purchase in local warehouses and is even working on 30-minute
delivery of small items by autonomous flying quadcopters. I can’t wait (but I’ll bet it won’t be cheap).
Taco Bell is working to fulfill our desire for fast food right now. They plan to introduce a mobile ordering
system later this year. Through their mobile app, already tested in five locations in Orange County,
customers can place an order with the closest Taco Bell location and pay through their phone with credit
or gift cards. The order can be picked up in-store or at the drive-through window, and the app will use
GPS location to let the store know when the customer is near, so the order is ready and freshness is
Bits and Bytes
October 2014
Page 6
maintained. I’m not sure I want Taco Bell to know how far I am from their restaurants. Other chains are
working on mobile apps of their own.
There goes more of our privacy in exchange for quick eats. When we want to watch a movie, we no
longer have to wait to buy or rent a DVD (or Blu-ray) or go to a theater. We can watch our entertainment
streamed to our computer, tablet or smart phone the instant we want it, in almost any location we choose.
We can easily stay connected with our friends through social media like Facebook, allowing us to share
our activities and see what everyone else is doing. Unfortunately, when watching other things happening
becomes too convenient, doing things yourself can get pushed aside and lots of time can be spent in
watching the Internet world go by, with little to show for it.
When we miss our far-away loved ones, we can not only speak to them, we can also see them, and at
reasonable costs. The Internet has brought us VoIP, or voice over Internet Protocol, and along with it
lower rates (often free) for long distance phone calls. Programs like Skype provide video calls at
reasonable costs. And for those of us that can’t wait until the afterlife to converse again with our deceased
loved ones, a new start-up, Eterni.me, promises to help. Through access to a dead person’s online
interactions (chat logs, social network information, emails), they claim to use artificial intelligence
algorithms to construct an avatar or virtual person that the living can interact with. It could be like online
chat with a dead person. To satisfy our need for instant interactions with help lines and tech support,
companies are working on similar avatars with artificial intelligence (even more intelligent than Siri). When
we need to talk to a person right now, the avatar would be there and not even require a salary. It would be
good if they got to the point where I could not tell if I was talking with a person or a machine. It would be
bad if they got to the point where I could not tell if I was talking with a person or a machine.
All these advances in convenience and quick access come at the cost of our data security and privacy.
We can get quick answers to all our questions, get directions and compare products online, but we must
realize that the Technology, computers and the Internet will continue to try to provide what we want
(though perhaps not what we need), as long as there is profit in it somewhere for someone. Hopefully we
can learn to use these advances for the betterment of ourselves and others, appreciate them, and not
become like spoiled children crying “I want it now!”
Google and Bing and merchants are all keeping track of what we are asking for and about. Seeking online
information about sensitive topics or items might create undesirable associations in the data they hold
about us. And while a lot of tech jobs have been created due to the Internet, there have also been some
job losses. Just ask the former bank tellers, video rental clerks, encyclopedia salespersons and retail
store workers that lost their jobs due to the effects of the Internet
A New Android Tablet — Now What?
By Phil Sorrentino, Staff Writer, The Computer Club, Inc., Sun City Center, FL
May 2014 issue, The Journal, www.scccomputerclub.org/, philsorr (at) yahoo.com
You just got a new Android tablet. (Isn’t the look of a brand new tablet wonderful, it is so shiny and lacking
finger prints.) But fingerprints are a good thing, since they are a byproduct of using the touch enabled
screen; so the more finger prints, the more use. If the fingerprints eventually become annoying, you can
always clean them with a soft micro-fiber cloth.) Now, if the tablet is brand new, when you turn it on it will
probably take you through a few set up steps. These steps are usually also explained in a brief Quick
Start Guide that is included in the package. For more detailed information and instruction go to the
manufacturer’s website and look for a “Support” or “Documents” page for your specific tablet model and
download the User Manual, if there is one. If the tablet is not brand new, maybe a hand-me-up from one
of your kids or grandchildren, you may also want to get a User Manual and change some of these general
settings.
Bits and Bytes
October 2014
Page 7
Typically the first things to set up are very basic, such as Language and Time Zone. After these, the most
important thing to do is to get the tablet onto the internet. All tablets have Wi-Fi circuitry, so if you have Wi
-Fi at home, you are set. (If you don’t have Wi-Fi at home, the tablet will still be useful for watching videos,
showing pictures, playing games, and listening to music. And you can always use one of the many free
public Wi-Fi hot spots at locations like a Library or Starbucks.) Once you are in a Wi-Fi area, all you need
to do is key in the password or passphrase for the network if it is protected. (Hopefully, that makes sense
to you because you have protected your home network with WEP, WPA2 or WPA2 security.) Once you
have connected to Wi-Fi, you will be able to go to the “Google Play Store”, where you can download all
those useful Apps and games. If your tablet is new, it will probably instruct you to either setup a Google
account, or it will ask you to log-in to your Google account. Having a Google account allows you to
synchronize files and certain Apps so that you have the same information available to your tablet and your
home computer.
After your Google account is set up, there are a few operational things that you might like to modify. None
of these are absolutely necessary, but I find setting them to my preferences is helpful. Most of these
things will be found in “Settings”, so the first thing is to find the “Settings” icon and place it on a Home
Screen (if it is not there already). The Settings icon may be found in the “All Apps” collection. The “All
Apps” collection is accessed by an icon, typically at the top of the screen that looks like a small
rectangular collection of smaller squares, possibly four, or six, or nine.
All Apps Icon
Tap this icon and an alphabetical listing of all the Apps on your tablet will be shown. The
“Settings” icon typically looks like a square with three lines and dots within the square, or a
gear. There are probably multiple screens of Apps so you may have to flick the screen to the
left to uncover all the Apps. When you find the “Settings” icon, “tap and hold” the icon and it
will be selected. When you release it, it will then be placed on a screen. Now you can access the Settings
by tapping the Settings icon whenever you want to review or change a setting.
Settings Icons
Buy the way, tablets have multiple screens (usually an odd number), with the middle screen being the
home screen. If you have 5 screens then screen number 3 is the home screen. There may be an indicator
on each of the screens (typically on the bottom) that indicates which screen is currently being shown. Now
that the Settings icon is available, tap it and it will allow you to make changes to the tablet’s settings. The
settings are organized in groups such as Wireless & Networks, Device, Personal, Accounts, and System.
Under Wireless & Networks, tap “Wi-Fi” and you will see the network you are currently using (and others,
if you have used them in the past). Under Device, among others, there is “Sound” and “Display”. Tap
“Sound” and you can change the “Sound Profiles” and/or the Sound levels (depending on your version of
Android). Tap “Display” and you can change the Brightness of the display. Just tap Brightness and then
set the slider to the brightness level of your choice. This is also the place to change the Font size if it is
too small. (Font size=Large, seems to be a good choice.) The “Sleep” setting sets the time of inactivity
allowed before the screen goes off. A short time like 1 minute is good if you are actively using the tablet,
but a longer time (maybe 5 minutes) is nice to have when you are learning and it takes some time to
determine your next step. The longer time keeps the display from turning off, just when you are about to
take your next step. Under “System”, tap “About tablet”, which shows a lot of technical information, but the
one important item here is the version of the Android Operating System. “Android version” gives you the
currently loaded Android version, such as 4.2.2. (Don’t worry about the third digit.) Versions 4.1, 4.2, and
4.3 are commonly called “Jelly Bean”. Version 4.4 is the latest and goes by the name “Kit Kat.” Under
“System” you can also set the Date and Time, or let the tablet “Use network provided time.”
Bits and Bytes
October 2014
Page 8
Once you have found out the Android version and possibly made some changes to the Sound, Display,
Date & Time, or Wi-Fi, you can go back to the home screen by tapping the Back button. That’s the arrow
at the bottom of the screen that starts off to the right and turns back on itself to go to the left. Now you can
go to the “Google Play Store” and get all the Apps you think you will want to try out and/or use. The Play
Store icon looks like a Shopping Bag with a triangle in the middle of blue and red.
Google Play Store Icon
This icon is typically on the home screen, which is probably a good place for it. This way it
will always be available when you want to shop the Play Store. To go to the Play Store, tap
the icon and you will be transported to the Google Store. This is the place to get all those
popular Apps like Facebook, Pandora, Netflix, Skype, Angry Birds, Candy Crush, Yahoo Mail,
Solitaire, Kindle reader, Words with Friends, Google Earth, Tetris, Google Translate, Barcode
Scanner, Hulu+, Flashlight, Chrome, YouTube, IMDB, Google Drive, ColorNote, Evernote, Firefox, Sound
Hound, and many, many more. (Over 1 million, many of which may be the subject of future articles.) One
last thing to do is change the way the tablet can be accessed. Out of the box, the tablet only needs a
swipe to enable it. To make it more secure, go to “Settings” and then “Personal” and then change the
“Screen lock” to Pattern or PIN or Password; your choice. Make sure you don’t forget the Pattern or PIN
or password after it is set. With these few changes to your “out of the box” tablet, I’m sure you will begin
to enjoy your shiny new tablet.
3 Word Tools That Provide Quick Help
Nancy DeMarte, 1st VP, Sarasota Technology Users Group, Florida
May 2014 Issue, PC Monitor, www.thestug.org, ndemarte (at) Verizon.net
It doesn’t matter how much experience you have with Microsoft Word, at times you run into little problems
that need solving immediately. Here are three tools in Word that have helped me get out of some
frustrating situations.
1. Show/Hide:
Located in the Paragraph group on the Home tab in Word, the Show/
Hide tool looks like a paragraph symbol. Its primary purpose is to
assist you in proofreading a document, but it has other uses, too.
When turned on by clicking, it displays a variety of otherwise hidden
formatting marks which are only visible on the screen, not in the
printed document. These marks give you basic formatting information,
such as a dot for each space, a paragraph sign to show a new
paragraph, and a right-pointing arrow where words are aligned to tabs on the ruler. Reading through a
document with the tool enabled will help you find spots where you accidentally double-spaced between
words or pressed Enter unnecessarily, adding extra space between lines. In longer documents, being
able to see the dotted section break line can make it easier to position both a full page heading and a two
column article on the same page.
With all these marks visible on the screen, the document looks cluttered. For this reason, the Show/Hide
tool has a bad reputation with some Word users. On the other hand, some users want certain marks to be
visible all the time, not just when the Show/Hide tool is enabled. This can be set up in Word Options (File
– Word Options or Options – Display – “Always show these formatting marks on the screen”) by checking
the marks you want to see all the time. I choose not to do this, but the list is a good place to view what the
formatting marks mean.
The Show/Hide tool can be handy in several ways besides proofing. Let’s say you have completed a one
page document, but find when you print it, a blank page comes out of the printer along with the document.
Bits and Bytes
October 2014
Page 9
If you turn on the Show/Hide tool, scroll down to the blank page, and delete any formatting marks that
appear there, the blank page will disappear. Another special use of Show/Hide is controlling the spaces
between paragraphs by changing the size of the paragraph marks between them. If you want to decrease
the space, select the Paragraph mark between the paragraphs and click a smaller font size.
2. Margins:
All documents have margins around the outside of the page. Each
new version of Word seems to have different default margin sizes. In
Word 2003, top and bottom margins are 1”; the two sides are 1.25”.
In Word 2010/13, the default margins are 1” on all four sides. Recent
Word versions also have a Margins gallery. On the Page Layout tab
in the Page Setup group, click Margins to see the choices. If none of
these dimensions fits your needs, you can create your own custom
margins using the command at the bottom of the gallery.
One kind of problem this tool solves is similar to one addressed by Show/Hide. Assume you’ve typed a
document that is a bit longer than one page. Your choices are to revise the text, use a smaller font size, or
reduce the size of the page margins. I often click the Narrow margins choice (.5” on all sides) to eliminate
spillover text. That’s about the smallest margin setting possible to ensure all the text will print.
Another problem which margin changes can solve is the
need to put a document into a ring notebook or bind it in
book form. In this case you want the inside margin wider
than the outside. Here’s where the
Mirrored option comes in handy, as shown.
3. Format Painter:
I wrote about this tool a couple of years ago, but it’s so useful, it needs another
mention. For those who are new to it, Format Painter copies text formats, like
fonts, font effects (bold, italics), and font colors; and paragraph formats, like
indents, line spacing, and bulleting from one place to another within a document.
Here’s how it works. You are in the middle of a document and find you want to
copy a paragraph into this one from another document saved on your computer. You open the second
document, highlight the paragraph, and click Copy or press Ctrl+C. Click in the first document where the
copied selection will go, and click Paste or press Ctrl+V. Now you notice that the new paragraph is in a
different font and font size from the rest of the text. Instead of manually making these format changes,
click anywhere in the original section of the document, and then click the Format Painter icon (Home tab –
Clipboard group). Select the new paragraph (You can select a whole paragraph with a triple click.) and it
will change to match the rest of the document. This works especially well to match the indenting pattern
when using bullets or automatic numbering.
Sometimes you need to copy a format to more than one place in a document. Format Painter makes it
easy. Pretend you have created a document with six sub-heads scattered throughout. After you finish, you
decide to emphasize the sub-heads by changing the font, adding boldface, and making the text blue. You
select the first sub-head and manually make these changes to it. Then you click inside this newlyformatted heading, and double click the Format Painter icon. Double clicking keeps Format Painter active
until you click its icon to close it. Drag over each of the other sub-heads one by one, and each will take on
the format of the first one. Then click Format Painter again to turn it off. You’ll be surprised how often
Format Painter can help you fix mismatched formats in an instant. That’s why I put it on my Quick Access
toolbar. Little tools can cure big headaches.
Bits and Bytes
October 2014
Page 10
Now We Have a High Tech Way to Get to Know Your Neighbors
By Sandy Berger, CompuKISS, www.compukiss.com, sandy (at) compukiss.com
Do you remember when neighbors knew each other and a neighborhood was a tight-woven community?
Well, I do and I miss that. So today I'll tell you about a new, high-tech way to get to know your neighbors.
We don’t know our neighbors like we did when I was a kid. We stay inside our air conditioned homes and
keep to ourselves. But it doesn’t have to be that way.
We can use technology to bring us back to those by-gone days when neighbors joined to form a closeknit community. This can be easily done with a new web service called Nextdoor (www.nextdoor.com).
Nextdoor lets neighbors get in touch with each other again. It is a free and private social network for
neighborhoods.
The first member from the neighborhood is called the Founding Member. To use this website, he or she
defines the neighborhood boundaries and gives the neighborhood a name, both of which can be edited in
the future, if necessary. The Founding Member can then start inviting neighbors to join. Each member
must verify their address. A neighbor who is a verified member of that specific Nextdoor neighborhood
can vouch for, and invite another neighbor to join. Accepting such an invitation will allow them to join
Nextdoor as a verified member. Each neighbor uses their real name and must verify their address in
order to join. Not only is your private information never shared, but it is not accessible by search engines.
Nextdoor launched in 2011 and now has over 12,000 neighborhood groups represented. They have
communities in all 50 states. According to its co-founder and CEO, Nirav Tolia, they add about 40 or so
neighborhoods each day.
Nextdoor lets you share useful stuff with the folks in your immediate vicinity. You can use it for stopping
burglars and for spreading crime warnings for the area. You can use it to learn about illnesses, deaths,
and other times when a neighbor might need a meal, a ride, or just some moral support.
You can also use Nextdoor for advice about contractors and baby-sitters. You can use it as a mini-Craigs
list where you can sell or buy things without dealing with strangers. You can use it to plan a block party
or to invite neighbors to an impromptu get together. If your area were to ever encounter a weather-related
disaster like a tornado, Nextdoor could be an invaluable asset.
Why don’t you try it in your neighborhood?
Password Managers: What They Are and How to Use One
By Mike Morris, President / Editor, Front Range PC Users Group, Fort Collins, CO
Originally published in k-Byte, the newsletter of the Front Range PC Users Group, www.frpcug.org
Introduction
A password manager application is ". . . software that helps a user organize passwords. . . . The software
typically has a local database or a file that holds the encrypted password data for secure logon onto
computers, networks, web sites and application data files . . . ." (Wikipedia) (http://bit.ly/PhVjkz).
Before you ask "why bother," think for a moment about how many web sites you connect to that require
a password. Do you use the same (or very similar) password for most or all of those web sites? If you
are like the overwhelming majority of computer users, the answer to that question is likely to be "yes."
You should, very definitely, NOT do that!
Bits and Bytes
October 2014
Page 11
All of the computer security experts (and there are a lot of them these days) warn us not to use the same
password for all accounts. For example:
"The message of password reuse security is one that Hord Tipton, executive director of the
International Information System Security Certification Consortium (ISC2), echoes.
(www.ics2.org)
"Diversifying your passwords for each account is essential to protecting all of your online
information," Tipton said. "Once a password has been stolen, hackers often attempt to
access multiple accounts, compounding the potential damage.""
Source: Yahoo Email Is Breached: Lessons Learned (http://bit.ly/1h5jSZi)
See also Password Security, Protection, and Management (http://1.usa.gov/1fYSklG)
With respect to Mr. Tipton, "diversifying your passwords" is much easier said than done . . . unless you
use a password manager.
There are a number of these applications (for example, see this http://bit.ly/PhT1Sg), but one, KeePass, is
a ". . . free, open source, cross-platform and light-weight password management utility for Microsoft
Windows, with unofficial ports for Linux, Mac OS X, iOS and Android . . . ." Wikipedia (http://
bit.ly/1k8zUV3).
In fact, if you need a lot of passwords (I counted over 70 web sites that I use that need a password), it is
almost impossible to keep track of them. But even if you have just a few (10 or a dozen), a password
manager can be extremely helpful, and provide an extra measure of security for you.
How do password managers provide this extra security?
With KeePass the extra security is provided through these features:
1. All your passwords are stored in one database.
2. The database is locked with one master key or a key file, so you only have to remember one single
master password (OK, you also need to remember the password to your computer, so that's 2
passwords you have to remember).
3. The database(s) is (are) encrypted using (one of) the best and most secure encryption algorithms
currently known (AES).
4. KeePass can generate strong random passwords for you.
Source: KeePass Password Safe (http://bit.ly/IzB7qC)
Since KeePass is open source, you get this extra security for free.
If all of those features sound a little "techie," don't worry, KeePass is actually easy to use. Therefore,
KeePass (v. 2.20) will be used to demonstrate how you use a password manager application. As with all
good things, it takes a little effort to enter the data--at least, it does if you need as many passwords as I
do.
Installation
You can download the current version (which, as of 02/04/2014, for Windows, is 2.25) from the KeePass
web site, http://keepass.info/. The installation follows the usual Windows sequence. However there is
one window in the sequence worth a comment:
Bits and Bytes
October 2014
Page 12
Do enable this file
association
This step may not be necessary at this point, but establishing that file association at the beginning
probably reduces the risk of future problems.
Set Up
Once the installation is complete, at the first launch you will see the KeePass main screen:
At this point, you have two primary set up tasks:
1. Create a database
2. Enter data into the database
Bits and Bytes
October 2014
Page 13
You create a database with these steps:
Click on File, then on New:
You will be asked (in the usual Windows format) to decide where you want to save the program. Here is
an example of that window from my computer:
The default Save location for Windows 7 is, of course, Documents. Remember, you can choose to save
the database anywhere on your computer. I set up a separate folder called KeePass in the root directory
of my hard drive and saved the database there (just my preference).
Note also that a default "File name" is entered. I modified that name, in the expectation (as yet
unproven), that I will eventually need multiple databases. I chose NewDatabase_1.
With the location and file name selected, click on Save. You will see:
Bits and Bytes
October 2014
Enter password
here—this one you
have to remember
Page 14
Click on the 3 dots to see
the actual characters (and
reduce typing errors)
Initially, do not use
a Key file, and do
not enable
“Windows user account.”
You enter a Master Password into this window. It needs to be a "strong" password, but it also needs to be
something you can remember. A “strong” password is:
“A password that is hard to detect both by humans and by the computer. Two things make
a password stronger: (1) a larger number of characters, and (2) mixing numeric digits,
upper and lower case letters and special characters ($, #, etc.).”
Source: PC Magazine (http://bit.ly/1h5lq5l)
This password you may want to write down (yes, using the old fashioned pencil and paper); and although
this should be obvious, don’t identify it on that piece of paper. You may also want to keep it with you.
From the KeePass Help file (Composite Master Key):
“If you forget this master password, all your other passwords in the database are lost, too.
There isn't any backdoor or a key which can open all databases. There is no way of
recovering your passwords.”
A more detailed discussion of passwords vs. key files is available from the Composite Master Key section
of the KeePass Help file.
If creating a strong password that you can remember seems contradictory, enter:
“how to create strong passwords that you can remember” into your favorite search engine.
You will find many articles with suggestions.
After you enter your password, click on the OK button at the bottom right of the Create Composite Master
Key window. You will see something similar to this (I will talk about the Database Settings window that is
part of the database creation process later—the default values are acceptable):
Bits and Bytes
October 2014
Page 15
Sample entries
Pre-defined folders, or “groups”
You can add groups, and/or modify their order. However, you are, at this point, ready to enter data. You
use the “Add Entry” window for this task. It is available from the Edit menu and from the Toolbar:
When the Add Entry window is displayed, it will already contain an automatically generated strong
password:
Bits and Bytes
October 2014
Page 16
Your user name will also be included. The only field required, other than the password, is the URL of the
web site for which you want to use this password.
By the way, that Notes field is a handy place to record the answers to all those security questions you are
asked when you register at any web site.
You add as many entries as you need passwords. If you choose to organize them into groups, click on
the group name in the left panel before you click on Add Entry.
I want to depart momentarily from this sequence and return to the Create New Password Database steps.
You will see a Database Settings window during this set up (you can also access Settings from the File
menu after the database is created). All of those settings can be left at their default values. However, you
may want to enter a description. For example:
How to Use the Password
Here are the steps for using the password:
1. Connect to the log in window of the web site of interest. You can also connect to the web site from
KeePass. Right click on the entry for that web site and then click on URL. If you have more than
one browser installed (as I do), you can choose which one to use from the list that is displayed:
Bits and Bytes
October 2014
Page 17
2. Once you are connected to the web site’s log in window, in KeePass, right click on the entry for that
web site and then click on “Copy User Name”:
Return to web site log in screen and paste the user name into the appropriate field (you could, of
course, just type that in).
3. In KeePass, right click (again) on the entry for that web site and this time click on “Copy
Password.”
Return to web site log in screen and paste the password into the appropriate field.
4. Click on the log in or sign in button for the web site.
There is one important note regarding these steps. You have only a limited (but adjustable) time to
paste the user name or password after you copy it. KeePass will clear the Clipboard after some number
of seconds for security reasons. That time is set in the Security tab of the Tools/Options menu item:
Note that in the image above, that time is set to 12 seconds.
Extras
So far, these instructions cover just the basics. There are many extras, three of which are worth
mentioning, although not discussed here in detail (see the KeePass Help file).
Bits and Bytes
October 2014
Page 18
1. Generate your own passwords: If you are not satisfied with the automatically generated
passwords, you can create your own. Click on the icon under the 3 dots and you will see:
Build your own password
Generate a password
using one of these profiles
2. Mobility: There is a “portable” version (http://keepass.info/download.html) that you can install
on a flash drive that will allow you to use KeePass on any other computer (with some
restrictions—see the KeePass Help file) “without creating any new registry keys and it doesn't
create any configuration files in your Windows or application data directory of your user
profile.”
3. Plugins: There are a large number of plugins available (http://keepass.info/plugins.html),
including one called KeeForm that will "(open) websites and fill in the login data automatically,
for Internet Explorer and Firefox." Before you install any plugin, be sure to read the Plugins for
KeePass 2.x (http://bit.ly/PhVjkz) information.
Acknowledgements
Thanks to Front Range PC Users Group member Bert Broekstra for his help with learning this program.
Thanks to Front Range PC Users Group member Herb Cantor for finding the “Yahoo Email is Breached . .
.” article and for sending the link to me.
APCUG 2014 Fall Virtual Technology Conference
Saturday - November 1, 2014, 1:00pm to 5:00 pm
1:00 pm - 1:50 pm
2:00 pm - 2:50 pm
3:00 pm - 3:50 pm
4:00 pm - 4:50 pm
Track 1:
Track 2:
Track 1:
Track 2:
Track 1:
Track 2:
Track 1:
Backing up Strategies
Buying and Selling on eBay
Windows 10
The History of Women in Technology
Utilities & Programs That You Need for Your Computer
Bitcoin and Crypto-Currencies
Setting up a User Group Facebook Page
For information on presentations/presenters and to register: http://apcug2.org/content/vtc13