1
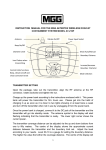
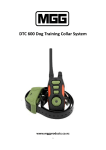
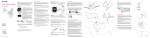
DTC 280 Pet Trainer Dog Training Collar
Manual
1
Waterproof and Re-chargeable
Important Safety Information
WARNING: NOT FOR AGGRESSIVE DOGS. Do not use this product if your dog is aggressive or
if your dog is prone to aggressive behavior. Aggressive dogs can cause severe injury and
even death to their owner and others. If you are unsure whether this product is
appropriate for your dog please consult your veterinarian or certified trainer.
CAUTION:
Risk of skin damage: Please read and follow the instructions carefully in this guide. Proper fit
of the collars is important because a loose collar may cause inconsistent performance. A
collar worn for too long or made too tight on the dog’s neck may cause skin damage, ranging
from redness to pressure ulcers (commonly known as bedsores).
. Avoid leaving the collar on the dog for more than 12 hours per day
. When possible reposition the collar on the dog’s neck every 1 to 2 hours
. Check the fit to prevent excessive pressure. It is okay to trim any excess strap length.
. Never connect a lead to the electronic collar because it may cause excessive pressure on
the contacts.
. Wash the dog’s neck area and contacts of the collar weekly with a damp cloth.
. Examine the contact area daily for signs of a rash or a sore.
. If a rash or sore is found, discontinue use of the collar until the skin has healed.
. If the condition persists beyond 48 hours, see your veterinarian.
These steps will help your dog stay safe and comfortable. Millions of dogs are comfortable
while wearing stainless steel contacts. Some dogs are sensitive to contact pressure. You may
find after some time that your dog is very tolerant of the collar. If so you may relax some of
these precautions. It is important to continue daily checks of the contact area. If redness or
sores are detected discontinue use until the skin has fully healed.
Thank you for choosing the MGG Dogtrainer brand! You and your dog deserve a
companionship that includes memorable moments and a shared understanding together.
Our mission is to ensure your dog’s safety by providing you the tools and techniques to
successfully train your dog. Should you have any queries please contact our customer
service. [email protected]
(09 401 6360)
NOTE: Please charge before using the product.
2
Components
3
4
Key Definitions
1, Antenna: Transmit signal to the collar-receiver
2. LED Indicator: It will flash when “Y” button is pressed and also serves as battery charging
indicator
3. LCD Screen:
Static Mode: Under this mode, when “Y” button is pressed the collar-receiver will shock,
static levels can be adjusted from 0 to 100 by pressing UP/DOWN button.
. Vibration Mode: Under this mode, when “Y” button is pressed the collar-receiver will
vibrate. Vibration levels can be adjusted from 0 to 100 by pressing UP/DOWN button.
. Beep Mode: Under this mode, when “Y” button is pressed the collar-receiver will give a
warning beep.
. Light Mode: Under this mode, when “Y” button is pressed the green LED light on the
receiver will flash every one second making it convenient to help locate your dog. in the
dark.
.1/2 button indicates channel 1 or 2 on the transmitter. Select one channel for use with
one collar-receiver.
5
4. Up/Down button: Press the Up/Down buttons on the right hand side of the transmitter
to set the level of correction you wish to administer. ( WARNING: ALWAYS BEGIN WITH A
LOW-LEVEL SETTING IN THE INITIAL TRAINING STAGES ).
5. Channel Button: When the CHANNEL button “1/2” is pressed, you can sync the
collar-receiver and the transmitter via different channels.
6. Y Button: It indicates the LAUNCH button which will send the correction signal to the
collar-receiver.
7. Mode Button: It indicates audio, vibration and static-shock correction modes on the
LCD-display screen.
8. Charging Hole: for remote transmitter charging.
Collar receiver:
1.
○ Metal Probes attach here: They deliver vibration and static stimuli.
2.
○ ON/OFF/Encode Button: Turn on/off the collar-receiver; hold 5 seconds to encode the
receiver.
3.
○ Rubber Cover: After completion of charging please put the cover securely in place to
safeguard the internal unit from dust and water.
4.
○ Charging Hole: for collar-receiver charging.
6
A: When charging, the LED light is red; when fully charged, it turns to green
○
B: Under “light” mode, press the “launch” mode, and the LED light in the collar-receiver will
○
flash green every one sec.
C: In “standby” status, the LED light in the collar-receiver will flash green every four
○
seconds .
D: After turning on the receiver press and hold the ON/OFF/ENCODE button for five
○
seconds to encode it. Refer to the encoding/synchronizing instructions on page 9.
Features
1. Rechargeable remote transmitter and collar-receiver.
2. The collar-receiver and transmitter are both waterproof but we advise against
submerging them under water for more than a few minutes.
3. LCD display with blue backlight screen for night use.
4. Four modes (static/vibration/beep/light) at your disposal.
5. 100 intensity levels of vibrations
6. 100 intensity levels of static shocks
7. Intensity levels can be adjusted by pushing the UP/DOWN button.
8. Power saving:
. The collar-receiver, if left unused for 5 minutes, will enter into “SLEEP” status and can
be re-activated by any movement.
. The remote transmitter, if left unused for 2 minutes, will enter into “STANDBY” status.
If unused for 5 minutes it will enter into a “DEEP SLEEP” status. To re-activate the
transmitter you can simply press any orange button. The training system can be used with
1 or 2 collar-receivers
How the dog training system works?
This system has been proven safe, comfortable and effective for all dogs over 7Kgs except for
aggressive dogs. It assists you in controlling your dog without a leash within a range of 150
to 280m. At the push of a button the remote transmitter sends a signal activating the
collar-receiver. Using the remote trainer consistently and correctly most bad behavior that
your dog exhibits can be corrected or any basic obedience commands taught. It can also be
used to deter such unwanted behaviors as jumping up, digging and chasing. While the
stimulation is startling it is harmless to your dog. Electronic training devices require
7
interaction and training from the owner to achieve the desired results.
Important: The system has a range of up to 280m in ideal conditions. Depending on the way
you hold the remote transmitter the range may vary. Hold the remote transmitter in a
horizontal position away from your body to achieve optimum range. Terrain, weather,
vegetation, transmission from other radio devices and other factors will affect the range of
your remote transmitter.
Operating Guide
Step 1 Prepare the remote transmitter:
Charge the remote transmitter
1. Connect the charger connector to the charging hole.
2. Plug the charger into a standard outlet
3. The red light in the transmitter comes on indicating that charging is taking place
4. Charge the transmitter at least 6 hours for the very first charge even though it may
indicate it is fully charged. This conditions the battery. Other than the first charge,
please just charge until the red light goes off.
5. When charging is complete, the red light will turn off automatically
6. “Low Battery Indicator” signals the need for recharging.
How to use the remote transmitter
1. To turn on/off the transmitter, press any button on the transmitter.
2. Press the MODE button to toggle among 4 different modes
3. Press UP/DOWN buttons on the right-hand side of the transmitter to adjust the intensity
level of vibration or static shock.
4. “1/2” button indicates either channel 1 or channel 2 on the transmitter. Select one
channel for use with one collar-receiver
5. The remote transmitter will go into STANDBY MODE if not operated for 2 minutes and
will turn off if not operated for 5 minutes.
6. In STANDBY MODE press any button to wake it up. When turned off, press and hold the
MODE button for 1 second to turn it on.
8
Step 2 Prepare the Collar-receiver:
Charge the collar-receiver
1. Connect the charger connector to the charging jack.
2. Plug the charger into a standard outlet.
3. The red LED light in the collar-receiver will turn on. (A)
4. When the collar-receiver has been fully charged the red LED light will turn off
automatically (B)
5. When charging is finished put the rubber cover securely back in place to keep the
internal unit free from dust and water.
6. N.B. Charge the transmitter at least 6 hours for the very first charge even though it may
indicate it is fully charged. This conditions the battery. Other than the first charge,
please just charge until the red light goes off.
NB: The collar-receiver will beep for 20 seconds if it needs recharging.
9
Step 3. Synchronize the transmitter with collar-receiver:
1. Turn on the remote transmitter by pressing any button on the transmitter.
2. Select channel 1 or 2
3. Press ON/OFF button on the collar-receiver to turn it on
4. Press ON/OFF button again and hold it for 5 seconds and then the LED light will start to
flash.
5. Now you can hear the first beep from the collar-receiver and then press the “Y” button
(of the transmitter) immediately. If too slow you may need to repeat the procedure but
more quickly.
6. You will hear the second beep from the receiver which signifies that the transmitter and
the receiver have been synced.
7. To sync the transmitter and the second receiver repeat step 2 through 6
8. Please be sure to choose the other channel
NB: According to the factory default settings, when the collar-receiver has been turned on
the syncing should be completed within 10 seconds. You have to press the “Y” button at
least within 10 seconds. Please DO NOT try to sync the transmitter with the two
collar-receivers at the same time.
Step 4 Test the training system
The following testing methods will help you ascertain whether this training system is
functioning correctly. Please make sure that you have synchronized the transmitter and
collar-receiver before testing.
Test the static shock function ( Figure 2-1 )
Put the test-light on the contact points of the collar-receiver. Turn on the remote transmitter,
switch to SHOCK mode and press the UP/DOWN button to adjust the intensity level.
Press “Y” button and the bulb will flash signifying that the SHOCK function works. Please
10
make sure the SHOCK level is well above 0 when testing the function.
Test the vibration functions (Figure 2-2)
Turn on the remote transmitter, switch to VIBRATION mode and press the UP/DOWN button
to adjust the vibration level.
Press “Y” button and the collar-receiver will vibrate, signifying the VIBRATION function works.
Please make sure the vibration level is well above 0 when testing the function.
Test the beep function (Figure 2-3)
Turn on the remote transmitter, switch to BEEP mode.
Press “Y” button and the collar-receiver will beep signifying the BEEP function works
Test the LED light function (Figure 2-4)
Turn on the remote transmitter, switch to LED LIGHT mode.
Press “Y” button and the collar-receiver will flash signifying the LED LIGHT function works.
NB:
1. The screen of the remote transmitter does not display when:
1. It is in STANDBY mode. To save power the transmitter will go into STANDBY mode if
there is no operation for 2 minutes. You can press any button except for the LED
LIGHT button to activate it and then its screen will show the display.
2. It is in DEEP SLEEP mode. To save power the transmitter will go into the DEEP SLEEP
mode if there is no operation for 5 minutes. You can hold and press the MODE
button for 1 second to activate it and then its screen will display.
2 . The collar-receiver will go into DEEP SLEEP mode if there is no operation for 5 minutes.
Any movement will activate it. If the receiver has no response then you press the “Y”
button and if its indicator light is not on either then you can shake it or let your dog move to
11
activate it. (If you shake the receiver, you’ll hear a rattling noise caused by the built-in
vibration sensor which indicates that it is in working status).
Step 5 Fit the collar-receiver
Important : The proper fit and placement of the collar-receiver is essential for effective
training. The metal contact probes must have direct contact with your dog’s skin as follows:
(1) To fit the collar-receiver you will need to attach the collar-strap to the receiver box. (3A)
(2) With your dog standing in front of you, place the collar-receiver around its neck so the
receiver box and probes are on the underside of your dog’s neck and making direct
contact with the skin. You may need to trim the fur to ensure good contact. (3B)
(3) Fasten the collar-strap. The fit should be sung but not taut. You should be able to place
one finger beneath the collar-strap around your dog’s neck (3C)
(4) Allow your dog to wear the collar-receiver for several minutes and then check the strap
again. As your dog becomes more familiar with the collar-receiver you should ensure the
fit is comfy.
CAUTION : RISK OF SKIN DAMAGE
. For comfort, safety and effectiveness of this product please see to it that you check the fit
of your dog’s collar frequently. If any skin irritation is observed, discontinue the use of the
collar for a few days. If the condition persists beyond 48 hours, see your veterinarian.
. Do not attach a leash to the collar, which can result in squeezing the metal probes too
tightly against your dog’s neck.
. The collar-receiver is not designed to be worn constantly. We recommend the collar not be
worn for more than 12 hours out of every 24-hours period.
. Most dogs feel uncomfortable when wearing the collar for the very first time. Don’t use
any functions before the dog has gotten accustomed to the collar.
. We suggest you give the dog VIBRATION before starting the STATIC SHOCK. After a time of
training your dog will learn that shock will come after vibration. In this way, the vibration
alone can effectively curb the misbehaviors of your dog. The STATIC SHOCK might be
unnecessary sometimes.
Step 6 Regular Maintenance
. Check the metal probes for tightness on a weekly basis.
. Rinse the metal probes with alcohol on a weekly basis. ( NB: Please turn off the
collar-receiver before touching the metal probes. )
. Check your dog’s neck for irritation and wash it on a weekly basis.
12
Frequently Asked Questions:
How old does a dog have to be before using the system?
Your dog should be able to learn basic obedience commands such as “sit” or “stay”. The
collar-receiver may be too large for dogs under 6Kgs.
Once my dog is trained and has been obeying my commands, will he have to continue to
wear the collar?
Probably not but you may need to reinforce training with the collar.
Can I use the dogtrainer rechargeable training collar with more than one dog?
Yes , you just need to add another collar to the system for a 2nd dog.
How long can I continuously deliver vibration or static shock to my dog?
Ten seconds. After 10 seconds, the transmitter will time out and should be started again.
Is the collar-receiver waterproof?
Yes but you have to ensure that its charging hole is sealed by the rubber bung.
Can I use the system on aggressive dogs?
No. please do not use this system to correct or eliminate any form of aggression or biting
behavior. In the event that your dog is showing signs of aggressive behavior then contact a
professional dog trainer in your vicinity.
Will I get exactly 280m of range with the dogtrainer rechargeable training collar?
13
The range you get with this system will vary according to terrain, vegetation, as well as
transmission from other radio devices. To get the maximum amount of range, please refer
to the “how the system works” section of this guide.
What do I do if my dog’s neck becomes red and irritated?
Discontinue use of the collar until the skin has healed. If the condition persists beyond 48
hours see your veterinarian.
Can I replace the collar-receiver with another kind of collar?
No .
Can I attach a leash to the collar-receiver?
No. This can result in pulling the metal probes too tightly against your dog’s neck. Attach
a leash to a separate, nonmetallic collar or a harness ensuring the extra collar does not put
pressure on the metal probes.
How will I know when to charge the system?
For the remote transmitter the symbol will show up on the LCD screen. For the receiver, if
you hear the beep from it for 20 seconds when it is already on, you will need to have it
charged.
What is the life-span of the lithium batteries of the remote transmitter and the
collar-receiver?
They can be charged over 400 times
How long can I leave collar-receiver on my dog?
As the collar is not designed to be worn constantly we recommend the collar not be worn
for more than 12 hours out of every 24-hour period.
How should I arrange training sessions for my dog?
Make the training sessions short and positive, between 10-15 minutes long each time. This
will enable your dog to keep its attention focused on you.
What kind of dogs is the dogtrainer rechargeable training collar suitable for?
The collar is adjustable from length 15cm to 50cm. If your dog’s neck circumference is
larger than 50cm this collar may not be suitable for your dog. This collar is NOT suitable
for dogs under 6Kgs.
Troubleshooting
My dog is not responding after the dogtrainer dog training system has been installed
successfully
. You need to charge the remote transmitter and the collar-receiver for 6H separately before
initial use.
14
. Check to see if the remote transmitter and the collar-receiver have been turned on.
. Check the intensity levels of vibration and static shock
. Make sure the collar-receiver has sufficient power to operate
. Restart the collar-receiver by pressing the ON/OFF button.
. Please test the 4 functions (i.e. BEEP, LIGHT, VIBRATION AND STATIC SHOCK) before initial
use. See the “test the training system” part of this guide for testing methods.
. Check whether the collar-receiver has entered into the DEEP SLEEP mode.
. Check if the collar fits snugly with your dog’s neck.
. If necessary, please trim your dog’s neck hair so that the metal probes come in direct
contact with your dog’s skin.
. If all of the above have been addressed your dog still gives no response. Please try to
re-synchronize the remote transmitter with the collar-receiver.
The remote transmitter does not work.
. Check if the remote transmitter is in low battery status. If the icon shows up then battery
exhaustion is imminent.
. You have to press and hold the MODE button of the transmitter to turn it on.
. Check if the transmitter has entered into the STANDBY or DEEP SLEEP status.
My collar-receiver worked great for some time but now it does not work after charging.
. Firstly check if the receiver has been charged correctly. Check the “prepare the
collar-receiver” part of the guide for the correct charging method.
. Check that the receiver has been turned on.
I want to test the collar-receiver on myself but it does not work.
. When testing the receiver on your hands, please touch the 2 electrodes at the same time
as touching one single electrode will not work.
General Training Tips
The following are tips on how to get the best out of your MGG Dogtrainer Remote Dog
Training Collar:
This product is intended to support behavioural training and is not designed to be used
without the necessary interactions. Always praise your dog for good behaviour. Verbal
commands combined with positive reinforcement will contribute to the success of your
training and will achieve the desired results in the shortest time.
The recommended age for training is a minimum of 6 months provided that the dog has the
attention span and capability to learn basic commands. A good indication will be if he/she
can understand and obey “sit” and “stay” commands. That shows that the brain is
sufficiently developed to understand the training collar logic.
Work with your dog on one behaviour at a time to avoid confusion and frustration.
15
Use as little stimulus as possible and only to reinforce verbal commands when necessary.
Do not over correct your dog.
Use verbal commands first and supplement with a corrective stimulus only as needed.
consistent with your verbal commands using the same words every time.
Be
Use the beeps as a warning by pushing the Beep button. The dog will become conditioned
to the beep preceding the corrective stimulus and will soon learn to recognise the beep as a
warning along with your verbal command.
This system is not appropriate for correcting aggressive behaviour.
professional trainer for advice about that.
Please consult a
Do not rely on this product solely to train your dog. If your dog shows signs of growling,
snarling, biting or aggression while using the collar, stop training immediately and contact a
professional trainer.
Although most dogs respond to this product, some will not.
effectiveness of this or any other trainer on your dog.
MGG cannot guarantee the
This product is not recommended for aggressive or elderly animals in poor health or animals
otherwise unable to withstand the static stimulus.
Caution: Any collar worn for extended periods can cause a condition similar to bedsores
known as Pressure Necrosis. To reduce the possibility you must do the following. Never
leave the collar on your dog for more than 12 hours per day. Examine your dog’s neck daily
for any signs of a rash or a sore. Supervise your dog during the first 2 days of training.
Regularly check the fit of the collar to prevent excessive pressure. You should be able to
insert one finger between the collar strap and your dog’s skin.
SAFETY:
To maximise the effectiveness of the DTC 280 remote training system and the safety of your
dog, please check the fit of the collar frequently and re-adjust the position of the electrodes
on their neck if necessary, checking for signs of irritation or discomfort.
If signs of skin irritation are noticed, immediately discontinue use and apply antibiotic
ointment to help heal and sooth the area. If the condition persists beyond 48 hours seek
the advice of a veterinarian. Such side effects are extremely rare and are generally caused
by a more serious underlying condition.
Wash the dog’s neck area and the correction poles as often as needed to keep the area and
poles clean. Make sure the straps are clean for best performance. The straps can be
removed for cleaning but must be replaced in the same position.
16
Stop any undesirable behaviour by administering the stimulus DURING THE ACTUAL
BEHAVIOUR. Using this device as a punishment after the fact does no good at all and will
confuse or frustrate the animal.
PLEASE NOTE
Please note that when shaking the receiver you may hear a rattling noise, which is actually
caused by the built-in vibration sensor and is by no means an indication of any malfunction
in the receiver. The range of “up to 280m” is line of sight and denotes the maximum valid
distance that can be achieved in ideal conditions. Any obstacles will reduce the effective
distance.
Warranty Terms & Conditions and Compliance:
MGG warrants to the original retail purchaser that your MGG DTC 280 Remote Training
System will be free from defects in material and workmanship for a period of one year from
the date of the original retail purchase, provided that the damage is not caused by abnormal
use or neglect. Warranty does not cover lost parts, cracked screen, physical damage or
water damage. Warranty may include repair or exchange. After the expiration of the
warranty, replacements and repairs are available for an additional charge.
Terms of Use:
It is understood that you accept without modification of the terms and conditions, the
offering to you of this product. This training collar has been designed for the training of
dogs. Your dog’s temperament may not be suitable for this system. This collar is not
recommended for dogs that are aggressive or have been neglected. This product is
designed for dog training purposes. It is not intended to punish, injure, provoke or harm.
Using this product in a way in which is not intended is strictly prohibited .
In no event shall MGG be liable for any damages arising out of or connected with the use or
misuse of this product. Buyer assumes all risks and liability associated with the use of this
product.
Modification of Terms and Conditions:
MGG reserves the right to change the terms and conditions under which this product is
offered. This equipment is in full compliance with the limits for Class B digital device,
pursuant to Part 15 of the FCC rules in the United States and Canadian ICES-003 regulations.
For Europe, this product meets the standards for R&TTE-Directive 11955/EEC compliance.
In some countries, this device may be restricted according to frequency or transmission
regulations.
The user is responsible for compliance.
Unauthorised changes or
modifications to the equipment are not approved by MGG and are additionally in violation
of FCC regulations. Such modifications render the warranty immediately void.
www.mggproducts.co.nz
17