1
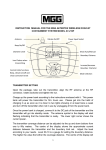
USER MANUAL EF400 PRO SERIES Contents 1. Introduction ............................................................................................... 2. Safety requirements and regulations......................................................... 3. Specification ............................................................................................. 4. Installation guide....................................................................................... 5. Maintenance .............................................................................................. 6. Guarantee .................................................................................................. Contact Information If you have any further technical questions about our products, please contact us at: MGG Products 29C Mill Lane Kerikeri 0230 New Zealand Tel: (+64) 09 401 6360 E-mail:[email protected] Website: www.mggproducts.co.nz 1. Introduction Thank you for buying an MGG electric fence energiser. This energiser has built-in lightning protection devices to reduce the risk of lightning damage and has built-in RFI (Radio Frequency Interference) suppressed circuitry. If for any reason you are not happy with your purchase, please return the energiser to MGG Products within 14 days of purchase and we will give you a full refund (excluding freight). Please read this manual carefully before installation. This manual refers to the MGG electric fence energiser model EF400. 2. Safety requirements and regulations WARNING: Please read the following installation requirements and regulations: Ensure the energiser is turned off before touching the fence. Only connect to mains (230v) using the approved mains adaptor provided Do not submerge the energiser in water or expose to possible flooding. Keep the battery in a well ventilated area. For animal use only. Warning signs must be displayed. Make sure the energiser is well earthed in continuous damp soil. Poor earthing, poor insulation or excessive vegetation touching the fence will reduce the effectiveness of the energiser. Do NOT climb over, through or under a multi -wire electric fence, please use a gate or a specially designed crossing point. Avoid electric fence configurations that are likely to lead to the entanglement of animals or people. Electric fences should be installed and operated so that they cause no electrical hazard to persons, animals or their surroundings. Children or infirm persons must be supervised at all times. Do not place combustible materials near the fence or energiser connections. In the event of a fire, the energiser must be disconnected. Do not dismantle or attempt to make any changes to the energiser yourself. Do not supply an electric fence from two separate energisers or from independent fence circuits of the same energiser. This is highly dangerous! Only one energiser at a time can be connected to any fence. The minimum distance allowed between two separate electric fences powered by their own energiser is 2.5m, should these fences need to be connected this can only be done using non conductive material. Do not electrify barbed or razor wire. In areas of public access, use an electric fence warning sign every 10m (33ft) to identify the electrified wire(s). Crossing with overhead power lines should be avoided wherever possible. If such a crossing cannot be avoided, it should be made underneath the power line and at right angles. If connecting leads and electric fence wires are installed near an overhead power line, the clearances should be not less than those shown below: Power Line Voltage Voltage Clearance Metres Under 1000 Between 1000 and 33000 Over 33000 3 4 8 If the connecting leads and electric fence wires are installed near an overhead power line, their height above the ground should not exceed 3m. This height applies either side of the orthogonal projection of the outermost conductors of the power line on the ground surface, for a distance of: • 2 metres for power lines operating at a nominal voltage not exceeding 1000 volts; • 15 metres for power lines operating at a nominal voltage exceeding 1000 volts. Electric animal fences intended for deterring birds, household pet containment or training animals such as cows need only be supplied from low output energisers to obtain satisfactory and safe performance. For electric animal fences intended for deterring birds from roosting on buildings, no electric fence wire should be connected to the energiser earth electrode. A warning sign should be fitted to every point where persons may gain ready access to the conductors. Fence wiring should be installed well away from any telephone line, telegraph line or radio aerial. The size of the warning sign must be at least 100mm x 200mm. The background colour of both sides of the warning sign should be yellow. The text on the sign should be black and should show either: - “CAUTION: Electric Animal Fence” or, - The symbol shown below: The warning must be indelible, appear on both sides of the warning sign and be at least 25mm. 3. Specification Contents: 1 x MGG EF400 Dual Powered Electric Fence Energiser. 1 x Mains Adaptor 1 x Battery Connection Cable Features: 1. 2. 3. 4. 5. 6. 7. 8. 9. 10. Weatherproof and anti-dust Pulse current technology, longer battery lifetime. Low average current, longer battery lasting time. Dual powered: Operated by12 volt lead acid battery or by mains using adaptor provided only. Low battery warning light. Pulse indicator. Easy-access terminals and mounting brackets for quick connections and installations. Bottom easy to plug DC input terminals. Easy ON/OFF switch. Weight :1.51-2.5kg Size: 210mm*153mm*68mm. Characteristics: Model Energy Power Power Maximum Open 500ohm Power number (Joules) source consumption current volts Load Length volts km 5300 50 (single wire) EF400 4 12v 4.8w 400mA 9500 20 (triple wire) Distance is based on single strand high tensile galvanized wire (no vegetation) 4. Installation guide HOW TO INSTALL THE FENCE 1. Plan the fence line. Avoid rough, stony or steep areas if possible. For best electric fence performance use multi-wire (at least 3 wires connected in parallel) fencing. 2. Install end strain posts and corner posts. Ensure that all corner posts are firm to withstand the wire strain. Ensure the cross wire does not touch the live wires. 3. Run out the bottom wire between the end posts. 4. Tension wires until there is only slight visible sag. 5. Connect all live wires in parallel at the end of each fence section using joint clamps. Use joint clamps to ensure tight wire connections. Connect any earth wires together in parallel. Never connect live and earth wires together. Step 1. Mounting the Energiser - Ensure the energiser is correctly mounted using its hanging point to prevent water damage. - Only ONE energiser at a time can be connected to the fence. - Children or infirm persons must be supervised at all times. - Ensure the energiser's battery is placed in a well ventilated area and keep fire hazard materials away from the energiser and fence. Step 2. Earthing fence. Connect the black terminal to the earth stake using connection cable provided. The most effective place for an earth system is in constantly damp soil Step 3. Connect the fence Connect the energiser’s red terminal to the fence using the red connection cable provided. DO NOT USE MAINS ADAPTOR WHEN INSTALLING THE ENERGISER OUTDOORS. Step 4. Connect to power, battery or mains (using adaptor provided) For battery connection Connect the battery connection cables from the energiser to the battery using crocodile clips: the red crocodile clip to the (+) terminal of battery, the black crocodile clip to the (-) terminal of battery. For mains connection There is an adapter with power cord and power terminal, connect the terminal of the cord to the energiser, insert the adapter plug in the socket. Battery energizer: If installing outside, for a better operation, please install the energizer into a weather proof box, out of reach of children. Install where there is no risk of the energizer incurring fire or mechanical damage and where the battery leads can be attached easily. Note: It is important to mount the energizer correctly. If the energizer is mounted upside down, water can damage the energizer. Make sure the battery is also installed in a well-ventilated area. Mains energizer If installation outside, make sure to install the energizer into a weather proof box, make sure that rain cannot wet out the power cords, and keep out of reach of children. Install where there is no risk of the energizer incurring fire or mechanical damage and where the battery leads can be attached easily. Note: It is important to mount the energizer correctly. If the energizer is mounted upside down, water can enter and damage the energizer. 5. Maintenance Warning: Do not dismantle the unit to repair. Please contact your dealer or MGG directly. Fault Energiser doesn’t operate Possible Cause(s) Solution Switch in off position Move switch to on position Poor battery connection Connect the energizer to the battery correctly Incorrect battery voltage 12V battery Incorrect battery connection Connect red lead to the (+) terminal of battery, black lead to (-) terminal Battery is flat Battery voltage should be greater than 10V Faulty energiser Have the energiser repaired Faulty energiser Disconnect battery and remove the fence wire from the Red terminal. Reconnect energiser again. Using a Digital Volt Meter check the voltage across the terminals. If the voltage is less than 5000V, have the energiser repaired. Inadequate earthing Improve the earth system by adding more galvanized earth stakes to the earth system until the earth voltage is 200V or below. Short on the fence line Check the electrical connections are secure. From the fence to the red terminal, from the earth system to the green terminal, at gates etc. Check the voltage on the fence every 33m (100ft) using the Digital Volt Meter. Note if the voltage is dropping. The closer to a fault, the lower the voltage reading will be. Become aware of things that cause faults and always be on the lookout for: stray pieces of wire on the fence, heavy vegetation growth, cracked or broken insulators, and broken wires. Electric fence voltage is below 3000V or your stock are escaping 6. Guarantee We offer a 2 Year warranty starting from the date of the purchase marked on the invoice. We will only perform warranty services when the unit is returned to us un-tampered and with a copy of the original invoice. If these requirements are not fulfilled, we reserve the right to void warranty.