1
E-PRACTICE PAD
ELECTRONIC DRUM
PRACTICE PAD
QUICKSTART GUIDE
::: ENGLISH ( 1 – 3 ) :::
USER'S MANUAL
::: ENGLISH ( 4 – 7 ) :::
MANUAL DE INICIO RÁPIDO
::: ESPAÑOL ( 8 – 10 ) :::
GUIDE D’UTILISATION RAPIDE
::: FRANÇAIS ( 11 – 13 ) :::
GUIDA RAPIDA
::: ITALIANO ( 14 – 16 ) :::
KURZANLEITUNG
::: DEUTSCH ( 17 – 19 ) :::
INTRODUCTION
Welcome to the Alesis E-Practice Pad! This digital drum is a fun way to learn
and practice the drums. Included are 65 drum sounds and 60 songs and
exercises, all designed to make you a better drummer. It feels great and gives
you a full range of dynamics from the lightest touches to the loudest accents.
Here are several features you'll come to love about the E-Practice Pad:
y
y
y
y
y
y
y
y
y
65 different drum sounds
BOX CONTENTS
E-Practice Pad
Power Adapter
Quickstart Guide
Safety Instructions &
Warranty Information
Booklet
Metronome with six sounds, adjustable time signatures and subdivisions
60 practice games and exercises
Natural feel and performance with full dynamic range
Headphone jack for silent practice or amplifier output for playing with other musicians
Mountable on standard 8mm cymbal stand or snare stand
Recording and playback for listening to your playing
Runs on batteries for portability or on wall power with included power adapter
Expandable with optional bass drum and hi-hat pedal
Please refer to this manual to take full advantage of E-Practice Pad's numerous features, and have fun
playing!
Sincerely,
The People of Alesis
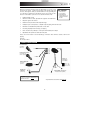
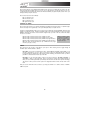
CONNECTION DIAGRAM
Kick Drum Pedal *
(footswitch;
1/4” mono)
Hi-Hat Control Pedal *
(footswitch; 1/4”
stereo; optional)
Power (or 4
AA batteries;
not included)
Hi-Hat Cymbal Pad *
(1/4” mono;
optional)
Headphones
or Monitors
(1/4” stereo)
Cymbal Stand (standard 8mm
threaded mount; optional)
WARNING: Only put on your headphones
or turn on your monitors AFTER turning on
the E-Practice Pad.
* To purchase these accessories, visit alesis.com.
1
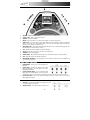
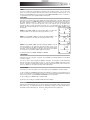
TOP PANEL FEATURES
1.
VOLUME – Adjusts the volume level.
2.
START / STOP – Starts or stops the metronome.
3.
RECORD – Enters Record Mode.
4.
METRO – Press this button to select metronome settings or change the pad sound.
5.
TEMPO / TAP – Press this button to enter Tempo Mode, then use the VALUE +/- buttons to adjust the
tempo. You can also press and hold this button for three seconds then tap the button (four times) to
the beat of the new tempo you wish to enter.
6.
BEAT INDICATOR – These LEDs flash in time with the quarter notes of the pattern being played. The
red LED flashes on the downbeat of each bar.
7.
LCD – Displays the current parameters and other operations.
8.
VALUE +/- – Decreases or increases the value of each parameter.
9.
TRAINING – Enters Training Mode.
10.
GAME / TIMER – Enters Game Mode when pressed. Hold down this button to enter Timer Mode.
11.
PAD – Strike this single-zone pad with a drumstick.
12.
METRONOME SPEAKER – This speaker plays the metronome sound only unless headphones are
connected to the rear panel.
REAR PANEL FEATURES
1.
HEADPHONES – Connect a set of 1/4" headphones to
this input.
2.
HI-HAT INPUT – Connect an optional hi-hat cymbal
trigger pad here with a 1/4" mono cable to use as a hihat trigger while playing.
3.
HI-HAT CONTROL INPUT – If you connected a hi-hat
trigger pad to the HI-HAT INPUT, connect an optional
footswitch here with a 1/4" stereo cable to this input to use both "open" and "closed" hi-hat sounds.
4.
KICK PEDAL INPUT – Connect an optional footswitch here with a 1/4" mono cable to use as a bass
drum trigger while playing.
SIDE PANEL FEATURES
1.
DC INPUT – Connect the included power adapter here, then
connect the adapter to wall power.
2.
POWER SWITCH – Turns the E-Practice Pad on and off.
2
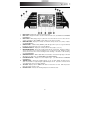
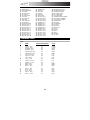
LCD FEATURES
1.
BEAT COUNT – Displays the count of the current beat (1-9).
2.
BEAT TYPE – Displays the number of beats the metronome will count. (See BEAT under CHANGING
PARAMETERS.)
3.
BEAT CHECK – When playing along to a pattern, the closer the lit arrows are to the center, the more
accurate your timing is. When "GOOD" is lit, the timing of your strokes is accurate.
4.
MODE INDICATOR – Displays the currently selected mode: Tempo, Record, Score, Timer, or Game.
(See OTHER MODES.)
5.
GAME OK ICON – In Game Mode ("GAME2"), "OK" will appear when your score is greater than 60,
indicating the pattern will change to one of greater difficulty.
6.
PARAMETER DISPLAY – Displays the current parameter values (tempo, score, etc.).
7.
METRONOME NEEDLE – Moves left and right in time with the current tempo. During the "Balance"
exercise, this area becomes a meter, measuring the force of each hit of the pad. During the "Count"
exercise, this area becomes a meter, indicating the time remaining or the number of hits remaining.
(See TRAINING MODE.)
8.
GAME NOTE DISPLAY – While in Game Mode, horizontal bars on the left and right edges of the LCD
will prompt you to hit the pad. (See GAME MODE under OTHER MODES.)
9.
RHYTHM INDICATOR – Displays the current rhythmic figure.
PARAMETERS.)
10.
TRIGGER ICONS – Indicates the available triggers you can use while playing and when they are
struck. A snare drum icon (representing the pad) will always be shown. If you have connected a hi-hat
or kick drum trigger, these icons will be displayed.
11.
TAP ICON – Displays after the TEMPO / TAP button is held for three seconds. Strike the pad four
times at the tempo you wish to enter.
12.
BATTERY LEVEL – Indicates the remaining battery life of the E-Practice Pad.
3
(See RHYTHM under CHANGING
USING THE E-PRACTICE PAD
CHANGING PARAMETERS
Press METRO to select a parameter to adjust: Beat, Rhythm, Click Sound, Click Volume, Pad Sound, or
Metronome. Keep pressing METRO to toggle through these options. An arrow on the left edge of the LCD
will appear to indicate the selected parameter. Press VALUE +/- to increase or decrease the value of the
parameter.
Note: After pressing METRO, you can also turn the metronome on or off by pressing START / STOP.
BEAT
Select any of the following beat combinations. The metronome will count beats based on this number, and
the selected beat will be displayed in the BEAT TYPE area of the LCD.
0–9
2+3
3+2
3+4
4+3
4+5
5+4
5+6
6+5
6+7
7+6
7+8
8+7
8+9
9+8
Examples:
y If you select "4," the metronome will mark the downbeat (with the red LED and a different "click" sound)
every four beats.
y If you select "5+6," the metronome will mark the downbeat (with the red LED and a different "click"
sound) every five beats then six beats.
RHYTHM
Select any of the following 24 rhythmic figures. The selected rhythmic figure will be played on every beat
counted by the metronome. The exceptions are the clave figures, which are played across two bars (as
opposed to every beat). The RHYTHM INDICATOR of the LCD will display the current rhythmic figure.
CLICK SOUND
Select any of six sounds to serve as the metronome "click." The number of the selected sound will be
displayed in the PARAMETER DISPLAY area of the LCD.
1.
2.
3.
4.
5.
6.
Metronome
Claves
Sticks
Cowbell
Voice Count
Electronic
CLICK VOLUME
Adjust the metronome volume by selecting a setting from "0" (off) to "4" (loud). The volume level will be
displayed in the PARAMETER DISPLAY area of the LCD.
PAD SOUND
Select one of 65 sounds for a pad or attached trigger. To do this, strike the pad or trigger, then use VALUE
+/- to select a sound. (See the PAD SOUNDS section for a list of available sounds.)
4
TRAINING MODE
E-Practice Pad's Training Mode contains a set of exercises designed to help you improve your speed,
stamina, and accuracy as a drummer. This section outlines how to use the different Training Mode features.
To enter Training Mode, press TRAINING then use the VALUE +/- buttons to select the type of exercise,
which will be indicated by an arrow on the right-hand side of the LCD. Available exercises include: Beat
Check, Balance, Pattern, Follow Me, Gradual Up / Down, and Count.
To begin each exercise, select it, then press START / STOP. Press it again to end the exercise.
BEAT CHECK
Beat Check is actually more of a setting than an "exercise." It is always enabled regardless of what other
exercise is selected.
While playing, Beat Check measures the accuracy of your strokes. If you see arrows on the left (pointing to
the right), you are striking the pad "behind the beat" or slightly slower than the actual tempo. If you see
arrows on the right (pointing to the left), you are striking the pad "ahead of the beat" or slightly faster than the
actual tempo. When the "Good" icon in the center is displayed, your strokes are accurately timed.
Use the VALUE +/- buttons to increase or decrease the tolerance of Beat Check (how "strictly" it measures
your accuracy). The higher the number, the stricter the Beat Check will be. The levels are as follows:
L-1: Quarter note (easier timing)
L-2: Quarter note (more exact timing)
L-3: Eighth notes (easier timing)
L-4: Eighth notes (more exact timing)
L-5: Sixteenth notes (easier timing)
L-6: Sixteenth notes (more exact timing)
L-7: Sixteenth note triplets (easier timing)
L-8: Sixteenth note triplets (more exact timing)
BALANCE
This exercise measures the differences in dynamics (i.e. force and,
therefore, volume) between different strokes, especially between your
left and right hands.
In this exercise, the metronome needle acts as a "meter" to indicate the
force of each hit of the pad while the BEAT CHECK meter acts as a
"force check": the "GOOD" icon means a stroke is of equal force to the
previous one. If it is a heavier stroke than before, arrows will appear to
the right (pointing left) to indicate you should hit the pad with less force.
If it is a lighter stroke than before, arrows will appear to the left (pointing
right) to indicate you should hit the pad with more force.
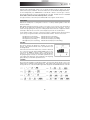
PATTERN
This exercise helps familiarize you with different rhythms. The metronome will play through a series of four
rhythmic figures constituting a pattern (pictured here). Each rhythmic figure is played for two bars before
moving to the next one. The current rhythmic figure will be displayed in the RHYTHM TYPE area of the LCD.
5
FOLLOW ME
This exercise improves your familiarity with rhythmic figures and sense of timing without a metronome. The
metronome will play a rhythmic figure for one, two, four, or eight measures. For the following one, two, four,
or eight measures (respectively), the metronome will be muted while you play the rhythm yourself. This cycle
will repeat until you stop the exercise.
This exercise has four levels of difficulty:
F-1: one-measure cycle
F-2: two-measure cycle
F-3: four-measure cycle
F-4: eight-measure cycle
GRADUAL UP / DOWN
This exercise helps improve your stamina and timing by gradually increasing the tempo of a rhythmic figure
then decreasing it to the original tempo. This cycle will repeat until you stop the exercise.
Assign the original (minimum) tempo of the exercise before beginning by pressing TEMPO / TAP and using
VALUE +/- to adjust the tempo. Assign the maximum tempo of the exercise during the exercise by pressing
TEMPO / TAP when the exercise has reached the highest tempo you want. The rate at which the tempo
increases is as follows:
G-1: The tempo will increase/decrease by 1 BPM each beat.
G-2: The tempo will increase/decrease by 1 BPM every two beats.
G-3: The tempo will increase/decrease by 2 BPM every eight measures.
G-4: The tempo will increase/decrease by 5 BPM every eight measures.
G-5: The tempo will increase/decrease by 5 BPM after every eight
measures you play correctly.
"BPM" is a stands for "beats
per minute" or the number of
quarter note beats that occur
in
one
minute,
which
designates the tempo.
COUNT
This exercise has two modes to help improve your speed.
available options with the VALUE +/- buttons.
After selecting "Count," toggle through all
Fixed Time: You can select a fixed amount of time – 15 seconds, 30 seconds, or 60 seconds – to hit
the pad as many times as you can. After a one-measure count-in, the designated amount of time will
be represented by the metronome needle "meter" (as time remaining). The number of times you hit the
pad will be counted and shown at the top of the LCD.
Fixed Hits: You can select the number of times you need to hit the pad – 200 times, 500 times, or
1,000 times – while you are being timed. After a one-measure count-in, the designated number of
times you need to hit the pad will be represented by the metronome needle "meter" (as hits remaining).
The amount of time you take to hit the pad for the designated number of times will be shown on the
LCD.
After you are done with either of these exercises, you may press VALUE +/- to exit the exercise or START /
STOP to repeat it.
6
OTHER MODES
TIMER
You can set a timer from 1 to 60 minutes to designate a period of time to practice. You can enter other
modes or use all other pad functions while the timer is running. The timer will go off when it runs out. To set
the timer, hold down GAME for three seconds until the "Time" MODE INDICATOR is shown. Use VALUE +/to set the amount of time. Press START / STOP to start the timer.
GAME MODE
In this mode, you can learn to play various rhythms by following visual prompts on the LCD. On the left and
right edges of the LCD – the GAME NOTE DISPLAY – horizontal bars will move from the top of the display to
the bottom, toward the drum icons. When a bar reaches a drum icon, strike the actual pad with your
drumstick. (The bars on the left and right side of the screen represent your left and right hands,
respectively.) When you strike a pad at the correct time, an "L" or "R" will appear next to the drum icon on
the LCD. There are three different ways to play this game in Game Mode. Press GAME / TIMER to toggle
through them:
GAME: Pressing GAME / TIMER once will enter Game Mode. You will be able
to hear the pattern you are supposed to play, but you will not be scored.
GAME 1: Pressing GAME / TIMER a second time will display "GAME 1." You
will not hear the pattern you are supposed to play and you will be scored.
GAME 2: Pressing GAME / TIMER a third time will display "GAME 2." You will
not hear the pattern you are supposed to play and you will be scored. If you
score at least 60 points, the "OK" icon will appear on the LCD and the pattern
will change. (There are 60 patterns for this game, which become more difficult
as you progress.) Press START / STOP to begin the new pattern.
To exit Game Mode, press METRO, TRAINING, or RECORD.
TEMPO MODE
In this mode, you can set the tempo of a pattern. Press TEMPO to enter Tempo Mode then use the VALUE
+/- buttons to adjust it.
You can also enter a tempo by tapping the TEMPO / TAP button. The E-Practice Pad will automatically
detect the new tempo from how quickly you press it. To do this, hold the TEMPO / TAP button for three
seconds. The "TAP" icon will appear at the bottom of the LCD. Tap the pad four times at the new tempo you
want to set. (Note: You can not tap a new tempo while in Game Mode.)
RECORD MODE
In this mode, you can record a pattern of your own to play back. Press RECORD to enter Record Mode.
To start recording, press RECORD (while already in Record Mode). If a pattern is selected, it will play as you
record. You can play along to this pattern if you want, or you can mute the background pattern by setting the
metronome volume to "0." (See CHANGING PARAMETERS for more information.)
To stop recording, press RECORD again or START / STOP.
To play back your recording, press START / STOP while in Record Mode.
SETTINGS
E-Practice Pad will automatically save your current settings (beat and rhythm settings, metronome sound,
tempo values, etc.). To return E-Practice Pad to its original factory settings, press and hold both VALUE +
and VALUE – buttons while turning it on. All previous settings will return to their original state.
7
PAD SOUNDS
01:
02:
03:
04:
05:
06:
07:
08:
09:
10:
11:
12:
13:
14:
15:
16:
17:
18:
19:
20:
21:
22:
Standard Snare
Standard Snare Rim
Rock Snare
Rock Snare Rim
Room Snare
Room Snare Rim
Jazz Snare
Jazz Snare Rim
Funk Snare
Funk Snare Rim
Hip-Hop Snare
Hip-Hop Snare Rim
Electronic Snare 1
Electronic Snare 2
Electronic Snare 3
Electronic Snare 4
Electronic Snare 5
Electronic Snare 6
Electronic Snare 7
Electronic Snare 8
Electronic Snare 9
Electronic Snare 10
23:
24:
25:
26:
27:
28:
29:
30:
31:
32:
33:
34:
35:
36:
37:
38:
39:
40:
41:
42:
43:
44:
Standard Kick
Rock Kick
Room Kick
Jazz Kick
Funk Kick
Hip-Hop Kick
Electronic Kick 1
Electronic Kick 2
Electronic Kick 3
Electronic Kick 4
Standard Tom 1
Standard Tom 2
Standard Tom 3
Standard Tom 4
Standard Tom 5
Standard Tom 6
Electronic Tom 1
Electronic Tom 2
Electronic Tom 3
Electronic Tom 4
Electronic Tom 5
Electronic Tom 6
45:
46:
47:
48:
49:
50:
51:
52:
53:
54:
55:
56:
57:
58:
59:
60:
61:
62:
63:
64:
65:
Standard Hi-Hat Closed
Standard Hi-Hat Pedal
Standard Hi-Hat Open
Rock Hi-Hat Closed
Rock Hi-Hat Pedal
Rock Hi-Hat Open
Standard Hi-Hat Closed/Open
Rock Hi-Hat Closed/Open
Jazz Hi-Hat Closed/Open
Standard Crash
Rock Crash
Standard Ride
Rock Ride
Metronome 1
Metronome 2
Claves 1
Claves 2
Sticks 1
Sticks 2
Cowbell 1
Cowbell 2
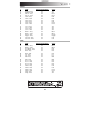
GAME MODE SONGS
EASY
#
NAME
TIME SIGNATURE (BEAT)
STYLE
1
2
3
4
5
Country – Easy
Country – Hard
6/8 Ballad – Easy
6/8 Ballad – Hard
8-Beat Ballad – Easy
4/4
4/4
6/8
6/8
4/4
Country
Country
Ballad
Ballad
Ballad
6
7
8
9
10
8-Beat Ballad – Hard
Pop Bossa – Easy
Pop Bossa – Hard
Funk 1 – Easy
Funk 1 – Hard
4/4
4/4
4/4
4/4
4/4
Ballad
Latin
Latin
Funk
Funk
11
12
13
14
15
8-Beat Pop – Easy
8-Beat Pop – Hard
Ballad – Easy
Ballad – Hard
Blues 1 – Easy
4/4
4/4
4/4
4/4
4/4
Pop
Pop
Ballad
Ballad
Blues
16
17
18
19
20
Blues 2 – Hard
Bossa – Easy
Bossa – Hard
Dance 1 – Easy
Dance 2 – Hard
4/4
4/4
4/4
4/4
4/4
Blues
Latin
Latin
Dance
Dance
20
MEDIUM
#
NAME
TIME SIGNATURE (BEAT)
STYLE
21
22
23
24
25
Big Band – Easy
Big Band – Hard
Dance 2 – Easy
Dance 2 – Hard
Funk 2 – Easy
4/4
4/4
4/4
4/4
4/4
Jazz
Jazz
Dance
Dance
Funk
26
27
28
29
30
Funk 2 – Hard
Funk 3 – Easy
Funk 3 – Easy
Fusion – Easy
Fusion – Hard
4/4
4/4
4/4
4/4
4/4
Funk
Funk
Funk
Fusion
Fusion
31
32
33
34
35
Jazz 1 – Easy
Jazz 1 – Hard
Jazz 2 – Easy
Jazz 2 – Hard
March 1 – Easy
4/4
4/4
4/4
4/4
4/4
Jazz
Jazz
Jazz
Jazz
March
36
37
38
39
40
March 1 – Hard
Reggae – Easy
Reggae – Hard
Latin Jazz – Easy
Latin Jazz – Hard
4/4
4/4
4/4
4/4
4/4
March
Reggae
Reggae
Latin
Latin
TIME SIGNATURE (BEAT)
STYLE
HARD
#
NAME
41
42
43
44
45
March 2 – Easy
March 2 – Hard
Rock Shuffle – Easy
Rock Shuffle – Hard
Metal – Easy
4/4
4/4
4/4
4/4
4/4
March
March
Rock
Rock
Rock
46
47
48
49
Metal – Hard
Pop – Easy
Pop – Hard
R&B – Easy
4/4
4/4
4/4
4/4
Rock
Pop
Pop
R&B
50
51
52
53
54
55
R&B – Hard
Rock 1 – Easy
Rock 1 – Hard
Rock 2 – Easy
Rock 2 – Hard
Samba – Easy
4/4
4/4
4/4
4/4
4/4
4/4
R&B
Rock
Rock
Rock
Rock
Latin
56
57
58
59
60
Samba – Hard
Shuffle – Easy
Shuffle – Hard
Swing – Easy
Swing – Hard
4/4
4/4
4/4
4/4
4/4
Latin
Fusion
Fusion
Jazz
Jazz
21
www.alesis.com
7-51-0282-A