1
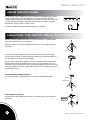
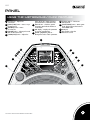
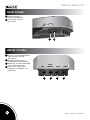
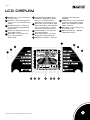
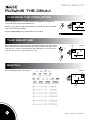
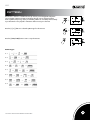
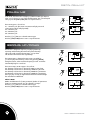
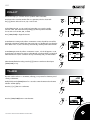
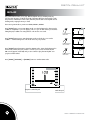
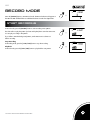
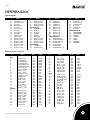
SD1
Practice Pad
www.simmonsdrums.net
FCC Statements
1. C
aution: Changes or modifications to this unit not expressly approved by the party responsible for compliance could void the user’s authority to operate the
equipment.
2. Note: This equipment has been tested and found to comply with the limits for a Class B digital device, pursuant to Part 15 of the FCC Rules. These limits are designed to
provide reasonable protection against harmful interference in a residential installation. This equipment generates, uses, and can radiate radio frequency energy and,
if not installed and used in accordance with the instructions, may cause harmful interference to radio communications. However, there is no guarantee that interference
will not occur in a particular installation. If this equipment does cause harmful interference to radio or television reception, which can be determined by turning the
equipment off and on, the user is encouraged to try to correct the interference by one or more of the following measures:
•Reorient or relocate the receiving antenna.
•Increase the separation between the equipment and receiver.
•Connect the equipment into an outlet on a different circuit.
•Consult an experienced radio/TV technician for help.
SD1
congratulations!
Thank you for purchasing the Simmons SD1 Digital Practice Pad. This pad has been developed to play
like an acoustic drum, but with greater functionality. Before you use the SD1, we recommend that you
read through this manual, so you may get the very best out of your new pad.
Taking Care of Your Digital Drum Pad
Location
• Keep the unit away from direct sunlight, high temperature sources, and excessive humidity to prevent deformation, discoloration, or more serious damage.
Power Supply
•Turn the power switch OFF when the SD1 is not in use.
•The AC adapter should be unplugged if the SD1 is not to be used for an extended period of time.
•Avoid plugging the AC adapter into an outlet that is also powering high-consumption appliances such as electric heaters or televisions. Also avoid using multi-plug adapters, since these can reduce sound quality, cause operation errors and result in
possible damage.
•Turn OFF the SD1’s power switch and all related devices prior to connecting or disconnecting cables to avoid damaging the unit.
Handling and Transport
•Never apply excessive force to controls, connectors, and other parts.
•Unplug cables by gripping the plug firmly. Do not pull on the cables.
•Disconnect all cables before moving the module. •Physical shocks caused by dropping, bumping, or placing heavy objects on the module can result in scratches and more serious damage.
Cleaning
•Clean the module with a dry, soft cloth.
•A slightly damp cloth may be used to remove stubborn grime and dirt.
•Never use cleaners such as alcohol or paint thinner.
•To avoid discoloration, do not place vinyl objects on top of module.
Electrical interference
•The module contains digital circuitry and may cause interference if placed too close to radio or television receivers. If this occurs, move the SD1 further away from the
affected equipment.
Service and Modification
•There are no user-serviceable parts in the drum module.
•Do not attempt to open the drum module or make any change in the circuits or parts of the unit. This would void the warranty.
www.simmonsdrums.net
1
digital drum kit
table of contents
• Summary
Main Features
• Setting Up
Power Supply
Using The AC-Adapter
Using The Batteries
When To Change The Battery
Using The Headphones
Mounting The Digital Drum on a Stand
Precautions When Folding Tripod
External Pedal/Pad Setup
• Panel
Top Panel
Side Panel
Rear Panel
• LCD Display
• Playing The Drum
Changing the Parameters
Time Signature
Rhythm
Click Sound
Click Volume
Changing The Pad Sound
Tempo/Tap
• Training Mode
Changing The Exercise Function
Beat Check
Beat Check Level
Balance
Pattern
Pattern Type
Follow Me
Gradual Up/Down
What is BPM?
Count
Timer
Game
• Record Mode
Start Recording
Stop Recording
Playback
• Parameter Save And Factory Set
Factory Setting
Battery
• Appendix
Pad Sound List
Game Demo List / Song List
2
3
3
3
3
3
3
3
4
4
4
4
5
5
6
6
7
8
8
8
8
9
9
9
9
10
10
10
10
10
11
11
12
12
12
13
13
14
15
15
14
15
16
16
16
17
17
17
SD1 User’s Manual
SD1
summary
The SD1 is an easy-to-use digital drum pad with advanced functions for comprehensive training. The
training functions include beat check, balance, pattern, “Follow-me,” gradual up/down, and count.
Each function contains a unique set of exercises specifically designed to help everything from speed and
accuracy, to stamina and better timing skills. What’s more, the GAME function allows users to practice all
those skills along with backing tracks. Combining the high-quality sounds, multi-function display, and the
extensive training features, the SD1 is perfect for professional and amateur drummers alike.
Main Features
• 65 pad sounds and 6 metronome sounds
• 24 rhythm types
• Beat check training
• Pattern training
• Stroke balance training
• “Follow-me” training, for building sense of timing
• Gradual up/down training, for developing your tempo feels
• Count training
• Game with 60 levels, for practicing built-in patterns
• Record and playback
• Phone output, for connecting stereo headphones
• Comes with two foot switches, for bass drum and hi-hat performance.
SETTING UP
Power supply
The SD1 runs either on 4 AA batteries, or the included 9V AC adapter. Follow the
instructions below for whichever power source you intend to use.
Using the AC-Adapter
Connect the power adapter to the DC jack located on the rear panel of the unit, and plug
the AC power adapter into an AC power outlet.
Do not use any adapter other than the one provided. The technical specifications of the
adapter are 9V DC output, 500mA, center-positive type.
AC Power Socket
AC powe r
s oc k e t
9V
Using Batteries
Press down and slide the lid off of the battery compartment located on the bottom of
the unit.
Place the batteries into the tray, making sure that their positive and negative sides match
the [+] and [–] marks on the unit.
When to Change the Battery
The battery LOW indicator at the lower right of the display will flash when the battery
power drops. Insufficient battery power lowers the volume level of the mini speaker and
causes unstable operation. Replace the battery as soon as possible.
Note: We recommend using alkaline batteries.
www.simmonsdrums.net
*The batteries
estimated
is 4
*The estimated
life span life
of thespan
batteries
is 4hours.
hours
3
digital drum kit
USING HEADPHONES
An optional set of stereo headphones can be connected to the headphone jack, located
on the rear panel. When a pair of headphones is connected to the jack, the internal
speakers of the unit will switch off automatically, allowing for private practice. If you want
to use an external sound system, the headphone jack can also be used to connect the
digital drum to a stereo system or mixing console.
K IC K
H I- H AT
C ONT R OL
H I- H AT
P H ONE S
Turn the power OFF on all equipment before making any connections.
MOUNTING THE DIGITAL DRUM ON A STAND
The SD1 can fit any standard snare stand, or it can be screwed on to any 8mm cymbal
stand via the threaded section on its underside.
Whichever stand you use, make sure that the tripod legs are open enough to keep the
stand secure.
11.8 in (30 cm)
If using a snare stand, simply mount the SD1 in the claws where you would normally
place the snare, and then close them tight enough until they grasp the unit firmly but are
not squeezing it hard enough to do any damage.
If using an 8mm cymbal stand, attach the wing screw and washer in the order shown in
the figure. Attach the pad’s threaded section to the screw. Turn it until the screw is just
about all the way in; then adjust the angle of the pad and tighten the wing screw from the
side to the stand. Do not turn the pad forcefully after the screw is in all the way. Doing so
may damage the screw.
Precautions When Folding the Tripod
Use care when folding tripod legs. Fingers can be pinched while handling stands.
Wingscrew
Tighten the knob
External Pedal / Pad Setup
Connect the Kick and/or Hi-Hat pedals to their corresponding inputs on the rear panel
with cables.
K IC K
H I- H AT
C ONT R OL
H I- H AT
P H ONE S
C
K IC K
Kick
4
SD1 User’s Manual
SD1
Panel
using the metronome/click feature
11. Volume knob – Adjusts the
sound level.
22. [START/STOP] button – Starts or stops the metronome.
33. [RECORD] button – Enters
record mode.
44. [METRO] button – Selects pad sounds and sets the metronome.
55. [TEMPO/TAP] button – Adjusts the tempo (from 30 to 240). Hold and press this button to enter TAP mode.
66. Beat Indicator – Flashes in quarter note timing. Red indicator flashes on accent beats.
77. LCD display – Displays the parameter for current operating item.
88. [VALUE +]&[VALUE -] buttons – Changes the value of each parameter.
99. [Training] button – Selects the
training mode.
110
0. [GAME/TIMER] button – Enters game mode. Hold and pressthis button to enter TIMER mode.
111
1. Drumpad
112
2. Mini speaker –Plays the
metronome sound
7
6
5
4
8
9
3
10
2
11
www.simmonsdrums.net
11
12
5
digital drum kit
SIDE PANEL
11. 9V Power Connection –
Connect 9V adapter here.
22. Power Switch – Turns the
power on/off
9V
POWER
ON
OFF
KICK
1
HI-HA
CONTRT
OL
HI-HAT
2
REAR PANEL
11. Kick jack – Connect included pedal or other controller to play kick.
drums. (Mono)
2
2. HI-HAT Control jack - Connect included pedal for hi-hat transitions.
33. HI-HAT jack – Connect included pedal crash or cymbal pads to unit.
4 Phone output – Supports stereo 4.
headphones or an amplifier as an output device.
KICK
1
6
HI-HAT
CONTROL
2
HI-HAT
3
PHONES
4
SD1 User’s Manual
SD1
LCD Display
11. Beat/Bar Count – Shows which beat of the bar you’re on.
2
2. Beat Count – Shows how many beats are in your one or two bar metronome patterns.
3
3. Beat Check Indicators – Shows how you are performing against the Beat Check function.
4
4. Indicators for Tempo, Record, Score, Timer, & Game modes.
5
5. OK indicator – Shows that you can
move to the next level in
Game 2 mode.
66. Drum/Temp/Training/Game Mode Parameters – Displays drum, tempo, timer, score, or level information, depending on which mode you are in.
77. Metronome – In most modes, a simple metronome needle is used to mark the time. In counting mode, it is used as an indicator to track your progress.
88. Parameter Display – Arrows point to the current parameter.
99. Drum & Bar indicators – Shows the dropping bars in the game mode.
10 Beat Divisions Indicators – Shows the
10.
beat division set in the rhythm parameter.
111
1. Drum Indicators – Shows which drum sounds are active (pad, kick, and/or hi-hat). Each one flashes to indicate when it is being hit.
112
2. TAP Indicator – Shows when you are in Tap Tempo mode.
13
13 Battery Level Indicator – Will flash when batteries are low.
4
3
5
6
2
7
1
8
www.simmonsdrums.net
9
10
11
12
13
9
7
digital drum kit
PLAYING THE DRUM
CHANGING THE PARAMETER
Press the [METRO] button to select each parameter, including the beat, rhythm, click
sound, click volume, pad sound, and metronome.
Press the [+] or [-] buttons to adjust the parameter for each item. The arrow on the LCD
will point to the selected parameter.
Press the [START/STOP] button to turn the metronome on and off.
TIME SIGNATURE
T ype
Pick the time signature for the metronome by choosing from the list of beat counts shown
below. The bottom note value for all beat counts is always a quarter note. Choose from
single bars of 0 – 9 beats, or the following two-bar combinations: 2+3, 3+2, 3+4, 4+3,
4+5, 5+4, 5+6, 6+5, 6+7, 7+6, 7+8, 8+7, 8+9, 9+8.
Nu m be r
T ype
Nu m be r
RHYTHM
Nu m be r
There are 24 rhythm styles to choose from.
Nu m be r
T ype
T ype
8
SD1 User’s Manual
SD1
CLICK
SOUND
There
are 6 click sounds
to choose from:
• 1/Metronome
• 2/Claves
• 3/Sticks
• 4/Cowbell
• 5/Voice Count
• 6/Electronic
11
1
Click Volume
Adjust Volume from 0-4
22
2
CHANGING THE PAD SOUND
33
Press the METRO button to enter pad sound selection mode.
There are 65 pad sounds. Press the [+] or [-] buttons to select the sound.
3
TEMPO/TAP
B E AT
B E AT
B E AT
B E AT
Press [TEMPO] to enter Tempo mode. The LCD temporarily displays the tempo value
with a tempo icon for three seconds. Press the [+]/[-] buttons to adjust the tempo value.
Minimum BPM is 30. Max is 240.
B E AT
You can also set the metronome tempo by hitting the pad and briefly holding down the
[TEMPO] button for three seconds to enter tap mode while the “TAP” icon flashes. Hit the
pad 4 times to set the tempo. The value is determined by the interval of the last two hits.
B E AT
B E AT
B E AT
B E AT
B E AT
T E MP O
T E MP O
T E MP O
T E MP O
T E MP O
T E MP O
T E MP O
T E MP O
T E MP O
T E MP O
Note: In Game mode, tap function is disabled.
B E AT
B E AT
B E AT
B E AT
B E AT
P re s s th e bu tt on for 3 s e c on ds
P re s s th e bu tt on for 3 s e c on ds
Press thePbutton
for 3 seconds
re s s th e bu tt on for 3 s e c on ds
P re s s th e bu tt on for 3 s e c on ds
P re s s th e bu tt on for 3 s e c on ds
T E MP O
T E MP O
T E MP O
T E MP O
T E MP O
T AP
T AP
T AP
T AP
T AP
www.simmonsdrums.net
9
digital drum kit
Training Mode
This function has a unique set of exercises specifically designed to help build speed, accuracy, stamina,
and better timing skills.
changing the exercise function1
Press the [TRAINING] button to select the desired function.
21
Press the [+] or [-] buttons to select the exercise item. The arrow on the LCD points to the
selected function. Press the [START/STOP] button to start or stop the exercise.
beat check
The Beat Check mode is used with all other training modes. Regardless of how the
metronome sound is played in other training modes, the rhythm will be checked
according to the beat check setting. The beat check result appears on the display.
Beat Check Level
• L-1/Quarter note (relatively easier timing)
• L-2/Quarter note (more exact timing)
• L-3/8th note (relatively easier timing)
• L-4/8th note (more exact timing)
• L-5/16th note (relatively easier timing)
• L-6/16th note (more exact timing)
• L-7/16th note triplets (relatively easier timing)
• L-8/16th note triplets (more exact timing)
1
21
3
2
2
34
1
3
3 45
2
3
4
45
5
5
4
balance
This function checks the differences in playing dynamics between the left and right hands
(or one hand).
5
Press the [START/STOP] button to start or stop the exercise.
10
SD1 User’s Manual
SD1
pattern
This function is based on a traditional warm up exercise, and is designed to help learn
various rhythmic patterns. The metronome plays through a series of beats and beat
division patterns. Play along, and try to match the patterns as consistently and accurately
as possible. Each one is played for 2 measures before moving on to the next.
Press the [+] or [-] buttons to select the pattern type for this exercise.
Press the [START/STOP] button to start or stop the exercise.
GOOD
Pattern Type:
P-1
P -2
P-3
P-4
P-5
P-6
P-7
P-8
www.simmonsdrums.net
11
digital drum kit
follow me
In this mode, the metronome sound plays a pattern and then goes silent for
a bar or more, doing so in one of the selected patterns. This cycle will repeat
until you press the [START/STOP] button to stop the exercise.
There are 4 types to choose from:
F-1: 1 measure cycle, (this means one measure will play at normal
volume & one measure will play muted)
F-2: 2 measure cycle
F-3: 4 measure cycle
F-4: 8 measure cycle
Press the [+] or [-] buttons to select the exercise type.
Press the [START/STOP] button to start or stop the exercise.
graDUAL UP/DOWN
This function is designed to improve your playing stamina by
increasing and decreasing the metronome speed. The tempo
will increase until it reaches the max tempo you set, then it
will decrease until it reaches the original tempo.
The starting tempo is whatever the metronome is set at before
you start to play. The max tempo can be set by pressing [TEMPO]
during the exercise, when it reaches the speed you want. It will then
automatically begin to count down.
There are 5 tempo variation types to choose from:
G-1 The tempo will increase or decrease by 1BPM on every beat.
G-2 The tempo will increase or decrease by 1 BPM every two beat.
G-3 The tempo will increase or decrease by 2 BPM every 8 measures.
G-4 The tempo will increase or decrease by 5 BPM every 8 measures.
G-5 If you play correctly for eight measures the drum will acknowledge
this and advance 5 BPM faster.
T E MP O
What is BPM?
BPM is an abbreviation for “beats per minute” (number of quarter-note
beats in a one-minute period). It is also referred to as tempo.
Press the [+] or [-] buttons to select the exercise type.
Press the [START/STOP] button to start or stop the exercise
12
SD1 User’s Manual
SD1
COUNT
This function helps you count the amount of pad hits within a fixed time.
Fixed time mode counts the number of hits in a given time, which is chosen with
the [+] [-] buttons. Choose from 15, 30, or 60 seconds.
In fixed hitting amount, you can count how long it takes you to reach a specific
amounts of hits. Choose the amount by hitting [+] button beyond the fixed time
choices. Choose from 200, 500, or 1000.
Press [START/STOP] to begin the exercise.
In Fixed-Time Accounting mode, after a one-measure count-in, the pad hit count will be
displayed on the LCD in real-time. The metronome section on the LCD will count down the
time. When it runs out, the count will stop automatically, and the pad hit value will flash.
In Fixed-Hitting Count mode, after a one-measure count-in , a clock will appear to count
down the time. The metronome section on the LCD will count down the hits you have left. When the time runs out, the countdown will stop automatically and your time will flash.
When the LCD flashes the value, press the [+] [-] buttons to exit this mode and press
[START/STOP] to stop.
TIMER
The timer can be set from 1 to 60 minutes, allowing you to practice for whatever period
of time you determine.
T IME R
Briefly hold down the [GAME] button for 3 seconds to enter the Timer mode. The Timer
indicator will then light up.
Press the [+] or [-] buttons to set the time.
T IME R
Press the [START/STOP] button to start the timer.
www.simmonsdrums.net
13
digital drum kit
GAME
The game feature teaches you to play different rhythms along to backing tracks, by
following bars dropping on the left and right of the LCD. When the dropping bars reach
the pad icons at the bottom of the screen, strike the pad. The SD1 has 61 rhythms and 31
backing tracks, ranging from easy to hard.
There are 3 game modes to practice in: GAME, GAME1, GAME2.
Press [GAME] button once to enter Game mode. In it, the backing track’s drum sound is
audible to compliment to your own playing. This is so you can hear where you should be
hitting the pad, in addition to seeing the bars. This mode is not scored.
GA ME
ME
GAGA
ME
Press the button for
the first time
Press [GAME] button twice to enter the Game1 mode, in which only your sound is
audible –– not the backing track. This mode will score your practice.
G A ME 1
G A GA
MEME
1
G A ME 1
Press the button for
the second time
Press [GAME] button three times to enter the Game2 mode. Again, the backing track’s
drum sound is muted, and your practice is scored. If your score is more than 60, the
OK icon will appear on the LCD, and you can continue to play the next rhythm. Your
progress will be tracked.
GA ME 2
G A ME 1
GA ME 2
GAGA
MEME
2
Press the button for
the third time
GA ME 2
G A ME 1
Press [METER], [TRAINING], or [RECORD] buttons to exit the Game mode.
GA ME 2
Prepare to strike the pad
14
Strike the pad
SD1 User’s Manual
SD1
Record Mode
R E C OR D
R E C OR D
R E C OR D
Press the [RECORD] button to enter Record mode. The Record indicator will appear on
the LCD. The LCD will flash if the recorded data has been stored to the digital drum.
START RECORDING
R E C OR D
R E C OR D
In Record mode, press the [RECORD] button to start recording a new pattern.
R E C OR D
The drum will now play the pattern (i.e. beat and rhythm) that is set in the metronome.
You can play according to this pattern.
If you’d like to mute the background pattern, set the metronome’s volume to 0
before recording.
Stop Recording
In Recording mode, press the [START/STOP] button to stop the recording.
R E C OR D
R E C OR D
R E C OR D
Playback
In Record mode, press the [START/STOP] button to play back the user pattern.
www.simmonsdrums.net
15
digital drum kit
Parameter Save and Factory
Settings
The digital drum saves your current settings for beat/rhythm type, click/pad sound,
tempo value, and more.
factory setting
The digital drum will reset to the factory settings if you press both the [+] and [-] buttons
before turning the power on.
Battery
When using the battery to supply power, the LCD will display the battery level indicator.
When full, the system will perform at its best.
The battery level indicator at the lower right of the display will be lit when the battery
power drops. The system will work normally, but note that insufficient battery power may
cause unstable operation.
When the battery level indicator is empty and begins to flash, please replace
the batteries.
16
SD1 User’s Manual
SD1
Appendix
Pad Sound List
#
01
02
03
04
05
06
07
08
09
10
11
12
13
14
15
16
17
18
Name
#
Standard snare
Standard snare rim
Rock snare
Rock snare rim
Room snare
Room snare rim
Jazz snare
Jazz snare rim
Funk snare
Funk snare rim
Hiphop snare
Hiphop snare rim
Electronic snare1
Electronic snare2
Electronic snare3
Electronic snare4
Electronic snare5
Electronic snare6
Name
19
Electronic snare7
20
Electronic snare8
21
Electronic snare9
22
Electronic snare10
Kick (Bank 12)
23
Standard kick
24
Rock kick
25
Room kick
26
Jazz kick
27
Funk kick
28
Hiphop kick
29
Electronic snare1
30
Electronic snare2
31
Electronic snare3
32
Electronic snare4
Tom (Bank14)
33
Standard tom1
34
Standard tome2
#
Name
35
Standard top
36
Standard top
37
Standard top
38
Standard top
39
Electronic top
40
Electronic top
41
Electronic top
42
Electronic top
43
Electronic top
44
Electronic top
CRASH (Bank 18)
45
Standard hihat cl
46
Standard hihat ped
47
Standard hihat Op
48
Rock hihat Cl
49
Rock hihat ped
50
Rock hihat Op
51
Standard hihat cl_op
#
Name
52
Rock hihat cl_op
53
Jazz hihat cl_op
54
Standard crash
55
Rock crash
56
Standard ride
57
Rock ride
METRO (bank 20)
58
METRONOME-1
59
METRONOME-2
60
CLAVES-1
61
CLAVES-2
62
STICK-1
63
STICK-2
64
COWBELL-1
65
COWBELL-2
Game Demo List / Song List
#
Easy
1
2
3
4
5
6
7
8
9
10
11
12
13
14
15
16
17
18
19
20
Medium
21
22
23 24
25
26
27
28
29
30
Name
Beat
Style
Country_easy
County_hard
6/8 Ballad_easy
6/8 Ballad_hard
8 beat ballad_easy
8 beat ballad_hard
Pop Bossa_easy
Pop Bossa_hard
Funk_1_easy
Funk_1_hard
8 beat pop_easy
8 beat pop_hard
Ballad_easy
Ballad_hard
Blues_1_easy
Blues_1_hard
Bossa_easy
Bossa_hard
Dance_1_easy
Dance_1_hard
4/4
4/4
6/8
6/8
4/4
4/4
4/4
4/4
4/4
4/4
4/4
4/4
4/4
4/4
4/4
4/4
4/4
4/4
4/4
4/4
Country
Country
Ballad
Ballad
Ballad
Ballad
Latin
Latin
Funk
Funk
Pop
Pop
Ballad
Ballad
Blues
Blues
Latin
Latin
Dance
Dance
Big band_easy
Big band_hard
Dance_2_easy
Dance_2_hard
Funk_2_easy
Funk_2_hard
Funk_3_easy
Funk_3_hard
Fusion_easy
Fusion_hard
4/4
4/4
4/4
4/4
4/4
4/4
4/4
4/4
4/4
4/4
Jazz
Jazz
Dance
Dance
Funk
Funk
Funk
Funk
Fusion
Fusion
www.simmonsdrums.net
#
31
32
33
34 35
36
37
38
39
40
Hard
41 42
43
44
45
46
47 48
49
50
51
52
53
54 55
56
57
58
60
61
Name
Beat
Style
Jazz_1_easy
Jazz_1_hard
Jazz_2_easy
Jazz_2_hard
March_1_easy
March_1_hard
Reggae_easy
Reggae_hard
Latinjazz_easy
Latinjazz_hard 4/4
4/4
4/4
4/4
4/4
4/4 4/4
4/4
4/4
4/4
Jazz
Jazz
Jazz
Jazz
March
March
Reggae
Reggae
Rock
Rock
March_2_easy
March_2_hard
Rock Shuffle_easy
Rock Shuffle_hard
Metal_easy
Metal_hard
Pop_easy
Pop_hard
R&B_easy
R&B_hard
Rock_1_easy
Rock_1_hard
Rock_2_easy
Rock_2_hard
Samba_easy
Samba_hard
Shuffle_easy
Shuffle_hard
Swing_easy
Swing_hard
4/4
4/4
4/4
4/4
4/4
4/4
4/4
4/4
4/4
4/4
4/4
4/4
4/4
4/4
4/4
4/4
4/4
4/4
4/4
4/4
March
March
Rock
Rock
Rock
Rock
Pop
Pop
R&B
R&B
Rock
Rock
Rock
Rock
Latin
Latin
Fusion
Fusion
Jazz
Jazz
17
digital drum kit
One (1) Year Limited Warranty
Subject to the limitations set forth below, Simmons® hereby represents and warrants that the components of this product shall be free from defects in workmanship and
materials, including implied warranties of merchantability or fitness for a particular purpose, subject to normal use and service, for one (1) year to the original owner
from the date of purchase.
Retailer and manufacturer shall not be liable for damages based upon inconvenience, loss of use of product, loss of time, interrupted operation or commercial loss or
any other incidental or consequential damages including but not limited to lost profits, downtime, goodwill, damage to or replacement of equipment and property, and
any costs of recovering, reprogramming, or reproducing any program or data stored in equipmentthat is used with Simmons® products. This guarantee gives you specific
legal rights. You may have other legal rights which vary from stateto state. Some states do not allow limitations on how long an implied warranty lasts, so the above
limitation may not apply to you.
California Prop 65 Warning
This product may contain a chemical[s] known to the state of California to cause cancer, birth defects, or other reproductive harm.
Simmons
P.O. Box 5111
Thousand Oaks, CA 91359-5111
All trademarks and registered trademarks mentioned herein are recognized as the property of their respective holders.
Made in China
0908-8199.01
18
SD1 User’s Manual