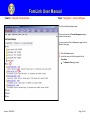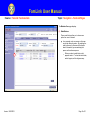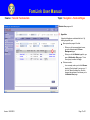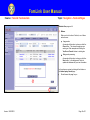
1
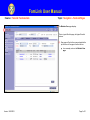
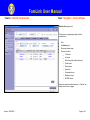
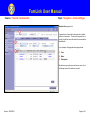
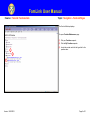
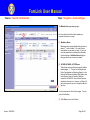
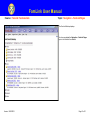
FamLink User Manual
Course: FamLink Fundamentals
Topic: Navigation – FamLink Pages
Overview
You access many different pages while working in FamLink. You’ll find that the design of FamLink has a consistent functionality, a “look and feel” that makes it
easy for you to create and access information on the pages.
In this topic of the FamLink User Manual, we take a closer look at the different elements or “parts” of a typical FamLink page and how they work. You will learn
how to identify the page you are on and how to use the various buttons, lists, tabs, check boxes, text boxes, and other features of FamLink pages that will help
you with your daily work.
Workflow
Because you use navigation throughout FamLink, it is not specific to any particular process.
Version: 04/03/2012
Page 1 of 21
FamLink User Manual
Course: FamLink Fundamentals
Topic: Navigation – FamLink Pages
This is the FamLink Desktop, your starting point.
We are going to use the Maintain Case page to
facilitate our discussion of FamLink pages.
Let’s open the Maintain Case page for one of our cases.
(1) Click the Cases expando.
(2) Locate the case, and click the hyperlink for the
Case Name.
The Maintain Case page opens.
Version: 04/03/2012
Page 2 of 21
FamLink User Manual
Course: FamLink Fundamentals
Topic: Navigation – FamLink Pages
The Maintain Case page displays.
1
This is a typical FamLink page, with typical FamLink
features.
(1) Every page in FamLink has a name located at the
top left corner of the page in the blue title bar.
In our example, we’re on the Maintain Case
page.
Version: 04/03/2012
Page 3 of 21
FamLink User Manual
Course: FamLink Fundamentals
Topic: Navigation – FamLink Pages
Maintain Case page cont’d
The features on a typical page might include a
combination of:
Tabs
An Options pane
Group and header boxes
Common functions:
Text boxes
List boxes
Date boxes (also called text boxes)
Check boxes
Radio buttons
Hyperlinks
Command buttons
Mandatory boxes
AFCARS boxes
Pages are sometimes called windows. In FamLink, we
always refer to them as pages.
Version: 04/03/2012
Page 4 of 21
FamLink User Manual
Course: FamLink Fundamentals
Topic: Navigation – FamLink Pages
Maintain Case page cont’d
A page may consist of several tabs. Tabs give you
views of different sets of data for the main page. Think
of their function as being the same as notebook tabs.
There are five tabs on this page:
General
Address
Collaterals
File Location
Closing History
The first tab is the default tab that FamLink displays
when you open the page.
Clicking each tab allows you to see different information
for this case.
For example, clicking the Address tab displays
address information for the case.
Clicking the Collaterals tab displays all collaterals
associated with the case.
Version: 04/03/2012
Page 5 of 21
FamLink User Manual
Course: FamLink Fundamentals
Topic: Navigation – FamLink Pages
Maintain Case page cont’d
1
2
A group box is a frame that encloses a set of related
options or information. The name of the group box is
usually in light blue and a thin black line surrounds the
related items.
In our example, this page has three group boxes:
3
(1) Case
(2) Basic
(3) Participants
Sometimes a group box does not have a name, but it
will always have a thin black line around it.
Version: 04/03/2012
Page 6 of 21
FamLink User Manual
Course: FamLink Fundamentals
Topic: Navigation – FamLink Pages
Maintain Case page cont’d
Let’s look at the Options pane.
Many pages in FamLink have an area to the left called
the Options pane. Here you find hyperlinks to certain
Actions, Checklists, or Documents related to the work
you are doing on that page. The Options pane content
changes according to the page you are on.
In our example, the Options pane displays these
hyperlinks under the Actions heading:
Delink Intake.
Submit a Case Closure Request.
Relationship Matrix.
Under the Checklist heading, these hyperlinks display:
Adoption Support Case Closure Checklist.
CPS Case Closure Checklist.
FRS Case Closure Checklist.
Investigation/Case Closure Checklist.
CFWS Cases Close when a Permanent Plan
is Completed Checklist.
Under the Documents heading, a hyperlink to the
Family Face Sheet form displays.
Version: 04/03/2012
Page 7 of 21
FamLink User Manual
Topic: Navigation – FamLink Pages
Course: FamLink Fundamentals
Maintain Case page cont’d
Let’s discuss the header group box in FamLink.
Most pages in FamLink have a header group box at the
top of the page.
The header is a group box that displays basic
information for the work you are doing on that page,
usually the case name and case ID number.
In our example, the Case header box displays:
The case name, including the last name
(Beacon), first name (Linda Sue), and MI
(blank).
The case ID# (1406).
The date the case was created (03/14/2008).
The current status of the case (Open).
If the page has several tabs, the header box remains
the same from tab to tab.
1
Now, let’s use the Provider Maintenance page to look
at list and text boxes. First, we have to return to the
Desktop.
(1) Click Close to return to the Desktop.
Version: 04/03/2012
Page 8 of 21
FamLink User Manual
Course: FamLink Fundamentals
Topic: Navigation – FamLink Pages
The FamLink Desktop displays.
To open a Provider Maintenance page:
(1) Click your Providers expando.
(2) Click the My Providers expando.
(3) Locate the provider and click the hyperlink for the
provider name.
1
2
3
Version: 04/03/2012
Page 9 of 21
FamLink User Manual
Topic: Navigation – FamLink Pages
Course: FamLink Fundamentals
The Provider Maintenance page displays.
Let’s start with the General tab.
Throughout FamLink, you find navigational elements for
commonly used functions.
(1) Text Boxes
These are user-entered boxes that can be
limited to a few characters or large enough for a
significant amount of text.
1
2
A text box may have a scroll bar that lets you
view text that’s not showing in the box.
(2) List Boxes
One type of list box is sometimes referred to as
a dropdown list. These boxes have a down
arrow on the right-hand side that you must click
before you can see a list of options. Click the
list box, select your choice by highlighting it,
and click again.
Version: 04/03/2012
Page 10 of 21
FamLink User Manual
Course: FamLink Fundamentals
Topic: Navigation – FamLink Pages
The Provider Maintenance page displays the
Characteristics tab.
We have moved to the Characteristics tab to continue
our review of list boxes.
(1) List Boxes continued
1
Another type of list box displays a portion of the
list along with a scroll bar to the right to access
more choices than what is visible on screen.
In the example shown, highlight your choice
and click the Add button next to the box. In
our example, this “moves” the choice from
the Possible Values list to the Selected
Values list to the right.
For more than one selection, you can
repeat the steps above or you can hold
down the CTRL key on your keyboard to
highlight your choices. When you click the
Add button, all your choices move to the
Selected Values list.
Version: 04/03/2012
Page 11 of 21
FamLink User Manual
Topic: Navigation – FamLink Pages
Course: FamLink Fundamentals
Characteristics tab cont’d
(1) If you want to move all the choices in the list to the
Selected Values list, you can click the Add All
Values button.
(2) To remove values from the Selected Values list,
highlight the value and click Remove.
(3) If you want to remove all values from the Selected
Values list, click Remove All.
1
2
Now, let’s take a look at date and check boxes.
3
We will do so on the Person Management page. Let’s
first return to the Desktop.
(4) Click Close.
The FamLink Desktop will display.
4
Version: 04/03/2012
Page 12 of 21
FamLink User Manual
Course: FamLink Fundamentals
Topic: Navigation – FamLink Pages
The FamLink Desktop displays again.
We are going to use the Person Management page to
continue our discussion.
You can access the Person Management page from the
Maintain Case page.
(1) Click the Cases expando.
(2) Locate the case, and click the hyperlink for the
Case Name.
The Maintain Case page opens.
1
2
Version: 04/03/2012
Page 13 of 21
FamLink User Manual
Course: FamLink Fundamentals
Topic: Navigation – FamLink Pages
The Maintain Case page displays.
To access the Person Management page:
(1) Click the hyperlink for a participant’s name.
1
Version: 04/03/2012
Page 14 of 21
FamLink User Manual
Topic: Navigation – FamLink Pages
Course: FamLink Fundamentals
The Person Management page displays.
(1) Date Boxes
You can type directly in these boxes, also
referred to as date text boxes.
When you click this box, you get a yellow note
telling you what date format to use. There is no
need to type in forward slashes, “/”. FamLink
does that for you.
2
1
You also can right-click the box to display a
calendar. Use the calendar arrows to go from
month to month, or year to year, and then you
click the date.
The date box is the only place in FamLink where you
right-click to perform a function. In all other instances,
using right-click displays the standard Windows rightclick menu.
(2) Check Boxes
3
When you select a check box, you are selecting
the item or option next to it. A check symbol
appears inside. To clear the check box and
remove the check mark, just select the box
again.
Now let’s look at the radio buttons on the Maintain
Case page.
(3) Click Close to return to the Maintain Case page.
Version: 04/03/2012
Page 15 of 21
FamLink User Manual
Course: FamLink Fundamentals
Topic: Navigation – FamLink Pages
The Maintain Case page displays.
(1) Radio Buttons
These round buttons allow you to choose one
option from a set of choices.
In our example, only one person on this case
can be the reference person. By selecting the
radio button next to the name of the female
head of household, you are selecting that
person as the reference person.
1
Version: 04/03/2012
When you select a radio button, a dot
appears inside it. To clear the radio button,
select it again, and the dot goes away.
Page 16 of 21
FamLink User Manual
Topic: Navigation – FamLink Pages
Course: FamLink Fundamentals
Maintain Case page cont’d
(1) Hyperlinks
A hyperlink displays as underlined blue font. By
clicking a hyperlink, you:
Open up another page in FamLink.
1
When you click a case participant name,
you open that participant’s Person
Management page.
When you click the Maintain hyperlink, you
open a Relationship Entry page. This is
the only way to access that page.
Perform an action.
In our example, when you click the Remove
hyperlink, FamLink asks if you are sure. If
you click Yes in the dialog box, FamLink
removes the participant, and returns you to
the Maintain Case page.
Version: 04/03/2012
Page 17 of 21
FamLink User Manual
Topic: Navigation – FamLink Pages
Course: FamLink Fundamentals
Maintain Case page cont’d
(1) Buttons
When you click a button in FamLink, one of these
actions occurs:
A page action.
An example of this action is when you click the
Close button. This closes the page you are
working on. Other examples are clicking the
Yes, No and Cancel buttons in a dialog box.
Background processing.
An example of this action is when you click the
Save button. In the background, FamLink
updates its database with your new information.
Let’s continue our review by looking at the buttons on
the Intake Inquiry Search page.
We will access this page for you.
1
1
Version: 04/03/2012
Page 18 of 21
FamLink User Manual
Topic: Navigation – FamLink Pages
Course: FamLink Fundamentals
The Intake Inquiry Search page displays.
(1) Buttons cont’d
Another action that can occur when you click a
button in FamLink is:
Data transfer.
An example of this action is when you click the
Continue button. It pulls your returned results
from a search into a specific work process, such
as an intake or investigation.
In our example, we clicked the Add/Edit
button on the Intake page to access the
Intake Inquiry Search page. Our search
returned one name (Frump, Horace), which
displayed in the Persons Returned group
box.
When you click the Select hyperlink, the
participant’s name displays in the
Participants group box.
When you click the Create button, you
access the Intake Participant page, to
create a participant.
1
When you click Continue at the bottom of
the page, the name in the Participants
group box transfers to the Participants tab
on the Intake page.
We’re going to return to the Maintain Case page to
continue our discussion.
Version: 04/03/2012
Page 19 of 21
FamLink User Manual
Topic: Navigation – FamLink Pages
Course: FamLink Fundamentals
The Maintain Case page displays again.
Let’s look at how FamLink collects mandatory or
required information on a page.
1
(1) Mandatory Boxes
Mandatory boxes are shaded light blue and have an
asterisk “*” next to the label. You must fill these
boxes before you can save your work. If you try to
close the page without completing this information,
FamLink displays a Validation Errors dialog box
telling you which box or boxes you missed.
2
(2) AFCARS, NCANDS, & NYTD Boxes
3
These boxes have a red label and a symbol called a
double-dagger, “‡.” They are for the Adoption and
Foster Care Analysis and Reporting System, for the
National Child Abuse and Neglect Data System, and
for the National Youth in Transition Database
required for all SACWIS. Some of these boxes are
mandatory, others are not. However, not filling all of
them out may prevent you from closing the case at a
later time.
You have reviewed all of the FamLink pages. You can
return to the Desktop.
(3) Click Close to return to the Deskto.
Version: 04/03/2012
Page 20 of 21
FamLink User Manual
Course: FamLink Fundamentals
Topic: Navigation – FamLink Pages
The FamLink Desktop displays.
You have completed the Navigation – FamLink Pages
topic in the FamLink User Manual.
Version: 04/03/2012
Page 21 of 21