1
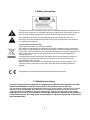
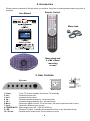
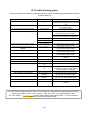
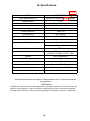
Contents
1.
Safety Information
2
2.
Safety Instructions
2
3.
Digital Switch over
3
4.
Accessories
4
5.
User Controls
4
6.
Remote Control
5
7.
Connections
7
8.
Menu Operation
9
First Time Installation
10
Tuning
11
Firmware upgrade
12
Cam Module
13
Recording
14
Picture menu
15
Sound Menu
16
Time Menu
16
Option Menu
17
Lock Menu
17
9.
EPG (Electronic Programme Guide ).
18
10.
Digital Radio
18
11.
Teletext (Analog)
19
12.
Teletext (Digital)
19
13.
Media
20
PVR Record
21
PVR Playback
22
14.
Wall Mounting
24
15.
Trouble Shooting Guide
25
16.
Specifications
26
1. Safety Information
The lightning flash with arrowhead symbol, within an equilateral triangle, is intended to alert
the user to the presence of un-insulated “dangerous voltage” within the products enclosure
that may be of sufficient magnitude to constitute a risk of electric shock to the persons.
The exclamation point within an equilateral triangle is intend to alert the user to the
presence of important operating and maintenance (servicing) instructions in the literature
accompanying the appliance.
Correct disposal of this Product
(Waste Electrical & Electronic Equipment (WEEE)
The crossed out “Wheelie bin” is intended to show that this appliance must not be placed
with ordinary household waste at the end of its useful life. To prevent possible harm to the
environment or human health from uncontrolled waste disposal, please keep separate from
other household waste and recycle it responsibly to promote the sustainable reuse of
material resources.
Household users should contact either the retailer where you purchased the product, or
their local government office for details of where and how you can take this item for
environmentally safe re-cycling.
Business users should contact their supplier and check the terms and conditions of the
purchase contract. This product must not be mixed with other commercial wastes for
disposal
This appliance complies with European Safety and Electrical directives
2. Safety Instructions
CAUTION. PLEASE READ AND OBSERVE ALL WARNINGS AND INSTRUCTIONS GIVEN IN THIS USER
MANUAL AND MARKED ON THE APPLIANCE. RETAIN THIS BOOKLET FOR FUTURE USE.
This set has been designed and manufactured to assure your personal safety. Improper use can result
in Electric shock or Fire hazard. The safeguards in this appliance will protect you if you observe the
correct procedures for installation, servicing and operation. There are NO user parts inside. DO NOT
REMOVE THE CASE OR OTHER COVERS OR YOU MAY BE EXPOSED TO DANGEROUS VOLTAGES OR
LASER RADIATION AND WILL INVALIDATE YOUR WARRANTY. REFER ALL SERVICING TO QUALIFIED
SERVICE PERSONNEL.
2
2
2
2. Safety Instructions
Unpacking and Handling. Open the carton carefully and remove the polyfoam packing. Carefully lift
the TV and place onto a firm stable surface, this will need two persons. Lift off the Poly bag and retain all
packaging for future use. Keep all packaging away from small children and animals.
Placing TV. The TV should be placed on a firm table or shelf. If placing in a cabinet ensure there is
sufficient spacing for air flow. For wall mounting please see page 24.
Ventilation and Heat Sources. Do not place material over the ventilation slots, this will cause the TV to
overheat and fail. Do not place the TV in direct sunlight or near heat sources such as radiators or fires.
Ventilation slots. Do not allow objects to be dropped inside the ventilation slot, this could cause a short
circuit and a possible fire. Do not allow chains to be dangled into the TV. A serious electrical shock my
occur.
Candles and Open flames. Do not place lighted candles (“T” Lights) on the top or at the sides of the
TV, or any other naked flame near the TV cabinet.
Connections. When connecting the TV to external sources and the mains supply, do not place wires
that can be tripped over. Do not trap or place heavy objects on the mains lead.
Dis-connection Device. The mains plug is the Disconnection device and MUST be accessible at all
times.
Moisture. Do not place the TV in wet or damp conditions, such as steamy kitchens, basements or other
damp places. Do not allow water or other fluids to enter the TV. Do not touch the Mains plug or adaptor
with wet hands. Should moisture enter the TV, disconnect from the supply and call the customer help
line.
Cleaning. Disconnect the TV from the mains supply. Use a soft dry cloth, for stubborn stains use a soft
moist cloth with a dilute mild detergent.. Do NOT use petrol based fluids or abrasive materials.
LCD Screen. Do not hit or cause impact to the LCD screen. The screen consists of many individual
pixels and is easily damaged. Bright or dark dots may occur and are not covered by warranty.
Lightning.
During a thunderstorm or when leaving the appliance for long periods such as holidays, disconnect the
aerial input (if external aerial) and remove the mains plug, This is to prevent power surges damaging the
apparatus
3. Digital Switchover
DIGITAL SWITCH OVER AND YOUR TV.
WHAT YOU NEED TO DO TO ENJOY WATCHING TV DURING AND FOLLOWING DIGITAL
SWITCHOVER.
Starting in 2008 and ending in 2012, television services in the UK will go completely digital, TV region by TV
region.
To continue using this digital TV during and following the digital switchover, you will need to “reset” your
digital TV channels.
Users of this digital TV must reset on at least 2 different occasions, normally 1 month apart when your
switchover happens. Digital UK, the body leading the digital switchover, and broadcasters, will advise you
when to reset your digital channels on each occasion.
If you do not reset your digital channels, you risk loosing some or all of your TV services during and following
switchover.
Please refer to this instruction manual to retune the Digital TV services.
Do NOT use “ADD” channels, you MUST “AUTO TUNE” and allow a complete retune. (See page 11) “Tuning
Auto Scan”
For more information please contact the “Customer Help Line” (Page 25) or visit www.digitaluk.co.uk
3
3
3
4. Accessories
Please check the contents of the box before you continue. If any item is missing please contact your point of
purchase.
Remote Control
User Manual
Mains lead
Base stand and
4 x M4 x18mm
mounting
screws
5. User Controls.
Side view
Mains Input
1. Power.
: Turns TV On from standby. Also returns TV to standby.
2. Vol –
: Reduces Volume level.
3. Vol +
: Increases Volume level.
4. CH : Reduces channel selection by 1 with each press.
5. CH +
: Increases channel selection by 1 with each press.
6. Menu.
: Selects the MENU function. If in a sub menu, will revert to previous level of menu.
7. Input.
: Selects the different input sources.
8. POWER INPUT.: Mains supply input 100 – 240V AC 50/60 Hz
9. LED.
: Displays TV status. In standby illuminates Red, when in use illuminates Green.
10. I R Lens.
: Remote control receiver lens. Do not obstruct or cover.
4
4
4
6. Remote Control.
2. MUTE. Press to mute sound, press
again to restore sound.
4. INFO. Displays TV settings and
channel being viewed.
6. ASPECT. Selects different picture
size modes
8. NICAM. In Analog TV mode switches
between Mono and Nicam. In DVBt
mode selects different soundtracks if
transmitted.
10. RED. Red fast text mode button.
Red select button in PVR mode.
12. GREEN. Green fast text mode.
Green select button in PVR mode.
14. YELLOW. Yellow fast text mode.
Yellow select button in PVR mode.
16. BLUE. Blue fast text mode.
Blue select button in PVR mode.
18. RECALL. Recalls previous channel
viewed.
20. RIGHT. Navigation button.
22. DOWN. Navigation button.
24. VOL +. Volume up button.
26. VOL -. Volume down button
28. MENU. Enters Setup menus.
30. EXIT. Exits setup menus
32.SUBPAGE/SUBTITLE. Subpage
selects subpages in Text mode. Subtitle
displays subtitles in Analog, and DVBt
modes
34.. REVEAL. Reveals hidden answers
in Text quiz pages.
36. FAV / REPEAT.Fav displays
Favourite program listing.Repeat sets
the repeat mode in PVR playback.
38. TV/RADIO. Selects TV or Radio in
DVBt mode.
40. T.SHIFT/PAUSE. Direct entry to
Media mode if Hard drive is connected.
Press to start Time Shift mode. PAUSE.
When playing back in PVR mode.
1. POWER. Switches TV to
Standby and Operation.
3. P MODE. Selects picture modes.
5. S MODE. Selects sound modes.
7. 0-9. Numeric buttons for direct
channel selection or track/chapter
numbers.
9. EPG. Selects Electronic
Programme Guide..
11. UP. Navigation button
13. OK. Confirmation button.
15. LEFT. Navigation button.
17. CH-. Channel DOWN select.
19. CH+. Channel UP select.
21. SOURCE. Selects various input
modes.
23. SLEEP. Sets sleep timer, sets
from 10 minutes to 4 hrs
25. INDEX. Selects Text index.
27. SIZE. Changes Text size in
Analog text mode
29. TXT. Selects Teletext.
31. HOLD. HOLD freezes text
pages
33. RECORD. Press to record DTV
Programmes
35. PLAY/REPEAT. Plays or sets
Repeat points.
37. PREV. Selects previous track or
file
39. NEXT. Selects next track or file
41. STOP. Stops playback in PVR
mode. Cancels Repeat Mode
42. FAST FORWARD. Fast forward
playback in PVR mode
43. REWIND. Rewinds playback in
PVR mode
5
5
5
6. Remote Control.
Battery Fitting and Disposal
1.
2.
3.
4.
Open the battery cover
Fit two “AAA” batteries. Ensure the battery polarities are correct i.e + to + and – to -.
Replace the battery cover
To prevent injury, do NOT break open or throw exhausted batteries in a fire.
Do not mix batteries, old and new, Carbon or Alkaline.
Do not use re chargeable batteries.
Remove batteries if not using the remote control for long periods to prevent leakage.
If the batteries do leak, clean the compartment with soapy water and scrape any residue
from the contacts. To NOT touch or ingest battery residue.
Should you swallow chemicals leaked from a battery, please URGENTLY consult a medical
adviser.
In the event that the remote control does not function, please check that the + VE end of
the battery terminals are in contact with the connection spring. Some batteries have a
smaller + VE terminal and may not reach the spring. You can stretch the spring slightly to
ensure connection
Do Not place used batteries in domestic waste, consult your battery retailer or your
local waste disposal company for advice.”.
6
6
7
7. Connections.
IMPORTANT. When making connections ensure the TV is disconnected from the MAINS supply
input, and that the appliance being connected is also disconnected from the mains supply.
POWER INPUT
USB.
HDMI 1, 2, 3.
VGA.
PC AUDIO.
SCART.
CI SLOT.
CVBS.
AUDIO L/R.
Y,Pb,Pr.
TUNER.
HEAD PHONES
: Mains supply input. 100 – 240V 50/60 Hz
: PVR interface.
: 3 x Inputs (optional) from HDMI source (High Definition).
: PC input (RGB).
: Stereo audio input from PC (Used in conjunction with VGA input).
: Audio /Video input and output. (General quality).
: Place a CAM (Conditional Access Module) into this point to allow a “Pay per View” card.
: Low quality video input (1vPP 75 Ω).
: Low level audio inputs used in conjunction with CVBS and Y,Pb,Pr.
: Interlace or Sequential Component Video Input, “typical use PS3 or X Box”.
: RF input from TV aerial or cable source.( 1 m/V @ 75 Ω) typical.
: Stereo output to headphones only.
Typical connections
CVBS/
AV
Input
3 x HDMI
Inputs
(optional)
Connect CVBS and
Audio L/R (if required).
Use SOURCE button to
select AV
Connect HDMI input.
Use SOURCE button to select
HDMI 1, 2 or 3 (Optional)
Headphones.
Plug in headphones.
Set volume level for
comfortable listening.
Note :- Do NOT use
headphones at high
volume levels for
prolonged periods.
7
8
7
7. Connections.
PC
connections.
Connect VGA
(15 pin) plug to
TV and PC.
Connect stereo
audio lead.
Use SOURCE
button to select
VGA.
Antenna
or cable
SCART.
Connect scart lead to TV and appliance.
Use SOURCE/INPUT button to select SCART.
In some circumstances the TV will automatically
select scart when the appliance is used.
Hard Drive or Memory Stick. Switch TV to
standby and insert either the USB Hard
Drive or USB memory stick.
Use SOURCE/INPUT button to select
“MEDIA”
Y,Pb,Pr
Connect Y,Pb,Pr leads and audio
leads to TV and appliance.
It is wise to use dedicated
Y,Pb,Pr leads from your retailer.
Use SOURCE/INPUT button to
select Y,Pb,Pr.
8
8
9
7. Connections.
Source/ Input Menu.
To access the Source menu, press the SOURCE button on the Remote Control or the INPUT
button on the TV.
Using the ▲/▼ buttons select the Source / Input required and press OK to select.
8. Menu Operation.
Connect the TV to the Mains supply and suitable aerial. It is advisable not to connect other apparatus until
you have established that the TV is working correctly. If using the TV for DVBt (Freeview) viewing the
existing aerial may not be suitable. Indoor aerials (set top) may not be suitable for some of the received
stations. If stations are missing, freeze or break up, it is certainly the aerial signal that is not sufficient.
Turn on the power and a Red led will be displayed in the lower right corner.
Press either the Power button on the remote control or the Power button on the TV.
The led will now turn Green and the screen will light up after approx 5 seconds.
At this stage no stations will be stored.
9
10
9
8. Menu Operation.
First Time Installation
Fig 1
The first time the TV is connected and turned on you will see Fig 1.
Using the ▲/▼ buttons select OSD Language, this is defaulted to
English. If you require a different language, use the ►/◄ buttons to
select a language of your choice.
COUNTRY. Defaulted to UK. If you are in a different country, select
“COUNTRY” use the ►/◄ buttons to select your country of choice.
Note 1 :OSD Language may also be selected in the Function Menu
TUNE TYPE. In the UK select ATV/DTV. If in an area that has fully
converted to Digital TV select DTV.
SOUTHERN IRELAND
Using the ▲/▼ buttons select “COUNTRY”. This is Defaulted to UK.
Use the ►/◄ buttons to select “BELGIUM”.
Using the ▲/▼ buttons select “TUNE TYPE”. Select “ATV” using
the ►/◄ buttons.
Press “OK” . The TV will now start to search and locate all the TV
stations in your area. (Fig 2).
When Tuning has been completed, the First station received will be
displayed.
To see a list of all the stations received, press the “LIST” button.
Fig 2
If the stations received are not in the correct order, Please see page
12.
When the selections have been made press “OK” and Fig 2 will be
displayed. The TV will now tune all the TV signal spectrum.
As tuning progresses it will display the number of stations received in
each mode.
When tuning is completed, BBC1 (DTV) will be displayed.
To see a list of the “Stations” received, press (LIST) on the R/C.
Fig 3 will be displayed. Use the ▲/▼ buttons to see the complete
listing. To select a station press OK
It may occur that the Analog Stations are not in the correct order to
change the order see page 12
10
11
Fig 3
8. Menu Operation.
Menu. To enter the Menu functions press the “MENU” button on either
the TV or the R/C. Fig 4 will be the first menu to be displayed. At the
top of the Menu are a number of symbols, these symbols display the
type of menu function, these are “in order” :- Tuning, Picture, Sound,
Timer, Options and Lock. To select any of these functions use the ►/◄
buttons. To Enter the menu use the ▲/▼ buttons.
Fig 4
Tuning.
Autoscan. Should the TV need retuning due to, relocation or DTV
upgrades, select AutoScan and press OK. Fig 5 will be displayed.
Use the ▲/▼ buttons to select “Country” and the ►/◄ buttons to
select. (UK is default).
TuneType. In the UK select ATV/DTV. If in an area that has fully
converted to Digital TV select DTV.
DTV Manual Tuning. “Fig 6”.
Occasionally Manual tuning may be required. Use the ►/◄ buttons
change the Channel number. At the bottom of the menu, a Signal
Quality/Strength bar is shown, any signal below normal will probably
display a “Freezing or Pixilated” picture. Press “OK” to start the Manual
Tuning. The OSD will then show the number of stations received on
that channel.
Note :- In certain areas where two Digital TV areas overlap, e g Wales,
the stronger signal may take “priority”. In this case Manual Tuning is
essential.
ATV Manual Tuning. “Fig 7”.
Occasionally Manual tuning may be required.
Storage to. This is the “Memory location” and can be changed with the
►/◄ buttons.
System. This is the “Sound setting”. In the UK this is “I”. In Western
Europe it is “B/G”, in Eastern Europe it is “D/K”. France is “L” or “LL”.
“Default is “I”. Select using the ►/◄ buttons.
Current CH. This is the actual channel location the TV is receiving.
If adding a TV game or other device with a TV signal output, set this to
a channel with no signal. Select using the ►/◄ buttons.
Search. Use the ► button to increase the frequency. Use the ◄ button
to decrease the frequency. To stop searching press “Exit”. If a signal is
found, check that it is the one required. Use the ▲/▼ buttons to select
“Storage to”, change the number using the ►/◄ buttons and press the
RED button to save all the settings.
Fine Tune. In some unusual circumstances the Sound or Picture may
need “Fine Tuning”. Use the ►/◄ buttons. To increase or decrease the
frequency. Each press of the button changes the frequency by 5 Khz.
Press the RED button to save all the settings.
11
12
Fig 5
Fig 6
Fig 7
8. Menu Operation.
Program Edit. DTV. Fig 8
In this menu you may perform four functions. Skip, Lock, Favourite and
Delete.
Skip. Use the ▲/▼ buttons to select which stations you wish to skip.
Press the “Blue” button. An indicator will be placed in the Skip column.
To remove, select again and press the Blue button. The Skip function
only stops selection of the selected station when using the CH+/CHbuttons. Direct number entry works normally.
Lock. Displays which stations have been locked. To change status you
must see page 17.
FAV. To add stations to a “Favourite” list, use the ▲/▼ buttons to
select which stations you wish to add. Press the “FAV” button on the
R/C. To un select press the FAV button again.
Delete. To remove any station from the listing, use the ▲/▼ buttons to
select which stations you wish to delete and press the RED button. If a
mistake has been made, you must select AutoScan to re install all the
stations.
Program Edit. ATV. Fig 9
In this menu you may perform six functions. Skip, Lock, Favourite, Delete,
Move and Rename
Skip. See above.
Lock. Displays which stations have been locked. To change status you
must see page 17.
FAV. See above.
Delete. See above.
Move. When “Auto Tuning” in Analog mode, it is possible that the stations
may not be in the correct order. To move any stations, use the ▲/▼
buttons to select the station. Press the YELLOW button. The line will
“widen” to show it has been selected. Use the ▲/▼ buttons to select the
new location and press “OK”. The station will now be in the new location.
Rename. It is possible to rename any station in Analog mode. Use the
▲/▼ buttons to select the station. Press the GREEN button. The Station
name text will be highlighted. Use the ▲/▼ buttons to change the letter
highlighted, a full letter/numeric alphabet is available. To select the next
letter or digit use the ►/◄ buttons. To confirm the change press “OK”
Fig 8
Fig 9
Fig 10
Signal Information. Select using the ▲/▼ buttons. A typical display is
seen opposite “Fig 10”.
This is for information only and cannot be changed.
Firmware Upgrade OAD. This is set to “ON” as default. If an upgrade
signal is received, you will see a message as in Fig 10A. Select Yes to
upgrade and No to decline the upgrade. If Yes is selected the TV will
automatically upgrade the firmware.
12
13
Fig 10a
8. Menu Operation.
CI Information (DTV).
Fig 11
Using a CAM (Conditional Access Module) (CI Slot).
This feature allows the user to access digital terrestrial “pay per view”
channels. To use this facility a conditional access module (CAM) and viewing
card need to be obtained by subscribing to a pay channel company.
To insert the module. Ensure the TV is fully disconnected from the power
source.
Insert the CAM into the CI slot with the label facing the front of the TV (Fig 11).
A positive stop should be felt if correctly fitted. DO NOT force the module.
Fig 12
To release the CAM push the button adjacent to the card and slide the module
away from the TV.
Reconnect the TV and switch on. Select DTV.
Insert your “Pay per view” card. “Do NOT touch the gold contacts”
Press the LCD Menu button and select DTV Setting menu. Select CI
Information and press ►.
To check the module is working use the ▲/▼ buttons to select Module
Information and press OK, you should now see the information as in Fig 33
To check the card is working Ok select CI Information and press OK. If
everything is ok you will see a list as Fig 12. If the information is not present,
remove the card reverse and reinsert. This information should now be seen.
Fig 13
Exit the menu’s by pressing OK or Exit and you are ready to view “Pay per
view” channels.
Figs 13 and 14 show the module and card information.
To obtain the CAM and pay per view card, these may be purchased from good
high street stores.
Fig 14
13
14
8. Menu Operation.
Record Start (DTV). Fig 15.
PVR recording may be started from this menu. Select using the ▲/▼
buttons and press “OK”.
Fig 15
Recorded List (DTV). Select this to see the list of programmes
already stored on your memory system.
Recorder Mode (DTV). You may set a “Timer Recording” using the
menu in Fig 16.
Use the ▲/▼ buttons to select each function. Use the ►/◄ buttons to
select the changes required. You may set more than one “Timer
Recording”, however you must ensure the times do NOT overlap.
Schedule List (Fig 17). Shown below is the Timer Schedule List.
This displays the status of set timer recordings. You may delete any
setting or previous successful recordings. Select by using the ▲/▼
buttons, and Delete using the RED button.
Fig 17
PVR File system. This is described on page 20
14
15
Fig 16
8. Menu Operation.
Fig 18
Picture Menu. (Fig 18).
Picture Mode. There are four settings. Standard, Mild, User and
Dynamic. “Standard is set as default”
Standard. Select for viewing in normal room lighting.
Mild. Select when viewing in subdued room lighting, this will help
prevent eye strain.
User. This allows you to set your own levels of Brightness, Contrast
and Colour.
Dynamic. Select when using in bright room lighting conditions.
These selections may also be selected using the “P MODE” on the
remote control.
Brightness. Adjusts the overall picture brightness.
Contrast. Adjusts the ratio of dark to light.
Colour. Adjusts the colour saturation (colour depth).
Sharpness. Adjusts the clarity of the picture. If the signal is noisy (ATV Mode only) then this setting should be
reduced to mask the noise. This also reduces the picture sharpness.
Tint. Only available when using NTSC sourced material from the AV inputs.
Colour Temperature. There are four settings, Cool, Medium, Warm and User.
Cool has a Blue tint and may be a little harsh. Medium is the natural setting. Warm has a reddish tint to give a
“warm” feeling. User. This allows you to set the Red, Green and Blue settings individually.
Aspect Ratio. There are up to seven settings, depending upon the input mode chosen.
16:9, Normal format for general viewing. Zoom 1, magnifies the picture, Zoom 2, increases magnification, Just
scan, fills the screen with no overscan. Panorama, gives the effect of “cinemascope”, Auto, adjusts the aspect ratio
automatically as some material is transmitted in different formats to match the original material. 4:3 is for films that
were originally made in 4:3 format. The Aspect ratio may also be set using the “ASPECT” button on the remote
control.
Noise Reduction. There are four settings. Off, Low, Medium and High. Certain material may be transmitted with a
“noisy” background. Use the settings to obtain the best picture.
Fig 19
Screen. (Fig 19) This is “greyed out” in all modes except VGA/PC
mode. When connecting to a PC, the PC will need to be matched to
the TV.
In most situations “Auto Adjust” will be sufficient. When selected the
picture will jump and shake for a few seconds until the settings are
finalised.
For special applications you may set the four adjustments :Horizontal Pos. Adjusts the picture position horizontally.
Vertical Pos. Adjusts the picture position vertically.
Size. Adjusts the vertical height.
Phase. Adjusts the clock phase to minimise picture jitter.
To select use the ▲/▼ buttons, to adjust use the ►/◄ buttons.
15
16
8. Menu Operation.
Fig 20
Sound Menu. (Fig 20).
Sound Mode. Select from :- Standard, Music, Movie, Sports and
User.
Standard. Used for general viewing.
Music. Selected for enhanced music appreciation.
Movie. Selected for Action movies and large productions.
Sports. Suitable for sport programmes.
User. Adjust for your personal listening.
These settings may also be selected with the “S MODE” button on the
remote control.
Bass. Adjusts lower register frequencies.
Treble. Adjusts higher register frequencies.
Balance. Adjusts the level of the left and right speaker.
Auto Volume. When set to “ON” Adjusts the level of sound to prevent louder passages. Also levels sound when
adverts are shown.
Surround Sound. When set to “ON”, simulates surround sound. Used when showing DVD’s and Movies.
Fig 21
Time Menu. (Fig 21).
Clock. This is set from the DTV signal and is for information only.
Off Time. (Fig 22) . This is used to turn off the TV at a pre
determined time. Especially useful for children’s bedrooms. Select
using the ▲/▼ buttons, to adjust use the ►/◄ buttons.
Repeat. Select from “Once”, Everyday, Mon – Fri, Mon – Sat, Sat –
Sun, Sunday and Off.
On Time. ( Fig 23). This is used to turn On the TV at a pre
determined time. Select using the ▲/▼ buttons, to adjust use the
►/◄ buttons.
Repeat. Select from “Once”, Everyday, Mon – Fri, Mon – Sat, Sat –
Sun, Sunday and Off.
Source. This may be set to any of the Input sources.
Channel. This allows you to set the required channel at switch on.
Volume. This allows you to set the volume. (Default is 30).
Sleep timer. You may set the TV to turn off after a preset time. The
preset times are :- Off, 10, 20, 30, 60, 90,120, 180, and 240 minutes.
Note: You may also use the “SLEEP” button on the remote control.
No Action Auto Standby. When turned “ON” allows the TV to
switch to standby when no “User Button” or Remote Control action is
made for 3 hours. Note :- Default setting “Off”. In PVR Timer mode
this must be set to “Off”.
Time Zone. This is defaulted to the time zone set when “Auto
Tuning” by the TV signal.
16
17
Fig 22
Fig 23
8. Menu Operation.
Fig 24
Option Menu (Fig 24).
OSD Language. Default is set to English. To change the language
use the ►/◄ buttons.
Audio Language 1. If the programme providers transmit another
language this may be selected. The default is set to English.
Audio Language 2. If the programme providers transmit another
language this may be selected. The default is set to English.
Subtitle Language 1. If the programme providers transmit another
language this may be selected. The default is set to English.
Subtitle Language 2. If the programme providers transmit another
language this may be selected. The default is set to English.
OSD Time duration. You may set the time the OSD is displayed on
the screen. This is selected from 0 – 40 seconds in 5 second steps.
Default is set to 30 seconds.
Backlight. This adjusts the backlight intensity. It is recommended
that it is kept at the default level of 100.
Country. This is for information only. It can only be reset in the Auto
Tuning menu.
Restore Factory Defaults. Should you get all the settings incorrect,
select this item. When selected, press OK. All the TV settings will
revert to “Factory default settings”. Note :- Tuning memory and
Passwords will NOT be affected.
Fig 25
Fig 26
Lock Menu (Fig 25).
Lock System. When selected you will be required to enter a
Password. The Default password is :-0000. When set to “ON”, all
Menu functions will require a password before adjustments can be
made.
Set Password. (Fig 26). It is recommended that the password is
changed from the factory default number. Use the ▲/▼ buttons to
select each row in turn and use the “numeric” buttons to enter the
codes.
Lock Program. (Fig 27). To stop un authorised viewing of certain TV
channels you may set locks. Press OK to enter the menu and use the
▲/▼ buttons to select the stations that need locking.
Set the locks for each station using the GREEN
button. To unlock press the GREEN button again.
Parental Guidance. This allows you to set a “level
of acceptance” of programme material. This can be
set from “Off to 18”. 4 is the least harmful, 18 is for
Adult material. This must be set for each channel
viewed.
17
18
Fig 27
9. EPG (Electronic Programme Guide) (DVBt only). Fig 28
Fig 28
An “Electronic Programme Guide” EPG is provided by
the programme providers. To access this press the
EPG button on the remote control. Fig 28 will be
shown. This displays all the channels in “numerical”
order. Use the ▲/▼buttons to move up and down the
list and press “OK” to select the station required.
To see more Stations listed press the ►/◄ buttons,
this will display the next lot of 9 stations.
To see more programmes of any station, select the
“TIME” display and press the ► button. This changes
the display to Fig 29. Using the ▲/▼buttons to select
the required programme. The details will be shown in
the box on the right of the display.
Fig 29
The EPG provides programme information for up to 7
days.
You may set a “Remind” flag. Press the GREEN button
of a programme you wish to view later. This can be on
any channel. When the time is due to view the
programme a “Popup” will appear on the screen
warning you that it is about to start. You may then
select “Yes” or “No” to view that programme.
To view the Schedule of programmes selected for
recording, press the YELLOW button.
Fig 30
Index Button. This moves the display to highlight
“Channel or Time”.
Some boxes may be blank, the data may not be
available.
To exit the EPG, press the EPG button again or EXIT.
10. Digital Radio. (Fig 30)
To access the Digital Radio Stations continue as
follows :- Press the TV/RADIO button. Use the EPG
button to see the Radio station listing. Select the radio
station you require using the ▲/▼ buttons and press
“OK”. You may also use “Direct Button entry” using the
“Numeric Buttons”..
Fig 31
To see more Stations listed press the ►/◄ buttons,
this will display the next lot of 9 stations.
Index Button. This moves the display to highlight
“Channel or Time”.
To return to DTV mode use the TV/RADIO button
again.
18
19
11. Teletext. (Analog) TV
Teletext is an information system broadcast by certain programme providers. It can provide
Subtitles for viewers hard of hearing (888). Weather, Travel information, games and many
other services.
Below is a description of the buttons associated with Teletext.
TEXT.
: Press to select Teletext, press again to exit.
MIX
: Press to mix the video information to the text page. Press again to turn off.
INDEX.
: Press to access the index page directly.
SIZE.
: Press to increase the text size in the top half of the page, press again to
increase the text size in the lower half of the page, press again to return to
normal text size.
REVEAL.
: Press to reveal hidden answers in quizzes or puzzles.
SUBPAGE.
: Some text pages may contain several sub pages. To access these press
this button and then enter the page number using the numeric buttons.
Press again to exit the feature.
COLOUR BUTTONS. : Red, Green, Yellow, Blue are used as fast access buttons to pages of text
which are highlighted at the bottom of each text page.
HOLD.
Press to hold any text page for easy viewing. Press again to return to normal.
12. Teletext. (Digital) TV
(Fig 32)
Fig 32
Teletext is provided in the DVBt service and operates differently from
Analog TV
To enter TELETEXT, press the TXT button or the RED Button.
Use the ▲/▼ buttons to select the category you require and press OK to
enter. In each category there will be sub pages. Use the ▲/▼ buttons and
OK button to select.
To exit Teletext. Press the TEXT button.
19
20
13. Media
PVR. “HARD DRIVE RECORDER”
To allow recordings of Digital TV programmes, the USB connector is enabled to allow connection of a PC Hard
Drive (HDD) or USB Stick memory.
Hard Drive (HDD). This should be a “Stand alone” with USB connection and should have a capacity of 40 Gbits
or larger. A “Stick” memory should have a capacity over 2 G Bytes.
Before you can record, the Media Memory must be formatted. This is done by the TV. Ensure the TV is in
Standby Plug the Media Memory into the USB connector and then switch the TV on. A box will be displayed
stating “PVR INITIALISING”. Both HDD and USB Memory stick must be formatted.
Note :- You MUST use a dedicated HDD or Memory stick for Recording. When formatting takes place, you will
see a message telling you that ALL previous data on the device will be LOST. Do NOT use a HDD or Memory
stick with valuable data stored.
Akura accepts NO responsiblity for any data lost from any media device plugged into this TV under ANY
circumstances.
Formatting the media. Plug in the selected media storage module, select “Menu” and using the ▲/▼ buttons
select PVR File System and press ►. Using the ▲/▼ buttons Select “Check PVR File system on press “OK”.
When the media has been checked select “Format” and press “OK”. see (Fig 33).
Fig 34
Fig 33
Fig 35
An “over” menu will be displayed, (Fig 34).
PVR File system Type will be highlighted, use the ►/◄
buttons to select “FAT 32” then press “OK”. Fig 35 will
then be shown. When formatted Fig 33 will again be
displayed with the details that are shown in grey.
The HDD or Stick memory is now ready for use.
Once the HDD has been formatted it can be used for
other media storage such as Photographs, Music and
other media files. Remove from the TV and insert into
your computer to transfer the files required.
NOTE
This TV is NOT a dedicated PVR recorder. It will only record the one TV channel , and if a
“Timer” recording is set, the TV will change to that channel when recording starts.
20
21
17
17
13. Media
Recording.
You may “Instant” record, use the EPG as a “Record Timer” or set the “Record Timer” from the menu and “Time
Shifting”.
Instant Recording.
Select the programme you wish to record (Freeview only). Press the “Record” button once, Fig 36 will be
displayed, to remove this press the “Record” button again, a reminder will be shown in the lower right corner of
the screen.
To see the Button display again press the Record button again. To Stop the recording press the “STOP” button
on the remote control or use the ►/◄ buttons to select STOP and press “OK”.
Fig 36
EPG Recording.
Press the “EPG” button, the display (Fig 28) page 19 will be displayed. “Refer to the text on page 19 to select the
programme required” and press the “RECORD” button. Fig 16 “Recorder Schedule” page 15 will be shown. Set
the “MODE” to “ONCE” and press “OK”.
Schedule List. To see a list of scheduled programmes on your record list, press the “YELLOW” button on the
R/C.
You may have as many programmes scheduled as you want, but none must “Over lap”. Should you try to set a
programme to record that “over laps” another, when you press the “OK” button you will see a message “TIME
OVERLAY” this means you cannot select that item to record as it is in the same time slot as another recording.
Timer Recordings. This has been fully described on page 13.
Time Shifting and Play Pause.
If you need to pause a “Live” TV programme while you “make a cup of tea”, press the “T-Shift” button and the
picture will “Freeze” and the “Time Shift” button display will be shown “ Fig 37”.
When you wish to resume press “Play”, the programme will resume from the paused section. To end the “Time
Shift” mode press “Stop”, the TV will revert to normal operation. Stopping “Time Shift” will clear the memory
used.
The amount of time you “Pause” is shown in the display below. To pause the Playback use the ►/◄ buttons to
select PAUSE or any other function and press “OK”.
Fig 37
18
18
21
22
19
13. Media
Fig 38
Media Playback “Digital TV”.
Index
Press the “INDEX” button on the Remote control. A list of programmes stored
on your HDD or Memory stick will be displayed. “Fig 38”. Move up and down
the list using the ▲/▼ buttons. To see the details of the item listed, press the
INFO button. To play any of the items press “OK”. A “Play Button Bar” is
displayed (Fig 39). Some of the buttons are repeated on the Remote control.
To use the buttons displayed below use the ►/◄ buttons and press “OK”.
Fig 39
Button Functions.
► Play. Press to start playing. Press again to provide a “Start point” for “Repeat mode”. Press again at the end of
the section you wish to repeat. The display will show
and will continually repeat that section until the
Stop button is pressed, normal play will then resume.
◄◄ FB Fast Rewind. ►► FF Fast Forward.
Prev, Plays previous segment.
Next, Plays next segment,
Pause, select to pause playback and press “OK”. To restart playing press PLAY.
Media Playback. (Photographs).
Press the “SOURCE” button and select “MEDIA” a display as in Fig 40 will be shown. Press OK and Fig 41 will be
displayed. Use the ►/◄ buttons to select the correct file, “Memory”. Press OK and Fig 42 will be displayed.
Fig 40 also shows “Disk C:” If your disc is partitioned (Logical drive), then this will display the number of partitions.
To select a different partition use the ▲/▼ buttons to select and press “OK”.
Fig 40
Fig 41
Fig 42
To view the photos, select using the ▲/▼/ ►/◄ buttons and
press OK to place a “red tick” adjacent to each photo. To view
the photo’s in “full screen” press ► Play. To “tick” all the files
press the GREEN button, and to Delete any ticked file press
the RED button.
22
23
19
19
13. Media
Media Playback “Music”.
Press the “SOURCE” button and select “MEDIA” a display as in Fig 40 will be shown. To select Music use the ►
button. Press “OK” and Fig 43 will be displayed. Press “OK” again and Fig 44 will be displayed. Use the ►/◄
buttons to select the correct file, “Memory”. Press OK and Fig 44 will be displayed.
Fig 43 also shows “Disk C:” If your disc is partitioned (Logical drive), then this will display the number of partitions.
To select a different partition use the ▲/▼ buttons to select and press “OK”.
Fig 44
Fig 43
Fig 46
Fig 45
To view the music files select the folder containing the files. Press OK and a display similar to Fig 45 will be seen.
Using the ▲/▼/ ►/◄ buttons and press OK to place a “red tick” adjacent to each Music file. To play the music,
press “PLAY”. A display similar to Fig 46 will be seen. To remove any file from the play list press the “YELLOW”
button. To remove all the files press the “GREEN” button.
To repeat any or all of the tracks, select “REPEAT” using the ▲/▼/ ►/◄ buttons and press the “OK” button to
select each one in turn, Repeat All, Repeat none, and Repeat 1.
To return to the Media menu press “STOP”, then “EXIT”.
To save power when playing music, press the “BLUE” button, this will turn the screen off. To restore the screen
press the BLUE button again
Media Playback “Movie”.
Press the “SOURCE” button and select “MEDIA” a display as in Fig 40 will be shown. To select Movie use the ►
button. Press “OK” and Fig 47 will be displayed. Press “OK” again and Fig 48 will be displayed. Use the ►/◄
buttons to select the correct file, “PVR”. Press OK and Fig 49 will be displayed.
Fig 47 also shows “Disk C:” If your disc is partitioned (Logical drive), then this will display the number of partitions.
To select a different partition use the ▲/▼ buttons to select and press “OK”.
Fig 48
Fig 47
20
20
23
24
13. Media
Fig 49
Media Playback “Movie” cont...
Select one of the files using the ►/◄ buttons and
press OK. This will “Tick” that file and start playing in
the box on the right. If you wish to select more files,
tick these also. To see full screen press “PLAY”.
To stop play, press “STOP”. The screen will then
return to “Fig 49”. To return to the master menu “Fig
47”, press “EXIT”.
Media Playback “Text”.
Press the “SOURCE” button and select “TEXT” a display as in Fig 50 will be shown. To select Text use the ►
button. Press “OK” and Fig 51 will be displayed. Press “OK” again and Fig 52 will be displayed.
Use the ►/◄ buttons to select the correct file, “Memory”. Press OK and Fig 52 will be displayed.
Fig 50 also shows “Disk C:” If your disc is partitioned (Logical drive), then this will display the number of partitions.
To select a different partition use the ▲/▼ buttons to select and press “OK”.
Fig 50
Fig 51
Select one of the files using the ►/◄ buttons and press
OK. This will “Tick” that file and start playing in the box on
the right. If you wish to select more files, tick these also. To
see full screen press “PLAY”.
To stop play, press “STOP”. The screen will then return to
“Fig 51”. To return to the master menu “Fig 50”, press
“EXIT”. Note :- The TEXT feature will only play .TXT files
Fig 52
14. Wall Mounting
To mount the TV on a wall you need to purchase an adjustable bracket
to fit 200 x 200mm centres.
Fig 53
Remove the screws as shown below (Fig 53).
Slide the base from the TV.
Mount the wall bracket as described by the manufacturer.
Mount the TV to the wall bracket using 4 x 5 mm x 10 mm set screws.
(Do NOT use longer screws as the internal parts of the TV may be
damaged).
Akura Ltd accepts no responsibility for any damage, caused to or by,
incorrect mounting of the wall bracket.
24
25
21
21
15. Trouble shooting guide.
Should you experience difficulties operating this product please consult the guide below before calling the
Customer Help Line.
SYMPTOM
Dead. No led lit
POSSIBLE CAUSE
Power not connected to
TV
No Picture. Led lit Red
TV in standby.
No picture. Dark screen Led lit Green
Backlight faulty
No picture. Blue screen. No signal displayed Incorrect input settings
Aerial not connected
TV Picture noisy and ghosting (Analog)
TV not tuned in
Incorrect input selected.
Poor aerial signal
TV Picture freezing and breaking up
(Digital).
Teletext freezing or breaking up
Poor aerial signal
Poor aerial signal
Digital Signals missing
Poor aerial signal
Bright dots or Dark dots
Pixel damage
Lost passwords
REMEDY
Check power lead and mains supply
connections and supply to the TV is turned
On
Press Power button on TV or Power button
on remote control.
Call customer help line.
Ensure the input selected has an input
connected to it and is turned on.
Check the settings of the “Source” and
consult the User Guide of the apparatus.
Ensure aerial is connected
Follow instructions from page 10
Have aerial signal checked. If indoor aerial
it may need an outdoor aerial.
Have aerial signal checked. If indoor aerial
it may need an outdoor aerial.
Have aerial signal checked. If indoor aerial
it may need an outdoor aerial.
Have aerial signal checked. If indoor aerial
it may need an outdoor aerial.
This is not uncommon. It is not covered by
warranty
TV7948.
PC OPERATION
No picture. Blue screen. No signal displayed No connection from PC to
Check all connections carefully
TV.
PC resolution incorrectly Enter Display setup of PC and set resolution
set
to 800x600. Increase in steps until the
required resolution is selected
PVR OPERATION
Not recording or Time Shifting
Drive or Memory not
Enter the Main menu, select PVR File
formatted
system and Format the medium.
Drive not detected by the TV
USB connection
Ensure the Medium is DIRECTLY connected
incorrect.
to the TV, not via an extension lead.
REMOTE CONTROL
No or intermittent operation
Exhausted batteries
Replace batteries every six months or when
required
If you are still having difficulty please call the Technical help line. Ring 0845 293 7698 (Normal rates apply).
Opening hours Mon-Fri 8 am – 8pm. Sat 9 am – 4pm. Sun 10am – 4pm “Bank holidays as Sun”
Or try our website :- www.ekey.co.uk (24Hr) Emails should be responded to within 3 - 4 hours should the
consumer have difficulty getting through.
25
28
23
16. Specifications.
已更新
ITEM
DESCRIPTION
Power Requirements TV
100-240V AC 50/60 Hz (115W) nominal.
Standby Power
Screen Size
Case dimensions
< 1W
25.5" (64.8cm) diagonal
671 x 250 x 514 mm inc base
Weight
11.5 Kg’s
Screen resolution
1080P FD
Colour Systems
PAL, SECAM
Sound Systems
BG, I, DK, L
Audio Output
8W per channel
Tuning
Analog. Band 1, Band 3, UHF
Digital UHF
Firmware
MSD 306
Inputs
Scart, 3 x HDMI (optional), VGA, CVBS,
L/R audio. PC Audio. Y,Pb,Pr, USB
Outputs
Scart, Headphones.
OSD Language
English.
Audio
Nicam stereo/Mono (Analog)
Wall Mounting
Adjustable(200 x 200mm)
Remote Control
Infra Red Default code TV7948.
Remote Control batteries
2 x "AAA" batteries
Technical Specifications are subject to change without notice. Errors and omissions
are exempted
Flat Screen
Although the Flat screen is made with high precision technology and 99.9% or more of the pixels are
effective, dots may appear. These can be black or bright dots (red, green or blue) and may appear
constantly on the Flat screen. This is a structural property of the Flat panel and is not a malfunction.
26
30