1
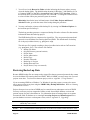
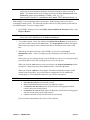
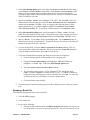
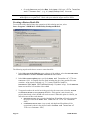
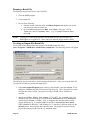
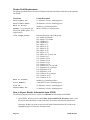
Chapter 9 NDSR Utilities NDSR utilities include various backup and restore features, ways to generate output files, and methods of importing and exporting Header tab information. This chapter describes: How to create backup files How to restore backup files How to create command-line utilities for backup, restore, and output files How to import and export Header tab information Creating Backup Files Create NDSR backup files regularly to ensure project and record data are protected from loss. It is extremely important to back up all project data before uninstalling NDSR or deleting any NDSR program files. A backup file is a copy of an NDSR project. It should be stored in a location separate from the NDSR application. The backup storage location may be specified on the User Preferences tab of the Preferences window for the Backup folder: field. The default backup location for Windows 7 and Windows 8 is in C:\Users\Public\Pulbic Documents\NCC\NDSR 2015\Backup. Protect your data by copying the backed up files to a secondary location on a regular basis (e.g., daily). In NDSR, you may choose to back up all projects or only selected projects. If you are running NDSR on a Windows 7 or Windows 8 operating system, you may backup one or more projects at a time using the NDSR Utility, Backup and Restore. Refer to “Running Command-line Utilities”. NOTE: It is not recommended to copy the C:\ProgramData\NCC\NDSR 2015\database\ndsrdb.db file for backup purposes as it is not reliable. Use the Backup and Restore features that are incorporated in NDSR. Multi-tasking is not recommended while backing up data. Backup of large projects may take a considerable amount of time. The following steps describe how to create a backup file using the NDSR program. 1. Open NDSR. When you receive the Folder, Project and Record Selection window determine whether you want to back up selected projects or all projects. 2. To back up all projects, select ProjectBackupAll. To back up selected projects, highlight the project(s) you want to back up and then select ProjectBackupSelected. NOTE: To select more than one project, refer to “Appendix 1, Using Windows”. Chapter 9 NDSR Utilities Page 9.1 3. You will receive the Browse for Folder window indicating the directory where you may select the backup folder. The default backup location for Windows 7 and Windows 8 is in C:\Users\Public\Pulbic Documents\NCC\NDSR 2015\Backup. If this is the location where you want to back up the files, select OK. To change the location browse to select a folder within your particular system or network. Microhelp, found in the lower left-hand corner of the Folder, Project and Record Selection window, provides the status of the backup during the procedure. 4. You may confirm the existence of the backup file by viewing it in Windows Explorer in the location specified in Step 3. The backup procedure generates a compressed backup file and a reference file that contains information about the backed-up project. The NDSR backup files are compressed or zipped files. They are password protected and cannot be viewed without first restoring them into NDSR. The default name of a backup file is the project abbreviation (e.g., project.zip). The reference file is named according to the project abbreviation with an inf extension (e.g., project.inf). The reference file contains: Backup File Name Original Directory (current location) Project Name Project Abbreviation Record Type Number of Records Backed up in Version Backup Date and Time Project Notes (if any were entered) Restoring Backed-up Data Because NDSR backup files are compressed or zipped files that are password protected, they cannot be viewed without first restoring them into NDSR. While in NDSR, you may restore one or several projects at one time. To select more than one project, refer to “Appendix 1, Using Windows”. If you are running NDSR on a Windows 7 or Windows 8 operating system, you may also restore one or more projects at any time using the NDSR Utility, Backup and Restore. Refer to “Running Command-line Utilities”. Projects from previous versions of NDSR may be restored into any subsequent version of NDSR. You may create new projects composed of intake records from multiple database versions and generate reports for your selected data set. For information about re-running a data set to capture new nutrient fields for the data set or restoring User-recipe Projects and Menu Projects from a previous database version to a subsequent version, refer to “Appendix 23, Upgrading”. NOTE: Any editing of foods in intake records must be done using the same database version in which they were created. NOTE: NCC recommends that NDSR projects to be restored are located on the hard drive of the Page 9.2 NDSR Manual computer used to restore them. Files on a compact disk, flash drive, network drive, or received as an email attachment should be saved to the hard drive before restoring in NDSR. The default location is the location specified on the User Preferences tab of the Preferences window for the Backup folder: field. (e.g., C:\ Users\Public\Public Documents\NCC\NDSR 2015\Backup\Study X). Multi-tasking is not recommended while restoring data. Restoring large projects may take a considerable amount of time. The following steps describe how to restore backed-up data while in the NDSR Program. To restore a single project: 1. Open NDSR. When you receive the Folder, Project and Record Selection window, select ProjectRestore. NOTE: You may restore to a specific folder location other than the Main Folder. Projects will restore to the folder highlighted in the Folder selection pane. 2. Two windows appear. In the first window titled Select Files to Restore select the project you wish to restore and select the OPEN button. The Project Restore window also appears which shows the progress of the restoration and allows cancellation of the restore at any time. 3. When the project does not already exist in NDSR, you will receive the Project Information window. After reviewing the project information, select OK to restore the project. If the project you are restoring already exists in NDSR, you will receive a message asking if you want to add records to the existing project or create a new project. When you select the NEW button to create a new project, the Project Information window will appear. Change the project name and abbreviation. Select the OK button. When you select the ADD button, the program will check for duplicate records (a record with the same ID and date). Any records that are not duplicates will be added to the existing project. For any duplicates that exist, you will have five options: NOTE: You cannot give a restored project the same name or abbreviation as an existing project. SKIP THIS RECORD (do not restore this record) SKIP ALL DUPLICATES (do not restore any duplicate records) OVERWRITE THIS RECORD (replace the record in the existing project with the record in the project being restored) OVERWRITE ALL DUPLICATES (replace all duplicate records in the existing project with the records in the project being restored) CANCEL (cancel the restore for all records not yet restored) If you select the CANCEL button, the restore will be canceled. Chapter 9 NDSR Utilities Page 9.3 4. To restore more than one project at a time: Open NDSR. When you receive the Folder, Project and Record Selection window, select ProjectRestore. Choose the projects to be restored in the Select Files to Restore window. Select the OPEN button. The Project Restore window appears which shows the progress of the restoration and allows you to cancel the restoration at any time. When the projects are restored they will be displayed on the Project selection: pane. When one or more of the projects already resides in NDSR the Restore Duplicate Options window appears, and you must choose how duplicates are to be processed. All records in all of the projects will be processed in the manner chosen. When restoring multiple projects at one time you will have two options for handling duplicates: SKIP ALL DUPLICATES (do not restore any duplicate records) OVERWRITE ALL DUPLICATES (replace all duplicate records in the existing project with the records in the project being restored). Running Command-line Utilities Command-line utilities are available when NDSR is run on a Windows 7 or Windows 8 operating system. They allow you to generate backup files, restore backed-up data, and generate output files while you are not in the NDSR program. A batch file must be created and ran to create the desired result. Creating a Backup Batch File To access the utility that facilitates the creation of the backup batch file, select StartProgramsNDSR 2015NDSR Utility, Backup and Restore. The following steps describe how to create a backup batch file. 1. In the Select one of the following pane at the top of the window, select the CREATE NDSR BACKUP FILES IN THE PATH INDICATED radio button. Page 9.4 NDSR Manual 2. In the Select backup options pane, select either the BACKUP ALL PROJECTS radio button or the BACKUP A SINGLE PROJECT radio button. If the BACKUP A SINGLE PROJECT radio button is selected, indicate the project abbreviation of the project to be backed up by selecting the project abbreviation from the drop-down list. All projects currently in NDSR will be available for selection. 3. Specify the Folder where the backup file will be stored: field. The default location is the location specified on the User Preferences tab of the Preferences window for the Backup folder: field. A complete path, including the drive letter, must be indicated (e.g., C:\ Users\Public\Public Documents\NCC\NDSR 2015\Backup\Study X). To search for a different folder, use the BROWSE button. 4. In the Select batch file options pane, specify the Batch folder name: field (the folder where the batch file will be stored). The default location is the location specified on the User Preferences tab of the Preferences window for the Backup folder: field. 5. Specify a Batch file name: field, type backup.bat. Use the BROWSE button to search for a previously created batch file. A batch file always overwrites previous batch file backups if the name of the file is the same. 6. To create the batch file, select the WRITE COMMAND TO BATCH FILE button. This will create a batch file in the location indicated. When you receive the Create File dialog box, verify the pathway and file name. Select OK to create the file. 7. To use the same batch file to backup more than one project but not all projects: Create a backup batch file as indicated above for a single project. Change the Project abbreviation in the Project abbreviation of project to back up: field in the Select backup options pane. Select the WRITE COMMAND TO BATCH FILE button. The following prompt appears: “File <batch file location and name> exists. Append to existing file?” To add the command to backup the newly selected project to the current batch file, select OK. To cancel the operation and not save your changes, select the CANCEL button. Close the window when finished. 8. To run the batch file and back up the projects you have indicated, refer to “Running a Batch File”. Running a Batch File The following steps describe how to run a batch file. 1. Close the NDSR program. 2. Create a batch file. 3. Do one of the following: Find the location of the batch file in Windows Explorer and double click on the icon next to the name, as if you were going to open the file. This will cause the file to run. Chapter 9 NDSR Utilities Page 9.5 NOTE: Go to the Start menu and select Run. In the Open: field, type “<file location and filename>.bat”. (e.g., C:\temp\backup.bat). Select OK. You may use a scheduling program to run the batch files at a specified time (e.g., midnight) on a regular basis. Check with your technical support staff for details. Creating a Restore Batch File To access the utility that facilitates the restoration of the backed-up projects, select StartProgramsNDSR 2015NDSR Utility, Backup and Restore. The following steps describe how to create a restore batch file. 1. In the Select one of the following pane at the top of the window, select the RESTORE NDSR FILES BACKED UP IN THE PATH INDICATED BELOW radio button. 2. In the Select restore options pane, specify the Name and location of file to restore: field. A complete directory path, including the drive letter and the file name extension .zip, must be indicated (e.g., C:\ Users\Public\Public Documents\NCC\NDSR 2015\Backup\Study X\tutor.zip). Use the BROWSE button to search for a file and then select OPEN. 3. To append records to the end of an existing project by the same name, select the APPEND TO EXISTING PROJECT, IF AVAILABLE checkbox. If this option is not selected, any projects that already exist in NDSR will not be restored. When this option is selected, you must select one of three radio buttons: SKIP DUPLICATES (Any records with duplicate ID and date will not be restored to the project listed in the Name and location of file to restore: field.) OVERWRITE DUPLICATES (Any records with duplicate ID and date will be overwritten by those in the project listed in the Name and location of file to restore: field.) Page 9.6 NDSR Manual (The restore will be canceled when any records with duplicate ID and date are found in the project listed in the Name and location of file to restore: field.) CANCEL RESTORE 4. When the project to be restored is a User-recipe project or Menu project entered in a previous version of NDSR, you may select the UPDATE USER RECIPES AND MENU RECORDS TO THE CURRENT FOODS DATABASE checkbox. Selecting this option will restore user-recipe records and menu records in a manner that allows them to be edited and used in any new records created in the current version. Restored records may need to be edited; refer to “Appendix 23, Upgrading”. To restore User-recipe projects or Menu projects in a manner that allows you to create output files for the old data using only updated nutrient values that are appropriate for a previous database, do not select the UPDATE USER RECIPES AND MENU RECORDS TO THE CURRENT FOODS DATABASE checkbox. When the project you are restoring is not a User-recipe project or Menu project, the program will ignore the UPDATE USER RECIPES AND MENU RECORDS TO THE CURRENT FOODS DATABASE checkbox. 5. In the Select batch file options pane, specify the Batch folder name: field (the folder where the batch file will be stored). The default location is the location specified on the User Preferences tab of the Preferences window for the Backup folder: field. A complete path, including the drive letter, must be indicated (e.g., C:\ Users\Public\Public Documents\NCC\NDSR 2015\Backup\Study X). To search for a different folder, use the BROWSE button. 6. Specify a Batch file name: field, type restore.bat. Use the BROWSE button to search for a previously created batch file. 7. To create the batch file, select the WRITE COMMAND TO BATCH FILE button. This will create a batch file in the location indicated. When you receive the Create File dialog box, verify the pathway and file name. Select OK to create the file. 8. To use the same batch file to restore more than one project: Create a restore batch file as indicated above. Change the Name and location of file to restore: field in the Select restore options pane. Make any desired changes to the APPEND TO EXISTING PROJECT, IF AVAILABLE and UPDATE USER RECIPES AND MENU RECORDS FOR THE CURRENT FOODS DATABASE checkboxes. Select the WRITE COMMAND TO BATCH FILE button. The following prompt appears: “File <batch file location and name> exists. Append to existing file?” To add the command to restore the newly selected project to the current batch file, select OK. To cancel the operation and not save your changes, select the CANCEL button. Close the window when finished. 9. To run the batch file and restore the projects you have indicated, refer to “Running a Batch File”. Chapter 9 NDSR Utilities Page 9.7 Running a Batch File The following steps describe how to run a batch file. 1. Close the NDSR program. 2. Create a batch file. 3. Do one of the following: Find the location of the batch file in Windows Explorer and double click on the icon next to the name to run the file. Go to the Start menu and select Run. In the Open: field, type “<file location and filename>.bat”. (e.g., C:\temp\restore.bat). Select OK. NOTE: You may use a scheduling program to run the batch files at a specified time (e.g., midnight) on a regular basis. Check with your technical support staff for details. Creating an Output File Batch File To access the utility that facilitates the creation of the NDSR output files, select StartProgramsNDSR 2015NDSR Utility, Output File. The following window will appear. The following steps describe how to create an output file batch file. After you create the batch file, you must run it in order to produce the output file(s). 1. In the Select output file options pane at the top of the window, select the Output file project abbreviation: field from the drop-down list. This is the project for which an output file will be created. All projects currently in NDSR will be available for selection. 2. Specify the Folder where the output file will be stored: field. The default location is the location specified on the User Preferences tab of the Preferences window for the Output folder: field. A complete path, including the drive letter, must be indicated (e.g., C:\Users\Public\Pulbic Documents\NCC\NDSR 2015\Output for Windows 7 and Windows 8). To search for a different folder, use the BROWSE button. Do not include the output file name. The output file name will be the project abbreviation plus the letter d (e.g., tutord.zip). Page 9.8 NDSR Manual 3. When an output file for a project already exists, specify what to do in the location indicated by selecting one of the following radio buttons: CANCEL THIS OUTPUT FILE AND KEEP THE EXISTING FILE (The new output file will not be created.) OVERWRITE THE EXISTING OUTPUT FILE (The previous output file will be replaced by a new output file.) BACKUP EXISTING OUTPUT FILE FIRST (The previous output file will be renamed (e.g., from outputd.zip to outputd.old) and the new output file will be created.) 4. To include column headers in your output files, select the INCLUDE COLUMN HEADERS IN OUTPUT FILES checkbox. 5. In the Select batch file options pane, specify the Batch folder name: field (the folder where the batch file will be stored). The default location is the location specified on the User Preferences tab of the Preferences window for the Output folder: field. A complete path, including the drive letter, must be indicated (e.g., C:\Users\Public\Pulbic Documents\NCC\NDSR 2015\Output for Windows 7 and Windows 8). To search for a different folder, use the BROWSE button. 6. Specify a Batch file name: field, type output.bat. Use the BROWSE button to search for a previously created batch file. 7. To create a batch file, select the WRITE COMMAND TO BATCH FILE button. This will create a batch file in the location indicated. When you receive the Create File dialog box, verify the pathway and file name. Select OK to create a file. 8. To create an output file for more than one project: Create an output batch file as indicated above. Change the Output file project abbreviation: field from the dropdown list and/or the Folder where output file will be stored: field in the Select output file options pane. If desired, change the options under If an output file for this project already exists. Select the WRITE COMMAND TO BATCH FILE button. The following prompt appears: “File <batch file location and name> exists. Append to existing file?” To add the command to create the newly selected project to the current batch file, select OK. To cancel the operation and not save your changes, select the CANCEL button. Close the window when finished. 9. To run the batch file and generate output for the projects you have indicated, refer to “Running a Batch File”. Chapter 9 NDSR Utilities Page 9.9 Running a Batch File The following steps describe how to run a batch file. 1. Close the NDSR program. 2. Create a batch file. 3. Do one of the following: Find the location of the batch file in Windows Explorer and double click on the icon next to the name to run the file. Go to the Start menu and select Run. In the Open: field, type “<file location and filename>.bat” (e.g., C:\temp\output.bat). Select OK. NOTE: You may use a scheduling program to run the batch files at a specified time (e.g., midnight) on a regular basis. Check with your technical support staff for details. Importing and Exporting Record Header Information When you collect header information using other programs (e.g., Microsoft Excel or Microsoft Word), you can import record header information into NDSR using the Record Import function. To manipulate record header information using another program (e.g., Microsoft Excel or Microsoft Word), you can export record header information from NDSR using the Record Export function. NOTE: You may import or export Header tab information for all record types (recalls, records, record-assisted recalls, user recipes, menus, and DSAM user products). How to Import Header Information to NDSR A separate document or spreadsheet must be created for each project to which you want to import header information. The following steps describe how to import record header information into NDSR. NOTE: All records created by importing Header tab information will have the Date of Entry: field set as the date of import. The Date of Entry: field appears on the Record Properties Report and can be edited. 1. Create a document using word-processing or spreadsheet software (e.g., Microsoft Excel or Microsoft Word). 2. Type the header fields information for each record on one line or row. Be sure the fields are properly set up in the document or spreadsheet. Use the format as shown in the “Header Field Requirements” table on the following pages. Type the data for the fields in the order listed in the table; any field can be left blank. NOTE: Any fields for which no data will be imported must not contain a space. Page 9.10 Separate each field, including blank fields, using the TAB key. If you indicated on the Methods tab in the Preferences window that you do not want all header fields to appear on the record header, leave those fields blank. NDSR Manual Do not use a table to format the fields when using word-processing software. 3. Select FileSave As to save the document. Choose the location of the folder and file name. Change the Save as type: field to text only (.txt) file. This saves the document or spreadsheet as a text (.txt) file. When you are using a spreadsheet program to create the file, save it as a tab delimited text file. You will receive a warning that the file may contain features that are not compatible with Text (Tab delimited) format. Click YES to save. 4. Open NDSR. When you receive the Folder, Project and Record Selection window, select the project. If the project does not yet exist, create a new project following the steps in “Chapter 3, Managing NDSR Projects”. 5. Select RecordImport Header. 6. When you receive the Select Import File dialog box, choose the appropriate subdirectory and file. Select the OK button. 7. When NDSR has imported the record header information, participant IDs and intake dates appear in the Record selection: pane on the Folder, Project and Record Selection window. You may complete the intake records according to “Chapter 4, Managing NDSR Intake Records and DSAM”. When a record with the same participant ID and intake date already exists, you can overwrite the existing record, cancel the import for the specific header, or cancel the import for all records. Chapter 9 NDSR Utilities Page 9.11 Header Field Requirements The following table describes the required format for the Record Header fields that can be imported into NDSR. Field Name Participant ID: Format Description Participant Name: 50 characters or fewer, including spaces Date of Birth: mm/dd/yyyy (including slashes) Gender: (Type only the first letter of the gender option. Use capital letters.) Life Stage Group: M(ale), F(emale), or U(nspecified) Date of Intake: mm/dd/yyyy (including slashes) Visit Number: 3 characters or fewer, including spaces Site ID: 12 characters or fewer, including spaces Interviewer ID: 12 characters or fewer, including spaces 12 characters or fewer, including spaces Enter the three digit code of the group, 101= Infants 0-6 months 102= Infants 7-12 months 103= Children 1-3 104= Children 4-8 105= Males 9-13 106= Males 14-18 107= Males 19-30 108= Males 31-50 109= Males 51-70 110= Males over 70 years old 111= Females 9-13 112= Females 14-18 113= Females 19-30 114= Females 31-50 115= Females 51-70 116= Females over 70 years old 117= Pregnancy 18 or younger 118= Pregnancy 19-30 119= Pregnancy 31-50 120= Lactation 18 or younger 121= Lactation 19-30 122= Lactation 31-50 How to Export Header Information from NDSR The following steps describe how to export record Header tab information from NDSR. 1. Open NDSR. When you receive the Folder, Project and Record Selection window, select the project that contains the records from which you want to export header information. Determine whether you want to export record header information from all records in the highlighted project or from only selected records. Page 9.12 NDSR Manual 2. To export header information from all records in a project, select at least one record in the Record selection: pane, and then select RecordExport HeaderAll. To export header information from only selected records, select the records to be exported and then select RecordExport HeaderSelected. NOTE: To select multiple records, refer to “Appendix 1, Using Windows”. 3. When you receive the Select Export File dialog box, choose the folder where you want the export file saved and insert a file name in the File name: field. The file name will default to the project name with a text extension (.txt). Select the SAVE button. When the target file already exists, you will be asked whether you want to overwrite the file. 4. When NDSR has exported the record header information, the record header data appears in the text file you created. These data sets are in the format indicated in “Header Field Requirements”. Reference Information For information about installing or deleting NDSR, refer to “Chapter 2, Installation”. For information about managing projects, refer to “Chapter 3, Managing NDSR Projects”. For help with copying records into projects, refer to “Chapter 3, Managing NDSR Projects”. For information about restoring projects created in a previous version of NDSR, refer to “Appendix 23, Upgrading”. Chapter 9 NDSR Utilities Page 9.13