1
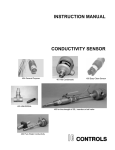
INSTRUCTION MANUAL MODEL 450 TWO-WIRE CONDUCTIVITY TRANSMITTER IC CONTROLS Page 2 450 Instructions IC CONTROLS CONTENTS INST450-201 450 Menu . . . . . . . . . . . . . . . . . . . . Installation . . . . . . . . . . . . . . . . . . . Analyzer Mounting . . . . . . . . . . . . . . Analyzer Wiring . . . . . . . . . . . . . . . . Sensor Mounting . . . . . . . . . . . . . . . Sensor Connections . . . . . . . . . . . . . Program Settings . . . . . . . . . . . . . . . NOTICE OF COMPLIANCE . . . . . . . . . STARTUP . . . . . . . . . . . . . . . . . . . . Analyzer Startup Tests . . . . . . . . . . . . Calibration Settings . . . . . . . . . . . . . . Serial Number Display . . . . . . . . . . . . Easy Menu . . . . . . . . . . . . . . . . . . . Easy to Use—Remembers Where You Were Home Base—Press Sample . . . . . . . . . Arrow Keys . . . . . . . . . . . . . . . . . . Enter Key . . . . . . . . . . . . . . . . . . . Edit Mode . . . . . . . . . . . . . . . . . . . . Conductivity CALIBRATION . . . . . . . . . . Conductivity Calibration Kits . . . . . . . . . Calibration Using Standard Solutions . . . . Editing the Cell Constant . . . . . . . . . . . Calibration by Grab-Sample - Sensor in line . Manual Calibration . . . . . . . . . . . . . . Selecting a Conductivity standard . . . . . . Sensor Life . . . . . . . . . . . . . . . . . . msiemens vs µsiemens Display . . . . . . . Measurement Range . . . . . . . . . . . . . 4 5 5 5 5 5 5 6 7 7 7 7 8 8 8 8 8 9 11 12 13 14 15 15 16 16 16 17 450 Instructions Range Switching . . . . . . . . . . . . . Cell Constant and Range . . . . . . . . . 4 to 20 mA Adjustable Output Signal . . . Reversible 20 to 4 mA Output . . . . . . Simulated 4 to 20 mA Output . . . . . . . Output Specifications . . . . . . . . . . . SENSOR INSTRUCTIONS . . . . . . . . . Preparation for use . . . . . . . . . . . . Calibration for Conductivity Measurement Electrode Storage . . . . . . . . . . . . Restoring Sensor Response . . . . . . . Mechanical Cleaning of Sensor . . . . . Chemical Cleaning of Sensor . . . . . . Caution and Error Messages . . . . . . . Display Prompts . . . . . . . . . . . . . . Glossary . . . . . . . . . . . . . . . . . . . Configuration of Program . . . . . . . . . Troubleshooting . . . . . . . . . . . . . . Isolating the Problem . . . . . . . . . . . NEW Conductivity SENSOR . . . . . . . . Repair and Service . . . . . . . . . . . . . Parts List . . . . . . . . . . . . . . . . . . Appendix A: 450 Spec. Sheet . . . . . . . MICRO CONDUCTIVITY TRANSMITTER Appendix B: 650 Spec. Sheet . . . . . . . MICRO pH/ORP TRANSMITTER . . . . Industrial Products Warranty . . . . . . . Index . . . . . . . . . . . . . . . . . . . . . . . . . . . . . . . . . . . . . . . . . . . . . . . . . . . . . . . . . . . . . . . . . . . . . . . . . . . . . 17 17 18 18 18 18 19 19 19 19 20 20 20 22 24 25 26 28 28 29 30 31 32 32 34 34 36 37 Page 3 IC CONTROLS 450 Menu Page 4 450 Instructions IC CONTROLS Installation Installation Analyzer Mounting Installing the Quick Disconnect The analyzers can be surface mounted using No 8 screws. Dimensions are 10cm x10cm x10cm (4"x4"x4") case on horizontal 5.4cm (2 1/8") centers and vertical 11.7cm (4 5/8") centers. The sensor is supplied with a 5 foot lead as standard. The analyzer should be kept within this distance. The analyzer should be positioned to allow the sensor still connected up to be removed and the electrode placed in a beaker on the floor for cleaning or calibration. The safest place for the beaker is on the floor the service person stands on. The electrical connector is on the right side, and the electrode connectors are on the bottom. Vertical separation between rows of analyzers should allow for periodic remove/reinstall of electrode lead and. IC CONTROLS recommends 7cm (3 inch) minimum separation between rows / columns. Ground +24 VDC Analyzer Wiring 1 3 2 Return Wiring Quick Disconnect Flow Insertion The analyzer requires 24 VDC power via the 4-20mA Quick Disconnect, terminals 1 and 3. The microprocessor for stable operation needs a good ground. A good ground connection can typically be made by using shielded 4-20 mA wire connected to ground in the Quick Disconnect and to earth at the 24V power supply. Sensor Mounting The sensor should be mounted tip down at an angle anywhere from horizontal to vertical, horizontal is best because air bubbles will rise to the top and grit will sink both bypassing the sensor. The sensor is designed to be installed with a holder fitting, for flow (-21 option) P/N A2300121 a 1 inch flowcell, for insertion (-26 option) P/N A2300126 a 1 inch MNPT threaded fitting, or for submersion (-25 option) using a ½ NPT split nipple P/N A2300134 on a 1/2 FNPT inside threaded 3/4 pipe support. Submerge to ensure probe is wetted by fluid to 5" deep. Note: Do not mount where a lot of air bubbles rise in the tank; they will cause Submersion spikes in your Conductivity readout. If a bubble is allowed to lodge in the sensor tip, electrical continuity between the electrodes may be disrupted. Sensor Connections Sensor connection is straight forward: Simply line-up the watertight fitting on the sensor with the socket on the analyzer and press in. Rotate the plug collar to ensure a solid and watertight seal. Program Settings Sensor Connections Before putting analyzer into operation verify your Conductivity selection and your settings to ensure that they agree with your sensor constant selection and your actual sensor. For a more detailed description of how to adjust any program setting, refer to the appropriate section of this instruction manual. For the 4-20 mA output, set high limit and low limit. Set preference for temperature °C/°F units in [ CONF ] [ unit ]. 450 Instructions Page 5 IC CONTROLS Installation Factory Default Program Settings The following program settings are the default settings for the analyzer. New analyzers will have these settings unless the setup has already been customized for your application. Conductivity Sensor Constant Cell Constant set to 1.0 Output, Default settings Input to be transmitted Low setting High setting ON/OFF switch Units Conductivity 0 mS 10.00 mS ON [ 1E-3 ] selectable (0 µS) (10,000 µS) Sample units Conductivity units [1E-3] milli-Siemen (µ-Siemen [1E-6] selectable) Metric units, temperature °C Celsius (°F Fahrenheit selectable) Temperature compensation method Automatic TC using temperature input. Input Signal Damping Signal Damping for Conductivity Temperature is 1 second is 1 second NOTICE OF COMPLIANCE US This meter may generate radio frequency energy and if not installed and used properly, that is, in strict accordance with the manufacturers instructions, may cause interference to radio and television reception. It has been type-tested and found to comply with the limits for a Class A computing device in accordance with specifications in Part 15 of FCC Rules, which are designed to provide reasonable protection against such interference in an industrial installation. However, there is no guarantee that interference will not occur in a particular installation. If the meter does cause interference to radio or television reception, which can be determined by turning the unit off and on, the user is encouraged to try to correct the interference by one or more of the following measures: Reorient the receiving antenna, Relocate the meter with respect to the receiver Move the meter away from the receiver Plug the meter into a different outlet so that the meter and receiver are on different branch circuits If necessary, the user should consult the dealer or an experienced radio/television technician for additional suggestions. The user may find the following booklet prepared by the Federal Communications Commission helpful: How to Identify and Resolve Radio-TV Interference Problems.This booklet is available form the U.S. Government Printing Office, Washington, D.C. 20402 Stock No. 004-000-00345-4. CANADA This digital apparatus does not exceed the Class A limits for radio noise emissions from digital apparatus set out in the Radio Interference Regulations of the Canadian Department of Communications. Le present appareil numérique n émet pas de bruits radioélectriques depassant les limites applicables aux appareils numériques (de la class A) prescrites dans le Règlement sur le brouillage radioélectrique édicté par le ministère des Communications du Canada. Page 6 450 Instructions STARTUP IC CONTROLS STARTUP If the analyzer is new follow the procedures described in Installation, before mounting. If the analyzer has been previously installed all that is required is to attach the sensor to the analyzer and then to turn on the power. The startup will begin by scrolling a flashing [ IC CONTROLS ] across the display while performing memory tests. The analyzer will then display in sequence the model number, in this case [ 450 ], and software option numbers, plus the program version number, e.g.[ 2.00]. The program then proceeds to the display test which will light each of the implemented display segments in turn. Next it scrolls the 10 digit serial number and then proceeds to display Conductivity, (or errors if detected). All program settings, calibration settings, and defaults will have been remembered by the analyzer. +Err or -Err display indicates that the input is offscale. Either the electrode is not in solution, or the sample is higher than the display can show in units, or the sensor is not connected properly. If the display periodically flashes [ err ] select [ Err ] from main menu to see what errors have been detected by the analyzer. Calibration Settings If the analyzer was calibrated previously then the analyzer will use the calibration settings, otherwise factory default settings are used. IC CONTROLS recommends a full two point chemical calibration after initial startup. See calibration section. Analyzer settings and parameters can be viewed and/or changed at any time. Serial Number Display The analyzers serial number can be reviewed at any time. Press the SAMPLE key four (4) times to call up the startup display routine above. Repeat as often as desired. The serial number is the 10 digit number that scrolls across the screen. 450 Instructions Page 7 IC CONTROLS Easy Menu Easy Menu The layout of the program is shown in the menus found on pages 4. The menu can be used as a quick reference guide to all the analyzer functions. Easy to Use—Remembers Where You Were The analyzer remembers where home base is, it remembers which areas of the menu you used last, and it will loop around columns in the menu for you. You can explore the menu with the arrow keys to find any capability and simply press SAMPLE to return to home base. Then use the Right arrow key to return to exactly where you were. Home Base—Press Sample The SAMPLE key’s function is to give you a known starting point displaying the home sample or home input . The SAMPLE key is usable from anywhere in the menu. The Conductivity display is the home base display for the analyzer. The analyzer’s two inputs, Conductivity and temperature, are arranged underneath each other at the left-hand side of the menu. Use the Up arrow key to display each of the readings in turn. From anywhere in the menu the SAMPLE key can be used to return to the Conductivity or home sample display. The program will safely abort whatever it was doing at the time and return to displaying the Conductivity sample. Features 1. The analyzer has a built-in timer which returns the program to displaying the home base if no key has been pressed for 15 minutes. This time-out has the same effect as pressing the SAMPLE key. 2. When in doubt as to what the analyzer is displaying pressing the will ensure it is displaying Conductivity. SAMPLE key Arrow Keys The arrow keys on the keypad are used to move around in the menu. The same keys can have other functions as well, e.g. see under Edit Mode, but when moving from frame to frame in the menu these keys work as expected. Example: Press SAMPLE to make sure that we are at home base. Press the right arrow key. One of the prompts in the column starting with [ Conductivity ] will be displayed. Use the Up arrow key to display the prompt above. If the prompt at the top is displayed the program will loop around. Press the Up key until [ CONF ] is displayed. Press the Sample key to return to the Conductivity display. Press the Right key again and [ CONF ] will be displayed again. Enter Key The ENTER key is used to access the ability to change values or edit settings. Page 8 450 Instructions Edit Mode IC CONTROLS Edit Mode Edit mode is used to change a numeric value or to select between different options. The values and settings which can be edited are identified by the darker shading in the menus. Any frame which has a white background cannot be modified by going into edit mode but can be viewed. Editing by Selecting a Setting Examples of selecting a value are on/off settings and switching between different units (e.g. Metric or Imperial). Editing a value is like picking an option from a list. You can see only one item on the list at a time. Example: Turn output off. From the menu select [ out ] [ ON.OF ]. The analyzer will now display either [ ON ] or [ OFF ], which are the two choices. To change the setting, press ENTER to go into edit mode. The display will start blinking. Use the up arrow key to switch between the possible options, which in this case are [ ON ] and [ OFF ]. When [ ON ] is displayed, press ENTER again to accept the new setting and leave edit mode. Editing a Numeric Value Numeric values such as an alarm setpoint are adjusted by going into edit mode and then adjusting each digit until the new value is displayed. Use the arrow key to move between digits and use the up arrow key to adjust each digit. When you press ENTER to go into edit mode two things will happen. First, the last digit will start blinking to show that this digit can be changed. Second, any blank spaces will change to zeros and a plus or minus sign will appear. Now each digit can be accessed. Change between positive and negative numbers by switching between plus and minus sign using the up arrow key when the plus/minus segment is blinking. Press ENTER again to leave edit mode. Before the new value is changed, the analyzer will check the new value to make sure that it is within range. If the new value is lower than the lowest value allowed for that frame then the analyzer will use the lowest allowable value instead of the new value you entered. Likewise if the new value you entered is higher than allowable then the highest allowable value is used instead. The analyzer will display whatever value it has stored in memory. Example: Change the low from 0 to 2. From the menu select [ out ] [ LO ]. The current setpoint (e.g. [ 0.00 ]) will be displayed. Press ENTER to enter edit mode. The display will change to [ + 00.00] and the last digit will start blinking. Press three times to move left two digits. The third digit from the end will now be blinking. Press the up arrow key to change the ‘0’ to ‘2’. Press ENTER again and the display will change from [ +00.00] to [ +02.00 ] indicating that the new value has been stored in memory. The 4-20 mA low setpoint has now been changed from 0.00 Conductivity to 2.00 Conductivity. Press the left arrow key to display [LO ], [out] etc. 450 Instructions Page 9 IC CONTROLS Edit Mode Summary of Key Functions in Edit Mode Enters edit mode. The entire display or a single digit will blink to indicate that the analyzer is in edit mode. Press the Enter key again to leave edit mode and accept the new value. Adjusts blinking digit upward or selects the previous item from the list. If a ‘9’ is displayed then the digit will loop around to show ‘0’. Numeric Values only: move right one digit. If blinking is already at last digit display will loop to the +/- sign on the left. Page 10 450 Instructions Conductivity CALIBRATION IC CONTROLS Conductivity CALIBRATION The conductivity sensor-analyzer system is usually calibrated using standard conductivity solutions. Alternatively grab-sample analysis on a previously calibrated laboratory reference conductivity meter can be used. Both methods are described in this section. Overall system accuracy is maintained by calibrating the sensor and analyzer together in a concentration close to the expected sample concentration. The analyzer is generally calibrated in one of the standard concentration ranges 0-100 µSiemen, 0-1000 µSiemen, or 0-10 000 µSiemen. Calibration determines the effective cell constant of the conductivity sensor. The cell constant is affected by the shape of the sensing surface and surface characteristics of the electrode surface. The effective cell constant will change over time as surface conditions on the electrodes change, deposits form, and anything else affects either the controlled volume or the effective electrode surface area. The 450 features an output hold. Output hold goes into effect as soon as it is turned on. Select [Hold ] then [ on ] then if desired edit the output value desired, then press SAMPLE to return to the Conductivity display, then start your calibration. The output hold will stay in effect until a) you select [Hold ] then [ OFF ], b) no key is pressed for 15 minutes, c) the startup routine is called by pressing SAMPLE four times, d) the power is interrupted so the analyzer reboots. The output hold feature avoids false alarms and erratic signal output caused by a routine calibration. Conductivity Standards easily used with the 450 are: 100 µSiemen Standard A1100161 500ml btl. 1000 µSiemen Standard A1100162 500ml btl. 10,000 µSiemen Standard A1100163 500ml btl. These standards come in 500 mL bottles and are available in six-packs. 450 Instructions Page 11 IC CONTROLS Conductivity CALIBRATION Conductivity Calibration Kits As part of IC CONTROLS ongoing commitment to assure our customers the best possible results from their conductivity systems we QC IC CONTROLS Standards to NIST Materials and then we put together calibration kits. These kits conveniently package requirements for Conductivity calibrations, in amounts for easy use, along with the necessary utensils and accessories. These items are provided in durable plastic. This way, you are assured reliable and accurate results, and at the same time the technician’s job is easier. Calibration Kit Contents Part No. Size A1400051 100 µSiemen A1100161 (x2) 500 mL Low Conductivity Calibration Kit Demin Water A1100192 (x4) 500 mL Cell Constants 0.01 to 0.2 Syringe A7400031 Polyethylene graduated cylinders A1400052 Medium Conductivity calibration kit Cell constants 0.1 to 5.0 A1400053 High Conductivity Calibration Kit Cell constants 10.0 to 50.0 A1100007 (x2) Sensor Cleaning Brush, ¼" A1100016 Instruction sheet V9803460 100 µSiemen 1,000 µSiemen 10,000 µSiemen 10 mL 100 mL 1 1 A1100161 500 mL A1100162 (x2) 500 mL A1100163 500 mL Demin Water A1100192 Syringe A7400031 500 mL Polyethylene Beakers A7400020 (x3) Sensor Cleaning Brush, ¼" A1100016 1 Instruction sheet V9703440 1 10 mL 250 mL 10,000 µSiemen A1100163 (x2) 500 mL 100,000 µSiemen A1100164 (x2) 500 mL 367,000 µSiemen A1100165 (x2) 500 mL 100,000 µSiemen A1100164 (x2) Syringe A7400031 Sensor Cleaning Brush, ¼" A1100016 1 Instruction sheet V9703470 1 A1400054 Cleaning and Conditioning Solution Conductivity Chemical Cleaning Kit Demin Water A1100192 A1100005 (x4) Syringe A7400031 Polyethylene Beakers A7400020 (x2) Sensor Cleaning Brush, ¼" A1100016 Rubber Gloves 500 mL 10 mL 500 mL 500 mL 10 mL 250 mL 1 1 pair About Calibration . . . When you buy from IC CONTROLS our commitment to you includes the standards to properly clean and calibrate the equipment. Our commitment does not stop when we ship the equipment, it continues until you have calibrated the analyzer system, are satisfied with the results, and beyond. To assist you in obtaining reliable results, IC CONTROLS developed calibration and cleaning procedures and manufactures and packages the necessary standards, buffers and supplies in convenient usage quantities. If you need assistance with calibration techniques or any other matter, our application development lab. specialists are only a toll-free phone call away for advice and/or lab. simulation of your problem. Buy from IC CONTROLS because you get outstanding customer support as well as quality industrial equipment; in short, REAL SOLUTIONS. Page 12 450 Instructions Conductivity CALIBRATION IC CONTROLS Calibration Using Standard Solutions Select a conductivity standard with a concentration which is close to the expected sample concentration. A second conductivity standard can be used to verify that the conductivity sensor is responding properly. This second standard can be any value, but typically 10% of the first standard works well, giving checks at 100% and 10% of range. NOTE 1: IC CONTROLS manufactures Conductivity Standards and QC’s them to NIST materials. Certificates of Traceability to Nist materials are available as P/N A1900333. IC CONTROLS also packages these standards and supplies in Calibration kits 1. Obtain calibration supplies such as a graduated cylinder or beaker which is large enough to submerse the conductivity sensor and distilled or demineralized water in a squeeze bottle for rinsing, or an IC CONTROLS Calibration Kit. 2. Remove the conductivity sensor from the process and inspect the sensor for any deposits. If the sensing surface is coated, clean the sensor before proceeding. See Sensor Maintenance, Chemical Cleaning . Rinse the sensor cell area with distilled water. 3. Rinse the graduated cylinder or beaker and pour some of the selected higher conductivity standard into the graduated cylinder or beaker. 4. Immerse the sensor into the beaker or cylinder. Ensure the sensor electrode area is completely submerged. If the sensor has vent holes then the sensor must be submerged below the vent holes and there must be no air bubbles inside. Important: a) Air bubbles inside the controlled volume area of the conductivity sensor cause major upsets to ion flow and result in large errors in the reading. b) If the analyzer is not reading on-scale at this point, it may be because the wrong concentration range is selected. Go to maimn menu, [COND.], [UNIT], , ENTER , select either [1E-3] for milli-Seimen, or [1E-6] for micro-Siemen, then ENTER to install your choice. For more; see Calibration, m-Siemen vs µ-Siemen Display. Figure 1 CONDUCTIVITY CALIBRATION 5. Press and/or [ up arrow ], [ cond ] [ CAL ] from the menu, then compare the displayed standard value to that of the standard you are using, if different edit the 450 value to agree (see “Edit Mode, Editing a Numeric Value" above). The analyzer will display in units of mSiemen or µSiemen, depending on the setting of [ cond] [ unit ]. SAMPLE 6. Press to start the calibration. The analyzer will display a flashing concentration reading. From here on the calibration process is automatic. 450 Instructions Page 13 IC CONTROLS Conductivity CALIBRATION The analyzer will wait until the reading has stabilized. As soon as the reading is stable the analyzer calculates the cell constant automatically using the temperature-compensated value of the conductivity standard. At this point the display stops blinking and displays the conductivity based on the adjusted cell constant or standardized reading. While the display is blinking you may at any time force the analyzer to standardize by pressing the ENTER key. Note: a) It is possible to repeat or restart the calibration at any time. Simply press SAMPLE , then as needed to restart or to repeat the calibration. b) If an error occurs during calibration, an [ err ] message will be displayed. Refer to the error description tables towards the back of the instruction manual for the appropriate action to be taken. 7. The conductivity sensor and analyzer pair are now calibrated. The system should not require calibration for one month or more. Used conductivity standard should be discarded because exposure to air and contamination causes the conductivity of standards to change. Note: a) You can inspect and/or manually adjust the cell constant for the conductivity sensor by pressing SAMPLE [ cond ] [ CELL ] [ 1 ] from the menu. The cell constant should correspond closely to the constant stamped on the cell. b) The sensor condition can be verified by measuring the concentration of a second standard. Rinse the sensor surface with demineralized water and then measure the concentration of the second standard (refer to step 4). If the analyzer reads correctly then the sensor condition is good. If the analyzer does not read correctly then the sensor may not be responding properly and may need to be cleaned. Editing the Cell Constant The cell constant for the conductivity sensor can be adjusted either by doing a calibration or by directly editing the value stored in memory. To edit the cell constant, press SAMPLE [ cond] [CELL ] [ 1 ] from the menu. The cell constant will be displayed with a multiplication factor of 1, which is the actual cell constant. To edit the displayed constant, press ENTER to go into edit mode. The [ 1 ] frame will accept cell constants between 0.01 and 99.99. For pure-water applications conductivity sensors with low cell constants are used. When working with cell constants smaller than 0.1, you can view the cell constant with more resolution by selecting [ CELL ] [ 100 ] from the menu. The cell constant will be multiplied by 100 to give two extra digits of resolution. Page 14 450 Instructions IC CONTROLS Conductivity CALIBRATION Calibration by Grab-Sample - Sensor in line The grab-sample technique is quicker and easier if the sensor is not easily accessible or if standard solutions are unavailable or impractical. This procedure describes how to calibrate the analyzer without taking the sensor out of the process. The procedure requires that you measure the sample with a second analyzer. 1. Obtain the following materials: second conductivity analyzer and calibration supplies for it, a clean beaker for taking a sample, and a calculator. 2. Record the 450 cell constant for the sensor. The cell constant is displayed by pressing SAMPLE , and then [ cond ] [ CELL ] [1 ] from the menu. 3. Draw a representative sample from the process. 4. Record the conductivity of the sample as displayed by the 450 conductivity analyzer. 5. Measure the conductivity of the sample using the second conductivity analyzer and record the conductivity reading. For best results the sample should be at the same temperature and the analyzers should use the same temperature compensation method. 6. Calculate the new cell constant to be entered into the 450 analyzer using the following formula: new cell const = lab reading × old cell const field reading For example, if the 450 analyzer is reading 820 µSiemen, the cell constant (from step 2) is 1.0, and the reading from the second method is 890 µSiemen, then the new cell constant becomes new cell const = 890 ×1.0 =1.09 820 7. Adjust the cell constant to the new value, e.g. 1.09 as in the example. The cell constant is adjusted by [ cond ] [ CELL ] [ 1 ] from the menu. Press Enter to go into edit mode, then adjust the displayed value. 8. The analyzer should now read accurately. Manual Calibration It is possible to bypass the regular calibration procedures and manual edit the cell constant. When the cell constant is manual edited there is no way for the analyzer to verify the accuracy of the adjustments made. Warnings are given, however, if the edits fall outside the preset ‘safe’ regions. Unlike a normal calibration, the manual edits allow values outside reasonable limits. Error messages will come up but the new values will be installed nonetheless. IC CONTROLS advises that the operator use one of the regular calibration procedures whenever possible. 450 Instructions Page 15 IC CONTROLS Conductivity CALIBRATION Selecting a Conductivity standard Conductivity standards provide the simplest and most accurate method of calibrating the 450 analyzer. The analyzer has been programmed to recognize the three standards most commonly used for calibration: 100, 1000, and 10,000 µSiemen at 25°C(77°F). Simply place the sensor in the standard and the analyzer will use the correct temperature adjusted value for the standard. Temperature Dependence of standards The Conductivity of a solution is dependent on temperature. To achieve greater accuracy, the temperature-compensated values for the 100, 1000, and 10,000 Conductivity standards are calculated by the analyzer. If manual temperature compensation has been selected then the manual temperature compensation setpoint is used as the standards temperature. Other standards or Custom standards If a standard with a Conductivity value other than 100, 1000, or 10,000 µSiemen is to be used, press [ Cal ] [ 100 ], then ENTER to edit to the known value. Values entered this way are not temperature compensated; the standards is assumed to have the specified Conductivity value at the current temperature. Sensor Life The Conductivity Sensor need to be calibrated periodically to maintain accurate Conductivity measurement. IC CONTROLS recommends electrodes be calibrated every 30 days. Depending on the process, they may need to be calibrated more frequently, or less frequently. mSiemen vs µSiemen Display Since the analyzer display has 4 digits, the highest number that can be displayed is 9999. When the main sample is set to display using µSiemen in [ cond ] [ unit ] and the conductivity goes higher than 9999 µSiemen, the analyzer shows [+Err] instead of a reading. Internally the analyzer is still calculating the conductivity reading correctly, but it can’t be displayed properly. While this condition occurs caution 1.9 will appear in the error menu. A program setting allows you to display the conductivity using either µSiemen or mSiemen units, where 1 mSiemen = 1000 µSiemen. Normally it is best to display the conductivity using µSiemen units for maximum resolution, and to switch to mSiemen units only if the sample exceeds the maximum display capability of 9999 µSiemen. By changing the display units a reading of 9000 µSiemen would change to 9.00 mSiemen. Switch between units by changing the setting in [ cond ] [ unit ]. The options are [ 1E-3 ] for mSiemen (1E-3 is scientific notation for milli or thousandth) and [ 1E-6 ] for µSiemen (1E-6 is scientific notation for micro or millionth). This setting is independent of the units selected for the outputs and alarms. For example, the display units for the sample frame can be mSiemen, while the output1 units selection, [ out ] [ out1 ] [ unit ], can be set to [ 1E-6 ] for µSiemen. Refer to the output and alarm sections for further information on setting outputs and alarms. Page 16 450 Instructions Conductivity CALIBRATION IC CONTROLS Measurement Range The 450 conductivity analyzer is a single range analyzer. The analyzer input circuit for the conductivity input has one range so changing the sensor to one with a new more appropriate cell constant is used to avoid going off-scale. Note: there is no relationship between the range of the conductivity input circuit and the output range feature of the 4-20 mA output —these two functions are completely independent of each other. The measuring range of the instrument, e.g. 0 to 10,000 µSiemen, is determined by the gain used by the analyzer itself and the cell constant of the conductivity sensor. The range described in this manual are based on a cell constant of 1.0 cm-1. The displayed measuring range is determined by multiplying the cell constant by the analyzer range gain factor 10,000. The analyzer input range gain, combined with the cell constant of the conductivity sensor, determine the full scale of the analyzer. The analyzer full scale is 10,000 µSiemen with a 1.0 constant sensor. Sensor Constant and Range Changing the sensor cell constant, to say 0.01, achieves an analyzer with a range of 0 to 100 µS, while a sensor constant of 0.1 achieves 1000 µS, and a change to sensor constant 10 produces 100,000 µS. When the sensor is replaced with a sensor having a different cell constant, you should first change the cell constant in program memory. Press SAMPLE then [ up arrow ] or to [ CONF] [ cond ] [ CELL] [ 1 ] from the menu, then edit the cell constant. The program will allow cell constants between 0.001 and 99.99 to be entered. 450 Instructions Page 17 IC CONTROLS 4 to 20 mA Adjustable Output Signal 4 to 20 mA Adjustable Output Signal A 4 to 20 mA output is provided over the 24V DC power leads. The output has an on/off switch and adjustable low and high. This makes it possible, for example, to transmit short span Conductivity signals such as 40 to 70 µSiemen, using the high and low adjustments. To adjust the output span or output “window” for Conductivity signals, set [ LO ] to correspond to the low end of the scale or 4 mA output, and set [ HI ] to correspond to the high end of the scale or 20 mA output. The analyzer will automatically scale the output according to the new settings. Reversible 20 to 4 mA Output The low scale setting will normally be lower than the high scale setting. It is possible to reverse the output or “flip the window” by reversing the settings of the low and high scale. Example: Define an output window from 70 to 20 µSiemen with 70 corresponding to 4 mA output and 20 µSiemen corresponding to 20 mA output. Set [ LO ] to 70 and set [ HI ] to 20. Simulated 4 to 20 mA Output Select [ cur ] from the menu to display the output current in mA that is presently being transmitted by this output signal. The display will be updated as the output signal changes based on the input signal and the program settings. From here you can watch the output respond to the change in the input signal. This is useful for verifying program settings and for testing the hardware calibration. To simulate a different 4 to 20 mA output signal press ENTER to enter edit mode. Edit the displayed mA value to display the desired output needed for testing the output signal. Press ENTER to select the displayed value. The output signal will be adjusted to put out the desired current. This process can be repeated as often as necessary. The output signal is held at the displayed level until the program leaves this part of the menu. Output Specifications 4 to 20 mA maximum span 0 to 100 % scale span adjustment 0.1 mA steps output resolution 0.01 mA steps Page 18 450 Instructions SENSOR INSTRUCTIONS IC CONTROLS SENSOR INSTRUCTIONS Preparation for use 1. Moisten the sensor body with tap water and remove the lower (storage) plastic cap. Rinse the exposed Conductivity elements with tap water. 2. For the first time use, or after long term storage, immerse the lower end of the sensor in a conductivity standard for 30 minutes. This wets the Conductivity electrodes and prepares them for stable readings with test solutions. Note: IC CONTROLS sensors are shipped dry. These electrodes are often ready for use immediately with typical accuracy of ±2 % Conductivity without calibration. We recommend a soak in standard plus calibration with an appropriate conductivity standard to achieve good accuracy.. Calibration for Conductivity Measurement Overall system accuracy is maintained by calibrating the sensor and analyzer together in a concentration close to the expected sample concentration. The cell and analyzer can generally be calibrated in two of four typical ranges: 0-100 microSiemen, 0-1,000 microSiemen, 0-10,000 microSiemen, and 0-100,000 microSiemen. Where to do Conductivity Calibrations A suitable place to conduct a calibration is at a counter or bench with a sink, in an Instrument Shop or Laboratory. However, IC CONTROLS Conductivity calibration kits are kept small and portable so that they can be taken to installation sites, together with a bucket of water (for cleaning/rinsing) and a rag/towel (for wiping or drying). NIST Traceable IC CONTROLS QC’s Conductivity Standards with NIST materials. Certificates of Traceability to NIST are available as P/N A1900333 Electrode Storage Short term: Rinse the sensor electrodes in demin water, allow to dry and store dry. Long term: Rinse the sensor electrodes in demin water, allow to dry, cover with tip with a plastic shipping cap and store dry. 450 Instructions Page 19 IC CONTROLS SENSOR INSTRUCTIONS Restoring Sensor Response Mechanical Cleaning of Sensor The sensor will require cleaning if sludge, slime, or other tenacious deposits build up in the internal cavities of the sensor. Wherever possible clean with a soft brush and detergents. General debris, oil films and non-tenacious deposits can be removed in this way. For flat-surface sensors use a potato brush and a beaker or bucket of water with a good liquid detergent. Take care not to scratch the electrode surfaces. Internal cavities of standard sensors can be brushed with a soft quarter-inch diameter brush. Plastic body sensors should be washed over all the wetted surfaces with a soft cloth. This will return their appearance to like-new condition and removes sites for buildups to occur. Check the sensor calibration against a conductivity standard and calibrate if necessary. If the sensor is still not responding properly, proceed to the Chemical Cleaning of Sensor procedure, otherwise return the sensor to the process. Chemical Cleaning of Sensor Obtain a supply of IC CONTROLS conductivity sensor cleaning and conditioning solution, available in conductivity chemical cleaning kit A1400054. NOTE 1: A suitable place to do chemical cleaning is at a counter or bench with a Laboratory sink, with a chemical drain where waste is contained and treated before release. Note 2: IC CONTROLS kits are kept small and portable so that they can be taken to installation sites, together with a plastic bucket of water (for rinsing) and a rag/towel (for wiping or drying). Waste materials (particularly acid leftovers) should be returned to the Laboratory sink for disposal. CAUTION: Use extra caution when handling cleaning solution as it contains acid. Wear rubber gloves and adequate facial protection when handling acid. Follow all A1100005 MSDS safety procedures. a) Set up the cleaning supplies where you plan to do the cleaning. Lay out the sensor cleaning brush, syringe, cleaning solutions and rinse solutions, plus your beakers and sensor if already at hand. Note: Ensure your Cleaning Solution beaker is on a firm flat surface since it will contain acid. b) First remove the conductivity sensor from the process and examine it for deposits. Use the sensor cleaning brush and tap rinse water to loosen and flush away any deposits within the cell measurement area. Detergent can be added to remove oil films and non-tenacious deposits. Hard scales and other tenacious deposits may require chemical cleaning. c) CHEMICAL CLEANING Fill a beaker ¾ full of cleaning and conditioning solution A1100005, or for flow-through sensors with internal passages, seal one end to form a container inside the sensor body. Page 20 450 Instructions SENSOR INSTRUCTIONS IC CONTROLS d) Lower the conductivity cell into the center of the beaker until the top hole is submerged; or pour the solution in until the flow sensor is full. e) Keep removing, re-immersing the sensor until the sensor electrodes appear clean. Stubborn deposits can be worked on with the brush and syringe to squirt cleaner into hard to reach areas. CAUTION: Use great care when brushing and squirting acid. Wear rubber gloves and facial protection. f) Rinse the cleaned sensor thoroughly in tap water and squirt with Demin 2nd rinse before calibrating. g) Check the sensor against a conductivity standard near full scale. If the sensor is still not developing the proper cell constant ±5% (or reading in the standard), re-clean or proceed to troubleshoot or replacement. h) A clean, rinsed and dried conductivity sensor should read near zero in air. If it does not, troubleshoot the sensor, wiring, and analyzer. If the sensor cannot be returned to good condition, it may need replacing. As a rule of thumb the cell constant as calculated by the analyzer should be within 25 % of the original or intended value stamped on the sensor. Note: If none of the above procedures succeed in restoring your sensor response, it is near the end of its useful life and should be replaced. 450 Instructions Page 21 IC CONTROLS Caution and Error Messages Caution and Error Messages Detected errors and/or cautions can be displayed by the analyzer. From the keypad press or from the main menu select [ Err]. If there are no error or caution messages, [ NONE ] will be displayed, otherwise scroll through the error list using the Up arrow key. Errors and/or cautions cannot be removed from this list directly; each error/caution will be removed automatically when appropriate, e.g. errors associated with improper calibration will be cleared after a successful calibration. Caution and Error messages are numbered. Messages 1 through 5 are identified as [ En.e ] where n is the input number and e is the error number. Messages 6 through 9 are less serious and are identified as cautions instead, e.g. [ CAn.e ]. Off-scale errors for Conductivity are not numbered and are identified as [+ Err ] and [ - Err ], depending on whether the input is at the top or the bottom of the scale. The off-scale error is displayed instead of the sample reading and does not show up in the error menu with the numbered error messages, if any. input/source input number for error/caution messages Conductivity 1 °C 2 Error and Caution Messages for Conductivity Error Description Causes Solutions E1.2 Effective cell constant would be less than 0.005. Previous cell constant retained. Wrong or bad standard used for calibration. Redo calibration, specifying correct standard. Also refer to troubleshooting section. E1.3 Effective cell constant would be > 100. Previous cell constant retained. Wrong standard used for calibration. Redo calibration, specifying correct standard. Also refer to troubleshooting section. E1.5 Temperature compensator is off-scale. Process outside of TC operating range of -10°C to 210°C Use manual temperature compensation. E1.7 Check TC connections or install TC. Conductivity shows Linear Temperature negative value. Compensation Constant is set too high. Determine a lower LTCC to use to correctly compensate for temperature. A typical value is 2.00 (for 2% change per °C). CA1.9 Display shows +Err Conductivity value too high for the LCD display. Change the display units from microSiemen to milliSiemen in [cond] [ unit ]. 0.00 Open circuit— sensor not connected. No conductivity measurement. Page 22 Sensor resistance saturated the analyzer. Sensor with different cell constant should be used. 450 Instructions IC CONTROLS Caution and Error Messages Error Messages for Temperature Error Description Causes Solutions E2.1 Temperature reading off-scale. Temperature less than -10°C. Display shows [ -Err ] Temperature less than -10°C. Verify process and sensor location. Electronic Service necessary. Check wiring is good. Check TC is near 1,000 ohm if not replace sensor Return to IC CONTROLS Temperature reading off-scale. Temperature greater than 210°C. Display shows [ +Err ]. Temperature compensator not attached. Attach compensator. Electronic Service necessary. Check wiring is good. Check TC is near 1,800 ohm if not replace sensor Return to IC CONTROLS E2.2 450 Instructions Verify process temp. and sensor location. Page 23 IC CONTROLS Display Prompts Display Prompts [ °C ] [ do ] [ CAL ] [ CELL] [ CONF] [ cur ] [ cuSt ] [ donE] [ Err ] [ Er.95 ] [ °F ] [ HI ] [ Hold] [ LO ] [ OFF ] [ OFFS ] [ ON ] [ ON.OF] [ out ] [ Cond ] [ Cn.dA ] [ SEt ] [ tc ] [ ltcc ] [ t.dA ] [ t.Of ] [ unit ] Page 24 Temperature in degrees Celsius; temperature input. Dopress to do reset/clear action. Calibrate.analyzer. Conductivity Sensor Cell Constant. Configuration of program to match hardware. Signal output in mA, or current. Custom standards value for calibration. Donereset/clear action has been taken. Error EPROM checksum failed. Temperature in degrees Fahrenheit. High limit (20 mA) for 4-20 mA output window Output hold during calibration. Low limit (4 mA) for 4-20 mA output window. off. mV offset. on. On/off switch. 4-20 mA analog output channel Conductivity input. Conductivity damping. Setpoint; select manual temperature compensation. temperature compensation. temperature compensation linear %change per °C. temperature damping. temperature zero offset. Metric / Imperial unit selection. ENTER 450 Instructions Glossary IC CONTROLS Glossary EPROM Erasable/Programmable Read Only Memory. The EPROM chip holds the program which determines the functioning of 450 analyzer. Replacing the EPROM chip with a chip containing a new or an updated program changes the way the analyzer functions. The EPROM chip is programmed by the manufacturer. EEPROM Electronically Erasable/Programmable Read Only Memory. The EEPROM chip holds the customer settings for the program which determines the site functioning of 450 analyzer. The customer settings in the EEPROM chip will not disappear even if the chip losses power. Menu The series of prompts which determine the layout of the program used by the analyzer. Microprocessor An integrated circuit (chip) which executes the program in the EPROM and controls all the input/output functions. RAM Random Access Memory. Memory in RAM can be both written to and read from. The contents of RAM will disappear as soon as the RAM chip loses power. Sensor Both a sensing and a drive electrode are needed for the analyzer to measure the Conductivity. Commonly these are combined into one sensor. A temperature detector may be built into the sensor as well. TC Temperature Compensator. Temperature Compensation Correction for the influence of temperature on the Conductivity. The analyzer reads out concentration as if the process were at 25 degrees Celsius, regardless of actual solution temperature. 450 Instructions Page 25 IC CONTROLS Configuration of Program Configuration of Program The 450 analyzer has been designed with ease-of-use in mind. In most cases the analyzer has been configured to work with a 1.0 constant Conductivity sensor. No configuration of the analyzer is necessary unless another sensor constant was ordered. Several options are available and if they are changed the program configuration settings need to be set accordingly. Initalizing All Program Settings Occasionally it may be desirable to reinitialize all of the program’s settings to bring them back to factory defaults. Executing the initialization procedure will cause the analyzer to reset all the program variables and settings to factory defaults and then proceed with the normal startup display. The initialization procedure is not to be used unless you are absolutely sure that you want to restore the analyzer to factory default configuration. After the analyzer program been initialized you will need to re-enter the output signal settings, as well as the program configuration if it was different from the factory default settings. For your convenience the analyzer will remember your most recent menu selections. Temperature Calibration The temperature compensator in the sensor can sometimes show a small variance in its offset. To make the sensor read correctly use the following procedure. The current temperature, as measured by the temperature sensor, needs to be known. If the sensor is in the process, the known temperature of the process can be used. Select [ CONF ] [ t.OF ] from the menu. A frame showing the current temperature offset will be displayed. Use the following formula to calculate the new offset value: offset new = Tcorrect − Tdisplayed + offset current Page 26 450 Instructions Configuration of Program IC CONTROLS For example, if the temperature input is reading 24.6°C and it should be reading 25.0°C and the current offset is 0.2: offset new = 25.0 − 24.6 + 0.2 = 0.6 The calculation works both for Celsius and Fahrenheit units. Select [ CONF ] [ t.OF ] from the menu, Press ENTER , then change the temperature offset to the new offset value. Press ENTER again to leave edit mode. Return to the sample menu and verify that the temperature input is now displaying the correct temperature. Selecting °C or °F By default the analyzer will use metric units, meaning that temperature will be displayed using degrees Celsius and that the prompt for the temperature input will be [ °C ]. The analyzer can also be made to use degrees Fahrenheit and the prompt for the temperature input will be [ °F ] instead of [ °C ] throughout the program. For practical reasons the temperature input is identified as [ °C ] throughout this instruction manual and in the menus. To select Fahrenheit units for the analyzer, select [ unit ] from the configuration menu, then go into edit mode and change the [ °C ] prompt to [ °F ]. Input Damping Both the active measurement and the temperature can be damped to provide the user with a means to deal with rapidly varying or noisy signals. Damping range is 0 to 60 seconds. With 0 there is no damping and each reading the analyzer makes is used to directly update the display and 4-20 mA output. The factory default 1 second adds the next seconds readings to the first and divides by two, this gives very fast response. Selecting 60 seconds adds the readings for all 60 seconds and divides by 60, providing an excellent smooth damping out of turbulent readings. Any selection between 0 and 60 can be made. For conductivity select [ CONF ] [ c.dA ] [ 0001 ] from the menu, Press ENTER , then change the Conductivity damping to the new number of seconds. Press ENTER again to leave edit mode. For temperature select [ CONF ] [ t.dA ] [ 0001 ], etc. 450 Instructions Page 27 IC CONTROLS Troubleshooting Troubleshooting When trying to determine what the problem is with a Conductivity loop, there are a few simple steps to follow: Isolating the Problem FIRST: Write down the symptoms. a) Conductivity reading b) temperature reading c) Conductivity Cell Constant in Analyzer d) Sensor Cell Constant on the label. SECOND: Separate the sensor from the analyzer so that the problem can be isolated. Disconnect the sensor from the analyzer at the fitting (see diagram). In this way it is much easier to test and determine if the problem is in the Conductivity sensor or in the analyzer. THIRD: See if the analyzer reads correctly without the sensor. a) Remove the sensor leads from the Analyzer, it should read 0 or close to zero b) Insert a 1000 ohm 1 % resistor across the sensor cell connections and a second one across the sensor TC connections Note the Temperature reading and if it is approximately 0 °C (or 32 °F) then the analyzer looks allright c) Change the analyzer cell constant setting to 1.00 Note the Conductivity reading and if it is approximately 1000 (or 1.00 if reading milli-Siemens) then the analyzer looks allright. d) If the reading is far from 1000 µSiemen, do a calibration with [ Cal ] set to 1000 and note the Conductivity Cell Constant in [ CELL ]. FOURTH: Problem isolated If the [ CELL ] is within 10 % of 1.00, then the analyzer is good. If the analyzer is good then the problem is in the sensor — refer to the Conductivity Sensor Instructions section above. If the [ CELL ] is greater than 10% out, the problem may be in the analyzer. IC CONTROLS recommends replacement or return to the factory for repair. Page 28 450 Instructions NEW Conductivity SENSOR IC CONTROLS NEW Conductivity SENSOR The 450 uses IC CONTROLS model 414 universal, flow / submersion / insertion, Conductivity Sensor. Standard Sensors are: for Conductivity 414-1.0 Various other options may also be selected. MODEL 414 BASIC DESCRIPTION (Universal Quick Connect General Purpose pH Sensor) Universal flow / submersible / insertion, conductivity sensor, includes IC CONTROLS 455 temperature compensator, 0-90°C (50-194°F) at 0-65 PSI, up to 100 PSI at 65°C (149°F), supplied with 1.0 cell constant and carbon electrodes standard. Body 6.5" CPVC, fits flowcell (1" slip) and has 1/2" FNPT submersion pipe mount, lead 5 ft., fitting BNC. Includes one instruction manual. ADD pH ELECTRODE OPTIONS (to change from General Purpose electrode) -0.01 0.01 sensor constant, recommended for 0-10 and 0-100 µSiemen, OK on 0-1.0 -0.1 0.1 sensor constant, recommended for 0-1,000 µSiemen, OK on 0-100 -1.0 1.0 sensor constant, recommended for 0-10,000 µSiemen, OK on 0-1,000 ADD BODY OPTIONS -12 PVDF body, maximum 130°C (266°F), or 175 PSIG at 50°C (122°F) ADD MOUNTING OPTIONS -21 CPVC one piece flow cell / insertion fitting, 1" slip, P/N A2300121 -22 PVDF Flow cell, 1" FNPT, P/N A2300122 -23 316 SS flow cell, 1" FNPT, P/N A2300123 -24 CPVC flow cell, 1" FNPT, P/N A2300124 -25 Submersion close-nipple 1/2"NPT split to pass wire after fitting, for 3/4" support pipe with 1/2"FNPT inside. -26 CPVC Quick Connect insertion fitting, 1" MNPT, to 60 PSIG at 90°C (194°F), P/N A2300126 -28 SS Quick Connect insertion fitting, 1" MNPT, to 100 PSIG at 150°C (302°F), P/N A2300128 -29 PVDF Quick Connect insertion fitting, 1" MNPT, to 100 PSIG at 110°C (230°F), P/N A2300129 ADD APPLICATION & MAINTENANCE OPTIONS -70(x) Extra copies of instruction sheet (x) qty $ (EA) -71(x) Long sensor cable; minimum 6 ft., maximum 100ft. Length (x) times $/ft. -72(x) Conductivity 400 J-Box to analyzer cable (x) feet, P/N A9200000, length times $/ft -77 Quick connect fitting for 450 -78 Surface 400 J-Box & terminal strip for extn. wiring -89 Stainless steel tag -90 100 µSiemen standard, 500 mL bottle, P/N A1100161 -91 1,000 µSiemen standard, 500 mL bottle, P/N A1100162 -92 10,000 µSiemen standard, 500 mL bottle, P/N A1100163 -93 100,000 µSiemen standard, 500 mL bottle, P/N A1100164 -97 Medium Conductivity calibration kit for cell constants 0.1 & 1.0, P/N A1400052; for cell constant 0.01 P/N A1400051 -99 Special Sample Order: 414 -1.0 - - - - 414 -1.0 - - - -91 Basic universal general purpose conductivity sensor Basic universal general purpose conductivity sensor with calibration standards RECOMMENDATION FOR CALIBRATION AND SERVICE SUPPLIES: Minimum: Low and high range for sensor constant selected of options -90 & -91 or -91 & -92. Normal: Medium Conductivity calibration kit for cell constants 0.1-1.0, P/N A1400052 (option -97) - 1 mixed 6-pack of conductivity standards and accessories - one 500 mL 100 µSiemen (P/N A1100161) - three 250 mL polyethylene beakers (P/N A7400020) - two 500 mL 1,000 µSiemen (P/N A1100162) - one sensor cleaning brush (P/N A1100016) - one 500 mL 10,000 µSiemen (P/N A1100163) - one instruction sheet (P/N V9703440) - one 500mL bottle of demin water for rinsing (P/N A1100192) - one 10 mL syringe (P/N) A7400031) 450 Instructions Page 29 IC CONTROLS Repair and Service Repair and Service Field Service is dispatched in Canada from the home office of IC CONTROLS. In North America, call 1-800-265-9161, or call 519-941-8161. Outside of North America consult your authorized IC CONTROLS distributor, or: IC CONTROLS Ltd. 29 Centennial Road Orangeville, Ontario CANADA FAX 519-941-8164 email: [email protected] www.iccontrols.com Page 30 450 Instructions IC CONTROLS Parts List Parts List Part Number Description 450 Conductivity Analyzer A9051041 Assembly, 450 Conductivity / 4-20mA PCB A9051039 Assembly, M50 micro board (Conductivity) A9051038 Assembly, M50 display board A9141016 Assembly, 450 case, complete A2500269 2 inch Pipe mounting kit, 53-series Conductivity Sensor - Standard Replacement 414-1.0 1.0 constant Conductivity Sensor, with TC. 414-0.1 0.1 constant Conductivity Sensor, with TC 414-0.01 0.01 constant Conductivity Sensor, with TC Sensor - Mounting options A2300121 CPVC one piece flow cell assembly A2300126 CPVC quick connect Insertion Fitting A2300134 CPVC ½ split nipple submersion adapter Calibration Supplies A1400052 Conductivity Calibration Kit, 1 year supply, incl. beakers & solutions A1400051 0.01 cell Conductivity Calibration Kit, 1 year supply, incl. beakers & solns A1400054 Conductivity Chemical Cleaning Kit, includes instructions, solutions, equipment. A1100161-6P 100µS Standard, 6 pak, 6x500ml bottles A1100162-6P 1000µS Standard, 6 pak, 6x500ml bottles A1100163-6P 10000µS Standard, 6 pak, 6x500ml bottles A1100164-6P 100000µS Standard, 6 pak, 6x500ml bottles A1100192-6P Deionized Rinse Water, 6 pak, 6x500ml bottles A1100005-6P Cleaning & Conditioning Solution, Conductivity, 6-pak, 6x500ml bottles A1100020 Beaker, Tuff Plastic, 250ml for field calibrations A7400031 Syringe, for rinsing sensor, 10ml A1100007 Tuff plastic 100ml Graduated Cylinders for 0.01 A1100016 Sensor cleaning brush ¼ inch 450 Instructions Page 31 IC CONTROLS Appendix A: 450 Spec. Sheet Appendix A: 450 Spec. Sheet MICRO CONDUCTIVITY TRANSMITTER Why buy from IC CONTROLS ? You will get REAL SOLUTIONS for conductivity: reliable, accurate, long-life sensors, free application support and ongoing help with calibration and service. You get sensors designed to give you the best possible value for money expended. The result is reliable, continuous, accurate conductivity readings, even in dirty, hot, humid corrosive environments, and a commitment from the IC CONTROLS team to get you those results. You also get access to our conductivity specialists who are generally chemists and/or chemical engineers that understand conductivity sensors and how they interact with process liquids. Plus, you get access to our unique Application Development Laboratory. If you want help or better performance we will review your application and analyze your used conductivity sensor. The findings are formulated into recommendations to improve your results, cut your work and costs. Frequently new users have told us that they where referred to IC CONTROLS by staff at a related plant who where impressed by the extra value work done for them, the improved results and reduced workload achieved. They want to buy from IC CONTROLS too, to get that extra value for the day when they encounter problems. IC CONTRO LS does not just supply the conductivity analyzers and sensors and some backup tests. Our commitment to you includes the supplies to properly clean and calibrate your sensors, and continues until you are satisfied with the results. IC CONTROLS developed calibration and cleaning procedures for continuous measurement calibration systems. IC CONTROLS NIST traceable conductivity standards and cleaning solutions provide you with the ability to maintain accuracy through proper calibration and cell integrity. An IC CONTROLS conductivity user in need of assistance with calibration techniques or any other matter is only a phone call away from our Application Development Laboratory specialists for advice and/or laboratory simulation of your problem. Buy from IC CONTROLS because you know the accuracy of your readings are as good as the quality of your calibrations, and you want the best results. In short, buy from IC CONTROLS because you want to make your life easier, plus maintain or improve your conductivity results, but not increase costs. You want REAL SOLUTIONS to conductivity, value for your money! Page 32 450 Instructions IC CONTROLS Appendix A: 450 Spec. Sheet IC CONTROLS has incorporated economy and microprocessor intelligence into your Two-Wire Transmitter. The Model 450, economically brings you flexibility, reliability, and ease of use. The transmitter is easily applied and surface mounts in a 10x10x10 cm (4x4x4 inch) size NEMA 4X (IP 65) corrosion resistant case, with options available for pipe or panel mount. BASIC CONDUCTIVITY (SENSOR and MICROPROCESSOR TRANSMITTER) Basic, input/output isolated microprocessor CONDUCTIVITY Transmitter with IP65 (NEMA 4X) surface type 10x10x10cm (4x4x4" ) MODEL 450 PVC housing. Clear front window shows 4½ digit display selectable for Conductivity, temperature (C or F), mA output and program messages. Precision ±1 digit, stability ±2 digits, accuracy ± 0.5 %. 24 VDC 2-wire operated with 4-20 mA output. Program configurable 4-20 mA span. Includes one instruction manual and one 414-1.0 constant Conductivity Sensor (select alternate constant below), which fits 1" flowcell and has 1/2" FNPT submersion pipe mount, lead 5 ft. ADD SELECT CONDUCTIVITY RANGE AND SENSOR CONSTANT -0.01 for 0-10 and 0-100 µSiemen, 0.01 constant Conductivity Sensor -0.1 for 0-1000 µSiemen, 0.1 constant Conductivity Sensor -1.0 for 0-10,000 µSiemen, 1.0 constant Conductivity Sensor -9 No sensor (supply analyzer only) ADD ELECTRODE MOUNTING OPTIONS -21 CPVC Flow cell / insertion fitting, one piece, 1" slip, P/N A2300121 -24 CPVC Flow cell, 1" FNPT, P/N A2300124 (requires an option -26 electrode insertion fitting) -25 Submersion close-nipple 1/2"NPT split to pass wire after fitting, for 3/4" support pipe with 1/2"FNPT inside -26 CPVC insertion fitting, Quick Connect, 1" MNPT, to 60 PSIG at 90°C (194°F), P/N A2300126 ADD (FUTURE) DIGITAL OUTPUT OPTION -35 Serial two-way link (replaces 4-20 mA), permits multiple networked analyzers using one cable and Advanced IC Net TM Intelligence Access window program. See Computer Section. ADD CALIBRATION & MAINTENANCE OPTIONS -70(x) Extra copies of instruction sheet (x) qty $ (EA) -85 24 VDC power supply for up to 6 transmitters, model 520 (115 or 230 VAC +/- 10% 50/60 Hz) -87 Panel Mounting Kit for Transmitter -88 2" Pipe Mounting Kit for Transmitter -89 Stainless steel tag -90 100 µSiemen standard, 500 mL bottle, P/N A1100161 (available 6 pack is P/N A1100161-6P) -91 1,000 µSiemen standard, 500 mL bottle, P/N A1100162 (available 6 pack is P/N A1100162-6P) -92 10,000 µSiemen standard, 500 mL bottle, P/N A1100163 -93 100,000 µSiemen standard, 500 mL bottle, P/N A1100164 -96 Low Conductivity calibration kit for cell constants 0.01 - 0.1, P/N A1400051; STDs, supplies, instructions -97 Medium Conductivity calibration kit for cell constants 0.1 - 1.0, P/N A1400052; STDs, supplies, instructions -99 Special (available 6 pack is P/N A1100163-6P) (available 6 pack is P/N A1100164-6P) Sample Order: 450 - - MICROPROCESSOR CONDUCTIVITY Transmitter, with general purpose 1.0 constant sensor APPLICATION TIPS: - automatic temperature compensation is standard - If the analyzer is to be mounted at over 1.5M (5ft) distance from the Conductivity sensor, use a 400-50 J-Box and P/N A9200000, (Belden 8722 [or equal] 4 conductor 2 shielded) cable, good for 100 ft. or more. See wiring Dwg D59900208 - Two-wire 24V DC instruments require a power supply. To specify IC CONTROLS 2-wire power supply, see Model 520 - For local indicators on the 2-wire loop, see Model 552 Digital Display - Alarms can be added remotely using Model 585 Signal Conditioner 450 Instructions Page 33 IC CONTROLS Appendix B: 650 Spec. Sheet Appendix B: 650 Spec. Sheet MICRO pH/ORP TRANSMITTER IC CONTROLS has incorporated economy and microprocessor intelligence into your Two-Wire Transmitter. The Model 650, economically brings you flexibility, reliability, and ease of use. The transmitter is easily applied and surface mounts in a 10x10x10 cm (4x4x4 inch) size NEMA 4X (IP 65) corrosion resistant case, with options available for pipe or panel mount. The analyzer stores the last calibration record Settings can be viewed, functions tested, calibration updated without opening the enclosure, by use of the front panel keypad. Analyzer Intelligence goes beyond measurement and control; it provides the user with calibration data, including events such as offset, slope and diagnostics. Ultimately, the user has superior control with a competitive advantage. Let IC CONTROLS provide you with REAL SOLUTIONS to your control needs - buy IC CONTROLS Basic Microprocessor Two-Wire Transmitter. Why buy from IC CONTROLS ? You will get REAL SOLUTIONS for pH/ORP: reliable, accurate, long-life sensors, free application support and ongoing help with calibration and service. You get sensors designed to give you the best possible value for money expended. The result is reliable, continuous, accurate pH readings, even in dirty, hot, humid corrosive environments, and a commitment from the IC CONTROLS team to get you those results. You also get access to our pH/ORP specialists who are generally chemists and/or chemical engineers that understand pH and ORP electrodes and how they interact with process liquids. Plus, you get access to our unique Application Development Laboratory. If you want help or better performance we will review your application and analyze your used pH or ORP sensor. The findings are formulated into recommendations to improve your results, cut your work and costs. Frequently new users have told us that they where referred to IC CONTROLS by staff at a related plant who where impressed by the extra value work done for them, the improved results and reduced workload achieved. They want to buy from IC CONTROLS too, to get that extra value for the day when they encounter problems. IC CONTRO LS does not just supply the pH/ORP analyzer and sensors and some backup tests. Our commitment to you includes the supplies to properly clean and calibrate your pH or ORP sensors, and continues until you are satisfied with the results. IC CONTROLS developed calibration and cleaning procedures for continuous measurement calibration systems. IC CONTROLS NIST traceable Intuitive user friendly program, “just seems to do what you expect ”: Auto calibration - recognizes your buffers Self and sensor diagnostics Fault tolerant Output hold during calibration programmable 4-20 mA output Frequent adjustments by keypad prompts Program remembers what you were doing No long key sequences Instant return to sample Operate without menu or manual LCD displays pH, ORP, temperature, mA output and calibration status. EASY MAINTENANCE Reliable, separately powered and input-output isolated circuit prevents computer interface problems Calculates pH Offset and Efficiency Durable IP65 (Nema 4X) housing withstands hosing down. Survives acid and caustic fumes, humidity, etc. USES UNIVERSAL SENSOR Application Development Laboratory specialists for advice and/or Submersible Flow Insertion laboratory simulation of your problem. Buy from IC CONTROLS USE ANY OF THE FOLLOWING pH buffers, ORP standards and cleaning solutions provide you with the ability to maintain accuracy through proper calibration and cell integrity. An IC CONTROLS pH/ORP user in need of assistance with calibration techniques or any other matter is only a phone call away from our because you know the accuracy of your readings are as good as the quality of your calibrations, and you want the best results. In short, buy from IC CONTROLS because you want to make your Local digital indication 420 mA signal life easier, plus maintain or improve your pH results, but not increase costs. You want REAL SOLUTIONS to pH measurement, value for your money! Page 34 The Model 650 is 24 VDC Two-Wire loop operated. 450 Instructions Appendix B: 650 Spec. Sheet IC CONTROLS Model 650 pH/ORP SELECTION GUIDE ORDER BY FAX: (519) 941-8164 BASIC PH/ORP (ELECTRODE and MICROPROCESSOR TRANSMITTER) Basic, input/output isolated microprocessor pH/ORP Transmitter with IP65 (NEMA 4X) surface type 10x10x10cm (4x4x4" ) PVC MODEL 650 housing. Clear front window shows 4½ digit display selectable for pH (or mV), ORP mV, temperature (C or F), mA output and program messages. Precision ±1 digit (0.01 pH), stability ±2 digits (0.02 pH) per month, accuracy ± 0.5 %. 24 VDC 2-wire operated with 4-20 mA output. Program configurable 4-20 mA span. Includes one instruction manual and one 0-14 pH (614-2-34) or ORP (614-4) sensor, which fits 1" flowcell and has 1/2" FNPT submersion pipe mount, lead 5 ft, BNC fitting. ADD SELECT ELECTRODE -2 pH SENSOR 614-2 general purpose 0-14 pH tip, 10-90°C (32-194°F) at 0-65 PSI (up to 100 PSI below 65°C (149°F) -4 ORP SENSOR 614-4 Platinum ORP tip -6 Flat Glass pH tip, 0-50°C (32-122°F), 0-12 pH -9 NO electrode (supply analyzer only) ADD ELECTRODE MOUNTING OPTIONS -21 CPVC Flow cell / insertion fitting, one piece, 1" slip, P/N A2300121 -24 CPVC Flow cell, 1" FNPT, P/N A2300124 (requires an option -26 electrode insertion fitting) -25 Submersion close-nipple 1/2"NPT split to pass wire after fitting, for 3/4" support pipe with 1/2" FNPT inside -26 CPVC insertion fitting, Quick Connect, 1" MNPT, to 60 PSIG at 90°C (194°F), P/N A2300126 -30 supply pH electrode without temperature compensator. (Note; ORP electrode has no TC) ADD OPTION TEMPERATURE COMPENSATION NOT NEEDED ADD (FUTURE) DIGITAL OUTPUT OPTION -35 Serial two-way link (replaces 4-20 mA), permits multiple networked analyzers using one cable and Advanced IC Net TM Intelligence Access window program. See Computer Section. ADD CALIBRATION & MAINTENANCE OPTIONS -42 ORP Standard +476 mV, P/N A1100154, (does 6 calibrations) -43 ORP Standard +263 mV, P/N A1100083, (does 6 calibrations) -44 ORP Standard +66 mV, P/N A1100084, (does 6 calibrations) -45 ORP kit, 1 year supply, P/N A1600061 ( 2 ea. 263 & 66mV STD, wash soln., 4 bkrs, sqeeze btl, 6 DI water) -70(x) Extra copies of instruction sheet (x) qty $ (EA) -85 24 VDC power supply for up to 6 transmitters, model 520 (115 or 230 VAC +/- 10% 50/60 Hz) -87 Panel Mounting Kit for Transmitter -88 2" Pipe Mounting Kit for Transmitter -89 Stainless steel tag -91 600-50 for electrode over 45M from analyzer. Requires 4 wire shielded cable P/N A9200006 or equal. -93 pH Buffer 6-pack: 4, 7 & 10, P/N A1100054. For Pure Water see P/N A1100220-6P -94 pH Buffer 4 pH, 500 mL, red, P/N A1100051. For Pure Water see P/N A1100216 -95 pH Buffer 7 pH, 500 mL, green, P/N A1100052. For Pure Water see P/N A1100217 -96 pH Buffer 10 pH, 500 mL, blue, P/N A1100053. For Pure Water see P/N A1100218 -97 Electrode storage solution, 500 mL bottle, P/N A1100090 -98 pH service kit: 1 year supply, P/N A1600050 (6 of 4,7,10, wash soln., 4 bkrs, squeeze btl, 6 DI water) -99 Special Sample Order: 650 - - MICROPROCESSOR pH/ORP Transmitter, with general purpose pH sensor APPLICATION TIPS: - For automatic temperature compensation, analyzer requires -34 TC option in 614 pH sensor - If the analyzer is to be mounted at over 45M (100ft) distance from the pH sensor, use a 600-50 interface and cable, P/N A9200006, good for 1000 ft. or more. - Two-wire 24V DC instruments require a power supply. To specify IC CONTROLS 2-wire power supply, see Model 520 or option -5 - For local indicators on the 2-wire loop, see Model 552 Digital Display - Alarms can be added remotely using Model 585 Signal Conditioner 450 Instructions Page 35 IC CONTROLS Industrial Products Warranty Industrial Products Warranty Industrial instruments are warranted to be free from defects in material and workmanship for a period of twelve (12) months from the date of installation or eighteen (18) months from the date of shipment from IC CONTROLS whichever is earlier, when used under normal operating conditions and in accordance with the operating limitations and maintenance procedures in the instruction manual, and when not having been subjected to accident, alteration, misuse, or abuse. This warranty is also conditioned upon calibration and consumable items (electrodes and all solutions) being stored at temperatures between 5°C and 45°C (40°F and 110°F) in a non-corrosive atmosphere. IC CONTROLS consumables or approved reagents must be used or performance warranty is void. Accessories not manufactured by IC CONTROLS are subject to the manufacturer’s warranty terms and conditions. Limitations and exclusions: Industrial electrodes, and replacement parts, are warranted to be free from defects in material and workmanship for a period of three (3) months from the date of installation or eighteen (18) months from the date of shipment when used under normal operating conditions and in accordance with the operating limitations and maintenance procedures given in the instruction manual and when not having been subjected to accident, alteration, misuse, abuse, freezing, scale coating, or poisoning ions. Chemical solutions, standards or buffers carry an “out-of-box” warranty. Should they be unusable when first “out-of-box” contact IC CONTROLS immediately for replacement. To be considered for warranty, the product shall have an RA (Return Authorization) number issued by IC CONTROLS customer service department for identification and shall be shipped prepaid to IC CONTROLS at the above address. In the event of failure within the warranty period, IC CONTROLS, or its authorized dealer will, at IC CONTROLS option, repair or replace the product non-conforming to the above warranty, or will refund the purchase price of the unit. The warranty described above is exclusive and in lieu of all other warranties whether statutory, express or implied including, but not limited to, any implied warranty of merchantability or fitness for a particular purpose and all warranties arising from the course of dealing or usage of trade. The buyer’s sole and exclusive remedy is for repair, or replacement of the non-conforming product or part thereof, or refund of the purchase price, but in no event shall IC CONTROLS (its contractors and suppliers of any tier) be liable to the buyer or any person for any special, indirect, incidental or consequential damages whether the claims are based in contract, in tort (including negligence) or otherwise with respect to or arising out of the product furnished hereunder. Representations and warranties made by any person, including its authorized dealers, distributors, representatives, and employees of IC CONTROLS, which are inconsistent or in addition to the terms of this warranty shall not be binding upon IC CONTROLS unless in writing and signed by one of its officers. Page 36 450 Instructions IC CONTROLS Index + Err 7 - Err 7 4 to 20 SEE Current output Automatic range switching 17 Battery backup 7 Buffers custom buffer 16 selecting 16 temperature dependence of 16 Calibration 11, 13, 15, 17 cell constant 15 grab sample 15 output hold 11 settings 7 standards 11 temperature input 26 Cell constant 15, 17 x 100 14 Celsius 27 Conductivity SEE ALSO Calibration Conductivity sensor cell constant 14 maintenance 20 Configuration 26 - 27 Program 26 units 27 Current output 18 during calibration 11 output hold 11 reversing 18 short span 18 simulating 18 Custom buffer 16 Default settings 5 Diagnostics memory test 7 startup procedure 7 Edit mode 9 - 10 change settings 9 key functions 10 numeric values 9 Electrode 25 Calibration 19 Preparation 19 Restoring Response 20 Storage 19 Error messages 22 CA 1.9 16, 22 clearing 22 E 1.1 22 E 1.2 22 E 1.3 22 E 1.5 22 E 1.7 22 E 2.1 23 E 2.2 23 meaning of 24 Farenheit 27 Home base 8 Hysteresis 25 Installation 5 - 7, 26 - 27 Keypad arrow keys 8 ENTER key 10 SELECT key 10 UP key 10 Manual range switching 17 Memory test 7 Menu 4, 8, 25 home base 8 MicroSiemen 16 MilliSiemen 16 manual adjustment 15 Startup diagnostics 7 display 8 error checking 7 initial startup 7 loss of power 7 Program Initialization 26 serial munber 7 Temperature calibration 26 - 27 offset 26 Temperature compensation 25 manual 16 standard buffers 16 Timer 15 minute timeout 8 Timers 16 Troubleshooting 28 isolating the problem 28 Units 27 conductivity 13, 16 Version Program 7 Warranty 36 Offset manual adjustment 15 Output hold 11 Program Version 7 Prompts 24 Range switching 17 SAMPLE key 8 Sample menu 8 Sensor life 16 Serial Number 7 Simulated current output 18 Slope 450 Instructions Page 37