1
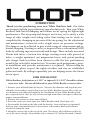
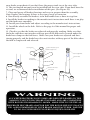
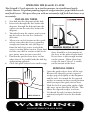
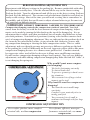
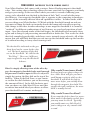
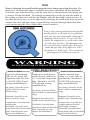
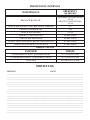
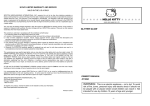
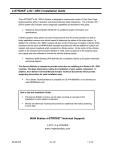
USER MANUAL
Congratulations on your purchase of another cutting-edge suspension
product from White Brothers! Please read this manual completely before
you ride. It will help you to set your fork for optimum performance.
IMPORTANT CONSUMER SAFETY INFORMATION
WARNING: RIDING A BIKE IS DANGEROUS. NOT PROPERLY MAINTAINING OR INSPECTING YOUR BIKE AND ITS COMPONENTS IS EVEN MORE
DANGEROUS. IT IS ALSO DANGEROUS TO NOT READ AND FOLLOW THESE
INSTRUCTIONS.
1. NEVER REMOVE STEERER TUBE FROM CROWN. REMOVING IT WILL RENDER
BOTH THE CROWN AND STEERER TUBE INOPERABLE. IF SERVICE BECOMES NECESSARY OR REMOVAL OCCURS, PLEASE CALL WHITE BROTHERS CUSTOMER SERVICE
FOR PRODUCT EVALUATION AND DIAGNOSIS.
2. DO NOT PERFORM ANY MODIFICATIONS OR ADJUSTMENTS THAT ARE NOT OUTLINED IN THIS MANUAL. SEE THE TUNING SECTION FOR MORE DETAILS.
3. INSPECT YOUR FORK BEFORE EVERY RIDE. INSPECT THE CROWN, TUBES, AND
AXLE SEAT AREAS FOR ANY SIGNS OF FATIGUE, BENDING, CRACKING OR OTHER
DAMAGE. MAKE SURE THE FORK CAPS AND ALL FORK HARDWARE AND AXLE ARE
TIGHT BEFORE EACH RIDE. IF YOU NOTICE ANY TYPE OF DAMAGE, DO NOT RIDE
IT. RETURN IT TO YOUR DEALER OR TO WHITE BROTHERS FOR A COMPLETE INSPECTION AND NECESSARY REPAIR.
4. PERFORM ALL RECOMMENDED MAINTENANCE ACCORDING TO THE MAINTENANCE SECTION OF THIS MANUAL. FAILURE TO PERFORM MAINTENANCE COULD
DRASTICALLY REDUCE THE FORK’S LIFE, PERFORMANCE AND CAUSE YOUR FORK
TO BE A SAFETY HAZARD.
5. WHITE BROTHERS RECOMMENDS THAT YOU WEAR PROPER SAFETY EQUIPMENT
EVERY TIME YOU RIDE, INCLUDING AN APPROVED BICYCLE HELMET. NEVER RIDE
AT NIGHT WITHOUT LIGHTS.
6. ALWAYS USE GENUINE WHITE BROTHERS PARTS. USE OF AFTERMARKET REPLACEMENT PARTS AND UPGRADES VOIDS THE WARRANTY AND COULD CAUSE
STRUCTURAL FAILURE.
7. WHITE BROTHERS FORKS ARE DESIGNED FOR OFF ROAD USE ONLY. THEY ARE
NOT EQUIPPED WITH REFLECTORS FOR ROAD USE. IF YOU ARE GOING TO USE
YOUR FORK ON THE ROAD, HAVE A DEALER OR MECHANIC INSTALL REFLECTORS
THAT MEET THE CONSUMER PRODUCT SAFETY COMMISSION’S REQUIREMENTS.
8. ALL WHITE BROTHERS LOOP FORKS ARE DESIGNED BASED ON THE 74MM POST
MOUNT DISC BRAKE STANDARD AND ARE COMPATIBLE WITH ROTORS FROM
160MM TO 203MM. MAKE SURE TO USE THE APPROPRIATE DISC BRAKE ADAPTER
FOR THE ROTOR SIZE YOU PLAN TO USE, AS RECOMMENDED BY YOUR BRAKE
MANUFACTURER.
INTRODUCTION
Thank you for purchasing your new White Brothers fork. Our forks
are designed to help you perform at your absolute peak. Your new White
Brothers fork has oil damping and utilizes an air spring for lightweight
performance. The air spring and damper are factory set to satisfy a wide
range of rider weights and riding styles. Fine-tuning can be easily accomplished by changing air pressure of the air spring. See the adjustment
and maintenance section for rider weight verses air pressures settings.
The damper can be adjusted to give a wide range of compression and rebound damping. Steering accuracy is improved over conventional MTB
forks by utilizing superior materials and design. These include oversized
32mm fork tubes, a torsion box design steering crown with pressed in
tubes, a weight optimized cast magnesium lower, and patent-pending
axle design. Fork travel has been chosen to offer the best performance
possible for each fork’s intended use. To ensure peak performance, proper installation and periodic maintenance is required. When riding on
public land, please respect the rights of others and stay on established
paths and trails. By riding responsibly, you are helping ensure the future
of our sport.
FORK INSTALLATION
White Brothers forks feature a 1.125” or tapered 1.5-1.125” threadless aluminum steer tube. Do not add threads to your White Brothers steerer tube.
1. Remove your old fork from the bicycle. Measure the diameter and length of your
old forks steerer tube to ensure that your new White Brothers steerer tube is the correct diameter and sufficient length for the installation. If your White Brothers fork
has a tapered steerer tube, be sure to leave enough room above the taper to allow for
proper stem installation.
2. Remove the crown race from your old fork.
3. Press the crown race onto your new White Brothers fork. (See Figure #1)
4. Preassemble the fork on the bike with the headset, stem, and spacers (optional).
Refer to your stem manufacturer’s instructions to determine how much room is
needed to clamp the stem.
5. Mark the steerer tube at the top of the stem. The steerer tube will now need to be
cut to the correct length. Disassemble and cut 3mm (1/8”) below the mark. Consult
your dealer or mechanic if you don’t have the proper tools to cut the steer tube.
6. The star fangled nut must now be installed into the steer tube. If you don’t have the
set tool, we recommend dealer installation of this part. (See Figure #3)
7. Clean and grease all headset bearings and races to prepare them for assembly.
Note: Replace the bearings if there is any sign of wear or corrosion.
8. Now loosely assemble the headset, stem and handle bars as done in step four.
9. Install the headset according to the manufacture’s instructions until there is no play
and the fork turns smoothly.
10. Install your front brake and adjust according to the manufacture’s instructions.
11. Install the wheel on the fork. Refer to the page 4 of this manual for proper axle
operation.
12. Check to see that the brakes are adjusted and properly working. Make sure that
the brake cable does not interfere with any part of the bike and is secured under the
brake hose clamp on the fork brace. Make sure your brakes are adjusted and functioning properly, and the brake hose does not interfere with any part of the bike when
the fork is compressed and released.
S teering S tem
Optional Heads et S pace r
Heads et Upper R ace
S tar F angled Nut
S teerer Tube
F rame with
Hea ds et C ups
Heads et Lower R ace
F ork C rown
WARNING
ALL WHITE BROTHERS LOOP FORKS ARE DESIGNED BASED ON THE
74MM POST MOUNT DISC BRAKE STANDARD AND ARE COMPATIBLE
WITH ROTORS FROM 160MM TO 203MM. MAKE SURE TO USE THE APPROPRIATE DISC BRAKE ADAPTOR FOR THE ROTOR SIZE YOU PLAN TO
USE, AS RECOMMENDED BY YOUR BRAKE MANUFACTURER. FAILURE
TO DO SO COULD RESULT IN SERIOUS INJURY OR DEATH.
OPERATING THE QtapeR-15 AXLE
The QtapeR-15 axle operates in a similar manner to a traditional quick
release skewer. It’s patent pending tapered wedge interface grips both the axle
and fork lowers. This provides you with an extremely stiff fork that steers very
accurately.
INSTALLING WHEEL
1. Seat hub into the dropouts of the fork.
2. Insert axle through the disc brake side
dropout, through the hub and into the
captive nut on the non-disc brake side
dropout.
3. Thread axle into the captive nut by turning the axle or the nut in a clockwise
direction.
4. When you can feel tension on the quick
release cam when the lever is pointing
straight out from the axle (90 degrees
from the fork leg), you’ve reached the
correct starting point tension. If you don’t
feel the cam start to tension at the 90-degree point, more tension is needed.
5. Position the quick release lever so that
when closed, it’s parallel with the fork leg
and pointing upwards.
6. Close the quick release lever until it stops
WHEEL REMOVAL
FULLY CLOSED
TENSION BEGINS AT 90°
moving inward. After closing it,
there should be a clear imprint of
the lever in the palm of your hand.
If not, there is not enough tension
on the system. When closed correctly, the word “closed” is visible
on the outside of the lever.
REMOVING WHEEL
1. Open the quick release lever all the way.
Because the QtapeR system’s tapered
wedges grip very tightly to the dropouts
and the axle, it’s normal for the tapered
wedges to remain in their seated position
when you open the quick release lever.
2. With the heel of your palm, apply a light
side ways tap on the side of the tire. This
allows the tapered wedges to release.
3. Un-thread the axle (counter clockwise
rotation) and pull it out the disc brake
side.
WARNING
DO NOT LUBRICATE AXLE PARTS
WARNING
WHEN INSTALLING THE WHEEL OR A NEW TIRE, CHECK FOR MINIMUM
CLEARANCE. RELIEVE AIR PRESSURE IN THE AIR SPRING AND COMPRESS FORK COMPLETETLY TO BOTTOM OUT. THERE MUST BE 1/8” OR
3MM CLEARANCE BETWEEN THE CROWN AND HIGHEST POINT ON THE
TIRE AT FULL BOTTOM OUT TO ENSURE ADEQUATE CLEARANCE IN ALL
RIDING CONDITIONS. ANY LESS CLEARANCE CAN RESULT IN THE TIRE
HITTING THE CROWN RESULTING IN SERIOUS INJURY OR DEATH.
TUNING
Your new White Brothers fork has a break-in period of about 10 hours of ride
time. During this time, the moving parts inside the fork will bed into each
other and the fork will become even smoother than it was when brand new.
•
TOOLS NEEDED FOR TUNING:
High pressure shock pump for use with Schrader valves
• 2.5mm allen key
LOOP 130/140/150
WEIGHT
LBS. KG
120 55
130 59
140 64
150 68
160 73
170 77
180 82
190 86
200 91
210 95
220 100
PSI
50-60
55-65
60-70
65-75
70-80
75-85
80-90
85-95
90-100
95-105
100-110
AIR SPRING
PRESSURE
Inside the disc brake side stanchion tube is
the air spring. To adjust air pressure, remove
the dust cap on top of the leg to expose the
Schrader valve. Use a high-pressure shock
pump to adjust air pressure to desired level.
Re-install dust cap. Refer to chart below for
recommendations on beginning pressure.
The best setting for you will vary according to
rider personal preference, but this range will
serve as an ideal starting point.
WARNING
NEVER EXCEED 110psi
- DAMPING +
FASTER
SLOWER
REBOUND
Rebound damping is what prevents your suspension fork from feeling like a pogo stick. It
controls the rebound stroke of the fork after a
compression stroke (bump) has occurred. It is
also one of the most useful adjustments and it’s
easy to feel the difference between different settings. Your fork comes from the factory at 6 clicks
out from full slow. This is a very useable setting
for the majority of trail conditions. Adjustments
can be made by turning the red knob on the
bottom of the damper leg. Increasing (turn knob
clockwise) rebound damping slows the rebound
stroke of the fork. Decreasing (turn knob counter clockwise) rebound damping speeds up the
rebound stroke of the fork. Ideally, you want to
arrive at a setting that allows your wheel to track
the terrain and not get bounced off line.
Why would I want slower rebound
damping?
Why would I want faster rebound
damping?
By slowing down the rebound damping,
you can increase the control of the fork in
certain situations. Be careful not to slow
it down too much however, or this could
cause the fork to “pack up” on consecutive bumps that occur in rapid succession.
Here are some situations that lend themselves toward a slower rebound setting:
By speeding up the forks rebound stroke,
you can increase control in situations
where you’re encountering consecutive
bumps in rapid succession. Doing so allows the fork to rebound more completely
before it encounters the next bump, thus
avoiding “pack up” which occurs when
the forks rebound is set too slow to allow
it to rebound fully before it encounters
another bump. After several bumps like
this, the fork is essentially moved down
towards bottom out, adversley effecting handling because you don’t have any
more bump-eating travel left and overall
fork length is much shorter. Here are
some situations that lend themselves
toward a quicker rebound setting:
•
•
•
•
•
Large, violent impacts that are spaced
apart
Slower speed riding
Generally smooth trail conditions with
small undulations
Jumps and drops
Personal preference
•
•
•
Small to medium sized consecutive
bumps that occur in rapid succession
Higher speed riding
Generally rough trail conditions with
lots of rocks
REBOUND DAMPING ADJUSTMENT TIPS
Experiment with different settings in the parking lot. Become comfortable with what
the adjustment actually does. Turn the rebound all the way to the slowest setting.
Push on the fork. Turn the adjustment knob all the way to the fastest setting. Push on
the fork. Feel the difference? The extreme ends of adjustment (both fast and slow) are
rarely useful settings. Most of the time, you will want a setting that is somewhere in
the middle, and it’s likely that you’ll want to adjust rebound often to get the most out
of your fork on different terrain.
COMPRESSION without threshold (applies to tcr forks only)
Compression damping controls the compression stroke of your fork. Your fork
comes from the factory set with the least amount of compression damping. Adjustments can be made by turning the blue knob on the top of the damper leg. It is an
adjustment that is subtle, and often overlooked, but can make a big difference in how
your fork performs. Your fork has 5 positions (starting at the furthest counter clockwise) of compression damping adjustment. They are indicated on the gradient decal on
the crown by the color black or white. As you turn the dial clockwise, you are adding compression damping or slowing the forks compression stroke. This is a subtle
adjustment, and even though you may not perceive a difference pushing on the fork
in the parking lot, it will act differently on the trail. Aggressive riders tend to like more
compression damping because it is a firmer, more positive feel. Comfort oriented,
less aggressive riders tend to like less because it allows more small bump sensitivity.
Do not confuse compression damping with pre-load (spring). They are very different
adjustments, and while adding compression damping may make the fork feel “stiffer”, it
is not changing the spring rate.
COMPRESSION ADJUSTMENT
Why would I want more compression damping?
•
•
•
•
The fork is bottoming out easily
To control brake dive
To preserve geometry in hard cornering situations.
You encounter lots of large violent
impacts on the trail
Why would I want less compression
damping?
•
MORE COMPRESSION
•
•
MORE THRESHOLD
You want the most small bump
sensitivity
Comfort is your main objective in
tuning your fork
You encounter lots of small to
medium sized bumps with few large
impacts
COMPRESSION ADJUSTMENT TIPS
For a softer, plusher, more comfort
oriented ride, use less compression.
For a firmer, efficient, more performance oriented ride, use more
compression.
THRESHOLD (applies to tcr forks only)
Your White Brothers fork comes with a unique, Patent-Pending magnetic threshold
valve. This cutting edge technology allows you tune your fork so it supports you firmly
and gets your energy to the rear wheel where you want it, instead of allowing your
energy to be absorbed into the fork in the form of fork “bob”, a result of rider introduced forces. Our magnetic threshold valve is superior to the competing technologies
because of the extremely efficient blow off capabilities it offers. In other words, when
you are riding your White Brothers TCR fork with the threshold turned on and you
encounter a bump, the fork can instantly absorb the bump with virtually no perceptible change to the rider. Another advantage to our magnetic threshold is it cannot be
“confused” by different combinations of trail features, or speed and repetition of trail
input. Once the rebound stroke of the fork begins, the threshold valve instantly closes
again and is doing it’s job preventing unwanted bob or brake dive. This results in a fork
that feels completely predictable, and always reacts instantly to any obstacle. All of this
means that you will likely find that you can turn on the threshold and reap the benefits
of it without needing to worry about turning it off.
The threshold is indicated on the gradient decal on the crown by the color
red. The last 3 positions of the dial
are on the threshold. We call this the
“Red Zone”. There are 2 different
ways to affect the way the threshold
behaves.
THRESHOLD
BLEED
Bleed is simply allowing some of the oil to bypass the magnetic threshold valve until enough
oil pressure is built to open it. Bleed is adjusted
simply by turning the blue dial on the top of the
fork leg. When in the Red Zone, as you continue to turn the dial clockwise, you are decreasing
the amount of bleed. In the full clockwise position, you have very little bleed. Please note that
no matter how much bleed you choose to allow,
your threshold level remains unchanged.
COMPRESSION
Why would I want more bleed?
Personal preference plays a huge role
here. More bleed will give you more
small bump sensitivity while on the
threshold. It will allow the fork to
move more before you actually blow
through the magnetic threshold. The
rougher the trail conditions, the more
bleed is usually desired.
Why would I want less bleed?
- BLEED +
RED
ZONE
+ COMPRESSION -
If you want the fork to have less movement until it’s absolutely needed, then
you may want less bleed. Typically,
you would want very little bleed if
you’re riding on a very smooth trail
or road.
TRIM
Trim is adjusting the actual level of magnetic force being exerted on the valve. The
more force, the larger the impact needed to overcome it and blow off the threshold.
Your fork came from the factory with the trim close to the minimum level giving you
a stronger feeling threshold. We strongly recommend you ride the fork for awhile at
this setting to experience and become familiar with the threshold’s characteristics. If
you then decide to tune, it can be adjusted by removing the small black dust cap on the
compression dial, and then using a 2mm allen key inserted through the hollow blue
screw and turning the silver (2mm) allen screw beneath it.
TRIM ADJUSTMENT
SOFTER THRESHOLD
Trim is a fine tuning adjustment and should
usually only be used if you are very familiar
with your fork and comfortable changing it’s
damping characteristics. To increase trim,
(reduce the magnetic force on the valve) turn
the allen key clockwise. This decreases the
force needed to blow off the valve. Extremely
small changes make a big difference in the
threshold level. Baby steps! We recommend
adjusting this in 1/8 turn increments.
WARNING
DO NOT REMOVE OR UN-THREAD THE HOLLOW BLUE SCREW
Rider A: Rides
aggressive all-mountain
style, on a 6” travel, fullsuspension bike. The fork
is a LOOP TCR 150 and
settings would likely be:
Air Spring: Generally on the
higher end of the recommended range
SAMPLE RIDER PROFILES
Rider B: Rides
Rider C: Recreational,
competitive, performance comfort oriented rider
oriented cross-country on riding a 5” travel, full-susa 4” travel, full-suspension pension bike. The fork is a
bike. The fork is a LOOP
LOOP TCR 140, and setTCR 100 and settings
tings would likely be:
would likely be:
Air Spring: Generally on the
lower end of recommended
Air Spring: Generally Mid to
high end of the recommended range
range
Rebound: Generally on the
Rebound: Generally in the
slower end of the range
middle of the rebound range
Rebound: Generally in the
middle of the rebound range
Compression: Generally more
Compression: Generally less
compression
compression for the most
Threshold: Generally miniThreshold: Generally maximum bleed while on threshold small bump sensitivity
mum bleed while on threshold Trim: Generally less trim
Threshold: Generally maxiTrim: Generally more trim
mum bleed while on threshold
(higher threshold force)
(lighter threshold force)
(still in the Red Zone).
MAINTENANCE INTERVALS
MAINTENANCE
FREQUENCY
(in hours)
REPLACE BATH OIL
NORMAL CONDITIONS:
45-50
MUDDY CONDITIONS:
25-30
CHECK AIR SPRING AND RELUBE IF NEEDED
25
CHANGE DAMPER OIL
150
CHECK FASTENERS
25-30
INSPECT STANCHIONS
EVERY RIDE
CHECK AIR PRESSURE
EVERY RIDE
CLEAN DIRT AND MUD FROM STANCHIONS
EVERY RIDE
CHECK ADJUSTMENT CONTROLS
EVERY RIDE
TORQUE VALUES
FASTENER
TORQUE
COMPRESSION BOLT (DAMPER SIDE)
70-75 LB-IN 8 NM
COMPRESSION BOLT (AIR SPRING SIDE)
70-75 LB-IN 8 NM
TOP CAPS
110 LB-IN 12.4 NM
SERVICE LOG
SERVICE
DATE
___________________________________________________________________
___________________________________________________________________
___________________________________________________________________
___________________________________________________________________
___________________________________________________________________
___________________________________________________________________
___________________________________________________________________
___________________________________________________________________
___________________________________________________________________
___________________________________________________________________
___________________________________________________________________
___________________________________________________________________
___________________________________________________________________
___________________________________________________________________
___________________________________________________________________
___________________________________________________________________
___________________________________________________________________
LIMITED WARRANTY
Who is covered:
This warranty is extended only to the original end-use purchaser, or the person
receiving the product as a gift, and shall not be extended to any other person or
transferee. Original proof of purchase is required.
What is covered/For how long:
Your White Brothers fork is warrantied for a period of 1 year from the date of
retail purchase. White Brothers warrants that this product, when delivered to
you in new condition, in original packaging, from a White Brothers authorized
reseller and used in normal conditions, is free from any defects in manufacturing,
materials, and workmanship.
What is not covered:
This warranty does not cover defects resulting from improper or unreasonable use
or maintenance; improper installation, failure to follow operating instructions;
accident; unauthorized alterations of modification of original condition; damages
caused by inadequate packing or shipping procedures; wear items including seals,
bushings, o-rings, piston bands, foam rings, stanchions, bottom out bumpers,
stripped fastener threads and heads; and products purchased from unauthorized
dealers.
What we will do:
During the warranty period, we will, at our sole option, repair or replace any
defective parts within a reasonable period of time and free of charge.
What we will not do:
Pay shipping, insurance, or transportation charges from you to us, or any import
fees, duties and taxes.
What you must do to obtain Limited Warranty Service:
Return product, with proof of purchase from an authorized White Brothers
dealer, using the following procedures:
1. Contact White Brothers for specific return and shipping instructions.
2. Label and ship the product, freight prepaid, to the address provided
by White Brothers; and
3. Place any necessary return authorization number prominently on the
outside of the carton.
OTHER CONDITIONS
THE PROVISIONS OF THIS LIMITED WARRANTY ARE IN LIEU
OF ANY OTHER WARRANTY, WHETHER EXPRESSED OR IMPLIED, WRITTEN OR ORAL, INCLUDING ANY WARRANTY OF
MERCHANTABILITY OR FITNESS FOR A PARTICULAR PURPOSE.
WHITE BROTHERS MAXIMUM LIABILITY SHALL NOT EXCEED
THE ACTUAL PURCHASE PRICE PAID BY YOU FOR THE PRODUCT.
IN NO EVENT SHALL WHITE BROTHERS BE LIABLE FOR SPECIAL,
INCIDENTAL, CONSEQUENTIAL, OR INDIRECT DAMAGES HOWSOEVER CAUSED INCLUDING WITHOUT LIMITATION THE REPLACEMENT OF EQUIPMENT AND PROPERTY. THIS WARRANTY
IS VOID IF THE LABEL BEARING THE SERIAL NUMBER HAS BEEN
REMOVED OR DEFACED.
OTHER LEGAL RIGHTS
This limited warranty gives you specific legal rights, and you also may
have other rights that vary from state to state or country to country. Some
places do not allow limitations on implied warranties or the exclusion or
limitation of incidental or consequential damages, so the above limitations
or exclusions may not apply to you.
* Failure to register this product will not affect your limited warranty rights,
however, proof of purchase is required.
WHITE BROTHERS CYCLING IS A DIVISON OF:
MOUNTAIN RACING PRODUCTS
580 N WESTGATE DR
GRAND JUNCTION, CO 81505
970.241.3518
FOR MORE INFORMATION VISIT US ON THE WEB:
WHITEBROTHERSCYCLING.COM
NOTES
___________________________________________________________________
___________________________________________________________________
___________________________________________________________________
___________________________________________________________________
___________________________________________________________________
___________________________________________________________________
___________________________________________________________________
___________________________________________________________________
___________________________________________________________________
___________________________________________________________________
___________________________________________________________________
___________________________________________________________________
___________________________________________________________________
___________________________________________________________________
___________________________________________________________________
___________________________________________________________________
___________________________________________________________________
___________________________________________________________________
___________________________________________________________________
___________________________________________________________________
___________________________________________________________________
___________________________________________________________________
___________________________________________________________________
___________________________________________________________________
___________________________________________________________________
___________________________________________________________________
___________________________________________________________________
___________________________________________________________________
___________________________________________________________________
___________________________________________________________________
___________________________________________________________________
___________________________________________________________________
___________________________________________________________________
___________________________________________________________________
___________________________________________________________________
___________________________________________________________________
___________________________________________________________________
___________________________________________________________________
___________________________________________________________________
___________________________________________________________________
___________________________________________________________________
___________________________________________________________________
___________________________________________________________________
___________________________________________________________________
___________________________________________________________________
___________________________________________________________________
___________________________________________________________________
___________________________________________________________________
___________________________________________________________________
___________________________________________________________________
___________________________________________________________________
___________________________________________________________________
___________________________________________________________________
___________________________________________________________________
___________________________________________________________________
___________________________________________________________________
___________________________________________________________________
___________________________________________________________________
___________________________________________________________________
___________________________________________________________________
___________________________________________________________________
___________________________________________________________________
___________________________________________________________________
___________________________________________________________________
___________________________________________________________________
___________________________________________________________________
___________________________________________________________________
___________________________________________________________________
___________________________________________________________________
___________________________________________________________________
___________________________________________________________________
___________________________________________________________________
___________________________________________________________________
___________________________________________________________________
___________________________________________________________________
___________________________________________________________________
___________________________________________________________________
___________________________________________________________________
___________________________________________________________________
___________________________________________________________________
___________________________________________________________________
___________________________________________________________________
___________________________________________________________________
___________________________________________________________________
___________________________________________________________________
___________________________________________________________________
___________________________________________________________________
___________________________________________________________________
___________________________________________________________________
___________________________________________________________________
___________________________________________________________________
___________________________________________________________________
___________________________________________________________________