1
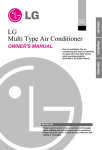
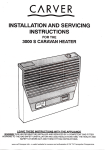
HEATSEEKER® GAS FIREBOX
INSTALLATION & OPERATING MANUAL
The Heatseeker Gas Firebox is approved to be installed into a masonary
fireplace and as a zero clearance firebox and is designed to operate on
Natural Gas and Propane (LPG) gases ONLY. Approval Number GMK10100.
Installed primarily as a decorative appliance. Not certified as a Space Heater.
VERSION 19
WARRANTY INFORMATION
The benefits provided to you under the following warranty are in addition to any other rights and remedies available to
you under the law.
1. Warranty
If:
(a)
during the first 10 years from the date of purchase (Firebox Warranty Period), there is a defect in the firebox of the
Real Flame Gas Burner; or
(b)
during the first 12 months from the date of purchase (Parts Warranty Period), there is a defect in the gas valves or
other parts of the Real Flame Gas Burner,
due to improper workmanship or material, Real Flame will replace or repair the Real Flame Gas Burner without
charge. Any replacement product is warranted only for the time remaining on the original Firebox Warranty
Period or the Parts Warranty Period as relevant.
2. Registration
You must register to receive the benefit of this warranty by completing the warranty registration on our website
(www.realflame.com.au) or completing and mailing the attached registration card within 30 days of purchase of
your Real Flame Gas Burner (or, if the Real Flame Gas Burner is fitted to a new home, within 30 days of the date
of settlement of purchase of such new home).
3. Exclusions
Real Flame is not obliged to replace or repair the Real Flame Gas Burner under clause 1 if:
(a)
it has been improperly stored, installed, connected, used, operated or repaired, or damaged, abused, tampered
with, altered (without our written approval), or not maintained in strict accordance with our installation and
operating instructions; or
(b)
it has been installed in an outdoor setting.
4. Limit of Liability
The warranty provided under this warranty is limited to replacement or repair of the Real Flame Gas Burner only,
at our option. To the extent permitted by law, Real Flame excludes liability for consequential loss or any other loss
or damage caused to property or persons arising from any cause whatsoever, and damage arising from normal
wear and tear.
5. Claiming under the Warranty
In order to claim under this warranty you must, within the Firebox Warranty Period or the Parts Warranty Period
(as relevant), contact Real Flame, providing the original proof of purchase and the details below:
Supplier Name___________________________________________________________________________
Date Of Purchase / settlement of property if new home _________________
Model / Serial Number_______________________
This warranty does not cover the cost of claiming under the warranty or transporting the Real Flame Gas Burner to and
from the supplier.
Our goods come with guarantees that cannot be excluded under the Australian Consumer Law. You are entitled to a
replacement or refund for a major failure and for compensation for any other reasonably foreseeable loss or damage.
You are also entitled to have the goods repaired or replaced if the goods fail to be of acceptable quality and the failure
does not amount to a major failure.
If you would like to speak to someone about your Real Flame Gas Burner or claiming under this warranty, please
contact the Real Flame Service Warranty Desk on 03 8706 2000.
Real Flame Pty Ltd ACN 006 311 155
Head Office: 1340 Ferntree Gully Road, Scoresby 3179
Telephone: 03 8706 2000 Facsimile: 03 8706 2001
2
INSTALLATION NOTICE
The installation of this appliance is only to be carried out by an authorised person in accordance
with the Manufacturer’s Instructions, local gas fitting regulations, AS5601-2004 installation code for
gas burning appliances and any other relevant statutory regulations.
In all cases the installation of this appliance shall meet the requirements as set out in AS5601-2004.
NOTE: A slight smell may be apparent for the first few hours of use. This is due to the heat resistant
paint curing. It is recommended to open windows in the room for the first lighting of the fire. In some
instances a slight discolouration may occur inside the firebox. This is a normal condition and is not
covered by warranty.
IMPORTANT SAFETY NOTICES
DO NOT PLACE ARTICLES ON OR AGAINST THIS APPLIANCE.
DO NOT USE OR STORE FLAMMABLE MATERIAL NEAR THE APPLIANCE.
DO NOT SPRAY AEROSOLS IN THE VICINITY OF THIS APPLIANCE WHILST IT IS IN OPERATION.
CARE MUST BE TAKEN TO ENSURE THAT ANY RETURN AIR REGISTER OR EXHAUST SYSTEM
DOES NOT ADVERSLEY AFFECT THE OPERATION OF THE APPLIANCE OR DRAUGHT OF
CHIMNEY OR FLUE.
DO NOT MODIFY THIS APPLIANCE.
THIS APPLIANCE IS DESIGNED TO OPERATE WITH LUMINOUS FLAMES. THIS MAY EXHIBIT
SLIGHT CARBON DEPOSITS.
WARNING
This firebox has a naked flame, care should be taken when it is operating if children or the infirm are
in close proximity. A safety screen is recommended if constant supervision is not possible. It is
recommended that a secondary guard complying with AS-NZS2286 be installed.
VENTILATION REQUIREMENTS
MODEL
EFFECTIVE VENTILATION
600
700
850
1000
1500
18,000 sq mm
18,000 sq mm
32,000 sq mm
32,000 sq mm
40,000 sq mm
THIS IS PRIMARILY A DECORATIVE APPLIANCE AND IS NOT CERTIFIED AS A SPACE HEATER.
3
CONTENTS
Contents ..................................................................................................................4
Data Plate .................................................................................................................5
Inbuilt model installation diagrams ..........................................................................6
Dimensions Heatseeker 600 ....................................................................................7
Dimensions Heatseeker 700 ....................................................................................8
Dimensions Heatseeker 850 ....................................................................................9
Dimensions Heatseeker 1000 ................................................................................10
Dimensions Heatseeker 1500 ................................................................................11
Dimensions Heatseeker 600 ZC ............................................................................12
Dimensions Heatseeker 700 ZC ............................................................................13
Dimensions Heatseeker 850 ZC ............................................................................14
Dimensions Heatseeker 1000 ZC ..........................................................................15
Dimensions Heatseeker 1500 ZC ..........................................................................16
Inbuilt Installation Procedure .................................................................................17
Zero Clearance Timber Frame Installation ............................................................19
Zero Clearance Model Components .....................................................................20
Zero Clearance Model Assembly...........................................................................21
Zero Clearance Model Installation Procedure .......................................................22
Lighting instructions...............................................................................................23
Commissioning ......................................................................................................24
Optional Power Flue...............................................................................................25
Introduction.............................................................................................25
Installation...............................................................................................25
Motor Clearance .....................................................................................28
Frameout.................................................................................................29
Motor exploded view ..............................................................................29
Internal Motor..........................................................................................30
External Motor ........................................................................................31
Troubleshooting Electronic Ignition and Power Flue System ...............................32
Parts kit ................................................................................................................34
Flue termination (cowls) regulations .....................................................................35
Marble trim installation instructions .......................................................................36
Mantlepiece installation instructions......................................................................37
Electrical diagram ..................................................................................................38
Real Flame contact information .............................................................................40
4
DATA PLATE (Affixed to burner)
HSIB600
Fitted with Magiglo 400 or 400EI burner
Gas
Natural Gas
ULPG
Injector Size (mm)
1 x 2.60
1 x 1.30
TPP
0.80 kPa
2.70 kPa
N.G.C. (Mj/Hr)
28
21
TPP
0.80 kPa
2.60 kPa
N.G.C. (Mj/Hr)
37
33
TPP
0.80 kPa
2.70 kPa
N.G.C. (Mj/Hr)
28
21
TPP
0.80 kPa
2.60 kPa
N.G.C. (Mj/Hr)
37
33
TPP
0.80 kPa
2.60 kPa
N.G.C. (Mj/Hr)
37
33
TPP
0.75 kPa
2.55 kPa
N.G.C. (Mj/Hr)
39
34
TPP
0.75 kPa
2.55 kPa
N.G.C. (Mj/Hr)
39
34
TPP
0.75 kPa
2.60 kPa
N.G.C. (Mj/Hr)
49
49
TPP
0.80 kPa
2.55 kPa
N.G.C. (Mj/Hr)
55
48
Fitted with Magiglo 540 or 540EI burner
Gas
Natural Gas
ULPG
Injector Size (mm)
2 x 2.25
2 x 1.10
HSIB700
Fitted with Magiglo 400 or 400EI burner
Gas
Natural Gas
ULPG
Injector Size (mm)
1 x 2.60
1 x 1.30
Fitted with Magiglo 540 or 540EI burner
Gas
Natural Gas
ULPG
Injector Size (mm)
2 x 2.25
2 x 1.10
HSIB850
Fitted with Magiglo 540 or 540EI burner
Gas
Natural Gas
ULPG
Injector Size (mm)
2 x 2.25
2 x 1.10
Fitted with Magiglo 750 or 750EI burner
Gas
Natural Gas
ULPG
Injector Size (mm)
3 x 1.85
3 x 0.95
HSIB1000
Fitted with Magiglo 750 or 750EI burner
Gas
Natural Gas
ULPG
Injector Size (mm)
3 x 1.85
3 x 0.95
HSIB1500
Fitted with 1000EI burner
Gas
Natural Gas
ULPG
Injector Size (mm)
3 x 2.25
3 x 1.10
Fitted with 1200EI burner
Gas
Natural Gas
ULPG
Injector Size (mm)
4 x 2.20
4 x 0.95
5
HEATSEEKER INBUILT MODEL
•
Unit installed into an existing “working” fireplace requires an AGA approved 225mm gas
cowl and chimney plate fixed to the chimney top.
•
If the fireplace is not a “working” fireplace, then the applicable flue to the model being
installed should be installed using a gather, single skin flue and AGA approved gas cowl.
•
If the flue is to be exposed, or enclosed with any combustible material, the appropriate
approved twin skin flue and gas cowl is required.
Overall Dimensions (in mm)
MODEL
600
700
850
1000
1500
A
B
C
D
E
F
G
H
I
730
830
980
1130
1650
370
370
370
370
370
605
605
605
605
605
610
710
860
1005
1505
370
370
370
370
370
740
840
990
1140
1650
670
670
670
670
670
75
75
75
75
75
15
15
15
15
15
PI
L
OFF
6
OT
DIMENSIONS
Heatseeker 600
A
B
C
D
E
F
G
H
670
740
370
610
605
130
330
365
I
J
K
L
380
150
65
60
J
E
H
H
Heatseeker 600 Trim
FRONT - 4 SIDED
FRONT - 3 SIDED
E
F
A
B
C
D
E
F
790
800
740
670
100
75
D
B
C
A
7
DIMENSIONS
Heatseeker 700
A
B
C
D
E
F
G
H
665
830
370
710
605
130
330
365
I
J
K
L
380
150
65
60
J
E
H
Heatseeker 700 Trim
FRONT - 4 SIDED E
FRONT - 3 SIDED F
D
B
C
A
8
A
B
C
D
E
F
890
800
840
670
100
75
DIMENSIONS
Heatseeker 850
A
B
C
D
E
F
G
H
665
980
370
860
605
130
330
365
I
J
K
L
380
150
65
60
J
E
H
Heatseeker 850 Trim
FRONT - 4 SIDED
FRONT - 3 SIDED
E
F
A
B
C
D
E
F
1040
800
990
670
100
75
D
B
C
A
9
DIMENSIONS
Heatseeker 1000
A
B
C
D
E
F
G
H
665
1130
370
1005
605
130
330
365
I
J
K
L
380
150
65
60
J
E
H
Heatseeker 1000 Trim
FRONT - 4 SIDED
FRONT - 3 SIDED
E
D
B
C
A
10
F
A
B
C
D
E
F
1190
800
1140
670
100
75
DIMENSIONS
Heatseeker 1500
A
B
C
D
E
F
G
H
670
1630
370
1505
605
130
330
365
I
J
K
L
380
150
65
65
J
E
H
A
B
C
D
E
F
1650
800
1650
670
100
75
Heatseeker 1500 Trim
E
F
D
B
C
A
11
DIMENSIONS
Heatseeker 600 ZC
A
B
C
D
E
F
G
H
665
730
415
675
-
235
650
-
I
J
K
L
380
150
65
60
A
B
C
D
E
F
790
800
740
670
100
75
J
Heatseeker 600 ZC Trim
FRONT - 4 SIDED
FRONT - 3 SIDED
E
F
D
B
C
A
12
DIMENSIONS
Heatseeker 700 ZC
A
B
C
D
E
F
G
H
665
830
415
775
-
235
650
-
I
J
K
L
380
150
65
60
A
B
C
D
E
F
890
800
840
670
100
75
J
Heatseeker 700 ZC Trim
FRONT - 4 SIDED E
FRONT - 3 SIDED F
D
B
C
A
13
DIMENSIONS
Heatseeker 850 ZC
A
B
C
D
E
F
G
H
665
985
415
930
-
235
650
-
I
J
K
L
380
150
65
60
J
Heatseeker 850 ZC Trim
FRONT - 4 SIDED
FRONT - 3 SIDED
E
D
B
C
A
14
F
A
B
C
D
E
F
1040
800
990
670
100
75
DIMENSIONS
Heatseeker 1000 ZC
A
B
C
D
E
F
G
H
665
1130
415
1075
-
235
650
-
I
J
K
L
380
150
65
60
A
B
C
D
E
F
1190
800
1140
670
100
75
J
Heatseeker 1000 ZC Trim
FRONT - 4 SIDED
FRONT - 3 SIDED
E
F
D
B
C
A
15
DIMENSIONS
Heatseeker 1500 ZC
A
B
C
D
E
F
G
H
668
1630
417
1595
-
250
930
-
I
J
K
L
380
150
65
65
J
A
B
C
D
E
F
1650
800
1650
670
100
75
Heatseeker 1500 ZC Trim
E
F
D
B
C
16
A
HEATSEEKER INBUILT MODEL
Heatseeker Inbuilt Installation Procedure
TICK BOXES
Check chimney for correct venting of fumes
Position unit centrally
Connect to gas supply using 15mm copper union
Connect to power supply
Assemble log and coal or pebble set as shown (Figures 1-7).
IMPORTANT! Only logs, coals and pebbles supplied by Real Flame are to be used.
Figure (1) Remove box containing logset, and
unpack. Place the large log at the rear
of the burner just in front of the 2
square tabs on the log support panel.
Figure (2)
Figure (3) Place the 2 ‘Y’ shaped logs as
shown, the larger on the left.
Position the ‘Y’ end of the logs
towards the front of the heater.
Figure (4) Place the 2 straight logs as shown
Place the 14 large coals and 8 small coals
on top of the white ceramic blanket.
Ensure front row of coals are placed
10 - 12mm away from the front grille.
17
HEATSEEKER INBUILT MODEL
Heatseeker Inbuilt Installation Procedure
(continued)
The Heatseeker Gas Firebox (Natural Gas Only) is approved for use with Pebbles.
To install the Pebbles, follow the installation instructions as per Figures 5-7. Note: A Real Flame
Pebble Tray needs to be ordered for this option.
Figure (5) Install the metal angle at the rear of
the fireplace and place one row of
pebbles behind the burner rail.
Figure (6) Place pebbles between the first row
and the angled tray.
Note: Keep pebbles clear of burner rail.
Figure (7) Place remaining pebbles up the
angle of the rear tray so as the tray
is hidden.
Note: If a coals only configuration is being used, use the same set up as pebbles.
TICK BOXES
Fit the trim to the front of the firebox.
Light the unit following the procedure on page 21.
Install the 225mm AGA approved gas cowl where using the chimney to vent the fumes.
Test the unit for safe operation and show customer correct operating procedures.
Test for spillage.
Perform pressure test.
18
HEATSEEKER ZERO CLEARANCE MODEL
Heatseeker Zero Clearance Timber Frame Installation
D
(Recommended only)
D
(Recommended only)
IMPORTANT
Install unit and
fluing before
plasterboard.
Plaster to run
beyond stud and
behind trim
A
HEATER
A
From hearth
TRIM
B
C
B
Approx 20mm for
hearth if required.
NOTE: If fire is to be installed off the floor with a 4 sided
trim, use the same A, B, C and D dimensions as shown with
framework included below fire to required height. Ensure
frame is suitable for fire weight.
Min 25mm
clearance
C
Frameout Dimensions (in mm)
MODEL
600
700
850
1000
1500
A
B
750 750
750 850
750 1000
750 1150
1030 1680
C
D
450
450
450
450
450
2100
2100
2100
2100
2100
CLEARANCES FROM
COMBUSTIBLES
Floor
Sides
Top
Flue Outer
0 mm
25 mm
100 mm
25 mm
NOTE
Plasterboard to run beyond stud as shown,
and to go behind fixing flange on unit.
19
HEATSEEKER ZERO CLEARANCE MODEL
1.
Position the Heatseeker firebox in the selected installation position in the room.
2.
You will require the Zero Clearance Kit to suit the Heatseeker model you are fitting. This
should be fitted to the firebox as shown on page 19.
Components
2
3
4
1
5
8
7
9
6
ZERO CLEARANCE KIT COMPONENTS
No.
1
2
3
4
5
6
7
8
9
10
20
Description
Panel – Base
Panel – Side LH
Panel – Side RH
Panel – Rear
Panel – Top
Gather
Panel – Side Strips
Panel – Top Angle
Pack of screws
3.6m Flue Kit & Cowl
Qty
1
1
1
1
1
1
2
1
1
1
10
HEATSEEKER ZERO CLEARANCE MODEL
Fit Zero Clearance Kit to unit as shown below:
ITEM 8
ITEM 7
ITEM 7
ITEM 6
ITEM 1
1.
Place main fire box (Item 1)
centrally on base panel and
secure.
2.
Secure side strips (Item 7) and
top strip (Item 8) to main fire
box.
3.
ITEM 2
Secure gather
(Item 6) to main
fire box.
ITEM 5
ITEM 3
ITEM 4
4.
Secure LH and RH side panels
(Items 2 & 3) to main fire box.
5.
Secure rear panel (Item 4)
to main fire box.
6.
Secure top panel (Item 5)
21
HEATSEEKER ZERO CLEARANCE MODEL
Heatseeker Zero Clearance Installation Procedure
TICK BOXES
Connect to gas supply
Connect to power supply
Install flue to 600mm minimum above roof line. (Min. total flue run 3.6m)
Plaster to unit with trim removed
Install trim
Assemble unit as per page 19
Test the unit for safe operation and show customer correct operating procedures.
Flue Size
MODEL
600
700
850
1000
1500
22
Inner
Outer
150mm Gal
150mm Gal
200mm Gal
200mm Gal
225mm Gal
200mm Gal
200mm Gal
250mm Gal
250mm Gal
275mm Gal
LIGHTING PILOT AND MAIN BURNER
Before lighting the pilot make sure that the gas line is connected.
FOR YOUR SAFETY READ BEFORE LIGHTING
The appliance has a pilot which must be lit using the piezo ignition, when lighting the pilot follow
the instructions exactly.
Before lighting the appliance check for gas leaks.
Use only your hand to push in and turn the gas control knob, never use tools. If the knob will not
push in or turn by hand, don’t try to repair it, call a qualified service technician. Force or attempt to
repair may result in a fire or explosion.
If the controls have been underwater, immediately call a qualified service technician to inspect the
appliance and replace any part of the control system and fan that has been immersed in water.
LIGHTING INSTRUCTIONS
Figure 1
Figure 2
1.
To light the pilot, press in and turn the gas control knob anticlockwise to
the pilot position.
2.
Keep knob depressed and turn the knob anticlockwise toward the
until you hear a click. If the pilot lights, continue to depress knob for 20
seconds and release. If pilot goes out repeat the procedure.
3.
To light the burner, turn the control knob to the flame setting. The burner
can be set anywhere between low and high flame.
4.
To turn the burner off, turn the control knob clockwise to the “PILOT”
position. This will leave the pilot burning.
5.
To turn off the burner and the pilot, turn the knob clockwise to the “OFF”
position.
If you are unable to get the appliance to operate correctly, contact either
your sales agent or the manufacturer (see contact details on back cover).
Figure 3
Test operation of appliance and fully instruct user before leaving.
Note: Check gas pressure. Refer to Data Plate on page 5 for details.
Figure 4
TO TURN OFF GAS TO APPLIANCE
Push in gas control knob slightly and turn to the “OFF” position.
Figure 5
23
COMMISSIONING PROCEDURE
Once the fire is installed and operational the installer must check for spillage. Carry out the
lighting procedure and turn the fire to high. Allow to warm up for 10 minutes and then using a
smoke match set 25mm down and 25mm inside of the fire opening run the match across the
width of the opening to check that all of the smoke is drawn away.
Repeat the test with doors and windows to the premises open and closed, and with any extractor
fans in the same room or adjacent rooms running on high. The fire should continue to clear its
combustion products. Also operate any other flued appliances in the same or neighbouring rooms
and ensure they continue to function satisfactorily as multiple flues can work against one another.
If spillage is detected during this procedure it could indicate a faulty flue or lack of ventilation. If
the problem cannot be rectified immediately, disconnect the appliance, and advise the customer
not to use the appliance until the problem has been resolved.
The customer should always be advised of the need for regular servicing and checks to ensure
the continued clearance of combustion waste products.
NOTE: Care must be taken to ensure that any return air register exhaust system does not
adversely affect the operation of the appliance or draught of chimney or flue.
WARNING
“DO NOT place articles on or against this appliance.“
“DO NOT use or store flammable materials near this appliance.”
“DO NOT spray aerosols in the vicinity of this appliance while it is in operation.
24
OPTIONAL POWER FLUE
THE INSTALLATION MANUAL OF THE REAL FLAME POWER FLUE SYSTEM IS TO BE READ IN
CONJUNCTION WITH THE INSTALLATION MANUAL OF THE REAL FLAME PRODUCT BEING
USED. THE DESIGN OF THE REAL FLAME POWER FLUE SYSTEM IS SUBJECT TO COPYRIGHT
AND ALL INFRINGEMENTS WILL BE VIGOROUSLY PURSUED.
Introduction - the Power Flue System
POWER FLUE DESIGN
A ‘flue’ using a fan to remove or assist in removing combustion products from an appliance, is
known as a ‘power flue’.
POWER FLUE APPLICATION
A power flue application can be used to enable a client to have a decorative fire with a horizontal
flue run or a vertical flue run where flue space is inadequate for the normal flue.
Installation Instructions
VENTILATION REQUIREMENTS
Air supply to the unit is to be in accordance with ventilation Clause 5.4 of the Gas Code 601.
Ventilation requirements do not change by using a power flue.
All Real Flame installation manuals have the ventilation areas clearly defined for each product.
ACCESS TO POWER FLUE MOTOR
Access must be provided to the flue motor, this access MUST be at least 400mm x 400mm.
There MUST be a minimum clearance of 250mm between the top of the motor and any fixed
object i.e. ceiling or stud work. This is so the top of the fan box can be removed.
WIRING OF THE POWER FLUE
All wiring for the power flue is carried out at the factory and plug connectors are fitted for easy
installation. The power supply for the power flue is via a 3-pin plug at the rear of the firebox that
can be plugged into a power socket within the cavity.
ISOLATION SWITCH
If the power point is within a cavity an isolation switch accessible from outside the cavity must be
provided.
WIRING CLEARANCES
Wiring must at all times have a clearance of at least 150mm from the flue.
FAN FAILURE SENSING DEVICE
All Real Flame Power Flue systems are fitted with a sensing device within the unit to ensure that,
in the event of flow failure, the safety shut off valve within the module will go into lockout and shut
off the gas supply to the unit.
‘LOCKOUT’
‘Lockout’ is the term used when the module in the unit senses a fault. When a fault is detected by
the module it will shut off the gas and go into lockout. If this occurs contact the manufacturer.
25
OPTIONAL POWER FLUE (continued)
Installation Instructions
(continued)
LOCATION OF FLUE TERMINAL FOR POWER FLUE
Listed below are the minimum clearances required for fan-assisted terminations:
1.
Below eaves, balconies and other projections. .........................................................200mm
2.
From the ground, above a balcony or other surface. ................................................300mm
3.
From a return wall or external corner..........................................................................300mm
4.
From a Gas meter. ....................................................................................................1000mm
5.
From an electricity meter or fuse box. ........................................................................500mm
6.
From a drainpipe or soil pipe. ......................................................................................75mm
7.
Horizontally from any building structure or obstruction facing a terminal.................500mm
8.
From any other flue terminal. Cowl, or combustion air intake. ..................................300mm
9.
Horizontally from any openable window, door, non-mechanical air inlet,
or any other opening into a building with the exception of sub floor ventilation.......300mm
10.
From a mechanical air inlet including a spa blower.................................................1000mm
11.
Vertically below an openable window, non-mechanical air inlet,
or any other opening into a building with the exception sub floor ventilation. ..........500mm
ELECTRICAL
SHOULD THE SUPPLY FLEX AT THE BACK OF THE FIREBOX BE DAMAGED, A SPECIALLY
PREPARED FLEX IS REQUIRED. FOR REPLACEMENT CONTACT THE MANUFACTURER.
THE ON/OFF WALL SWITCH MUST NEVER BE ATTACHED TO A METAL FRAME.
WARNING
Whenever servicing the power flue system, always turn off the electrical power supply and
close the manual gas control valve.
IMPORTANT INFORMATION
In addition to the instructions in this manual all national, state and local regulations must be
adhered to. These include but are not limited to:
• Australian Standards AS3000 - Electrical Installation.
• Australian Standards AS5601-2004 - Gas Installation.
• Local Gas and Electrical Authority Regulations.
• Municipal Building Codes.
The power flue should be serviced every 12 months by an authorised technician. If repairs
are needed an authorised technician must carry them out.
FITTING THE MOTOR
The power flue motor has a 150mm spigot and a twin spigot of 150mm & 200mm. The single
spigot fits over the vertical flue and the 150mm/200mm flue attaches to the horizontal spigot.
FLUE SIZE
26
All flue prior to the motor is 150mm/200mm twin skin and all flue after the motor is
150mm/200mm twin skin.
OPTIONAL POWER FLUE (continued)
Installation Instructions
(continued)
HORIZONTAL FLUE RUN
The maximum length of horizontal flue run is to be 13.5 metres with a maximum of four (4) bends;
these bends can be 45° or 90°. The horizontal flue run is to have a grade downwards from the
motor to the termination.
VERTICAL FLUE RUN
The minimum vertical flue run is 900mm from the top of the firebox (1500mm from the floor). If a
longer vertical run is required twin skin flue 150mm & 200mm can be added between the muffler
top and the fan. The flue can be cut to the required height.
FLUE CLEARANCES
All flue clearances are as per the requirements listed in the heater specifications.
TERMINATION
The termination to be used for all horizontal installations is to be 100mm cowl that has been
approved as a horizontal cowl.
Installation of Power Flue Kit
POWER FLUE MUFFLER
The power flue muffler has a spigot at each end. The end that attaches to the firebox has a spigot
equivalent to the inner flue spigot diameter of the firebox, the top of the muffler has a 150mm
spigot which the motor fits to, or the 150/200 twin skin flue if required. The flow arrow on the
muffler is to be pointing up.
WIRING (see wiring diagram page 30)
A 3 metre lead is supplied with the power flue, this lead has a different connection on each end,
one end is plugged into the connection on the left hand side of the firebox and the other end is to
be plugged into the fan. The wire coming from the rear of the firebox with the standard 3-pin plug
attached is to be plugged into a power point. A single gang wall switch is also supplied attached
to the 3 metres of lead; this wall switch is to be attached at a location accessible to the client. No
other wiring is required.
SERVICING OF THE POWER FLUE MOTOR
The Real Flame Power Flue motor is designed so as to make servicing the motor a simple task.
The power lead connected to the motor is to be disconnected (unplugged) and the two side clips
are to be undone, the fan motor will then lift out for servicing. The fan Motor box connected to the
flue does not have to be disconnected from the flue.
27
OPTIONAL POWER FLUE (continued)
Motor Clearance
Minimum clearance
250mm
Ensure there is
adequate ventilation
within this cavity to
prevent motor overheating.
150mm/200mm
twin skin flue - optional
for additional height
Minimum
height
28
OPTIONAL POWER FLUE (continued)
For Heatseeker 600, 700 & 850 Series
Frameout
Minimum clearance
250mm
IMPORTANT
Install unit and fluing
before plasterboard.
D
400mm x 400mm
Access Panel
90mm x 38mm
ON EDGE
Sound check
plaster board
C
A
B
Motor
Motor
OFF
T
LO
PI
Motor
Capacitor
4 mf
MODEL
A
B
C
D
600
750
750
450
1800
450
1900
450
2100
Pressure
700
750
Differential
Switch 850
850
750
1000
Fan
Fan Casing
29
OPTIONAL POWER FLUE (continued)
Internal Motor
500mm
Top Termination
300mm min.
Access
Panel
Min. Distance
Domestic: 220mm
Industrial: 320mm
150mm x 200mm flue extension
200mm
Motor
Termination
150mm x 200mm twin
skin flue (if required)
900mm
Baffle
Heater
25mm
Flue
Minimum 25mm clearance
from outer flue to
combustible interior.
NOTE:
1.
Maximum of 4 elbows, 45° or 90°.
2.
Allow 400mm x 400mm access panel for service of motor.
Flush Cowl Terminations 300x300
115
300
22
154
300
FRONT
152 182
SIDE
REAR
Flush Cowl Terminations 500x500
115
500
154
22
152 182
500
30
FRONT
SIDE
REAR
OPTIONAL POWER FLUE (continued)
External Motor
25mm clearance
200mm
340mm
External Motor
150mm x 200mm flue extension
150mm x 200mm twin
skin flue (if required)
Miniumum
1290mm
900mm
Baffle
Heater
NOTE:
1.
Maximum of 4 elbows, 45° or 90°.
Fan Box
Dimensions
A
B
C
D
E
F
G
H
302
348
345
55
90
20
200
150
I
J
K
L
M
N
O
P
20
120
60
105
75
45
112
13
31
TROUBLE SHOOTING FOR ELECTRONIC IGNITION AND
POWER FLUE SYSTEM.
Symptom
Possible Cause
Corrective Action
Fire turned on and
nothing happens
No Power to Module
Connect Power
Fire turned on and
motor starts but
there is no spark
Pressure switch not
operating
Check pressure switch
Fire sparks when
turned on but will
not ignite
A. No Gas
Connect Gas.
B. Sparker is to far from
metal
Adjust sparker so it cross lights to metal.
C. Pressure switch
(Power Flue) is not
operating correctly.
Remove fan from housing and check that small tube
supplying air to pressure switch has not moved or been
damaged.
C. Valve solenoids are
faulty
Check solenoids
D. Solenoid wires to
module not connected
correctly
Check that the four pin plug from the valve has been
connected correctly
A. Something is touching
the heat sensor
Ensure that nothing is touching the sensor which is located
behind the cover plate at front of burner.
B. The power polarity is
reversed
Check polarity
A. Insufficient air for
burner to operate
correctly
Check that the unit has correct ventilation as per Installation
manual.
B. Pressure switch not
operating correctly
Check air supply tube to pressure switch.
Fire ignites and then
shuts down within a
couple of seconds
Fire ignites and
shuts down after
several minutes
32
TROUBLE SHOOTING FOR ELECTRONIC IGNITION AND
POWER FLUE SYSTEM. (continued)
The power flue and electronic control box have a red LED light that indicates the
possible cause of a problem, the LED light will flash in different sequences for
different problems, the most common are:-
Long Flash
Short Flash
1
0
Normal Running State.
1
1
Flame Failure.
1
2
Waiting for pressure switch ON
1
3
Waiting for pressure switch OFF
2
1
Maximum retries exceeded
33
PARTS LIST
PART No.
DESCRIPTION
PART No.
01
BM 733 Control Valve
05
02
Regulator SC-75
06
5/16˝ 90O Union Elbow
S.I.T. ODS Pilot Assembly (Natural Gas)
07
1/4˝ Nut and Olive
S.I.T. ODS Pilot Assembly (Propane Gas)
08
Injector Holder Stem
1/2˝ Male to 1/2˝ Copper Union
09
Injector
03N
03P
04
1/2˝ to 3/8˝ Hex Nipple
3
9
6
1
7
8
4
5
2
LOG AND COAL SETS
34
HEATSEEKER FLUE TERMINATION (COWLS) REGULATIONS
Natural Draught
D
Refer to Note 1
Refer to Note 1
B
A OR B
C
600mm
AREA
CLEARANCE REQUIRED
A: Horizontally from a neighboring structure. ......................................................1000mm
B: If less than a meter horizontally from a neighboring structure
then terminates above that structure by. ...........................................................500mm
C: From any opening into a building....................................................................1500mm
D: From another flue terminal. ................................................................................200mm
Notes:
1. A trafficable roof designed for personal or public use, the end of the flue shall be at least
2 meters above the roof level. This dimension is to be increased where necessary so
that the minimum distance of 500mm is maintained above any surrounding parapet or at
least 200mm from the nearest part of a chimney.
2. The current version of the AG601 gas codes and any other relevant codes should be
read in conjunction with the above guidelines to ensure a correct and safe installation.
35
OPTIONAL MARBLE HEARTH AND/OR MARGIN SET
1190mm
275mm
620mm
270mm
375mm
1810mm
Marble Margin Set Installation Procedure
1.
Install Heatseeker with trim in place.
2.
Install marble over trim up to the fire opening. Use liquid nails to fix to wall. Marble should
look like the diagram below once it has been installed and before mantelpiece has been
attached.
Firebox
36
OPTIONAL MANTELPIECE INSTALLATION
Wall Stud
Firebox
Trim
Marble Margin
Mantel Leg
Mantel Shelf
A
F
D
C
E
G (Internal
H (Internal
Dimension)
Dimension)
B
MANTELPIECE DIMENSIONS
Federation Square
Adelaide Federation
Windsor Universal
Bouvier Universal
Kensington Universal
Friedrich Universal
A
1440
1460
1810
1810
1810
1810
B
1340
1300
1665
1665
1665
1665
C
1165
1170
1180
1180
1180
1180
D
950
950
1090
1090
1090
1090
E
950
950
860
860
860
860
F
235
235
280
280
280
280
G
100
100
100
100
H
80
80
80
80
37
ELECTRICAL DIAGRAM
GREEN/YELLOW
Electrical Ignition models
TECHRITE IGNITION PACK
TAIS-CP-R15-D5-000V
SPARK
ON/OFF SWITCH
BROWN
GREEN/YELLOW
BLUE
BLUE
FAN SWITCH
FLAME
SENSING
BLUE
BLUE
RED
FUSE
BLACK
BROWN
BROWN
BROWN
BROWN (HIGH) NOT USED
WHITE (LOW)
WHITE
BLACK (MED)
BLACK
BLUE
BLUE
FAN
GAS
VALVE
GREEN/YELLOW
GREEN/YELLOW
Powerflue models
TECHRITE IGNITION PACK
TAIS-CP-R15-D5-000V
SPARK
ON/OFF SWITCH
BLUE
BLUE
FLAME
SENSING
BLUE
BROWN
BROWN (HIGH) NOT USED
FAN
WHITE (LOW)
WHITE
BLACK (MED)
BLACK
BLUE
BLUE
GREEN/YELLOW
38
GAS
VALVE
RED
FAN SWITCH
BLACK
BROWN
BROWN
FUSE
WHITE
GREEN/YELLOW
BLUE
ORANGE
BROWN
AIR
PRESSURE
SWITCH
39
REAL FLAME PTY LTD
ABN 76 006 311 155
Head Office/Factory/Showroom
1340 Ferntree Gully Rd.
Scoresby Vic 3179
Ph: (03) 8706 2000 Fax: (03) 8706 2001
E-mail: [email protected]
Richmond - VIC Showroom
300 Swan St.
Richmond Vic 3121
Ph: (03) 9428 4443 Fax: (03) 9428 4445
Dandenong - VIC Showroom
9 Lonsdale St.
Dandenong Vic 3175
Ph: (03) 9791 9285 Fax: (03) 9791 9662
Geelong - VIC Showroom
1/2A Gordon Avenue.
Geelong West Vic 3218
Ph/Fax: 5229 0844
E-mail: [email protected]
Sydney - NSW Showroom
546 Pacific Highway.
Chatswood NSW 2067
Ph: (02) 8905 0189 Fax: (02) 8905 0192
E-mail: [email protected]
Miranda - NSW Showroom
36 Kareena Rd
Miranda NSW 2228
Ph: (02) 8513 6202 Fax: (02) 9520 1974
E-mail: [email protected]
Adelaide - SA Showroom
173 -175 Magill Rd.
Norwood SA 5067
Ph: (08) 8132 0371 Fax: (08) 8132 1687
E-mail: [email protected]
Miton - QLD Showroom
46 Douglas St,
Milton QLD 4064
Ph: (07) 3368 2011
Perth – WA Showroom
47-53 McDonald St East,
Osborne Park WA 6017
Ph: (08) 9444 9900 Fax: (08) 9444 9800
Fyshwick – ACT Showroom
88 Wollongong St,
Fyshwick ACT 2609
Ph: (02) 6280 5522