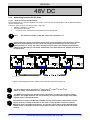
1
User Manual
Eproms EVM - E48 – E1G
EVGL1 – EVGL2
Microface E
24VAC – 24VDC - 48VDC
Hiromatic G
Hiromatic E
English
HPAC - Code 272 189
Revision 15.02.2005
1
User Manual Microface E & Hiromatic G/E 15.02.2005
1
ENGLISH
INDEX
1
1.1
2
2.1
2.1.1
2.1.2
2.1.3
2.1.4
2.1.5
2.1.6
2.2
2.3
2.4
2.5
2.6
2.7
2.8
2.9
2.10
2.10.1
2.10.2
2.10.3
2.11
2.11.1
2.11.2
2.12
2.12.1
2.13
2.14
3
3.1
3.1.1
3.1.2
3.1.3
3.1.4
3.1.5
3.2
3.3
3.3.1
3.3.2
3.3.3
3.3.4
3.3.5
3.3.6
3.3.7
3.4
3.5
4
4.1
4.2
4.3
2
Introduction ................................................................................................................................ 3
Foreword.................................................................................................................................... 3
Hardware ................................................................................................................................... 3
Microface Evolution 24V AC/DC – 48V DC ................................................................................... 3
Microface Evolution 24V AC and Microface Evolution 24V DC....................................................... 4
Networking between 24V AC/DC Units......................................................................................... 5
Microface Evolution 48V DC........................................................................................................ 7
Networking between 48V DC Units .............................................................................................. 8
How to make mixed networks between Microface 24Vdc and Microface 48Vdc............................... 9
Hironet Opto-isolator (only Microface 48VDC)..............................................................................10
LCD Display ..............................................................................................................................11
Eprom .......................................................................................................................................12
Humitemp and Humitemp Evolution ............................................................................................12
EEAP........................................................................................................................................13
Hirosensor 2T............................................................................................................................13
PTC Temperature Sensor ..........................................................................................................13
PTC Airflow Sensor....................................................................................................................13
I-Board / TAM Module ................................................................................................................14
Hiromatic G / Hiromatic E...........................................................................................................14
Hiromatic G / E direct Connection to Microface ........................................................................14
Hiromatic G Backside View, Jumpers and Eprom Position........................................................15
Hiromatic Evolution Backside View, Jumpers and Eprom Position.............................................16
Power Supply Module for Hiromatic (24V only) ............................................................................17
PSM Hardware ......................................................................................................................17
PSM Connection (24V only) ...................................................................................................17
Hirobus Cables and other Connection Cables ..............................................................................17
Addressing ............................................................................................................................18
Hardware, Technical Specification ..............................................................................................19
Spare Parts List.........................................................................................................................20
Software ...................................................................................................................................21
The LCD Display .......................................................................................................................21
How to move through the Values/Parameters of the LCD Display .................................................22
How to enter the Password (PIN) ................................................................................................22
How to change Parameters ........................................................................................................22
How to reset Alarms or Warnings ................................................................................................22
Tricks........................................................................................................................................22
The LCD Parameters .................................................................................................................23
The Microface E LCD Display Warnings / Alarms.........................................................................37
Hiromatic G / E..........................................................................................................................38
Hiromatic E Layout ....................................................................................................................38
How to Move in the Hiromatic Windows .......................................................................................40
The Menus ................................................................................................................................41
General Information ...................................................................................................................63
List of CCAC Eproms, used since 1996 .......................................................................................63
Notes to Icon Versions (E1G, EVM) and non-Icons Versions (WXG, 1-2-3XM, A1M)......................63
Hiromatic Parameter List ............................................................................................................64
Hiromatic Messages / Warnings / Alarms ....................................................................................72
Connection Guide......................................................................................................................74
Inputs / Outputs for Chilled Water or Single Compressor Units......................................................74
Inputs / Outputs for Twin Compressor Units.................................................................................75
Electrical Connections ................................................................................................................76
User Manual Microface E & Hiromatic G/E 15.02.2005
2
ENGLISH
1
Introduction
1.1
Foreword
This User Manual describes the Microface E Control System. It contains information concerning the
architectures of the control systems as well as the settings required to obtain the desired behaviour of the
Unit.
The Microface Control System will effectively manage all the different functions of air conditioning units as
well as of Chillers/Superchillers, depending on the Program inserted with the Eprom (Eprom explanation see:
Chapter 2.3,Eprom).
In the following sections first the Hardware, and later the Software (Firmware) are explained in detail.
2
Hardware
2.1
Microface Evolution 24V AC/DC – 48V DC
The Microface Evolution is a microprocessor-based electronic card, which is able to manage the devices and
the sensors installed in the unit (please note that Microface E differs from the so called “Microface Standard”;
all explanations in the following sections refer ONLY to the Microface E and are not applicable on Microface
Standard).
Microface E is installed in the electrical panel of indoor-units together with a User-interface module (“LCD
Display”), which allows to read/set/reset values, parameters and alarms.
In outdoor- or ceiling mounted units the LCD Display is mounted in a box with extension cable, which allows
placing it on a reachable position.
To get access to the Microface E connections and Jumpers the LCD Display (if present) has to be removed
from its 4 mounting pins.
Take care not to pull out the connecting cable when removing the LCD Display!
Please note that there are 3 different Microfaces E available:
Supplied with 24 V AC; with 24V DC and with 48V DC. While both the 24V versions (AC and DC) have a
very similar hardware and common properties, the 48V DC version is completely different: it needs a specific
Eprom; also the networking follows different rules than the 24V AC or DC versions – see following chapters.
•
•
•
3
For 24V AC supplied versions the Eprom EVM (Air Conditioner) or SCM (Chillers) has to be used
For 24V DC supplied versions the Eprom EVM (Air Conditioner) has to be used
For 48V DC supplied versions the Eprom E48 (Air Conditioner) has to be used.
User Manual Microface E & Hiromatic G/E 15.02.2005
3
ENGLISH
24V AC/DC
2.1.1
Microface Evolution 24V AC and Microface Evolution 24V DC
Note: Microface E 24V AC and Microface E 24V DC have different hardware (different part numbers); but
the components appear nearly identical on both Microfaces, so that the following description refers to both
versions.
As the Microface E is the “Heart” of the System, which controls all Functions of the Unit, some Jumpers have
to be set in order to set-up the control board according to the requested Functions. Most of these Jumpers
are already correctly set in the factory, only the Jumpers for the unit’s address (“A”) has to be set in the field,
during start-up of the Unit.
Never add / remove Jumpers when Microface is under power!
A
EWE
MICROFACE E
AI
Backup battery
EPROM
E/F
SG
HM
quick plug-in connector
to "local" LCD display.
ES
I-Board
RS485
for direct
communication
to Hirolink.
quick plug-in connector to
Humitemp, Hirosensor, EEAP
sensors, "remote" LCD display.
HIROBUS quick plug-in
connector to Hiromatic G or
next/previous Microface.
HIROBUS quick plug-in connector to
next/previous Microface.
JUMPERS:
EWE:
EEPROM write enable. Always set this jumper.
A:
Address setting. See chapter “Networking” for Details. Units, not connected to others: NO Jumper.
AI:
Analogue Inputs selection. See details on Microface Connection Guide at the end of the manual.
E/F:
EPROM / Flash memory selection jumper. Set the jumper when EPROM is installed. Do not set this
jumper when Flash memory is installed.
SG:
Subgroup ID setting. See chapter “Subgroup Microfaces”
HM:
Comb connector for I -Module (present when humidifier is installed).
ES:
EPROM /Flash memory size selection jumper. Set jumper between middle and right pins for 1 or 2 Mbit
size memory devices. Set jumper between middle and left pins for 4 Mbit size memory devices.
Figure 1 – Microface E 24V AC and 24V DC with connectors and jumpers.
4
User Manual Microface E & Hiromatic G/E 15.02.2005
4
ENGLISH
24V AC/DC
2.1.2
Networking between 24V AC/DC Units
2.1.2.1 How to connect the Microfaces
Several units can be connected together via Hirobus. The units can exchange data, and so different features
can be activated, like:
• Teamwork (The group of units behaves like 1 big unit)
• Standby + Rotation + Cascade
• One common Hiromatic
• … and some more, described in the Software Part of this Manual.
Note:
The maximum number of units to be connected is 16.
This Number reduces to 8, only if a Hirolink is connected to the common Hiromatic.
If a Hirolink Light or Hirolink SMM is connected directly to the Microfaces, 16 Units
can be connected.
Please note that a wrong connection could cause serious problems to the electronic devices
(Microface and Hiromatic); for this reason we strongly recommend you to use only first
quality products or to buy the cables directly from your sales reps.. Before connecting the
cables to the Microface a check with Cable-Tester (see Spare Parts List, Chapter 2.14) has to
be performed.
EPROM
MICROFACE E
EPROM
MICROFACE E
HIROBUS:
Six wires flat screened cable
TO HIROMATIC G (if installed)
eight wires flat cable.
The cable must be screened if
Hiromatic is not installed on the
door of the unit.
TO NEXT MICROFACE
NOTE : CONNECT THE SCREEN OF THE FLAT CABLE TO THE CLOSEST "PE" (EARTH) OF THE ELECTRICAL PANEL ON BOTH SIDE OF THE CABLE.
HIROBUS CABLES MUST BE INSTALLED INSIDE SUITABLE CONDUITS, SEPARATE FROM THOSE OF POWER TRANSMISSION CABLES.
Figure 2 connecting Microfaces. Cables to be used: see Figure 25 on page 18.
st
nd
nd
The bus-cable must be wired from 1 unit to the 2 , from 2
“Star” or “Ring” connections are not allowed at all.
rd
to the 3 etc.
The Maximum length of the Hirobus-cable is 300 meters, counting all connection cables
together. The single distances are not of interest, as long as the total length of all cables
together doesn’t exceed 300 meters.
AC and DC MICROFACES E CANNOT BE CONNECTED IN THE SAME
NETWORK!
5
User Manual Microface E & Hiromatic G/E 15.02.2005
5
ENGLISH
24V AC/DC
2.1.2.2 Subgroup-Microfaces
nd
In some specific Units (CCAC: twin compressor units with freecooling or Matrix 4 circuit: 2 Microface for
control of circuit 3 and 4) a second Microface is installed, identified as “Microface Subgroup”. The Microface
Subgroup must have the same eprom and the same address as the “Master” Microface; the definition of
Master and Subgroup Microface is done through a Jumper. There are 2 types of Subgroup: Type 1 is used
for CCAC, Type 3 for Matrix 4 Circuit. The position of the subgroup jumper also defines the type of subgroup,
see Figure 3:
SUBGROUP Type 3:
MATRIX 4 circuit
MASTER
JUMPERS BLOCK
JUMPERS BLOCK
SUBGROUP Type 1:
CCAC
EPROM
SUBGROUP MICROFACE
EPROM
MASTER MICROFACE
From previous unit
To next Unit or to Hiromatic
Figure 3 Master and Subgroup Microface
2.1.2.3 Slave-Microfaces
In some Chillers or Superchillers (Matrix) Screw Compressors are mounted. Screw Compressors have
capacity control (50 – 100%), by using a slide, driven with solenoid valves. To control the solenoid valves, a
so called „Slave Microface“ is installed. The Slave Microface uses a different Eprom (MIO), the Master
Microface uses the Eprom SCM instead. For the Slave Microfaces no Subgroup must be set. The address is
defined by the Slave Microface number: address 1 for Slave 1, 2 for Slave 2, regardless of the address of the
Master Microface.
For connection see Figure 4: Master and Slave Microface
SLAVE MICROFACE 1
EPROM
EPROM
MASTER MICROFACE
To Slave Microface 2
Figure 4: Master and Slave Microface
6
User Manual Microface E & Hiromatic G/E 15.02.2005
6
ENGLISH
48V DC
2.1.3
Microface Evolution 48V DC
As the Microface E is the “Heart” of the System, which controls all Functions of the Unit, some Jumpers have
to be set in order to set-up the control board according to the requested Functions. Most of these Jumpers
are already correctly set in the factory, only the Jumpers for the unit’s address (“A”) has to be set in the field,
during start-up of the Unit.
Never add / remove Jumpers when Microface is under power!
AI
Quick-plug for Local
LCD display.
A
MICROFACE E 48 VDC
Fuses
HM
RS485 for
direct
Communication
to Hirolink
ES
SG
EPROM
Power connector for
OPTO Hironet
Backup battery
EWE
E/F
Out 8
OPTO
NET
EARTH
Quick-plug for connection to
Humitemp, Hirosensor,
EEAP sensors.
Quick-plug for connection through HIROBUS to
the previous/next unit.
Quick plug for connection through HIROBUS
to Hiromatic G or the previous/next unit.
JUMPERS:
EWE:
EEPROM write disable. Never set this jumper.
A:
Address setting. See chapter “Networking” for Details. Units, not connected to others: NO Jumper set.
AI:
Analogue Inputs selection. See details on Microface Connection Guide at the end of the manual.
E/F:
EPROM / Flash memory selection jumper. Set the jumper when EPROM is installed. Do not set this jumper
when Flash memory is installed.
Subgroup ID setting. See chapter “Units with 2 Microfaces”
Comb connector for I-Module (present when humidifier is installed).
EPROM /Flash memory size selection jumper. Set jumper between middle and right pins for 1 or 2 Mbit size
memory devices. Set jumper between middle and left pins for 4 Mbit size memory devices.
OPTO:
enable/disable of the analogue-optosilated output. Set the jumper in the right/left to have analogue-optosilated
output. See more details in the User manual.
EARTH: this faston is connected to the HIROBUS RJ45 connectors screen. In case of screened Hirobus cable with metal
connector, the Hirobus’s screen have to be connected to earth by faston.
NET:
Opto-isolated Hirobus. See description in the chapter “Networking between Units”. Unit not connected to others
and not connected to Hiromatic: NO Jumpers set.
OPTO HIRONET:
SG:
HM:
ES:
this 3 pins connector provides the power supply and direction signal to the OPTO Hironet interface (275799);
attaching the OPTO Hironet interface the Hironet Network will be Opto-isolated.
Figure 5 – Microface E 48VDC with connectors and jumpers
Please note that the position of output 8 is different from Microface 24VDC to Microface
48VDC
7
User Manual Microface E & Hiromatic G/E 15.02.2005
7
ENGLISH
48V DC
2.1.4
Networking between 48V DC Units
2.1.4.1 How to connect the Microfaces
Several units can be connected together via Hirobus. The units can exchange data, and so different features
can be activated, like:
Teamwork (The group of units behaves like 1 big unit)
• Standby + Rotation + Cascade
• One common Hiromatic
• … and some more, described in the Software Part of this Manual.
Note:
The maximum number of 48V DC units to be connected is
6.
Please note that a wrong connection could cause serious problems to the electronic devices
(Microface and Hiromatic); for this reason we strongly recommend you to use only first
quality products or to buy the cables directly from your sales reps.. Before connecting the
Cables to the Microface a check with Cable-Tester (see Spare Parts List, Chapter 2.14) has to
be performed.
Up to 6 Microface E 48VDC and 1 Hiromatic
Faston to EARTH
EPROM
Unit #6
EPROM
Unit #2
EPROM
Unit #1
Faston to EARTH
Faston to EARTH
To Hiromatic
Figure 6 connecting Microfaces. Cables to be used: see Figure 24 on page 18.
st
nd
nd
The bus-cable must be wired from 1 unit to the 2 , from 2
“Star” or “Ring” connections are not allowed at all.
rd
to the 3 etc.
The Maximum length of the Hirobus-cable is 60 meters, counting all connection cables
together. The single distances are not of interest, as long as the total length of all cables
together doesn’t exceed 60 meters.
The Hirobus connectors of Microface 48VDC are fully optoisolated. It means that a power
supply must be provided via Hirobus to the driver of each Hirobus connector because
Microface does not supply those drivers. It is for this reason that a system with Microface
48VDC works in network only with 8 poles cables (2 poles are used to provide 10V to the
drivers).
8
User Manual Microface E & Hiromatic G/E 15.02.2005
8
ENGLISH
48V DC
2.1.4.2
Hirobus Opto-Isolation Jumper Setup
A
Only the Hirobus connector on the right receives
power from Hirobus. The Hirobus of this Microface E
48VDC is OPTOISOLATED.
B
Microface E 48VDC provides power to the Hirobus
connector on the right ONLY.
C
Microface E 48VDC Hirobus drivers receive power
from Hirobus. The Hirobus of this Microface is
OPTOISOLATED.
D
Microface E 48VDC provides Power to Hirobus
drivers on BOTH HIROBUS connectors.
Figure 7, Jumpers for Hirobus
2.1.5
How to make mixed networks between Microface 24Vdc and Microface 48Vdc
There is the possibility to connect 1 only Microface 24VDC to 1 only Microface 48VDC with Hiromatic
(optional). To do this see Figure 8
NET
IBoard
EPROM
MICROFACE E 24VDC
EPROM
MICROFACE E 48 VDC
EARTH
8 poles Hirobus
8 poles Hirobus
Figure 8 – mixed network with 1 Microface 48 VDC (with Hirobus Jumper Position A or C) and 1
Microface 24 VDC
In all the other possible variations of mixed connections, please contact Information &
Controls Department (e-mail : [email protected] )
9
User Manual Microface E & Hiromatic G/E 15.02.2005
9
ENGLISH
48V DC
2.1.6
Hironet Opto-isolator (only Microface 48VDC)
For Microface 48VDC an opto-isolator for the Hironet is available. It must be used any time a connection
from Microface E 48VDC to Hirolink has to be established.
There are two cable-connectors on it: the signal (Hironet) cable-connector (A) must be connected to the
Hironet connector of Microface, the power supply cable-connector (B), which supplies the opto-isolator, shall
be connected above (very close) the Hironet connector. The 2 sockets in the box (C,D) are to be used to
perform the networking between the units.
Microface 1
B
A
Microface 2
B
A
Microface 3
B
A
A
C
D
C
D
C
B
C,D
Hirolink
Figure 9 – Hironet opto-isolated connector with example of connection (for Eprom E48)
10
User Manual Microface E & Hiromatic G/E 15.02.2005
10
ENGLISH
2.2
Backlit LCD
LCD Display
There are two different Displays available:
“Local” Display
“Remote” Display
23.0
Both Displays have the same Front-View:
Up-push-button
Down-push-button
Enter push-button
Red LED
Green LED
Yellow LED
Figure 10 – LCD Display Front View (with plastic cover)
Just the backside connections are different, because of the different connection types to the Microface E:
Local or Remote Display.
"LOCAL" LCD DISPLAY
"REMOTE" LCD DISPLAY
Six poles connector for
the connection to the
external panel Switch
and LED
FERRITE
Alternative !!
CONNECTION TYPE A:
4 wires flat cable
(410 mm max. length)
MICROFACE E
HT
CONNECTION TYPE B
(HIROBUS):
8 wires screened flat cable.
Screen connected on both
sides to earth.
MAX LENGTH: 20 m.
to Humitemp,
EEAP,
Hirosensor 2T
Sensors
The T-Adapter is necessary only when both "Hirobus" sensors and
"remote" LCD display must be connected the same. Otherwise the
it can be connected directly to the Microface E “HT” Jack.
Figure 11 – Local and Remote Display Backside
Never use cables longer than 410 mm (Local Display) or longer than 20m (Remote Display)!
11
User Manual Microface E & Hiromatic G/E 15.02.2005
11
ENGLISH
2.3
Eprom
The Eprom is the device, which stores the Program; the Microface has to work with. It doesn’t store any
2
user-settings; this is done by the Microface itself (in the RAM and the E Prom). The Version Name and the
Number are printed on the Label of the Eprom.
The following Eproms are today in use for Standard Units (the xxx is a placeholder for the actual Version):
EVM 1.60.xxx
E48 1.60.xxx
E1G 1.60.xxx
EVG L1/L2 1.60.xxx
2
2
2
4
MBit Air Conditioners, for Microface E 24V AC/DC.
MBIT Air Conditioners, for Microface E 48V DC.
MBit Air Conditioners, for Hiromatic G.
MBit Air Conditioners, for Hiromatic E.
SCM 1.01 / 1.02.xxx
MIO 1.01 / 1.02.xxx
SCG 1.01 / 1.02.xxx
SCE L1 1.01 / 1. 02.xxx
2
2
2
4
MBit
MBit
MBit
MBit
Chillers/Superchillers, for Microface E 24V AC.
Chillers/Superchillers, Output extension for Microface E 24V AC.
Chillers/Superchillers, for Hiromatic G.
Chillers/Superchillers, for Hiromatic E.
Figure 12 - Eprom
Un-power the Microface before mounting/dismounting the Eprom. Remove Eprom only with
special tool; never use a screwdriver. For correct direction of mounting please refer to Figure
1 in Chapter Microface Evolution for Microface, and Figure 20 in Chapter 2.10.2 for Hiromatic.
Compare the Mark in the Eprom with the direction in the Drawing.
2.4
Humitemp and Humitemp Evolution
The Humitemp is a combined Temperature / Humidity Sensor. If connected, the Microface will use the values
of the Humitemp for control. It is connected to the Microface through Hirobus-Cable (max. length: 25 m).
The Humitemp is used for Air-Conditioners only.
Humitemp, Humitemp E
Front View
Temperatur e
Reading
Humitemp
open, Rear View
Humidity
Reading
Hirobus
Address
Switch
Humitemp Evolution
open, Rear View
Hirobus
Address
Jumpers
Figure 13 – Humitemp
The Address-Switches / Jumpers inside the Humitemp allows setting different Functions to the Sensor:
Control Sensor
nd
EEAP Sensor, for 2 step Warnings
Hirosensor 1 (for Indication in Microface E or Hiromatic G only, no Control or Alarms)
Hirosensor 2 (for Indication in Microface E or Hiromatic G only, no Control or Alarms)
Figure 14 – Address switches / jumpers
These address switches / jumpers are also present in the EEAP and Hirosensor 2T sensors.
12
User Manual Microface E & Hiromatic G/E 15.02.2005
12
ENGLISH
2.5
EEAP
The EEAP has the same Hardware as the Humitemp. The EEAP function can be activated by simply
changing the Address-Switches to the EEAP function. The EEAP is used for Air-Conditioners only.
2.6
Hirosensor 2T
The Hirosensor 2T is a double temperature sensor; it allows (according to the Software installed in the
Microface) to show 2 more temperatures (without any Warning Levels or Control Functions) in the Control.
Both temperature sensors have a cable length of 2 meters.
TemperatureReading 1
TemperatureReading 2
Figure 15 – Hirosensor 2T
2.7
PTC Temperature Sensor
The PTC Sensor is used in Air-Conditioners as well as in Chillers/Superchillers. There are different Types
and lengths available: please refer to Chapter 2.14 Spare Parts List.
PTC Sensors are temperature-sensors, changing the resistance according to the temperature (positive
temperature coefficient). The connection is 2 poles. The length of the cable for the sensor ranges from 2 to
10 meters.
Measuring
Element
Cable
Figure 16 – PTC Sensor
2.8
PTC Airflow Sensor
The PTC Airflow Sensor measures the Airspeed (used only in Air-Conditioners). The System used is the one
used also for Airflow-Anemometers. There is an automated Setup-Procedure in the EVM Software, which
helps making the right settings. The PTC Airflow has to be supplied with 24V, and gives back a Signal of 010VDC, according the airspeed measured. It has to be connected to an analogue input. The connection is 3
poles. The length of the cable for the sensor is 2 meters.
Measuring and
Heating Element
Cable
Figure 17 – PTC Airflow
13
User Manual Microface E & Hiromatic G/E 15.02.2005
13
ENGLISH
2.9
I-Board / TAM Module
The I-Board for CCAC Units is the current transformer for the Humidifier (cylinder Type).
For Chillers/Superchillers it can be used (optional) to have a volt free Warning contact.
The I-Board consists of one Current Transformer-Coil (one phase of the power supply for the humidifier must
be wired through the hole); and 1 output relay (to start humidifier for CCAC applications, and to have the
warning relay for Chiller / Superchiller applications). The I-Board is simply plugged onto the Microface, see
Chapter 2.1.1 on page 4 for the position.
Figure 18 – I-Board
2.10 Hiromatic G / Hiromatic E
Hiromatic G / E is a microprocessor-based electronic device, which makes it possible to control the functions
of one or more Microface devices. Hiromatic G offers numerous advantages of programming the units as
well as to optimise their operation using various features, see chapter 3, Software.
2.10.1 Hiromatic G / E direct Connection to Microface
Hiromatic can be fixed on the front panel of the unit, simply connecting the HIROBUS cable as shown in
Figure 19
HIROMATIC (BACKSIDE)
EPROM
MICROFACE E
FERRITE
Eight wires screened flat cable (max length: 10 m)
(Use direct connection when the distance between
Microface and Hiromatic is less than 10 m)
Figure 19 – direct Connection between Microface and Hiromatic
14
User Manual Microface E & Hiromatic G/E 15.02.2005
14
ENGLISH
2.10.2 Hiromatic G Backside View, Jumpers and Eprom Position
B
A
CONTRAST
DISPLAY
ADJUSTING
v
F
Write Enabling
C
11.0592
12.0000
CRYSTAL
SELECTION
JUMPER
12MHz
BATTERY
+
2M
EPROM
D
512
EPROM
SELECTION
Figure 20 – Hiromatic G Backside
Description of the Jumpers:
A:
B:
C:
D:
2
Write enabling for E Prom. Always set this Jumper.
With jumper on V position, the adjusting of the Display contrast is enabled; with jumper on F position,
it is fixed.
Please double-check with your Hirolink Manual, which Frequency has to be set. Normally 12MHz
should be O.K. If no Hirolink is connected, the setting is not of interest.
Eprom selection. Jumper must be in 2M Position.
Please take special care about the Jumpers when installing a new (Spare Part) Hiromatic!
15
User Manual Microface E & Hiromatic G/E 15.02.2005
15
ENGLISH
2.10.3 Hiromatic Evolution Backside View, Jumpers and Eprom Position
Transformer
Board
Display Board
Backup Battery
C
E
A
EPROM
D
Hironet
Hirobus
F
Figure 21– Hiromatic Evolution Backside
Description of the Jumpers:
A:
C:
D:
E:
F:
Eprom (2M) / Flash Size (4M): Middle + Upper Jumper: 2 or 4 MBit (std. setting)
Middle + Lower Jumper: not used.
Write Disabling:
do not set this Jumper
Interface Selection:
both Jumpers as indicated in Drawing: RS 485 (std. setting)
No Jumpers set: RS 422
Contrast Selection:
Middle + Left Jumper: Variable Contrast
Middle + Right Jumper: Fixed Contrast
Flash download:
not supported yet. Do not set this Jumper
Please take special care about the Jumpers when installing a new (Spare Part) Hiromatic!
16
User Manual Microface E & Hiromatic G/E 15.02.2005
16
ENGLISH
2.11 Power Supply Module for Hiromatic (24V only)
2.11.1 PSM Hardware
Hiromatic G can be supplied mounted in an independent electrical panel containing a power supply module
as well (PSM Power Supply Module), if the Distance to the next Microface is more than 10 meters. The PSM
Module itself needs a power of 24V AC or 24V DC.
Input
24VAC / 24VDC+
24VAC / DC GND
not used
Figure 22 – PSM Module
Output
24VAC / 24VDC+
24VAC / DC GND
(max 6.5A)
2.11.2 PSM Connection (24V only)
The connection between Hiromatic G and
the PSM is carried out in the factory by
means of an eight wires HIROBUS cable.
to Hiromatic
The PSM should be connected to
Microface through a six wires screened HIROBUS cable; the screen needs to be grounded in both terminals.
When the system consists of more than one unit, Hiromatic can be connected to any unit where Microface
has a free HIROBUS connector (usually either the first or the last one of the Microface chain).
Fuse 8x20mm, 250V, T1.6A
from Microface / Macroface
HIROMATIC (BACKSIDE)
EPROM
MICROFACE E
FERRITE
Six wires screened flat cable.
(Use this connection when the
distance between Microface
and Hiromatic is greater than
10 m). The length may vary
within the total limit of 300 m
(max. Hirobus overall length).
Eight wires screened flat cable
(max length: 10 m)
Power Supply for
PSM:
24VAC; 24V DC
POWER SUPPLY MODULE (PSM)
Figure 23 Connection of Microface LAN to Hiromatic Graphic with PSM.
2.12 Hirobus Cables and other Connection Cables
The connections between various Microfaces, Hiromatic, display and sensors are carried out with cables
having a different number of wires and different connectors. Following you can find how these cables have to
be done. For the type of cable and connectors refer to the spare part list included in this manual.
17
User Manual Microface E & Hiromatic G/E 15.02.2005
17
ENGLISH
Please note that a wrong connection could cause serious problems to the electronic devices
(Microface and Hiromatic); for this reason we strongly recommend to use only first quality
products or to buy the cables directly from your sales reps..
EIGHT POLES MODULAR
JACK
Figure 24
EIGHT WIRES FLAT CABLE.
USE SCREENED CABLE WHEN CABLE
IS RUNNING OUTSIDE THE UNIT.
Eight-wires; eight poles connector HIROBUS cable, for Hiromatic or Humitemp
connections; for connection between Microface and the remote LCD Display (see
Figure 11); and for Microface 48V DC connections (screened cable necessary).
EIGHT POLES MODULAR
JACK (USE ONLY THE
CENTRAL SIX POLES)
Figure 25
SIX WIRES SCREENED FLAT
CABLE
Six-wires (Pin 1 and 8 not connected) HIROBUS cable, for Microface 24V AC/DC
connections, eight poles connectors. This cable must be screened.
FOUR POLES MODULAR
JACK
FOUR WIRES FLAT CABLE
Figure 26
4 wires flat cable for local LCD Display, four poles connectors.
2.12.1 Addressing
When Microfaces are connected with HIROBUS, it is necessary to assign a different address to each of
them, by means of a group of jumpers on the Microface. The jumper position is described in Figure 27.
The units must be addressed starting from #1, consecutively. If there are 2 Microfaces on
Board (Subgroup, see chapter Subgroup-Microfaces), both Microfaces must have the same
address. The bus-cable doesn’t necessarily need to go in order of the addresses, it could also
be wired 1-5-4-2-3, for example.
#1
#5
#9
#13
#2
#6
#10
#14
#3
#7
#11
#15
#4
#8
#12
#16
Figure 27 – Address Jumpers
18
User Manual Microface E & Hiromatic G/E 15.02.2005
18
ENGLISH
2.13 Hardware, Technical Specification
Microface E 24V AC
Power Supply
Digital Out (Triac)
Digital Out (Relay)
Analogue Out (0-10V)
Analogue In (resistive)
Analogue In (resistive / 0-10VDC)
Storage Temperature
Operating Temperature Range
Microface E 24V DC
Power Supply
Digital Out (Triac)
Digital Out (Relay)
Analogue Out (0-10V)
Analogue In (resistive)
Analogue In (resistive / 0-10VDC)
Storage Temperature
Operating Temperature Range
Microface E 48 VDC
Power Supply
Digital Out (Triac)
Digital Out (Relay)
Analogue Out (0-10V)
Analogue In (resistive)
Analogue In (resistive / 0-10VDC)
Storage Temperature
Operating Temperature Range
Humitemp, EEAP
Power Supply
Temperature range
Humidity range
Minimum airspeed required
Temperature precision
Humidity precision (@25°C)
Hirosensor 2T
Power Supply
Temperature range
Length of sensor elements
PTC Temperature sensor
Cable length
Temperature range
Point of calibration
Hiromatic G / E
Power Supply
Graphic Display
Mounting hole
Power Supply Module (PSM)
Power supply
Output
24VAC, ± 10%; 50 Hz
7
2 (max. 24V – 1A)
2
8
3
-10 (not condensing) to +65°C
0 (not condensing) to +55°C
24VDC, ± 10%
7
2
2
8
3
-10 (not condensing) to +65°C
0 (not condensing) to +55°C
48VDC, ± 10%
7
2
2 (1 opto isolated)
8
3
-10 (not condensing) to +65°C
0 (not condensing) to +55°C
10VDC (from Hirobus)
0 to 50°C
20 to 90%
0,5 m/s
± 0,5°C
40 to 65%: ±2 %r.H.
20 to 90%: ±4 %r.H.
10VDC (from Hirobus)
-28 to 100°C
2 m (each)
1,5 m and 10m
-28 to 100°C
2000Ω at 25.0°C
10VDC (from Hirobus)
Backlit, 200 x 64 pixels
175 x 150mm
24VAC, ± 10%; 24VDC, ± 20%
10VDC (Hirobus, stabilised);
24VAC, ± 10%; 24VDC, ± 20% (filtered)
I-Board (Current transformer)
Current Range
Digital Out (Relay)
19
User Manual Microface E & Hiromatic G/E 15.02.2005
0 – 30A
1 (max. 24V – 1A)
19
ENGLISH
2.14 Spare Parts List
20
DESCRIPTION
Useful for
CODE
Switch + Led
Microface E and Hiromatic G user manual CCAC GB
Air-Conditioners
Chillers/Superchillers
255039
Yes
Yes
272189
Yes
No
Microface and Hiromatic user manual SC2000 / Matrix
271589
No
Yes
Microface E (Evolution) 24 AC board
275297
Yes
Yes
Microface E (Evolution) 24 DC board (only for DC units)
275298
Yes
No
Microface E (Evolution) 48 DC board (only for DC units)
275690
Yes
No
Opto-isolated Connector for 48V Hironet connection
275799
Yes
No
Local LCD display for Microface
275098
Yes
Yes
Remote LCD display for Microface
275662
Yes
No
I-Board / TAM Module
275099
Yes
Yes
Alarm Board 24VAC
275148
Yes
No
Heaters Board for 1 Comp + Glycol FC units 24VAC
275366
Yes
No
Alarm Board 24VDC
275288
Yes
No
Probe temperature PTC
275183
Yes
No
Probe PTC 2 kohm L = 10 m
275155
Yes
Yes
Probe Temp. + Hum. Humitemp
275181
Yes
No
Probe airflow PTC
275184
Yes
No
EPROM Microface EVM160***
275791
Yes
No
EPROM Hiromatic E48160***
275795
Yes
No
EPROM Hiromatic E1G160***
275789
Yes
No
EPROM Hiromatic EVG-L1 160***
275790
Yes
No
EPROM Hiromatic EVG-L2 160***
275875
Yes
No
EPROM Microface SCM101***
275427
No
Yes
EPROM Microface MIO101***
275766
No
Yes
EPROM Hiromatic SCG101***
275428
No
Yes
EPROM Hiromatic SCE L1 101***
275733
No
Yes
EPROM Microface SCM102***
276049
No
Yes
EPROM Microface MIO102***
276050
No
Yes
EPROM Hiromatic SCG102***
276052
No
Yes
EPROM Hiromatic SCE L1 102***
276051
No
Yes
Hiromatic Graphic
275051
Yes
Yes
Hiromatic Evolution
275691
Yes
No
Kit EEAP
372201
Yes
No
Hirosensor 2T
275193
Yes
Yes
Kit Liquistat - Hiromatic
482979
Yes
No
LWD (Leakage Water Detector)
275353
Yes
No
Flat cable 8 way M-M L = 1 m
275607
Yes
Yes
Flat cable 8 way M-M L = 10 m
275610
Yes
Yes
Flat cable 8 way screened (specify length)
275626
Yes
Yes
Module PSM 24/24-10 for Hiromatic
275316
Yes
Yes
"T" adapter for HIROBUS
275652
Yes
No
Plastic holder for Microface only
270002
Yes
Yes
Plastic holder for Microface and LCD display
270003
Yes
Yes
Hirobus / Hironet Cable Tester
480061
Yes
Yes
Hirobus / Hironet Interface Tester
480060
Yes
Yes
User Manual Microface E & Hiromatic G/E 15.02.2005
20
ENGLISH
3
Software
3.1
The LCD Display
The interface module consists of a backlit LCD and of three push buttons that permit an easy access to the
unit parameters (see Figure 28). Writing access is protected by a password.
Backlit LCD
23.0
Up-push-button
Down -push-button
Enter push -button
Red Led
Green Led
Yellow Led
Figure 28 Interface module between Microface and operator (front view).
There are three LED’s: the yellow Led to indicate the unit is power supplied, the green one lights up when
the unit is in operation and the red one signals either an alarm or a warning condition.
On the LCD the following symbols will be displayed (see Figure 29):
23.5
SET
°C(%)
!
RH
STANDBY
Figure 29; LCD Layout
The snow symbol is active when the unit is in cooling operating mode.
The fan symbol is active when the unit is running, that means that the fan(s) / (pump) is (are)
operating.
The sun symbol is active when the unit is in heating mode (AC only)
!
STANDBY
The alarm triangle is ON when either a warning or an alarm is active.
RH %
The „STAND BY“ string will be displayed when the unit is in the stand-by mode (not running).
Attention: There is a 3 minutes after-running time when changing from ON to STANDBY.
Therefore the Unit displays STANDBY with fans still on for a time of 3 minutes.
The ‘SET’ string will be displayed after the correct password is entered; the presence of this string
on the display confirms the full access to the displayed parameters.
The „RH“ and “%” strings appear when relative humidity is displayed on the LCD.
°C
The „°C“ string appears when temperature is displayed on the LCD.
SET
21
User Manual Microface E & Hiromatic G/E 15.02.2005
21
ENGLISH
3.1.1
How to move through the Values/Parameters of the LCD Display
All Values and Parameters are listed up just one after the other. To jump the next parameter, simply the
“down” button has to be pressed.
The name of the first parameter (p1 is not a real parameter, but only an
example) will be displayed for one second, while the value itself will be
123
displayed for two seconds (alternating) (this position is also considered as
the “Home”.
“Up” and “down” push-buttons
The name of the second parameter (p2 is not a real parameter, but only
an example) will be displayed for one second, while the value itself will be
123
displayed for two seconds (alternating).
“Up” and “down” push buttons to reach the other parameters.
p1
65
p2
65
3.1.2
How to enter the Password (PIN)
Without password or by entering the wrong password, read only access is given, without the possibility to
change values.
To enter a password in Microface, select the “Pin” parameter by pressing the “down” push-button as often as
necessary. When pressing “Enter” (↵), a 0 will be displayed as first digit on the left and will be followed by
two dashes (a password is made of 3 digits). Change the numeric value by pressing the “up” or “down” push
buttons. After having obtained the required numeric value, press “Enter” (↵) to go to the following digit.
Pressing “Enter” (↵) after having selected the last password digit, the parameter (“Pin”) name will be
displayed again. If the correct Password is entered, the desired modifications can be made. Reaching the
next changeable Parameter, the LCD Display will show a “SET” string, which is the confirmation, that the PIN
was entered correctly.
Different Password-Levels give different “Rights”:
Level
Level
Level
Level
Level
Level
Level
Air Conditioners
Read only
Customer Level
Service Low Level
Not used
Sensor Calibration
Service High Level
Service contacts
0
1
2
3
4
5
6
Superchillers
Read only
Customer Level
Service Level
Not used
Sensor Calibration
Not used
Not used
The password is stored, until the first parameter / value (“Home”) of the list is displayed
again. Never leave the Unit without jumping back to “home” (pressing “Enter” and “UP”
together).
3.1.3
How to change Parameters
To change the value of a parameter (possible only when the Password “PIN” has been correctly inserted),
scroll the list using the “up” and “down” push-buttons until the desired parameter is displayed and press
“Enter” (↵). By pressing the “up” and “down” push buttons, it is possible to change the corresponding value;
after having obtained the required value, press enter (↵) again. The display will show again the name of the
parameter alternating with the new value.
3.1.4
How to reset Alarms or Warnings
When an alarm is triggered, the red alarm LED is lit on the LCD Display Module and the corresponding
symbol is shown in the Display.
The Alarm section can be reached by pressing the “up” push-button when the first parameter is on the
display; alarms are pointed out according to their code order.
After having entered the alarm section, the alarm code is displayed and every second the code is replaced
by the coded description.
Pressing the “Enter” key (↵), when an alarm code is displayed on the LCD, all the active alarms will be reset.
After the reset operation, all the still active alarms will be shown again. If there are no more active alarms,
the first parameter / value of the list will be displayed again.
3.1.5
Tricks
To quickly reach the parameter at the bottom of the list, press “Enter” (↵) together with the “down” pushbutton. To quickly reach the parameter at the top of the list, press “Enter” (↵) together with the “up” pushbutton.
22
User Manual Microface E & Hiromatic G/E 15.02.2005
22
ENGLISH
3.2
The LCD Parameters
See chapter 3.1.1 how to move through the Menu and how to enter the Password. The order of the following
table is according the menu-layout of the LCD.
LCD
t1
Parameter Name
Description
RETURN TEMP.
h1
RETURN HUMIDITY
t2
SUPPLY TEMP.
The temperature of the air entering the air
conditioning unit. Depending on how the unit is
configured (devices and sensors installed), this
temperature is measured by a Humitemp or by a
PTC sensor installed inside the unit in the return air
flow path. For sensor installation please refer to the
electrical diagrams of the unit. This temperature is
used by Microface, together with *Room
Temperature Setpoint, *Temp. Proportional Band and
*Temp. Integration Factor to decide the cooling
status of the unit.
The humidity of the air entering the air conditioning
unit. The humidity is measured by a Humitemp
installed inside the unit in the return air flow path or, if
Humitemp is not installed, is not measured. For
sensor installation please refer to the electrical
diagrams of the unit. This humidity is used by
Microface, together with *Room Humidity Setpoint ,
*Humidity Proportional Band and *Humidity
Integration Factor to decide the
humidification/dehumidification status of the unit.
A read only value. It is the temperature
User Setting
of the air delivery of the unit.
Available only when the corresponding
sensor is installed.
This Value could influence the Control,
if SUPPLY LIMIT (Para 114) is set.
t3
OUTDOOR TEMP.
The temperature of the environment
outside the room. It is used, together
with the Return Air Temperature, to
decide the freecooling status of the
unit. If more units are connected via
HIROBUS each unit will work with the
average of the values read by all
sensors. The value displayed here
is this average.
t4
GLYCOL TEMP.
The temperature of the refrigerant
mixture (water or glycol and water)
entering the unit. In Free Cooling or
Dual Fluid units, depending on the
value set in DT Room-Glycol, it is
only displayed or used to decide the
Free Cooling Status of the unit.
In Free Cooling units it also drives
the Analogue Output for the Dry-Cooler.
Each Unit uses ist own sensor for
Control.
23
User Manual Microface E & Hiromatic G/E 15.02.2005
23
ENGLISH
LCD
Act
AcH
Parameter Name
Description
ACTUAL TEMP. SETP
This Value shows the actual Temp / Hum
ACTUAL HUM. SETP.
Setpoint for the specific Unit.
User Setting
The Humidity Setpoint can be
automatically influenced from the
Humidity Compensation' Parameter.
see Para 113 in Control Parameters 1/2.
Eet EEAP
Eeh EEAP
The Temperature and relative Humidity
measured by the optional EEAP Sensor
(Electronic Environment Alarm Package)
(if installed).
This Sensor allows to set second step
Temp. and Hum. Warnings.
H1L
H1r
H2L
H2r
HIROSENSOR 1
The temperatures (two values) measured
HIROSENSOR 1
by Hirosensor sensor number 1 (2).These
HIROSENSOR 2
values are not used for regulation or
HIROSENSOR 2
Alarm / Warning generation.
dr
DRAIN :
DRAIN' (Humididier) can be set to ON
without setting MANUAL to ON, and without to Enter a Password before. DRAIN
stops automatically after 20 Seconds.
NOTE: The Alarm Relay falls to 'ALARM'
when setting the Unit in Manual Mode.
Pin
PASSWORD:
Microface has 3 Levels of Password.
Please ask your local dealer to get it.
nEt
NUMBER OF UNITS
The number of air conditioning units
connected together in the Bus-Network.
The user must set it properly depending
on the actual Network configuration.
All the units in the network must have
different addresses (starting from 1).
sHp
TEAMWORK MODE
Possible settings: NO, 1, 2.
NO : The Units work in stand-alone,
using ist own sensors for
regulation.
This setting must be used in MultiRoom Installations.
Set to 1 if the units shall operate as
one System. For Control the average T+H
of all units in operation is used.
All Units together are working like one
big Unit.
Not to be set in Multi-Zone Rooms.
24
User Manual Microface E & Hiromatic G/E 15.02.2005
24
ENGLISH
LCD
Parameter Name
Description
User Setting
Possible settings: NO, 1, 2.
Set to 2 if the units shall operate in
stand-alone, but with restrictions from
the Average T+H. The Averages decide, if
Cooling or Heating, Hum or Dehum has to
be performed, the units itself decide
about according their own Sensors.
Teamwork setting 2 is a stand-alone
mode operation, but 'mastered' from the
Average T+H, to avoid competition
between the Units.
To be set in Multi-Zone or un-balanced
Rooms.
Id
IDENTIFICATION NUMBER A number that uniquely identify a Microface
connected on an Hironet network. Must be
different for each Microface in the network.
Cen
COMMUNICATION
Set 'NO' if the Microface will
transmit Data to the Hirolink, without
accepting commands from Hirolink.
Set 'YES' if also commands
(Setpoint changes etc.) shall be
accepted from Hirolink.
Aut
AUTORESTART
The time delay, in seconds, between the
power on and the start of the unit.
NOTE: Each Unit multiplies the time
with its Microface ID Number.
rE
HM ON/OFF ENABLED
To enable the ON/OFF button of
Hiromatic Graphic to switch ON/OFF the
air conditioning units on the HIROBUS
network.
sPt
TEMP. SETPOINT
The temperature of the air desired in
the room.It is the reference value used
by Microface, together with Return Air
Temperature, Temp. Proportional Band
and Temp. Integration Factor to decide
the cooling or heating status.
25
User Manual Microface E & Hiromatic G/E 15.02.2005
25
ENGLISH
LCD
SPH
Parameter Name
Description
HUMIDITY SETPOINT
The humidity of the air desired in the
User Setting
room. It is the reference value used by
Microface, together with Return Air
Humidity,Humidity Proportional Band and
Humidity Integration Factor to decide
to HUM or to DEHUM.
Hco
HUM COMPENSATION
If enabled, the Control respects the
psychometric relation between
Temperature and Humidity.Reading the
actual Temperature the relative
Humidity Setpoint will be recalculated.
See SYS or Unit Overview, act. Setp.
SUP
SUPPLY LIMIT
A low limit for the Supply Air Temp.
The air conditioning unit will try to
always keep the Supply Air Temperature
greater than the value set in this
parameter. If set to a value different
from NO a PTC sensor must be installed
inside the unit (or near it) in the
supply air flow path. To decide its
cooling status, Microface uses the
lower between a) the deviation of
Return Air Temperature from Temperature
Setpoint and b) the deviation of Supply
Temperature from Supply Air Setpoint.
Note: Supply Limit is capable to reduce
the opening of Dampers of Valves, but
will never stop a compressor.
(Exception: 2nd Compressor in a Twin
Compressor Unit).
SP2
TEMP. SETPOINT 2
A second setpoint value for the air
temperature of the room. It is used
when at least one User Input is set as
2ndSETP (Second Setpoint) and the
switch on the corresponding input of
Microface is open.
FSS
FANSPEED STANDARD
The parameter used by Microface to
regulate the speed of the fan during
normal operation when an Analog Output
of Microface is used to drive the fan.
(The corresponding Analogue Output must
be assigned to Fanspeed).
26
User Manual Microface E & Hiromatic G/E 15.02.2005
26
ENGLISH
LCD
FSd
Parameter Name
Description
FANSPEED DEHUM
The parameter used by Microface to
User Setting
regulate the speed of the fan during
Dehum operation when an Analog Output
of Microface is used to drive the fan.
(The corresponding Analogue Output must
be assigned to Fanspeed).
FSP
FANSPEED NO POWER
The parameter used by Microface to
regulate the speed of the fan during
NoPower operation when an Analog Output
of Microface is used to drive the fan.
(The corresponding Analogue Output must
be assigned to Fanspeed).
Stb
NUMBER OF STDBY UNITS STBY Units normally are halted and
will start only in case of an alarm of
another Unit in the Network.
This parameter defines how many units
will be in standby mode.
For Rotation see Para 012 and 013.
rot
ROTATION FREQUENCY
In Microface only units the possible settings are:
NO or YES.
NO means no Rotation by time, only in case of an
Alarm the faulty Unit will be switched off and the
Standby Unit will be started.
If set to YES,rotation will be done every 24 hours.
CAS
ENABLE CASCADE
Setting this parameter will let the
standby unit(s) to start not only when
an alarm appears on an active unit but
also in case of increasing and/or decreasing of temperature and/or humidity
to co-operate with active unit(s).
NOTE: Cascade settings force Teamw. 1!
Possible Settings:
no NO : cascade function not active
Yth YES : active with both temperature
(cooling/heating) and humidity
(humidification/de-humification)
Yt TEMP : active only for temperature
(cooling/heating)
ytc COOL : active only for cooling
rob
27
ROTATE BY
Allows to perform a group units rotation
User Manual Microface E & Hiromatic G/E 15.02.2005
27
ENGLISH
LCD
roo
Parameter Name
Description
ROTATE ONCE
When set to 'YES' the system is forced
User Setting
to perform one rotation of the standby
units.
Working only when 'Rotation Frequency'
(Para 012) is not set to 'NO'.
HT
LT
HH
LH
HIGH TEMPERATURE
These Warnings are generated from the
LOW TEMPERATURE
Standard Return Sensor of each Unit, if
HIGH HUMIDITY
the thresholds are over- / underridden.
LOW HUMIDITY
The Warnings are delayed for a time of
30 Minutes after Unit start.
EEAP WARNINGS
These Warnings are generated from the
HTA
LTA
HHA
LHA
HIGH TEMPERATURE
optional EEAP Sensor, if the thresholds
LOW TEMPERATURE
are over- / underridden.
HIGH HUMIDITY
The Warnings are delayed for a time of
LOW HUMIDITY
30 Minutes after Unit start.
Eco
EEAP CONNECTED
This Parameter changes automatically to YES,
If EEAP is connected. This Parameter is read only.
US1
US2
USER INPUT 1
According to the value set for this
USER INPUT 2
parameter (both inputs have the same
selection possibilities) Microface will
take some actions when the switch
connected to the corresponding input of
Microface is open :
nH nHumi' :the humidification is disabled
nC nComp' :the compressor(s) disabled
ALp WARNING' :a Warning is generated
(the unit continue its operations)
AhP ALARM' :an alarm is generated
(the unit stops its operations)
Set 2nd Setpoint' :the reference value for
Return Air Temperature regulation
switches to Temp.Setpoint 2
noP No Power' :everything is stopped
except Fans and Freecooling function
nu Not Used' : Microface will not take
any action on User Input opening.
LSI LSI'
: self-setting on UI2 when a
STD. Internal Humidifier is selected.
28
User Manual Microface E & Hiromatic G/E 15.02.2005
28
ENGLISH
LCD
noC
tFc
Parameter Name
Description
User Setting
UNIT TYPE: COMPRESSORS These parameters define the operating
UNIT TYPE: FC
mode of the unit.WARNING: wrong setting
of this Para may cause false alarms
as well as serious damage of the unit.
For correct setting please refer to the
following table:
No. (Number) of Compressors:
0 0 = Chilled Water Unit
1 1 = Single Compressor
2 2 = Twin Compressor
Type of Freecooling:
n N (None) = No Freecooling
Air AIR = FC by opening AIR-DAMPER
6Ly GLYC = FC by opening Water Valve(s)
Std
STD. SETTINGS
If set to YES, all Parameters of the
selected Unit will be changed automatically to pre-defined Values. To be
used after Microface or Eprom update
only. NOTE: 'YES' jumps back to 'NO'
(it behaves as a 'push button').
Pbt
If
T-PROPORTIONAL BAND
Normally best results will be reached
T-INTEGRATION FACTOR
if the 'AUTOSET' (Para 255) is enabled.
Proportional Band is divided in two
equal parts, one part for Cooling, one
part for Heating (Hysteresis). Inside
this Hysteresis there are the different
Components (Compressors, Heaters), which
share the width of the Hysteresis.
If Teamwork Mode 1 is selected, the
P-Band belongs to the whole System.
NOTE: Too small P-Band will cause the
bad Control Quality (Hunting).
Integration Factor:
If set to any value, the PI control is
enabled. The integration factor doubles
the actual, real deviation from the
setpoint within the selected time. This
will force cooling/heating to add more
steps to reach the setpoint.
To be used if P-Band must be wide
because of bigger number of units
connected, and working in Teamwork 1.
29
User Manual Microface E & Hiromatic G/E 15.02.2005
29
ENGLISH
LCD
PBH
IFH
Parameter Name
Description
H-PROPORTIONALBAND
Normally best results will be reached
H-INTEGRATION FACTOR
if the 'AUTOSET' (Para 255) is enabled.
User Setting
Proportional Band is divided in two
equal parts, one part for Dehum. , one
part for Hum. (Hysteresis). Inside
this Hysteresis there are the different
Components (Humidifier etc.), which
share the width of the Hysteresis.
If Teamwork Mode 1 is selected, the
P-Band belongs to the whole System.
NOTE: Too small P-Band will cause the
bad Control Quality (Hunting).
Integration Factor:
If set to any value, the PI control is
enabled. The integration factor doubles
the actual, real deviation from the
setpoint within the selected time. This
will force Hum / Dehum to add more
steps to reach the setpoint.
To be used if P-Band must be wide
because of bigger number of units
connected, and working in Teamwork 1.
ASE
AUTOSET ENABLE
Enables the permanent Calculation
and Self-Setting of the best Control
Parameters for the actual Situation.
It is recommanded to run the System
always with AUTSET ON.
EHS
HEATING STEPS
Number of Heating Steps. 0,1,2,or 3.
If NO Heater is present, the 2 free
Outputs might be used for
ALARMS / WARNINGS Indication,
see List on next page:
LQT : Rel.1: Water Alarm (LWD)
Rel.2: High/Low Temperature
FCF : Rel.1: Compressor Fail (HP/LP/TH)
Rel.2: Fan Failure
CHF : Rel.1: Compressor Fail (HP/LP/TH)
Rel.2: Humidifier Failure
LTA : Rel.1: Low Temperature
Rel.2: Low Temperature (EEAP)
HTA : Rel.1: High Temperature
Rel.2: High Temperature (EEAP)
30
User Manual Microface E & Hiromatic G/E 15.02.2005
30
ENGLISH
LCD
Hde
Parameter Name
Description
HEATING DEADBAND
The Value the Heaters shall start
User Setting
later'. Means the the Group of Heaters
is shifted with the Deadband Value to
lower Temperatures.
rt
3P.ACT. RUNTIME
Actuators are motors, that drive either
the Freecooling Damper or which drive
Chilled Water or Freecooling valves.
This Parameter is the information for
the time necessary from completely
closed to completely open position.
AoP
3P.ACT. MIN.OPEN
This Parameter guarantees a permanent
opening of the selected percentage, as
long as the Unit is in operation, even
if the Control would like to close the
3P-Actuator completely.
Hue
HUMIDIFIER ENABLE
Enables / Disables the Humidifier
Operation.
NOTE: Setting this Parameter to YES
makes the Control looking for a
Humidity Sensor. If not present, a
Warning will occur.
HU
HS
HUMIDIFIER MODEL
To be set according the Steam Cylinder
SUPPLY VOLTAGE
mounted in the air conditioning unit.
If an external humidifier has to be
controlled, this parameter must be set
to 'EXT'.The Voltage sets automatically
after setting the Cylinder Type.
Pro
STEAM RATE
When set to 100% the Humidifier will
produce the nominal amount of steam, if
set to a lower value the Humidifier
will produce less steam according the
setting. This is valid for both operating Modes: ON-Off and Proportional.
PH
CONTROL
The ctrl. behaviour of the Humidifier:
ono When set to 'ON/OFF' the Humidifier
will start at the left-end of Humidity
Proportional Band at its max. capacity
(defined with STEAM RATE) and stop when
the Room Humidity Setpoint is reached.
31
User Manual Microface E & Hiromatic G/E 15.02.2005
31
ENGLISH
LCD
PH
Parameter Name
Description
CONTROL
Otherwise, the steam output will be
User Setting
proportional to the deviation of
Return Air Humidity from
Pro Room Humidity Setpoint.
HUC
ACT.L HUMIDIFIER CURRENT Shows the actual measured current from the
Steam Cylinder.
Hud
DEADBAND
The Value the Humidifier shall start
later'. Means the the Humidifier
is shifted with the Deadband Value to
lower Humidity.
dEH
DEHUM.ENABLE
Enables / Disables the Dehumidification
Operation.
NOTE: Setting this Parameter to YES
makes the Control looking for a
Humidity Sensor. If not present, a
Warning will occur.
no NO : No Dehum performed
Yes YES : Dehum performed if required.
SFc STOP FC: (For Direct FC Units):
Instead to start the Compressor for
Dehum, the FC Damper will be closed to
avoid incoming Outdoor Humidity.
ELr
EL.REHEAT ENABLE
During Dehum Operation it could be
necessary to reheat. If it is no
problem from the Power consumption, put
Para to 'YES', If Compressor and
Heaters may not operate at the same
time, put it to 'NO'.
dHh
DEHUM HYSTERESIS
Defines the Return Air Humidity value
at which the dehumidification will be
stopped. It is expressed as percentage
of the full Humidity Proportional Band.
(50% means that dehumidification will
be stopped at Room Humidity Setpoint).
ddb
DEADBAND
The Value the Dehumidification shall
start 'later'. Means the the DehumStarting point is shifted with the
Deadband Value to higher Humidity.
32
User Manual Microface E & Hiromatic G/E 15.02.2005
32
ENGLISH
LCD
dEC
Parameter Name
Description
DEHUM.RELAY AS
Allows using the digital output of
User Setting
dehumidification for other purposes, if
the dehumidification mode is not
required:
see next page:
DEH DEHUM : Dehumidification relay used for
Dehumidification (Standard)
A1 WARNING : Relay used as General Warning
Contact (splits WA and AL on two Rel.)
Poo NO POWER : Relay changes its status if
the unit switches to 'NO POWER' mode.
LSt
WATER LEAK DETECTOR
Enables or disables the sensor. When
A1 enabled can be set to Warning (Message
A2 only) or to Alarm (stops Unit in case
of Water detection).
L9
Value: actual Indication from LWD.
Should be between 1.4 and 1.6 if OK.
dt1
DT ROOM-OUTDOOR
The value of the difference between the
Return Air Temperature and the Outdoor
Temp. over which (with a hysteresis of
+/-1,5 C) the unit will enable Free
Cooling mode (if there are not other
conditions that disable the FreeCooling
operation). The Free Cooling mode will
be activated when also the condition on
DT Room-Glycol is fulfilled.
If set to 'CON', the Control expects
to get a command with a switch instead
of a Temperature Sensor.
If set to 'EFC' the unit will not go
in Freecooling mode during normal
Operation, but only in case of
NO POWER' Operation or Compressor
Failure, if the Delta is 3 deg C.
(Emergency Freecooling only).
dt2
DT ROOM-GLYCOL
The value of the difference between the
Return Air Temperature and the Glycol
Temp. over which (with a hysteresis of
+/-1,5 C) the unit will enable Free
Cooling mode (if there are not other
conditions that disable the FreeCooling
33
User Manual Microface E & Hiromatic G/E 15.02.2005
33
ENGLISH
LCD
Parameter Name
Description
User Setting
DT ROOM-GLYCOL
operation). The Free Cooling mode will
be activated when also the condition on
DT Room-Outdoor is fulfilled.
If set to 'CON', the Control expects
to get a command with a switch instead
of a Temperature Sensor.
dt3
STOP FC AT SET.+
The Free Cooling mode will be stopped
when the Return Temp. will be greater
than Room Temp. Setpoint plus
Stop FC at Room Set +.If Free Cooling is
stopped for this reason, it will be
disable for at least one hour
In case of FC+DX the vale is used to active the
compressor 1. Compressor 2 (on Twin DF units)
is activate 1.5°C over (see also fpd)
An1, 2 ANALOG OUTPUT 1, 2
An 3, 4 ANALOG OUTPUT 3, 4
Both the 0 - 10Vdc outputs may be used
for several purposes:
3P1 3P. ACTUATOR 1 : Position of first
3 Point Actuator (Feedback)
3P2 3P. ACTUATOR 2 : Position of second
3 Point Actuator (Feedback)
H33 HEATING 33% : Signal increases to 10V
within the first step of Heaters.
SLc SUPPLY CONTROL : Fan speed regulation
in relation to supply air temperature
rAD RADCOOLER : DryCooler Fanspeed Ctrl.
(Glycol FC, incl. Su/WI changeover)
ELH HEATER BOARD : For Units which have
additional Heater Board for Heaters.
HTH HT HUM. : Humidity Signal
(0%rH - 100%rH = 0V - 10V)
Ptc SUPPLY TEMP.: Supply Temp. Signal
(0C - 50C = 0V - 10V)
Htt RETURN TEMP : Return Temp. Signal
(0C - 50C = 0V - 10V)
FS FANSPEED : Fanspeed Control,
Setpoints see Para 122,123 and 124.
HEA HEATERS : Signal increases to 10V within
the Heaters Part of P-Band.
HU HUMIDIFIER : Signal incr. to 10V within
the Humdifier Part of P-Band.
Co COOLING : Signal increases to 10V within
the Cooling Part of P-Band.
Co1 COOLING 1 : Signal incr. to 10V within
the Compressor 1 Hysteresis.
Co2 COOLING 2 : Signal incr. to 10V within
34
the Compressor 2 Hysteresis.
User Manual Microface E & Hiromatic G/E 15.02.2005
34
ENGLISH
LCD
Parameter Name
Description
User Setting
SS SUPERSAVER : Output for Setpointshifting of Superchillers.
AL1 ALARMBOARD: Signal for Alarm Board
Cr METRIC ROOM : Drive signal for HotGas re-heating in 'Constant-like' units.
NOTE: Compressor will not stop on SetPoint, but 25% of P-Band lower,
with a delay of 20 Minutes.
FLo
LOW AIRFLOW AT
Use 'AUTOSET AIRFLOW' (Para 302) to set.
Depending on the value assigned to this
Para, Microface will give Warning or
Alarm (depends on Para 304) when the
voltage generated by airflow sensor is
lower than the threshold set.
If a differential pressure switch is
SI used , 'SWI' has to be set.
ASA
AUTOSET AIRFLOW
Stop Unit first.Set Parameter to 'YES'.
Unit will start the Fan for 30 secs,
and then wait 30 secs with Fan off.
After that the Value will be set. If a
Warning appears, there was no reaction
from the Airflow device.
FLo
AIRFLOW VALUE
Read only analogue value (percentage)
that informs about the airflow speed
inside the unit. This value can be
taken into account when setting the
Low Airflow At (Para 301).
FF
FAN FAILURE
Depending on the value assigned to this
Parameter, Microface will stop Humidity
ALP Control and heating only (Warning) or
AhP will completely stop the Unit (Alarm),
When the Airflow Value is lower than
the Treshold setting.
35
User Manual Microface E & Hiromatic G/E 15.02.2005
35
ENGLISH
LCD
LPd
Parameter Name
Description
LOW.PRES.AL.DELAY
The time delay (in minutes) after a
User Setting
start of the compressor(s) in which the
occurrence of a low pressure alarm is
ignored. After this time the low
pressure alarm is delayed of
approximately 10 seconds.
CoD
COMPRESSOR DELAY
The compressor is activated after the delay
set , this function is used on those units
equipped with Interceptor Water Valve
tHC
COMP.TH.ENABLE
To enable or disable the Alarm
'Compressor Motor Protection'.
fpd
FC or DX
Cooling configuration
FC+DX Compressor and Free cooling are enabled
to work toghether
FC or DX Compresor and Free cooling are not ebabled
to work toghether
sch
IST. STOP COMP.
Defines the working band of compressor 1
and compressor 2 when the free cooling
is active.
CA1
CA2
CA3
CA4
CA5
CA6
CA7
CA8
CA9
C10
C11
tSt
Calibration Humitemp Temp.
Allows the User the adaptation of
Calibration Humitemp Humidity the Sensor-Values, using the Offset
Calibration Supply Air Sensor
Values. The Actual Value contains
Cal. EEAP Temperature
already also the Offset.
Cal. EEAP Humidity
Cal. Hirosensor 1 left Sensor
Cal. Hirosensor 1 right Sensor
Cal. Hirosensor 2 left Sensor
Cal. Hirosensor 2 right Sensor
Cal. Outdoor Temp. Sensor
Cal. Glycol Temp. Sensor
Autotest
If set to YES, the Unit automatically runs
following test Cycle:
Fan ON
After 1 Minute: Compressor 1 ON
After 4 Minutes: Co 1 OFF, Co2 ON
After 4 Minutes: Co 2 OFF, El. Heaters ON
After 1 Minute: Heaters OFF, FC Act. to 50%
After reaching 50%: Alarm relays ON
After 1 Minute: Al. Rel. OFF, Warning Relay ON
After 1 Minute: end of Test.
36
User Manual Microface E & Hiromatic G/E 15.02.2005
36
ENGLISH
3.3
The Microface E LCD Display Warnings / Alarms
A1
HP1
COMP. 1 HIGH PRESSURE
ALARM
A2
LP1
COMPRESSOR 1 LOW PRESSURE
ALARM
A3
HC
HIGH CHILLED WATER
WARNING
A4
LC
LOW CHILLED WATER FLOW
WARNING
A5
EHO
ELECTRICAL HEATERS OVERHEATED
WARNING
A6
AF
FAN FAILURE
WARNING
A7
AF
FAN FAILURE
ALARM
A8
CF
CLOGGED FILTERS
WARNING
A9
LE
WATER LEAKAGE
WARNING
A10
LE
WATER LEAKAGE
ALARM
A11
UI1
USER INPUT 1 TRIGGERED
WARNING
A12
UI1
USER INPUT 1 TRIGGERED
ALARM
A13
HFA
HUMIDIFIER FAILURE
WARNING
A14
HHC
HUMIDIFIER HIGH CURRENT
WARNING
A15 A16
HF Hn
HUMIDIFIER FAILURE
WARNING
A17
HUC
HUMIDIFIER CYLINDER WORN
WARNING
A18
HrT
HIGH ROOM TEMPERATURE
WARNING
A19
LrT
LOW ROOM TEMPERATURE
WARNING
A20
HrH
HIGH ROOM HUMIDITY
WARNING
A21
LrH
LOW ROOM HUMIDITY
WARNING
A22
HTE
HIGH ROOM TEMPERATURE
WARNING
A23
LTE
LOW ROOM TEMPERATURE
WARNING
A24
HHE
HIGH ROOM HUMIDITY
WARNING
A25
LHE
LOW ROOM HUMIDITY
WARNING
A26
HE
CONDITIONER WORKING HOURS EXCEEDED
WARNING
A27
HC1
COMPRESSOR 1 WORKING HOURS EXCEEDED
WARNING
A28
HH
HUMIDIFIER WORKING HOURS EXCEEDED
WARNING
A29
PtC
PTC SENSOR FAILURE
WARNING
A30
rSF
ROOM SENSOR FAILURE
WARNING
A31
rSF
ROOM SENSOR FAILURE
ALARM
A32
ESF
EEAP SENSOR FAILURE
WARNING
A33
SF
WATER PRESENCE SENSOR FAILURE
WARNING
A34
nET
NETWORK FAILURE
WARNING
A35
or
OUT OF MEMORY
WARNING
A58
HP2
COMP. 2 HIGH PRESSURE
ALARM
A59
LP2
COMPRESSOR 2 LOW PRESSURE
ALARM
A60
HC2
COMPRESSOR 2 WORKING HOURS EXCEEDED
WARNING
A61
Out
OUTDOOR TEMP. SENSOR
WARNING
A62
6Ly
GLYCOL TEMP. SENSOR
WARNING
A65
Fir
SMOKE ALARM
ALARM
A68
UI2
USER INPUT 2 TRIGGERED
WARNING
A69
UI2
USER INPUT 2 TRIGGERED
ALARM
A70
nEt
NO CONNECTION TO UNIT 1
WARNING
A71
th1
COMPRESSOR 1 MOTOR PROTECTION
ALARM
A72
th2
COMPRESSOR 2 MOTOR PROTECTION
ALARM
A73
Fir
FIRE ALARM
ALARM
A75
FA1
CONDENSER 1 FAN FAILURE
WARNING
A76
FA2
CONDENSER 2 FAN FAILURE
WARNING
A77
Hb
NETWORK PING
WARNING
A78
SId
SUBGROUP-ID NOT UNIQUE
WARNING
A79
SU1
SUBGROUP-UNIT 1 NOT CONNECTED
WARNING
A80
SU2
SUBGROUP-UNIT 2 NOT CONNECTED
WARNING
A81
rSF
SHARE ROOM SENSOR FAILURE
WARNING
A82
rSF
SHARE ROOM SENSOR FAILURE
ALARM
A83
Out
MAINTENANCE DONE
WARNING
A84
6Ly
MAINTENANCE SHOULD BE DONE
WARNING
A90
AFd
AIRFLOW DEVICE NOT READY, PLS. CHECK
WARNING
37
User Manual Microface E & Hiromatic G/E 15.02.2005
37
ENGLISH
3.3.1
Hiromatic G / E
Hiromatic G Layout
The front panel of Hiromatic G for HPAC units consists of a backlit graphic LCD, of nine push buttons that
permit input function and of three LED (see Figure 30).
hiromatic g
To go up to the Main Window or back to
the previous window
Push-button to start/stop the system and
the units (if enabled).
on off
home
reset
report
Alarms and warnings reset.
This LED (red) will be ON if one (ore more) alarm
is active or not reset
This LED (green) will be ON when the unit is in
operation
enter
alarm
on
line
This LED (orange) will be ON when the unit is
power supplied
Figure 30 – Hiromatic G with E1G Eprom Front View
3.3.2
Hiromatic E Layout
The front panel of Hiromatic G for HPAC units consists of a backlit graphic LCD, of eight push buttons that
permit input function and of two LED (see Figure 31).
Cursor Buttons: to move inside the Menu;
Left or Light: To go up to the Main
Window or back to the previous window
Push-button to start/stop the system and
the units (if enabled).
Help Key: opens Online-Help for the
selected Parameter
This LED (orange) will be ON when the unit is
power supplied
Alarms and warnings reset.
GREEN when the Unit is in Operation,
YELLOW if the Units is in Warning condition,
RED if the Unit is in Alarm condition
ENTER Button, to set Parameters
Figure 31 - Hiromatic E with EVG Eprom Front View
38
User Manual Microface E & Hiromatic G/E 15.02.2005
38
ENGLISH
3.3.2.1
Meaning of the different Symbols in the Main Window
Return Air Temperature (if on the top-right SYSTEM is indicated, it is the average of all
units with system on. If UNIT x is indicated, it is the return air temperature of the
specific unit.
This is valid for all indications in Hiromatic Display.
Return Air Humidity of the System / the Unit.
Supply Air Temperature of the System / the Unit.
This Bargraph gives Information about the actual used Coolingrecourses in Operation, either for the System or for a specific Unit.
NOTE: Compressors stopped with failure are excluded from this
Bargraph, so that the information is about the actual available compressors.
This Bargraph gives Information about the actual used Freecoolingrecourses in Operation, either for the System or for a specific Unit.
This Bargraph gives Information about the actual used Heatingrecourses in Operation, either for the System or for a specific Unit.
This Bargraph gives Information about the actual used
Dehumidification-recourses in Operation, either for the System or for a
specific Unit.
This Bargraph gives Information about the actual used Humidificationrecourses in Operation, either for the System or for a specific Unit.
This Bargraph gives Information about the next Maintenance time
(mm-yy. (See Next Maintenance Calculation on page 57 for
explanation).
This Field of the Window informs about time, date, the status of the System / Unit.
39
User Manual Microface E & Hiromatic G/E 15.02.2005
39
ENGLISH
3.3.3
How to Move in the Hiromatic Windows
Left /Right
to the Menues
There are two ways to enter the menus: with or without Password. Entering without Password allows to read
the values (except Password Menu and Calibration Menu); entering with Password allows also to change
Parameters.
Without Password: Press ENTER or DOWN; press DOWN once more, and then ENTER.
With Password: Press ENTER or DOWN; ENTER to select first digit of Password; select with UP or DOWN,
press RIGHT for the next Digit; UP or DOWN to select, etc. After having selected the correct Password,
press ENTER.
Press DOWN to select the Enter-String, and press ENTER to jump into the Menu-Icons. Depending on the
Password Level some of the Menus will be read/write, some of the read only.
Left /Right
Enter
Up / Down
Enter
select menu
Enter
into menu
Select the Window with LEFT-RIGHT-DOWN, Press ENTER to select the first Icon, Press LEFT-RIGHT-UPDOWN to select the Icon (The Menu), and press ENTER to get in.
40
User Manual Microface E & Hiromatic G/E 15.02.2005
40
ENGLISH
3.3.4
The Menus
The E1G Software gives some Icon – Menus:
• The System Menus, see Chapter 3.3.4.1 on page 41
• The Unit Menus for User, see Chapter 3.3.4.2 on page 45
• The Unit Menus for Service and Setup 3.3.4.3 on page 49.
3.3.4.1
System Menus
This Window contains the following Menus (from top left to bottom right):
Readable w/o Password
Write Access Level
UNIT STATUS OVERVIEW
Yes
read only
GRAPHIC DATA RECORD
Yes
read only
STATUS REPORT
Yes
read only
SERVICE CONTACTS
Yes
Contact your distributor
SYSTEM SETTINGS
Yes
Level 0
STANDBY SETTINGS
Yes
Level 2 + 5
SYSTEM SETUP
Yes
Level 2 + 5
PASSWORD MENU
No
Level 3
Status Overview
UNIT
UNIT
UNIT
UNIT
UNIT
UNIT
UNIT
1
2
3
4
5
6
7
8
SYS OFF
SYS OFF
SYS OFF
SYS ON
SYS ON
SYS ON
SYS ON
9
10
11
12
13
14
15
16
This Window gives Information about the number of connected units and the status of each unit.
The String “UNIT” appears only for those Units, which are configured in the Parameter: “Number of Units”. If
beside the “UNIT” String no Status appears, it means that the unit was disconnected from the Hirobus.
Graphic Data Records
For the System, as well as for each single unit an 8-days Graphic Data Record as well as a 24-hours Record
for both Temperature and Humidity are available. The temperature/humidity scale can be adjusted (EnterUP/DOWN). The Records are stored also after power off.
Left /Right
Left /Right
Up / Down
Up / Down
Up / Down
Left /Right
41
User Manual Microface E & Hiromatic G/E 15.02.2005
Up / Down
Left /Right
41
ENGLISH
Status Report
The Status Report contains the last 200 events in order of appearance, which occurred to the System, as
well as to each single unit. From the System-Status-Report (a collection of events of all units) it is possible to
reach the Unit-Status-Report (a collection of events for the selected unit only) of the single units by pressing
the RIGHT key.
STATUS REPORT PAGE
66
(01) 21.02.2001 20:10
RESET
GENERAL ALARM
(01) 21.02.2001 20:10
ACKNOWLEDGE
GENERAL ALARM
(01) 20.02.2001 16:45
WARNING
HIGH ROOM TEMPERATURE
Service contacts
Please to contact your distributor to get more information.
System Settings
000
001
002
003
004
005
006
SYSTEM SETTINGS
PIEZO FRQ.
LANGUAGE :
TIME :
DATE :
CONTRAST :
TEMP. INDICATION
OFF/0.5
ENGLISH
22:10
TH 22/02/2001
74
C
Help on: SYSTEM SETTINGS
This Window allows to select the Language of the Hiromatic, as well
as to set the Time and the Date. Note: No Password is necessary to set
Date & Time.
Change to Fahrenheit not possible yet.
42
User Manual Microface E & Hiromatic G/E 15.02.2005
42
ENGLISH
Standby Settings
010
011
012
013
014
015
016
STANDBY SETTINGS
NUMBER OF STDBY UNITS
ROTATION FREQUENCY
ROT. PERFORMED AT
ENABLE CASCADE
ROTATE ONCE
ROTATION BY / HT
0
DAILY
10:00
COOL.
NO
1 / NO
Help on: NUMBER OF STDBY UNITS
STBY Units normally are halted and
will start only in case of an alarm of
another Unit in the Network.
This parameter defines how many units
will be in standby mode.
For Rotation see Para 012 and 013.
Help on: ROTATION FREQUENCY
Defines the frequency at which the
automatic rotation of standby units
will be performed.
Selectable: No, Daily, and all Days of
the Week.
For time of Rotation see Para 013.
Help on: ROT. PERFORMED AT
The time of the day at which the
rotation of the standby units will be
performed.
Valid only when 'Rotation Frequency'
(Para 012) is not set to 'NO'.
Help on: ENABLE CASCADE 1/3
Setting this parameter will let the
standby unit(s) to start not only when
an alarm appears on an active unit but
also in case of increasing and/or decreasing of temperature and/or humidity
to co-operate with active unit(s).
Help on: ROTATE ONCE
When set to 'YES' the system is forced
to perform one rotation of the standby
units.
Working only when 'Rotation Frequency'
(Para 012) is not set to 'NO'.
Help on: ENABLE CASCADE 2/3
NOTE: Cascade settings force Teamw. 1!
Possible Settings:
NO : cascade function not active
YES : active with both temperature
(cooling/heating) and humidity
(humidification/de-humification)
Help On : ROTATE BY
It allows to perform a group rotation
Help on: HT
If set YES all standby units will be activated
in case of High Temperature Warning
43
Help on: ENABLE CASCADE 3/3
TEMP : active only for temperature
(cooling/heating)
COOL : active only for cooling
User Manual Microface E & Hiromatic G/E 15.02.2005
43
ENGLISH
System Setup
020
021
022
023
024
025
026
SYSTEM SETUP
NUMBER OF UNITS
TEAMWORK MODE
HM ID NUMBER
BAUDRATE
COMMUNICATION
HM EPROM VERSION
4
2
1
19200
READ/WRITE
EVGL1 1.60.037
Help on: NUMBER OF UNITS
The number of air conditioning units
connected together in the Bus-Network.
The user must set it properly depending
on the actual Network configuration.
All the units in the network must have
different addresses (starting from 1).
Help on: TEAMWORK MODE 1/4
Possible settings: NO, 1, 2.
NO : The Units work in stand-alone,
using ist own sensors for
regulation.
This setting must be used in MultiRoom Installations.
Help on: HM ID NUMBER
A number that uniquely identify an
Hiromatic Graphic connected on an
Hironet network. Must be different for
each Hiromatic Graphic in the network.
Help on: TEAMWORK MODE 2/4
Set to 1 if the units shall operate as
one System. For Control the average T+H
of all units in operation is used.
All Units together are working like one
big Unit.
Not to be set in Multi-Zone Rooms.
Help on: BAUDRATE
The speed of the Communication with
Hirolink. It is not selectable via
software but by means of a jumper on
Hiromatic Graphic board.
Help on: TEAMWORK MODE 3/4
Set to 2 if the units shall operate in
stand-alone, but with restrictions from
the Average T+H. The Averages decide, if
Cooling or Heating, Hum or Dehum has to
be performed, the units itself decide
about according their own Sensors.
Help on: COMMUNICATION
Set 'READ' if the Hiromatic will
transmit Data to the Hirolink, without
accepting commands from Hirolink.
Set 'READ/WRITE' if also commands
(Setpoint changes etc.) shall be
accepted from Hirolink.
Help on: TEAMWORK MODE 4/4
Teamwork setting 2 is a stand-alone
mode operation, but 'mastered' from the
Average T+H, to avoid competition
between the Units.
To be set in Multi-Zone or un-balanced
Rooms.
Help on: HM EPROM VERSION
The version of the EPROM installed in
Hiromatic G. This information appears
(among others) also at the power on of
Hiromatic G. Remember to record this
information when you ask for help from
PDE or any other Support Organisation.
44
User Manual Microface E & Hiromatic G/E 15.02.2005
44
ENGLISH
3.3.4.2
Unit Menus (User)
This Window contains the following Menus (from top left to bottom right):
GRAPHIC DATA RECORD
STATUS REPORT
UNIT OVERVIEW
UNIT SETTINGS
CONTROL PARAMETERS
WARNINGS / ALARMS
WORKING HOURS
SETUP ASSISTANT
Readable w/o Password
Yes
Yes
Yes
Yes
Yes
Yes
Yes
No
Write Access Level
read only
read only
read only
Level 2 + 5
Level 1 + 2 + 5
Level 2 + 5
Level 2 + 5
Level 1
Graphic Data Record
See Graphic Data Records, on page 41
Status Report
See Status Report, on page 42
Unit Overview
UNIT OVERVIEW
SUPPLY TEMP.
EEAP
HIROSENSOR 1
HIROSENSOR 2
OUTD/GLYCOL
ACT.SETP.
22.5 C
0
12.6 C / 43.7 %rH
12.1 C / 22.2 C
0
12.1 C / 22.2 C
0
22.9 C / 44.4 C
0
24.0 C 45.0 %rH
Help on: SUPPLY TEMP.
A read only value. It is the temperature
of the air delivery of the unit.
Available only when the corresponding
sensor is installed.
This Value could influence the Control,
if SUPPLY LIMIT (Para 114) is set.
Help on: EEAP
The Temperature and relative Humidity
measured by the optional EEAP Sensor
(Electronic Environment Alarm Package)
(if installed).
This Sensor allows to set second step
Temp. and Hum. Warnings.
Help on: HIROSENSOR 1,2
The temperatures (two values) measured
by Hirosensor sensor number 1 (2).These
values are not used for regulation or
Alarm / Warning generation.
Help on: ACT.SETP.
This Value shows the actual Temp / Hum
Setpoint for the specific Unit.
The Humidity Setpoint can be
automatically influenced from the
Humidity Compensation' Parameter.
see Para 113 in Control Parameters 1/2.
45
User Manual Microface E & Hiromatic G/E 15.02.2005
45
ENGLISH
Help on: OUTD/GLYCOL 1/4
OUTD (OUTDOOR TEMP) :
The temperature of the environment
outside the room. It is used, together
with the Return Air Temperature, to
decide the freecooling status of the
unit. If more units are connected via
Help on: OUTD/GLYCOL 3/4
GLYCOL (GLYCOL TEMP) :
The temperature of the refrigerant
mixture (water or glycol and water)
entering the unit. In Free Cooling or
Dual Fluid units, depending on the
value set in DT Room-Glycol, it is
Help on: OUTD/GLYCOL 2/4
HIROBUS each unit will work with the
average of the values read by all
sensors. The value displayed here
is this average.
Help on: OUTD/GLYCOL 4/4
only displayed or used to decide the
Free Cooling Status of the unit.
In Free Cooling units it also drives
the Analogue Output for the Dry-Cooler.
Each Unit uses ist own sensor for
Control.
Unit Settings
100 UNIT SETTINGS
101
102 AUTORESTART
103 HM ON/OFF ENABLED
104
105
106
23
YES
Help on: AUTORESTART
The time delay, in seconds, between the
power on and the start of the unit.
NOTE: Each Unit multiplies the time
with its Microface ID Number.
46
sec
Help on: HM ON/OFF ENABLED
To enable the ON/OFF button of
Hiromatic Graphic to switch ON/OFF the
air conditioning units on the HIROBUS
network.
User Manual Microface E & Hiromatic G/E 15.02.2005
46
ENGLISH
Control Parameters
110
111
112
113
114
115
116
CONTROL PARAMETERS 1/2
TEMP. SETPOINT
HUMIDITY SETPOINT
HUM COMPENSATION
SUPPLY LIMIT
TEMP. SETPOINT 2
23.6 C
50.0 C
YES
11.1 C
NO
120
121
122
123
124
125
126
CONTROL PARAMETERS 2/2
FANSPEED STANDARD
FANSPEED DEHUM
FANSPEED NO POWER
90%
80%
60%
Help on: TEMP. SETPOINT
The temperature of the air desired in
the room.It is the reference value used
by Microface, together with Return Air
Temperature, Temp. Proportional Band
and Temp. Integration Factor to decide
the cooling or heating status.
Help on: SUPPLY LIMIT 1/3
A low limit for the Supply Air Temp.
The air conditioning unit will try to
always keep the Supply Air Temperature
greater than the value set in this
parameter. If set to a value different
from NO a PTC sensor must be installed
Help on: HUMIDITY SETPOINT
The humidity of the air desired in the
room. It is the reference value used by
Microface, together with Return Air
Humidity,Humidity Proportional Band and
Humidity Integration Factor to decide
to HUM or to DEHUM.
Help on: SUPPLY LIMIT 2/3
inside the unit (or near it) in the
supply air flow path. To decide its
cooling status, Microface uses the
lower between a) the deviation of
Return Air Temperature from Temperature
Setpoint and b) the deviation of Supply
Help on: HUM COMPENSATION
If enabled, the Control respects the
psychometric relation between
Temperature and Humidity.Reading the
actual Temperature the relative
Humidity Setpoint will be recalculated.
See SYS or Unit Overview, act. Setp.
Help on: SUPPLY LIMIT 3/3
Temperature from Supply Air Setpoint.
Note: Supply Limit is capable to reduce
the opening of Dampers of Valves, but
will never stop a compressor.
(Exception: 2nd Compressor in a Twin
Compressor Unit).
Help on: TEMP. SETPOINT 2
A second setpoint value for the air
temperature of the room. It is used
when at least one User Input is set as
2ndSETP (Second Setpoint) and the
switch on the corresponding input of
Microface is open.
Help on: FANSPEED STANDARD
The parameter used by Microface to
regulate the speed of the fan during
normal operation when an Analog Output
of Microface is used to drive the fan.
(The corresponding Analogue Output must
be assigned to Fanspeed).
Help on: FANSPEED DEHUM
The parameter used by Microface to
regulate the speed of the fan during
Dehum operation when an Analog Output
of Microface is used to drive the fan.
(The corresponding Analogue Output must
be assigned to Fanspeed).
Help on: FANSPEED NO POWER
The parameter used by Microface to
regulate the speed of the fan during
NoPower operation when an Analog Output
of Microface is used to drive the fan.
(The corresponding Analogue Output must
be assigned to Fanspeed).
47
User Manual Microface E & Hiromatic G/E 15.02.2005
47
ENGLISH
Warnings / Alarms
130
131
132
133
134
135
136
STD. SENSOR WARNINGS
HIGH TEMPERATURE
LOW TEMPERATURE
HIGH HUMIDITY
LOW HUMIDITY
28 C
17 C
65 %rH
22 %rH
Help on: STD. SENSOR WARNINGS
These Warnings are generated from the
Standard Return Sensor of each Unit, if
the thresholds are over- / underridden.
The Warnings are delayed for a time of
30 Minutes after Unit start.
140
141
142
143
144
145
146
147
EEAP WARNINGS
HIGH TEMPERATURE
LOW TEMPERATURE
HIGH HUMIDITY
LOW HUMIDITY
EEAP CONNECTED
USER INPUT 2
USER INPUT 2
Help on: EEAP WARNINGS
These Warnings are generated from the
optional EEAP Sensor, if the thresholds
are over- / underridden.
The Warnings are delayed for a time of
30 Minutes after Unit start.
Para 146 shows if EEAP is connected.
Help on: USER INPUT 1,2 1/4
According to the value set for this
parameter (both inputs have the same
selection possibilities) Microface will
take some actions when the switch
connected to the corresponding input of
Microface is open :
Help on: USER INPUT 1,2 3/4
2nd Setpoint' :the reference value for
Return Air Temperature regulation
switches to Temp.Setpoint 2
No Power' :everything is stopped
except Fans and Freecooling function
Help on: USER INPUT 1,2 2/4
nHumi' :the humidification is disabled
nComp' :the compressor(s) disabled
WARNING' :a Warning is generated
(the unit continue its operations)
ALARM' :an alarm is generated
(the unit stops its operations)
Help on: USER INPUT 1,2 4/4
Not Used' : Microface will not take
any action on User Input opening.
LSI'
: self-setting on UI2 when a
STD. Internal Humidifier is selected.
48
32
12
85
10
NO
Warning
LSI
User Manual Microface E & Hiromatic G/E 15.02.2005
48
°C
°C
%rh
%rH
ENGLISH
Working Hours
160
161
162
163
164
165
166
WORKING HOURS 1/2
HOURS LIMIT
FAN 123
32000
CO1 456
32000
CO2 789
32000
FC 222
32000
170
171
172
173
174
175
176
START
1
2
3
4
WORKING HOURS 2/2
HOURSLIMIT
HE1 123
32000
HE2 456
32000
HUM 789
32000
DEH 222
32000
START
1
2
3
4
Help on: WORKING HOURS
This Window shows the actual working
hours of the components (HOURS), the
hours threshold (LIMIT), the number of
starts (START)
Setup Assistant
A self explaining Guide, which helps to set up the Setpoints, the Warning thresholds for first and second
Level. Once started, it guides step by step through the procedure.
3.3.4.3
Unit Menus (Service & Setup)
This Window contains the following Menus (from top left to bottom right):
SERVICE
CALIBRATION
UNIT CONFIGURATION
NEXT MAINTENANCE CALC.
SLEEP MODE SETTINGS
REFRIGERANT
49
Readable w/o Password
Yes
No
Yes
Yes
Yes
Yes
Write Access Level
Level 5
Level 4
Level 5
Level 5
Level 2 + 5
Level 5
User Manual Microface E & Hiromatic G/E 15.02.2005
49
ENGLISH
Service
190
191
192
193
194
195
196
MANUAL OPERATION 1/6
MANUAL: OFF
HUM :
FAN :
ON
DRAIN :
COMP.1: ON
DEHUM :
COMP.2: OFF
AL.REL:
HEAT 1:
OFF
HEAT 2:
OFF
OFF
OFF
OFF
OFF
Help on: MANUAL OPERATION 1/2
This Window allows to run all
Components in Manual-Mode, with all
Safety Devices on. At first the Para
MANUAL' has to be set to 'ON', after
that the FAN must be started, before to
be able start any other component.
200
201
202
203
204
205
206
MANUAL OPERATION 2/6
3P.ACTUATOR 1 :
3P.ACTUATOR 2 :
ANALOGUE OUT 1 :
ANALOGUE OUT 2 :
ANALOGUE OUT 3 :
ANALOGUE OUT 4 :
0%
0%
0%
0%
0%
0%
Help on: MANUAL OPERATION
After setting the Unit in Manual Mode
and starting the FAN, also both the
ANALOGUE OUTPUT can be set individually
(Ana Out are initialised on 60% when
setting the Manual Mode. 3P Actuators
are either CW / FC Valves or Dampers.
Help on: MANUAL OPERATION 2/2
DRAIN' (Humididier) can be set to ON
without setting MANUAL to ON, and without to Enter a Password before. DRAIN
stops automatically after 20 Seconds.
NOTE: The Alarm Relay falls to 'ALARM'
when setting the Unit in Manual Mode.
210
211
212
213
214
215
216
INPUTS INFORMATION 3/6
REMOTE
o-o
FIRE ALARM
o-o
SMOKE WARN. o-o
FILTER
o-o
USER INPUT1
o-o
USER INPUT2
o-o
ON
OK
WA
WA
ACT
AL
1232
1232
1232
1232
1232
1232
220
221
222
223
224
225
226
INPUTS INFORMATION 4/6
HP1
o-o
OK
LP1
o-o
OK
TH1
o-o
OK
HP2
o-o
OK
LP2
o-o
OK
TH2
o-o
OK
230
231
232
233
234
235
236
INPUTS INFORMATION 5/6
HIGH CW T.
o-o
LOW CW FLOW o-o
COND.1 FAIL
o-o
COND.2 FAIL
o-o
DT1
o-o
DT2
o-o
OK
OK
OK
OK
OK
OK
1232
1232
1232
1232
1232
1232
240 INPUTS INFORMATION 6/6
241 HEATERS OH.
o-o
OK
242
243
244
245
246
1232
1232
1232
1232
1232
1232
1232
Help on: INPUTS INFORMATION
This Window gives Info about the
Digital Inputs.
The CONTACT indicates open or closed,
the Description informs about the
Meaning of the Contact. The Number on
the right is for internal use only.
50
User Manual Microface E & Hiromatic G/E 15.02.2005
50
ENGLISH
Sensor Calibration
310
311
312
313
314
315
316
CALIBRATION 1/2
HT TEMP
HT HUMI
PTC SU/RE
PTC AMB
PTC GL/SU
ACTUAL
20.0
21.0
22.0
2,3
34.7
OFFSET
0.0
+1.1
0.0
-2.2
0.0
320
321
322
323
324
325
326
327
CALIBRATION 2/2
HIROS. 1L
HIROS. 1R
HIROS. 2L
HIROS. 2R
EEAP T.
EEAP H.
ACTUAL
20.0
21.0
22.0
2,3
23.0
50.0
OFFSET
0.0
+1.1
0.0
-2.2
+0.0
+0.0
Help on: CALIBRATION
Allows the User the adaptation of
the Sensor-Values, using the Offset
Values. The Actual Value contains
already also the Offset.
51
User Manual Microface E & Hiromatic G/E 15.02.2005
51
ENGLISH
Unit Setup - Window 1/6
250
251
252
253
254
255
256
UNIT CONFIGURATION 1/6
UNIT TYPE: COMPRESSORS
UNIT TYPE: FC
STD. SETTINGS
TEMP.PROP/INT
HUM PROP/INT
AUTOSET ENABLE
1
AIR
NO
2.0K/ NO
6%/ NO
YES
Help on: AUTOSET ENABLE
Enables the permanent Calculation
and Self-Setting of the best Control
Parameters for the actual Situation.
Help on: UNIT TYPE: 1/3
These parameters define the operating
mode of the unit.WARNING: wrong setting
of this Para may cause false alarms
as well as serious damage of the unit.
For correct setting please refer to the
following table:
Help on: UNIT TYPE: 2/3
No. (Number) of Compressors:
0 = Chilled Water Unit
1 = Single Compressor
2 = Twin Compressor
It is recommanded to run the System
always with AUTSET ON.
Help on: STD. SETTINGS
If set to YES, all Parameters of the
selected Unit will be changed automatically to pre-defined Values. To be
used after Microface or Eprom update
only. NOTE: 'YES' jumps back to 'NO'
(it behaves as a 'push button').
Help on: UNIT TYPE: 3/3
Type of Freecooling:
N (None) = No Freecooling
AIR = FC by opening AIR-DAMPER
GLYC = FC by opening Water Valve(s)
Help on: TEMP.PROP/INT 1/4
Normally best results will be reached
if the 'AUTOSET' (Para 255) is enabled.
Proportional Band is divided in two
equal parts, one part for Cooling, one
part for Heating (Hysteresis). Inside
this Hysteresis there are the different
Help on: HUM PROP/INT 1/4
Normally best results will be reached
if the 'AUTOSET' (Para 255) is enabled.
Proportional Band is divided in two
equal parts, one part for Dehum. , one
part for Hum. (Hysteresis). Inside
this Hysteresis there are the different
Help on: TEMP.PROP/INT 2/4
Components (Compressors, Heaters), which
share the width of the Hysteresis.
If Teamwork Mode 1 is selected, the
P-Band belongs to the whole System.
NOTE: Too small P-Band will cause the
bad Control Quality (Hunting).
Help on: HUM PROP/INT 2/4
Components (Humidifier etc.), which
share the width of the Hysteresis.
If Teamwork Mode 1 is selected, the
P-Band belongs to the whole System.
NOTE: Too small P-Band will cause the
bad Control Quality (Hunting).
Help on: TEMP.PROP/INT 3/4
Integration Factor:
If set to any value, the PI control is
enabled. The integration factor doubles
the actual, real deviation from the
setpoint within the selected time. This
will force cooling/heating to add more
Help on: HUM PROP/INT 3/4
Integration Factor:
If set to any value, the PI control is
enabled. The integration factor doubles
the actual, real deviation from the
setpoint within the selected time. This
will force Hum / Dehum to add more
Help on: TEMP.PROP/INT 4/4
steps to reach the setpoint.
Help on: HUM PROP/INT 4/4
steps to reach the setpoint.
To be used if P-Band must be wide
because of bigger number of units
connected, and working in Teamwork 1.
To be used if P-Band must be wide
because of bigger number of units
connected, and working in Teamwork 1.
52
User Manual Microface E & Hiromatic G/E 15.02.2005
52
ENGLISH
Unit Setup – Window 2/6
260
261
262
263
264
265
266
UNIT CONFIGURATION 2/6
HEATING STEPS
HEATING DEADBAND
3P.ACT. RUNTIME
3P.ACT. MIN.OPEN
COMPRESSOR DELAY
2
0.0 K
170sec
0%
0Sec
Help on: HEATING STEPS 1/3
Number of Heating Steps. 0,1,2,or 3.
If NO Heater is present, the 2 free
Outputs might be used for
ALARMS / WARNINGS Indication,
see List on next page:
Help on: HEATING STEPS 2/3
LQT : Rel.1: Water Alarm (LWD)
Rel.2: High/Low Temperature
FCF : Rel.1: Compressor Fail (HP/LP/TH)
Rel.2: Fan Failure
CHF : Rel.1: Compressor Fail (HP/LP/TH)
Rel.2: Humidifier Failure
Help on: HEATING STEPS 3/3
LTA : Rel.1: Low Temperature
Rel.2: Low Temperature (EEAP)
HTA : Rel.1: High Temperature
Rel.2: High Temperature (EEAP)
Help on: HEATING DEADBAND
The Value the Heaters shall start
later'. Means the the Group of Heaters
is shifted with the Deadband Value to
lower Temperatures.
Help on: 3P.ACT. RUNTIME
Actuators are motors, that drive either
the Freecooling Damper or which drive
Chilled Water or Freecooling valves.
This Parameter is the information for
the time necessary from completely
closed to completely open position.
Help on: 3P.ACT. MIN.OPEN
This Parameter guarantees a permanent
opening of the selected percentage, as
long as the Unit is in operation, even
if the Control would like to close the
3P-Actuator completely.
Help on: COMPRESSOR DELAY
This parameter defines the compressor delay activation
in order to manage the Solenoid Interceptor
Water Valve
Unit Setup – Window 3/6
270
271
272
273
274
275
276
UNIT CONFIGURATION 3/6
HUMIDIFIER ENABLE
MODEL / SUP VOLT
STEAM RATE
CONTROL
AMPS NOM/ACT
DEADBAND
Help on: HUMIDIFIER ENABLE
Enables / Disables the Humidifier
Operation.
NOTE: Setting this Parameter to YES
makes the Control looking for a
Humidity Sensor. If not present, a
Warning will occur.
53
NO
93H/400V
100%
ON/OFF
10.3/ 5.2A
0.0%
Help on: MODEL / SUP VOLT
To be set according the Steam Cylinder
mounted in the air conditioning unit.
If an external humidifier has to be
controlled, this parameter must be set
to 'EXT'.The Voltage sets automatically
after setting the Cylinder Type.
User Manual Microface E & Hiromatic G/E 15.02.2005
53
ENGLISH
Help on: STEAM RATE
When set to 100% the Humidifier will
produce the nominal amount of steam, if
set to a lower value the Humidifier
will produce less steam according the
setting. This is valid for both operating Modes: ON-Off and Proportional.
Help on: AMPS NOM/ACT
Help on: CONTROL 1/2
The ctrl. behaviour of the Humidifier:
When set to 'ON/OFF' the Humidifier
will start at the left-end of Humidity
Proportional Band at its max. capacity
(defined with STEAM RATE) and stop when
the Room Humidity Setpoint is reached.
Help on: DEADBAND
The Value the Humidifier shall start
later'. Means the the Humidifier
is shifted with the Deadband Value to
lower Humidity.
Shows the Current, the Humidifier
actually should run with (NOM),
and the actual measured Current (ACT).
Help on: CONTROL 2/2
Otherwise, the steam output will be
proportional to the deviation of
Return Air Humidity from
Room Humidity Setpoint.
Unit Setup – Window 4/6
280
281
282
283
284
285
286
UNIT CONFIGURATION 4/6
DEHUM.ENABLE
EL.REHEAT ENABLE
DEHUM HYSTERESIS
DEADBAND
DEHUM.RELAY AS
LWD / LWD INPUT
STOP FC
YES
30%
0.0%
DEHUM
NO/0.0V
Help on: DEHUM.ENABLE 1/2
Enables / Disables the Dehumidification
Operation.
NOTE: Setting this Parameter to YES
makes the Control looking for a
Humidity Sensor. If not present, a
Warning will occur.
Help on: DEHUM HYSTERESIS
Defines the Return Air Humidity value
at which the dehumidification will be
stopped. It is expressed as percentage
of the full Humidity Proportional Band.
(50% means that dehumidification will
be stopped at Room Humidity Setpoint).
Help on: DEHUM.ENABLE 2/2
NO :
No Dehum performed
YES :
Dehum performed if required.
STOP FC: (For Direct FC Units):
Instead to start the Compressor for
Dehum, the FC Damper will be closed to
avoid incoming Outdoor Humidity.
Help on: DEADBAND
The Value the Dehumidification shall
start 'later'. Means the the DehumStarting point is shifted with the
Deadband Value to higher Humidity.
54
User Manual Microface E & Hiromatic G/E 15.02.2005
54
ENGLISH
Help on: EL.REHEAT ENABLE
During Dehum Operation it could be
necessary to reheat. If it is no
problem from the Power consumption, put
Para to 'YES', If Compressor and
Heaters may not operate at the same
time, put it to 'NO'.
Help on: DEHUM.RELAY AS 1/2
Allows using the digital output of
dehumidification for other purposes, if
the dehumidification mode is not
required:
Help on: LWD / LWD INPUT
Enables or disables the sensor. When
enabled can be set to Warning (Message
only) or to Alarm (stops Unit in case
of Water detection).
Value: actual Indication from LWD.
Should be between 1.4 and 1.6 if OK.
Help on: DEHUM.RELAY AS 2/2
DEHUM : Dehumidification relay used for
Dehumidification (Standard)
WARNING : Relay used as General Warning
Contact (splits WA and AL on two Rel.)
NO POWER : Relay changes its status if
the unit switches to 'NO POWER' mode.
see next page:
Unit Setup – Window 5/6
290
291
292
293
294
295
296
UNIT CONFIGURATION 5/6
DT INT/EXT / INT/GLY
STOP FC AT SET.+
ANALOG OUTPUT 1
ANALOG OUTPUT 2
ANALOG OUTPUT 3
ANALOG OUTPUT 4
5 / 5K
5K
COOLING
HEATING
COOLING
HEATING
help on: DT INT/EXT
1/3
The value of the difference between the
Return Air Temperature and the Outdoor
Temp. over which (with a hysteresis of
+/-1,5 C) the unit will enable Free
Cooling mode (if there are not other
conditions that disable the FreeCooling
Help on: DT INT/GLY
1/2
The value of the difference between the
Return Air Temperature and the Glycol
Temp. over which (with a hysteresis of
+/-1,5 C) the unit will enable Free
Cooling mode (if there are not other
conditions that disable the FreeCooling
help on: DT INT/EXT
2/3
operation). The Free Cooling mode will
be activated when also the condition on
DT Room-Glycol is fulfilled.
If set to 'CON', the Control expects
to get a command with a switch instead
of a Temperature Sensor.
Help on: DT INT/GLY
1/2
operation). The Free Cooling mode will
be activated when also the condition on
DT Room-Outdoor is fulfilled.
If set to 'CON', the Control expects
to get a command with a switch instead
of a Temperature Sensor.
help on: DT INT/EXT
3/3
If set to 'EFC' the unit will not go
in Freecooling mode during normal
Operation, but only in case of
NO POWER' Operation or Compressor
Failure, if the Delta is 3 deg C.
(Emergency Freecooling only).
Help on: STOP FC AT SET.+
The Free Cooling mode will be stopped
when the Return Temp. will be greater
than Room Temp. Setpoint plus
Stop FC at Room Set +.If Free Cooling is
stopped for this reason, it will be
disabled for at least one hour.
in case of FC+DX this parameter defines
the start of compressor 1.
Compressor 2 (on Twin DF) is activated 1.5 °K over
55
User Manual Microface E & Hiromatic G/E 15.02.2005
55
ENGLISH
Help on: ANALOG OUTPUT 1,2,3,4
1/7
Both the 0 - 10Vdc outputs may be used
for several purposes:
3P. ACTUATOR 1 : Position of first
3 Point Actuator (Feedback)
3P. ACTUATOR 2 : Position of second
3 Point Actuator (Feedback)
Help on: ANALOG OUTPUT 1,2,3,4
5/7
HUMIDIFIER : Signal incr. to 10V within
the Humdifier Part of P-Band.
COOLING : Signal increases to 10V within
the Cooling Part of P-Band.
COOLING 1 : Signal incr. to 10V within
the Compressor 1 Hysteresis.
Help on: ANALOG OUTPUT 1,2,3,4
2/7
HEATING 33% : Signal increases to 10V
within the first step of Heaters.
SUPPLY CONTROL : Fan speed regulation
in relation to supply air temperature
RADCOOLER : DryCooler Fanspeed Ctrl.
(Glycol FC, incl. Su/WI changeover)
Help on: ANALOG OUTPUT 1,2,3,4
6/7
COOLING 2 : Signal incr. to 10V within
the Compressor 2 Hysteresis.
SUPERSAVER : Output for Setpointshifting of Superchillers.
ALARMBOARD: Signal for Alarm Board
Help on: ANALOG OUTPUT 1,2,3,4
3/7
HEATER BOARD : For Units which have
additional Heater Board for Heaters.
HT HUM. : Humidity Signal
(0%rH - 100%rH = 0V - 10V)
SUPPLY TEMP.: Supply Temp. Signal
(0C - 50C = 0V - 10V)
Help on: ANALOG OUTPUT 1,2,3,4
METRIC ROOM : Drive signal for HotGas re-heating in 'Constant-like' units.
7/7
NOTE: Compressor will not stop on SetPoint, but 25% of P-Band lower,
with a delay of 20 Minutes.
Help on: ANALOG OUTPUT 1,2,3,4
4/7
RETURN TEMP : Return Temp. Signal
(0C - 50C = 0V - 10V)
FANSPEED : Fanspeed Control,
Setpoints see Para 122,123 and 124.
HEATERS : Signal increases to 10V within
the Heaters Part of P-Band.
Unit Setup – Window 6/6
300
301
302
303
304
305
306
UNIT CONFIGURATION 6/6
LOW AIRFLOW AT
AUTOSET AIRFLOW
AIRFLOW VALUE
FAN FAILURE
LOW.PRES.AL.DELAY
COMP.TH.ENABLE
50%
NO
44%
WARNING
3min
YES
Help on: LOW AIRFLOW AT 1/2
Use 'AUTOSET AIRFLOW' (Para 302) to set.
Depending on the value assigned to this
Para, Microface will give Warning or
Alarm (depends on Para 304) when the
voltage generated by airflow sensor is
lower than the threshold set.
Help on: AUTOSET AIRFLOW
Stop Unit first.Set Parameter to 'YES'.
Unit will start the Fan for 30 secs,
and then wait 30 secs with Fan off.
After that the Value will be set. If a
Warning appears, there was no reaction
from the Airflow device.
Help on: LOW AIRFLOW AT 2/2
If a differential pressure switch is
used , 'SWI' has to be set.
Help on: AIRFLOW VALUE
Read only analogue value (percentage)
that informs about the airflow speed
inside the unit. This value can be
taken into account when setting the
Low Airflow At (Para 301).
56
User Manual Microface E & Hiromatic G/E 15.02.2005
56
ENGLISH
Help on: FAN FAILURE
Depending on the value assigned to this
Parameter, Microface will stop Humidity
Control and heating only (Warning) or
will completely stop the Unit (Alarm),
When the Airflow Value is lower than
the Treshold setting.
Help on: COMP.TH.ENABLE
To enable or disable the Alarm
'Compressor Motor Protection'.
Help on: LOW.PRES.AL.DELAY
The time delay (in minutes) after a
start of the compressor(s) in which the
occurrence of a low pressure alarm is
ignored. After this time the low
pressure alarm is delayed of
approximately 10 seconds.
3.3.4.4
310
311
312
313
314
315
316
Next Maintenance Calculation
General Maintenance Settings
GENERAL MAINTENANCE SET. 1/7
MAINT. FREQUENCY
3
MAX. BONUS
MAX. PENALTY
LAST MAINTENANCE
RESET:
BY: HUBER
CALC.NEXT MAINTENANCE
PA
3M
3M
02.01
YES
02.02
Help on: MAINT. FREQUENCY
Possible Settings are:
NO : No next Maintenance Calculation
1 : Maintenance 1 time a year
2 : Maintenance 2 times a year
3 : Maintenance 3 times a year
4 : Maintenance 4 times a year
Help on: LAST MAINTENANCE
This Date sets automatically if the
Service Engineer sets the 'Reset'
Parameter. (see next Line)
Help on: MAX. BONUS
If the Unit is working in good
Conditions, next Maintenence can be
shifted to later time, adding the
Bonus (or parts of it) to the
next planned Service time.
The Bonus is given in Months.
Help on: LAST MAINTENANCE BY: / RESET:
The Service Engineer has to put his
name in the name-field after Service.
Pressing RESET sets the 'Last Maint.
Date' to the actual Date, and resets
all Maintenance Counters to 0.
Help on: MAX. PENALTY
If the Unit is working in bad
Conditions, next Maintenence must be
shifted to earlier time, reducing the
Penalty (or parts of it) from the
next planned Service time.
Penalty is given in Months.
Help on: CALC.NEXT MAINTENANCE
Is the Result of the Settings done
in this area.
It shows the calculated next Service
Time, respecting Bonus & Penalty as
well as std. Maintenance Frequency.
57
User Manual Microface E & Hiromatic G/E 15.02.2005
57
ENGLISH
Maintenance Settings for Components
123
1234
123
12/200
4
2M
COMP.1 SETTINGS/DIAGNOST.3/7
NUMBER OF STARTS
123
WORKING HOURS
1234
AV. WORKING TIME
123
STARTS/DAY OPT/WOR
12/200
NO.OF HP/LP/TH
1/1/0
ACTUAL BONUS
2M
COMP.2 SETTINGS/DIAGNOST.4/7
NUMBER OF STARTS
123
WORKING HOURS
1234
AV. WORKING TIME
123
STARTS/DAY OPT/WOR
12/200
NO.OF HP/LP/TH
1/1/0
ACTUAL BONUS
2M
HEAT.1 SETTINGS/DIAGNOST.5/7
NUMBER OF STARTS
123
WORKING HOURS
1234
AV. WORKING TIME
123
STARTS/DAY OPT/WOR
12/200
NUMBER OF ALARMS
1
ACTUAL BONUS
2M
HEAT.2 SETTINGS/DIAGNOST.6/7
NUMBER OF STARTS
123
WORKING HOURS
1234
AV. WORKING TIME
123
STARTS/DAY OPT/WOR
12/200
NUMBER OF ALARMS
0
ACTUAL BONUS
2M
HUM. SETTINGS/DIAGNOST. 7/7
NUMBER OF STARTS
WORKING HOURS
AV. WORKING TIME
STARTS/DAY OPT/WOR
NUMBER OF ALARMS
ACTUAL BONUS
FAN SETTINGS/DIAGNOST. 2/7
NUMBER OF STARTS
WORKING HOURS
AV. WORKING TIME
STARTS/DAY OPT/WOR
NUMBER OF ALARMS
ACTUAL BONUS
Help on: NUMBER OF STARTS
A Counter (read only) which indicates
the Number of starts of the specific
Component since the last Maintenance.
Counter will be reset when last
Maintenence is set (Reset).
Help on: WORKING HOURS
A Counter (read only) which indicates
the Working Hours of the specific
Component since the last Maintenance.
Counter will be reset when last
Maintenence is set (Reset).
Help on: AV. WORKING TIME
Calculated from Number of Starts and
Working hours.
This is the Basic Information for next
Maintenance Calculation.
58
123
1234
123
12/200
2
2M
Help on: STARTS/DAY OPT/WOR
Number of Starts per day for the
specific Component, which can be
considered as optimum (OPT), and can be
considered as bad working condition
(WOR).
Help on: NUMBER OF ALARMS
A Counter (read only) which indicates
the Number of Alarm occured to the
specific Component since last Maint.
(split in HP/LP/TH for compressors)
Counter will be reset when last
Maintenence is set (Reset).
Help on: ACTUAL BONUS
Actual Calculation of Wellness for the
specific Component (+ or -, Months).
The System will always take the value
from the worst Component for next
Maintenance Indication.
User Manual Microface E & Hiromatic G/E 15.02.2005
58
ENGLISH
Sleep Mode (Timer Mode)
180
181
182
183
184
185
186
SLEEP MODE SETTINGS
INTERVAL1
INTERVAL2
DAYS
MODE
RESET
19:00
00:00
Help on: INTERVAL1,2
Period of time in which the unit will
be daily in Sleep Mode.
Setting doesnot depend on Day settings!
06:00
00:00
MO
AUTO
YES
Set both Intervals to 00:00 if Sleep
Mode is not desired.
Help on: RESET 1/3
Setting NO:
If during Sleep Mode the Temperature or
Humidity crosses the threshold, Sleep
Mode will be interrupted (no Warning
will appear for a time of 30 Minutes).
The Unit will 'fall asleep' again if
Help on: DAYS
By means of this parameters it is
possible to set the unit in order to
force it to sleep the whole day in the
selected days.
Selected days are visible, not selected
days remain unvisible.
Help on: RESET 2/3
the next interval asks for Sleep Mode,
or if the RESET-Parameter was set to
YES' (changes back to 'NO' after set).
Sleep Mode will be activated only if
the Temperature is inside the
theresholds.
Help on: MODE
If set to 'SYS OFF' the unit will
completely stop in the specified time
intervals.If set to a value,a deadband
of the specified width is shifted in,
where no cooling or heating is
performed. Humidity ctrl is off in SM.
Help on: RESET 3/3
Sleep Mode AUTO:
If the Temperature crosses the threshhold (high or low) the Unit starts in
standard mode and 'sleeps' again automatically if the temperature is close
to the Setpoint.
59
User Manual Microface E & Hiromatic G/E 15.02.2005
59
ENGLISH
Refrigerant
In the REFRIGERANT section some parameters are available which allow management of the logging of the
refrigerant pressures and suction, discharge, condenser temperatures of the refrigerant circuit. The logging
is possible only through the NAVIGATOR CARD (see connection guide and manual code 272599)
470
471
472
473
474
475
476
477
CIRC.1 REFRIGERANT DIAGN.
PASSWORD (LEVEL 0)
COND. TEMP.
18,7
bar
EVAP. TEMP.
4,5
bar
DISCH. TEMP.
SUCT. TEMP.
LIQU. TEMP.
SUPERH./SUBC.
1,2 K
????
50,2 °C
5,2 °C
70,5 °C
6,4 °C
53,5 °C
3,3 K
480
481
482
483
484
485
486
487
CIRC.2 REFRIGERANT DIAGN.
PASSWORD (LEVEL 0)
COND. TEMP.
18,7
bar
EVAP. TEMP.
4,5
bar
DISCH. TEMP.
SUCT. TEMP.
LIQU. TEMP.
SUPERH./SUBC.
1,2 K
????
50,2 °C
5,2 °C
70,5 °C
6,4 °C
53,5 °C
3,3 K
CIRC. 1 / 2 REFRIGERANT DIAGNOSTIC
•
•
•
•
•
•
COND.
TEMP = condenser pressure value and temperature calculated
EVAP.
TEMP = evaporating pressure value and temperature calculated
DISCH. TEMP = discharge thermometric temperature value
SUCT.
TEMP = suction thermometric temperature value
LIQU.
TEMP. = liquid thermometric temperature value
SUPERH/SUBC. = superheating and sub cooling values calculated
490
491
492
493
494
495
496
497
REFRIGERANT C1/C2 SETUP
REFRIGERANTE:
R407C
HP1: 0.0V =-6.0 bar
8.2V = 30.0 bar
LP1: 0.0V =-2.5 bar
8.0V = 10.0 bar
H/L1: 10.0V = 16.0 bar
10.0V = 4.0 bar
HP2: 0.0V =-6.0 bar
8.2V = 30.0 bar
LP2: 0.0V =-2.5 bar
8.0V = 10.0 bar
H/L2: 10.0V = 16.0 bar
10.0V = 4.0 bar
500
501
502
503
504
505
506
507
LOGGING SETUP
PASSWORD (LEVEL 0)
LOGGING TIME
LOG. INTERVAL
LOGGING ACTIVE
COND./EVAP.
DISCH./SUC T.
LIQUID TEMP.
????
22h
1 sec.
YES
YES / YES
YES / YES
YES
REFRIGERANT C1 / C2 SETUP
• HP1 / LP1 = offset for the pressure transducer of compressor 1
• HP2 / LP2 = offset for the pressure transducer of compressor 2
Note: the offset values showed on the picture have been defined according to the standard pressure
transducers mounted on Liebert-Hiross units (Keller 4-20ma)
LOGGING SETUP
•
•
•
•
•
•
60
LOGGING TIME = logging time of pressures and temperatures saved on the NAVIGATOR BOARD
LOG. INTERVAL = defines the logging interval
LOGGING ACTIVE = enables / disables the logging
COND. EVAP.
= enables / disables the logging of the items in subject
DISCH./SUC T. = enables / disables the logging of the items in subject
LIQUID TEMP.
= enables / disables the logging of the items in subject
User Manual Microface E & Hiromatic G/E 15.02.2005
60
ENGLISH
510
511
512
513
514
515
516
517
CRITICAL OPERATING AT
PASSWORD (LEVEL 0)
HP HIGHER
LP LOWER
OUTD. HIGHER
DISCH. HIGHER
ROOM HIGHER
????
SET IST.
22.0 / 2.0 bar
2.5 / 2.0 bar
30.0 / 2.0 °C
80.0 / 9.0 °C
30.0 / 5.0 °C
520
521
522
523
524
525
526
527
SENSOR OFFSET CALIBRATION
PW (LIVELLO 0)
???? LETT. / OFFSET
C1 DISCH. TEMP.
70.0
/+0.0 °C
C1 SUCT. TEMP.
5.0
/+0.0 °C
C1 LIQU. TEMP
50.0
/+0.0 °C
C2 DISCH. TEMP.
70.0
/+0.0 °C
C2 SUCT. TEMP.
5.0
/+0.0 °C
C2 LIQU. TEMP
50.0
/+0.0 °C
CRITICAL OPERATING AT
•
•
•
•
HP HIGHER = defines the condenser pressure limit, if the value exceeds the limit the logging id forced
to 1 sample per second. The logging goes to normal as soon as the values comesbelow the limit minus
the hysteresis defined. In case of high pressure alarm the logging is forced to 1 sample per second for 5
minutes, then the logging is stopped. It will be reactivated as soon as the alarm is restored.
LP LOWER = defines the evaporator pressur limit, if the value exceeds the limit the logging is forced to
1 sample per second. The logging goes to normal as soon as the the values comes over the limit plus
the hysteresis defined. In case of low pressure alarm the logging is forced to 1 sample per seconds for
5 minutes, then the logging is stopped. It will be reactivated as soon as the alarm is restored.
OUTD. HIGHER = defines the outdoor air temperature (detected by Microface) limit, if the values
exceeds the limit the logging is forced to 1 sample per second. The logging goes to normal as soon as
the value comes below the limit plus the hysteresis defined.
ROOM HIGHER = defines the return air temperature (detected by Microface) limit, if the value exceeds
the limit the logging is forced to 1 sample per second. The logging goes to normal as soon as the value
comes below plus the hysteresis defined.
SENSOR OFFSET CALIBRATION
Offset PTC sensor calibration.
NOTE: the right offset must be performed when the compressor is working for a minimum of 5 minutes
61
User Manual Microface E & Hiromatic G/E 15.02.2005
61
ENGLISH
3.3.4.5
Navigator card for FC+DX units
The Navigator Card must be used on units where the FC+DX cooling configuration is required. In this case
the Hirobus address of Navigator must be 3 (see connection guide or Manual code 272599), and the inputs
of the board will be used in a different way.
WARNING: the DX+FC function can be set only in case of
Single DF or Twin DF units
530
531
532
533
534
535
536
537
•
•
•
FC+DX / BOARD 3 SETUP
UNIT TYPE
FC or DX
LP1: 0.0 V=-2,5 bar
8.0 V = 10.0 bar
LP2: 0.0 V=-2,5 bar
8.0 V = 10.0 bar
L1/L2: 10.0 V = 4.2 bar
10.0 V = 4.2 bar
LP STOP FC A / HYST.
5.0 / 2.0 bar
LP ALARM AT / HYST.
2.5 / 2.0 bar
STOP COMP. HYST.
50.0 %
UNIT TYPE = defines the cooling configuration:
FC or DX means that the compressor or free cooling will be used
FC + DX means that both, compressor and free cooling, can be activated
LP1 = sensor pressure transducer offset
LP2 = sensor pressure transducer offset
Note: the offset values showed on the picture have been defined according to the standard pressure
transducers mounted on Liebert-Hiross units (Keller 4-20ma)
•
•
•
62
LP STOP FC AT / HYST.= defines the low pressure limit to stop the free cooling when both,
compressor and free cooling, are working. If the pressure exceeds the limit , the free cooling is stopped
for 1 hour. The free cooling will be reactivated only if the pressure values comes over the limit plus the
hysteresis defined
LP ALARM AT / HYST. = define the low pressure limit to generate the low pressure alarm. The
compressors will be enalbed to work as soon as the pressure comes over the limit plus the hysteresis
defind and the alarm has been restored
STOP COMP. HYST. = defines the working band of compressor 1 and 2 when the free cooling is
active. The band value (in %) is calculated according to the temperature set point and DT3 parameters
values. The DT3 paramter is used also to activate compressor 1.
Compressor 2 on twin DF units) is activated 1.5 °K over.
User Manual Microface E & Hiromatic G/E 15.02.2005
62
ENGLISH
•
Compatibility Notes
3.3.5
General Information
There are 2 compatibility levels: one for Hirobus (among the units) and one for Hironet (connection to
Hirolink).
For Hironet there is nearly no restriction: “old” and “new” software versions can be put together and can be
wired to one Hirolink. It is just a matter to check if the software used in the Hirolink is compatible also with the
new unit; if not, the Hirolink needs to be upgraded (Eprom update).
For Hirobus compatibility some simple rules have to be respected:
All Eprom Versions are combined in so called “Families”. An Eprom label consists of 6 or 9 digits; digit 1-3 is
the Eprom name; digit 4-6 shows the family (e.g.”1.60”); digit 7-9 is the release number, no influence to the
compatibility. All Eproms within the same family are Hirobus-compatible; Eproms from different families are
not compatible.
3.3.6
List of CCAC Eproms, used since 1996
Eprom Name
Description
WXM 1.05 – 1.39 Microface Eprom for all CCAC
WXG 1.05 – 1.39 Hiromatic Eprom; Std. menu layout
WXM 1.41
WXG 1.41
Microface Eprom for all CCAC
Hiromatic Eprom; Std. menu layout
WXM 1.50
WXG 1.50
Microface Eprom for all CCAC
Hiromatic Eprom; Std. menu layout
WXM 1.51
WXG 1.51
Microface Eprom for all CCAC
Hiromatic Eprom; Std. menu layout
1XM 1.60.xxx
Microface Eprom for Single Compressor and
Chilled Water Units
Microface Eprom for Twin Compressor Units
Microface Eprom for Twin Compressor Units, System 4
Microface Eprom for Single Compressor and
Chilled Water Units, with Direct Communication from
Microface to Hirolink
Hiromatic Eprom; Std. menu layout
2XM 1.60.xxx
3XM 1.60.xxx
A1M 1.60.xxx
WXG 1.60.xxx
EVM 1.60.xxx
E1G 1.60.xxx
Hiromatic Microface Microface
G
Standard Evolution
x
x
ü
x
x
ü
Microface Eprom for all CCAC Units (except System
4); with Direct Communication from Microface to
Hirolink Light / SMM
Hiromatic Eprom; Icon Menu
x
ü
ü
x
x
ü
ü
x
x
ü
ü
x
x
x
x
ü
ü
x
x
x
x
x
x
ü
ü
ü
ü
X
x
x
x
ü
ü
x
x
x
x
x
x
The above listed Eproms need to be of the same family (1.51, or 1.60 etc.) in order to be Hirobus-compatible
(to be connected together).
3.3.7
Notes to Icon Versions (E1G, EVM) and non-Icons Versions (WXG, 1-2-3XM, A1M)
3.3.7.1 EVM and 1-2-3XM / A1M to be connected together, without Hiromatic
Both the above software versions are fully compatible. No need to update the 1-2-3XM / A1M Versions to
EVM.
3.3.7.2
EVM and 1-2-3XM / A1M to be connected together, with Hiromatic
The Microfaces can be connected together without problems. The Hiromatic to be used in that case is the
WXG 1.60.xxx. The mixed System will behave like a typical 1-2-3XM / A1M WXG Installation. New functions
like Te amwork 2, Auto-set of Control Parameters, Wellness & next Maintenance Calculation are not present.
If in a mixed Installation (EVM and 1-2-3XM / A1M) the Hiromatic G Software (E1G) will be connected, the
new features will be available for the EVM-equipped Units only; the 1-2-3XM / A1M equipped Units will not
support the new functions. The bar graphs in the System Window as well as in the Single unit windows will
not fill up for units equipped with 1-2-3XM / A1M, but will consider only the EVM-equipped units.
63
User Manual Microface E & Hiromatic G/E 15.02.2005
63
ENGLISH
3.4
Hiromatic Parameter List
The unit parameters are set depending on the unit type. The parameters on the “std. set” column are
indicative. The parameters can be varied in order to have the unit’s correct operation in relation to the
installation type. We advised to transcribe the unit configuration parameters into the “user setting” column
and keep the manual inside the unit.
64
User Manual Microface E & Hiromatic G/E 15.02.2005
64
ENGLISH
Parameter Name
Nr. Team Read
Range
Res. Std. Set Std. Set Std. Set Std. Set Std. Set
Write
CW
DX 1 Co DX 2 Co FC Gly FC Air
User
Setting
SYSTEM MAIN WINDOW
RETURN TEMP.
-
-
R
-28.0 – 100.0
°C
0,1
-
-
-
-
-
RETURN HUMIDITY
-
-
SUPPLY TEMP.
-
-
R
0 – 100.0
%rH
0,5
-
-
-
-
-
R
-28.0 – 100.0
°C
0,1
-
-
-
-
-
RETURN TEMP.
-
RETURN HUMIDITY
-
-
R
-28.0 – 100.0
°C
0,1
-
-
-
-
-
-
R
0 – 100.0
%rH
0,5
-
-
-
-
SUPPLY TEMP.
-
-
-
R
-28.0 – 100.0
°C
0,1
-
-
-
-
-
COUNTRY
-
-
W
None, Austria, Swittz.D
Switz.F, Benelux D,
Benelux F, Germany,
France, UK, Hungary,
Italy, Poland, Spain
-
-
-
-
-
-
-
LINE 1
-
-
W
Web contact
-
-
-
-
-
-
-
LINE 2
-
-
W
Phone number
-
-
-
-
-
-
-
LINE 3
-
-
W
Service contact
-
-
-
-
-
-
-
LINE 4
-
-
W
Service eamil
-
-
-
-
-
-
-
PIESZO FRQ.
1
-
OFF , ON / 0.1 -- 2.0
-
-
-
-
-
-
-
LANGUAGE :
2
-
W
L1 = English, Deutsch,
Italiano, Espanol,
Portugues, Swedish,
Nederland, French
L2 = English, Polski,
Hungarian, Czech,
Turkish, Russian, French,
Greek
-
-
-
-
-
-
-
TIME
3
-
W
mm:hh
-
-
-
-
-
-
-
4
-
W
dd:mm:yy
-
-
-
-
-
-
-
CONTRAST :
5
-
W
0-127
-
1
-
-
-
-
-
TEMP. INDICATION
6
-
W
°C
-
-
°C
°C
°C
°C
°C
ACTUAL TEMP. SETP
-
-
R
0 – 45.0
°C
0,1
-
-
-
-
-
ACTUAL HUM. SETP.
-
-
R
0 – 100.0
%rH
1
-
-
-
-
-
SUPPLY TEMP.
-
-
R
-28.0 – 100.0
°C
0,1
-
-
-
-
-
EEAP
-
-
R
-28.0 – 100.0
°C
0,1
-
-
-
-
-
EEAP
-
-
R
0 – 100.0
%rH
0,5
-
-
-
-
-
HIROSENSOR 1
-
-
R
-28.0 – 100.0
°C
0,5
-
-
-
-
-
HIROSENSOR 1
-
-
R
-28.0 – 100.0
%rH
0,5
-
-
-
-
-
HIROSENSOR 2
-
-
R
-28.0 – 100.0
°C
0,5
-
-
-
-
-
HIROSENSOR 2
-
-
R
-28.0 – 100.0
%rH
0,5
-
-
-
-
-
OUTDOOR
-
-
R
-28.0 – 100.0
°C
0,5
-
-
-
-
-
GLYCOL
-
-
R
-28.0 – 100.0
°C
0,5
-
-
-
-
-
FAN
-
-
R
ON - OFF
-
-
-
-
-
-
-
FAN
-
-
R
0-100
%
1
-
-
-
-
-
COMPRESSOR 1
-
-
R
ON - OFF
-
-
-
-
-
-
-
COMPRESSOR 1
-
-
R
0-100
%
1
-
-
-
-
-
COMPRESSOR 2
-
-
R
ON - OFF
-
-
-
-
-
-
-
COMPRESSOR 2
-
-
R
0-100
%
1
-
-
-
-
-
CW VALVE
-
-
R
0-100
%
1
-
-
-
-
-
HEATER 1
-
-
R
ON - OFF
-
-
-
-
-
-
-
HEATER 1
-
-
R
0-100
%
1
-
-
-
-
-
HEATER 2
-
-
R
ON - OFF
-
-
-
-
-
-
-
HEATER 2
-
-
R
0-100
%
1
-
-
-
-
-
65
User Manual Microface E & Hiromatic G/E 15.02.2005
UNIT MAIN WINDOW
CONTACTS
SYSTEM SETTINGS
:
DATE
:
UNIT OVERVIEW
65
ENGLISH
Parameter Name
Nr. Team Read
Range
Res. Std. Set Std. Set Std. Set Std. Set Std. Set
Write
HUMIDIFIER
-
-
R
HUMIDIFIER
-
-
DEHUMIDIFICATION
-
-
DEHUMIDIFICATION
-
FC STATUS
CW
DX 1 Co DX 2 Co FC Gly
FC Air
ON - OFF
-
-
-
-
-
-
-
R
0-100
%
1
-
-
-
-
-
R
ON - OFF
-
-
-
-
-
-
-
-
R
0-100
%
1
-
-
-
-
-
-
-
R
ON, OFF, START
-
-
-
-
-
-
-
FC ACTUATOR 1
-
-
R
0-100
%
1
-
-
-
-
-
FC ACTUATOR 2
-
-
R
0-100
%
1
-
-
-
-
-
NUMBER OF UNITS
21
YES
W
1 - 16
-
1
-
-
-
-
-
TEAMWORK MODE
22
YES
W
No, 1, 2
-
-
-
-
-
-
-
HM ID NUMBER
23
-
W
1-99
-
-
-
-
-
-
-
BAUDRATE
24
-
R
19200, 20833
-
-
-
-
-
-
-
COMMUNICATION
25
-
W
READ, READ/WRITE
-
-
-
-
-
-
-
HM EPROM VERSION
26
-
R
read only
-
-
-
-
-
-
-
AUTORESTART
102
-
W
0-999
S
1
5
5
5
5
5
HM ON/OFF ENABLED
103
-
W
Yes-No
-
-
-
-
-
-
-
TEMP. SETPOINT
111
YES
W
5,0-40,0
°C
0,1
23
23
23
23
27
HUMIDITY SETPOINT
112
YES
W
No, 20-80
%rH
1
50
50
50
50
NO
HUM COMPENSATION
113
YES
W
Yes, No
-
-
YES
YES
YES
YES
NO
SUPPLY LIMIT
114
YES
W
No, 5-25
°C
1
NO
NO
NO
10
10
TEMP. SETPOINT 2
115
YES
W
No, 5-40
°C
1
NO
NO
NO
NO
NO
FANSPEED STANDARD
122
-
W
No, 30-100
%
1
NO
NO
NO
NO
100
FANSPEED DEHUM
123
-
W
No, 30-100
%
1
NO
NO
NO
NO
80
FANSPEED NO POWER
124
-
W
No, 1-100
%
1
NO
NO
NO
NO
65
NUMBER OF STDBY UNITS
11
YES
W
0-16
-
1
0
0
0
0
0
ROTATION FREQUENCY
12
YES
W
DAILY, MON, TUE, WED,
THU, FRI, SAT, SUN
-
-
NO
NO
NO
NO
NO
ROT. PERFORMED AT
13
YES
W
hh:mm
-
-
00:00
00:00
00:00
00:00
00:00
ENABLE CASCADE
14
YES
W
NO, YES, COOL., TEMP.
-
-
NO
NO
NO
NO
NO
ROTATE ONCE
15
YES
W
Yes, No
-
-
NO
NO
NO
NO
NO
ROTATE BY / HT
16
NO
W
1-8, / Yes, No
HIGH TEMPERATURE
132
YES
W
No, 1-99
°C
1
NO
NO
NO
NO
NO
LOW TEMPERATURE
133
YES
W
No, 1-99
°C
1
NO
NO
NO
NO
NO
HIGH HUMIDITY
134
YES
W
No, 1-99
%rH
1
NO
NO
NO
NO
NO
LOW HUMIDITY
135
YES
W
No, 1-99
%rH
1
NO
NO
NO
NO
NO
HIGH TEMPERATURE
142
YES
W
No, 1-99
°C
1
NO
NO
NO
NO
NO
LOW TEMPERATURE
143
YES
W
No, 1-99
°C
1
NO
NO
NO
NO
NO
HIGH HUMIDITY
144
YES
W
No, 1-99
%rH
1
NO
NO
NO
NO
NO
LOW HUMIDITY
145
YES
W
No, 1-99
%rH
1
NO
NO
NO
NO
NO
EEAP CONNECTED
146
NO
R
Yes, No
-
-
-
-
-
-
-
USER INPUT 1
152
NO
W
WARNING, ALARM,
nHumi, nComp, 2ndSetp,
NoPower, NotUsed, LSI
°C
1
nu
nu
nu
nu
noP
USER INPUT 2
153
NO
W
See User 1
°C
1
nu
nu
nu
nu
nu
User
Setting
SYSTEM SETUP
UNIT SETTINGS
CONTROL PARAMETERS
STANDBY SETTINGS
STD. SENSOR WARNINGS
EEAP WARNINGS
66
User Manual Microface E & Hiromatic G/E 15.02.2005
66
ENGLISH
Parameter Name
Nr.
Team Read
Range
Res. Std. Set Std. Set Std. Set Std. Set Std. Set
Write
CW
DX 1 Co DX 2 Co FC Gly
FC Air
User
Setting
WORKING HOURS
FAN HOURS
162
NO
W
0 - 32000, actual
Hrs
1
NO
NO
NO
NO
NO
FAN LIMIT
162
NO
W
No, 0-32000
Hrs
100
32000
32000
32000
32000
32000
FAN START
CO1 HOURS
162
163
NO
NO
W
W
0 - 32000, actual
0 - 32000, actual
Hrs
1
1
0
NO
0
NO
0
NO
0
NO
0
NO
CO1 LIMIT
CO1 START
163
163
NO
NO
W
W
No, 0-32000
0 - 32000, actual
Hrs
-
100
1
32000
0
32000
0
32000
0
32000
0
32000
0
CO2 HOURS
CO2 LIMIT
164
164
NO
NO
W
W
0 - 32000, actual
No, 0-32000
Hrs
Hrs
1
100
NO
32000
NO
32000
NO
32000
NO
32000
NO
32000
CO2 START
FC HOURS
164
165
NO
NO
W
W
0 - 32000, actual
0 - 32000, actual
Hrs
1
1
0
NO
0
NO
0
NO
0
NO
0
NO
HE1 HOURS
HE1 START
172
172
NO
NO
W
W
0 - 32000, actual
0 - 32000, actual
Hrs
-
1
1
NO
0
NO
0
NO
0
NO
0
NO
0
HE2 HOURS
HE2 START
HUM HOURS
173
173
174
NO
NO
NO
W
W
W
0 - 32000, actual
0 - 32000, actual
0 - 32000, actual
Hrs
Hrs
1
1
1
NO
0
NO
NO
0
NO
NO
0
NO
NO
0
NO
NO
0
NO
HUM LIMIT
HUM START
174
174
NO
NO
W
W
No, 0-32000
0 - 32000, actual
Hrs
-
100
1
32000
0
32000
0
32000
0
32000
0
32000
0
DEH HOURS
DEH START
175
175
NO
NO
W
W
0 - 32000, actual
0 - 32000, actual
Hrs
-
1
1
NO
0
NO
0
NO
0
NO
0
NO
0
INTERVAL1
181
YES
W
Time hh:mm
-
-
0.00
0.00
0.00
0.00
0.00
INTERVAL1
INTERVAL2
181
182
YES
YES
W
W
Time hh:mm
Time hh:mm
-
-
0.00
0.00
0.00
0.00
0.00
0.00
0.00
0.00
0.00
0.00
INTERVAL2
DAYS
182
183
YES
YES
W
W
Time hh:mm
MO, TU, WE, TH, FR, SA,
SU
-
-
0.00
None
0.00
None
0.00
None
0.00
None
0.00
None
MODE
184
YES
W
Sys Off, 2-15
°C
1
Sys Off
Sys Off
Sys Off
Sys Off Sys Off
RESET
185
YES
W
No, Yes, Auto
-
-
Auto
Auto
Auto
Auto
Auto
MANUAL:
191
NO
W
ON, OFF
-
-
-
-
-
-
-
FAN :
COMP.1:
192
193
NO
NO
W
W
ON, OFF
ON, OFF
-
-
-
-
-
-
-
COMP.2:
HEAT 1:
194
195
NO
NO
W
W
ON, OFF
ON, OFF
-
-
-
-
-
-
-
HEAT 2:
HUM :
196
191
NO
NO
W
W
ON, OFF
ON, OFF
-
-
-
-
-
-
-
DRAIN :
DEHUM :
192
193
NO
NO
W
W
ON, OFF
ON, OFF
-
-
-
-
-
-
-
AL.REL:
3P.ACTUATOR 1 :
194
201
NO
NO
W
W
ON, OFF
0 – 100
%
1
-
-
-
-
-
3P.ACTUATOR 2 :
ANALOGUE OUT 1 :
202
203
NO
NO
W
W
0 – 100
0 – 100
%
%
1
1
-
-
-
-
-
ANALOGUE OUT 2 :
ANALOGUE OUT 3 :
204
205
NO
NO
W
W
0 – 100
0 – 100
%
%
1
1
-
-
-
-
-
ANALOGUE OUT 4 :
206
NO
W
0 – 100
%
1
-
-
-
-
-
67
User Manual Microface E & Hiromatic G/E 15.02.2005
SLEEP MODE SETTINGS
MANUAL OPERATION
67
ENGLISH
Parameter Name
Nr. Team Read
Range
Res. Std. Set Std. Set Std. Set Std. Set Std. Set
Write
CW
DX 1 Co DX 2 Co FC Gly
FC Air
User
Setting
CALIBRATION
HT TEMP
312
NO
W
+/- 9.9
°C
0,1
0.0
0.0
0.0
0.0
0.0
HT HUMI
313
NO
W
+/- 9.9
%rH
0,1
0.0
0.0
0.0
0.0
0.0
PTC SU/RE
314
NO
W
+/- 9.9
°C
0,1
0.0
0.0
0.0
0.0
0.0
PTC AMB
315
NO
W
+/- 9.9
°C
0,1
0.0
0.0
0.0
0.0
0.0
PTC GL/SU
316
NO
W
+/- 9.9
°C
0,1
0.0
0.0
0.0
0.0
0.0
HIROS. 1L
322
NO
W
+/- 9.9
°C
0,1
0.0
0.0
0.0
0.0
0.0
HIROS. 1R
323
NO
W
+/- 9.9
°C
0,1
0.0
0.0
0.0
0.0
0.0
HIROS. 2L
324
NO
W
+/- 9.9
°C
0,1
0.0
0.0
0.0
0.0
0.0
HIROS. 2R
325
NO
W
+/- 9.9
°C
0,1
0.0
0.0
0.0
0.0
0.0
EEAP T.
332
NO
W
+/- 9.9
°C
0,1
0.0
0.0
0.0
0.0
0.0
EEAP H.
333
NO
W
+/- 9.9
%rH
0,1
0.0
0.0
0.0
0.0
0.0
UNIT TYPE: COMPRESSORS
251
NO
W
0, 1, 2
-
-
-
-
-
-
-
UNIT TYPE: FC
252
NO
W
NONE, AIR, GLYC
-
-
-
-
-
-
-
STD. SETTINGS
253
NO
W
Yes, No
-
-
-
-
-
-
-
TEMP.PROP/INT
254
YES
W
1.0 – 30.0
K
3.0
Auto
Auto
Auto
Auto
Auto
TEMP.PROP/INT
254
YES
W
No, 5-15
Min
NO
Auto
Auto
Auto
Auto
Auto
HUM PROP/INT
255
YES
W
2 – 60
%rH
1
Auto
Auto
Auto
Auto
Auto
HUM PROP/INT
255
YES
W
No, 5-15
Min
NO
Auto
Auto
Auto
Auto
Auto
AUTOSET ENABLE
256
YES
W
Yes, No
-
-
YES
YES
YES
YES
YES
HEATING STEPS
261
NO
W
0, 1, 2, 3, HtA, LtA, CHF,
FCF, Lqt
-
-
-
-
-
-
-
HEATING DEADBAND
262
YES
W
0.0 – 30.0
K
0.1
0
0
0
0
0
3P.ACT. RUNTIME
263
NO
W
50 – 400
Sec
1
170
170
170
170
90
3P.ACT. MIN.OPEN
264
NO
W
0 – 50
%
1
0
0
0
0
0
COMPRESSOR DELAY
265
30
W
0 -120
Sec
1
0
0
0
0
0
HUMIDIFIER ENABLE
271
NO
W
Yes, No
-
-
-
-
-
-
-
MODEL / SUP VOLT
272
NO
W
21L, 53L/H, 93L/H, d3H,
HT2/5/9, EXT
-
-
-
-
-
-
-
MODEL / SUP VOLT
272
NO
230, 400, 460, 575
V
-
-
-
-
-
STEAM RATE
273
NO
W
No, 30-100
%
10
-
-
-
-
-
CONTROL
274
NO
W
ON/OFF, PROP
-
-
-
-
-
-
-
AMPS NOM/ACT
275
NO
R
0 – 40.00
A
0.01
-
-
-
-
-
DEADBAND
276
YES
W
0 – 50.0
%
0.1
0
0
0
0
0
DEHUM.ENABLE
281
NO
W
YES; STOP FC, NO
-
-
-
-
-
-
-
EL.REHEAT ENABLE
282
NO
W
Yes, No
-
-
NO
NO
NO
NO
NO
DEHUM HYSTERESIS
283
YES
W
25 – 50
%
1
50
50
50
50
50
DEADBAND
284
YES
W
0 – 50
%
1
0
0
0
0
0
DEHUM.RELAY AS
285
NO
W
DEHUM, NO POWER,
WARNING
-
-
DEH
DEH
DEH
DEH
WA
LWD / LWD INPUT
286
NO
W
NO, WARNING, ALARM
-
-
-
-
-
-
-
LWD / LWD INPUT
286
NO
R
0 – 2.50
V
0.01
-
-
-
-
-
DT ROOM-OUTDOOR
291
YES
W
NO, CON, EFC,
25K
K
1
NO
NO
NO
10
10
DT ROOM-GLYCOL
291
5
W
NO, CON, 2 - 25K
K
1
NO
NO
NO
6
NO
STOP FC AT SET.+
292
YES
W
NO, , 1 - 25K
K
1
NO
NO
NO
3
3
UNIT CONFIGURATION
68
3-
User Manual Microface E & Hiromatic G/E 15.02.2005
68
ENGLISH
Parameter Name
Nr.
Team Read
Range
Res. Std. Set Std. Set Std. Set Std. Set Std. Set
Write
ANALOG OUTPUT 1
293
NO
W
CW
COOLING, HEATING,
ALARMB., SUPERS.,
COOLING2, COOLING1,
HUMID., FANSPEED,
RET.TEMP, SUP.TEMP,
HT HUMI., HEATERB.,
RADCOOL., SUP.CONT,
HEAT 33%,
DX 1 Co DX 2 Co FC Gly
FC Air
-
-
COOLIN COOLIN COOLIN COOLIN COOLIN
G
G
G
G
G
HEATIN HEATIN HEATIN HEATIN HEATIN
G
G
G
G
G
COOLIN
COOLIN
COOLIN
COOLIN
COOLIN
G
G
G
G
G
HEATIN
HEATIN
HEATIN
HEATIN
HEATIN
G
G
G
G
G
40
40
40
40
40
-
User
Setting
3P.ACT.1, 3P.ACT.2,
METRIC
ANALOG OUTPUT 2
294
NO
W
See Analog 1
-
-
ANALOG OUTPUT 3
ANALOG OUTPUT 4
295
296
NO
NO
W
W
See Analog 1
See Analog 1
-
-
LOW AIRFLOW AT
AUTOSET AIRFLOW
301
302
NO
NO
W
W
0 – 100, Swi
No, Yes
%
-
1
-
AIRFLOW VALUE
FAN FAILURE
303
304
NO
NO
R
W
0-100
WARNING, ALARM
%
-
1
-
Alarm
Alarm
Alarm
Alarm
Alarm
LOW.PRES.AL.DELAY
COMP.TH.ENABLE
305
306
NO
NO
W
W
0–5
Yes, No
Min
-
1
-
3
-
3
-
3
-
3
-
3
-
MAINT. FREQUENCY
-
YES
W
No, 1 – 4
M
1
-
-
-
-
-
MAX. BONUS
-
YES
W
0 – 12
M
1
-
-
-
-
-
MAX. PENALTY
LAST MAINTENANCE
-
YES
YES
W
W
0 – 12
mm:yy
M
-
1
-
-
-
-
-
-
BY: / RESET
CALC.NEXT MAINTENANCE
-
NO
-
W
R
Editable text / Yes - No
mm:yy
-
-
-
-
-
-
-
FAN SETTINGS/DIAGNOST. 2/7
NUMBER OF STARTS
-
NO
R
0 - 32000
-
-
-
-
-
-
-
WORKING HOURS
AV. WORKING TIME
-
NO
NO
R
R
0 - 32000
0 - 32000
-
-
-
-
-
-
-
STARTS/DAY OPT/WOR
STARTS/DAY OPT/WOR
-
YES
YES
W
W
No, 1 – 240
No, 1 – 240
-
-
1
24
1
24
1
24
1
24
1
24
NUMBER OF ALARMS
ACTUAL BONUS
-
NO
NO
R
R
0 - 32000
-24
-
-
-
-
-
-
-
NUMBER OF STARTS
-
NO
R
0 - 32000
-
-
-
-
-
-
-
WORKING HOURS
-
NO
R
0 - 32000
-
-
-
-
-
-
-
AV. WORKING TIME
STARTS/DAY OPT/WOR
-
NO
YES
R
W
0 - 32000
No, 1 – 240
-
-
12
12
12
12
12
STARTS/DAY OPT/WOR
NO.OF HP/LP/TH
-
YES
NO
W
R
No, 1 – 240
0 - 32000
-
-
240
-
240
-
240
-
240
-
240
-
ACTUAL BONUS
-
NO
R
-24
-
-
-
-
-
-
-
GENERAL MAINTENANCE SET. 1/7
COMP.1 SETTINGS/DIAGNOST.3/7
69
User Manual Microface E & Hiromatic G/E 15.02.2005
69
ENGLISH
Parameter Name
Nr.
Team Read
Range
Res. Std. Set Std. Set Std. Set Std. Set Std. Set
Write
CW
DX 1 Co DX 2 Co FC Gly
FC Air
User
Setting
COMP.2 SETTINGS/DIAGNOST.4/7
NUMBER OF STARTS
-
NO
R
0 - 32000
-
-
-
-
-
-
-
WORKING HOURS
-
NO
R
0 - 32000
-
-
-
-
-
-
-
AV. WORKING TIME
STARTS/DAY OPT/WOR
-
NO
YES
R
W
0 - 32000
No, 1 – 240
-
-
12
12
12
12
12
STARTS/DAY OPT/WOR
NO.OF HP/LP/TH
-
YES
NO
W
R
No, 1 – 240
0 - 32000
-
-
240
-
240
-
240
-
240
-
240
-
ACTUAL BONUS
-
NO
R
-24
-
-
-
-
-
-
-
NUMBER OF STARTS
-
NO
R
0 - 32000
-
-
-
-
-
-
-
WORKING HOURS
-
NO
R
0 - 32000
-
-
-
-
-
-
-
AV. WORKING TIME
STARTS/DAY OPT/WOR
-
NO
YES
R
W
0 - 32000
No, 1 – 240
-
-
24
24
24
24
24
STARTS/DAY OPT/WOR
NUMBER OF ALARMS
-
YES
NO
W
R
No, 1 – 240
0 - 32000
-
-
240
-
240
-
240
-
240
-
240
-
ACTUAL BONUS
-
NO
R
-24
-
-
-
-
-
-
-
HEAT.2 SETTINGS/DIAGNOST.6/7
NUMBER OF STARTS
-
NO
R
0 - 32000
-
-
-
-
-
-
-
WORKING HOURS
AV. WORKING TIME
-
NO
NO
R
R
0 - 32000
0 - 32000
-
-
-
-
-
-
-
STARTS/DAY OPT/WOR
STARTS/DAY OPT/WOR
-
YES
YES
W
W
No, 1 – 240
No, 1 – 240
-
-
24
240
24
240
24
240
24
240
24
240
NUMBER OF ALARMS
ACTUAL BONUS
-
NO
NO
R
R
0 - 32000
-24
-
-
-
-
-
-
-
HUM. SETTINGS/DIAGNOST. 7/7
NUMBER OF STARTS
-
NO
R
0 - 32000
-
-
-
-
-
-
-
WORKING HOURS
AV. WORKING TIME
-
NO
NO
R
R
0 - 32000
0 - 32000
-
-
-
-
-
-
-
STARTS/DAY OPT/WOR
STARTS/DAY OPT/WOR
-
YES
YES
W
W
No, 1 – 240
No, 1 – 240
-
-
24
240
24
240
24
240
24
240
24
240
NUMBER OF ALARMS
ACTUAL BONUS
-
NO
NO
R
R
0 - 32000
-24
-
-
-
-
-
-
-
COND. TEMP.
472
NO
R
-25, 99 C / 0-40.0 bar
-
-
-
-
-
-
-
-
EVAP. TEMP.
473
NO
R
-25, 99 C / 0-40.0 bar
-
-
-
-
-
-
-
-
DISCH. TEMP.
474
NO
R
-25, 99 C / 0-40.0 bar
-
-
-
-
-
-
-
-
SUCT. TEMP.
475
NO
R
-25, 99 C / 0-40.0 bar
-
-
-
-
-
-
-
-
LIQU. TEMP.
476
-25, 99 C / 0-40.0 bar
-
-
-
-
-
-
-
-
SUPERH. / SUBC.
C2 REFRIGERANT DIAGN.
477
NO
R
-25, 99 C / 0-40.0 bar
-
-
-
-
-
-
-
-
COND. TEMP.
482
NO
R
-25, 99 C / 0-40.0 bar
-
-
-
-
-
-
-
-
EVAP. TEMP.
483
NO
R
-25, 99 C / 0-40.0 bar
-
-
-
-
-
-
-
-
DISCH. TEMP.
484
NO
R
-25, 99 C / 0-40.0 bar
-
-
-
-
-
-
-
-
SUCT. TEMP.
485
NO
R
-25, 99 C / 0-40.0 bar
-
-
-
-
-
-
-
-
LIQU. TEMP.
486
NO
R
-25, 99 C / 0-40.0 bar
-
-
-
-
-
-
-
-
SUPERH. / SUBC.
REFRIGERANT C1 / 2 SETUP
487
NO
R
-25, 99 C / 0-40.0 bar
-
-
-
-
-
-
-
-
REFRIGERANT
491
NO
W
R22 - R407
-
-
R407
R407
R407
R407
R407
HP1
492
NO
W
-10 - - 50.0 bar
-
-
-
-
-
-
-
LP1
493
NO
W
-10 - - 50.0 bar
-
-
-
-
-
-
-
HP2
495
NO
W
-10 - - 50.0 bar
-
-
-
-
-
-
-
LP2
496
NO
W
-10 - - 50.0 bar
-
-
-
-
-
-
-
70
User Manual Microface E & Hiromatic G/E 15.02.2005
HEAT.1 SETTINGS/DIAGNOST.5/7
C1 REFRIGERANT DIAGN.
NO
R
70
ENGLISH
Parameter Name
Nr. Team Read
Range
Res. Std. Set Std. Set Std. Set Std. Set Std. Set
Write
CW
DX 1 Co DX 2 Co FC Gly
FC Air
User
Setting
LOGGING SETUP
LOGGING TIME
502
NO
R
-
-
-
-
-
-
-
LOG. INTERVAL
503
NO
W
1, - - 765 sec
-
-
-
-
-
-
-
LOGGING ACTIVE
504
NO
W
YES - NO
-
-
-
-
-
-
-
COND. / EVAP.PR.
505
NO
W
YES - NO
-
-
-
-
-
-
-
DISCH. / CUCT. T.
506
NO
W
YES - NO
-
-
-
-
-
-
-
LIQUID TEMP.
507
NO
W
YES - NO
-
-
-
-
-
-
-
HP HIGHER
513
NO
W
10.0 - 40.0 / 0.0 - 20.0
-
-
-
-
-
-
-
LP LOWER
514
NO
W
0.0 - 20.0 / 0.0 - 20.0
-
-
-
-
-
-
-
OUTD. HIGHER
515
NO
W
10.0 - 40.0 / 0.0 - 20.0
-
-
-
-
-
-
-
DISCH. HIGHER
516
NO
W
10.0 - 40.0 / 0.0 - 20.0
-
-
-
-
-
-
-
ROOM HIGHER
517
NO
W
10.0 - 40.0 / 0.0 - 20.0
-
-
-
-
-
-
-
C1 DISCH. TEMP
522
NO
W
+/- 9.9
-
-
-
-
-
-
-
C1 SUCT. TEMP
523
NO
W
+/- 9.9
-
-
-
-
-
-
-
C1 LIQU. TEMP
524
NO
W
+/- 9.9
-
-
-
-
-
-
-
C2 DISCH. TEMP
525
NO
W
+/- 9.9
-
-
-
-
526
NO
W
+/- 9.9
-
-
-
-
-
C2 LIQU. TEMP
FC+DX BOARD 3 SETUP
527
NO
W
+/- 9.9
-
-
C2 SUCT. TEMP
-
-
-
-
-
-
UNIT TYPE
531
NO
W FC+ DX , FC or DX
-
-
-
-
-
-
-
LP1
532
NO
W
-10 - - 50.0 bar
-
-
-
-
-
-
-
LP2
533
NO
W
-10 - - 50.0 bar
-
-
-
-
-
-
-
LP STOP FC AT / HYST.
535
NO
W
0.0 - 20.0 / 0.0 - 20 bar -
-
-
-
-
-
-
LP ALARM AT / HYST.
536
NO
W
0.0 - 20.0 / 0.0 - 20 bar -
-
-
-
-
-
-
STOP COMP. HYST.
537
NO
W
-
-
-
-
-
-
CRITICAL OPERATING AT
SENSOR OFFSET CAL.
71
10.0 - - 80.0 %
-
User Manual Microface E & Hiromatic G/E 15.02.2005
71
ENGLISH
3.5
0
1
2
3
4
5
6
7
8
9
10
11
12
13
14
15
16
17
18
19
20
21
22
23
24
25
26
27
28
29
30
31
32
33
34
35
36
37
38
39
40
41
42
43
44
45
72
Hiromatic Messages / Warnings / Alarms
GENERAL ALARM
COMP. 1 HIGH PRESSURE
COMPRESSOR 1 LOW PRESSURE
HIGH CHILLED WATER
LOW CHILLED WATER FLOW
ELECTRICAL HEATERS OVERHEATED
FAN FAILURE
FAN FAILURE
CLOGGED FILTERS
WATER LEAKAGE
WATER LEAKAGE
USER INPUT 1 TRIGGERED
USER INPUT 1 TRIGGERED
HUMIDIFIER FAILURE
HUMIDIFIER HIGH CURRENT
HUMIDIFIER FAILURE
HUMIDIFIER FAILURE
HUMIDIFIER CYLINDER WORN
HIGH ROOM TEMPERATURE
LOW ROOM TEMPERATURE
HIGH ROOM HUMIDITY
LOW ROOM HUMIDITY
HIGH ROOM TEMPERATURE
LOW ROOM TEMPERATURE
HIGH ROOM HUMIDITY
LOW ROOM HUMIDITY
CONDITIONER WORKING HOURS EXCEEDED
COMPRESSOR 1 WORKING HOURS EXCEEDED
HUMIDIFIER WORKING HOURS EXCEEDED
PTC SENSOR FAILURE
ROOM SENSOR FAILURE
ROOM SENSOR FAILURE
EEAP SENSOR FAILURE
WATER PRESENCE SENSOR FAILURE
NETWORK FAILURE
OUT OF MEMORY
UNIT ON
UNIT OFF
SLEEP MODE
STANDBY MODE
POWER ON UNIT LOGIN
POWER OFF
Unit 1 disconnected
Unit 2 disconnected
Unit 3 disconnected
Unit 4 disconnected
RESET, ACKNOWLEDGE
ALARM
ALARM
WARNING
WARNING
WARNING
WARNING
ALARM
WARNING
WARNING
ALARM
WARNING
ALARM
WARNING
WARNING
WARNING
WARNING
WARNING
WARNING
WARNING
WARNING
WARNING
WARNING
WARNING
WARNING
WARNING
WARNING
WARNING
WARNING
WARNING
WARNING
ALARM
WARNING
WARNING
WARNING
WARNING
MESSAGE
MESSAGE
MESSAGE
MESSAGE
MESSAGE
MESSAGE
WARNING
WARNING
WARNING
WARNING
User Manual Microface E & Hiromatic G/E 15.02.2005
72
ENGLISH
46
47
48
49
50
51
52
53
54
55
56
57
58
59
60
61
62
63
64
65
66
67
68
69
70
71
72
73
74
75
76
77
78
79
80
81
82
83
84
85
86
87
88
89
90
73
Unit 5 disconnected
Unit 6 disconnected
Unit 7 disconnected
Unit 8 disconnected
Unit 9 disconnected
Unit 10 disconnected
Unit 11 disconnected
Unit 12 disconnected
Unit 13 disconnected
Unit 14 disconnected
Unit 15 disconnected
Unit 16 disconnected
COMP. 2 HIGH PRESSURE
COMPRESSOR 2 LOW PRESSURE
COMPRESSOR 2 WORKING HOURS EXCEEDED
OUTDOOR TEMP. SENSOR
GLYCOL TEMP. SENSOR
FREECOOLING STOPPED FOR 1 HOUR
ON-OFF BY HIROMATIC NOT ENABLED
SMOKE ALARM
NO POWER (USER INPUT)
POWER ON (USER INPUT)
USER INPUT 2 TRIGGERED
USER INPUT 2 TRIGGERED
NO CONNECTION TO UNIT 1
COMPRESSOR 1 MOTOR PROTECTION
COMPRESSOR 2 MOTOR PROTECTION
FIRE ALARM
OUT OF MEMORY
CONDENSER 1 FAN FAILURE
CONDENSER 2 FAN FAILURE
NETWORK PING
SUBGROUP-ID NOT UNIQUE
SUBGROUP-UNIT 1 NOT CONNECTED
SUBGROUP-UNIT 2 NOT CONNECTED
SHARE ROOM SENSOR FAILURE
SHARE ROOM SENSOR FAILURE
SHARE OUTDOOR TEMP. SENSOR
SHARE GLYCOL TEMP. SENSOR
UNIT SYNCHRONISATION
MAINTENANCE SHOULD BE DONE
MAINTENANCE DONE
HEATER 1/2 WORKING HOURS EXCEEDED
FREECOOLING WORKING HOURS EXCEEDED
AIRFLOW DEVICE NOT READY, PLS. CHECK
WARNING
WARNING
WARNING
WARNING
WARNING
WARNING
WARNING
WARNING
WARNING
WARNING
WARNING
WARNING
ALARM
ALARM
WARNING
WARNING
WARNING
MESSAGE
MESSAGE
ALARM
MESSAGE
MESSAGE
WARNING
ALARM
WARNING
ALARM
ALARM
ALARM
WARNING
WARNING
WARNING
WARNING
WARNING
WARNING
WARNING
WARNING
ALARM
WARNING
WARNING
MESSAGE
MESSAGE
MESSAGE
WARNING
WARNING
WARNING
User Manual Microface E & Hiromatic G/E 15.02.2005
73
ENGLISH
4
Connection Guide
The following gives Information about the Inputs and Outputs of the Microface. It is not an electrical drawing,
but general information about how the Inputs and Outputs have to be used.
For detailed information please refer to the electric diagram of the unit.
4.1
Inputs / Outputs for Chilled Water or Single Compressor Units
Input
P0
P1
P2
P3
P4
P5
P6
P7
Input
An0
An1
An2
Output
OUT0
OUT1
OUT2
OUT3
OUT4
OUT5
OUT6
OUT7
OUT8
OUT9
Output
PWM 0
PWM 1
74
Microface 1
Co = 2; FC = 0
Co = 2; FC = Glyc
Remote On/Off and
Remote On/Off and
Fire Alarm
Fire Alarm
User Input 1 and
User Input 1 and
(Cond.1 Fan Failure
(Cond.1 Fan Failure
or
or
Smoke Warning)
Smoke Warning)
Clogged Filter
Clogged Filter
HP1 and LP1 and TH1 HP1 and LP1 and TH1
HP2 and LP2 and TH2 HP2 and LP2 and TH2
Heaters Safety
Heaters Safety
LSI or User Input 2
LSI or User Input 2
Return Air Temp.
Return Air Temp.
or
or
Supply Air Temp.
Supply Air Temp.
Co = 2; FC = 0
Co = 2; FC = Glyc
Airflow Device
Airflow Device
Cond.2 Fan Failure
Cond.2 Fan Failure
Leakage Water
Leakage Water Detector
Detector (LWD)
(LWD)
Co = 2; FC = 0
Co = 2; FC = Glyc
Dehumidification
Dehumidification
or
or
Warning
Warning
or
or
No Power Operation
No Power Operation
Compressor 1
Compressor 1
Compressor 2
Compressor 2
Heaters Step 1
Heaters Step 1
or
or
Alternative Function
Alternative Function
Heaters Step 2
Heaters Step 2
or
or
Alternative Function
Alternative Function
Humidifier Fill
Humidifier Fill
Humidifier Drain
Humidifier Drain
Alarm
Alarm
Fan
Fan
Humidifier
Humidifier
(internal or external)
(internal or external)
Co = 2; FC = 0
Co = 2; FC = Glyc
selectable
selectable
selectable
selectable
Microface 2
Co = 2; FC = Glyc
Not used
Not used
Not used
Not used
Glycol Temp.
Outdoor Temp.
Not used
Not used
Co = 2; FC = Glyc
Not used
Not used
Not used
Co = 2; FC = Glyc
Not used
Not used
Freecooling On
Open FC Actuator 1
Close FC Actuator 1
Solenoid Water Valve Comp. 1
Solenoid Water Valve Comp. 2
Not used
Not used
Not used
Co = 2; FC = Glyc
selectable
selectable
User Manual Microface E & Hiromatic G/E 15.02.2005
74
ENGLISH
4.2
Inputs / Outputs for Twin Compressor Units
Input
P0
P1
P2
P3
P4
P5
P6
P7
Input
An0
An1
An2
Output
OUT0
OUT1
OUT2
OUT3
OUT4
OUT5
OUT6
OUT7
OUT8
OUT9
Output
PWM 0
PWM 1
75
Microface 1
Co = 2; FC = 0
Co = 2; FC = Glyc
Remote On/Off and
Remote On/Off and
Fire Alarm
Fire Alarm
User Input 1 and
User Input 1 and
(Cond.1 Fan Failure
(Cond.1 Fan Failure
or
or
Smoke Warning)
Smoke Warning)
Clogged Filter
Clogged Filter
HP1 and LP1 and TH1 HP1 and LP1 and TH1
HP2 and LP2 and TH2 HP2 and LP2 and TH2
Heaters Safety
Heaters Safety
LSI or User Input 2
LSI or User Input 2
Return Air Temp.
Return Air Temp.
or
or
Supply Air Temp.
Supply Air Temp.
Co = 2; FC = 0
Co = 2; FC = Glyc
Airflow Device
Airflow Device
Cond.2 Fan Failure
Cond.2 Fan Failure
Leakage Water
Leakage Water Detector
Detector (LWD)
(LWD)
Co = 2; FC = 0
Co = 2; FC = Glyc
Dehumidification
Dehumidification
or
or
Warning
Warning
or
or
No Power Operation
No Power Operation
Compressor 1
Compressor 1
Compressor 2
Compressor 2
Heaters Step 1
Heaters Step 1
or
or
Alternative Function
Alternative Function
Heaters Step 2
Heaters Step 2
or
or
Alternative Function
Alternative Function
Humidifier Fill
Humidifier Fill
Humidifier Drain
Humidifier Drain
Alarm
Alarm
Fan
Fan
Humidifier
Humidifier
(internal or external)
(internal or external)
Co = 2; FC = 0
Co = 2; FC = Glyc
selectable
selectable
selectable
selectable
Microface 2
Co = 2; FC = Glyc
Not used
Not used
Not used
Not used
Glycol Temp.
Outdoor Temp.
Not used
Not used
Co = 2; FC = Glyc
Not used
Not used
Not used
Co = 2; FC = Glyc
Not used
Not used
Freecooling On
Open FC Actuator 1
Close FC Actuator 1
Solenoid Water Valve Comp. 1
Solenoid Water Valve Comp. 2
Not used
Not used
Not used
Co = 2; FC = Glyc
selectable
selectable
User Manual Microface E & Hiromatic G/E 15.02.2005
75
ENGLISH
4.3
Electrical Connections
PTC 5
C 5
Closed :
Open :
Microface 1 Power Supply
24VAC , +/- 10%
Outdoor Sensor
(FC Glyc or FC Air only)
NOTES :
PTC 4
C 4
PTC 7
C 7
PTC 4
C 4
changeover
Contact
PTC 5
C 5
24 0 PE
DT Room-Glycol fulfilled
DT Room-Glycol not fulfilled
Microface 1
alternative
Closed :
Open :
alternative
changeover
Contact
DT Room-Outdoor fulfilled
DT Room-Outdoor not fulfilled
Power Supply, PTC Temperature Sensors
Return Air Temp. Sensor
or
Supply Air Temp. Sensor
FC Glyc: Glycol Temp. Sensor
FC Air: Supply Air Temp. Sensor
If Humitemp is connected, the Return air sensor changes automatically to Supply Sensor. If no
Humitemp is connected, it is the Return Air (Control) Sensor.
Instead of the Sensors for Outdoor and Glycol also switching contacts may be used. The relevant
Delta-T Parameter must be set to “CON” in that case.
Remote On/Off, Fire Alarm, User Input 1, Clogged Filter
Microface 1
Alternative
PTC 0
C
Open : Rem OFF
Closed : Rem ON
PTC 0
0
C
Fire Alarm
Remote ON/OFF only
NOTES :
2400
Ohm
Open : Rem OFF
Closed : Rem ON
OK
PTC 1
0
Alarm
C
PTC 2
1
C
2
Open :
Alarm or Warning
Closed : OK
Open : Smoke Warning
or Cond. Fan Fail 1
Closed : OK
Remote ON/OFF + Fire Alarm
2400
Ohm
User Input 1 Alarm + Smoke Warning
or + Cond. Fan 1 Fail
Clogged Filter Switch
ALWAYS USE RELAYS TO CONNECT EXTERNAL CONTACTS TO THE Microface!
NEVER CONNECT EXTERNAL COMMANDS DIRECTLY TO THE Microface!
The Smoke Warning is available ONLY if the UI is set to Alarm.
The Smoke Warning DOESNOT STOP THE FAN. It only disables the Freecooling and
closes the
Freecooling actuator to 0.
If the UI is set to Warning, the second possibility. is to get a Condenser Fan 1 Fail Warning.
76
User Manual Microface E & Hiromatic G/E 15.02.2005
76
ENGLISH
Compressor Control Compressor = 1, Freecooling = None
Microface 1
DIG Out 2
2
G
DIG Out 1
1
PTC 3
PTC 4
3
4
C
C
2400
Ohm
CC
TH
Open : OK
Closed : Alarm
LP
HP
Open : Alarm
Closed : OK
TH (Motor Protection)
Optional
Solenoid Valve
Compressor Contactor (CC)
NOTES : with the 160032 Eprom version the output 2 is used for the solenoid iinterceptor water valve
In place of the solenoid interceptor refrigerant valve
Compressor Control: 1 or 2 Compressors
+ Freecooling Glyc or Air w/o Thermal Protection
Microface 1
Twin DX, Twin FC / DF only
DIG Out 1
G
1
PTC 3
3
DIG Out 2
C
G
2
PTC 4
4
C
2400
Ohm
CC1
LP1
HP1
2400
Ohm
Open : Alarm
Closed : OK
CC2
LP2
Open : Alarm
Closed : OK
HP2
Solenoid Valve Compressor 1 Contactor (CC1)
Solenoid Valve Compressor 2 Contactor (CC2)
NOTES :
77
User Manual Microface E & Hiromatic G/E 15.02.2005
77
ENGLISH
Compressor Control: 1 or 2 Compressors
+ Freecooling Glyc or Air with Thermal Protection
Microface 1
2 compressor units only
DIG Out 1
G
PTC 3
1
3
DIG Out 2
C
G
PTC 4
2
4
C
1800
Ohm
1000
Ohm
LP1
HP1
1800
Ohm
CC1
HP2
510
Ohm
TH1
TH2
Solenoid Compressor 1
Valve Contactor (CC1)
LP1, LP2 :
NOTES :
LP2
1000
Ohm
CC2
510
Ohm
Solenoid Compressor 2
Valve Contactor (CC2)
Open : Alarm
Closed : OK
TH1, TH2 :
Open : OK
Closed :Alarm
3 Point Actuator Control
Microface 1
6 FC: Air
4 FC: Glyc
2 Compressors: 0
CW (Compressors: 0) only
PTC 3
3
PTC 4
4
C
C
close
open
DIG Out 5
DIG Out 3
G DIG Out 1
High CW Temp.
Low CWFlow
Open : Alarm
Closed : OK
Open : Alarm
Closed : OK
3point Actuator
NOTES :
78
ALWAYS USE RELAYS TO CONNECT EXTERNAL CONTACTS TO THE Microface!
NEVER CONNECT EXTERNAL COMMANDS DIRECTLY TO THE Microface!
User Manual Microface E & Hiromatic G/E 15.02.2005
78
ENGLISH
Electrical Heaters Control: all units except 1 Compressor + FC Glyc
Microface 1
DIG Out 3
3
PTC 5
Heaters Alarm Input
DIG Out 4
4
G
5
PC1
PC1
Heater 1
PC2
ANA IN 1 (Jumper not set)
Heaters Alarm Input
1
C
PC2
Safety
Thermostat
Open : Alarm
Closed : OK
PC1
Heater 2
Gnd
PC2
Open : Alarm
Closed : OK
FC Air only
NOTE :
Electrical Heaters Control: Units with 1 Compressor + FC Glyc
Microface 1
ANA IN 1 (Jumper not set)
Heaters Alarm Input
ANA Out 0 or 1 (selectable)
G
1
G0
Y2
G0 G 0 or 1
on
off
PC1
Gnd
PC2
C2
Open : Alarm
Closed : OK
R2
C3
G0 G
R4
R5
PC2
Heater 1
PC1
Safety
Thermostat
Heater 2
Contact from
Fan Contactor
NOTE : on C2-R3 there is Solenoid Interceptor Water valve compressor 1
on C3-R4 there is Solenoid Interceptor Water valve compressor 2
C3-R5 is not usedl
79
User Manual Microface E & Hiromatic G/E 15.02.2005
79
ENGLISH
User Input 2, Airflow Device, LWD
alternative
Microface 1
Open : UI active
Closed : UI inactive
ANA IN 2 (Jumper not set)
Gnd
2
red
6
blue
C
ANA IN 0
(Jumper set)
G
G0
0
black
ANA IN 0
(Jumper not set)
GND
0
PTC 6
Open : OK
Closed : Fan
Failure
in case of LSI:
Open : Cylinder empty
Closed : Cylinder full
Airflow Sensor
NOTES :
Leakage Water Detector
ALWAYS USE RELAYS TO CONNECT EXTERNAL CONTACTS TO THE Microface!
NEVER CONNECT EXTERNAL COMMANDS DIRECTLY TO THE Microface!
Airflow Sensor or Differential Pressostat (Contact) for Fans supervision are
alternative.
Warning, Alarm and Fan Output
Microface 1
All except FC = Air
No
Nc
DIG Out 7
Co
No
Nc
Co
DIG Out 0
Dehumidification
Alarm
(max.24VAC)
(max.24VAC)
NOTE 1 :
80
FC = Air only
DIG Out 2
DIG Out 8
G
S
8
G0
Fan Output
2
G
Fan Contactor
Dehum. Output can be programmed as :Dehumidification, Warning,
No Power message or not used. (all Functions are alternative)
User Manual Microface E & Hiromatic G/E 15.02.2005
80
ENGLISH
Humidifier Control
Microface 1
DIG Out 5
G
5
DIG Out 6
DIG Out 9
6
9
NOT PRESENT
in FC = Air units
Fill Valve
NOTES :
Drain Valve
Humidifier Contactor
Fill and Drain Valve are not present in Units with FC = Air.
In these Units only remote Humidifiers can be controlled (or internal Humidifier with
additional Electronic Card).
Analogue Outputs and Status Messages
Microface 1
ANA Out 0
Signal 1 :
selectable
NOTES :
81
DIG Out 2
ANA Out 1
1
G
2
G
Signal 2 0-10VDC
Signal 1 0-10VDC
0 G0
Co = 1 & FC = Glyc only:
Signal 2:
selectable
FC : Output ON if Unit is in FC Mode
DF : Output ON if Unit is in CW-Mode.
Compressor = 1 & FC = Glyc: 1 Analogue Output is necessary to drive the Heater Board, if
Heaters are present.
User Manual Microface E & Hiromatic G/E 15.02.2005
81
ENGLISH
PTC 5
C 5
PTC 5
C 5
PTC 4
C 4
Closed :
Open :
24 0 PE
DT Room -Glycol fulfilled
DT Room-Glycol not fulfilled
Microface 2
alternative
Microface 1 Power Supply
24VAC , +/- 10%
changeover
Contact
Outdoor Sensor
NOTES :
PTC 4
C 4
Closed :
Open :
alternative
DT Room-Outdoor fulfilled
DT Room-Outdoor not fulfilled
Power Supply, PTC Sensors for units with 2 Compressors & FC = Glyc
changeover
Contact
Glycol Temp. Sensor
The Glycol sensor is Standard in FC units only, but can also be connected to DF Units.
Instead of the Sensors for Outdoor and Glycol also switching contacts may be used. The
relevant Delta-T Parameter must be set to “CON” in that case.
Digital Outputs for units with 2 Compressors & FC = Glyc
Microface 2
DIG Out
4
DIG Out
5
DIG Out
2
G
DIG Out
6
close
3
open
G
3point FC
Actuator 1
Solenoid
Interceptor
Valve Comp. 1
Solenoid
Interceptor
Valve Comp. 2
Output ON
if Unit is in FC / DF
Mode
NOTES :
82
User Manual Microface E & Hiromatic G/E 15.02.2005
82
ENGLISH
PTC3
TO HUMITEMP CONNECTOR OF
MICROFACE E
PTC2
PTC1
NAVIGATOR 1
(COMPRESSOR 1)
HIROBUS ID = 1
HIROBUS ID = 2
LP1
PTC3
HP1
HIROBUSS 8 POLES
CABLE
PTC2
PTC1
NAVIGATOR 2
(COMPRESSOR 2)
•HP1/2 = CONDENSER PRESSURE TRANSDUCER
•LP1/2 = EVAPORATING PRESSURE TRANSDUCER
•PTC1 = DISCHARGE PTC TEMPERATURE
•PTC2 = SUCTION PTC TEMPERATURE
•PTC3 = LIQUID PTC TEMPERATURE
THE NAVIGATOR 2 IS REQUIRED ONLY IN CASE OF
TWIN COMPRESSORS UNITS
LP2
HP2
Navigator card for FC + DX cooling configuration
TO HUMITEMP CONNECTOR OF MICROFACE E
HIROBUSS ID = 3
NAVIGATOR
(COMPRESSOR 1 / 2)
LP1
LP2
• LP1 = EVAPORATING PRESSURE TRANSDUCER COMPRESSOR 1
• LP2 = EVAPORATING PRESSURE TRANSDUCER COMPRESSOR 2
• LP2 TRANSDUCER IS REQUIRED ONLY IN CASE OF TWIN COMPRESSORS
83
User Manual Microface E & Hiromatic G/E 15.02.2005
83