1
Wt*rvv!
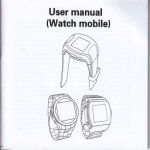
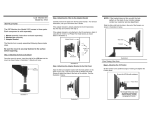
User manual
Before using producl,pleose reod this
monuol corefully ond keep it propelly for
f uture reference,when necessorY.
USER MANUAL
Preface
Thank you for purchasing the FULL HD Sport Camera , 1 OSOP
HD Digital waterproof video camera. fhis product is quite small
and delicate with wonderful waterproof humanity design. With
a multipurpose damp. it can help you achise omni-directional
vids /
monitoring under all kinds of outdoor conditions.
This manual contains important safety and operating
information. Please read all the information arefully before
you use the device to avoid accidents and kep it for future
reference.
Prcduct Overview
undeMater activity fan, are you always impressed by the
beautiful scene in the sea or lakes, or are you still looking for a
companion that can help you record your unforgettable
uperiences?
As an
the FULI HD Sport Camera. it is ideal for outdoor and
undeMater pursuits. Water-proof feature makes it possible to
take photos and record videos under water up to 20 meters.
Try
t
With HD lens and low light level sensitivity, you will never miss
any opportunity of taking beautiful undeMater shots again.
Product Features
> Waterproof up to 20 meters. ideal for outdoor and
underuater pursuits
1/ 2.5 5.oMega pixel CMOS Lens
> 1 20" wide-angle,HD camera lens, let you shoot more
>
freely.
> Advanced vibration effect, makes mode transfer more
convenient, easier to operate
> Optional video resolutions:
A, 720P60: 1280*720P 60fps H.264AVl
B, 720P30: 1280*720P 30fps H.264AVl
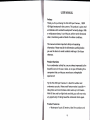
7. HDMI port 8. MicroSD card slot 9. Waterproof
coverMaterproof ring lo.Microphone hole 1 1 . Laser light
'12. LED lights 13. Camera lens 14. Base bracket
15. Mounting
bracket 16. Combination reset button(press power and light
button together)
irp
>
>
>
>
>
>
>
l2MP photo resolution, jPG format
Built-in high capacity Li-battery lasting video
recording for 2.5 h
Support HDMI and Tv-out, easy to share more funs
Unique loop recording and audio recording function
Laser light help for fixing position of the target obiect
2 high brightness LED lights for night using
Flashlight function lasting working up to 1 0h
Support MicroSD card up to 32 GB (CLASS 4 or above
is recommended)
> USB2.0 Upnp
> Support PC charging
1 . power / mode / up button 2. Charging
light(yellow) 3. Recording/playingy'execute button
4. Led indicator/down button 5. LED indicator
(red & blue&purple) 6. USB/AV-OUT/charging port
LED
LED lighto,elbw)
i.*^*#til,,.**-
",
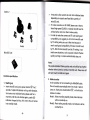
lnstallation (With Pictures)
The FULL HD Sport Cameracan be used handheld or can be
used combined with clips and bracket, as below picture shows:
1. Remove the back cover: Rotate the back over simultaneously
to push back outside, and then you can remove the back
cover,
Product Structures
Respectively is:
2 chaEing
-
C, FULL HD30: 1920*1080P 30pfs H.264 AVI
D, 1080P30: 1rt40*1080P 30fps H.264 AVI
>
-'- *E=
buflon
,@
2. lnstallation of mounting bracket
-3-
trdq
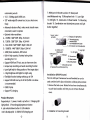
Standard Accessories:
User manual, USB cable, Adaptor, Bag, AV cable, HDMI cable,
Mounting Bracket
>01 Mount bracket
>O2 Suction cup mount
>03 Base bracket
>04 Adhesive base (with pc 3M sticker)
>05 Upright bracket
>06 90' bracket
>O7 Hexagonal plastic nut
>08 Ani5e plastic nut
>09 Silicon strap 5cm
>10 Silicon strap 35cm
>1 1
Silicon strap 70cm
1
1
Option'l
G
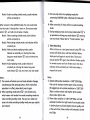
Option Accessories
ln view of differernt usage purpose. such as motorbike,
airplanes,golf carts. vehicle, bicycles and many others round
and square rail applications,we also offer the optional
accessories to user to meet their different demand.
C
Multi-functional sport bracket
Option 2
&
>
lt may take
>
video resolution is HD 'lO8Op, please use at least a
brand high-speed (CLASS 4 or above) microsD card to
achieve better and more fluent video quality.
ln order to make the camera and TF card reach good
compatibility, we suggest you to format microsD card
by ry setting when you use it first time because it
won't reach good compatibility if format microSD card
by PC. After format microSD card by TV setting, it can
avoid some situations, such as purple indicator flashes
quickly warning or camera automatically stops, etc
a few seconds to enter into initialized state
depending on capacity and load data quantity of
microSD card.
o
>
@
Sucker
MicroSD Card
For
Notes:
The purple:indicatqflirshgs,,qyickty, ana q4.n:wilt
be.f.ast ihyttJrn
vibration when turned on wlthdt microsD card. please turn off
unit and insert microSD card again
Function specification
2.
1. Starting up
>
lnsert microsD card, press power button,,O,,for 2
seconds. Purple LED indicator is lit up with vibration.
Unit enters into initialized state, please wait for a
moment until the unit vibrates again, purple LED
indicator changed to blue, this means the unit enters
into standby mode.
Mode transfer
ln the condition of not connecting to AV&HDMI cable,
the unit would automatically enter into mode 1 after it
turns on. Short press mode botton,.[0],,, unit will circle
inbelow 3 modes:
Mode'l: Video recording standby mode, blue indicator
will be constantly on.
Mode2: Photo taking standby mode, red indicator will be
constantly on.
Mode3: Audio recording standby mode, purple indicator
will be constantly on.
3) Unit can only enter into replaying mode after
connecting AV&HDMI cable, otherwise this mode will
skip.
When conneqt to the AV&HDMI cable, the unit would enter
into the mode I directly after it turns on. Short press mode
4) After connecting
botton"[o]", unit will circle in below 4 modes:
Model: Video recording standby mode, blue indicator
will be constantly on.
Mode2: Photo taking standby mode, red indicator will be
5) During replaying mode, short
constantly on.
Mode3: Video and photo replaying mode, purple
indicator is constantly on. (During this mode,
long press mode botton"o" and unit enters into
next mode)
Mode4: Audio replaying mode. purple indicator is
constantly on. (During this mode, long press
mode botton"[o]" and unit enters into next mode)
)
The camera will vibrate once and mode indicator changes
simultaneously after pressing button, which means that
operation is in effect, please don't press it again.
2) When operating mode button"[o]", unit vibrates twice,
which means unit transfer from audio Hording mode into
video recording standby mode. Thus you can realize unit
enters into video recording standby mode even you couldn't
see
there will be no audio recording
press mode button,,[0],, is
up operation and long press mode button,,[t].1,, entering
into next mode. Please refer to ,,Tv-out function,. part_
3.
Video Recording
After unit turns on, short press execute button,,0l,,, the
camera will vibrate once, and blue indicator flashes
slowly and unit begins to record video. Short press
execute button"f4" again, blue indicator flashes quickly
for several seconds and unit vibrates once, then blue
indicator will be constantly on, that means video is
stopped and saved.
Notes:
Notes:
1
ry
mode,
indicator,
1) System setting video resolution is 1280*720p 6ofps,
that suits for outdoor extreme sports video recording.
We suggest you set up video resolution to 1 280*720p
30fps to achieve clearer and brighter photo quality
2)
when indoor light is dark.
When video resolution is 1 280*720p 6ofps, unit will
automatic transfer into night mode if unit r{ords video
in darker places to achieve brighter picture quality. and
at the same time, frame number will automatic transfer
into 30fps.
3)
When the loop recording function iso-.ff.; thqu:.ti!:Ur!ll
automatically save a file after it tulli reaoad a 4G, iideo fill
.. . .
and then start to.recqd the new file. .
4) Please remove the waterproof cover in the backide of the
unit for a better audio quality when it not use undwater.
5) When microsD card is full (Loop recording function is ofo.
battery used up or standby mode for 3 minutes (time slot
can be set up), unit will shut down auiomatiially"
Notes:
l)
indicator willflaih quitkly during phdto-rakin9,
case for a better picture quality.
2) When microSD card is full, battery used up or standby
mode.for 3 mlnutes (time slot can be set up), unit will
shut down automatically.
Red
don't shake the unit in
6. Audio recording
When the unit in the sate of turning on, short press
4.
>
>
Loop recording function
Through system parameter setting, loop recording
function can be open, please refer to "system
parameter setting" chapter
After start the loop recording function, in the video
state, the unit would automatically save the video file
according to the time setting in the system. The system
time setting have 2mins, smins, 1 smins. three state
options.
mode button"O" to audio recording standby mode.
Short press execute button"Fl". unit will vibrate one
time, and then the purple indicator would flash slowly
and unit begin to record audio. Short press execute
button"pl" again, unit vibrates again, that means the
audio recording is finished and save the file
successfully, and then the purple indicator would be
constantly on state.
Notesl
5.
Photo Taking
ln the unit turning on state, short press mode button
"[o]" to photo-taking standby mode, red indicator will
be constantly on. Short press execute button,,[D.,, red
indicator flashes quickly for several seconds and unit
vibrates one time, this means the photo taking is
finished and save the file successfully. And then the red
indicator would be constantly on state.
1)
Please remove the waterproof cover in the backside of
the.uhit {ar a bettir:iu{io quality during audio
recording.
2) When microSD.,card is full,:battery used up oritandby
mode for 3 minutes(time slot can be set up), unit will
sht{ dbwn autoinatically.
7.
LED
>
Unit provides 2 high brightness LED lights and 'l laser
and Laser light
-1 1-
li9ht.
>
system would come to the state of turning off, it would
help to get more longer time for the usage. The way to
ln any turning on state (except Tv-out playback mode),
short press LED light button,,[9,,the LED light and taser
light will circle in below five modes:
Modeo; All light go out. (Unit would enter into this mode
after turn on)
Model: The laser light would light up for 30 seconds for
the purpose of positioning the object, and then
laser light will go out.
Mode 2: The LED lights are on for the purpose of video
recording and strength the color quality in the
dark place condition.
Mode 3: The laser light is on for positioning in all the
recording state.
Mode 4: The LED lights keep quickly flash in a high
frequency to save flashlight energy.
I
>
I
operate as below details:
Long press LED/laser light button"[Y]", flashlight is lit
up, short press LED&laser light button"[i] ", unit will
circle in below 5 modes:
Mode 0: Torch state: Flashlight is lit up and can be working
up to 10h.
Mode 1: The laser light is on for positioning purpose.
t\4ode 2: The LED lights keep quickly flash in a high
frequency to save flashlight energy.
Mode 3: Laser light flashes slowly for intermittent laser
positioning,
Mode 4: Turn off all.LED lights.
Notes:
1) When in the single flashlighvlaser positioning function,
Notes:
1
)
2)
3)
it is common condition if there is no vibration after
time the unit will vibrate after you successfully
press the operation button.
ln any mode, long press LED&laser light buttoh,,g,,, the
unit will transfer to modeo (al' lights go out).
Each
The consequence of themode circle is : mode 0->mode
1
->mode 2->mode 3->mode 4->mode
O
8" Flashlight and laser positioning function
The unit has the single flashlight and laser positioning
function. When this single function works, the DV
l
l
press buttons.
2) ln any mode, long
press LED&laser light button,,[r,, and
unit will transfer to mode 4(all lights go out).
3) The consequence oflhe mode circle is : mode 0->mode
1->mode 2->mode 3->mode 4->mode O
9. Turn off and automatically turn off function
>
ln the standby mode, press power button"[0)" around
two seconds, purple indicator flashes and unit vibrates
I
l
>
1
3 times, unit will turn off.
When microsD card is full, battery used up or standby
mode for 3 minutes (time slot can be set up), unit will
shut down automaticallY.
o. MicroSD card error warning and unit turn
off
>
l{ot6:
l)
automatically
purple indicator flashes quickly with the fast rhythm
vibration. The unit would turn off automatically 1 5
seconds later
1
1. Low power warning and automatic shut down
During the system operation state, when
built-in li-battery uses up, warning system will start.
Blue and red indicator alternate flash slowly and unit
will be slow rhythm vibration, and then turn off
automatically 15 seconds later
1
2. Downloading files and removable disk tunction
Connect the unit to the computer UsB slot.
Press power button"[t!)" to turn on the unit, and a
removable disk will appear in "my computer", you can
view the pictures or videos, audio record files in the
removable disk, and you can also copy these files to
>
>
-l 4-
ln this mode, you can short Press LED/laser light button
be used as a
'@" to turn on flashlight function, unit 6n
The warning system would start in the condition of not
inserting microsD card, microsD card damaged and
microSD card full recording, and at the same time the
your computer
When connected to computer with USBl .1 port, please
copy the videos to your computer desktop, and then
replay it to avoid ragged playback.
USB
2)
table lamp.
When connect to the U58, if the yellow indicator flash,
it means the unit is in the state of power charging.
13. Power Charging
> Plug the AC adaptorinto socket, and then connect with
the camera for battery charging. The yellow indicator
will be constantly on during charging. lndicator goes
out after the battery is full charged. The charging time
is
about 3 hours.
> Unit also could get power charging through
USB cable,
when you connect the unit to computer, it would be
start the power charging function. To avoid extending
charging time, please do not press the power button
"'0 " after you connect it to computer
Notes:
when you connect to adaptor for charging in the status of
units staring up, the unit would turn off automatically if unit is
in standby mode for 3 minutes(time slot can be set uP), but it is
15-
still in the charging statu5.
14. Shooting when charging
Put the AC adaptor into socket, and then connect with
camera, long press power button,,@,,to turn on the
unit. Several seconds latet purple indicator will be
changed to blue, unit vibrates one tjme, that means unit
enters into the standby mode. And the yellow indicator
will be constantly on indicating it,s in the charging
status. And this time, you could operate any function of
the unit.
Notes:
Unit will turn off automatically if unit is in standby mode for 3
minutes (time slot can be set up), but it is still in t-he charging
status.
1
1
2)
3)
up button"@" or down button"[ii]" for browsing. Short
press enter button"[!" into playback interface and
short press enter button"[ir " again to playback videos.
During playback, buttons function as following;
A. Short press enter button"[D", pause or resume play.
B, Long press enter button"@", return to previous layer
menu.
C,
5. TV playback function
The unit has AV &HDMI two options for the audio and
video output, you could choice any one you like. Here
we suggest to using the HDMI output for a better HD
)
Via AV cable, please connect AV cable to the camera,s
USB&AV-OUT port, the yellow plug connect with TV
video input port(yellow), white plug connect with ry
audio input port(white). pleas set up the signal input
by refer to the TV user manual.
B,
Via HDMI cable. please connect one plug of HDMI cable
to the camera's HDMI port, another plug connect with
ry
HDMI port. Please set up the signal input by refer to
During video playing, long press down button"eil" or
up button"O " to achieve fast foeard or backward
play videos.
4)
video quality.
A,
the TV user manual.
Turn on camera. you can see POWER LOGO and hear
short warning tone, and then blue indicator will be
constantly on and unit enters into standby mode.
Videos playback: refer to "Mode transfer" chaptet
short press mode button"O " to videos playback mode,
purple indicator will be constantly on. And then press
A,
B.
Pictures playback: refer to "Mode transfer" chapter.
short press mode button".rol" to video and pictures
playback mode, purple indicator will be constantly on.
And then press up button"@" or down button"8" for
browsing. Short press enter button"[tl " into playback
interface and short press enter button'@ " again into
pictures automatically play. During playback, buttons
function as {ollowing;
Short press enter button"E]", pause or resume play.
Long press enter button"El", return to previous layer
menu.
C, During pausing
play, short press down button"ejl"
-17-
or up button"(D" to achieve upward or downward play
photos.
5)
Mode 2: Standby mode of photo taking, red indicator will
be constantly on.
Mode 3: Video and picture taking playback mode, purple
indicator will be constantly on.(ln this mode,
press mode button,,@,,into next mode.)
Mode 4: Audio playback mode, purple indicator will be
constantly.on.(ln this mode, press mode button
,,@,,
into next mode.)
Audio playback: refer to ,,Mode transfer,, chapter, short
press mode button"@,, to audio playback mode, purple
indicator will be constantly on. And then press up
button"@" or down button,,@,, for browsing. Short
press enter button"8l,, into playback interrace and
short press enter button"[E,,a9ain to playback audios.
During playback, buttons function as following;
A,
B.
C.
Short press entei button,,El,,, pause or resume play.
Long press enter button,,[d,,, return to previous layer
menu.
'I
6. Shoot when connect to TV
Please refer to "TV playback function,, chapter, well
connect the AV or HDMI cable, you could operate the
TV output for video and photo-taking function.
During audio playing, short press down button,,[9,, or
up button"@ " to achieve fast fomard or backward
play audios.
17. System parameter setting
>
Please refer to "TV playback function,, chaptet via AV
or HDMI cable, connect to ry unit enters into standby
mode. Long press enter button,,@", TV will show
system parameter setting interface. Buttons functions
as below:
Short press enter button"F),,to select & quit settinq
zl..
A.
l)
B,
Short press up button"@" to upward correct setting
item, and short press down button,,g,,to downward
C,
Long press enter button,,Fl,,to quite and save setting
items.
items.
4).
correct setting item,
-l 8-
-1
9-
Setting illustration:
>
RESOLUTION:720P30fps.
FULL
A.
720P60fps. l080P30fps.
HD3ofps initial setting is 720P 60fps
720P30: 1280*720P 30fps,
B. 720P60:
number as 30fps to achieve clearer and brighter photo
quality when indoor light is dark.
1080P30: 1440*1080P 30fps,
FULL HD30: 1 920*1 080P 30pfs, Full HD shooting
)
2)
3)
)
2)
resolution suitable for eryirmm€nt.
Plese use a brand high-speed (CLASS 4 or above)
microsD card to achieve better and more fluent photo
quality.
when video resolution is 1280*720P 50fps, unit will
automatic transfer into night mode if unit records video
in darker places to achleve brighter picture quality, and
QUALIry:
tire,
H. M.
>
L
20
SIZE:5M, 8M. 12M
lllustration:
5MP=photo resolution is 2592* 1 944, 8MP= photo
resolution is 3200*2400, 1 2MP=photo resolution is
4000*3000.
Photo size and memory capacity consumption depend
on photo resolution.
TIME STAMP: DATE/TIME. OFF
AUTO. 60Hz , 50Hz
lllustration: Setting up light source frequency according to
grid frequency to cancel shooting flashing under the lamp.
FLICKER:
>
TV
>
TIME
frame number will automatic transfer
lllustration: A high video quality setting, higher video
quality would get, and at the same time higher memory
capacity consumption.
PHOTO
lllustration: it is used for opening or closing images
watermark markers,
Photg quali-iy,rind maniory capacity consumption
depend on vidrc resolution, please set up video
at the same
into 3Ofps.
>
1
>
Notes:
1
>
128O*72OP 60fps, suits for outdoor extreme
sports video recording. We suggest you set up frame
C,
D,
Notes: Please use a brand high-speed (CLASS 4 or above)
microSD card to achieve better and more fluent photo quality.
ryPE: NTSC. PAL
lllustration: Choose right video format both for camera
and TV during using TV-OUT function. otheruise TV
will show the inharmonious color problem.
AND DATE: YEAR.MONTH.DATE HOUR:MINUTE
lllustration: lf the time stamp shown on videos and
photos is wrong, please set up correct time and date
through this setting.
-21-
Button function:
Up button" 0 " or down button"
A.
l$
"
lllustration: After setting the related auto power off
time. the unit would shut down automatically if there
operation.
used for upward or
downward correcting.
B.
is
Enter button" E " used for saving and quitting setting.
OFF. 2MlN. 5 MlN. 15 MIN
lllustration: Setting up loop recording function:
't- lnitial settings is OFt, unit will shut down automatically
during shooting when memory is full.
2. After setting up 2MlN. 5 MlN, 15 MlN, unit will save
the recording video when reaching this timing length.
When TF card is full, unit will delete the former videos
automatically one by one to acquire relevant space to
store new videos.
RECORD OVERWRITE:
>
lllustration: lf you want to reset the system, choose
and short press enter button" E ". System
parameters will return to factory default and unit will
YEs,
resta rt.
>
BEEP
SOUND: ON. OFF
lllustration: this function for the purpose of turning on
or turning off the button beep sound after connecting
to TV
>
DEFAULTSETTING:YES. NO
FIRMWARE VERSION:
lllustration: Use for viewing the software version and
related information.
18. Reset the system
lf the unit couldn't work well for any reason, please
press power button" 0 " and light button" E " at the
same time to reset unit, and unit will shut down.
Please turn on unit again to operate functions.
FORMAT:YEs. NO
lllustration: Used for resetting microSD card
N6t€6r::i::::::,::
Notes:
after ieseui!.g:(riit,pliiii.lal6aiif6r3rid.r,ilaliti,:ii'i,liiqrciini[
>
AUTO POWER OFF:
1
MlN. 2MlN. 3 MIN.
-22-
5
MIN.
OFF
-23-
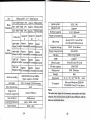
Lens
Photo
Resolutior
5 Meqa Dixel 1/ 2.5" CMOS sensor
'12M 4000*3000 JPG Approx.900pcs/4cB
8M 3200*2400 JPG Approx.1200pcs/4cB
5M 2592*1944 JPG Approx. 1700pcs/4cB
Video size
1920*1080P
30fpsH.264 A\
Video
QUALITY:
QUALITY
QUALITY:
H
M
L
Approx.
qpprox.
\pprox.
41 min(4cB 19 min(4GE i2min(4GB)
Approx.
Resolution
lofpsH.264 A\ 41 min(46E
1440*1080P
rpprox.
\pprox.
19 min(4Gl
i2min(4GB)
1280*720P
5ofpsH.254 A\
Approx.
41 min(4cE
\pprox.
;4 min(4ct
\pprox.
1280*120P
Approx.
\pprox.
i2 min(4Gl
Approx.
lofpsH.264 A\ 62 min(Acl
Audio recording
Lens tvoe
Min. lllumination
Single torch
function usage tim€
l2min(4GB)
123min(4GB
Signal system
Vibration hinl
Battery Capacity
1
000mAh
1.5W
Video time
Around 2.5 h (turn offall
the LED with 4GB memory)
Supplied Voltaqe
Power charqinq tim
LJSB
Jack
HDMI
Memorv tvpe
card caDacitv
SD
DC5V lAorabove
Around 3h
US82.0 Hiqh Speed
support
MicrosD card (TF Card)
2G B-3
2
GB
Waterprool
lPXS 2ometers
Weight
Dimension
e] (L) x41 (H) .36 (w) (mm)
Mono approx.22hl4cB
1
Supporl
3.7Vl
Power consumption
ADPCM WAV format 48Khz,
F/2.8 f =3mm 12O"wide anole
NTSC. PAL
OS
LUX
supporl
86s
Microsoft Windows2O00lXP
/
VISTA,/WIN 7/mac10.4 or above
l{ots:
Around
1
0hours
Laser distance
20M(indoor)
Scanning Frequency
Auto,60Hz.50Hz
Signal system
NTSC. PAL
lhe vid6 lifiallehte!,pllrelrymoV consumption and video
situation,-thdiedltqned.4!i.wOdld,bes6me different with the
date we mentimed abwe.