1
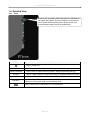
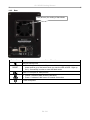
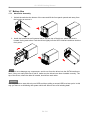
FANTEC GL-35DSR
Network Attached Storage for 2 HDDs
User Manual
EN
Table of Contents
1 2 3 4 Getting Started ........................................................................................................................................ 1 1.1 1.2 1.3 About this Device ............................................................................................................................... 1 Package Contents ............................................................................................................................. 1 System Requirements ....................................................................................................................... 1 1.4 Detailed View ..................................................................................................................................... 2 1.5 Quick Installation Guide ..................................................................................................................... 4 1.6 1.7 About Data Backup ............................................................................................................................ 4 Before Use ......................................................................................................................................... 5 1.3.1 1.3.2 Supported Operating Systems .................................................................................................................. 1 Supported USB Devices ........................................................................................................................... 1 1.4.1 1.4.2 Front ......................................................................................................................................................... 2 Rear .......................................................................................................................................................... 3 1.5.1 Power ON / OFF Procedure ...................................................................................................................... 4 1.7.1 1.7.2 Hard Drive Assembly ................................................................................................................................ 5 Initializing the NAS System ....................................................................................................................... 6 NAS Settings and User Interface ........................................................................................................... 9 2.1 How to login ....................................................................................................................................... 9 2.2 User Interface & Settings ................................................................................................................. 11 2.1.1 2.1.2 2.1.3 Discover Tool ............................................................................................................................................ 9 Web Browser & Device Name on a PC ................................................................................................... 10 Safari Web Browser & Bonjour Bookmarks on a Mac ............................................................................. 10 2.2.1 2.2.2 2.2.3 2.2.4 2.2.5 2.2.6 Albums .................................................................................................................................................... 11 Library ..................................................................................................................................................... 12 Preference .............................................................................................................................................. 13 Applications............................................................................................................................................. 18 Registration ............................................................................................................................................. 20 About ...................................................................................................................................................... 20 Network Storage & Extra Features ...................................................................................................... 21 3.1 File Access on a PC ........................................................................................................................ 21 3.2 File Access on a Mac....................................................................................................................... 24 3.3 BitTorrent Download Manager ......................................................................................................... 26 3.4 Printer Server ................................................................................................................................... 27 3.5 Media Server ................................................................................................................................... 31 3.6 3.7 iTunes Server .................................................................................................................................. 33 USB Copy ........................................................................................................................................ 34 3.1.1 3.1.2 3.1.3 3.1.4 Windows Explorer ................................................................................................................................... 21 Mapping a Network Drive ........................................................................................................................ 21 Disconnecting a Network Drive ............................................................................................................... 22 FTP ......................................................................................................................................................... 23 3.2.1 3.2.2 SMB ........................................................................................................................................................ 24 FTP ......................................................................................................................................................... 25 3.3.1 Starting a Download ................................................................................................................................ 26 3.4.1 3.4.2 Installation on a PC ................................................................................................................................. 27 Installation on a Mac ............................................................................................................................... 30 3.5.1 3.5.2 Xbox 360 ................................................................................................................................................. 31 PlayStation 3 ........................................................................................................................................... 32 Appendix ................................................................................................................................................ 35 4.1 4.2 4.3 4.4 4.5 Specifications ................................................................................................................................... 35 Trademarks ...................................................................................................................................... 35 Technical Terms .............................................................................................................................. 36 FAQ.................................................................................................................................................. 36 Precautions ...................................................................................................................................... 37 4.6 Important Notices ............................................................................................................................. 37 4.5.1 4.5.2 4.5.3 4.5.4 Power on/off precautions ........................................................................................................................ 37 Location and placing precautions ............................................................................................................ 37 Electricity and power plug ....................................................................................................................... 37 Cables ..................................................................................................................................................... 37 4.6.1 4.6.2 4.6.3 About this Manual ................................................................................................................................... 37 Intellectual Property ................................................................................................................................ 37 GPL Statement ....................................................................................................................................... 37 GL-35DSR Getting Started
1 Getting Started
1.1 About this Device
The ultra compact design of the GL-35DSR makes this dual-bay network storage enclosure one of
the smallest in the market, but it comes with flexibility and performance. Not only does it come with
all the standard functions a network drive offers but thanks to RAID protection, all valuable data
can be securely backed up and the built-in media server provides streaming of the digital content
on the local network. The installation of the 3.5" SATA hard drives is easy and quick, thanks to the
screw less design.
Product Dimensions (WxDxH): 8cm x 17cm x 12cm
1.2 Package Contents
•
•
•
•
•
FANTEC GL-35DSR (hard drives not included)
Power adapter (DC +5V/4.2A +12V/3A)
Ethernet cable
Utility CD
User manual
1.3 System Requirements
•
•
•
•
Computer with internet browser and flash player, network access for setup
Switch or Router with one free Ethernet port for the GL-35DSR LAN
One or two 3.5" SATA-I or SATA-II hard drives (1.5Gb/s or 3.0Gb/s)
80GB -2TB per HDD (for RAID, identical capacities are recommended)
1.3.1 Supported Operating Systems
• PC running Windows XP, Windows Vista or Windows 7
• Mac running Mac OS 10.2 or above
Note
(PC running Windows required to initialize NAS system!)
1.3.2 Supported USB Devices
• USB printers (all-in-one printers are not supported)
• USB drives (mass storage class) or USB flash drives using the FAT or FAT32 file system
Note
For external USB devices, we recommend using self-powered USB drives. If two bus-powered
USB drives are connected at the same time, at least one of them needs to be powered by an
external power supply.
MS-DOS, Microsoft, Windows XP/Vista/7 are trademarks of Microsoft Corporation. Apple Macintosh, iTunes and Mac are
trademarks of Apple Computer. BitTorrent™ and Torrent™ are trademarks of BitTorrent, Inc. All other third party brands
and names are the property of their respective owners.
EN 1/41
GL-35DSR Getting Started
1.4 Detailed View
1.4.1
Front
Press to turn on power. Press and hold for 3 seconds to
shut down the system. Press and hold for 6 seconds to
cut off power and forcefully power off the system (not
recommended under normal circumstances).
LED/Icon
Status/Function
• Blue = Power ON
Access
HDD1/2 ERROR
READY
LAN
BACKUP
• Flashing blue = Read/Write data access
• Red = Error or empty drive bay (HDD 1 will light up during start up)
• Green = NAS system is ready and running in standard mode from HDD
• Green = NAS is connected to the network
Press this button for one second to copy all the files from the attached
USB drive to the public folder on the network drive.
USB 2.0 host port for USB drives (FAT32 read/write)
EN 2/41
GL-35DSR Getting Started
1.4.2
Rear
Fan (40 mm) for cooling of hard disks.
Button/Icon
Status/Function
Slot for security lock
RESET
• When the power is turned off, press and hold this button, turn on the
power and let go of the button when you see the LED at HDD 1 light up
red (~ 2 seconds) in order to enter the flash mode.
USB 1.1 host port for USB printers
• Yellow = Indicates data access (read/write)
• Green = Indicates LINK status of network connection
Power receptacle
EN 3/41
GL-35DSR Getting Started
1.5 Quick Installation Guide
Following is a quick installation guide to get you up and running in a matter of minutes. For further
details on each of the settings, please refer to the subsequent chapters.
1. Install minimum one hard drive.
2. Connect the Ethernet cable from your network router/switch to the GL-35DSR.
3. When everything is connected:
a) Press and hold the Reset button.
b) Turn the GL-35DSR on.
c) Release the Reset button after about 2 seconds and give it about 1-2 minutes to start.
4. Start the “Discover Tool” to locate the network drive and initialize the NAS system.
5. Login via web browser to modify the settings of your network drive and set up your users.
6. You are now ready to start sharing files.
Note
Without installing hard drives and initializing the NAS system first, the device cannot be accessed
via web browser.
1.5.1 Power ON / OFF Procedure
Connect the power supply to your device first. Then connect the power supply to the wall socket.
To turn on the GL-35DSR LAN, press the power switch to start up the system. It will take about
one to two minutes for the device to go online. The green READY LED will indicate when the
system is ready.
To safely turn off the GL-35DSR LAN, press and hold the power switch for 3 seconds. The system
will shut down all services and about 20 seconds later, it will power off.
If for some reasons the system is unresponsive, press and hold the power switch for 6 seconds to
forcefully shut down the system and cut off the power.
Note
If the device is not in use for a longer period of time, we recommend turning off the power and
removing the power supply from the wall socket.
1.6 About Data Backup
To protect your files and prevent the loss of your data, it’s strongly recommend to keep two copies
of your data. One copy on your GL-35DSR and a second copy on your internal PC drive or another
storage media such as a CD, DVD, Tape or an additional external drive.
Any loss or corruption of data while using the GL-35DSR is the sole responsibility of the user, and
under no circumstances will the manufacturer be held liable for compensation or the recovery of
this data.
EN 4/41
GL-35DSR Getting Started
1.7 Before Use
1.7.1
Hard Drive Assembly
1. Unlock the switch at the bottom of the case and lift the front panel upward and away from
the housing to remove it.
2. Install the hard drives as illustrated below with the top of the drives, where the label is
located, facing each other. Push the drives lightly into the SATA interface and then lock the
front panel.
Note
Be careful not to damage any components, and do not force the drives into the SATA interface to
hard. If they not easily slide into it and fit, make sure the drives have been installed correctly. The
top of the drives, where the label is located, should face each other.
Important
It is not possible to start with only one HDD and then adding a second HDD at a later point. In this
way you have to re-initializing the system which will affect a loss of all existing data!
EN 5/41
GL-35DSR Getting Started
1.7.2 Initializing the NAS System
In order to configure and access the network drive, the NAS system has to be initialized first. To do
so, use the Discover Tool program to locate the device, prepare the hard drives and set up the
system.
1. Make sure that at least one hard drive has been installed and the network drive is
connected to the local network.
2. Press and hold the reset button, turn on the power and let go of the reset button about 2
seconds later.
3. Wait for the green READY LED to start flashing and then start the Discover Tool from a
computer that is connected to the same local network.
4. It will automatically search for the network drive but if it doesn’t start by itself or didn’t find
the drive, click Refresh to start the search process again.
5. Once the device has been located, select it from the list and then click Initialize NAS
System to start the setup of the system.
EN 6/41
GL-35DSR Getting Started
6. Select the drive mode from the list. If you have installed only one HDD, select “Single Drive”,
or otherwise, for two HDDs select “Dual Drive”. Click OK to continue.
If you have installed two hard drives and selected the “Dual Drive” mode, you can now
select the RAID mode. Select “RAID 1” to create a mirror copy of all data on the second
drive or select “JBOD/BIG” to create one large volume and combine the capacity of both
drives. Click OK to continue.
RAID 1
Two drives show up as one volume but only 50% of the total capacity. RAID 1 creates an
exact copy (or mirror) of a set of data on the second drive. This is useful when reliability
and backup take precedence over storage capacity. Should one hard drive fail, it can be
replaced and the data rebuilt automatically.
RAID0
The drives show up as one large single volume, combining the capacities of all drives.
RAID0 is an array that is written sequentially across the drives. By itself, it does not provide
any performance or redundancy benefits. However, if one drive becomes damaged, the
whole array can become corrupted.
BIG
The drives show up as one large single volume, combining the capacities of all drives. By
itself, it does not provide any performance or redundancy benefits. It is ideal for drives with
different capacities, making use of the maximum storage capacity. However, if one drive
becomes damaged, the whole array can become corrupted.
EN 7/41
GL-35DSR Getting Started
7. Select the firmware you like to install. This should be a “..*.tar..” file and has to be uploaded
without decompressing the file first.
8. Double-check your settings and press OK to continue. If there is a mistake and you would
like to change some of the settings, press Cancel to abort and start again from step 3.
9. It will now prepare the hard drives, initialize the system and install the firmware. This
process will take several minutes. Make sure not to interrupt it in any way and wait until it is
finished completely.
10. Once the process is done, a message will pop up to confirm that it is finished. Click OK to
close the dialog and wait for the system to restart by itself. It will restart even if the dialog
has not yet been closed. Once the NAS is ready, the green READY LED will light up.
Note
Initializing the NAS system is only necessary the very first time, when new hard drives were
installed or when the drives have been formatted again. To change the settings of the network
drive or to upgrade the firmware after initializing the system, login to your network drive via web
browser and go to the “Preference” menu.
To initialize the NAS system again if the firmware has already been installed, first enter the flash
mode, before trying to initialize it. To enter the flash mode, press and hold the reset button when
the device is turned off. Turn on the power and release the reset button once the HDD 1 LED lights
up red (~ 2 seconds). After the system has started up, the green system LED will be flashing and it
will be possible to initialize the system again.
EN 8/41
GL-35DSR NAS Configuration
2 NAS Settings and User Interface
2.1 How to login
To configure your GL-35DSR LAN, open your web browser, enter the IP address or device name
of your GL-35DSR LAN and then use the web interface for further configuration. To locate the
network drive and find out its IP address, we recommend using the Discover Tool program.
Default Login
User name: admin
Password: 123456
2.1.1 Discover Tool
The Discover Tool program can be used to locate and access the network drive on your local
network.
1. Make sure that the network drive has already been initialized, that it is connected to the
same local network as your computer and the power is turned on.
2. Wait at least 15 seconds after turning on the network drive and then start the Discover Tool.
It will automatically search for the device but if it does not find it, click Refresh to start the
search again and make sure the program is not being blocked by any firewall.
3. Once the device has been located, select it from the list and double-click on it to open the
configuration page in your web browser. By default, the user name is “admin” and the
password is “123456”. For security reasons, we strongly recommend changing the
password for the “admin” account after the first login.
EN 9/41
GL-35DSR NAS Configuration
2.1.2 Web Browser & Device Name on a PC
Use the device name, which by default is “//gl-35dsr”, enter that name into the URL field of your
web browser and then access the web configuration interface of your GL-35DSR.
Note
This method of login only works on Windows and not on a Mac!
2.1.3 Safari Web Browser & Bonjour Bookmarks on a Mac
Start your Safari web browser, open the Bookmarks panel and select Bonjour. Locate and select
the “gl-35dsr-GIGA-LAN UI” link and double-click on it to open the login page of the network drive,
in order to access the web configuration interface of your GL-35DSR.
1
3
2
EN 10/41
GL-35DSR NAS Configuration
2.2 User Interface & Settings
2.2.1
Albums
Click Download to save the
selected files on your computer
Filter files and display them
according to media type
Option to change the View how
the media files are displayed
List of available Albums
Double-click any media file to
open it in the browser
The media files that are stored in an album can be viewed and displayed directly in the web
browser. Select your preferred View to browse your media files or download them to your computer.
Note
The use of Subfolders is currently not supported.
The more content is stored in one Album, the more time is needed to load the preview.
The albums are shared with all users by default, enabling access to all users who have an account
on this system, making it an easy way to quickly share your media files among your family and
friends.
Note
To use the Cooliris View at your PC, a browser plug-in has to be installed first. Please
see www.cooliris.com for more details and to download the plug-in.
EN 11/41
GL-35DSR NAS Configuration
2.2.2
Library
Toolbar
Public folder for all shared files
(e.g. SMB or UPnP-AV)
Private folder for all personal
files and documents
Albums directory
List of current Albums
The Media Library can be used to manage your media files on the NAS. Files can be uploaded,
downloaded, sorted, renamed and deleted via web browser. To select multiple files, Shift-Click or
Ctrl-Click on the files and then drag and drop them in the new location. By touching the pictures
with your mouse over any of the icons in the toolbar you can see a description of each function.
Albums
Files that are stored in an album can be viewed and downloaded directly in the web browser. The
albums are shared with all users by default. Enabling access to all users who have an account on
this system is an easy way to share your media.
Use the Albums window on the left hand side to create a new album, browse for your media files in
the Media Library and then simply drag and drop the files into your new album. When removing an
album, it will only delete the link to your media files but not actually remove them from the drive.
Private
All files stored inside the Private directory will only be accessible by the current user. Use this to
store your personal files and documents. If you ever need to share some files with other users,
simply drag and drop them to an album or copy them to the Public folder instead.
Public
The files stored in the Public directory can be accessed by all users. The media files can be
accessed from a DLNA or UPnP-AV player and documents can be shared via SMB (Samba) or
FTP connection. Any user mounting the device as a network drive will be able to view and modify
the files in this folder.
Note
To upload single or multiple files by dragging them from your computer and dropping them in the
Media Library, install Gears from Google. See http://gears.google.com for more details.
EN 12/41
GL-35DSR NAS Configuration
Important
For a large number of files or folders to be copied, it’s recommended to copy these files via SMB.
This way is a lot faster, than the use of GUI copy mode with Google Gears!
Please enter the IP address into the browser bar of you Internet Explorer (e.g. \\192.168.11.10) or
enter the name of the device (e.g. \\gl-35dsr).
For more information please see chapter 3.1.1
2.2.3
Preference
Double-click any of the icons
to modify the settings
Note
Only the system administrator (admin) is able to modify any of these settings. All other Users will
only be able to view the system information.
System Information
Displays important information
about the NAS system
Click to shutdown the system
Click to reboot the system
This menu displays important information about the NAS, such as IP address, firmware version,
date & time as well as the disk usage.
To shut down the system click Shutdown, to restart the system click Reboot.
EN 13/41
GL-35DSR NAS Configuration
Users
List of current users
Add new user with +
Remove selected user with -
Confirm
To add a new user, click +, fill out the user name (no special characters), enter the password twice
and then click 9. To remove an existing user, select the name from the list, click – and then
confirm the removal.
The admin account for the system administrator is created by default and cannot be deleted.
However, for security reasons, we recommend changing the default password as soon as possible.
Note
Only the system administrator (admin) is able to modify the NAS settings.
Firmware Upgrade
Click to update the firmware for
your NAS system
1.
Click Upload New Firmware.
2.
Select the firmware from your computer and upload it to the GL-35DSR.
Important
Never turn off your unit during the firmware update procedure. This may damage your device! If the
upgrade fails (e.g. power supply failure during firmware update), you may not be able to operate
your device anymore
Disk Management
EN 14/41
GL-35DSR NAS Configuration
Displays details about the
internal hard drives
Displays details about the
external USB drives
RAID Manager
RAID Settings
For data security select RAID 1 (mirror copy) mode, for performance select RAID 0 mode and to
combine different HDDs select BIG mode.
If one HDD is faulty (RAID 1 mode only), please turn off the NAS, replace the defective hard drive
and restart the system. It will automatically rebuild the RAID1 array. Rebuilding the RAID1 array
will take a while. The time of rebuilding depends on the capacity of your hard drives.
Important
Changing the RAID mode will erase all existing data!!! Make sure you have a backup of your data
before you change the RAID mode.
Note
Before disconnecting and shutting down an attached USB drive, it is recommended to use the Disk
Management tool and click Remove Disk for the corresponding device in order to safely eject it.
Power Management
Standby for internal HDDs
Standby for external USB drive
HDD Standby
Select a time from the drop down list or select None to disable the HDD standby function. If a time
has been set and the drive has been idle long enough, the system will power down the drive to
save energy and reduce heat.
EN 15/41
GL-35DSR NAS Configuration
System Log
Click on any of the tabs to see
the complete log file
•
•
•
•
•
•
•
System Bootup Message – Displays the system start up log from boot to system ready.
System Log – Displays the main log of the system.
WebServer Log – Displays the log of the web server.
Samba Log – Displays the SMB log of the Samba server.
Mt-daapd Log – Displays the iTunes log of the music server.
BTPD Log – Displays logs that are related to the BitTorrent application.
NTP Log – Displays the NTP log of the network time server.
Date and Time
Time zone
Internet time server
Date and time
Date and Time
If internet access is available, we recommend selecting the correct time zone from the list, enabling
the function “Synchronize with a NTP server” and clicking Submit to update and synchronize the
time. The time will also be synchronized again after every restart of the system.
Note
To use the time server, you need to enter a valid NTP server. If none of the pre-selected time
servers are working, turn off the NTP server and set the time manually. The GL-35DSR comes
equipped with a battery and a real-time clock, so even if the device is powered off, it will retain the
correct time.
EN 16/41
GL-35DSR NAS Configuration
Network
Device Name
LAN setting
DNS and Gateway
Device Name
This name is used to identify your device on the network. If you prefer a different name that is
easier to remember, change it and click Submit to save the new name. When selecting a new
hostname, make sure to use a unique name and not one that has already been used on the local
network. By default, the device name is set to GL-35DSR.
LAN Setting
We recommend using “Automatically DHCP”, in order for the network drive to automatically obtain
its IP address from the DHCP server. If required, you can also set it to a static IP address and fill
out all information manually. If you need assistance with these settings, please contact your
network administrator for help.
Note
After changing any of the settings, click Submit to save the new configuration.
FTP Service
Option to enable or disable the
FTP server
Advanced Settings
By default, the FTP server will run on port 21 but if this port is not available or blocked, it can be
changed to a different port number. To reduce the loading on the system and the bandwidth, FTP
clients can be limited according to your own preferences.
Note
For security reasons, it’s recommended to disable the Anonymous login.
EN 17/41
GL-35DSR NAS Configuration
iTunes Server
Option to enable or disable the
iTunes server
Advanced Settings
Option to run a scan manually
The iTunes server is enabled by default and will automatically stream all MP3 music that is stored
inside the /Public/Music folder with iTunes.
To add more songs, simply copy the new MP3 music files into the /Public/Music folder and wait for
the rescan interval or login via web browser and click Rescan to scan the folder immediately.
Note
The directory for the shared music files is set to /Public/Music and cannot be changed. Songs that
are not stored inside that directory will therefore not show up on iTunes.
2.2.4
Applications
Downloader
Enter URL of file to download
Click to start HTTP download
Toolbar
List and details of current files
To start downloading files, copy the URL (HTTP or FTP) to the file you like to get and paste it into
the address field of the Downloader. Click Download to start the process.
The Downloader can download 20 files at a time with an additional 30 files in the queue. Once the
files have been added to the queue, it can download the files by itself and the computer can be
turned off.
EN 18/41
GL-35DSR NAS Configuration
BitTorrent Service
BitTorrent Service Settings
Click to upload new Torrent
List and details of current
Torrent files
To start downloading files, download a torrent file from the internet and then upload it to the
network drive. Once the torrent file has been added, you can start downloading. The downloaded
files will be stored in the “BT” folder inside the Public directory.
The BitTorrent™ client can download 4 files at a time with a maximum of 40 files in the queue. The
download speed may not be as fast as a BitTorrent™ client on the computer but once the Torrent
has been added to the queue, it can download the files by itself and the computer can be turned off.
Note
Make sure the port for the BitTorrent™ client is not blocked by your router or its firewall. If
necessary, set up port forwarding, so that the traffic for that port (e.g. 6881) is forwarded to your
network drive.
Important
Sometimes it may happen, that you cannot add your selected Torrent files. In the case, please
rename the file and make sure you do not have any special character or space character inside.
(e.g. “driver_update_file.torrent” instead of “driver update file.torrent”)
EN 19/41
GL-35DSR NAS Configuration
2.2.5
Registration
Device registration for remote
access
Note
This function is currently not yet available!
2.2.6
About
Displays copyright information
and warranty disclaimer
EN 20/41
GL-35DSR Network Storage & Extra Features
3 Network Storage & Extra Features
3.1 File Access on a PC
3.1.1 Windows Explorer
Use Windows Explorer and type “\\” followed by the IP address or the device name gl-35dsr into
the address field and press the Enter key on your keyboard. It will then list all available folders on
your LAN disk. To create a permanent link to your network drive, see Mapping a Network Drive.
You can copy files to the network drive as if it were a folder on your local drive. Depending on the
bandwidth, you can also open and directly play the files. For video playback of high definition
content, we recommend transferring the data to your local drive or video player, first.
Note
When you have to access multiple folders with different passwords or have modified the settings
without a computer restart, go to Tools (Options) and disconnect the temporary network drive first,
before accessing the new folder.
3.1.2 Mapping a Network Drive
Mapping the network drive will allow you to create a permanent drive letter that will be present
even after restarting the computer. This permanent drive letter provides convenient access to your
network drive and can be used to store files within other applications.
Note
If you have problems when trying to access the shared folders, disconnect all network drives,
reboot your computer, restart your network drive (router, switch) and then try again.
1. Double-click on My Computer, go to the Tools menu and select “Map Network Drive…”.
EN 21/41
GL-35DSR Network Storage & Extra Features
2. Follow the setup wizard and fill in the path to your network drive. When entering the IP
address, also add the folder name of the share (e.g. \\192.168.11.11\public). It is
recommended to select the “reconnect at logon” option when you map the network drive,
otherwise you will have to map it again after a system restart.
3. Once the drive has been mapped, you are able to find and access it under My Computer.
This link will still be there even after restarting the computer.
Note
You can also map a network drive by using the Discover Tool program and by clicking on the “Map
Network Drive” icon.
3.1.3 Disconnecting a Network Drive
When you don’t need a mapped network drive any more, we recommend disconnecting it. It is also
necessary to disconnect a temporary network drive when you try to login with a new user name
and password but have not restarted the computer in between the different login.
1. Double-click on My Computer, go to Tools and select “Disconnect Network Drive…”.
EN 22/41
GL-35DSR Network Storage & Extra Features
2. Select any temporary or mapped network drives that you would like to remove and click OK
to disconnect them.
3.1.4 FTP
For FTP transfers, we recommend installing and using a separate FTP application, which can
either be a free utility or shareware program.
Note
Files cannot be opened directly via FTP, you will always have to transfer them to your computer
first, before reading or playing them.
1. Using Windows Explorer, type “ftp://” followed by the IP address of your network drive into
the address field. If the account is password protected, add the user name and password in
front of the IP address with a @ sign in between like this “ftp://test:[email protected]”.
2. After login, you can access the available folders and transfer your files.
EN 23/41
GL-35DSR Network Storage & Extra Features
3.2 File Access on a Mac
3.2.1 SMB
To mount and access the network drive, use the Connect to Server command.
1. Click on “Go” and select “Connect to Server”.
2. Type “smb://” followed by the IP address of your network drive and click on Connect.
3. Select Registered User and enter your user name and password.
4. Choose a folder from the list and click OK.
EN 24/41
GL-35DSR Network Storage & Extra Features
5. The mounted drive will be listed in your finder under Shared devices. There you can access
the network drive and transfer your files. When no longer needed, click on the eject button
to disconnect the drive.
3.2.2 FTP
For FTP transfers, we recommend installing and using a separate FTP application, which can
either be a free utility or shareware program. The FTP utility on the Mac will only be able to read
the data on the network drive but cannot upload any new data to it.
1. Click on “Go” and select “Connect to Server”.
2. Type “ftp://” followed by the IP address of your network drive and then click on Connect.
3. Enter the correct username and password. The FTP folder will then be listed in your finder
under Shared devices and you can download the files. When the FTP is no longer needed,
click on the eject button to disconnect the drive.
EN 25/41
GL-35DSR Network Storage & Extra Features
3.3 BitTorrent Download Manager
Used in conjunction with its built-in BitTorrent™ client, the NAS can be used to download files from
the Internet and have them saved directly to the hard drive.
3.3.1 Starting a Download
To start downloading files, download a torrent file from the internet and then upload it to the
network drive. Once the torrent file has been added, you can start downloading. The downloaded
files will be stored in the “BT” folder inside the Public directory.
1. Download and store the torrent file(s) on your computer.
2. Login to your network drive and go to the Applications menu. Under BitTorrent Service,
click Upload Torrent and locate the torrent file on your computer.
3. Click OK to confirm and close the confirmation window.
4. The file will be added to the download queue and the download starts automatically. You
can now turn off your computer if desired.
5. For further commands, select the file from the list and you will have the option to stop and
start the download as well as completely remove a file from the queue or see more details.
6. Once the download process has reached 100% and if the file is not removed from the
download queue, it will start seeding (uploading) the file to other users.
7. You can now go to the BT folder and copy your file into your desired folder. If you don’t
intend to share this file with other BitTorrent users, you can now remove it from the
download queue.
Note
Once the Torrent has been added to the queue, the GL-35DSR LAN can download the files by
itself and the computer can be turned off.
Important
Sometimes it may happen, that you cannot add your selected Torrent files. In the case, please
rename the file and make sure you do not have any special character or space character inside.
(e.g. “driver_update_file.torrent” instead of “driver update file.torrent”)
EN 26/41
GL-35DSR Network Storage & Extra Features
3.4 Printer Server
This network drive is equipped with a printer server. Connect your USB printer to the USB host port
on the back of your network drive to share it with other workstations on the same local network.
3.4.1 Installation on a PC
Printing via the shared network printer will be slower than when the printer is connected directly to
the USB port on the computer. After you press the Print button, please wait for the printer to
receive the data.
1. Connect your USB printer to the USB host port on the network drive and turn both units on.
2. Login to your network drive and go to the Applications menu to make sure the printer server
service has been enabled. We also recommend using a fixed IP address, in order to
prevent having to modify the printer setup whenever the IP changes.
3. On your PC, go to Start and select “Printers and Faxes”.
4. Go to File, select “Add Printer” to bring up the printer setup wizard and press “Next” to start.
5. Select “Local printer attached to this computer”, deselect “Automatically detect and install
my Plug and Play printer“ and press “Next”.
6. Select “Create a new port”, choose “Standard TCP/IP Port” from the list and click on “Next”.
EN 27/41
GL-35DSR Network Storage & Extra Features
7. Make sure the network drive and printer are both turned on and connected to the same
local network as your computer, then click on “Next”.
8. Enter the IP address of your network drive (the port name will be filled out automatically)
and then click on “Next”.
9. Select “Custom” and click on “Settings” to modify the configuration.
EN 28/41
GL-35DSR Network Storage & Extra Features
10. Select “RAW”, use the default port number “9100” and then click on OK to confirm it.
11. Click on Finish not complete the TCP/IP Wizard and close the dialog.
12. After clicking on “Next”, a pop-up window will appear asking for a driver. Select your printer
model from the list or browse for the corresponding driver on your local drive.
13. In the next few steps, you will be able to give the printer a name, set it as default printer,
add a description and print a test page. It is not necessary to share the printer with other
network users, because it can be installed on other computers in the same way as here.
14. Once you have completed the wizard set-up your printer should be properly installed and
ready to print.
Note
Not all USB printers are supported, e.g. multi function all-in-one printers and GDI/host-based
printers, therefore, your printer may not be compatible and printing might fail.
EN 29/41
GL-35DSR Network Storage & Extra Features
3.4.2 Installation on a Mac
Printing via the shared network printer will be slower than when the printer is connected directly to
the USB port on the computer. After you press the Print button, please wait for the printer to
receive the data.
1. Go to System Preferences and click on Print & Fax.
2. Click on the plus symbol to add a new printer.
3. Select the IP tab. For the Protocol, select “HP Jetdirect – Socket” and for the Address enter
the IP address of your network drive. The Name and Location are used to easily identify the
printer and do not have to be the same as the ones used in this example. For the last step,
select the corresponding printer driver and click on Add.
4. Done! Your printer has been set up and you are now ready to print.
Note
Not all USB printers are supported, e.g. multi function all-in-one printers and GDI/host-based
printers, therefore, your printer may not be compatible and printing might fail.
EN 30/41
GL-35DSR Network Storage & Extra Features
3.5 Media Server
The UPnP media server can be used to share your photos, music files and videos that are stored
on the network drive in the “Public” folder with a Xbox 360, a PlayStation 3 or any other DLNA
compliant UPnP-AV client that is connected to the same local network. Before you start, make sure
both devices are connected to the same network and both are turned on.
The UPnP-AV media server supports streaming of the following file formats:
• Pictures: JPG, PNG, BMP
• Music: MP3, WMA, WAV
• Video: MKV, AVI, MPEG, MPG, WMV, DAT, DivX, VOB, MOV, TS, MTS, M2TS, FLV
Note
Playback support for the various file formats also depends on the UPnP-AV client (e.g. PS3 or
Xbox 360). For more details, please refer to the documentation of your game console or digital
media adapter (DMA).
3.5.1
Xbox 360
1. On your NAS, make sure that the media files you would like to share are stored in the
Public folder on the network drive.
2. On your Xbox 360, go to My Xbox and select your preferred media library (e.g. Videos,
Music or Pictures), depending on what types of files you would like to play.
3. For the source, select your network drive. By default, the GL-35DSR network drive will
show up as Oxford_serv.
EN 31/41
GL-35DSR Network Storage & Extra Features
4. Once inside the Public folder, you can now access your pictures, music or videos,
depending on the media library you have selected on your game console.
5. Select and play the files you would like view or listen to and enjoy!
3.5.2
PlayStation 3
1. On your NAS, make sure that the media files you would like to share are stored in the
Public folder on the network drive.
2. On your PS3™, open the Settings menu, go to Network Settings, select Media Server
Connection and Enable it. This will allow the PS3 to automatically detect the media server
on the network drive.
3. When you turn on the PS3™, media servers on the same local network are automatically
detected and a shortcut will be displayed under Photo, Music and Video.
4. Select the network drive to access the Public folder with its shared files and playback your
photos, music or videos.
Note
For uninterrupted playback, we strongly suggest using a wired network connection for your game
console and not the wireless setup.
EN 32/41
GL-35DSR Network Storage & Extra Features
3.6 iTunes Server
When MP3 music files are stored in the “/Public/Music” folder, the files will automatically appear on
iTunes and music can be played directly from the network drive.
1. Store the MP3 music files that you would like to access from iTunes on the network drive in
the Public directory inside the “Music” folder.
2. If you have only just added your music files, wait for about 1 minute until the music files
have been added to the database of the NAS system.
3. Start iTunes, go to shared devices and select your network drive from the list. You can now
play back your music files directly in iTunes.
Note
If your music files do not appear, please see your iTunes Server scan interval or start a Rescan.
.
EN 33/41
GL-35DSR Network Storage & Extra Features
3.7 USB Copy
When a USB drive is connected to the GL-35DSR via USB, all files on the USB drive can be
copied to the internal hard drive of the network drive with a push of the BACKUP button.
1. Connect the USB drive to the front port of your GL-35DSR network drive. We recommend
using self-powered USB devices. In order for the network drive to mount the USB drive, the
file system has to be FAT32 (read/write). NTFS / EXT3 or other file formats are not
supported.
2. Press the BACKUP button for one second to copy all the files from the attached USB drive
to the Public folder on the network drive.
3. A new folder with the current date and time will automatically be created and all files from
the USB drive will be copied into this folder. When the backup is done, the USB drive will
be unmounted and you cannot access to the USB drive anymore.
4. The USB drive can now be removed and the data can be accessed on the network drive in
the Public directory.
Note
To safely unmount the USB drive without doing a backup, go to the Disk Management menu,
select the external USB drive and click Remove USB device in order to eject the drive.
EN 34/41
GL-35DSR Appendix
4 Appendix
4.1 Specifications
Internal Hard Drive(s)
• 3.5" SATA-I or SATA-II hard drives (1.5Gb/s or 3.0Gb/s)
• 80GB - 2TB
Interface/Ports
• 10/100/1000Base-TX Auto MDI/MDI-X
• 2x USB host ports for USB drives and printers
Supported USB devices
• USB hard drives (FAT32 only)
• USB printers (RAW protocol)
Supported UPnP clients
•
•
•
•
System Requirements
• PC: Windows XP/Vista/7
• Mac: OS 10.2 or above (Windows OS required to initialize
NAS for the first time)
• Network router or switch
Router/Firewall Requirements
•
•
•
•
Power (AC adapter)
• AC Input: 100-240V, 1.3A, 50-60Hz
• DC Output: +5V/4.2A, +12V/3A
Dimensions
17.0cm x 12.0cm x 8.0cm
Operating Temperature/Humidity
5°C ~ 40°C / 10%RH ~ 80%RH non condensing
Storage Temperature/Humidity
-20°C ~ 70°C / 5%RH ~ 90%RH non condensing
Xbox 360
PlayStation 3
iTunes
DLNA compliant and certified UPnP clients
UPnP
Port 80 for HTTP control panel
Port 21 for FTP file server
Port 6881 for BitTorrent downloads
Note
Design and specifications are subject to change without prior notice and will depend on the current
firmware release.
This manual is based on firmware: FT_2.0.0_20100324.
The diagrams and images contained in this document may not fully represent the actual product
and are there for illustration purposes only.
4.2 Trademarks
• MS-DOS, Microsoft, Windows XP/Vista/7 are trademarks of Microsoft Corporation.
• Apple Macintosh and Mac are trademarks of Apple Computer.
• All other third party brands and names are the property of their respective owners.
EN 35/41
GL-35DSR Appendix
4.3 Technical Terms
Description for terms and abbreviations used in this manual.
BitTorrent™
BitTorrent is the name of a peer-to-peer (P2P) file distribution client application and also of its
related file sharing protocol, both of which were created by programmer Bram Cohen. BitTorrent is
designed to distribute large amounts of data widely without incurring the corresponding
consumption in costly server and bandwidth resources. For more details, please refer
to www.bittorrent.com.
Torrent™
A torrent can mean either a .torrent metadata file or all files described by it, depending on context.
The torrent file contains metadata about all the files it makes downloadable, including their names
and sizes and checksums of all pieces in the torrent. It also contains the address of a tracker that
coordinates communication between the peers in the swarm.
FAT32
File Allocation Table (FAT) is a file system developed by Microsoft for MS-DOS. The FAT file
system is considered relatively uncomplicated, and is consequently supported by virtually all
existing operating systems for personal computers.
LAN
A Local Area Network (LAN) is a computer network covering a small local area, like a home, office,
or small group of buildings such as a home, office, or college.
FTP
FTP or file transfer protocol is a commonly used protocol for exchanging files over any network
that supports the TCP/IP protocol (such as the Internet or an intranet). There are two computers
involved in an FTP transfer: a server (GL-35DSR LAN) and a client (user’s computer).
SMB
Server Message Block (SMB) is a network application-level protocol mainly applied to share files,
printers, serial ports, and miscellaneous communications between nodes on a network.
4.4 FAQ
Q: FTP access on my Mac doesn’t work properly!
A: The FTP utility on the Mac will be able to read the data on the network storage but you can not
write any new data to the drive. To upload files, you will need to install a separate FTP application.
Q: I want to restart or turn off the server but it doesn’t work!
A: Make sure that there are no current file transfers in process or any other disk activities. Close
any applications that might still be accessing the GL-35DSR and then try again. After turning off
the power or pressing the power button, it will take a few seconds before the device starts to power
down.
EN 36/41
GL-35DSR Appendix
4.5 Precautions
4.5.1 Power on/off precautions
It is recommended to switch the unit off when not in use. When re-locating the device or when not
in use for an extended period of time, we strongly recommend unplugging the unit.
4.5.2 Location and placing precautions
Avoid positioning your device in the following places:
•
•
•
•
Locations with direct sunlight, next to radiators, other sources of heat.
Locations with very high temperatures (more than 38° C) or humidity (more than 90%).
Very dusty or sandy locations.
Locations subject to vibration, shock, or with a sloping base.
4.5.3 Electricity and power plug
Careful attention must be paid to the following points in order to prevent damage, fire, and/or injury:
• Make sure the power switch is in the OFF position when you connect the power adapter and
always connect the power adapter to your device first, before you plug it into the wall socket.
• When removing the power cable from the socket, pull on the plug fixture and never on the cord.
• Do not connect and remove the power cable with wet hands.
• Never try to repair the power cable yourself or to modify it in any way.
• If the unit is dropped or becomes damaged in any other way, unplug the power cable.
4.5.4 Cables
Use only the cables supplied or in order to avoid the risk of malfunction, electric shock, and/or
possible interference to the device.
4.6 Important Notices
4.6.1 About this Manual
This manual was written for the FANTEC GL-35DSR network drive with the firmware version
FT_2.0.0_20100324. Images and descriptions may slightly vary between this document and the
actual product you have, and the available functions will depend on the firmware version.
4.6.2 Intellectual Property
The FANTEC GL-35DSR network drive is not designed or intended to, and may not be used to
violate any copyrights or other IP (Intellectual Property) rights. Each user of the network drive may
only use it in connection with materials legally owned by or licensed to the user and only extend
such ownership or license rights that will permit such use.
4.6.3 GPL Statement
This product contains free software which is licensed under the GNU General Public License.
After you purchase this product, you may procure, modify or distribute the source code of the
GPL/LGPL software that is used in this product.
To obtain a copy of our open source software, please use the provided CD or contact our support
center and we will provide you with a CD-ROM of the source code that is used, charging only the
actual expense involved. Otherwise please download the source code from
http://www.fantec.de/html/de/1/docid/__gpl.html/content.html. However, please be noted that we
cannot provide guarantee with the source code, and there is also no technical support for the
source code from us.
EN 37/41
GL-35DSR Appendix
TECHNICAL INFORMATION
License information for the software used in the unit.
This product contains Free Software which is licensed under the GNU General Public License.
After you purchase this product, you may procure, modify or distribute the source code of the
GPL/LGPL software that is used in this product.
If you contact our Support Center, we will provide you with a CD-ROM of the source code that is
used, charging only the actual expensed involved. However, please be noted that we can not
provide guarantee with the source code, and there is also no technical support for the source code
from us.
GNU GENERAL PUBLIC LICENSE
Version 2, June 1991
Copyright (C) 1989, 1991 Free Software Foundation, Inc.
51 Franklin Street, Fifth Floor, Boston, MA 02110-1301, USA
Everyone is permitted to copy and distribute verbatim copies
of this license document, but changing it is not allowed.
Preamble
The licenses for most software are designed to take away your freedom to share and change it. By
contrast, the GNU General Public License is intended to guarantee your freedom to share and
change free software--to make sure the software is free for all its users. This General Public
License applies to most of the Free Software Foundation's software and to any other program
whose authors commit to using it. (Some other Free Software Foundation software is covered by
the GNU Lesser General Public License instead.) You can apply it to your programs, too.
When we speak of free software, we are referring to freedom, not price. Our General Public
Licenses are designed to make sure that you have the freedom to distribute copies of free software
(and charge for this service if you wish), that you receive source code or can get it if you want it,
that you can change the software or use pieces of it in new free programs; and that you know you
can do these things.
To protect your rights, we need to make restrictions that forbid anyone to deny you these rights or
to ask you to surrender the rights. These restrictions translate to certain responsibilities for you if
you distribute copies of the software, or if you modify it.
For example, if you distribute copies of such a program, whether gratis or for a fee, you must give
the recipients all the rights that you have. You must make sure that they, too, receive or can get
the source code. And you must show them these terms so they know their rights.
We protect your rights with two steps: (1) copyright the software, and (2) offer you this license
which gives you legal permission to copy, distribute and/or modify the software.
Also, for each author's protection and ours, we want to make certain that everyone understands
that there is no warranty for this free software. If the software is modified by someone else and
passed on, we want its recipients to know that what they have is not the original, so that any
problems introduced by others will not reflect on the original authors' reputations.
Finally, any free program is threatened constantly by software patents. We wish to avoid the
danger that redistributors of a free program will individually obtain patent licenses, in effect making
the program proprietary. To prevent this, we have made it clear that any patent must be licensed
for everyone's free use or not licensed at all.
The precise terms and conditions for copying, distribution and modification follow.
TERMS AND CONDITIONS FOR COPYING, DISTRIBUTION AND MODIFICATION
0. This License applies to any program or other work which contains a notice placed by the
copyright holder saying it may be distributed under the terms of this General Public License. The
EN 38/41
GL-35DSR Appendix
"Program", below, refers to any such program or work, and a "work based on the Program" means
either the Program or any derivative work under copyright law: that is to say, a work containing the
Program or a portion of it, either verbatim or with modifications and/or translated into another
language. (Hereinafter, translation is included without limitation in the term "modification".) Each
licensee is addressed as "you".
Activities other than copying, distribution and modification are not covered by this License; they are
outside its scope. The act of running the Program is not restricted, and the output from the
Program is covered only if its contents constitute a work based on the Program (independent of
having been made by running the Program). Whether that is true depends on what the Program
does.
1. You may copy and distribute verbatim copies of the Program's source code as you receive it, in
any medium, provided that you conspicuously and appropriately publish on each copy an
appropriate copyright notice and disclaimer of warranty; keep intact all the notices that refer to this
License and to the absence of any warranty; and give any other recipients of the Program a copy
of this License along with the Program.
You may charge a fee for the physical act of transferring a copy, and you may at your option offer
warranty protection in exchange for a fee.
2. You may modify your copy or copies of the Program or any portion of it, thus forming a work
based on the Program, and copy and distribute such modifications or work under the terms of
Section 1 above, provided that you also meet all of these conditions:
a) You must cause the modified files to carry prominent notices stating that you changed the files
and the date of any change.
b) You must cause any work that you distribute or publish, that in whole or in part contains or is
derived from the Program or any part thereof, to be licensed as a whole at no charge to all third
parties under the terms of this License.
c) If the modified program normally reads commands interactively when run, you must cause it,
when started running for such interactive use in the most ordinary way, to print or display an
announcement including an appropriate copyright notice and a notice that there is no warranty (or
else, saying that you provide a warranty) and that users may redistribute the program under these
conditions, and telling the user how to view a copy of this License. (Exception: if the Program itself
is interactive but does not normally print such an announcement, your work based on the Program
is not required to print an announcement.)
These requirements apply to the modified work as a whole. If identifiable sections of that work are
not derived from the Program, and can be reasonably considered independent and separate works
in themselves, then this License, and its terms, do not apply to those sections when you distribute
them as separate works. But when you distribute the same sections as part of a whole which is a
work based on the Program, the distribution of the whole must be on the terms of this License,
whose permissions for other licensees extend to the entire whole, and thus to each and every part
regardless of who wrote it.
Thus, it is not the intent of this section to claim rights or contest your rights to work written entirely
by you; rather, the intent is to exercise the right to control the distribution of derivative or collective
works based on the Program.
In addition, mere aggregation of another work not based on the Program with the Program (or with
a work based on the Program) on a volume of a storage or distribution medium does not bring the
other work under the scope of this License.
3. You may copy and distribute the Program (or a work based on it, under Section 2) in object code
or executable form under the terms of Sections 1 and 2 above provided that you also do one of the
following:
a) Accompany it with the complete corresponding machine-readable source code, which must be
distributed under the terms of Sections 1 and 2 above on a medium customarily used for software
interchange; or,
b) Accompany it with a written offer, valid for at least three years, to give any third party, for a
charge no more than your cost of physically performing source distribution, a complete machinereadable copy of the corresponding source code, to be distributed under the terms of Sections 1
and 2 above on a medium customarily used for software interchange; or,
EN 39/41
GL-35DSR Appendix
c) Accompany it with the information you received as to the offer to distribute corresponding source
code. (This alternative is allowed only for noncommercial distribution and only if you received the
program in object code or executable form with such an offer, in accord with Subsection b above.)
The source code for a work means the preferred form of the work for making modifications to it.
For an executable work, complete source code means all the source code for all modules it
contains, plus any associated interface definition files, plus the scripts used to control compilation
and installation of the executable. However, as a special exception, the source code distributed
need not include anything that is normally distributed (in either source or binary form) with the
major components (compiler, kernel, and so on) of the operating system on which the executable
runs, unless that component itself accompanies the executable.
If distribution of executable or object code is made by offering access to copy from a designated
place, then offering equivalent access to copy the source code from the same place counts as
distribution of the source code, even though third parties are not compelled to copy the source
along with the object code.
4. You may not copy, modify, sublicense, or distribute the Program except as expressly provided
under this License. Any attempt otherwise to copy, modify, sublicense or distribute the Program is
void, and will automatically terminate your rights under this License. However, parties who have
received copies, or rights, from you under this License will not have their licenses terminated so
long as such parties remain in full compliance.
5. You are not required to accept this License, since you have not signed it. However, nothing else
grants you permission to modify or distribute the Program or its derivative works. These actions
are prohibited by law if you do not accept this License. Therefore, by modifying or distributing the
Program (or any work based on the Program), you indicate your acceptance of this License to do
so, and all its terms and conditions for copying, distributing or modifying the Program or works
based on it.
6. Each time you redistribute the Program (or any work based on the Program), the recipient
automatically receives a license from the original licensor to copy, distribute or modify the Program
subject to these terms and conditions. You may not impose any further restrictions on the
recipients' exercise of the rights granted herein. You are not responsible for enforcing compliance
by third parties to this License.
7. If, as a consequence of a court judgment or allegation of patent infringement or for any other
reason (not limited to patent issues), conditions are imposed on you (whether by court order,
agreement or otherwise) that contradict the conditions of this License, they do not excuse you from
the conditions of this License. If you cannot distribute so as to satisfy simultaneously your
obligations under this License and any other pertinent obligations, then as a consequence you may
not distribute the Program at all. For example, if a patent license would not permit royalty-free
redistribution of the Program by all those who receive copies directly or indirectly through you, then
the only way you could satisfy both it and this License would be to refrain entirely from distribution
of the Program.
If any portion of this section is held invalid or unenforceable under any particular circumstance, the
balance of the section is intended to apply and the section as a whole is intended to apply in other
circumstances.
It is not the purpose of this section to induce you to infringe any patents or other property right
claims or to contest validity of any such claims; this section has the sole purpose of protecting the
integrity of the free software distribution system, which is implemented by public license practices.
Many people have made generous contributions to the wide range of software distributed through
that system in reliance on consistent application of that system; it is up to the author/donor to
decide if he or she is willing to distribute software through any other system and a licensee cannot
impose that choice.
This section is intended to make thoroughly clear what is believed to be a consequence of the rest
of this License.
8. If the distribution and/or use of the Program is restricted in certain countries either by patents or
by copyrighted interfaces, the original copyright holder who places the Program under this License
may add an explicit geographical distribution limitation excluding those countries, so that
EN 40/41
GL-35DSR Appendix
distribution is permitted only in or among countries not thus excluded. In such case, this License
incorporates the limitation as if written in the body of this License.
9. The Free Software Foundation may publish revised and/or new versions of the General Public
License from time to time. Such new versions will be similar in spirit to the present version, but
may differ in detail to address new problems or concerns.
Each version is given a distinguishing version number. If the Program specifies a version number
of this License which applies to it and "any later version", you have the option of following the
terms and conditions either of that version or of any later version published by the Free Software
Foundation. If the Program does not specify a version number of this License, you may choose
any version ever published by the Free Software Foundation.
10. If you wish to incorporate parts of the Program into other free programs whose distribution
conditions are different, write to the author to ask for permission. For software which is copyrighted
by the Free Software Foundation, write to the Free Software Foundation; we sometimes make
exceptions for this. Our decision will be guided by the two goals of preserving the free status of all
derivatives of our free software and of promoting the sharing and reuse of software generally.
NO WARRANTY
11. BECAUSE THE PROGRAM IS LICENSED FREE OF CHARGE, THERE IS NO WARRANTY
FOR THE PROGRAM, TO THE EXTENT PERMITTED BY APPLICABLE LAW. EXCEPT WHEN
OTHERWISE STATED IN WRITING THE COPYRIGHT HOLDERS AND/OR OTHER PARTIES
PROVIDE THE PROGRAM "AS IS" WITHOUT WARRANTY OF ANY KIND, EITHER
EXPRESSED OR IMPLIED, INCLUDING, BUT NOT LIMITED TO, THE IMPLIED WARRANTIES
OF MERCHANTABILITY AND FITNESS FOR A PARTICULAR PURPOSE. THE ENTIRE RISK
AS TO THE QUALITY AND PERFORMANCE OF THE PROGRAM IS WITH YOU. SHOULD THE
PROGRAM PROVE DEFECTIVE, YOU ASSUME THE COST OF ALL NECESSARY SERVICING,
REPAIR OR CORRECTION.
12. IN NO EVENT UNLESS REQUIRED BY APPLICABLE LAW OR AGREED TO IN WRITING
WILL ANY COPYRIGHT HOLDER, OR ANY OTHER PARTY WHO MAY MODIFY AND/OR
REDISTRIBUTE THE PROGRAM AS PERMITTED ABOVE, BE LIABLE TO YOU FOR
DAMAGES, INCLUDING ANY GENERAL, SPECIAL, INCIDENTAL OR CONSEQUENTIAL
DAMAGES ARISING OUT OF THE USE OR INABILITY TO USE THE PROGRAM (INCLUDING
BUT NOT LIMITED TO LOSS OF DATA OR DATA BEING RENDERED INACCURATE OR
LOSSES SUSTAINED BY YOU OR THIRD PARTIES OR A FAILURE OF THE PROGRAM TO
OPERATE WITH ANY OTHER PROGRAMS), EVEN IF SUCH HOLDER OR OTHER PARTY HAS
BEEN ADVISED OF THE POSSIBILITY OF SUCH DAMAGES.
© Copyright 2010 by FANTEC, Inc. All Rights Reserved
The information contained in this manual is believed to be accurate and reliable. FANTEC assumes no responsibility for
any errors contained in this manual. FANTEC reserves the right to make changes in the specifications and/or design of
this product without prior notice. The diagrams contained in this manual may also not fully represent the product that you
are using and are there for illustration purposes only. FANTEC assumes no responsibility for any differences between
the product mentioned in this manual and the product you may have.
EN 41/41