1
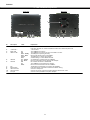
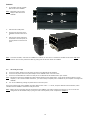
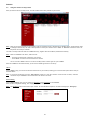
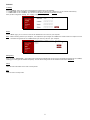
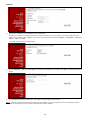
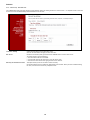
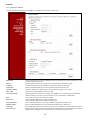
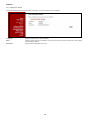
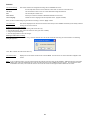
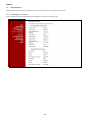
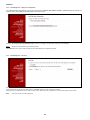
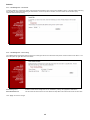
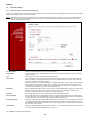
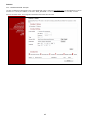
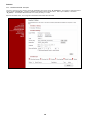
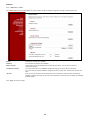
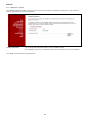
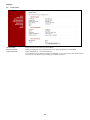
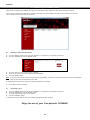
ENGLISH
Conceptronic CH3MNAS
User Manual
Congratulations on the purchase of your
Conceptronic 2-Bay Media Network Hard disk.
This User Manual gives you a step-by-step explanation of how to install and use the Conceptronic 2-Bay Media Network Hard disk.
When you need more information or support for your product, we advise you to visit our Service & Support website at
www.conceptronic.net/support and select one of the following options:
• FAQ
• Downloads
• Contact
: Frequently Asked Questions database
: Manuals, Drivers, Firmware and more downloads
: Contact Conceptronic Support
For general information about Conceptronic products visit the Conceptronic website at www.conceptronic.net.
Contents
5.5. Disk Management
5.5.1. Disk Management - Disk Status
5.5.2. Disk Management - Hard Drive Configuration
5.5.3. Disk Management - Scan Disk
5.5.4. Disk Management - Format Disk
5.5.5. Disk Management - Power Saving
5.6. Download / Backup
5.6.1. Download / Backup - FTP/HTTP Download/Backup
5.6.2. Scheduled download – Example 1
5.6.3. Scheduled download – Example 2
5.7. Maintenance
5.7.1. Maintenance – Password
5.7.2. Maintenance – System
5.7.3. Maintenance – Firmware
5.7.4. Maintenance – E-mail Alerts
5.8. System Status
5.9. Help
5.10. Logout
1. Package contents
2. The CH3MNAS explained
3. Hardware installation
3.1. HDD installation
3.2. Get ready for usage
4. Grab'n'Go Easy Finder
4.1. Installing the Grab'n'Go Easy Finder
4.2. Using the Grab'n'Go Easy Finder
5. Web-based configuration
5.1. Accessing the CH3MNAS web-based configuration
5.2. Initial HDD configuration
5.3. Basic Setup
5.3.1. Basic Setup – Wizard
5.3.2. Basic Setup – Date and Time
5.3.3. Basic Setup – Network
5.3.4. Basic Setup – Device
5.4. Advanced Setup
5.4.1. Advanced Setup – Groups
5.4.2. Advanced Setup – Users
5.4.3. Advanced Setup – Shared Folders
5.4.4. Advanced Setup – FTP Server
5.4.5. Advanced Setup – Media Server
5.4.6. Advanced Setup – iTunes Server
6. Connecting to CH3MNAS shares
6.1. Mounting a share to a drive letter
6.2. Unmounting a share
1. Package contents
The following items are present in the package of the Conceptronic 2-Bay Media Network Hard disk:
•
•
•
•
•
•
Conceptronic CH3MNAS
Power Adapter for CH3MNAS (5v & 12v, 1.5A)
LAN cable 1.8m
8x HDD screw
Multi Language Quick Installation Guide
Product CD-ROM
1
ENGLISH
2. The CH3MNAS explained
Back view
Front view
7
1
Nr
Description
1.
Power button
2.
3.
4.
< Reserved >
Power LED
HDD1/2 LED
5.
USB LED
6.
LAN LED
7.
8.
9.
10.
11.
Fan
Reset button
USB connection
LAN connection
DC Input
2
3 4 4 5 6
State
On
Off
Blue - Steady
Blue – Blink
Green
Red
On – Steady
On – Blink
Off
On
Blink
8
9
10
11
Explanation
Turn on or off the CH3MNAS.
Press once to power on. Press and hold the button for 5 seconds to power off.
< No function >
The CH3MNAS is turned on.
The CH3MNAS is turned off, or there is no HDD in the slot.
The HDD(s) are operating normally.
Data is read/written from/to the HDD(s).
The HDD(s) are in power saving mode.
A HDD is failing or a new HDD is installed.
An USB device is connected to the CH3MNAS.
Data is transmitted/received through the USB port.
No network connection is established.
The CH3MNAS is connected to the network.
Data is send/received to/from the CH3MNAS.
Temperature controlled fan for cooling the CH3MNAS.
Press and hold for 5 seconds to restore the default setting.
Connect a USB printer.
Connect the server to the local network through the Ethernet cable.
Connect to the provided AC/DC power adapter.
2
ENGLISH
3. Hardware installation
3.1
HDD installation
A.
Slide the lock switch (located on
the bottom of the front panel) to
the right position to unlock the
front panel.
B.
Slide the front panel up and pull
it off the CH3MNAS to access the
HDD bays.
C.
Insert 1 or 2 SATA 3.5” hard disk
drives into the available drive
bays until they are firmly
connected to the SATA slot on
the server.
Note: The upper HDD bay is the primary HDD bay, the bottom HDD bay is the secondary HDD bay.
If you want to install only 1 HDD, use the upper HDD bay.
The hard disk in the upper HDD bay is initialized as Volume_1 (/mnt/HD_a2).
The hard disk in the lower HDD bay is initialized as Volume_2 (/mnt/HD_b2).
You can secure the HDD’s by fastening
them to the CH3MNAS with the
included HDD screws.
D.
Slide the 2 side panels to the
front of the CH3MNAS.
3
ENGLISH
E.
Fix the HDD’s with the included
HDD screws to the CH3MNAS.
Note: Remember to fix the hard
disk(s) on both sides of the
CH3MNAS.
F.
Slide back the 2 side panels.
G.
Put the front panel back on the
CH3MNAS and slide it down to fix
it.
H.
Slide the lock switch (located on
the bottom of the front panel) to
the left position to lock the front
panel.
Note: To remove the HDD’s, make sure the CH3MNAS is turned off, the front cover is removed and the HDD screws fixed in step E are
removed. You can easily remove the HDD’s by pulling them at the front side of the CH3MNAS.
3.2
A.
B.
C.
Get ready for usage
Connect the power adapter to the DC power connector at the backside of the CH3MNAS.
Connect the AC power cable to the power adapter of the CH3MNAS and to a free wall outlet.
Connect the included Ethernet cable to the LAN port on the backside of the CH3MNAS and to your network.
Note: We advise to connect the CH3MNAS to a DHCP enabled network for easy configuration. If you connect the device directly to your
computer, or to a network without DHCP server, you need to setup a temporary static IP address for your computer to configure the
CH3MNAS.
D.
Turn on the CH3MNAS by pressing the power button on the front panel.
During the system startup of the CH3MNAS, the power LED will blink. After +/- 1 minute, the power LED will become solid blue, which
indicates that the CH3MNAS is started and ready to be used.
Note: Before you can fully benefit from all the features of the CH3MNAS, you need to configure the device first. You can access the
configuration of the CH3MNAS easily by using the Grab’n’Go Easy Finder, which is explained in chapter 4.
4
ENGLISH
4. Grab’n’Go Easy Finder
The CH3MNAS can be accessed and managed through the Grab’n’Go Easy Finder, which can be installed on your Windows computer with the
included CD-ROM.
4.1
Installing the Grab’n’Go Easy Finder
A.
Insert the Product CD-ROM in your CD-ROM drive. The Autorun Menu should appear automatically.
If the Menu does not appear, use Windows Explorer to navigate to the CD-ROM and execute “Autorun.exe”.
B.
C.
D.
Select the option “Install Grab’n’Go Easy Finder” in the Menu.
The Setup Wizard will appear. Click “Next” to continue.
You can change the destination folder on your hard disk by clicking the “Browse” button, or keep the default location. Click “Next” to
continue.
You can change the Start Menu folder by clicking the “Browse” button, or keep the default location. Click “Next” to continue.
E.
Note: If you do not want to add a Start Menu folder, check the option “Don’t create a Start Menu folder” before you click the “Next”
button.
F.
G.
H.
The Setup Wizard allows you to create a desktop and Quick Launch icon. Select which icon(s) you want to create by checking the
options. Click “Next” to continue.
The Setup Wizard is now ready to install the software. Click “Install” to start the installation.
When the installation is ready, click “Finish” to close the Setup Wizard.
Note: The Setup Wizard will automatically start the Grab’n’Go Easy Finder after the installation. If you do not want to start the Grab’n’Go
Easy Finder, uncheck the option “Launch Grab’n’Go Easy Finder” before you click the “Finish” button.
The Grab’n’Go Easy Finder is now installed on your computer. You can start the Grab’n’Go Easy Finder by using the shortcut in the Start
Menu, the shortcut on your desktop or the icon in the Quick Launch bar if you selected those options during installation.
5
ENGLISH
4.2
Using the Grab’n’Go Easy Finder
When you start the Grab’n’Go Easy Finder, the main window of the utility is shown on your screen:
Note: When you are using a firewall on your computer (like the standard firewall in Windows XP and Windows Vista), the firewall will show
a message to allow or deny the Grab’n’Go Easy Finder to access your network. Select “Allow” or “Unblock” to allow the Grab’n’Go
Easy Finder to access your network.
The Grab’n’Go Easy Finder will show the CH3MNAS device(s), together with the IP Address, Netmask and Gateway.
Note: When the CH3MNAS is not shown, make sure that:
- The Grab’n’Go Easy Finder is allowed in your firewall.
- The CH3MNAS is turned on and connected to the network.
You can click the “Search” button in the Grab’n’Go Easy Finder to search again for your CH3MNAS.
When the CH3MNAS is found and selected, you can use the following functions in the utility:
Search
At the “Search” page, you can search and select NAS devices in your network, allowing you to use the other options of the utility as
described below.
Note: If no servers are detected, click the “Search Device” button to re-scan your network. If there are still no results, check the
connection of your CH3MNAS on the network and if the device is turned on.
Device Setting
At the “Device Setting” page, you can change the Hostname and the Workgroup of the CH3MNAS.
When you have changed the settings, click “Apply” to apply the changes.
Note: The Workgroup refers to the name of your network. For most Windows computers, the default workgroup is “Workgroup”.
6
ENGLISH
IP Setting
At the “IP Setting” page, you can view and change the IP configuration of the CH3MNAS.
• If “DCHP Client” is set to “Enable”, the CH3MNAS will obtain an IP address from a DHCP server in your network automatically.
• If “DHCP Client” is set to “Disable”, you can enter the IP Address, Netmask and Gateway manually.
When you have changed the settings, click “Apply” to apply the changes.
Mount
At the “Mount” page, you can connect a share of the CH3MNAS to a drive letter on your computer.
Note: Before mounting shares on your computer, it is required that you configure the CH3MNAS first. Please continue to chapter 5 for the
web-based configuration of the CH3MNAS before you mount any shares on your computer!
Management
When you select “Management”, your browser will be started and automatically connects to the web-based configuration of the CH3MNAS,
allowing you to configure the CH3MNAS completely. The web-based configuration of the CH3MNAS is described in chapter 5.
About
Show the about information of the Grab’n’Go Easy Finder.
Exit
Close the Grab’n’Go Easy Finder.
7
ENGLISH
5. Web-based configuration
Some basic settings of the CH3MNAS can be configured through the Grab’n’Go Easy Finder, as described in chapter 5 of this manual. The
complete configuration of the CH3MNAS can be done through the web-based configuration of the CH3MNAS.
5.1
Accessing the CH3MNAS web-based configuration
You can enter the web-based configuration in 2 ways:
A.
B.
Select the CH3MNAS in the Grab’n’Go Easy Finder and click the “Management” button.
Start your web browser (like: Internet Explorer, Firefox, Safari or Chrome) and enter the IP address or hostname of the CH3MNAS in the
address bar.
(By default: http://192.168.0.25/ or http://CH3MNAS/ )
Note: If the CH3MNAS is connected to a DHCP enabled network, the CH3MNAS will automatically obtain an IP address from the DHCP
server in your network. In that case, it is advised to use the Grab’n’Go Easy Finder described in step A to connect to the
CH3MNAS.
The Login page of the CH3MNAS will be shown.
[ CH3MNAS - Login page ]
Enter the username and password and click the “Login” button to enter the web configuration of the CH3MNAS. (Only the administration
user “admin” is allowed to change or modify the configuration settings.)
Note:
5.2
The default login is: admin (no password is required).
Initial HDD configuration
When you login to the web-based configuration of the CH3MNAS for the first time, you need to choose a HDD configuration and format the
HDD’s. There are 4 available HDD configuration options:
•
•
•
•
Standard
JBOD
RAID 0
RAID 1
:
:
:
:
Each drive is an unique volume.
Combines both drives in a linear fashion to create 1 volume.
Provides data striping (Maximum performance).
Provides data mirroring over both disks (Maximum backup security).
[ HDD configuration – Select RAID type ]
A.
B.
Select the HDD configuration that you want to use and click “Next“ to proceed.
A message to confirm the re-format of the HDD’s will be shown. Click “OK” to proceed.
8
ENGLISH
[ HDD configuration – Select file system ]
C.
Select the file system for your HDD configuration. You can choose between:
• EXT2
: Allows the best performance on the CH3MNAS
• EXT3
: Allows the best stability of the CH3MNAS
Click “Next” to proceed.
Depending on the chosen HDD configuration at step A, the steps below are valid for your configuration.
• If you have selected “RAID 0” or “RAID 1”, proceed to step D of this chapter.
• If you have selected “Standard” or “JBOD”, the format of the HDD configuration is initialized when you have clicked “Next” at step C of
this chapter. You can proceed to step E of this chapter.
[ HDD configuration – RAID 0 volume ]
[ HDD configuration – RAID 1 volume ]
When “RAID 0” or “RAID 1” is selected as HDD configuration, the CH3MNAS will ask for the desired capacity of the RAID volume. The
maximum capacity for the RAID volume is shown in the top of the window.
D.
Enter the desired capacity for the RAID volume. The remaining space will be used for a JBOD volume. Click “Next” to proceed.
[ HDD configuration – Formatting ]
The HDD configuration is being created and the volumes will be formatted according to the entered configuration in the previous steps.
Note: The format of the Harddisk can take a while, depending on the chosen HDD configuration and the capacity of the Harddisk. Do not
turn off or unplug the device during format!
When the creation and format of the HDD configuration is complete, you will see a summary of the created HDD configuration.
[ HDD configuration – Format complete ]
E.
F.
The CH3MNAS must be restarted in order to use the created HDD configuration. Click “Restart” to proceed.
The web-based configuration will inform you on the waiting time before the CH3MNAS is available again after the restart. Click “OK” to
restart the CH3MNAS.
9
ENGLISH
During the restart, the web-based configuration will show a count-down timer to indicate when the CH3MNAS will be available again.
[ CH3MNAS - Restarting ]
When the restart of the CH3MNAS is complete, the login page will be shown, allowing you to login and continue the configuration of the
CH3MNAS. When you login to the web-based configuration of the CH3MNAS after configuring the hard disk(s), the main menu of the CH3MNAS
is shown on your screen.
Note: When the hard disk(s) in the CH3MNAS are formatted, the CH3MNAS automatically creates a share for each volume with full access
for all users in your network.
To limit the access to your CH3MNAS storage, you need to setup user accounts and change the access permissions on the shares. See
chapter 5.4 (Advanced Setup) for more information about “Users”, “Groups” and “Network Access”.
Note: Do not remove the hard disk(s) from the CH3MNAS when the device is in use! This can cause data-loss or HDD corruption!
10
ENGLISH
5.3
Basic Setup
Click the on the “Basic Setup” menu directory to view the configuration menus for setup Wizard, Date and Time, Network configuration
and Device name.
5.3.1 Basic Setup - Wizard
The CH3MNAS provides a setup wizard that allows you to quickly configure some of the basic settings, in order to quickly use the device.
A.
B.
Select the option “Basic Setup” at the left side of the screen and select “Wizard”.
Click the “Run Wizard” button to start the Setup Wizard of the CH3MNAS.
The initial Setup Wizard screen will be shown.
C.
Click “Next” to proceed with the Setup Wizard.
D.
Select the Time Zone for your region. Click “Next” to proceed with the Setup Wizard.
11
ENGLISH
E.
Change the IP configuration of the CH3MNAS to your requirements.
By default, the CH3MNAS is configured as DHCP client if there is a DHCP server in your network. If you want to assign a manual IP
address to the CH3MNAS, select “Static IP” and enter the correct IP settings in the fields “IP Address”, “Subnet Mask”, “Gateway IP
Address”, “DNS1” and “DNS2”.
Click “Next” to proceed with the Setup Wizard.
F.
Set the “Workgroup”, “Name” and “Description” to identify your CH3MNAS in your network. Click “Next” to proceed with the Setup
Wizard.
G.
Set a password for the administrator account. Click “Next” to proceed with the Setup Wizard.
Note: By default, no administrator password is configured in the CH3MNAS. It is strongly advised to set an administrator password to
prevent unauthorized access to the web-based configuration of the CH3MNAS.
12
ENGLISH
The Settings are now saved in the configuration of the CH3MNAS.
Note: Do NOT turn off or restart the CH3MNAS during this process.
After saving the settings, the Setup Wizard of the CH3MNAS is complete.
H.
Click “Completed” to restart the CH3MNAS and activate the settings.
The CH3MNAS will now restart and activate the settings. This can take a little while. After the restart, the CH3MNAS login window will be
shown on your screen.
Note: Remember to use your new administrator password if you have changed it at step G of this chapter.
13
ENGLISH
5.3.2 Basic Setup – Date and Time
The CH3MNAS Date and Time page contains several different options for setting the device’s internal clock. It is important that an accurate
time is set so that scheduled backups and downloads will be accurate.
Time Zone Settings
Choose the time zone from the pull-down menu.
Click the Set Time button to apply the new time zone.
NTP Server
Network Time Protocol (NTP) synchronizes the CH3MNAS with an Internet time server.
To enable NTP carry out the following:
• Tick the Enable NTP Server checkbox.
• Type the URL used for the NTP server in the NTP Server field.
• Click the Set Time button after typing the NTP Server location.
Manually Set The Date And Time
This option allows you to set the date and time manually.
Use the drop-down menus to choose the appropriate time and date. When you have finished choosing
the time, click the Set time from my computer button.
14
ENGLISH
5.3.3 Basic Setup – Network
The Local Area Network settings for the CH3MNAS are configured on the Network Settings menu.
DHCP Client
Selecting DHCP Client will cause the CH3MNAS to obtain an IP address from the local DHCP server. This is
the default status of the device.
Static IP
Selecting Static IP requires you to assign the IP information for the CH3MNAS manually.
IP Address
For Static IP address, type a compatible and unique LAN IP address for the device.
Subnet Mask
Type a Subnet Mask suitable to the class or IP address scheme used for the LAN.
Gateway IP Address
Type the IP address of the gateway device used for the LAN. Typically this is a router.
DNS1 / DNS2
Type at least one DNS IP address used for your LAN.
Link Speed Settings
Adjust the speed of the network connection of the CH3MNAS. The Link Speed Setting is configured at
“Auto” by default. If you want to set a fixed speed, set it to “100” Mbps or “1000” Mbps.
MTU
Type in an MTU rate that your network can support.
DHCP Server
Click the Enabled radio button to enable the DHCP Server.
Click the Disabled radio button to disable the DHCP Server.
Starting IP Address
Enter the starting IP address for the range of addresses assigned by the DHCP Server.
Ending IP Address
Enter the ending IP address for the range of addresses assigned by the DHCP Server.
Lease Time
Use the drop-down menu to set the duration of time that an IP address will remain assigned to a device.
DHCP Client List
Displays the Host name, IP Address, MAC Address and Expired Time of clients that have received a DHCP
address from the CH3MNAS. Click the Refresh button to refresh the list of DHCP clients.
15
ENGLISH
5.3.4 Basic Setup – Device
The device settings page allows you to assign a workgroup, name and description to the CH3MNAS.
Workgroup
Assigns a workgroup name to the CH3MNAS.
Name
Assigns a unique name to the CH3MNAS. The name can be used to access the device from a web browser
instead of the IP address.
Description
Assigns a device description to the NAS.
16
ENGLISH
5.4
Advanced Setup
Click the on the “Advanced Setup” menu directory to view the configuration menus for setup Groups, Users, Shared Folders configuration
and enable FTP Server, Media Server and iTunes Server services.
5.4.1 Advanced Setup – Groups
The CH3MNAS supports up to 10 Groups. Users can be added to a group, or used individually. Groups are created to allow access to specific
folders on the CH3MNAS, via FTP or the local network.
Create new group
Type a name for the new group in the Add a new group field and click the Add button.
Select Group
Use the drop-down menu to select a previously created group from the list for the addition or removal of
users.
List of All Users
Displays the list of users that you may assign to the selected group.
To add a new user to the selected group, click the user then click the “Add” button. Click the All
accounts checkbox to add all the user accounts setup on the CH3MNAS to the new group.
To remove a user from the group, click the user and then click the “Remove” button. Click the All
accounts checkbox to remove all the user accounts setup on the CH3MNAS to the new group.
Users in Group
Displays the current users in the selected group.
Groups List
Displays the list of groups that have been setup on the CH3MNAS. To delete the group click the trashcan
icon next to the group you want to delete.
Group Quota Settings
Displays the group quotas. Quotas can be edited by clicking the corresponding notepad icon.
Group Quota Status
Displays the current status of the group quota function. Click the Enabled / Disabled button to enable or
disable the Group Quota feature.
17
ENGLISH
5.4.2 Advanced Setup – Users
The Users menu is used to create users that can own and manage folders on the hard disk. The users created can also be assigned to user
groups as previously discussed.
Group
Select a group from the list to assign the new user to the group. Users do not have to belong to a group
however. To create a user without a group association select NONE.
User Name
Type a name for the new User.
Password / Confirm Password
Enter a Password and Confirm Password for the new user if desired, passwords are not required. Click the
Apply button to create the new user. A quota can now be set for the user if needed.
Users List
Displays the list of users that have been setup on the CH3MNAS. To change the password of a user click
the wrench icon next to the corresponding user. To delete a user click the trashcan icon next to the user
you want to delete.
User Quota Settings
Displays the user quotas. Quotas can be edited by clicking the corresponding notepad icon.
User Quota Status
Displays the current status of the user quota function. Click the Enabled / Disabled button to enable or
disable the User Quota feature.
18
ENGLISH
5.4.3 Advanced Setup – Shared Folders
Use the Shared Folders menu to create rules for sharing folders among individual users or groups. To create the folders, choose a volume in
My Computer and create a new folder in the normal fashion using Windows. The new folder will appear when browsing to select the shared
folder.
Category
Choose to create a shared folder for a user or group.
User / Group
Select the user or group that will use the shared folder. If selecting a User category, tick the All accounts
checkbox to create a Shared Folder for all the accounts setup on the CH3MNAS.
Folder
Browse to and select the previously created folder or directory you are controlling access to. Create the
folder on the disk in Windows.
Permission
Set the user or group permission to Read Only or Read/Write.
Oplocks
Select Yes from the drop-down menu to enable Oplocks on the CH3MNAS.
Opportunistic locks (oplocks) are guarantees made by a server for a shared logical volume to its clients.
These guarantees inform the Client that a file’s content will not be allowed to be changed by the server,
or if some change is imminent, the client will be notified before the change is allowed to proceed.
Oplocks are designed to increase network performance when it come to network file sharing, however
when using file-based database applications it is recommended to set the Oplocks option to No.
By default Vista has Oplocks enabled and can not be disabled. If you are having network performance
issues with applications sharing files from the CH3MNAS you may try to improve performance by setting
the Oplocks option to No.
Map archive
Select Yes from the drop-down menu to enable the Map Archive feature. Select No to disable Map archive.
When enabled, the file attribute “Archive” will be copied as the file is being stored on the CH3MNAS.
Certain backup software attaches this attribute to files that are being stored as backups.
Comment
Enter a description for the Shared Folder Rule.
Click the “Apply” button to create the new sharing rule. The new configuration appears listed in the Shared Folder List.
Modifying a Shared Folder
In the Shared Folder List section carry out the following to modify an existing Shared Folder:
• Click the Wrench icon next to the Shared Folder you want to modify.
• Change the required settings.
• Click the Apply button to save the changes.
Deleting a Shared Folder
In the Shared Folder List section, click the Trashcan icon next to the Shared Folder you want to delete.
The following dialog box appears:
Click “OK” to delete Shared Folder.
19
ENGLISH
5.4.4 Advanced Setup – FTP Server
The CH3MNAS is equipped with a built in FTP Server. The server is easy to configure and allows users access to important data whether they
are on the local network or at a remote location. The FTP server can be configured to allow user access to specific directories, and will
allow up to 10 users to access the CH3MNAS at a time.
FTP Account Settings:
Determines whether the FTP server rule will apply to an individual user or a group.
Category
Choose whether the FTP rule will apply to an individual User or a Group by clicking the appropriate radio
button.
User / Group
Use the drop-down menu to select the User or Group that the FTP Server rule will apply to.
Tick the All accounts checkbox to apply the FTP Server rule to all Users that are setup on the CH3MNAS.
Folder
Browse to and select the folder or directory you are granting FTP access to. Tick root to grant access to
all volumes.
Attribute
Use the drop-down menu to specify if the specified User or Group permission should be Read Only or Read
Write.
When you have finished configuring the FTP Account Settings, click the “Add” button.
20
ENGLISH
FTP Server Settings:
This section contains the configuration settings for the CH3MNAS FTP Server.
Max User
Use the drop-down menu to set the amount of users that can connect to the FTP server.
Idle Time
Sets the amount of time a user can remain idle before being disconnected.
Port
Sets the FTP port. Default is 21.
Flow Control
Allows you to limit the amount of bandwidth available for each user.
Client Language
Choose the Client Language from the drop-down menu. (Support Unicode)
When you have finished configuring the FTP Server Settings, click the “Apply” button.
FTP Access List:
This section displays the FTP Access Lists that have been setup on the CH3MNAS and allows you to modify or delete
existing FTP Access List entries.
Modifying an FTP Access List entry
Carry out the following to modify an existing FTP Access List entry:
• Click the Wrench icon next to the FTP Access List entry you want to modify.
• Change the required settings.
• Click the Apply button to save the changes.
Deleting an FTP Access List entry
To delete an existing FTP Access List entry, click the Trashcan icon next to the FTP Access List entry you want to delete. The following
dialog box appears:
Click “OK” to delete the FTP Access List Entry.
FTP Access Status:
Displays the current status of FTP Access to the CH3MNAS. The FTP Server can also be Started or Stopped in this
section.
Note: If you are behind a router, you will need to forward the FTP port from the router to the CH3MNAS. Additional filtering and firewall
settings may need to be modified on your router to allow FTP Access to the CH3MNAS from the Internet. Once the port has been
forwarded on the router, users from the internet can access the FTP server through the WAN IP address of the router.
21
ENGLISH
5.4.5 Advanced Setup – Media Server
The CH3MNAS features a UPnP AV Server for streaming media content stored on the device. This server provides the ability to stream
photos, music and videos to UPnP AV compatible network media players, like the Conceptronic CFULLHDMA(i), the Microsoft® Xbox-360 or
Sony Playstation® 3. If the server is enabled, the CH3MNAS will be automatically detected by UPnP AV compatible media players on your
local network.
UPnP AV Server
Select the Enable or Disable radio button to enable or disable the CH3MNAS UPnP AV server.
Folder
Specifies the folder or directory that will be shared by the UPnP AV server.
Tick root to share all files on all volumes, or click Browse to select a specific folder.
Click the “Apply” button to set the UPnP AV Server settings.
Note: The contents on your CH3MNAS are automatically indexed when you enable the Media Server and all changed, added or removed files
are automatically updated. If you want to initiate a manual refresh of your media library, click the “Refresh” button.
5.4.6 Advanced Setup – iTunes Server
The CH3MNAS features an iTunes Server. This server provides the ability to share music and videos to computers on the local network
running iTunes. If the server is enabled, the CH3MNAS will be automatically detected by the iTunes program and the music and videos
contained in the specified directory will be available to stream over the network.
iTunes Server
Select the Enable or Disable radio button to enable or disable the CH3MNAS UPnP AV server.
Folder
Specifies the folder or directory that will be shared by the UPnP AV server.
Tick root to share all files on all volumes, or click Browse to select a specific folder.
Password
Sets password for the iTunes server. (Optional)
Click the “Apply” button to set the iTunes Server settings.
Note: The contents on your CH3MNAS are automatically indexed when you enable the iTunes Server and all changed, added or removed
files are automatically updated. If you want to initiate a manual refresh of your iTunes library, click the “Refresh” button.
22
ENGLISH
5.5
Disk Management
Disk Management menus are used for configuration, formatting and maintenance of the physical hard drives.
5.5.1 Disk Management - Disk Status
Basic information about the installed hard drives is displayed in the read only Disk Status page.
23
ENGLISH
5.5.2 Disk Management - Hard Drive Configuration
The CH3MNAS supports four different types of disk configurations, Standard, JBOD, RAID 0 and RAID 1. Standard configures each disk as a
separate volume, while JBOD combines both disks into a single volume.
Click the “Re-configure All Existing Hard Drive(s)” button to reconfigure the Hard Drive settings on the CH3MNAS.
Note:
All data will be erased during the format process!
See chapter 5.2 for a step-by-step explanation of the Hard Disk Drive Configuration Wizard.
5.5.3 Disk Management - Scan Disk
With the Scan Disk option of the CH3MNAS, you can check a volume on drive errors.
Select the volume you want to scan and click the “Scan Disk” button to start scanning the volume.
During the scan, a progress bar will be shown on your screen. When the scan is finished, the results will be shown on your screen.
Note:
Scanning a volume can take some time.
24
ENGLISH
5.5.4 Disk Management - Format Disk
To format a disk drive, choose the volume to format from the drop-down menu and click the “Confirm“ button. A warning appears informing
that the disk will lose all data and asking for confirmation. If there is any data on the disk, it will be erased. Be sure to back up any
important data before formatting.
5.5.5 Disk Management - Power Saving
The CH3MNAS Power Management feature allows you to configure the drives to shut down while power remains constant to the device. The
drives will power up again when data is accessed.
Power Management
Enable or Disable Power Management on the CH3MNAS by clicking the appropriate radio button.
Hibernate Hard Drives
Set the amount of time from the Turn Off Hard Drives drop-down menu before idle drives will shut down.
Click “Apply” to save the changes.
25
ENGLISH
5.6
Download / Backup
5.6.1 Download / Backup - FTP/HTTP Download/Backup
This menu is available for use by Users (created with the Users menu) to set up schedules for downloading from FTP sites, and for scheduling
regular data back ups from the User’s local hard drive.
Note: Users backing up files from the local hard drive must create a shared folder used for this purpose. The user then has the option of
using a security user name and password to login or no login. Follow the procedures for the operating system used on the local
computer to create a shared folder.
Download/Backup
Choose to schedule a Backup of data or an FTP download.
Login Method
If a login account is used, choose Account and enter the User Name and Password. If no login is needed,
choose Anonymous.
Type
Select either file or folder to be backed up or downloaded.
Source (URL)
This is the URL of the local computer or FTP server including the folder containing the data. Enter the
URL for the HTTP, FTP or local site address of the server used for download. Click the ‘Test’ button to
make sure access to the location is allowed.
Enter the FTP, HTTP, or Local site address for the scheduled download. Click on ‘Test’ to verify access to
the site address and file/folder. Click on ‘Local’ to browse for a folder from the internal drives. If you
have chosen 'File' from the above drop down list, you must specify the exact file in the URL path. This
includes the file extension. (e.g. http://test.com/test/file.txt)
Destination
Enter the specific destination within the internal drives for downloaded files or folders to be saved. Click
Browse to browse the internal drives. Choose an existing folder on the CH3MNAS or create one by
selecting an unnamed folder in the pop-up menu and giving it a name.
Schedule
Use the drop-down menus to select the date and time for the download to occur.
Recurring Backup
Use the drop-down menu to schedule data back up on a regular basis according to the selected interval
and time. Back ups can be scheduled daily, weekly or monthly. Choose the time of day and if appropriate,
the day of the week, or the day of the month for the scheduled data back up.
Incremental Backup
By default all local backups and file/folder downloads are in Overwrite mode, meaning that identical files
in the destination folder will be overwritten by the source files. Checking Incremental Backup will have
the CH3MNAS compare identical file names at the source and destination. Files will only be overwritten if
the source file is more recent.
Download List
Pending or completed download events will be listed here. Current status is displayed for each event and
there is an option to delete a download event at any time.
Click “Refresh” to update the Download List.
26
ENGLISH
5.6.2 Scheduled download - Example 1
You want to schedule the download of a driver called “driver.exe” which is hosted at www.drivers.com. The downloaded driver must be
stored on the 1st disk of your CH3MNAS, in the folder “Driver_Downloads”. The file must be downloaded on 2 June 2009, at 10:00h.
With the information above, the configured scheduled download should look like below:
27
ENGLISH
5.6.3 Scheduled download - Example 2
You have a computer in your network, called “My_Computer” with a share called “My_Documents”. The computer is protected with an
account called “Conceptronic”, including a password. The backup must be stored on the 2nd disk of your CH3MNAS, in the folder
“My_Backup”. The scheduled download must occur weekly at Friday, at 17:30h.
With the information above, the configured scheduled download should look like below:
28
ENGLISH
5.7
Maintenance
Click the on the “Maintenance” menu directory to view the configuration menus for setup Password, System and E-mail configuration and
upgrade System Firmware.
5.7.1 Maintenance – Password
The Password menu allows you to set a password for the admin account. It is recommended to set an admin account password when first
configuring the CH3MNAS.
User Name
The administrator user name is admin, and this cannot be changed.
Password
Enter the current password. (Leave this blank if you have not set a password yet.)
New Password
Enter a new password.
Confirm Password
Enter the new password again for confirmation.
Click “Apply” to save the new password.
29
ENGLISH
5.7.2 Maintenance – System
The CH3MNAS System menu provides options for system restarts, saving and loading configuration settings, and setting idle times.
Restart
Click Restart to reboot the CH3MNAS.
Shutdown
Click Shutdown to Shutdown the CH3MNAS.
Default Settings
Click Restore to reset the CH3MNAS to its factory default settings. This will erase all previous
configuration changes.
Configuration Settings
Click Save to save the current CH3MNAS configuration settings to a file on the local computer.
If at a later time you need to reload this configuration after a system reset, browse to the file and click
Load.
Idle Time
Enter the time (in minutes) that the administrator will be allowed to remain idle while accessing the
CH3MNAS configuration settings or that users will be allowed to remain idle while accessing the download
schedule settings.
Click “Apply” to save the settings.
30
ENGLISH
5.7.3 Maintenance – Firmware
The CH3MNAS Firmware menu makes it simple to check for new firmware releases and upload them to the device. If new firmware is
available, download the file to your local computer.
Firmware Information
This section provides information about the current CH3MNAS firmware.
When upgrading the firmware, click Browse to select the new firmware file on your local computer.
Click “Apply” to begin the firmware upgrade process.
31
ENGLISH
5.7.4 Maintenance – E-mail Alerts
With the CH3MNAS E-Mail Alerts, you can configure e-mails to be sent alerting you to certain operational conditions and drive status
conditions. These alerts can prove helpful with the management and safeguarding of important data.
E-mail Alert Settings: This section contains the configuration settings for your e-mail account and alert preferences.
Login Method
Select either Account or Anonymous. Choosing Anonymous does not require a User Name or Password.
User Name
Enter the appropriate user name for your e-mail account.
Password
Enter the appropriate password for your e-mail account.
SMTP Server
Enter the IP address or domain name of your outgoing mail server. If you are unsure of this value,
contact your e-mail provider.
Sender E-mail
Enter the “from” e-mail address (e.g. [email protected]). This field does not require a valid e-mail
address. However, if your e-mail client is filtering spam, make sure you allow this address to be
received.
Receiver E-Mail
Enter the e-mail address you want to send the alerts to. This address must correspond with the SMTP
server configured above.
Test Email
Press this button to send test the E-mail alert feature is working.
E-mail Alert Types:
This section contains the alert options and their configuration settings.
Space Status
Select an interval in hours and minutes to have a status of space remaining on the drives e-mailed.
Hard disk drive volume full
An alert will be sent when the hard drive is full.
Hard disk drive failure
An alert will be sent if a critical error occurs on one of the drives.
Change administrator’s password
An alert will be sent if the admin password is changed.
Upgrade device firmware
An alert will be sent if the firmware is upgraded.
Device temperature has exceeded An alert will be sent if the CH3MNAS device temperature exceeds the set threshold. After the alert has
been sent, the CH3MNAS will power off for safety.
32
ENGLISH
5.8
System Status
LAN Information
Displays the local network settings of the CH3MNAS.
Device Information
Displays the Workgroup, Name, Description and current System Temperature of the CH3MNAS.
Printer Information
Displays information for a connected USB printer.
If you computer is having problems printing to the CH3MNAS, you can click the Clear print queue(s) button
to remove any print jobs that may be causing your computer not to print.
33
ENGLISH
5.9
Help
The CH3MNAS Help window provides s a menu of help topics that explain the features of the device.
5.10 Logout
When you click “Logout”, you will be logged out of the CH3MNAS web interface. The login window will be shown on your screen.
Note:
If you do not logout when you are finished, you are not able to access the web interface from another computer untill the idle
time set in chapter 5.7.2 has been elapsed.
34
ENGLISH
6. Connecting to CH3MNAS shares
When you have configured the CH3MNAS, you can connect the shares to your computer for easy access through your explorer.
Start the Grab’n’Go Easy Finder through the Start Menu, the shortcut on your desktop or the shortcut in the Quick Launch bar. The
Grab’n’Go Easy Finder will be shown on your screen:
6.1
Mounting a share to a drive letter
A.
B.
Click the “Search” button to search for your CH3MNAS. It will appear on the rigth side of the screen.
Select the CH3MNAS and click the “Mount” button.
C.
D.
E.
Select the share you want to mount to your computer.
Select the drive letter you want to assign to the selected share.
Click the “Mount” button.
Note: If you have a share which is protected by a username and password, you will see a window requesting the username and password.
Enter the Username and Password and click “OK”.
A message will be shown that the share is successfully mapped to your computer.
F.
6.2
A.
B.
C.
D.
Click “OK” to close the message.
Unmounting a share
Click the “Search” button to search for your CH3MNAS. It will appear on the rigth side of the screen.
Select the CH3MNAS and click the “Mount” button.
Select the mounted share you want to unmount.
Click the “Unmount” button.
A message will be shown that the share is successfully unmapped from your computer.
Enjoy the use of your Conceptronic CH3MNAS!
35
LICENSING INFORMATION
Licensing Information
This Conceptronic product CH3MNAS includes copyrighted third-party software licensed under the terms of the GNU General Public License.
Please see The GNU General Public License for the exact terms and conditions of this license.
Specially, the following parts of this product are subject to the GNU GPL:
1.
2.
3.
4.
5.
6.
7.
8.
9.
10.
11.
12.
13.
14.
15.
16.
17.
18.
19.
20.
21.
22.
23.
24.
25.
26.
27.
28.
29.
30.
31.
32.
33.
34.
35.
36.
37.
38.
Linux kernel 2.6.22.7
arm-none-linux-gnueabi-le-softfloat
arm-none-linux-gnueabi_build_uboot
at-3.1.8
busybox-1.11.2
chardetect
confuse
e2fsprogs-1.41.2
goahead
imgconvert
inotify
zlib-1.2.3
libid3tag-0.15.1b
gdbm-1.8.3
mt-daapd-0.2.4
jpeg-6b
libiconv-1.9.2
libtool-1.5.6
libusb-0.1.12
LPRng-3.8.10
mdadm-2.5.6
module-init-tools-3.3-pre1
msmtp-1.4.15
ncurses
mutt-1.5.18
ntp-4.2.0
nut-2.2.0
openssl-0.9.7
pure-ftpd-1.0.21
quota-tools
samba-3.0.28
tinylogin-1.4
u-boot-1_1_1
util-linux-2.12r
wget-LFS
web_page
sqlite-3.3.7
merge.tgz
All listed software packages are copyright by their respective authors. Please see the source code for detailed information.
Availability of source code
Conceptronic. has eposed the full source code of the GPL licensed software, including any scripts to control compilation and installation of
the object code. All future firmware updates will also be accompanied with their respective source code. For more information on how you
can obtain our open source code, please visit our web site.
GNU GENERAL PUBLIC LICENSE
Version 2, June 1991
Copyright (C) 1989, 1991 Free Software Foundation, Inc.
Temple Place, Suite 330, Boston, MA 02111-1307 USA
Everyone is permitted to copy and distribute verbatim copies
of this license document, but changing it is not allowed.
Preamble
The licenses for most software are designed to take away your freedom to share and change it. By contrast, the GNU General Public
License is intended to guarantee your freedom to share and change free software--to make sure the software is free for all its users. This
General Public License applies to most of the Free Software Foundation's software and to any other program whose authors commit to using
it. (Some other Free Software Foundation software is covered by the GNU Library General Public License instead.) You can apply it to your
programs, too.
When we speak of free software, we are referring to freedom, not price. Our General Public Licenses are designed to make sure that you
have the freedom to distribute copies of free software (and charge for this service if you wish), that you receive source code or can get it if
you want it, that you can change the software or use pieces of it in new free programs; and that you know you can do these things.
To protect your rights, we need to make restrictions that forbid anyone to deny you these rights or to ask you to surrender the rights.
These restrictions translate to certain responsibilities for you if you distribute copies of the software, or if you modify it.
For example, if you distribute copies of such a program, whether gratis or for a fee, you must give the recipients all the rights that you
have. You must make sure that they, too, receive or can get the source code. And you must show them these terms so they know their
rights.
We protect your rights with two steps: (1) copyright the software, and (2) offer you this license which gives you legal permission to copy,
distribute and/or modify the software.
Also, for each author's protection and ours, we want to make certain that everyone understands that there is no warranty for this free
software. If the software is modified by someone else and passed on, we want its recipients to know that what they have is not the original,
so that any problems introduced by others will not reflect on the original authors' reputations.
Finally, any free program is threatened constantly by software patents. We wish to avoid the danger that redistributors of a free program
will individually obtain patent licenses, in effect making the program proprietary. To prevent this, we have made it clear that any patent
must be licensed for everyone's free use or not licensed at all.
The precise terms and conditions for copying, distribution and modification follow.
36
LICENSING INFORMATION
GNU GENERAL PUBLIC LICENSE
TERMS AND CONDITIONS FOR COPYING, DISTRIBUTION AND MODIFICATION
0. This License applies to any program or other work which contains a notice placed by the copyright holder saying it may be distributed
under the terms of this General Public License. The "Program", below, refers to any such program or work, and a "work based on the
Program" means either the Program or any derivative work under copyright law: that is to say, a work containing the Program or a portion of
it, either verbatim or with modifications and/or translated into another
language. (Hereinafter, translation is included without limitation in the term "modification".) Each licensee is addressed as "you".
Activities other than copying, distribution and modification are not covered by this License; they are outside its scope. The act of running
the Program is not restricted, and the output from the Program is covered only if its contents constitute a work based on the Program
(independent of having been made by running the Program). Whether that is true depends on what the Program does.
1. You may copy and distribute verbatim copies of the Program's source code as you receive it, in any medium, provided that you
conspicuously and appropriately publish on each copy an appropriate copyright notice and disclaimer of warranty; keep intact all the notices
that refer to this License and to the absence of any warranty; and give any other recipients of the Program a copy of this License along with
the Program.
You may charge a fee for the physical act of transferring a copy, and you may at your option offer warranty protection in exchange for a fee.
2. You may modify your copy or copies of the Program or any portion of it, thus forming a work based on the Program, and copy and
distribute such modifications or work under the terms of Section 1 above, provided that you also meet all of these conditions:
a) You must cause the modified files to carry prominent notices stating that you changed the files and the date of any change.
b) You must cause any work that you distribute or publish, that in whole or in part contains or is derived from the Program or any part
thereof, to be licensed as a whole at no charge to all third parties under the terms of this License.
c) If the modified program normally reads commands interactively when run, you must cause it, when started running for such interactive
use in the most ordinary way, to print or display an announcement including an appropriate copyright notice and a notice that there is no
warranty (or else, saying that you provide a warranty) and that users may redistribute the program under these conditions, and telling the
user how to view a copy of this License. (Exception: if the Program itself is interactive but does not normally print such an announcement,
your work based on the Program is not required to print an announcement.)
These requirements apply to the modified work as a whole. If identifiable sections of that work are not derived from the Program, and can
be reasonably considered independent and separate works in themselves, then this License, and its terms, do not apply to those sections
when you distribute them as separate works. But when you distribute the same sections as part of a whole which is a work based on the
Program, the distribution of the whole must be on the terms of this License, whose permissions for other licensees extend to the entire
whole, and thus to each and every part regardless of who wrote it.
Thus, it is not the intent of this section to claim rights or contest your rights to work written entirely by you; rather, the intent is to exercise
the right to control the distribution of derivative or collective works based on the Program.
In addition, mere aggregation of another work not based on the Program with the Program (or with a work based on the Program) on a
volume of a storage or distribution medium does not bring the other work under the scope of this License.
3. You may copy and distribute the Program (or a work based on it, under Section 2) in object code or executable form under the terms of
Sections 1 and 2 above provided that you also do one of the following:
a) Accompany it with the complete corresponding machine-readable source code, which must be distributed under the terms of Sections 1
and 2 above on a medium customarily used for software interchange; or,
b) Accompany it with a written offer, valid for at least three years, to give any third party, for a charge no more than your cost of
physically performing source distribution, a complete machine-readable copy of the corresponding source code, to be distributed under the
terms of Sections 1 and 2 above on a medium customarily used for software interchange; or,
c) Accompany it with the information you received as to the offer to distribute corresponding source code. (This alternative is allowed
only for noncommercial distribution and only if you received the program in object code or executable form with such an offer, in accord
with Subsection b above.)
The source code for a work means the preferred form of the work for making modifications to it. For an executable work, complete source
code means all the source code for all modules it contains, plus any associated interface definition files, plus the scripts used to control
compilation and installation of the executable. However, as a special exception, the source code distributed need not include anything that
is normally distributed (in either source or binary form) with the major components (compiler, kernel, and so on) of the operating system on
which the executable runs, unless that component itself accompanies the executable.
If distribution of executable or object code is made by offering access to copy from a designated place, then offering equivalent access to
copy the source code from the same place counts as distribution of the source code, even though third parties are not compelled to copy the
source along with the object code.
4. You may not copy, modify, sublicense, or distribute the Program except as expressly provided under this License. Any attempt
otherwise to copy, modify, sublicense or distribute the Program is void, and will automatically terminate your rights under this License.
However, parties who have received copies, or rights, from you under this License will not have their licenses terminated so long as such
parties remain in full compliance.
37
LICENSING INFORMATION
5. You are not required to accept this License, since you have not signed it. However, nothing else grants you permission to modify or
distribute the Program or its derivative works. These actions are prohibited by law if you do not accept this License. Therefore, by
modifying or distributing the Program (or any work based on the Program), you indicate your acceptance of this License to do so, and all its
terms and conditions for copying, distributing or modifying the Program or works based on it.
6. Each time you redistribute the Program (or any work based on the Program), the recipient automatically receives a license from the
original licensor to copy, distribute or modify the Program subject to these terms and conditions. You may not impose any further
restrictions on the recipients' exercise of the rights granted herein. You are not responsible for enforcing compliance by third parties to this
License.
7. If, as a consequence of a court judgment or allegation of patent infringement or for any other reason (not limited to patent issues),
conditions are imposed on you (whether by court order, agreement or otherwise) that contradict the conditions of this License, they do not
excuse you from the conditions of this License. If you cannot distribute so as to satisfy simultaneously your obligations under this License
and any other pertinent obligations, then as a consequence you may not distribute the Program at all. For example, if a patent license
would not permit royalty-free redistribution of the Program by all those who receive copies directly or indirectly through you, then the only
way you could satisfy both it and this License would be to refrain entirely from distribution of the Program.
If any portion of this section is held invalid or unenforceable under any particular circumstance, the balance of the section is intended to
apply and the section as a whole is intended to apply in other circumstances. It is not the purpose of this section to induce you to infringe
any patents or other property right claims or to contest validity of any such claims; this section has the sole purpose of protecting the
integrity of the free software distribution system, which is implemented by public license practices. Many people have made generous
contributions to the wide range of software distributed through that system in reliance on consistent application of that system; it is up to
the author/donor to decide if he or she is willing to distribute software through any other system and a licensee cannot impose that choice.
This section is intended to make thoroughly clear what is believed to be a consequence of the rest of this License.
8. If the distribution and/or use of the Program is restricted in certain countries either by patents or by copyrighted interfaces, the original
copyright holder who places the Program under this License may add an explicit geographical distribution limitation excluding those
countries, so that distribution is permitted only in or among countries not thus excluded. In such case, this License incorporates the
limitation as if written in the body of this License.
9. The Free Software Foundation may publish revised and/or new versions of the General Public License from time to time. Such new
versions will be similar in spirit to the present version, but may differ in detail to address new problems or concerns.
Each version is given a distinguishing version number. If the Program specifies a version number of this License which applies to it and "any
later version", you have the option of following the terms and conditions either of that version or of any later version published by the Free
Software Foundation. If the Program does not specify a version number of this License, you may choose any version ever published by the
Free Software Foundation.
10. If you wish to incorporate parts of the Program into other free programs whose distribution conditions are different, write to the author
to ask for permission. For software which is copyrighted by the Free Software Foundation, write to the Free Software Foundation; we
sometimes make exceptions for this. Our decision will be guided by the two goals of preserving the free status of all derivatives of our free
software and of promoting the sharing and reuse of software generally.
NO WARRANTY
11. BECAUSE THE PROGRAM IS LICENSED FREE OF CHARGE, THERE IS NO WARRANTY FOR THE PROGRAM, TO THE EXTENT PERMITTED BY
APPLICABLE LAW. EXCEPT WHEN OTHERWISE STATED IN WRITING THE COPYRIGHT HOLDERS AND/OR OTHER PARTIES PROVIDE THE PROGRAM
"AS IS" WITHOUT WARRANTY OF ANY KIND, EITHER EXPRESSED OR IMPLIED, INCLUDING, BUT NOT LIMITED TO, THE IMPLIED WARRANTIES OF
MERCHANTABILITY AND FITNESS FOR A PARTICULAR PURPOSE. THE ENTIRE RISK AS TO THE QUALITY AND PERFORMANCE OF THE PROGRAM IS
WITH YOU. SHOULD THE PROGRAM PROVE DEFECTIVE, YOU ASSUME THE COST OF ALL NECESSARY SERVICING, REPAIR OR CORRECTION.
12. IN NO EVENT UNLESS REQUIRED BY APPLICABLE LAW OR AGREED TO IN WRITING WILL ANY COPYRIGHT HOLDER, OR ANY OTHER PARTY
WHO MAY MODIFY AND/OR REDISTRIBUTE THE PROGRAM AS PERMITTED ABOVE, BE LIABLE TO YOU FOR DAMAGES, INCLUDING ANY GENERAL,
SPECIAL, INCIDENTAL OR CONSEQUENTIAL DAMAGES ARISING OUT OF THE USE OR INABILITY TO USE THE PROGRAM (INCLUDING BUT NOT
LIMITED TO LOSS OF DATA OR DATA BEING RENDERED INACCURATE OR LOSSES SUSTAINED BY YOU OR THIRD PARTIES OR A FAILURE OF THE
PROGRAM TO OPERATE WITH ANY OTHER PROGRAMS), EVEN IF SUCH HOLDER OR OTHER PARTY HAS BEEN ADVISED OF THE POSSIBILITY OF
SUCH DAMAGES.
END OF TERMS AND CONDITIONS
How to Apply These Terms to Your New Programs
If you develop a new program, and you want it to be of the greatest possible use to the public, the best way to achieve this is to make it
free software which everyone can redistribute and change under these terms.
To do so, attach the following notices to the program. It is safest to attach them to the start of each source file to most effectively convey
the exclusion of warranty; and each file should have at least the "copyright" line and a pointer to where the full notice is found.
, 1 April 1989
Ty Coon, President of Vice
This General Public License does not permit incorporating your program into proprietary programs. If your program is a subroutine library,
you may consider it more useful to permit linking proprietary applications with the library. If this is what you want to do, use the GNU
Library General Public License instead of this License.
38