1
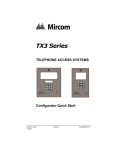
User Manual
LinkPro 3.0.11 + Veripatrol Mobile 2.4.31.4
August 2013, Rev. F
Bee Networx
668 Millway Avenue, Unit 12
Vaughan, ON L4K 3V3
Canada
www.beenetworx.com
Technical Support Tel: +1 647 478 4031
1
Contents
Overview ....................................................................................................................................................... 3
System overview ................................................................................................................................... 3
Prerequisites ......................................................................................................................................... 4
LinkPro Server ............................................................................................................................................... 4
Server Installation ................................................................................................................................. 4
Server Configuration ............................................................................................................................. 5
Viewing system information ................................................................................................................. 8
Reports .................................................................................................................................................. 9
Custom reports ................................................................................................................................... 10
Starting and stopping the LinkPro Server Service ............................................................................... 10
LinkPro Server License ........................................................................................................................ 10
Veripatrol Mobile and LinkPro Client.......................................................................................................... 10
Client Installation ................................................................................................................................ 10
Client Configuration ............................................................................................................................ 11
Configuration Source Directories ........................................................................................................ 13
Configuration Destination Directories ................................................................................................ 14
Client NIC (Network Interface Card) Mapping .................................................................................... 15
Client Scheduling................................................................................................................................. 16
LinkPro Client One-to-Many Functionality (BOLO) ............................................................................. 17
Using the LinkPro Client Application ................................................................................................... 18
Network Setup ............................................................................................................................................ 19
Configuration files ............................................................................................................................... 21
Configuring Source directories............................................................................................................ 21
Advisories and Recommendations.............................................................................................................. 21
2
Overview
System overview
LinkPro is a versatile platform that delivers unprecedented efficiencies and flexibility to mobile data
management and communication. The system allows a mobile device to maintain a connection with
legacy server applications on the Internet using one or more wireless networking technologies despite
mobility and disconnection. Moreover, the choice of networking technology is made based on userspecified application-oriented policies. Figure 1.0 represents the main functional components.
The LinkPro Mobile Client resides in the device. It performs connectivity management and, together
with the LinkPro Server, delivers bi-directional data routing for mobile applications.
The LinkPro Server coordinates data routing between mobile resident and back-end applications.
The design uses a proprietary architecture that provides non-intrusive, policy-controlled communication
on multiple wireless networks. Users specify policies at the applications-, data-type-, and user-level,
including the network type and the dynamic device state dimensions. For example, if a certain
application can tolerate delays, then LinkPro will schedule transmissions to minimize cost but still
meeting the delay bound. Users can define policies in terms of bounds on the monetary cost associated
with data delivery for different applications, or preferences to operate only over a certain type of
network. Similarly, users can specify preferences on whether to minimize overall power consumption
on the mobile device, or to minimize the cost of data transfer.
For interactive applications users demand no delay in data delivery, and LinkPro handles these data
types accordingly. Also, some non-interactive users may require the fastest possible data delivery not
available from a single network, while the monetary cost is of lesser importance if at all; this can occur in
emergency scenarios. With LinkPro technology, data transfers can take place using multiple networks
simultaneously achieving the fastest data delivery speeds possible.
LinkPro supports data transfer in the form of files.
On the Mobile Device:
3
-
-
Any Mobile Device Application that has to transfer files to the back-end application should place
these files into the Source directory of the mobile device file system. The LinkPro Client will
then pick them up and schedule them for transmission to the LinkPro Server.
The LinkPro Client application creates Incoming files in the Destination directory for the
specified mobile application.
On the Server:
- Outgoing files should be placed by any Back-end applications into the Source directory on the
file system of LinkPro Server. These files will then be scheduled for transmission to the LinkPro
Client application on mobile device.
- The LinkPro Server application creates incoming files in the Destination directory for the
specified back-end application.
Prerequisites
LinkPro Server:
- Processor: Core i7, 2.0GHz
- RAM: 8GB DDR3-13333
- Hard Drive: 7,200 RPM, 1GB of hard drive space
- 1 Public Static IP Address
- Port 14444 (configurable) open on firewall
- Windows 7, Windows XP, Windows Vista
- Windows Server 2003 R2 SP2 or Windows Server 2008 SP2
- Microsoft .NET Framework 3.5 SP1
- Microsoft SQL Server 2005 Express with the latest service packs
- Microsoft SQL Server Management Studio (recommended)
LinkPro Client:
- Any Device running Windows XP, Windows 7, Windows Vista, Windows XP Tablet
- Minimum of 10 MB of disc space
- Minimum RAM 30 MB
LinkPro Server
Server Installation
1. If a previous version of LinkPro is installed (and the existing configuration and device list needs
to be retained):
a. Backup the config.xml file in the "Bee Networx\LinkPro\Server" subdirectory of the
Program Files folder.
2. Uninstall any previous version of LinkPro you may have installed on the computer
3. Make sure all prerequisites are installed: .NET Framework 3.5 and Microsoft SQL Server 2005
Express with the latest service packs.
4. LinkPro Server listens to incoming TCP connections from devices on port 14444 by default. Make
sure this port is open on the LinkPro Server and external firewalls.
4
5. Login as Administrator. From the supplied CD run “\LinkPro Server\Setup.exe” and follow the
wizard's steps. It is recommended to accept the default setup parameters.
6. After installation, reboot the computer to complete LinkPro installation.
7. Validate that LinkPro Server is running – “Operational”: start the LinkPro Server GUI from
desktop link. If status is “Not operational” (check the status bar at the bottom of the screen)
then start LinkPro Service using service/start menu.
Server Configuration
Upon installation, LinkPro Server is preconfigured to use without any manual configuration
steps. LinkPro Server administrator can perform additional configuration changes using
Configuration Tab on the LinkPro Server GUI.
1. Start the LinkPro Server GUI “Start->Programs->Bee Networx->LinkPro Server”
2. Click the Device Access Control tab.
5
3. In the Device Access Control Window:
On the first LinkPro Client connection, Server will do auto registration by entering all the
necessary information into data base. The “Blocked” option is used to prevent a device from
connecting while still preserving the device’s settings for future reference. It is normally left
unchecked. Server administrator can use this option to prevent connection unwanted
devices.
The LinkPro Server's current list of configured devices can be easily exported to a comma
separated file by selecting the "Export Devices" and entering the desired path and name of
the file.
When a LinkPro Client starts, it will send the Device ID and the Password to the LinkPro
Server. The LinkPro Server will authenticate this device information by checking against the
list of configured Devices.
4. Click Configuration tab.
6
5. In the Configuration Window:
-
Source Directories
To add a source directory, click the Add button. Then in the table to the right enter the
directory path, destination address, importance and deadline information
-
Destination Directories
To add a destination directory, click the Add button. Then in the table to the right enter the
directory path, user and application names
-
Settings
Parameter
Description
Order ID
Customer licensing identification provided by Bee Networx.
Local Port
Directory Scan Interval
Inbound Task Timeout
Port for the Server to bind/listen on
How often to scan source directories for files, hh:mm:ss
Timeout to consider inbound file transmission failed and reschedule transmission. Generally should be set to substantial time
interval, since a failed task situation should not appear often.
Timeout to consider outbound file transmission failed and reschedule transmission. Generally should be set to substantial time
interval, since a failed task situation should not appear often.
Outbound Task Timeout
7
Idle timeout
Time that the Device and Server will stay connected if no data is
available to transfer.
Root Send Directory
Specifies the root folder where new folders for each device should
be added.
Time interval to consider device is not active. Task will be removed
and disposed.
Outbound Task
Initialization Timeout
Note: Please do not modify any settings not outlined here unless directed by Bee Networx'
support team.
For more information on directories configuration see Network Setup section.
Viewing system information
1. Start LinkPro Server GUI “Start->Programs->Bee Networx->LinkPro Server”
2. Select Status Tab
On the top section of the screen there is a list of current tasks. The Source and Destination
columns show the direction (incoming / outgoing) and Device ID of the file transfer. The Device
ID is a unique number assigned by the device manufacturer. It is visible on each LinkPro Client's
8
application screen. It can also be changed to meet specific user’s requirements to reflect
reference other than manufacturer’s device identification number.
On the bottom of the Status screen there is a list of the current connections to the LinkPro
Server.
Reports
1. Start the LinkPro Server GUI “Start->Programs->Bee Networx->LinkPro Server”
2. Click the Reports tab:
3. Select the desired report to produce
Usage Report
Shows the past data transmission for one or all devices, broken
down to connection types. The Summary shows the total data
usage in both directions per adapter for all devices in the report.
Tasks Report
Provides a complete list of files that have been transferred
between LinkPro Client and Server.
Connections Report
Provides a complete list of past connections from the LinkPro
Client to the LinkPro Server.
9
4. Each report can be produced for one or more devices and for specific period of time. Select the
desired criteria and click “Generate report” button to view the report.
5. Additional user specific reports can be added. Please, contact our sales team for additional
information
Custom reports
Custom reports can be generated by exporting data to excel. Retrieving custom reports requires some
familiarity with Microsoft SQL Server. Please, contact our technical support for additional instructions.
Starting and stopping the LinkPro Server Service
The LinkPro Server application utilizes a background Windows Service. This Windows Service is
configured to start automatically upon application startup.
The LinkPro Service status can be viewed in LinkPro Server GUI status bar on the bottom of the screen:
”Operational“ or ”Stopped“
To start/stop the LinkPro Service manually:
- Start the LinkPro Server GUI “Start->Programs->Bee Networx->LinkPro Server”
- In the menu, choose Service->Stop Service or Service->Start Service to stop or start
LinkPro communication service.
Note: If not manually stopped, the LinkPro Service is running even when LinkPro Server GUI is not open.
LinkPro Server License
LinkPro Server users have 2 product license options: trial license and regular product license.
Upon the first installation of LinkPro Server, trial license is valid for 21 days. After the trial license expires
and is not renewed, server will reject all client connections. Clients will get an error in the log “License
expired”.
To renew LinkPro license please contact Bee Networx sales at: +1 647 478 4032.
When renewal license file is received, place it into LinkPro Server directory - C:\Program Files (x86)\Bee
Networx\LinkPro\Server\. Subsequently, restart the LinkPro Service (see “Starting and Stopping the
LinkPro Server Service” section).
Veripatrol Mobile and LinkPro Client
Client Installation
Veripatrol Mobile Client installation package includes LinkPro Client with all required components.
LinkPro is activated and configured via Veripatrol Mobile Server Configuration Module: “Start-> Vievu
Veripatrol->Sever Configuration Module”. Select “Activate LinkPro” to activate. In active LinkPro
Dialog GUI, enter:
10
-
Three digit customer Number. For Trial version could be any number.
Server IP.
Server Port Number
In case, LinkPro Client is not supplied with Veripatrol Mobile installation package, please follow steps 1
through 3 for manual installation.
1. If a previous version of LinkPro is installed (and the existing configuration and XML schedule
needs to be retained):
a. Backup the client's configuration file (config.cf.xml)
b. Backup the client's XML schedule file (default_schedule.cf.xml)
2. Uninstall the current version of the LinkPro Client on the device.
3. Run the "Tablet\setup.exe” file and follow the wizard's steps.
Client Configuration
The Client application uses the configuration file config.cf.xml to store all settings.
This file must be configured before the application can be used.
If you are using VIEVU VERIPATROL Mobile Server Configuration to Activate LinkPro Client
11
you do not have to change this configuration file.
If you would like to change source and destination directories , to configure config.cf.xml file:
- Start LinkPro Configuration Editor “Start->Programs->Bee Networx->LinkPro Configuration
Editor”
- Click Open button and navigate to Program Files\Bee Networx\LinkPro\Client Configuration
folder; open config.xml.cf file.
Configure typical settings:
Parameter
Directory Scan Interval
Description
How often to scan source directories for files, hh:mm:ss.
Default is 00:10:00 – 10 minutes.
Wi-Fi Battery Threshold
Do not use Wi-Fi if battery is below the specified level 1..100
1 - always use
101 - never use
Do not use GPRS if battery is below the specified level 1..100
1 - always use
101 - never use
If set to True, device will turn on backlight each time it wakes
up from suspended mode.
If set to True, device will reset WiFi adapter before every
connection attempt. This is designed as a workaround for a
known WiFi protocol synchronization problem.
GPRS Battery Threshold
Turn on display
Reset WiFi
Important: Client Configuration File received from the installation package is preconfigured and
ready for use. The only additional configuration requires entering LinkPro Server IP, Port Number
and Customer ID.
Each NIC (Network Interface Card) is configured as follows:
Parameter
Description
Connection Type
Currently WWAN, WiFi or Wired connections are supported
Driver Name
Name of the adapter as it appears in the driver description.
Could be a short unique word that appears as a driver name.
To see all NIC driver names go to Settings->Connections>Network Cards applet on the device.
Server Information
Defines a list of URLs and ports for the Server. The Port
default value is 14444 and should correspond to the port
value on the server. The URL could be either an IP address
(e.g. 66.121.12.1) or a URL (beenetworx.com).
Server Information can be the same for all adapters.
Other Settings (it is not recommended to modify the default settings):
Parameter
Description
Inbound Task Timeout
Timeout to consider inbound file transmission failed and re12
Outbound Task Timeout
Idle Timeout
Connection Interval
Wi-Fi Scan Timeout
WWAN Scan Timeout
schedule transmission.
Timeout to consider outbound file transmission failed and reschedule transmission.
Timeout for the connection when no data is being
transferred.
How often to scan network adapters for available networks in
order to connect to the Server.
How long to try connecting to the Wi-Fi Access Point before
timing out
How long to try connecting to the WWAN network before
timing out
Configuration Source Directories
Each Source Directory has the following parameters:
Parameter
Directory Path
Destination Address
Description
Location of the directory on the disk, e.g. \My
Documents\App1 on the mobile device or c:\MyFolder\App1
on the LinkPro Server.
The Destination address where the source files are delivered
to.
Format:
OCMP://<DeviceId>/<Application>/<User>
Parameters:
DeviceId – Unique id of a device. For the mobile
device, it is a number visible on the bottom of the
Client's Application screen. For the LinkPro Server, it
is always SERVER.
Application – Name of the application that the data
should be delivered to.
User – Username of a User of the application. If not
applicable, can be set to “Default”.
Legal File Age
Sets the time in seconds after the last time a file was modified
before considering the file "completed" and ready for
transmission.
Deadline
Time of the day or relative time interval for the file to be
delivered. System will try to deliver the file before or at the
13
deadline.
Note: LinkPro considers the deadline 00:00:01 as an
immediate delivery request. Files scheduled for immediate
delivery will be delivered using any means of communication
available.
LinkPro considers the deadline 00:00:00 as NO Deadline and
will deliver files when WiFi Or Wired are available.
Deadline is Relative
Controls whether the Deadline field indicates an absolute
time of day or a relative timespan from the time when the
task was added.
Importance
Relative importance of data as a value from 1 to 10, where 1
is the highest importance. Specifies importance of data
relative to other data being transferred.
Configuration Destination Directories
Zero or more Destination directories can be configured on Mobile Device and LinkPro Server.
Each directory has following parameters:
Parameter
Directory Path
Description
Location of the directory on the disk, e.g. \My
Documents\App1 on the mobile device or c:\MyFolder\App1
on the LinkPro Server.
User
Username of a User associated with this directory. Can be set
to Default
Name of application associated with this directory
Application
Note: Please, do not modify any settings not outlined here unless directed by Bee Networx'
support team.
Veripatrol Mobile installation package default client configuration file has 4 directories configured:
1. Emergency Video
- Priority 2, any connection.
2. Emergency Picture
- Priority 1, any connection.
3. High
- Priority 5, WiFi till 1 hour deadline
4. Normal
- Priority 10
14
Here is the corresponding mobile device registry location: HKEY_LOCAL_MACHINE\\SOFTWARE\\Bee
Networx\\LinkPro\\Tablet\Configuration\\
-
SourceDirectory\\EmergencyPhoto
SourceDirectory\\EmergencyVideo
SourceDirectory\\High
SourceDirectory\\Normal
Note: It is possible to update LinkPro Client configuration by sending config.cf.xml with new
configuration parameters to the client using current LinkPro setup. To update all clients from the server
with new configuration parameters, place an updated config.cf.xml into “C:\LinkPro\Emergency\Send”
folder on the server; it is configured to update all client devices on the next connection instance.
Client NIC (Network Interface Card) Mapping
LinkPro Client has built-in logic to treat wired or specific WiFi connections (specific SSIDs) as WWAN
connections. This is especially useful when in-vehicle WiFi/WWAN routers are used for data
transmission.
LinkPro GUI can be used to configure each individual mobile device NIC mapping:
However, in most cases groups of devices need updating. To configure groups of mobile devices,
following XML structure should be included in “ocmpMapping.xml” and sent to client devices:
<?xml version="1.0" encoding="utf-8"?>
<Tablet>
<WiFiMapping>
<SSID>AstibeDemo</SSID>
15
<Priority>1</Priority>
<WiFi>True</WiFi>
<Wired>False</Wired>
<Wwan>False</Wwan>
</WiFiMapping>
<WiFiMapping>
<SSID>ASTILBE1</SSID>
<Priority>2</Priority>
<WiFi>True</WiFi>
<Wired>False</Wired>
<Wwan>False</Wwan>
</WiFiMapping>
<WiredMapping>
<WiredAsWwan>False</WiredAsWwan>
</WiredMapping>
</Tablet>
Client Scheduling
In order to optimize the efficiency of data transfers, network connectivity costs, and battery life of the
client devices, the LinkPro Client application provides for powerful scheduling capabilities. This schedule
contains configurable information about how often the LinkPro Client should attempt to connect over
each interface during defined periods of time.
During periods where no new files are created on the device, the Client’s schedule is especially
important since it will determine when and how the device connects to the LinkPro Server to allow the
LinkPro Server to transfer files to the device. If the schedule has gaps where no connections are
defined, then the Client will not attempt to connect to the LinkPro Server and therefore will not receive
any files from the LinkPro Server.
The LinkPro Client application uses one XML schedule file in the “Programs\LinkPro\schedules” folder to
store the device’s schedule.
To configure the Client’s XML schedule file:
1.
2.
3.
4.
5.
6.
7.
8.
Start LinkPro Configuration Editor “Start->Programs->Bee Networx->LinkPro Configuration
Editor”
Click the “Schedule” tab.
Click the New button and specify the name (“default_schedule.cf.xml”) and path of the new
schedule file and click the Save button.
Complete the “Job Type” field and check the “Schedule Enabled” checkbox.
Complete the “Day”, “Start Time”, “End Time”, “Network Connection Type”, “Network Scan
Interval” and “Entry Description” fields for the first time period. Note: To save time, select “All”
in the “Day” to repeat the schedule entry for each day of the week; or select “Weekdays” ” in
the “Day” to repeat the schedule entry for each weekday (Monday to Friday).
Repeat Step 5 for each required time period.
Click “Save” to save the file
After the schedule configuration is complete:
16
-
-
Copy the schedule file to the client device into the \Program Files\LinkPro\schedules
directory making sure to overwrite or delete any existing schedules in this folder
(LinkPro only supports 1 schedule at the current time).
Soft-reset the device.
There is a possibility to update client scheduling by sending “default_schedule.cf.xml” with new
schedule to the client.
To update all clients with new configuration place a new “default_schedule.cf.xml” into
“C:\LinkPro\Emergency\Send” folder
LinkPro Client One-to-Many Functionality (BOLO)
The LinkPro Client application has capability to pop up a Notification when a new file is received in a
specific directory; to make it happened you need to set up a receive folder with “Show Balloon” option
set to TRUE.
On the client device, BOLO notification will appear with 2 user options:
-
“Close” – pop-up disappears
“Open” – BOLO directory is open and new files are marked with a highlight
17
Using the LinkPro Client Application
The LinkPro Client application is usually hidden; however it can be viewed by clicking the LinkPro icon
and selecting "Advanced". The main application screen shows a list of current tasks and connections to
the Server. The LinkPro client connects to the Server periodically. Tap the “>>” button to force the
device to connect to the Server. When a connection is made, the appropriate connection type (WWAN,
WiFi, and Wired) will appear checked.
The LinkPro Client application shows the Device ID on the bottom of the screen. This id is unique for
each device and used throughout the LinkPro Network.
To see the current configuration, select the Settings tab. It shows basic settings, such as the Adapter
Scan interval and the server URLs.
18
Note: To modify settings it is necessary to copy the config.cf.xml to the PC, edit with LinkPro
Configuration Editor and copy back to the application folder on the client device.
To turn the Client Application off, tap the “File->Disable” button using menu entry. When the
application is closed, no LinkPro network transmission takes place. To hide the Client Application but
allow it to continue running, tap the “X” button.
There is one other LinkPro GUI tab used for displaying activity log information:
Network Setup
LinkPro supports multiple source and destination directories. Each directory can be separately
configured and used by different applications.
19
To configure the LinkPro Server configuration file see the Server configuration section.
To configure the LinkPro Client configuration file see the Client configuration section.
User Back-End Systems
Mobile Device
User Application
User Application
User Application
LinkPro Proxy Server
Source
Directory
Source
Directory
Destination
Directory
Destination
Directory
WiFi
GPRS
Ethernet
Link Pro Client Application
XML
Configuration
file
LinkPro Proxy Application
XML
Configuration
file
Incoming files might be overwritten by newer incoming file with the same file name. To prevent files
from overwriting for each receive directory you have to set “Attach Device Id” to True (LinkPro server
Configuration Tab, Destination Directories).
Successfully sent outbound files can be (optionally) deleted from the Source Directory. To delete files
after sending you need to set option “Delete Files After Send” to True. Use Source Directory / Common
settings to change this.
20
Configuration files
Bee Networx's LinkPro system is configured using an XML configuration file located in the application
directory on both the Mobile Device (config.cf.xml) and the Server (config.xml).
This file can be cloned across mobile devices, as long as the client hardware is the same.
Configuring Source directories
Figure 2
Source
Directory
OCMP://57645321/ImageStore/MichaelS
Source Directory
Destination
Directory
Destination Directory
Path
Path
Destination Address
User
Deadline
Application
Importance
Zero or more Source directories can be configured on a Mobile Device and the LinkPro Server.
Advisories and Recommendations
Advisory: LinkPro has been tested to transfer following file up to 4GB
Advisory: Ensure that LinkPro Clients has all WiFi SSIDs allowing access to the LinkPro included
in the LinkPro Client Mapping TAB.
Note: If the device’s WiFi adapter is connected to an Access Point linked LinkPro server, then the
LinkPro Client will utilize the WiFi adapter rather than the WWAN connection. If the WiFi
adapter is connected to an Access Point not active in the XML schedule at the time of the
network scan, LinkPro Client will bypass the WiFi adapter and use its WWAN adapter.
Advisory: Ensure to backup the LinkPro Client's configuration file and XML schedule before
uninstalling the LinkPro Client.
Note: The LinkPro Client has been designed to maximize battery life by suspending the mobile
device after periods of inactivity when running on battery. LinkPro will automatically wakeup
the mobile device whenever an outgoing file is due to be delivered or in accordance with the
XML schedule. However, if the device is placed in “Hibernate” mode then LinkPro will not be
21
able to wake it up as expected based on the defined schedule or file deadline impacting file
transfers.
Note: Server and client should not be installed on the same computer.
Recommendation: Use the LinkPro Configuration Editor to define one custom XML schedule for
the mobile device. Replace the “default_schedule.xml” in the “Program
Files\LinkPro\schedules” folder of the mobile device with this newly defined schedule.
22