1
1
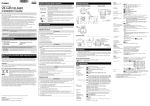
Installing the Camera
Mounting bracket
Before installing the camera, set the IP address and other network information on the camera
using the “VB Initial Setting Tool” on the Setup CD-ROM.
For details on how to operate the “VB Initial Setting Tool,” see “VB-M700F/VB-M600D/VB-M600VE
Operation Guide”.
Cable (AWG)
The camera's unique address. Write the address on the front of this
Installation Guide before installing the camera.
22
20
18
16
mm
(in.)
Φ 0.52
(Φ 0.020)
Φ 0.65
(Φ 0.026)
Φ 0.82
(Φ 0.032)
Φ 1.03
(Φ 0.041)
Φ 1.30
(Φ 0.051)
12 VDC maximum cable length
m
(ft.)
5
(16.4)
9
(29.5)
14
(45.9)
23
(75.5)
32
(105.0)
24 VAC maximum cable length
m
(ft.)
11
(36.1)
18
(59.1)
29
(95.1)
46
(150.9)
64
(210.0)
Serial No.
The camera's serial number. Write the number on the front of this
Installation Guide before installing the camera.
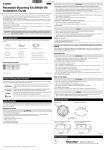
Use the mounting screw holes on the camera to fix the camera to the mounting bracket.
Mounting screw holes
Use UL cable (UL-1015 or equivalent) for 12 VDC or 24 VAC wiring.
J AC Adapter
Use the dedicated AC adapter PA-V17 (optional).
Lens
Important
3x Optical Zoom Lens (Electric Drive)
• You must consult your retailer or provide the mounting bracket yourself.
Protection plate
• A tripod mounting screw (1/4-20 UNC) will fit the fixing screw hole.
Front cover
• Be sure to use a mounting bracket with a mounting screw shorter than 5.5 mm (0.22 in.). Using a
mounting bracket with a mounting screw 5.5 mm (0.22 in.) or longer may damage the camera.
Note
• The camera does not have a power switch. Connecting and disconnecting the LAN cable (PoE power
supply), AC adapter, or external power supply plug turns the power ON and OFF, respectively.
• When the camera needs to be rebooted, perform the reboot operation from the camera setting page
(see “Maintenance” in “Setting Page” of the “VB-M700F/VB-M600D/VB-M600VE Operation Guide”).
Power connection terminal
Example installations
Using a ceiling mounting bracket
24
Conductor diameter
MAC Address
1 Mount the camera to the mounting bracket
Mounting screw holes
Recommended Power Cables for VB-M700F [Reference]
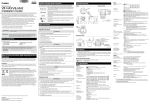
Part Names
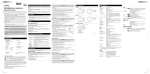
2 Connect the cables to the camera
100BT LAN connector
Using a wall mounting bracket
100Base-TX support
PoE power supply (IEEE802.3af compliant)
Connect the LAN cable.
If an AC adapter PA-V17 (optional) or external power supply is used, connect the power
connector to the camera.
Connect cables to the external device I/O terminals and audio input/output terminals as
necessary.
Audio output terminal (LINE OUT)
J External Device Input Terminals (IN1, IN2)
LED
External device input terminals consist of two sets (IN1, IN2) of two terminals, with the negative
terminal connected to the camera interior GND. Connect two cables to the positive and negative
terminals. When electrical continuity or insulation is created between the terminals, the viewer will
be notified of either status.
• Off: when [Turn Off] is selected (see “VB-M700F/VB-M600D/VB-M600VE
Operation Guide”, “Installation Conditions” in “Setting Page”)
When installation is complete, use the Camera Angle Setting Tool to check the image on
the camera and manually adjust the camera angle. Zoom and focus can be adjusted with
the Camera Angle Setting Tool (see “Camera Angle Setting Tool” in “VB-M700F/VB-M600D/
VB-M600VE Operation Guide”).
External device I/O terminals consist of two input and output systems each. VB-M700 Viewer
and RM Viewer can be used to check external device input status and control output to an
external device (see “Operating the External Device Output” and “Displaying Event Status” in the
“VB-M700F/VB-M600D/VB-M600VE Operation Guide”).
External Device I/O Terminals
The blue LED light comes on.
• On: when powered on, during reboot, during normal use
3 Set the camera angle
External Device I/O Terminals
* When [Turn Off] is selected, the LED light will come on for several seconds
when the camera is powered on and during reboot.
Important
Reset Switch
• When connecting sensors and switches, connect terminals that are electrically isolated from the
respective power and GND.
Power connector
Turn on the power while pushing this switch using a sharp object.
Continue to push the switch for 5 seconds or more to restore all
factory settings except for the date and time.
• Do not push the external device I/O terminal button with too much force. Doing so may cause the button
to remain pushed-in.
LAN cable
SD card cover
J External Device Output Terminals (OUT1, OUT2)
Audio input terminal (dual LINE IN and MIC IN)
External device output terminals consist of two sets (OUT1, OUT2) of two terminals. The sets
have no polarity. Controls from the viewer can be used to switch between electrical continuity and
insulation from one terminal to the next. Using optical couplers, the output terminals are isolated
from the camera's internal circuit.
2
The load connected to the output terminals should be within the following rating range.
Rating between output terminals:
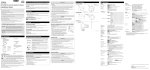
Internal Connection Diagram
Maximum voltage 50 VDC
+3.3 V
Continuous load current at or below 100 mA
1 kΩ
Note
Connecting the Camera
Using an SD Memory Card
Using Camera Housing
Open the SD card cover as shown in the diagram to insert or remove the SD memory card.
Firmly shut the SD card cover after inserting or removing the SD memory card.
When using the camera mounted in commercial camera housing, remove the camera's protection
plate to reduce the effects of excess reflections within the housing.
• Remove the lock screw on the front cover and remove the front cover and protection plate. Then
return only the front cover to its original position and fix in place with the lock screw.
Power Connection
Power can be supplied to the camera in the three ways described below.
The camera supports PoE functions. Power can be supplied to the camera by using a LAN cable
to connect it to a PoE HUB that conforms to the IEEE 802.3af standard.
• Check with your Canon sales representative for more information about PoE HUB and Midspan
technology.
SD card cover
• Some PoE HUBs allow current limits for each port, but applying limits may interfere with performance. If
using this type of PoE HUB, do not limit the operating current.
• Some PoE HUBs have total consumption current limits for ports, which can interfere with performance
when multiple ports are in use. For more information, check the instruction guide for your PoE HUB.
Protection plate
Front cover
Push the SD memory card as far as possible into the SD card slot.
Removing the card
Push the SD memory card in all the way until the card slightly pops out. Pinch the card and
remove.
• When reattaching the protection plate, face the side with the cutout toward the lens.
Important
• Make sure the SD memory card isn't write-protected.
• When using an SD memory card with the camera for the first time, it is recommended to format the card
after inserting it into the camera (see “Memory Card” in “Setting Page” in the “VB-M700F/VB-M600D/
VB-M600VE Operation Guide”).
• Insert the SD memory card before installing the camera.
+
External device Output terminal
IN1, IN2
0.1 µF
External device
Output terminal
OUT1, OUT2
Audio Input/Output Terminals
Each audio input/output terminal has one input system and one output system.
Connecting the camera to an audio input/output device such as a microphone or a speaker with
an amplifier allows you to send/receive audio through the viewer.
SD card slot
Inserting the card
10 kΩ
J PoE (Power over Ethernet)
Important
Lock screw
Adaptive wiring for external device cables
Solid conductor AWG: No. 28 - 22
Conductor size: Φ 0.32 - Φ 0.65 mm (Φ 0.013 - Φ 0.026 in.)
Cable strip should be approx. 8 - 9 mm (0.31 - 0.35 in.)
Internal controller
10 kΩ
• Use a category 5 or higher cable 100 m (328 ft.) or less in length for the LAN cable that connects the
camera and the PoE HUB.
• When the camera is connected to a switching HUB, changing the connection while the camera is
operating may cause the HUB learning function to interfere with communication. Do not change the
connection when the camera is operating.
• The camera can also be connected to an AC adapter (optional) while receiving power from a PoE
HUB. In such cases, the PoE power supply is given priority, and the camera does not use the power
supply from the AC adapter (optional). When the PoE power supply is disconnected, power is supplied
automatically from the AC adapter (optional). Midspan (a LAN cable power supply device) is a device
that, like a PoE HUB, supplies power to the camera via a LAN cable.
J Audio Input Dual LINE IN/MIC IN (monaural input)
Although the camera has a single audio input system, it supports two types of microphone input:
LINE IN and MIC IN. Before using the audio input, change the [Audio Input] on the Setting Page
(see “Audio Input” in the “VB-M700F/VB-M600D/VB-M600VE Operation Guide”). LINE IN is
selected by default.
Input terminal: Φ 3.5 mm (Φ 0.14 in.) mini-jack (monaural)
• Dynamic MIC IN
Input impedance: 1.75 kΩ ± 20%
* Supported microphones: Output impedance: 400 Ω - 600 Ω
• Condenser MIC IN
Input impedance (microphone bias resistance): 2.2 kΩ ± 20%
Microphone power supply: plug-in power (voltage: 1.8 V)
* Supported microphones: Condenser microphones with plug-in power support
• LINE IN
Input level: Max. 1 Vp-p
* Use a microphone with an amplifier.
J External Power Supply
J Audio Output Terminal LINE OUT (monaural output)
12 VDC or 24 VAC input can be used.
Connect the bundled power connector as shown below.
Connect the camera to a speaker with an amplifier. Audio can be sent to the speaker from RM
Viewer.
Output terminal: Φ 3.5 mm (Φ 0.14 in.) mini-jack (monaural)
Output level: Max. 1 Vp-p
* Use a speaker with an amplifier.
Screwdriver
Tightening torque: 0.2 N·m (max)
For 12 VDC and 24 VAC input, use a power supply insulated
from 100 VAC.
12 VDC can be connected in a non-polar configuration.
Strip
Cutout
Important
Approx. 4 to 6 mm
(0.16 to 0.24 in.)
Power connector
(bundled)
• The power supply should be within the following voltage range.
• 24 VAC: Voltage fluctuation within 10% of 24 VAC (50 Hz or 60 Hz
± 0.5 Hz or less)
Current supply capacity of at least 1.0 A per camera
Important
• Using incorrect settings for [Audio Input] may damage the camera and/or microphone. Be sure to
configure the settings correctly.
• Microphone characteristics may affect volume and sound quality.
• Use RM Viewer to send audio to the speaker. VB-M700 Viewer cannot be used to send audio.
• 12 VDC: Voltage fluctuation within 10% of 12 VDC
Current supply capacity of at least 1.5 A per camera
• Images and audio do not always synchronize properly.
• When using a 12-VDC battery power supply, be sure to connect
resistors of at least 0.5 - 1.0 Ω/20 W in series to the power line.
• Images and audio can be distributed to up to 30 clients. However, audio may be interrupted when
distributing to many clients.
• For an external power supply, use a double-insulated device.
• Audio may be interrupted when using antivirus software.
• Audio may be interrupted depending on PC characteristics and network environment.
• Connecting and disconnecting the LAN cable interrupts the audio. Use the viewer to reconnect.
VBM700IG_E.indd 2
2011/06/16 13:13:47