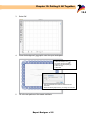
1
p o e r t R User Manual Deisigner is a product of Phoenix Learning Systems (www.phoenixlearning.com). V 2.2 The information in this manual is distributed on an “AS IS” basis, without warranty. While every precaution has been taken in the preparation of the manual, neither the author nor Phoenix Learning Systems shall have any liability to any person or entity with respect to any loss or damage caused or alleged to be caused directly or indirectly by the instructions contained in this manual or by the computer software and hardware in it. No part of this book may be reproduced or transmitted in any form or by any means, electronic, mechanical, photocopying, recording, or otherwise, without prior written permission of the publisher. For information on getting permission for reprints and excerpts, contact Phoenix Learning Systems. PowerSchool™ is a trademark of Pearson School Systems. All other trademarks are the property of their respective owners. © 2005-2006 Phoenix Learning Systems, All Rights Reserved Table of Contents Chapter 1: Downloading and Registration Purchase Report Designer............................................................................................1-1 Registration...................................................................................................................1-2 Steps to Download........................................................................................................1-3 Steps to Register...........................................................................................................1-4 Chapter 2: Introduction Overview........................................................................................................................2-1 Overview of Workflow....................................................................................................2-2 Create a New Report from Scratch........................................................................2-2 Edit an Existing PS Report Template.....................................................................2-3 Basic Features of the Designer Workspace..................................................................2-4 Designer Workspace Tools Overview....................................................................2-5 Designer Workspace Information Overview..........................................................2-6 Menus Overview............................................................................................................2-7 Designer Advanced Features........................................................................................2-8 How to Start...................................................................................................................2-9 Layout..........................................................................................................................2-11 Select Layout Settings.........................................................................................2-11 Chapter 3: Text Add Text.........................................................................................................................3-1 Text Properties Window.................................................................................................3-2 Move Text......................................................................................................................3-3 Manually Move Text...............................................................................................3-3 Layout Settings......................................................................................................3-3 Using Coordinates.................................................................................................3-4 Align Text Within the Text Object...................................................................................3-4 Resize Text Object.........................................................................................................3-4 Edit Text.........................................................................................................................3-5 Adjust Magnification...............................................................................................3-5 Clipboard...............................................................................................................3-5 Change Text...........................................................................................................3-5 Replace Text..........................................................................................................3-6 Add Text.................................................................................................................3-7 Duplicate Text (single incident)..............................................................................3-7 Duplicate Text with Precisioin................................................................................3-8 Apply Different Attributes to Text............................................................................3-8 Set or Change Text Frame Type............................................................................3-9 Delete text..............................................................................................................3-9 Style Sheets................................................................................................................3-10 Define a Style Sheet............................................................................................3-10 Apply a Style Sheet.............................................................................................3-11 Edit a Style Sheet................................................................................................3-11 Rename a Style Sheet.........................................................................................3-12 Copy and Modify a Style Sheet...........................................................................3-13 Numbers......................................................................................................................3-14 Create Numbered List..........................................................................................3-14 Fill Numbered List with Text.................................................................................3-15 Spellcheck...................................................................................................................3-16 Fonts............................................................................................................................3-17 Add Fonts............................................................................................................3-17 Remove Fonts.....................................................................................................3-17 Font Compatibility................................................................................................3-18 Chapter 4: Drawing and Pictures Overview........................................................................................................................4-1 Color..............................................................................................................................4-1 Lines..............................................................................................................................4-2 Create a Line.........................................................................................................4-2 Edit a Line (Change Properties)............................................................................4-2 Change Line Width................................................................................................4-3 Move a Line...........................................................................................................4-3 Rotate a Line.........................................................................................................4-4 Delete a Line..........................................................................................................4-5 Copy a Line............................................................................................................4-5 Duplicate a Line Multiple Times.............................................................................4-6 Boxes.............................................................................................................................4-7 Create a Box..........................................................................................................4-7 Edit a Box..............................................................................................................4-8 Resize a Box..........................................................................................................4-8 Move a Box............................................................................................................4-8 Rotate a Box..........................................................................................................4-8 Delete a Box..........................................................................................................4-8 Copy a Box (single incident)..................................................................................4-9 Duplicate a Box Multiple Times............................................................................4-10 Graphics and Pictures.................................................................................................4-11 Import a Graphic or Picture..................................................................................4-11 Edit a Graphic or Picture Properties....................................................................4-13 Move a Graphic or Picture...................................................................................4-13 Rotate a Graphic or Picture.................................................................................4-13 Copy a Graphic or Picture...................................................................................4-14 Delete a Graphic or Picture.................................................................................4-14 Report Designer v 2.2 Chapter 5: Alignment and Layers Overview........................................................................................................................5-1 Object Alignment...........................................................................................................5-2 Align Multiple Objects (Quick)................................................................................5-2 Object Menu Drop Down Alignment Selections.....................................................5-3 Layers............................................................................................................................5-9 Identify Object Layer..............................................................................................5-9 Order Object Layers............................................................................................5-10 Re-Order Object Layers.......................................................................................5-11 Chapter 6: Drop Down Menus Overview........................................................................................................................6-1 Designer Drop Down Menu...........................................................................................6-1 File Drop Down Menu....................................................................................................6-2 Edit Drop Down Menu...................................................................................................6-3 Object Drop Down Menu...............................................................................................6-4 Font Drop Down Menu..................................................................................................6-5 Style Drop Down Menu..................................................................................................6-5 Style Sheet Drop Down Menu.......................................................................................6-6 Favorites Drop Down Menu...........................................................................................6-6 Windows Drop Down Menu...........................................................................................6-6 Help...............................................................................................................................6-6 Chapter 7: Tables Overview........................................................................................................................7-1 Create a Table...............................................................................................................7-2 INSERT..................................................................................................................7-3 FILL........................................................................................................................7-4 SET WIDTH...........................................................................................................7-5 EDIT or ADD TEXT................................................................................................7-5 REPLACE TEXT....................................................................................................7-6 CLEAR...................................................................................................................7-6 Chapter 8: Fields and Functions Overview........................................................................................................................8-1 Fields Overview.............................................................................................................8-1 Import Field Lists...................................................................................................8-2 Create a Field List and Field Manually..................................................................8-4 Insert a Field..........................................................................................................8-6 Edit a Field.............................................................................................................8-9 Delete a Field.........................................................................................................8-9 Functions Overview.....................................................................................................8-10 Import a Function.................................................................................................8-10 Create a Function................................................................................................8-12 Report Designer v 2.2 Insert a Function..................................................................................................8-14 Save a Function as a Component.......................................................................8-16 Export a Function.................................................................................................8-17 Edit a Function.....................................................................................................8-18 Delete a Function.................................................................................................8-18 Chapter 9: Schedules and Transcripts Schedules Overview......................................................................................................9-1 Columns Tab Overview..........................................................................................9-1 Fonts Tab Overview...............................................................................................9-2 Periods Tab Overview............................................................................................9-2 Create a Schedule.................................................................................................9-3 Edit a Schedule......................................................................................................9-7 Delete a Schedule.................................................................................................9-7 Transcripts Overview.....................................................................................................9-8 Options Tab Overview............................................................................................9-8 Columns Tab Overview..........................................................................................9-8 Create a Transcript................................................................................................9-9 Edit a Transcript Object.......................................................................................9-11 Delete a Transcript Object...................................................................................9-11 Chapter 10: Import/Export Import/Export Components..........................................................................................10-1 Import a Component............................................................................................10-1 Export a Component............................................................................................10-2 Import/Export Report...................................................................................................10-3 Import Report.......................................................................................................10-3 Export Report.......................................................................................................10-4 Import/Export XML.......................................................................................................10-5 Import XML..........................................................................................................10-5 Export XML..........................................................................................................10-6 Chapter 11: Make Reports Easier Overview......................................................................................................................11-1 Duplicate Multiple Objects...........................................................................................11-2 Duplicate and Precisely Position Objects....................................................................11-3 Re-use An Object By Making It A Component.............................................................11-3 Set Object Position......................................................................................................11-4 Align Groups of Objects to a Grid................................................................................11-5 Align Groups of Objects to Each Other.......................................................................11-6 Favorites......................................................................................................................11-7 Favorites Shortcuts..............................................................................................11-7 Style Sheets................................................................................................................11-8 Filter Objects...............................................................................................................11-9 Select an Object by Layer or Content........................................................................11-10 Report Designer v 2.2 Chapter 12: Putting It All Together Overview........................................................................................................ 12-1 Award Certificate........................................................................................... 12-2 Create an Award Certificate.................................................................. 12-2 Attendance Call List...................................................................................... 12-6 High School Transcript............................................................................... 12-12 Student Schedule........................................................................................ 12-22 Appendix: Shortcut Table Index Report Designer v 2.2 Chapter 1: Downloading and Registration Purchase Report Designer Print and fill out the sales form found at www.phoenixlearning.com and FAX the sales form along with a Purchase Order (PO) to the FAX # on the form: To get a copy of the sales form, go to www.phoenixlearning.com/sales/sales.html. Chapter 1: Downloading and Registration 1-2 Registration Once you have purchased Report Designer, you will receive an email similar to the picture below with your registration information: The email you receive will include a .txt file titled: “_key.txt,” your registration code and the link to the downloads page at www.phoenixlearning.com. Once you have downloaded the application and placed it in a folder on your system, you will need to place the “_key.txt” file into the same folder in order for Report Designer to launch properly. Report Designer 2.2 Chapter 1: Downloading and Registration 1-3 Steps to Download 1. Select the link in the registration email or enter the link information into your Internet browser. 2. Select the link next to Report Designer that identifies the type of computer you are using: MacOS or Windows. Download the additional tutorial files and sample demo data, if desired. 3. If necessary, un-package the compressed file(s). 4. Place the unpackaged application and the _key.txt file together in a folder on your system. Report Designer 2.2 Chapter 1: Downloading and Registration 1-4 Steps to Register 1. Double-click on the Report Designer application. 2. Select NEW to create a new data file. 3. Title the data file and save the file to the Report Designer folder. Select SAVE. Report Designer 2.2 Chapter 1: Downloading and Registration 1-5 4. Fill in your registration information. You may cut and paste from the registration email. 5. Select REGISTER. Report Designer will automatically register and open. When Report Designer first opens, the bar above will display on your desktop. You are now ready to begin using Report Designer! NOTE: Screen captures in this manual were taken with MAC OS X. If using a Windows operating system, the screens will appear different. Report Designer 2.2 Report Designer 2.2 Chapter 2: Introduction Overview Welcome to Report Designer! Designer was developed to create customized object reports like report cards, schedules, medical information sheets and more with and without references to database objects. With Designer, you can design the way information is displayed in order to customize them for your school. Phoenix Report Designer is an XML-based software that can export reports in a format that is compatible with PowerSchool® (PS) Student Information System. Reports, certificates, form letters, transcripts, schedules, record stickers, trip reports and much more can be designed and created easily using the Designer WYSIWYG (What You See Is What You Get) format, then imported to PS for use. Designer combines familiar page layout tools such as lines, boxes and text objects with special transcript and schedule layout tools to make report creation quick and simple. Templates and components can be created, used and re-used to make report creation even quicker. NOTE: To quit Designer, use Designer > Quit Designer before attempting to close down your computer and turn it off. Chapter 2: Introduction 2-2 Overview of Workflow Report Designer provides a smooth exchange of files between your computer and the PowerSchool server. The PowerSchool server recognizes XML, a form of markup language, so Report Designer provides the ability to export any newly created report form to XML. Create a New Report from Scratch The chart below shows the workflow process when creating a new report form for use in PowerSchool. Create/Edit Report using Report Designer PowerSchool Server Your Computer Export to XML Import the XML Report Template into PowerSchool PowerSchool creates an Object Report using the Template Delete Report in PowerSchool. Make changes in Report Designer and re-import. Report design need changes? Test Print OK? Continue to use, but keep the original in Report Designer and only make edits and updates in Report Designer. Report Designer 2.2 Chapter 2: Introduction 2-3 Edit an Existing PS Report Template Report Designer allows you to edit existing PowerSchool report forms by allowing XML import. PowerSchool exports forms to XML and Report Designer allows you to import that XML form and edit it in Report Designer. Once you have completed making the changes to the old report, you may export that report form to XML in order to re-import it into PowerSchool. The chart below shows the workflow process when editing or changing a report that already exists in PowerSchool. PowerSchool Server Export Report Template to XML Your Computer Import the XML Report Template into Report Designer. Import new/edited report template into PowerSchool Edit the report in Report Designer. Export the Report to XML. NOTE: Delete existing report from PowerSchool before re-importing the edited template. Report Designer 2.2 Chapter 2: Introduction 2-4 Basic Features of the Designer Workspace Rulers Tools Workspace Page Zoom Percentage Object Information Report Designer 2.2 Chapter 2: Introduction 2-5 Designer Workspace Tools Overview If you are familiar with layout software, you will find the tools and functions familiar. Text Tool Insert and edit text Arrow Tool Select and move objects Box Tool Create boxes Line Tool Create and edit lines Transcript Tool Insert transcript objects Graphic Tool Insert and edit .jpg files Table Wizard Tool Define and insert a table Student Schedule List Tool Insert student schedule list objects Insert Functions Tool Insert Fields Tool Alignment Tools Align top Align left Align horizontal center Align vertical center Align bottom Align right Layer Tools Bring to Front Send to Back Move Forward Move Backward Lock Objects Unlock Objects Zoom In Zoom Out Set Layout Settings Report Designer 2.2 Chapter 2: Introduction 2-6 Designer Workspace Information Overview The Designer Workspace provides information to help set objects precisely on the page. Object Length and Height Zoom percentage Movement coordinates (display while moving object) Rotation Angle These tools are all covered in detail in the following chapters of this manual. Report Designer 2.2 Chapter 2: Introduction 2-7 Menus Overview Report Designer provides drop down menu functionality plus shortcut listings similar to other document design or layout software. Some of the drop down menu features are another way to access the Designer tool features, and some are additional options used in designing the report. Example 1: The Object drop down menu provides a list of ways to manipulate objects placed in your form. This section provides additional ways to manipulate objects that saves time and increases functionality. This section functions just as the layer tools function in the toolbox. This section provides additional alignment features for objects on the page. The Insert Fields selection functions the same as selecting the Insert Fields tool from the Designer Workspace Toolbox. Both actions open the Insert Fields list. The shortcut noted next to Insert Fields also opens the Insert Fields window. Refer to the Appendix for a list of available shortcuts. Details on the drop down menus are included in Chapter 6: Drop Down Menus. Report Designer 2.2 Chapter 2: Introduction 2-8 Designer Advanced Features Designer provides features that save commonly used objects and defaults that can be used in other reports such as a style sheet for text and a component library. To reduce the time it takes to create objects and design a report, Designer provides features such as auto duplicate object. This feature enables the user to place the duplicated items precisely to get the effect desired. Example 2: Advanced features of Designer that decrease the time it takes to create your individualized reports and forms are included in Chapter 11: Make Reports Easier. Report Designer 2.2 Chapter 2: Introduction 2-9 How to Start 1. Open Designer. 2. Select File > New. 3. The report setup window will display. Select the report parameters. Designer has the ability to group a set of different reports created and have them print as a single report. Identify the previous report here. Line Height refers to the leading. Leading is the vertical space between two lines of text. Leading is generally 120% of the typesize and is measured from the baseline of one line of text to the baseline of the line above it. Report Designer 2.2 Chapter 2: Introduction 2-10 4. Select OK. The Designer Workspace will open. You are now ready to begin designing your first form. Report Designer 2.2 Chapter 2: Introduction 2-11 Layout You may set up the workspace with grid lines and rulers to assist you in your report creation. Select Layout Settings 1. Select the Layout Settings Tool on the toolbar to the left of the workspace. 2. Show Ruler Lines and Grid Snap On are active by default. Select the checkbox next to the feature to deactivate it. Grid Snap On allows an object or multiple objects to be selected and aligned to the next grid marker assigned in the Grid Size. If Grid Size is set to 1/16” and Align to Grid is selected, the object(s) will align with the next closest 1/16” marker. Selecting Show Ruler Lines displays the horizontal and vertical lines on the workspace. The rulers on the top and left hand side of the workspace will continue to display even if Show Ruler Lines is deselected. Grid Size Options 3. Select OK once settings are identified. Report Designer 2.2 Report Designer 2.2 Chapter 3: Text Designer allows full control of the styles of text you use to create your forms and reports. Each text object can have only one set of attributes. For example, if you are typing “The quick brown fox jumped over the lazy dog” and wanted “lazy” to be bold, the whole text object would have to be bold. If you intend on sending the document or a component of the document to another Designer user, you must use typefaces (fonts) that are available on both computers or the item will not display properly. Add Text 1. Select the Text tool in the upper left corner of the workspace and click in the workspace to identify an insertion point. 2. Select Object > Properties from the drop down menus. Using the Text Properties window allows for all attributes to be set in one step. Enter text and select text attributes. (See next page for more details.) 3. Select OK. The text box will be placed on the form. You can select the text tool and draw the tool across the workspace in order to create a text box. Once the text box is created, you can just start typing the desired text. Styles such as font and point size can be added after the text is typed. Chapter 3: Text 3-2 Text Properties Window Enter text in the text box. Alignment: Left, Center, Right For more information on fields and functions, please refer to Chapter 8: Fields and Functions. Basic text attributes. “Sample” shows how your text will display. Frame: Frame type defines the behavior of the text box margins. Variable allows the text to flow and adjusts to always display the text string. Fixed limits the viewable area to the margins set. Text that does not fit within the margin will not be displayed. Move to Next Record: This is an advanced setting used in conjunction with databases. Selecting the checkbox allows a report to print multiple records on one page. Layer: Each object in your report document represents a layer. Layers may be stacked on or under other objects in the same document. Changing the layer number changes the order of objects stacked. Report Designer 2.2 Chapter 3: Text 3-3 Move Text Once a text box is placed on the workspace, you can manipulate it by moving it or rotating it. There are a few ways that you can move text. Manually Move Text 1. Using the arrow tool , select the text box(es) that need to be re-positioned. You may select multiple boxes by holding down the SHIFT key on the keyboard while selecting. 2. While holding down the arrow tool , with the mouse, re-position the text box. When done moving and re-positioning the box, release the mouse. The directional arrows on the keyboard will also move the text boxes in increments defined in Layout Settings. Press and hold CTRL while pressing a directional arrow to move the object 1/32”, 1/16”, 1/8” or 1/4” according to what is set in Layout Settings. Using the arrow keys to move an object without holding the CTRL key down moves the object 1 point for finer positioning. Layout Settings 1. Select the Layout Settings tool . 2. Set Grid Size to 1/4”, 1/8”, 1/16”, or 1/32”. This will determine what increments the object moves across the workspace when using the arrow keys as well as the grid on which to align an object. 3. Select OK. Report Designer 2.2 Chapter 3: Text 3-4 Using Coordinates 1. Using the arrow tool , select the text box(es) that need to be re-positioned. You may select multiple boxes by holding down the SHIFT key on the keyboard while selecting. 2. Highlight the ∆H (horizontal) or ∆V (vertical) and enter a number. The text box will move the entered distance. A negative number will move the text box to the left or up on the page. A positive number will move the text box to the right or down on the page. Select ENTER or click on the report workspace to enable the change. Align Text Within the Text Object To change the alignment of text already existing, refer to “Apply Different Attributes to Text” in this chapter or highlight the text, and make your selection from the Style > drop down menu. Shortcuts are available to make changes even quicker. Please refer to the Appendix or shortcut reference sheet for more information. When creating a new text object, open Object > Properties and select the alignment from the alignment choices available or select from the alignment tools in the toolbox. Resize Text Object To resize the text object, use the arrow tool to grab the edge of the selected object and “stretch” or “shrink” the object as needed. Press and hold the mouse button while grabbing the anchor point and stretching or shrinking the object. Any anchor point on a text object may be grabbed and manipulated. Anchor Point Report Designer 2.2 Chapter 3: Text 3-5 Edit Text You may re-open the properties window or highlight the text in a text box in order to edit the content or apply a different style. As in any document design or word processing software, Cut, Copy, Paste, Clear and Select All can be used. The most recently selected and deleted or copied item will be displayed on the clipboard. To edit text, you must be at 100% view magnification. Check the lower left corner of the workspace to find out what magnification you are at before trying to edit text on the workspace. Adjust Magnification To adjust magnification, use the zoom tools on the toolbar. Clipboard To display the Clipboard and its contents, select Edit > Clipboard. Only the most recently cut or copied objects will be on the clipboard. Change Text There are a couple ways to change the text in a text object already on the Designer workspace. • Using the text tool , highlight the text in the box. Type in the new text while the box is highlighted, apply a new font, style or style sheet using the drop down menus. • Using the arrow tool , select the text box. Select Object > Properties or double click on the box to open the Text Properties window. Make your changes and select OK. Report Designer 2.2 Chapter 3: Text 3-6 Replace Text 1. Using the arrow tool , select the text box(es) that need text replaced. You may select multiple boxes by holding down the SHIFT key on the keyboard while selecting. 2. Select Object > Replace Text. 3. Enter the text to be replaced in the Search For field. Enter the replacement text in the Replace With field. 4. Select OK. The text will automatically update the text boxes with the new text. Report Designer 2.2 Chapter 3: Text 3-7 Add Text 1. Using the arrow tool , select the text box that needs text added. You may select multiple boxes by holding down the SHIFT key on the keyboard while selecting. 2. Select Object > Append Text. 3. Enter the text to be added to the selected text boxes. 4. Select the correct radio button to place the text before or after the existing text. 5. Select OK. The text boxes will update automatically and include the new text. Duplicate Text (single incident) 1. Using the arrow tool , select the text box to duplicate. You may select multiple boxes by holding down the SHIFT key on the keyboard while selecting. 2. Select Edit > Copy or Object > Duplicate. A single incident of the text boxes selected will be duplicated and placed on the workspace. Report Designer 2.2 Chapter 3: Text 3-8 Duplicate Text with Precision 1. Using the arrow tool , select the text box that needs text copied. You may select multiple boxes by holding down the SHIFT key on the keyboard while selecting. 2. Select Object > Auto Duplicate Objects.... If information is already entered in the Auto Number text fields, these changes will be made also. Make sure that the Replace this text...field is empty before selecting OK. Apply Different Attributes to Text 1. Using the arrow tool , select the text box that needs new attributes. You may select multiple boxes by holding down the SHIFT key on the keyboard while selecting. 2. Select Object > Properties to re-open the Text Properties window or select Font > to change the font only and Style > to change the style, alignment or size of the text. Changes occur automatically when your selection is made using the Font > or Style > drop down menus. If you already have a Style Sheet defined, you can select Style Sheet > to display the available style sheets and select from the drop down menu. Report Designer 2.2 Chapter 3: Text 3-9 Set or Change Text Frame Type Object > Set Text Frame sets the frame to be variable or fixed. Fixed means the set size of the text frame will display only what can fit in the text frame. Variable allows the text to flow and the box to grow with the text in order to display all the text. If resizing the vertical, it will grow horizontally in order to fit the text into the box. Fixed will not do that. 1. Using the arrow tool , select the text box that needs a different frame type. You may select multiple boxes by holding down the SHIFT key on the keyboard while selecting. 2. Select Object > Set Text Frame. Fixed Frame is the default selection. Fixed Frame is good for functions and fields as the function or field entered is usually longer than the information that will automatically fill in the text object. 3. Select OK. Delete Text 1. Using the arrow tool , select the text box to be deleted. You may select multiple boxes by holding down the SHIFT key on the keyboard while selecting. 2. Press DELETE on the keyboard or select Edit > Cut or Edit > Clear. Report Designer 2.2 Chapter 3: Text 3-10 Style Sheets Style sheets can be used to define commonly used font attributes for reports and forms. Using Style Sheets helps shorten the time it takes to create reports that use common styles. A Style Sheet defined while building one report will be available to all other reports opened on your system. Style Sheets can be defined ahead of time, then applied to the specified text. Define a Style Sheet 1. Open a new or existing report form. 2. Select Style Sheet > Edit to open the Edit Style Sheet window and create a new style sheet. 3. Select DUPLICATE.... button. 4. Enter the new style name. Select OK. 5. Change the font attributes for the new style. 6. Select APPLY. The new style attributes are now associated wtih that style name. Close the Edit Style Sheets window by selecting the Close button in the upper left hand corner of the Edit Style Sheet window. Report Designer 2.2 Chapter 3: Text 3-11 Apply a Style Sheet 1. Select the text box to receive the style. 2. Select Style Sheet > then select the style from the drop down menu. Edit a Style Sheet 1. Select Style Sheet > and the style sheet to edit from the drop down menu. The Edit Style Sheets window will open. 2. Verify the correct Style Sheet is selected. 3. Make changes to the attributes. 4. Select APPLY. 5. Close the Edit Style Sheet window by selecting the close Report Designer 2.2 icon. Chapter 3: Text 3-12 Rename a Style Sheet 1. Select Style Sheet > and the style sheet to rename from the drop down menu. The Edit Style Sheets window will open. 2. Verify the correct Style Sheet is selected and select RENAME. 3. Type the new name, replacing the old one and select OK. 4. Select APPLY to close the Edit Style Sheets menu. Report Designer 2.2 Chapter 3: Text 3-13 Copy and Modify a Style Sheet 1. Select Style Sheet > and the style sheet to copy from the drop down menu. The Edit Style Sheets window will open. 2. Verify the correct Style Sheet is selected. 3. Select DUPLICATE... 4. Enter the new style name. 5. Select OK. 6. Modify the Font Attributes. 7. Select APPLY. Report Designer 2.2 Chapter 3: Text 3-14 Numbers Numbers can be added to multiple text boxes. Placing marker text that is intended to be replaced allows you to replace that text automatically with numbers. This text can be in any location within the text. Create Numbered List 1. Create a Text Box with “xx” as the text. 2. Select the box and select Object > Auto Number Text. Select the number of objects you want. Set the vertical and horizontal offset. Enter the “dummy” text and the starting numbers and format. 3. Select OK. To make your numbered list, you can enter text prior to using the “Auto Number Text” feature. You may also place the separator such as a period after the marker text. To reorder your text objects, adjust the layer number(s) of the objects. It is advisable to fill the text in after the numbering occurs. Report Designer 2.2 Chapter 3: Text 3-15 Fill Numbered List with Text These steps can be done immediately after applying the number sequence. Make sure all the text boxes are selected. 1. Select Object > Properties. 2. Add the text to accompany the first number in the sequence. Select OK. The next number in the sequence will display. Fill in each text box number in the sequence, selecting OK each time. Report Designer 2.2 Chapter 3: Text 3-16 Spellcheck Spellcheck does not do paragraph or composition checks. 1. Select the text box(es). 2. Select Edit > Spell Check Selected Objects.... The Check Spelling window will open. If there are any words not found in the Designer dictionary, they will be flagged and the Spelling...window will open. If there are no mistakes, as above, the Spelling... screen will not display. When a word is flagged as possibly incorrect, the Spelling... screen will display. You can select multiple objects and the spell check popup to the right will display and scroll through each object for approval. 3. Make changes to incorrect words by selecting the correct word, or re-typing the word correctly. If the word is correct as is, select IGNORE or ADD. ADD will add the new word to the dictionary. 4. Select CHANGE or CHANGE ALL to change all incidents of the word in the text box(es). 5. Select SAVE. Report Designer 2.2 Chapter 3: Text 3-17 Fonts Fonts are software that must be purchased and licensed for use by a company or individual. Some fonts come free of charge and are readily available on all computers. Other fonts must be loaded onto each computer that uses a document that has that font in the text. When you need additional fonts to be available on Designer, you can add them to the Designer list of fonts, but if you transfer the Designer report form to another computer, you must make sure that the font is available on that computer as well. Fonts cannot be added if they are not available on the computer being used. Add Fonts 1. Select Font > Edit Fonts. 2. Select the font in the left hand column to add to your Designer list of fonts. 3. Select ADD. Remove Fonts 1. Select Font > Edit Fonts. 2. Select the font in the right hadn column to remove from the Designer list. 3. Select REMOVE. Report Designer 2.2 Chapter 3: Text 3-18 Font Compatibility Sometimes development of the Designer report is on a PC and the server for PowerSchool is on a MAC OS. This can cause font incompatibility. To help resolve that, you can identify what to translate the PC fonts into when the report is exported to XML and re-imported to PowerSchool. 1. Select Fonts > Font Translation.... 2. Select the + sign to add a field to the list in the left column. Select the arrow that displays in the left hand column to display a drop down of the fonts on your resident computer. 3. Select a font from the drop down menu. The font will be copied to the right hand column as well. 4. Type the name of the equivalent font resident on the computer/server receiving the Designer files. 5. Select OK when done. Report Designer 2.2 Chapter 4: Drawing and Pictures Overview Boxes, lines, graphics and pictures are all part of making forms, certificates and other documents more personalized, interesting and attractive. In Designer, the Line tool, Box tool and Graphics tool work similar to a document design or word processing software. Pictures can be added to any document but they must be in .jpg (jpeg) format. Color Color can be added to box or line objects in Designer. Designer offers 256 colors. Color can be added using the object’s Properties window. To open the object’s property window, select the object, then select Object > Properties. The Properties window for the object selected will display. Chapter 4: Drawing and Pictures 4-2 Lines Straight lines can be created easily using the line tool. Line width, color and position in the layers can all be set in the Line Properties window. Create a Line 1. Select the Line tool . The cursor will display as a + sign. 2. Press down on the mouse within the workspace and “draw” the line by drawing the mouse across the board. 3. Select Object > Properties to open the Line Properties window. 4. Change width, color or layer order. Select OK. You can constrain the line to 45-degree angles by holding down the SHIFT key on the keyboard as you drag the line. Edit a Line (Change Properties) 1. Select the Arrow tool and select the line to be edited. 2. Select Object > Properties. The Line Properties window shown above will open. 3. Change line attributes as desired. Select OK. To change the length, “grab” one of the anchor points and “pull” the line longer or shorter. Report Designer 2.2 Chapter 4: Drawing and Pictures 4-3 Change Line Width 1. Select the Arrow tool and select the line to be edited. 2. Select Object > Set Line Width. 3. Select line width in points. 4. Select OK. Move a Line 1. Select the Arrow tool . and select the line to be moved. 2. Use your mouse to “grab” the line and move it or use the arrows to move the line in increments. Pressing CTRL while pressing the arrow keys will move the line in larger increments. Increments of movement are set in the Layout Settings Report Designer 2.2 properties window. Chapter 4: Drawing and Pictures 4-4 Rotate a Line 1. Select the Arrow tool and select the line to be edited. 2. Highlight and change the rotation percentage displayed in the workspace information box. 3. Press Enter on the keyboard or press the mouse button while hovering over the workspace. The line will rotate according to the percentage. To return the line to its original position, enter 0° in the rotation box. Report Designer 2.2 Chapter 4: Drawing and Pictures 4-5 Delete a Line 1. Select the Arrow tool and select the line to be deleted. 2. Press DELETE on the keyboard or select Edit > Cut or Edit > Clear to delete the line. Copy a Line 1. Select the Arrow tool and select the line to be copied. 2. Select Object > Duplicate. The line will be copied and set slightly below the current line. 3. Press CTRL ← to align the lines on the vertical axis. Press CTRL ↑ to align the lines on the horizontal axis. Pressing CTRL enables you to move the line by the exact amount of the offset as set in Layout Settings. Line after CTRL ← and CTRL ↑ have been pressed. The line is now stacked on or below the first line precisely. Report Designer 2.2 Chapter 4: Drawing and Pictures 4-6 Duplicate a LIne Multiple Times 1. Select the Arrow tool and select the line to be duplicated. 2. Select Object > Auto Duplicate Objects. 3. Select the number of lines you want and set a vertical or horizontal offset from the current line. Since there is no text in a line, do not enter any information or values in the Auto Number Text section of the popup window. 4. Select OK. Report Designer 2.2 Chapter 4: Drawing and Pictures 4-7 Boxes Box objects can be used to add design, organization and clarity to any document. Boxes may be created to be “see-through” with transparency to show the layer beneath. For example: you want to create a frame around certain text as shown below. The quick brown fox jumped over the lazy dog. Create a Box 1. Select the Box tool . The cursor will display as a + sign. 2. Press down on the mouse within the workspace and “draw” the box by drawing the mouse across the board. 3. Select Object > Properties to open the Box Properties window. 4. Change line width, line or fill color, layer order, transparency or corner radius. A box created in Designer can have rounded corners by defining a corner radius. Entering negative numbers will have no effect on the corner radius. Transparency determines whether the box is “see-through.” Activate (√) the checkbox if you want the box to be transparent and display all layers underneath. If you do not want the transparency, make sure the box is not checked. 5. Select OK. Report Designer 2.2 Chapter 4: Drawing and Pictures 4-8 Edit a Box (Change Properties) 1. Select the Arrow tool and select the box to be edited. 2. Select Object > Properties. 3. Change line attributes as desired. Select OK. Resize a Box 1. Select the Arrow tool and select the box to be edited. 2. Grab the anchor point of the box with the mouse. 3. While pressing down on the mouse button, “pull” the anchor point to increase or decrease size. Move a Box 1. Select the Arrow tool moved. and select the box to be 2. Use your mouse to “grab” the box and move it or use the arrows to move the line in increments. Pressing CTRL while pressing the arrow keys will move the line in larger increments. Increments of movement are set in the Layout Settings properties window. Anchor Point Rotate a Box 1. Select the Arrow tool and select the box to be edited. 2. Highlight and change the rotation percentage displayed in the workspace information box. 3. Press Enter on the keyboard or press the mouse button while hovering over the workspace. The box will rotate according to the percentage. To return the box to its original position, enter 0° in the rotation box. Delete a Box 1. Select the Arrow tool and select the box to be edited. 2. Press DELETE on the keyboard or select Edit > Cut or Edit > Clear to delete the box. Report Designer 2.2 Chapter 4: Drawing and Pictures 4-9 Copy a Box (single incident) 1. Select the Arrow tool and select the box to be copied. 2. Select Object > Duplicate. The box will be copied and set slightly below the current line. The box will duplicate once and be offset by the distance set in Layout Settings. To Align the box with the first box, select CTRL ← or CTRL ↑. Use the up and down arrows to move the box away from the original or use the precise placement tools. You may also duplicate the box and set a different offset amount by following the instructions for “Duplicate a Box Mulitple Times” and selecting 1 for the number to duplicate. Report Designer 2.2 Chapter 4: Drawing and Pictures 4-10 Duplicate a Box Multiple Times 1. Select the Arrow tool and select the box to be duplicated. 2. Select Object > Auto Duplicate Objects. 3. Select the number of boxes you want and set a vertical or horizontal offset from the current box. Since there is no text in a line, do not enter any information or values in the Auto Number Text section of the popup window. 4. Select OK. Report Designer 2.2 Chapter 4: Drawing and Pictures 4-11 Graphics and Pictures You can quickly import .jpg graphics and pictures into any report document. Import a Graphic or Picture 1. Select the Graphic tool . A system browse window will display. 2. Navigate to the graphic or picture (.jpg file) you want to use in this document. 3. Select OPEN. The Picture Properties window will open. 4. Select the options (see “Scaling Options” next page). 5. Select OK. Report Designer 2.2 Chapter 4: Drawing and Pictures 4-12 Scaling Options • No Scaling: Leaves the graphic as imported left and top justified. • Shrink to Fit, Proportional: Forces the graphic into the object margins but keeps the correct porportions left and top justified. • Shrink to Fit, Proportional, Centered: Forces the graphic into the object margins, but keeps the correct proportions centered. • Fill Box, Proportional: Forces the graphic into the object margins, but keeps the correct proportions as much as possible, left and top justified. • Fill Box, Proportional, Centered: Forces the graphic into the object margins, but keeps the correct proportions as much as possible, centered. • Fill Box, Force Dimensions: Forces the graphic to conform to the object margins ignoring proportions. • Tiled, Start at Left Corner: Duplicates the graphic across and down the entire report document for a wallpaper or backdrop effect. Student Photo Option The Student Photo option allows the report to use a database .jpg graphic instead of a local graphic. This option does not reflect any visual changes to the picture in Designer. Selecting this option modifies certain XML tags when exporting. When the pictures are placed, they will be placed by the scaling options defined above, fitting into the sized graphic location according to the setting. Report Designer 2.2 Chapter 4: Drawing and Pictures 4-13 Edit Graphic or PIcture Properties 1. Select the arrow tool and select graphic or picture to be edited. 2. Select Object > Properties. 3. Make changes to the attributes of the graphic or picture. 4. Select OK. Move a Graphic or Picture 1. Select the arrow tool and select the graphic or picture to be moved. 2. Press the mouse button and relocate the picture or use the arrow keys. Press CTRL to move the graphic in greater than 1 point increments as set in Layout Settings or use the precise positioning options in the bottom left half corner of the workspace. Rotate a Graphic or Picture 1. Select the arrow tool and select the graphic or picture to be rotated. 2. Highlight the rotate box and type in a rotation amount. 3. Press Enter on the keyboard or press the mouse button while hovering over the workspace. The graphic or picture will rotate according to the percentage. To return the graphic to its original angle, enter “0.” Report Designer 2.2 Chapter 4: Drawing and Pictures 4-14 Copy a Graphic or Picture 1. Select the Arrow tool and select the graphic or picture to be copied. 2. Select Object > Duplicate. The graphic or picture will be copied and set slightly below the current graphic or picture by the increment defined in Layout Settings. We advise importing each incident of a graphic rather than duplicating. When you copy the imported graphic, the settings are not copied. After copying an imported graphic or picture, select Object > Properties for the copy and identify the settings for the new picture. To align the second picture with the first one, select CTRL ← or CTRL ↑. To move and reposition, select the object and press the mouse button while moving across the workspace, use the arrow tools or the precise positioning options in the bottom left hand corner of the workspace. To duplicate a graphic or picture and set a defined offset amount, follow the directions in “Duplicate a Graphic or Picture Multiple Times” and just make one copy. Delete a Graphic or Picture 1. Select the Arrow tool and select the graphic or picture to be deleted. 2. Select Delete on the keyboard, Edit > Cut or Edit > Clear to delete the graphic or picture. Report Designer 2.2 Chapter 5: Alignment and Layers Overview Alignment and Layer options allow for quick ways to line up object and text or items within an object. Designer provides many options for how to align objects. Layers are defined in the Properties window of the object. Each object is assigned a different layer number. The layer of an object may easily be re-defined in the workspace by using the tools or the Object > drop down menu selections. Alignment Tools and Options Layer Tools and Options Chapter 5: Alignment and Layers 5-2 Object Alignment Object alignment is made easier by the ability to select multiple objects and align them together. There are tools in the toolbox for quick alignment of multiple objects and drop down selections in the Object menu that allow precise individual placement of selected objects and alignment of selected multiple objects. Align Multiple Objects (Quick) 1. Select multiple objects on the artboard. 2. Select the alignment tool that depicts the desired alignment. Align Left Align Horizontal Center Align Right I selected Left Align Align Top Align Vertical Center Align Bottom . This method is a quick alignment. Designer offers more control and ability to manipulate the objects you have selected. Please read on.... Report Designer 2.2 Chapter 5: Alignment and Layers 5-3 Object Menu Drop Down Alignment Selections Align to Grid 1. Select the objects on the artboard. 2. Select Object > Align to Grid. As noted above, the boxes will shift to align with the next grid mark. If the grid marks are too close, you can change the grid mark assignment by selecting the Layout Tool and selecting a different grid size. See page 2-11 in this manual for more information on Layout Settings. Report Designer 2.2 Chapter 5: Alignment and Layers 5-4 Align Objects.... 1. Select two or more objects to be aligned. For example we have selected the blue and red boxes. 2. Select Object > Align Objects... The Align Objects window will display. 3. Select the alignment options. When selections are made, the pallette will display how the choices will align the objects selected. For an example, we have selected to align the objects centered horizontally and top vertically. 4. Select ALIGN. Report Designer 2.2 Chapter 5: Alignment and Layers 5-5 Align Object Widths.... 1. Select two or more objects. 2. Select Object > Align Object Widths.... Right, Left or NONE determines whether the objects will shift to align in place from the Left, Right or not at all. Set Width To determines whether the objects will be set equal to the shorter or longer width object. 3. Select the Align Object Width... options and select OK. In this example, we aligned the widths of the red and blue rectangles to match the width of the blue and align on the left side of the objects. Report Designer 2.2 Chapter 5: Alignment and Layers 5-6 Set Object Position.... Object position can be set in relation to two or more objects or a single object in relation to the workspace. 1. Select the object(s) to position. 2. Select Object > Set Object Position.... 3. Select the parameter for the object positioning. In this example, we are positioning the red and blue boxes to bottom. The position determines the distance from each other or from the baseline if using a single object. 4. Select OK. Object(s) will reposition. Report Designer 2.2 Chapter 5: Alignment and Layers 5-7 Space Objects... Space can be applied to two or more objects. The space given is in relation to each object within the group. 1. Select the object(s) to position. 2. Select Object > Space Objects.... 3. Select the parameters for spacing: Vertical or Horizontal and in relation to the top or bottom of the objects. 4. Select OK. Report Designer 2.2 Chapter 5: Alignment and Layers 5-8 Center Objects on Page... 1. Select the object(s) to position. 2. Select Object > Center Objects on Page.... 3. Make selection. Select OK. The selected objects will center together. Report Designer 2.2 Chapter 5: Alignment and Layers 5-9 Layers Object layers determine the front to back positioning of an object in relation to the other objects in the workspace. Each object occupies a layer. Some report documents may contain hundreds of layers. The positioning of some objects may determine how they display in the final report. There are five menu commands for layering: Bring to Front Bring to Front moves the object to the layer on top. This layer will have the largest assigned layer number. Send to Back Send to Back moves the object to the first layer. This layer will be assigned layer number one. Move Forward Move Forward moves the object one step up. This will increase the layer number of that object by one. Move Backward Move Backward moves the object one step down. This wil decrease the layer number of that object by one. Re-order Object Layers Re-order Object Layers resequences the selected objects’ layers starting with the layer number you specify. This allows you to re-order several objects at once. Identify Object Layer 1. Select an object on the workspace. 2. Select Object > Properties. The object’s property box will display the layer number. Report Designer 2.2 Chapter 5: Alignment and Layers 5-10 Order Object Layers 1. Select an object in the workspace. We have selected the red box. 2. Select the layer arrangement: Bring to Front , or Bring Forward to bring it over the blue box. You may also select Object > Bring to Front or Object > Move Forward. Bring to Front Move Forward Send to Back Move Backward Report Designer 2.2 Chapter 5: Alignment and Layers 5-11 Re-order Object Layers 1. Select two or more objects. 2. Select Object > Re-order Object Layers. 3. Enter the number you want the re-ordering to start with. 4. Select OK. The objects will re-layer accordingly. Report Designer 2.2 Report Designer 2.2 Chapter 6: Drop Down Menus Overview Designer’s drop down menu system provides several ways to help increase your workflow success. The drop down menus for these items are covered in other areas of this manual as well. This chapter is to provide a reference section describing the functions of the drop down menus. Designer Drop Down Menu Some functions on the Designer drop down are basic system functions that come with the operating system being used. The Preferences and Services functions are not used by Designer. Hide Designer and Hide Others functions as designed and About Application provides basic application information such as software version and copyright information. NOTE: To quit Designer, use Designer > Quit Designer before attempting to close down your computer and turn it off. Chapter 6: Drop Down Menus 6-2 File Drop Down Menu When Designer is first opened, you will be presented with the basic Designer bar on the top of your screen. To begin working with Designer, select File > New to open a new file and begin designing a report document. Open...: Opens a browse window to allow you to navigate to and select a current report document. Close: Closes the current report document or workspace displayed. Save: Saves the current document. Save As...: allows you to save the current report document under a different name and continue to make changes and save it under the new name. Export XML...: Exports the report document in an XML format so it can be easily recognized and used by PowerSchool®. Import XML...: Allows a current report document from PowerSchool to be brought into Designer and modified. Once modified, the report document needs to be exported and re-imported to PowerSchool to be used in PowerSchool. Export Component.../Import Component...: This feature allows for components that have been created to be shared among Designer users. Export Report.../Import Report...: This feature allows for reports that have been created to be shared among Designer users. Report Designer 2.2 Chapter 6: Drop Down Menus 6-3 Page Setup...: Allows you to modify the page settings for the current report document. Print...: Allows you to print the current rerport document and review it. Printer settings may include pdf settings to create a pdf. Setup Fields...: Setup Fields can be used to create or add new fields to the selections. Designer comes with some fields already installed for educational use such as medical fields, student fields and teacher fields. Setup Functions...: Setup Functions can be used to create or add new functions that can be used in a report document in conjunction with PowerSchool. Some functions come already installed in Designer such as Attendance and Credit Type functions. Edit Drop Down Menu The Edit drop down menu provides basic functions such as Undo, Redo, Cut, Copy, Paste, Clear and Select All. These function the same as in other software. Show Clipboard displays the most recent text that has been cut or copied. Selecting Show Clipboard opens a small window display similar to a whiteboard. Spell Check Selected Objects...: Selected text objects will go through a spell check when this option is chosen. Grammar and sentence structure are not checked. Report Designer 2.2 Chapter 6: Drop Down Menus 6-4 Object Drop Down Menu The Object drop down menu provides many options for manipulating the objects on the workspace. An object is any item on the workspace including text frames, pictures, functions and fields. The Object menu is covered in detail in Chapters 3: Text, Chapter 4: Drawing and Pictures, Chapter 8: Fields and Functions and Chapter 11: Make Reports Easier. Report Designer 2.2 Chapter 6: Drop Down Menus 6-5 Font Drop Down Menu The Font drop down menu is provided for easy selection of available fonts. Fonts can be added using the Edit Fonts feature. Refer to Chapter 3: Text for more information on fonts. Style Drop Down Menu The Style drop down menu provides a selection of font and alignment attributes. The shortcuts can be used to minimize the time for this task as well as the properties window for the text box. Time to apply a style can be further reduced by using Style Sheets. Report Designer 2.2 Chapter 6: Drop Down Menus 6-6 Style Sheet Drop Down Menu Style Sheets are an effective way to reduce time formatting a document. Using Style Sheets will be covered in Chapter 11: Make Reports Easier. Basic attributes can be created and saved together and applied in one step when the style sheet is selected. Favorites Drop Down Menu The Favorites menu allows you to save a text object such as a phrase or heading that is used often. Windows Drop Down Menu If several reports are being worked on at one time, the Windows drop down menu displays a list of the open windows available. This provides an easy method of switching between report documents while you are designing. Help Help is currently not used with Designer. Report Designer 2.2 Chapter 7: Tables Overview The Table Wizard allows you to quickly and easily create a formatted table in your report document. A table contains box, text and line objects depending on the formatting options you choose. Fields and Functions can be inserted into a table cell. A table is inserted into the document as a single group. You can ungroup the object and manipulate the individual cells of the table in the document. Being able to ungroup allows you to edit text within the cells individually after it is created. You can get to the Table Wizard in two ways: • Select the Table Wizard icon • Select Object > Clipboard Text to Table. This option can only be used if there is text on the clipboard. To place text on the clipboard, cut or copy a text object. Set number of columns and rows. Use INSERT to add a row or add a field, or function to a cell. in the toolbox or Set width of all columns. Select this checkbox if you want all the current column widths to be adjusted when the UPDATE button is selected. CLEAR erases the content of the selected cell. EDIT or REPLACE text of selected cell. Set the width of a specific column. FILL functions similar to the autonumber function by filling the rows or columns with the numbering sequence selected or order chosen. Row height can be adjusted. Add graphic display to the table to make it more readable. Chapter 7: Tables 7-2 Create a Table 1. Select the Table Wizard icon . 2. Define the table parameters by identifying the number of columns and rows and width of columns. If changes are required to column width later, you can make the change and select UPDATE or select individual columns and use the SET WIDTH button. Activate (√) the checkbox next to “Reset column widths” in order to reset the existing column widths when UPDATE is selected. 3. Define parameters for the rest of the table and add any fields or functions. Each button across the top of the table wizard window is described more fully in the rest of this chapter. 4. Select CREATE TABLE. Table parameters can be edited and modified in the workspace by selecting the object and ungrouping the table cells. Once ungrouped, the table cells can be manipulated like any other individual text object. Report Designer 2.2 Chapter 7: Tables 7-3 INSERT The INSERT drop down allows you to insert a function, field or additional row into a selected table cell. Report Designer 2.2 Chapter 7: Tables 7-4 FILL The FILL drop down menu provides options for autonumbering: • Fill Down - Fills the selected cells with the value from the topmost row. • Fill Right - Fills the selected cells with the value from the left column. • Fill Number - Fills the selected cells with numbers starting at the number provided and counting up. • Fill Down Autonumber - Opens the Auto Number Text Object command dialogue box. This combines text replacement and autonumbering with the Fill Right function. • Fill Right Autonumber - Opens the Auto Number Text Object command dialogue box. This combines text replacement and autonumbering with the Fill Right function. Fill Down Autonumber and Fill Right Autonumber work the same as the Auto Number Text feature. Fill Down and Fill Right will fill the selected cells with the objects in the row or column noted. Fill number will fill the selected cells with the identified number sequence. Report Designer 2.2 Chapter 7: Tables 7-5 SET WIDTH The width of the selected column can be modified by selecting SET WIDTH in the Table Wizard. Default is .5. 1. Select a cell. 2. Select SET WIDTH. 3. 4. Enter the desired column width. Select OK. The width will change and display with the new parameter in the dialogue box. EDIT or ADD TEXT 1. Select the text to edit or the cell to enter text. 2. Select EDIT TEXT. 3. 4. Change or add text. Select OK. The text will be added to the selected cell if there originally was no text. Fields and Functions may be added to the table cell in the EDIT TEXT box by selecting the appropriate button in the bottom left hand corner or typing the information directly. Report Designer 2.2 Chapter 7: Tables 7-6 REPLACE TEXT The text to be edited should be selected before selecting REPLACE TEXT. 1. Highlight the text in the cell. 2. Select REPLACE TEXT. 3. Enter the replacement text. 4. Select OK. CLEAR The text to be cleared should be selected before selecting CLEAR. Selecting CLEAR deletes the text, field or function in the cell. If deleting an autonumbered cell, the autonumbering will not re-number to accomodate the loss of that number in the order. Report Designer 2.2 Chapter 8: Fields and Functions Overview Fields and Functions can be used to automate the insertion of names, addresses and other information from a database. Fields and Functions are macro-like strings of text that provide instructions for retrieving and inserting information into the field. Fields Overview Fields are single lines or strings of text that can be inserted into a text object. Fields can be any string of text that you use often. Designer allows you to have as many sets of fields that you need. Fields already created may be imported into Designer as part of a Field List and inserted into a current report. Fields may also be entered manually in Designer and saved in Favorites if used frequently. To import Field Lists, the fields must be saved as a tab-delimited file. The fields may be placed in a spreadsheet and saved. The file needs to be accessible from your computer when importing. If saving the information from Microsoft Excel, select Text (tab delimited) as the file type to save as. Chapter 8: Fields and Functions 8-2 Import Field Lists 1. Select File > Setup Fields. 2. Select IMPORT. A browser window will open for you to navigate to the tab delimited text file containing the field information. 3. Select the file. 4. Select OPEN. Report Designer 2.2 Chapter 8: Fields and Functions 8-3 5. Type a name for the file and select OK. The file is now added to the Field Setup list. Select the file to verify the fields are present. Report Designer 2.2 Chapter 8: Fields and Functions 8-4 Create a Field List and Field Manually 1. Select File > Setup Fields. 2. Select NEW... in the Field Lists section of the window. 3. Name the new field list and provide a prefix and suffix. 4. Select SAVE. Report Designer 2.2 Chapter 8: Fields and Functions 8-5 5. Select NEW... in the Fields section of the window. The new field list should still be selected. 6. Enter the Field Name and select OK. Repeat steps 5 and 6 for as many fields that need to be added to this list. When done, select the close window icon on the window. Report Designer 2.2 Chapter 8: Fields and Functions 8-6 Insert a Field There are a several ways to insert a field into a report depending on your need. A field can be entered using the Fields Tool , the Text Properties window or using Object > Insert Field. Using the Fields Tool Button 1. Select the Fields Tool . 2. Select a field list from the drop down menu, then select the field to add to the current report. 3. Select INSERT. A text box containing the field information will be placed on the workspace of the report. You can now move and place the object where you want it to be in the report. Report Designer 2.2 Chapter 8: Fields and Functions 8-7 Using Object > Insert Fields 1. Select Object > Insert Fields. 2. Select a field list from the drop down menu, then select the field to add to the current report. 3. Select INSERT. A text box containing the field information will be placed on the workspace of the report. You can now move and place the object where you want it to be in the report. Report Designer 2.2 Chapter 8: Fields and Functions 8-8 Using The Text Properties Window 1. Select the Text Tool and select an insertion point on the report workspace. 2. Select Object > Properties. 3. Select the Fields Tool. 4. Select the List Field from the drop down menu. 5. Select a field from the list displayed. 6. Select INSERT. To add multiple fields, repeat steps 4 and 5. Fields can be aligned, or stacked by putting a return between them in the properties window. Text attributes, frame type, alignment and layer may be set in this window. NOTE: If you already know the field information to enter, you may also enter a field into a text object by just creating the object and typing. Report Designer 2.2 Chapter 8: Fields and Functions 8-9 Edit a Field 1. Select the arrow tool 2. Select the field. 3. Select Object > Properties. 4. Edit or replace the field. 5. Select OK. Delete a Field 1. Select the arrow tool 2. Select the field. 3. Select Edit > Cut, Edit > Clear or the Delete key on the keyboard. Report Designer 2.2 Chapter 8: Fields and Functions 8-10 Functions Overview Functions help make entering complex information simpler. Functions are macro-like wizards that help you enter complex database fields. Functions may include multiple parameters. Designer allows you to have as many sets of functions or categories that you need. Functions can be entered manually or imported from another Designer application. Import a Function There are two ways to import a function: as a component and directly through the Setup Functions window. Importing a Set of Functions into the Category and Function List 1. Select File > Setup Functions. 2. Select IMPORT. A warning will pop up stating, “This will replace all existing functions. Continue?” Select OK to overwrite all existing functions with the list you are importing. Report Designer 2.2 Chapter 8: Fields and Functions 8-11 3. Browse to the tab delimited text file that contains the functions to import. 4. Select the file and select OK. The new list of categories and functions will be added to the Setup Functions menu. Importing a Function as a Component 1. Select File > Import Component. 2. Browse to the file. 3. Select the file and select OPEN. 4. If the component has imported successfully, or if there is a problem with the file, a popup will display giving that information. Report Designer 2.2 Chapter 8: Fields and Functions 8-12 Create a Function If a Function is not already created, you can create one manually and add it to your list of components and functions. 1. Select File > Setup Functions. 2. Select NEW in Category. If the Category already exists, select the Category, then select NEW next to the Functions list. 3. Enter the name of the Category and select OK. Select the Category in the Setup Functions window and select NEW next to the Functions List. Report Designer 2.2 Chapter 8: Fields and Functions 8-13 Enter Function information. Select NEW to enter parameters. 4. Enter the Function information. Select NEW to enter the Parameters. 5. Enter the parameters and select SAVE. 6. Select SAVE in the Edit Function page. The Function will now be added to the list. You may close the Setup Functions window by selecting the close button on the upper left hand corner of the window. Report Designer 2.2 Chapter 8: Fields and Functions 8-14 Insert a Function Functions can be added to a report in a number of ways: Using the Object > drop down menu, the text object properties window, and as a component if it is already saved as a component. Using the Object Drop Down Menu 1. Select Object > Insert Functions or the Function Tool on the Toolbar. Selected function information. 2. Select a Category. 3. Select a Function from that Category. 4. Select INSERT. An additional window may display to further define the how the function will display in the report. 5. Enter any additional format information and select INSERT. The selected function will now display on the workspace in order for you to place, align or adjust the function box as desired. Report Designer 2.2 Chapter 8: Fields and Functions 8-15 Using the Text Object Properties Window 1. Select the Arrow Tool and select the text object to receive the function or select the Text Tool and select an insertion point in the report. 2. Select Object > Properties to display the text object properties window. 3. Select the Functions Tool 4. Select the Category and Function within that Category. 5. Select INSERT. The function will be added to the text window. Multiple functions or fields and text may be added. Repeat steps 3 - 5 as necessary. Text attributes, allignment, frame type and layer may be defined in this window. . Report Designer 2.2 Chapter 8: Fields and Functions 8-16 Adding a Function Component The function must have been already saved as a component. 1. Select Object > Insert Component. 2. Select the Component. 3. Select INSERT. Save Function as a Component 1. Select the function to be made into a component. 2. Select Object > Save Component. 3. Title the component and select OK. Report Designer 2.2 Chapter 8: Fields and Functions 8-17 Export a Function To export a function from Designer, the function must be saved as a component, then exported. Exporting from Designer will create a tab delimited text file that can be easily imported to another computer with the Designer application. 1. Select File > Export Component. 2. Select the component to export and select EXPORT. The component will be saved in the selected location. The file may be emailed or saved to a removable disk and transferred to another computer running the Designer application in order to be imported for use. Report Designer 2.2 Chapter 8: Fields and Functions 8-18 Edit a Function 1. Select the arrow tool and select the function object. 2. Select Object > Properties. 3. Type any changes directly in the text window. 4. Select OK. Delete a Function 1. Select the arrow tool . 2. Select the Function object. 3. Select Edit > Cut, Edit > Clear or press the Delete button on the keyboard. Report Designer 2.2 Chapter 9: Schedules and Transcripts Schedules and transcripts can be automated in Report Designer using the Schedules and Transcripts features. Schedules Overview The Schedules feature automates the creation and placement of fields common in a class schedule. A Schedule is made up of many individual text objects that pull information from a database to display a student’s schedule. When creating a Schedule, you will need to design the report with the school name, address and other pertinent information you want displayed. If you want lines separating schedule information that is displayed, you will need to create the borders according to the measurements you define for each field. This section of the manual will describe creating the schedule information. Chapter 12: Putting It All Together will describe a step by step design of a Schedule. Columns Tab Overview Headings can be automated or ungrouped and replaced after the schedule is created. There are three tabs in the Schedules screen: Fonts, Periods and Columns. Each tab has a set of parameters to be defined for the display of the student schedule. Schedule columns display as they will on the report. Activate the checkbox in the Information column of the information you want displayed. Column width. Column width can be set manually or adjusted using the R-L arrows. As the column width is adjusted, the visual display in the text window will adjust. Prior course information for the year can be included using the correct PowerSchool codes. Current class information can be added to the schedule. Once a schedule is defined and set up, it can be saved with a unique name in order to use the schedule design at another time, or to modify it as needed. Chapter 9: Schedules and Transcripts 9-2 Fonts Tab Overview Define heading attributes for the columns. Define attributes for the column body text. Periods Tab Overview You can enter up to 20 class periods. 8 class periods are given by default. Use the identifiers for class periods that are defined in PowerSchool. Report Designer 2.2 Chapter 9: Schedules and Transcripts 9-3 Create a Schedule 1. Select the Schedules icon in the toolbox. The default screen display shows three tabs: Fonts, Periods, Columns. Each tab has a set of parameters to be defined for the display of the student schedule. The following pages will show and describe these features. Report Designer 2.2 Chapter 9: Schedules and Transcripts 9-4 2. Select the Columns tab. When using the Current or Historical column option, a Store Code must be entered. Information from the student’s current or historical grade records will be displayed as selected. The Columns tab options determine which database fields will display in each column. Up to eight columns may be displayed. The position of each column can be adjusted independently within the schedule. 3. Select the Fonts tab. The header can be set to a larger type size or different font. The Fonts tab options allow you to adjust the column header and the Schedule Listing font, font size and style. Report Designer 2.2 Chapter 9: Schedules and Transcripts 9-5 4. Select the Periods tab. The Periods tab provides for up to twenty classroom periods to be included on the schedule. The default setting is 1-8. Modify these to match your specific school’s period or PowerSchool expression name. 5. Once all parameters are set and the schedule displays the way you want it to, you can save the schedule settings in the Schedule Listing. Select SAVE from the drop down listing next to “Schedule Listing.” 6. Enter a Schedule Listing title. 7. Select OK. The Schedule will now be listed in the drop down menu and be selectable the next time you desire to create a schedule of classes based on the settings in this schedule. 8. Select OK to create the Schedule. Report Designer 2.2 Chapter 9: Schedules and Transcripts 9-6 Schedule Display and Making Changes The Schedule designed will be placed on the workspace when OK is selected. Additional information can be added as you design the rest of the report. Several schedules can be placed on a single sheet and trimmed for distribution to the students. The Schedule is in a grouped format. All the text objects are grouped and can be moved, resized and modified as a group. To manipulate individual text objects, you must ungroup the text objects. It is tempting to resize the individual objects, but the field information that scrolls beyond the box includes the informaton necessary to communicate with PowerSchool and pull the correct database information into those fields. The column width should be set in the schedule tool to fit the largest possible entry in the object box. Ungroup Schedule 1. Select the schedule. 2. Select Object > Ungroup. Individual text objects may now be selected and manipulated. 3. Report Designer 2.2 Chapter 9: Schedules and Transcripts 9-7 Edit a Schedule If you saved your designed schedule, you can re-open that schedule and make changes to the form. 1. Select the Schedules tool . 2. Select the saved schedule from the drop down menu. 3. Make changes to the design as desired and select SAVE from the drop down menu. 4. Accept or type in the same name as before and select OK. In order to replace the current schedule form on the report with the modified one, you must delete the existing form and replace it with the new, modified form. Delete a Schedule . 1. Select the arrow tool 2. Select the Schedule object on the workspace. 3. Select Edit > Cut, Edit > Clear or the Delete button on the keyboard. Report Designer 2.2 Chapter 9: Schedules and Transcripts 9-8 Transcripts Overview A transcript object pulls information from a database. Using the transcript object makes creation of transcript information automated. When creating a transcript, the form for only one year needs to be created. PowerSchool will automate creation of as many years transcript information as is identified in the Options tab, Options section. Options Tab Overview The transcript window will open with the Options tab selected by default. The options selected in the Transcript window places information for PowerSchool to read and place the correct database information into the object report. The Options tab allows you to set the font, font size, and style for the heading, and course listings. You can select to not automate the school name and information, but create your own title heading in the report. Select the years to be displayed on the transcript and any further restrictions such as no blank grade courses display. Columns Tab Overview The Columns tab defines which database fields will display in each term column. Up to six items may be displayed. The position of each item can be adjusted independently within the term column. Fields are added and removed automatically using the + and - buttons in the upper left hand corner of the Columns tab. Automated fields are: - Course Number - Course Name - Total Earned Credit - Letter Grade - Percent - Citizenship - Earned Credit Hours - Other - Blank If Credit Hours are displayed, you may choose the format to be used. If Course Info is displayed, you must select an item from the popup or enter your own code. “Other” may be selected and the PowerSchool code or field may be manually entered in the Format/ Other column. Report Designer 2.2 The width and alignment of each column set here enables calculation of columns created in the report. The width should be sufficient to allow the most information that might be included in that column to display. Chapter 9: Schedules and Transcripts 9-9 Create a Transcript 1. Select the Transcript icon in the toolbox. 2. Using the drop down menus, enter the desired settings and information such as School Name and year into the Options window. 3. Select the Columns tab. Select the fields to display for the student. A term does not need to be assigned for the Course Name, so that may be deleted next to “Course Name.” The Course Name needs only to be mentioned once. To display the grades for the full year, select the code for the first semester and select the fields you want displayed for that semester such as Letter Grade, Percent or Citizenship. Once you have identified the information you want displayed for each semester, copypaste the first repeatable field into the next empty field and change the term to the next semester code. To add, you may select the + sign, or copy-paste and change the semester code for the remaining fields. Perform this for each semester you want displayed on the transcript. 4. If you want to save the settings for this transcript, select SAVE from the Transcripts drop down menu in the lower left corner of the page to save the Transcript design. Report Designer 2.2 Chapter 9: Schedules and Transcripts 9-10 5. Enter the name. Select OK. 6. Select OK to close the window and create the transcript object. The transcript object can be resized and moved by selecting the arrow tool and grabbing an anchor point on the object. Report Designer 2.2 Chapter 9: Schedules and Transcripts 9-11 Edit a Transcript Object . 1. Select the arrow tool 2. Select the Transcript object on the workspace. 3. Select Object > Properties. 4. Make the desired changes to the transcript. 5. Select SAVE from the drop down menu to save the object with the changes. You may save it under the same name if desired. 6. Select OK to accept changes. Delete a Transcript Object . 1. Select the arrow tool 2. Select the Transcript object on the workspace. 3. Select Edit > Cut, Edit > Clear or the Delete button on the keyboard. NOTE: A transcript object cannot be ungrouped. Report Designer 2.2 Report Designer 2.2 Chapter 10: Import/Export The Import/Export functions allow you to import or export a component or report from your Designer application to another Designer application on another computer in order to share reports and components between users. The Import/Export XML functions allow you to import existing reports from PowerSchool and export your modified or newly created reports to PowerSchool. Import/Export Components Components are objects that have been saved for later use or sharing with other Designer application users. For more information on components and how to create and use them, please refer to Chapter 11: Make Reports Easier. Import a Component Components created by another Designer user on another computer can be saved and transferred to your computer and then imported into Designer. 1. Select File > Import Component. 2. Browse to the component and highlight it. 3. Select OPEN. A warning window will display stating whether the component file format is valid or not. Select OK to close the window. Chapter 10: Import/Export 10-2 Export a Component 1. Select File > Export Component. 2. Select the component to export. 3. Select EXPORT. 4. Enter the title and location for the file. Select SAVE. Send or copy the file to the location or computer that will be importing the component. Report Designer 2.2 Chapter 10: Import/Export 10-3 Import/Export Report A report must be open when trying to export the file. The file will export and be saved as a tab delimited text file ready for import to another Report Designer application. A report that is saved from PowerSchool for importing into Designer is in XML format. To import a report from PowerSchool, use the Import XML feature. To export to PowerSchool, use the Export XML feature to make it compatible with PowerSchool. Import Report 1. Select File > Import Report. 2. Browse to the report location and select it. 3. Select OPEN. An alert will display stating whether the file is compatible or if the report succesfully imported. Select OK on the screen to close it. The file wll be available in the list of reports. Select File > Open to view available reports. Report Designer 2.2 Chapter 10: Import/Export 10-4 Export Report 1. Select File > Export Report. 2. Name the file, identify the location to save it to and select SAVE. The file is now ready to be transferred to another Report Designer user. Report Designer 2.2 Chapter 10: Import/Export 10-5 Import/Export XML A report that is saved from PowerSchool for importing into Designer is in XML format. To import a report from PowerSchool, use the Import XML feature. To export to PowerSchool, use the Export XML feature to make it compatible with PowerSchool. When you need to modify a report in PowerSchool, it is best to export the report from PowerSchool and perform all the modifications within Designer. Import XML After a report has been exported as XML from PowerSchool, it should be made available to the computer with Report Designer for easy import, modification and exporting. 1. Select File > Import XML. 2. Select the XML file to import and select OPEN. The XML file will open in Designer, ready for modifications. Report Designer 2.2 Chapter 10: Import/Export 10-6 Export XML The file to be exported should be open on the workspace. 1. Select File > Export XML. 2. Enter a name and location and select SAVE. Modifications made to the report are now saved and exported to XML ready to be re-imported to PowerSchool. Report Designer 2.2 Chapter 11: Make Reports Easier Overview Report Designer was designed to help you make object reports easier and manageable. With that in mind, the following things were developed: • Ability to manipulate and place objects in a What You See Is What You Get (WYSIWG) removing the guesswork • Ability to duplicate multiple objects • Ability to save a regularly used object for re-use as a component • Ability to duplicate and precisely place objects • Ability to number or sequence objects • Ability to align groups of object to a grid or each other • Ability to space objects precisely • Ability to create text objects that are used frequently and save them in order to re-use them easily • Ability to create style sheets and easily apply them. These abilities and more were developed into Report Designer to help make creating object reports for PowerSchool users easier. Not all of the features mentioned are covered specifically in this chapter. Many of these are covered in other chapters. Chapter 11: Make Reports Easier 11-2 Duplicate Multiple Objects 1. Select the objects to be duplicated. Press and hold the SHIFT key to select multiple objects. 2. Select Object > Auto Duplicate Objects.... 3. Select the number of duplicates and their offset from the original group. If these objects have text also that is set up for text replacement with the auto number feature, you can enter that information now. 4. Select OK. Report Designer v 2.2 Chapter 11: Make Reports Easier 11-3 Duplicate and Precisely Position Objects 1. Perform auto duplication as described on the last page. 2. Use the ∆H and ∆V tools at the bottom of the workspace to precisely position the objects after duplication. Highlight the ∆H or ∆V and enter a value. 3. Press Enter or click on the workspace to enable the positioning. Re-use An Object By Making It A Component NOTE: Multiple objects can make up a component. 1. Select the object or group of objects to be made into a component. 2. Select Object > Save Component. 3. Title the component and select OK. Report Designer v 2.2 Chapter 11: Make Reports Easier 11-4 Set Object Position 1. Select the objects to position. 2. Select Object > Set Object Position. 3. Select position for the objects. 4. Select OK. Report Designer v 2.2 Chapter 11: Make Reports Easier 11-5 Align Groups of Objects to a Grid 1. Select the objects to align. 2. Select Object > Align to Grid. Objects will move the grid distance that is set in Layout Settings. 3. Select OK. Report Designer v 2.2 Chapter 11: Make Reports Easier 11-6 Align Groups of Objects to Each Other 1. Select objects to be aligned to one another. 2. Select Object > Align Objects. 3. Select Alignment options. 4. Select OK. Report Designer v 2.2 Chapter 11: Make Reports Easier 11-7 Favorites Create an often used text object and save it in the Favorites menu. To use the text object in another report, just select it from the Favorites drop down menu. Only single text objects can be saved in Favorites. Groups of objects can be saved as components. See “Re-use an Object by Making It a Component” in this chapter. 1. Select the text object to be saved as a Favorite. 2. Select Favorites > Add Selected Objects to Favorites. The text object will now be available from the Favorites drop down menu. Favorites Shortcuts You can define a shortcut using the CMD ( ) plus a selected number to place a Favorite text object. The text object must first be added to the Favorites list. 1. Select Favorites > Favorites. 2. Select the arrow next to a Favorite to display the drop down menu. 3. Select a number for that Favorite. 4. Select OK. To use the shortcut, press plus the associated number at the same time. The text object will place on the workspace. Report Designer v 2.2 Sort alphabetically by selecting the Sort button. Chapter 11: Make Reports Easier 11-8 Style Sheets Define your preferred font, font size, font style and alignment preferences and save as a Style Sheet. 1. Open a new or existing report. 2. Select Style Sheet > Edit... from the drop down menu. 3. Select an existing Style Sheet and select DUPLICATE. 4. Type a new style sheet name and select OK. 5. Modify the attributes for this style sheet and select APPLY. Select the close window icon to close the style sheet window. The new style sheet will be available in the Style Sheet drop down menu. Report Designer v 2.2 Chapter 11: Make Reports Easier 11-9 Filter Objects Select existing objects to quickly find, identify or modify them. Selecting the object does not make others disappear but only brings them to the forefront for easier selection and modification. This feature helps to filter out specific kinds of objects that are built into the layers. Layers can prevent selection of an object if too many layers are on top of the item needing to be selected. 1. Select multiple objects to filter. 2. Select Object > Filter Selected Objects. 3. Select the type of object to filter for and select OK. Report Designer v 2.2 Chapter 11: Make Reports Easier 11-10 Select an Object by Layer or Content This feature helps to find an object or layer that needs to be edited or re-positioned. You can sort by content or layer number. 1. Select Object > Select Object. 2. Select layer number or search for content. Report Designer v 2.2 Chapter 12: Putting It All Together Overview In this chapter we have included sample reports that you can practice making to become familiar with Report Designer before creating your first big object report. We will be creating the following object reports: • Award Certificate • Attendance Call List • High School Transcript • Schedule Turn the page and let’s get started! Chapter 12: Putting It All Together 12-2 Award Certificate Awards can be made quick and simple in Designer. .jpg graphics and pictures can be used as backgrounds. Create an Award Certificate 1. Open Designer. 2. Select File > New. Select Landscape Orientation. Select 14 pt. size. Report Designer v 2.2 Chapter 12: Putting It All Together 12-3 3. Select OK. 4. Place the background .jpg graphic onto the report workspace. 1. 2. 3. 4. 5. Select the Graphic Tool . A browser window will open. Browse to the appropriate .jpg. Select the .jpg. Select OK. 6. Fill in the information and make the selections shown. 7. Select OK. 8. Resize the award graphic leaving 1/2” margin on each side. 5. Fill in the text portions of the award certificate. Report Designer v 2.2 Chapter 12: Putting It All Together 12-4 Recognition Award 1. 2. 3. 4. 5. 6. Select the Text Tool . Select an insertion point at the top of the award. Select Object > Properties. (Text Properties window is shown below.) Type “Recognition Award” in the text window. Select the Font: Times, font size 40, Alignment centered, BOLD. Select OK. Resize the text object and center in the award as shown. Report Designer v 2.2 Chapter 12: Putting It All Together 12-5 Jack Layne Johnson 1. 2. 3. 4. 5. 6. Select the Text Tool . Select an insertion point on the next line. Select Object > Properties. (Text Properties window is shown below.) Type “Jack Layne Johnson” in the text window. Select the Font: Zapfino, font size 30, Alignment centered, BOLD. Select OK. Resize the text object and center in the award as shown. has achieved excellence in 1. 2. 3. 4. 5. 6. Select the Text Tool . Select an insertion point on the next line. Select Object > Properties. (Text Properties window is shown below.) Type “has achieved excellence in” in the text window. Select the Font: Times, font size 24, Alignment centered. Select OK. Resize the text object and center in the award as shown. Perfect Attendance 1. 2. 3. 4. 5. 6. Select the Text Tool . Select an insertion point on the next line. Select Object > Properties. (Text Properties window is shown below.) Type “Perfect Attendance” in the text window. Select the Font: Times, font size 36, Alignment centered, BOLD. Select OK. Resize the text object and center in the award as shown. School Year..... 1. 2. 3. 4. 5. 6. 7. Select the Text Tool . Select an insertion point on the next line. Select Object > Properties. (Text Properties window is shown below.) Type “School Year” in the text window. Press ENTER on the keyboard. Type “2006 - 2007.” Select the Font: Times. Select OK. Resize the text object and position as shown in the award. Principal... 1. 2. 3. 5. 6. 7. 6. Select the Text Tool . Select an insertion point on the next line. Select Object > Properties. (Text Properties window is shown below.) Type “Principal - June 4, 2007” in the text window. Select the Font: Times, Right alignment. Select OK. Resize the text object and position as shown in the award. Select File > Save and save the object report. You have now completed your first award certificate! Report Designer v 2.2 Chapter 12: Putting It All Together 12-6 Attendance Call List 1. Open Designer. 2. Select File > New. . 3. Select OK to select the defaults or make changes, then select OK. Report Designer v 2.2 Chapter 12: Putting It All Together 12-7 4. Create the headings. School Address School Heading 1. Select the Text Tool . 2. Select an insertion point in the upper left hand corner. 3. Select Object > Properties. 4. Type “Jefferson High School.” 5. Set Font: New Times Roman, Font Size to 24, BOLD. 6. Select OK. Align heading as necessary for placement. 1. Select the Text Tool . 2. Select an insertion point in the upper left hand corner. 3. Select Object > Properties. 4. Type “135 East Lansing Street.” Press [ENTER]. 5. Type “New York, NY 12345.” Press [ENTER]. 6. Type “(876) 876-1234 FAX: (876) 876-1235.” 5. Set Font: New Times Roman, Font Size to 12. 6. Select OK. Align as necessary for placement. Report Designer v 2.2 Chapter 12: Putting It All Together 12-8 Report Title 1. Select the Text Tool . 2. Select an insertion point in the upper left hand corner. 3. Select Object > Properties. 4. Type “Attendance Call List”. Press [ENTER]. 5. Type the field object to automate the current date. 5. Set Font: New Times Roman, Font Size to 21, BOLD, Right alignment. 6. Select OK. Align as necessary for placement. 5. 6. Draw the separating lines between the heading and the body. Make your headings. 1. Select the Line Tool . 2. Draw a horizontal line across the page under the heading. 3. Select Object > Properties. 4. Set the Line Width to 3 pt. 5. Select OK. 6. Select Object > Duplicate. 7. Press CTRL ← to align the lines. 8. Press CTRL ↓ to position the second line slightly below the first. 1. Select the Text Tool . Select an insertion point just below the lines on the left hand side. 2. Select Object > Properties. 4. Type GR. Select font Times, font size 12, BOLD. 5. Select OK. 6. Position the text object as shown. Report Designer v 2.2 Chapter 12: Putting It All Together 12-9 Repeat those steps for each of the following: 7. Student Home Phone Mother Day Father Day Note Call Reason ABS Create your fields. Only one line of field objects needs to be created for this report. The first line will be copied once to create the alternating gray and white lines and to set the positioning of the lines. 1. Select the Text Tool . Select an insertion point on the left hand side. 2. Select Object > Properties. 3. Select the Field Tool . The Insert Fields window will open. 4. Select Student Fields from the drop down menu. 5. Select “current grade” from the fields list. Select INSERT. 6. Select OK. Place the field object in its correct position below the GR heading. 1. Select the Text Tool . Select an insertion point next to the grade field. 2. Select Object > Properties. 3. Select the Field Tool . The Insert Fields window will open. 4. Select Student Fields from the drop down menu. 5. Select “last,first” from the fields list. Select INSERT. 6. Select OK. Place the field object in its correct position below the Student heading. 1. Select the Text Tool . Select an insertion point next to the name field. 2. Select Object > Properties. 3. Select the Field Tool . The Insert Fields window will open. 4. Select Student Fields from the drop down menu. 5. Select “HomePhone” from the fields list. Select INSERT. 6. Select OK. Place the field object in its correct position below the Home Phone heading. Report Designer v 2.2 Chapter 12: Putting It All Together 12-10 1. Select the Text Tool . Select an insertion point next to the Home Phone field. 2. Select Object > Properties. 3. Select the Field Tool . The Insert Fields window will open. 4. Select Student Fields from the drop down menu. 5. Select “Mother_Phone” from the fields list. Select INSERT. 6. Select OK. Place the field object in its correct position below the Mother Day heading. 1. Select the Text Tool . Select an insertion point next to the Mother Phone field. 2. Select Object > Properties. 3. Select the Field Tool . The Insert Fields window will open. 4. Select Student Fields from the drop down menu. 5. Select “Father_Phone” from the fields list. Select INSERT. 6. Select OK. Place the field object in its correct position below the Father Day heading. 1. Select the Text Tool . Select an insertion point on the right hand side of the report page. 2. Select Object > Properties. 3. Select the Field Tool . The Insert Fields window will open. 4. Select Student Fields from the drop down menu. 5. Select “ABS” from the fields list. Select INSERT. 6. Select OK. Place the field object in its correct position on the far right below the ABS heading. 8. Create the checkboxes. 1. Select the Box Tool . Create a small box approximately the size as shown and position it under the Note heading. 2. Select Object > Auto Duplicate Objects. 3. Select Number of Objects: 2, select 0 for Vertical Offset, select .5 for Horizontal offset. 4. Select OK. The box will duplicate two more boxes. Reposition more precisely as needed under the headings. 9. Select the farthest right box under the ABS heading. Select Object > Set Move To Next Record. Select Enable Move To Next Record. Select OK. 10. Copy the line you created. 1. Select all the fields and boxes in the first line you just created. 2. Select Object > Auto Duplicate Object. Vertical .5. Horizontal 0. 3. Select OK. Report Designer v 2.2 Chapter 12: Putting It All Together 12-11 11. Create the shaded box for the second line. 1. Select the Box Tool . Create a long rectangular box as shown and position it over the second line. 2. Select Object > Properties. 3. Select a light gray for the Line Color and the Fill Color. 4. Uncheck Transparent. 5. Select OK. 6. Select Object > Send To Back. 12. Create the rest of the page by duplicating the two lines. 1. Select all the fields and boxes in the two lines you just created including the shaded box. 2. Select Object > Duplicate. Seelct CTRL ← to align. Select CTRL ↓ twice to move and position. 3. Continue to select Object > Duplicate until the page is filled. Each successive duplication will position precisely. 13. Remove the “Move to Next Record” command from the last right-most box under the ABS heading in the last row. 1. Select the last field on the far right side of the bottom of the page under the ABS heading. 2. Select Object > Set Move To Next Record. 3. Select Disable Move To Next Record. 4. Select OK. You have now created your first attendance call list. Report Designer v 2.2 Chapter 12: Putting It All Together 12-12 High School Transcript Part of what makes Report Designer unique is the ability to insert custom tags and functions. Reports created in Designer can be exported in a format compatible with PowerSchool in order to use the database information available in PowerSchool. Let’s create a high school transcript that can be exported in XML format and used in PowerSchool to produce attractive, clear transcripts. 1. Open Designer. 2. Select File > New. 3. Select OK to select the defaults or make changes, then select OK. Report Designer v 2.2 Chapter 12: Putting It All Together 12-13 In our example, we have chosen a letter-size page portrait orientation. Let’s first create the header display on the transcript. Here is a picture of what we intend to create: Graphics or Picture Objects: We will put a “placeholder” graphic in the field where we want the student’s picture to display. The picture of each individual student must be automated the same as the name, grade and birth date. Text Objects: The Title “Official Transcript” and subheader will be manually typed in as text objects. The school name and address can be automated using the fields function or manually typed in as text objects. Text Objects: The titles, Student Name, Grade and Birth Date are Text objects, but the information printed is automated using the Field object tool. The Line tool is used to create the lines that define the transcript area. The header of the transcript is made up of a number of different objects, some of which can be automated, and some must be manually typed in. Review the notes on the header above to find out more. Report Designer v 2.2 Chapter 12: Putting It All Together 12-14 4. Create the header. Select the Text Tool . Select an insertion point to create a text object in the report. Select Object > Properties. Type “OFFICIAL TRANSCRIPT.” Select Times New Roman. Font Size: 24 Check BOLD. Select the Text Tool . Select an insertion point in the report. Select Object > Properties. Type “Accredited by the Northwestern Association of Schools and Colleges.” Select Times New Roman. Font Size: 10 Check Italic. Report Designer v 2.2 Chapter 12: Putting It All Together 12-15 Once the header is created, align the two text objects with the left hand margin line on the page. 5. Create the student information fields. Select the Text Tool . Select an insertion point to create a text object in the report. Select Object > Properties. Type “Student Name.” Select Times New Roman. Font Size: 12 Create a separate text object for each of the following: Student Name (shown above) Grade Student ID Birthdate Place the text objects as shown on the graphic below. Report Designer v 2.2 Chapter 12: Putting It All Together 12-16 To align Grade, Student ID and Birthdate on the horizontal axis, select all three text objects, then select Object > Align to Grid. 6. Create the school information. Select the Text Tool . Select an insertion point to create a text object in the report. Select Object > Properties. Type “Central High School.” Select Times New Roman. Font Size: 24 Check BOLD. The title of the school is going to be larger than the address so we create the text object separately. Select the Text Tool . Select an insertion point to create a text object in the report. Select Object > Properties. Report Designer v 2.2 Chapter 12: Putting It All Together 12-17 Type “802 North 650 East” press the Enter key, Type “Levan, AZ 84648” press the Enter key, Type “(602) 613-1562 Select Times New Roman. Select Center alignment. Font Size: 12 Align the text objects as shown on the following graphic. 7. Create placeholder for student photo. 1. Select the Insert Graphics Tool . 2. Browse to find a .jpg graphic to act as a placeholder. Select the graphic and select OK. 3. Activate the checkbox next to Student Photo. 4. Select Shrink to Fit, Proportional, Centered from the drop down menu. 5. Select OK. Resize the photo to the correct dimensions. If desired, create a frame using the box tool. Report Designer v 2.2 Chapter 12: Putting It All Together 12-18 8. Create the border line. Select the Line Tool . Draw a line horizontally across the page under the heading information. Select Object > Properties. Set Line Width to 3 (Points) 9. Create the transcript format. You should have the design of the transcript and what information you want on the transcript already defined to make the creation of the transcript information itself easier. In this example, we are going to display the course name, and the grade and credits earned for each quarter. Select the Transcript Tool on the Toolbar in the left column. Set Term/School Name Display to NONE. Set Font to Times New Roman. Enter 9 and 12 in the grade level fields. Select the Columns tab. Report Designer v 2.2 Chapter 12: Putting It All Together 12-19 Select the + symbol on the left hand side of the page three times to display the first three fields. Select the down arrow in the Course Number field and change the field to Course Name. The display will adjust with every change made, showing how the information will display in the report. Delete the S1 in the Term column next to Course Name. Select Grade from the drop down menu for the next field. Select Earned Credit Hours for the next field. Change the width of the first column to 1.5. Change the width of the second column to .25. Change the width of the third column to .4. Once you have completed these steps, you have set up the first quarter display of grade and credit hours earned. Now we can set up the next three quarters. Report Designer v 2.2 Chapter 12: Putting It All Together 12-20 10. Set the remaining quarters for the transcript. Once you have set up the first quarter, you need to tell PowerSchool to include the rest of the quarters for the year. 1. 2. 3. 4. 5. 6. 7. Select the + sign on the left hand side of the columns. Change S1 to S2. Change the field to Letter Grade. Change the width to .25. Select the + sign. Change the field to Earned Credit Hours. Change the width to .4. Repeat these steps for each quarter remaining. The display will continue to adjust as you make changes, showing how the transcript information will look once you are done. 11. Select OK when you are done creating the transcript. Once you select OK, the transcript is placed in the report workspace. Drag the transcript box down to about 2 inches above the bottom of the page. This will give growth room for the other years selected to display on the transcript when it prints from PowerSchool. NOTE: If you need to make the transcript flow into the additional columns on the right hand side of the page, set this in the transcript object within PowerSchool. Report Designer v 2.2 Chapter 12: Putting It All Together 12-21 12. Draw the columns for the quarters. Select the Line Tool . Draw the lines as shown in the graphic below. Draw a line separating each column of information, stopping around 2 inches above the bottom of the page. Draw a line horizontal above the transcript and below the 3 point line with enough room for 12 pt Times New Roman type to be used for the text objects. Create the text objects for QTR 1, QTR 2, QTR 3, QTR 4 and place them centered at the top of each column. 13. Create the remaining information as shown in the following graphic. Draw a 3 pt horizontal line in the second column of the page about half way down the transcript section. Create text objects and fields to display the cumulative and individual year GPA for the student. Draw a 3 pt horizontal line at the bottom of the transcript section about 2 inches above the bottom of the page. Create a text object and type Graduation Date:. Select the Field button while still in the text object properties window and enter the graduation date code. Create a text object and type in the GPA equivalents table. Draw the signature and date line and create the text objects for “SIGNATURE” AND “DATE”. If necessary, align the two text objects by selecting them, then selecting Object > Align to Grid. You have now created a School Transcript. Report Designer v 2.2 Chapter 12: Putting It All Together 12-22 Student Schedule Student schedules can be designed and printed in a number of sizes. One popular size is 4 schedules per page as shown below. Other sizes include half pages (2 on a single page) and full page. For our example, we will be making an object report with 2 schedules per page. This picture displays the schedule as it will look before importing to PowerSchool and printing. Once the schedule is imported to PowerSchool and printed, the field objects will be replaced by content as the 4-schedule report above shows. Report Designer v 2.2 Chapter 12: Putting It All Together 12-23 1. Open Designer. 2. Select File > New. . 3. Select OK to select the defaults or make changes, then select OK. In our example, we have chosen a letter-size page portrait orientation. Report Designer v 2.2 Chapter 12: Putting It All Together 12-24 4. Create the headings. As each heading part is created, position it on the report. SCHOOL NAME 1. Select the Text Tool . 2. Select a point on the upper right hand corner of the report. 3. Select Object > Properties. 4. Type “Hill Billie High School”. 5. Set the font to Times New Roman, font size to 18, style BOLD. 6. Select OK. Position the object. STUDENT NAME AND INFORMATION 1. Select the Text Tool . Select an insertion point on the report. 2. Select Object > Properties. 3. Type “Student Name:” and press ENTER. 4. Type “Student Number:” and press ENTER twice. 5. Type “Locker Number:” and press ENTER. 6. Type “Combination:”. 7. Set the font to Times New Roman, font size 12. 8. Select OK. Adjust placement as needed on the report. SCHOOL ADDRESS 1. Select the Text Tool . 2. Select an insertion point below the high school name. 3. Select Object > Properties. 4. Type “555 North 650 East”, press ENTER. 5. Type “Canyon View, AZ 55555”. 6. Select font Times New Roman, font size 14. 7. Select OK. Position the object. STUDENT ADDITIONAL INFORMATION 1. Select the Text Tool . Select an insertion point in the report. 3. Select Object > Properties. 4. Type “Gender:” and press ENTER. 5. Type “Birthdate:” and press ENTER twice. 6. Type “Grade:” and press ENTER. 7. Type “Enter Date:”. 8. Set the font to Times New Roman, font size 12. 9. Select OK. Adjust placement as needed on the report. STUDENT NAME AND INFORMATION 1. Select the Text Tool . 2. Select an insertion point on the left hand side of the report. 3. Select Object > Properties. 4. Select the Fields Tool . 5. Select the field for last,first for student name. Select INSERT and press ENTER. 6. Select the Fields Tool . 7. Select the field for the student ID number. Select INSERT and press ENTER twice. 8. Select the Fields Tool . 9. Select the field for the student locker number. Select INSERT and press ENTER. 10. Select the Fields Tool . 11. Select the field for the student locker combination. Select INSERT. 8. Set the font to Times New Roman, font size 12. 9. Select OK. Adjust placement as needed on the report. STUDENT ADDITIONAL INFORMATION 1. Select the Text Tool . Select an insertion point in the report. 3. Select Object > Properties. 4. Select the Fields Tool . 5. Select the field for student gender. Select INSERT and press ENTER. 6. Select the Fields Tool . 7. Select the field for student birthdate. Select INSERT and press ENTER twice. 8. Select the Fields Tool . 9. Select the field for student grade. Select INSERT and press ENTER. 10. Select the Fields Tool . 11. Select the field for student enter date. Select INSERT and press ENTER. 12. Set the font to Times New Roman, font size 12. 13. Select OK. Adjust placement as needed on the report. Report Designer v 2.2 Chapter 12: Putting It All Together 12-25 Make sure the fields are aligned and have adequate spacing in from the outside margins of the page. Don’t worry if the codes cross one another. It is important to only make certain the correct amount of space is available for the information that will print in that field. 5. Create the Class Schedule heading. Create the Lines. 1. Select the Line Tool . 2. Draw a horizontal line across the report directly under the headings. 3. Select Object > Properties. 4. Change the Line Width to 2.0. 5. Select OK. 6. Select Object > Duplicate to duplicate the horizontal line. 7. Press CTRL ← to align with the first line. 8. Press the ↓ to position the new line down about a 1/4 inch from the first. For my own ease, I have added a line at the midpoint of the report. Class Schedule heading 1. Select the Text Tool . 2. Select an insertion point in the report. 3. Select Object > Properties. 4. Type Class Schedule. 5. Select font Times New Roman, font size 14, style BOLD. 6. Select Center Alignment. 7. Select OK. 8. Position the text object to be centered between the lines and between the margins of the page. If necessary, stretch the text box to each side of the report page to center accurately. The page is now set up with the headings and ready to have the schedule form created and put into the report. Report Designer v 2.2 Chapter 12: Putting It All Together 12-26 6. Create the Schedule Form. Select the Schedule Tool . The Schedule properties window opens. Verify or activate the following checkboxes in the Information column: • Period • Teacher • Course • Course# • Room When selected, the fields may cross over each other in the display, but this will be fixed when we adjust the column placements. Adjust the column placement numbers manually or using the left and right arrows next to the field. Adjust them to match the numbers in the graphic above. Report Designer v 2.2 Chapter 12: Putting It All Together 12-27 Fonts Tab Column Header: Select Times New Roman, Size 11, BOLD. Schedule Listing: Select Times New Roman, Size 10. Periods Tab Delete Record #8. Report Designer v 2.2 Chapter 12: Putting It All Together 12-28 Save the Schedule to re-use at another time. Select the drop down list next to “Schedule.” Select SAVE.... Type in the title for the new schedule listing. Select OK. Select OK. Report Designer v 2.2 Chapter 12: Putting It All Together 12-29 7. Create guidelines for easier viewing of the schedule. We will create the interior lines first, then the outside box. INTERIOR LINES 1. Select the Line Tool . 2. Draw a vertical line between the Period and Course Number on the schedule. Use the heading as a guide for where to place your line. 3. Select Object > Properties. Set the Line Width to 1.0. 4. Select Object > Duplicate. Press CTRL ↑ to align the top of the line with the original. Press CTRL → to move the line and position it next to “course heading.” 5. Select Object > Duplicate. This should place the next line precisely where you want it to be. Repeat for the remaining interior lines. CREATE THE BOX AND FINAL LINE 1. Select the Box Tool . 2. Draw a box around the class schedule. Adjust the lines as necessary to touch the box as shown. 3. Select the Line Tool . 4. Draw a horizontal line under the headings but above the class schedule information so that the lines end points touch the outside box around the schedule. Report Designer v 2.2 Chapter 12: Putting It All Together 12-30 8. Create Parent Information. To instruct PowerSchool to move to the next record when populating the schedule: 1. Select the right-most last field. In this example, the Father’s Work Phone is the last right-most field. 2. Select Object > Properties. 3. Activate the checkbox next to “Move to Next Record.” PARENT NAME AND INFORMATION 1. Select the Text Tool . 2. Select an insertion point on the left hand side of the report. 3. Select Object > Properties. 4. Type “Parent/Guardian:” and press ENTER on the keyboard. 5. Type “Home Phone:” and press ENTER on the keyboard. 6. Type “Mother Work:” and press ENTER on the keyboard. 7. Type “Father Work:”. 8. Set the font to Times New Roman, font size 12. 9. Select OK. Position the object left aligned as shown. HOME ADDRESS 1. Select the Text Tool . 2. Select an insertion point on the right hand side of the report. 3. Select Object > Properties. 4. Type “Home Address:” 5. Set the font to Times New Roman, font size 12. 6. Select OK. Position the object as shown on the graphic above. PARENT NAME AND INFORMATION FIELDS 1. Select the Text Tool . Select an insertion point to the right of Parent/Guardian. 2. Select Object > Properties. 3. Select the Fields Tool and insert the field for Mother and the field for Father and select OK. 4. Press ENTER on the keyboard. 5. Select the Fields Tool and insert the field for Home_Phone and select OK. 6. Press ENTER on the keyboard. 7. Select the Fields Tool and insert the field for Mother_Work and select OK. 8. Press ENTER on the keyboard. 9. Select the Fields Tool and insert the field for Father_Work and select OK. 10. Select OK in the Text Properties window. Position the fields as shown above. HOME ADDRESS FIELDS 1. Select the Text Tool and select an insertion point to the right of “Home Address:” 2. Select Object > Properties. 3. Select the Fields Tool and insert the field for Home_address, select OK and press ENTER. 4. Select the Fields Tool and insert the field for Home_city, select OK. 5. Select the Fields Tool and insert the field for Home_state, select OK. 6. Select the Fields Tool and insert the field for Home_zip, select OK. 5. Set the font to Times New Roman, font size 12. 6. Select OK. Position the object as shown on the graphic above. Report Designer v 2.2 Chapter 12: Putting It All Together 12-31 9. Create the text object “Any changes to this schedule should be discussed with the counseling center.” 1. Select the Text Tool . 2. Select an insertion point below the schedule form. 3. Select Object > Properties. 4. Type “Any changes to this schedule should be discussed with the counselling center.” 5. Select font type Times New Roman, font size 12, Italic. 6. Select OK. 7. Position the sentence just below the schedule form on the report, left aligned. You have now created a schedule for one student, but it is only a half page. In order to create a full page that includes two schedules, we must copy the first half and place it on the second half of the page below the marking line that I created earlier for ease of use. 10. Duplicate the first half of the page. Select Edit > Select All to select all the objects in the report. Select Object > Duplicate. Press CNTRL ← to align the duplicate with the top half. Press CNTRL ↓ to move the duplicate to the bottom half of the page. Turn the next page to see the final outcome. Report Designer v 2.2 Chapter 12: Putting It All Together 12-32 11. Select File > Save As to save the file under a unique name if you have not already done so. If you have done so, select File > Save. You may now export the file to XML and import it into PowerSchool to create schedules using your new design. Report Designer v 2.2 Appendix: Shortcut Table File > New N File > Open O File > Close W File > Save S File > Export XML E Edit > Undo Z Edit > Redo ↑ Z Edit > Cut X Edit > Copy C Edit > Paste V Edit > Select All A Edit > Spell Check Selected Objects L Object > Properties P Object > Duplicate D Object > Insert Fields F Object > Insert Functions I Object > Replace Text R Object > Align Objects J Object > Group G Object > Ungroup U Object > Filter Selected Objects ↑ S Style > Plain ↑ P Style > Bold ↑ B Style > Italic ↑ I Style > Allignment Left ↑ L Style > Allignment Center ↑ C Style > Alignment Right ↑ R CTRL + ↑ ↓ ← or → mvoes the object in larger increments as set in Layout Settings. + ↑ ↓ ← or → resizes an object + CTRL + ↑ ↓ ← or → resizes in chunks Designer v 2.1.6 Index A Add Fonts 3-17 Add Text 3-1 Align Groups 11-5 Alignment 3-2 alignment 5-2 Alignment Selections 5-3 Align Multiple Objects 5-2 Align Objects.... 5-4 Align Object Widths.... 5-5 Align Text 3-4 Align to Grid 5-3 anchor point 3-4 Attendance Call List 12-1 Award Certificate 12-1 B Basic Features Boxes 4-1 Box tool 4-1 Bring to Front 2-4 G 5-9 C Center Objects on Page... Clipboard 3-5 Color 4-1 Columns Tab 9-1, 9-8 Components 10-1 Coordinates 3-4 D Designer drop down 6-1 Download 1-3 drop down menu 6-1 Duplicate 11-3 Duplicate Text 3-8 E Edit Text 3-5 Export 10-1 Export a Component Export XML 10-6 F Field Lists 8-2 Fields 8-1 Fields Tool Button 8-6 File Drop Down Menu 6-2 FILL 7-4 Fill Down 7-4 Fill Down Autonumber 7-4 Fill Number 7-4 Fill Right 7-4 Fill Right Autonumber 7-4 Font drop down menu 6-5 font incompatibility 3-18 Fonts 3-17 Fonts Tab 9-2 Frame Type 3-9 Frame type 3-2 Function as a Component 8-16 Function Component 8-16 Functions 8-1, 8-10 5-8 Graphic 4-11 graphics 4-1 Graphics tool 4-1 Grid Size 3-3 Grid Size Options H High School Transcript How to Start 2-9 12-1, 12-12 I Identify Object Layer 5-9 Import 10-1 Import/Export Report 10-3 Import/Export XML 10-1 Import a Component 10-1 Import XML 10-3, 10-5 Increments 4-3 INSERT 7-3 J 10-2 2-11 jpg 4-1 L Layer 3-2 Layers 5-9 Index i-2 Send to Back 5-9 Set Object Position 11-4 Set Object Position... 5-6 SET WIDTH 7-5 shortcut 2-7 Show Ruler Lines 2-11 Space Objects... 5-7 Spellcheck 3-16 strings of text 8-1 Student Schedule 12-22 Style drop down menu 6-5 Style sheet 3-10 Layout Settings 2-11, 3-3, 4-3 line attributes 4-2 Line Height 2-9 lines 4-1, 4-2 Line tool 4-1 line width 4-3 M macro-like strings 8-1 magnification 3-5 Menus Overview 2-7 Move Backward 5-9 Move Forward 5-9 movement 4-3 Move Text 3-3 Move to Next Record 3-2 T tab delimited 8-1 Tables 7-1 Table Wizard 7-1 Text 3-1 text objects 9-1 Text Properties Window Text Properties window Tools Overview 2-5 Transcripts 9-8 N Numbered List 3-14 Numbered List with Text Numbers 3-14 3-15 O W Object > Insert Field 8-7 Object alignment 5-2 Object drop down menu 6-4 Object Layer 5-9 Object layers 5-9 Object Position.... 5-6 Options Tab 9-8 Order Object Layers 5-10 Workflow P Periods Tab Picture 4-11 pictures 4-1 9-2 R Re-order Object Layers Register 1-4 Registration 1-2 Remove Fonts 3-17 reports 11-1 Resize Text 3-4 5-9, 5-11 S Schedule 12-1, 12-22 Schedule Listing 9-5 Schedules 9-1 Report Designer v 2.2 2-2 3-2 3-1 Designer v 2.1.6 1103 E. 350 S. Springville, UT 84663 www.phoenixlearning.com F: 801.489.1947 email: [email protected]