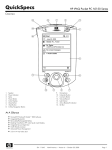
1
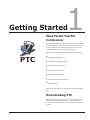
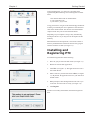
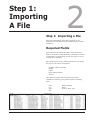
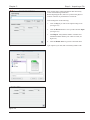
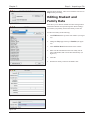
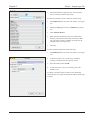
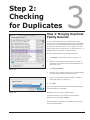
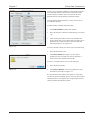
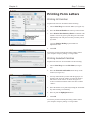
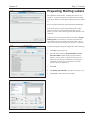
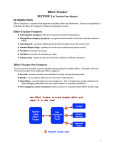
Parent Teacher Conferencer
PTC
FOR MACINTOSH or PC
Teach yourself PTC the quick and
easy way! This manual uses pictures
rather than lengthy explanations.
You’ll be a Pro in no time!
Parent Teacher
Conferencer
PTC is a product of Phoenix Learning Systems. Find us on the
World Wide Web at www.phoenixlearning.com/
Copyright © 2003 Phoenix Learning Systems.
Notice of Rights
All rights reserved. No part of this book may be reproduced
or transmitted in any form or by any means, electronic,
mechanical, photocopying, recording, or otherwise, without
the prior written permission of the publisher. For information
on getting permission for reprints and excerpts, contact
Phoenix Learning Systems.
Notice of Liability
The information in this manual is distributed on an “As IS”
basis, without warranty. While every precaution has been
taken in the preparation of the manual, neither the author nor
Phoenix Learning Systems shall have any liability to any
person or entity with respect to any loss or damage caused or
alleged to be caused directly or indirectly by the instructions
contained in this manual or by the computer software and
hardware in it.
i
Table of Contents
Table of Contents
Chapter 1:
Getting Started .................................................
Meet PTC............................................................
Downloading PTC.................................................
Installing and Registering PTC ...............................
1
1
1
2
Chapter 2:
Step 1: Importing.............................................. 3
Importing a File................................................... 3
Required Fields.................................................... 3
Importing a File................................................... 4
Editing Family and Student Data ............................ 5
Chapter 3:
Step 2: Checking for Duplicates......................... 7
Merging Duplicate Family Records .......................... 7
Chapter 4:
Step 3: Creating Sessions.................................. 8
Conference Sessions ............................................ 8
Chapter 5:
Step 4: Setting Teacher Constraints ................ 10
Setting Up Teachers ............................................10
Chapter 6:
Step 5: Setting Family Constraints .................. 12
Setting Up Families .............................................12
Chapter 7:
Step 6: Generating Schedules.......................... 14
Generating Schedules .........................................14
Chapter 8:
Step 7: Printing ............................................... 16
Printing .............................................................16
Printing Teacher Schedules ..................................16
Preparing Form Letters ........................................17
Printing Form Letters ..........................................19
Preparing Mailing Labels ......................................20
ii
1
Getting Started
Meet Parent Teacher
Conferencer
Parent Teacher Conferencer (PTC) is a simple to use, extreemly
powerful scheduling engine used by schools to schedule ParentTeacher Conferences. It streamlines the tasks involved with
scheduling with an easy-to-use seven step process.
The following chapters outline the Seven Steps. These include:
PTC
• Importing Student Data
• Checking for Duplicate Families
• Creating Conference Sessions
• Setting Teacher Constraints
• Setting Family Constraints
• Generating Conference Schedules
• Printing Reports
This chapter will outline how to download, install, and register
PTC.
Downloading PTC
When you purchase PTC, you receive license to both PC and
Macintosh versions. The PTC license is for a single school.
To use PTC for multiple schools, you must purchase separate
licenses.
1
Chapter 1
Getting Started
After purchasing PTC, you will receive an E-mail from
[email protected] containing three essential
items:
1. the internet address link to download PTC
2. your registration code
3. your license “_key.txt” file
Using your browser, navigate to the download page at Phoenix
Learning.com. Identify the correct platform to download and
click on the download link. Your browser will download the
compressed file into your selected download folder.
Figure 1.1
Depending on your computerʼs setup, it may automatically
decompress the file. Or you may need to decompress the file
manually.
When PTC has been decompressed, it will create a folder or
directory named PTC that contains all the necessary plug-ins
and files needed to use PTC (see Figure 1.1).
Installing and
Registering PTC
To install and register PTC do the following:
Figure 1.2
1.
Place the _Key.txt file in the PTC folder (see Figure 1.1).
2.
Double-click on the PTC application.
3.
Click New (see Figure 1.2). The application will create a
new blank data file.
4.
Enter a name for your data file and click Save (see Figure
1.3). By default, the application will save your data file in
the PTC folder.
5.
When prompted, enter the Registration Code sent to you
via E-mail. You must enter it exactly (see Figure 1.4).
6.
Click Register.
Figure 1.3
You have successfully downloaded, installed and registered
PTC.
Figure 1.4
2
2
Step 1:
Importing
A File
Step 1: Importing a File
PTC works independently from other applications. It was
designed to ues a tab-delimited text file containing basic student
information.
Required Fields
PTC requires that the import file contain certain fields. These
fields are essential in creating the family relationship records that
tie individual records into family records. See Figure 2.1 for an
example file for importing.
These fields must be properly named and present in your import
file, however, the order is not important.
LastFirst or Name or Student
Mother
Father
Home_Phone or Phone
Teacher
These fields are optional and will expand your printing
cababilities by allowing you to print form letters and mailing
labels.
Street
City
State
Zip
Student_Number
Room
Grade or Grade_level
Figure 2.1
3
Chapter 2
Step 1: Importing a File
PTC compiles these student information fields into family
records and scheduling information.
Before importing the file, make sure you know the physical
location of the file on your hard drive or network.
After starting PTC do the following:
Figure 2.2
1.
Click on Step 1, you will see the import setting screen
(see Figure 2.2)
2.
Click the Browse button. Locate your file and click Open
(see Figure 2.3)
3.
Click Import. Verify that the number of teachers and
scheduled students matches your schoolʼs records (see
Figure 2.4).
4.
Click the Return Arrow to go back to the main menu.
Upon import of your data, PTC will identify families with
Figure 2.3
Figure 2.4
4
Chapter 2
Step 1: Importing a File
duplicate phone numbers. These errors should be corrected in
Step 2 before proceeding.
Editing Student and
Family Data
Figure 2.5
PTC allows you to add new students and edit existing student
information that has already been imported. Before adding a
new student you probably need to add a family record first.
To add a new family do the following:
1.
Click Edit Data at the top of the main window (see Figure
2.5).
2.
Change the List popup at the top to Families (see Figure
2.6).
3.
Click Add New Record at the bottom of the window.
4.
Enter in all the information for the New family. Do not
enter an ID number, PTC will do that automatically (see
Figure 2.7)
5.
Click OK.
6.
Find the new family on the list and double click.
Figure 2.6
Figure 2.7
Figure 2.8
5
Chapter 2
Step 1: Importing a File
7.
Note the ID number assigned by PTC. You will need it
when you add any student to this family.
To add a new Student to the new family do the following:
Figure 2.9
1.
Click Edit Data at the top of the main window (see Figure
2.5).
2.
Change the List popup at the top to Students (see Figure
2.9).
3.
Click Add New Record.
4.
Enter in all the information for the new student. Enter
the ID as you noted from the family record above. Make
sure you assign a teacher, schedules are dictated by the
assigned teacher (see Figure 2.10).
5.
Click OK.
To edit a studentʼs information do the following:
1.
Click Edit Data at the top of the main window (see Figure
2.5).
2.
As shown in Figure 2.9, you can select a student by
scrolling or using the filter to search for criteria.
3.
Select the student and click Edit.
4.
As shown if Figure 2.10 you can edit any part of the
student record.
To change a studentʼs family association, first find the ID
assigned to the new family and change the studentʼs Family ID
to match.
Figure 2.10
6
Step 2:
Checking
for Duplicates
3
Step 2: Merging Duplicate
Family Records
In case of inconsistent data, it is possible that two family
records will be created when there should only be one. Step 2
provides a way to merge multiple family records that should
be one family. This screen allows you to merge two or more
family records into one single record. As shown in Figure 3.1,
the Ball family is listed twice as separate families.
To merge duplicate family records do the following:
Figure 3.1
1
Click Step 2 to work with duplicates (see Figure 3.1).
2.
Select all records that should be merged by clicking on
each family record while pressing the Command-key (�).
(ctrl for PC users)
3.
Click Merge Families...
4.
PTC may alert you if the families have no common names,
you must decide whether to proceed or cancel.
5.
Select the correct name and phone number by which to
identify this family (see Figure 3.2).
6.
Click OK.
PTC will merge the selected records into one family using the
record information you identified.
Figure 3.2
Repeat this process for every duplicate family.
You should carefully review the entire list of potential
duplicates before proceding to Step 3.
After all merging is completed, click the Return Arrow to go
back to the main window.
7
4
Step 3:
Creating
Sessions
Step 3: Conference
Sessions
PTC refers to the time periods that a teacher holds conferences
as “Sessions”. You must setup the session times for your
school. PTC will automatically schedule break times for
teachers, however, common break times should be indicated
by a session break. For example, if we want our conferences to
look like the following schedule, we would create 4 sessions.
October 23 12:00 PM - 8:00 PM with a dinner break for all
teachers from 5:00 -6:00 PM.
October 24 8:00 AM - 4:00 PM with a lunch break for all
teachers from 12:00 - 1:00 PM.
The session times would look like this:
Figure 4.1
10/23/03 - 12.00 PM - 5:00 PM
10/23/03 - 6:00 PM - 8:00 PM
10/24/03 - 8:00 AM - 12:00 PM
10/24/03 - 1:00 PM - 4:00 PM
An individual teacher may not have scheduled conferences
outside of the designated session times. If they do, you must
make the session times accomodate all teachers. You may have
to place restrictions on teachers to make them unavailable
during certain times.
To enter a session do the following:
Figure 4.2
1.
Click Step 3 to enter sessions (see Figure 4.1).
2.
Click on the Blue Arrow button to enter or edit a session
(see Figure 4.1).
3.
Enter the Session Date (see Figure 4.2).
4.
Enter the Start Time for the session (see Figure 4.2).
5.
Enter the End Time for the session (see Figure 4.2).
8
Chapter 4
Step 3: Creating Sessions
6.
Click the Green Check to save the session or click the
Red X for to cancel the session (see Figure 4.3).
To delete a session do the following:
1.
Select the session you want to delete.
2.
Click the Red Arrow button.
After you have entered all the conference session dates and
times, click the Return Arrow to go back to the main window.
Figure 4.3
9
5
Step 4:
Setting Teacher
Constraints
Step 4: Setting Up
Teachers
Individual teachers may have restrictions or constraints that
influence when they can be scheduled. Step 4 allows you to
restrict or exclude times within the set conference sessions.
To create a teacher constraint do the following:
1.
Click Step 4 to enter teacher constraints (see Figure 5.1)
2.
Select a teacher from the popup menu (see Figure 5.2).
3.
Click the Blue Arrow button to create a new constraint.
Figure 5.1
Figure 5.2
10
Chapter 5
Figure 5.3
Step 4: Setting Teacher Constraints
4.
Enter the Constraint Date (see Figure 5.3)
5.
Enter the Start Time (see Figure 5.3)
6.
Enter the End Time (see Figure 5.3)
7.
Select Restrict or Exclude.
Selecting Restrict forces the conferences to be scheduled on
this date and during this time period (see Figure 5.3).
Selecting Exclude forces the conferences NOT to be scheduled
on this date during time period indicated (see Figure 5.4).
Note: The constraints must fall during valid session times to
be viable constraints.
Figure 5.4
The Show Meetings button allows you to see the schedules
that have been created for each teacher. The date, time and
parent names are listed (see Figure 5.5). To print a teacherʼs
schedule see chapter 8, Step 7: Printing.
Figure 5.5
11
Step 5:
Setting Family
Constraints
6
Step 5: Setting Up
Families
Individual families may have restrictions or constraints that
influence when they can be scheduled. Step 5 allows you to
restrict or exclude times within the set conference sessions for
a family.
Figure 6.1
Figure 6.2
To create a family constraint do the following:
1.
Click Step 5 to enter family constraints.
2.
Select the first letter of the familyʼs last name from the
alphabet popup (see Figure 6.1).
3.
Select a family from the popup menu (see Figure 6.2).
4.
Click the Blue Arrow button to create a new contraint.
5.
Enter the Constraint Date (see Figure 6.3)
6.
Enter the Start Time (see Figure 6.3)
7.
Enter the End Time (see Figure 6.3)
8.
Select Restrict or Exclude.
Selecting Restrict forces the conferences to be scheduled on
this date and during this time period (see Figure 6.3).
Figure 6.3
12
Chapter 6
Search and Replace
Selecting Exclude forces the conferences NOT to be scheduled
on this date during time period indicated (see Figure 6.4).
Note: The constraints must fall during valid session times to
be viable constraints.
The View Meetings button allows you to see the current
schedule that has been created for each family (see Figure
6.5). The date, time and teacher is listed. To print a familyʼs
schedule see chapter 8, Step 7: Printing.
Figure 6.4
Figure 6.5
13
Step 6:
Generating
Schedules
7
Step 6: Generating
Schedules
PTC uses advanced algorithms to find the best schedule. PTC
first gives priority to families with multiple children, then
families with constraints.
You must first determine how long each parent-teacher
conference will last and how many conferences can be run
consecutively without giving teachers a break.
To generate the conferences do the following:
Figure 7.1
Figure 7.2
1.
Click Step 6 to see the scheduling screen (see Figure 7.1)
2.
Enter the Conference Length in minutes.
3.
Enter the Maximum Consecutive Conferences for
teachers. Note that PTC may break this rule once in a
while to fully schedule a family.
4.
Click Generate Schedules. PTC will schedule each
student trying to keep families to back-to-back schedule
times (see Figure 7.2)
When completed, PTC displays statistics about the last
schedule run. You may note the percentage of students
scheduled.
If all students were not scheduled, you may click the
Exceptions button to view those students who are still
unscheduled. You may then make changes to family constraints
and regenerate schedules to get a higher percentage (see
Figure 7.3). You may also choose to manually move student
schedules.
Figure 7.3
14
Chapter 7
Check Data Consistency
You may view completed schedules for each teacher from the
View Schedules button on the Teacher Constraints window.
Likewise family schedules may be viewed from the View
Schedule button from the Family Constraints window.
After generating student schedules, you may need to move a
few schedules by hand.
To hand schedule a student do the following:
Figure 7.4
1.
Click Edit Schedules from the main window.
2.
Select the teacher to whom the student belongs (see Figure
7.4).
3.
Click and drag the studentʼs name to the schedule time
desired. If the time slot is available PTC will simply move
the student. If a student already occupies that time slot,
PTC will prompt you to swap places.
To insert a student currently not on the roster do the following:
1.
Select the desired time slot.
2.
Click Insert Student (see Figure 7.4). You will be
prompted to select a student. You may use the filter or
scroll to the desired student and click OK.
To remove a student from the roster do the following:
Figure 7.5
1.
Select the desired student.
2.
Click Remove Student. You will be prompted to verify
the deletion, click OK (see Figure 7.5).
It is possible that a new student will register for school after
you have begun the scheduling process. You may add a student
and family ad hoc. See Chapter 2 for complete instructions on
entering students and families by hand.
15
8
Step 7:
Printing
Step 7: Printing
PTC provides three ways to print scheduling information (see
Figure 8.1).
1.
Teacher schedules
2.
Form letters to parents
3.
Family mailing labels
Printing Teacher
Schedules
To print Teacher Schedules for one teacher or for all teachers
do the following:
Figure 8.1
1.
Click Step 7.
2.
Click Print Teacher Schedules (see Figure 8.1).
3.
Choose All Teachers or select a teacher from the list.
You will be presented with the print dialog window follow
your computers setup for printing or saving to PDF.
Figure 8.2
16
Chapter 8
Step 7: Printing
Preparing Form Letters
The capabilities built into PTCʼs form letter area are very
extensive. A separate manual is provided for help in creating
form letters. The 4D Write User Reference may be found at:
http://www.phoenixlearning.com/downloads/downloads.htm
PTC has the ability to create merged form letters. These letters
are created once and printed dynamically for each family
in your file. PTC will merge information about teachers,
scheduled conferences, names and address.
Form letters may be saved and reused whenever needed. A
Sample Letter was included in your initial download.
Figure 8.3
To print form letters using the sample letter do the following:
1.
Click Step 7.
2.
Click Print Form Letters. The form letter window will
open. Note the menu within the form letter window. When
preparing and printing a form letter, you will use this new
menu.
3.
Choose Open from the File Menu from within the
window (see Figure 8.3).
4.
Browse to the PTC folder on your hard drive and choose
Sample Letter (see Figure 8.4).
Figure 8.4
17
Chapter 8
Step 7: Printing
5.
With the Text Tool selected, change the letter to fit your
school (see Figure 8.5).
6.
Change the school name and address at the top of the
form.
7.
Change or delete the mascot header at the top. “Home of
the Tigers!”
8.
Change the dates to match your conference sessions.
9.
Change the signature line at the bottom of the letter.
10. Select the Arrow Tool and select the graphic of the tiger.
11. Press Delete on the keyboard.
12. To insert your own graphic simply copy and paste it into
your form letter.
Verify that the letter is correct before printing.
School name and
address
Mascot header
Tiger graphic
Conference dates
Signature line
Figure 8.5
18
Chapter 8
Step 7: Printing
Printing Form Letters
Printing All Families
To print form letters for all families do the following:
1.
Choose Print Merge from the File Menu (see Figure 8.6).
2.
Select the Print All Families tab at the top of the window.
3.
Select Print for Distribution by Hand to send home with
students. You will be given a print dialog for each teacher
alphabetically. PTC will print one letter per family sorted
by teacher.
Or select Print for Mailing to print families in
alphabetical order.
Figure 8.6
4.
Click OK.
You will be presented with the print dialog window follow
your computers setup for printing or saving to PDF.
Printing Selected Families
To print form letters for selected families do the following:
1.
Choose Print Merge from the File Menu (see Figure
8.6).
2.
Select the Print Selected Families tab at the top of the
window (see Figure 8.7).
3.
You may find students by teacher with the popup or use
the filter at the top of the window to search for families
that match a certain criteria. As shown in Figure 8.7,
we have searched for families whose last name contains
“anders”.
4.
Select the families to be printed by holding the Commandkey while clicking on each family.
5.
Select to print the Highlighted families.
6.
Click OK.
Figure 8.6
Figure 8.7
You will be presented with the print dialog window follow
your computers setup for printing or saving to PDF.
19
Chapter 8
Step 7: Printing
Preparing Mailing Labels
The capabilities built into PTCʼs mailing label area are very
extensive. A separate manual is provided for help in creating
form letters. Chapter 9 in the 4D User Reference may be found
at:
http://www.phoenixlearning.com/downloads/downloads.htm
PTC has the ability to create merged mailing labels. These
labels are created once and printed dynamically for each
family in your file. PTC will merge names and addresses onto
each label.
Figure 8.8
Labels may be saved and reused whenever needed. A Sample
Mailing Label was included in your initial download. This
label contains the parentʼs names and family address. It was
created for an Avery 5160 label layout (10 rows x 3 columns).
To print mailing labels using the sample label do the following:
1.
Click Step 7 (see Figure 8.8).
2.
You must choose either to Print all Families or Print
Selected Families. When choosing to print selected
families, you may select by teacher or hand select the
families by pressing the command-key and clicking on
each family. You may also use the filter to search by
specific criteria (see Figure 8.9)
3.
Click OK.
4.
The Mailing Label Window will open (See Figure 8.10).
5.
Click Load... at the bottom of the window.
Figure 8.9
Figure 8.10
20
Chapter 8
Step 7: Printing
6.
Browse to the PTC folder on your hard drive and choose
Sample Mailing Label (see Figure 8.11).
7.
Click Open. PTC will load the selected mailing label.
8.
Click Print.
You will be presented with the print dialog window follow
your computers setup for printing or saving to PDF.
For extended help see our support website at
www.phoenixlearning.com.
Figure 8.11
21