1
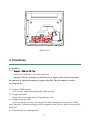
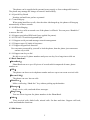
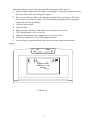
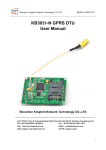
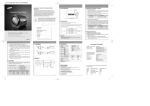
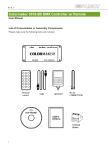
GSM FWP 850/1900
User's Manual
1
Contents
1. Introduction....................................................................................................................................................... 1
2.Features............................................................................................................................................................... 1
3. Components....................................................................................................................................................... 3
4. Functions............................................................................................................................................................ 4
4.1 Features: ............................................................................................................................................... 4
4.1.1 Support both GSM and extension phone. ............................................................................... 3
4.1.2 Support GSM network……………………………………………………………………..3
4.1.3 Support IP prefix ................................................................................................................... 4
4.1.4 Support Carrier lock................................................................................................................ 4
4.1.5 Intellectual Power Management ............................................................................................. 4
4.1.6 Special Key Board .................................................................................................................. 5
4.1.7 Auto Hang up (GSM calls only) ............................................................................................. 5
4.1.8 Off Hook Ringing (GSM calls only) ...................................................................................... 5
4.1.9 Support specialized SIM card (have applied for patent). ....................................................... 5
4.1.10 128*64 LCD with background light. .................................................................................... 5
4.1.11 Support serial port and message network management........................................................ 5
4.1.12 Support up to 18 kinds of ring tones..................................................................................... 5
4.1.13 Support keypad-lock function
4.1.14 Support one key to dial
4.2 Basic Functions:................................................................................................................................... 5
4.3 Idle Status:............................................................................................................................................ 5
5. Installation......................................................................................................................................................... 7
5.1 Adapter Installation............................................................................................................................. 7
5.2 Install or Remove the Batteries.......................................................................................................... 7
5.3 Remove or Insert the Special SIM Card ........................................................................................... 7
5.4 Connect Telephone Line...................................................................................................................... 8
6. Quick Start......................................................................................................................................................... 8
7. Operations ......................................................................................................................................................... 9
7.1 Menu:................................................................................................................................................. 9
1. Recent Calls ................................................................................................................................ 9
2. Messages....................................................................................................................................10
3. PhoneBook ................................................................................................................................10
4. Settings ...................................................................................................................................... 11
5. Power Manage ..........................................................................................................................12
6、Information.............................................................................................................................12
7.2 Short cut ..........................................................................................................................................13
1. “CID” and “SMS”....................................................................................................................13
2. Navigation keys.........................................................................................................................13
7.3 Operations ..........................................................................................................................................13
1. Make a call ................................................................................................................................13
2. Make a call in PhoneBook .......................................................................................................13
3. Answer a call.............................................................................................................................14
4.Forward a call.........................................................................................................................14
5.Calls list ...................................................................................................................................14
6.Set date and time ....................................................................................................................15
7.Volume.....................................................................................................................................15
8.Messages..................................................................................................................................15
7.4 Short Messages...................................................................................................................................15
1. Read messages ..........................................................................................................................15
2. Edit and Send out messages ....................................................................................................15
3. Reply ..........................................................................................................................................15
7.5 Turn off ...............................................................................................................................................16
8. Maintenance ....................................................................................................................................................17
9. Trouble Shooting .............................................................................................................................................17
2
1. Introduction
Thank you for choosing this product. Please read this manual carefully before using.
2.Features
Specifications:
Operating temperature:
0℃~ +40℃
Operating humidity: 5%~95%
Operating voltage:
AC110-240V±15%
DC8V~24V
Operating frequency:GSM900/DCS1800MHz or GSM850/PCS1900MHZ
L*W*H: 219.5mm*216.5mm*83.8mm
128*64 LCD with background light
1
2
3. Components
1.
2.
3.
4.
5.
Phone
Handset
Handset Cord
AC adapter (110-240VAC-10DC) or DC adapter (DC8V-24V)
RJ11 Line
Outline/Extension
Power
Jack
Serial
Port
USB
Ring
High
Low
Power
Off
On
Fax
Outline/Extension/Fax
Ring VOL(+~-)
Power Jack
Power(Off~On)
Serial Port
(Rear View)
Handset
Line
Status
Status LED
Read Short Message
Received Call List
LCD
Menu Key
Number-pad
Menu
CID
1
Navigation Key
SMS
3
2
ABC
DEF
Change/Switch
5
4
6
JKL
GHI
MNO
SET/OK
7
8
TUV
WXYZ
*
0
Input
Q
Erase
Dial/ Redial
W
A
Handsfree
Esc
Del
#
ㄩ
Symbol
Alphabetical-pad
6
PQRS
E
S
T
R
D
F
Y
G
U
H
I
J
O
K
P
L
Enter
ㄩ
Z
X
C
V
B
(Front View )
3
N
M
Del
Input
SIM Card Socket
Battery Holder
(Back View )
4. Functions
4.1 Features:
4.1.1 Support GSM and G3 Fax
support the GSM and G3 fax at the same time
Attention! The fax operation need the network to support. You need to activate the
fax function, to add the fax number to support the SIM. This fax number is used in
receiving the fax.
4.1.2 Support GSM network
User can dial, communication through GSM network.
4.1.3 Support IP prefix
Prefix IP access number ahead of long distance calls.
4.1.4 Support operator lock
After the operator locking, calls can only be made through specified operater’s SIM
card. Otherwise, following messages will be prompted on the screen: “Please used specified
SIM card”.
4.1.5 Intellectual Power Management
4
The phone can be supplied with external power supply or four rechargeable batteries.
The phone may manage the charge of batteries intellectually.
4.1.6 Special Key Board
Number pad and letter pad are separated.
4.1.7 Auto Hang up
When using hand-free to talk, after the other side hanged up, the phone will hang up
automatically in three seconds.
4.1.8 Off Hook Ringing
Receive calls as normal even if the phone is off hook. You can press “Hand-free”
to answer the call.
4.1.9 Support specialized SIM card (have applied for patent).
4.1.10 128*64 LCD with background light.
4.1.11 Support serial port and message network management.
4.1.12 Support up to 18 kinds of ring tones.
4.1.13 Support keypad-lock function
User can enter password by yourself to lock the phone, then the phone just can answer
and no way to dial.
4.1.14 Support one key to dial
Be able to set up 10 phone numbers and press one key for a long time to dial out
4.2 Basic Functions:
『PhoneBook』
PhoneBook can save up to 20 pieces of records which composed of name, phone
number etc.
『CID』
The phone can show received phone number and save up to ten recent received calls.
『Recent Calls』
The phone can save last ten calls.
『Hand-free』
Make a call using “Hand-free” key without picking up the handset.
『Messages』
Read, receive, edit, send and delete messages.
『Ring Tones』
You can select ring tone for phone numbers in the PhoneBook.
『Other』
View received calls, dialed calls, missed calls. Set date and time. Support call back,
redial and handsfree functions.
4.3 Idle Status:
5
Turn on the phone to enter idle status, the following icons will be shown:
A Signal strength. Indicates the strength of your phone’s connection with the network.
The more bars visible, the stronger the signal.
B Battery level indicator. Shows the amount of charge left in your battery. The more
bars visible, the greater the charge. It will flash during charging. When charging is
completed, it will stop flashing.
C Current GSM network
D Date and Time
E Short messages indicator. Flash when short messages are received.
F CID, flashing when a call is received.
G Indicator of incoming call. Flashing when a call is received.
H GSM status indicator. On for GSM signals searched.
I
External power supply indicator. Show this icon when using external power
supply.
G
A
Status
Line
E
F
I
C
Support Carrier
2004-05-30 14:20
Sunday
D
LCD Screen
6
H
B
5. Installation
5.1 Adapter Installation
This phone is supplied with power adapter (Use batteries in the case of power cut or
no power supply. Please make sure the batteries have been fully charged the batteries’
working time is limited.)
5.1.1 Make sure the power is switched to “OFF”.
5.1.2 Plug the output end of the adapter into the Power Jack on the phone, and connect the
input end to power supply.
(Caution: Make sure the power is put off and outer power supply is cut off before you
replace the batteries. )
5.2 Install or Remove the Batteries
When using batteries without connecting any power supply, the Talk Time and Idle
Time can be calculated as the following formulas show:
Talk Time (hour) = Battery Capacity (mAh) / talk time current (about 320mA)
Idle Time (hour) = Battery Capacity (mAh)/ idle time current (about 150mA)
(Prompt: Talk Time and Idle Time refer to how long you can talk or the phone can
keep idle status using fully charged batteries)
Follow the steps to install or remove batteries:
1. Make sure the power is switched to “Off” and cut off the outer power supply.
2. Open the cover of battery holder, push battery in the direction from anode(+) to
cathode(-), then take out the battery.
3. Install the batteries: First put one battery into the holder (cathode to the spring), then
put into another battery with the cathode pointing to the former one’s anode. Push it in
the direction to the spring and slide it into the holder.
4. Make sure the batteries have well contacted. Then close the cover.
Note: When you use outer power supply, the phone will charge the batteries
automatically until full. The charging may take about 8 hours in normal.
5.3 Remove or Insert the Special SIM Card
(Notes: Please switch the power to “OFF” when you remove or insert the SIM Card)
1. Make sure the power of phone is switched to “OFF”.
2. Open the cover of SIM Card.
3. Lift out the SIM Card when you want to remove it.
7
4. If you want to insert the SIM Card, please slide the card in the holder with the cut
corner on the upper and the gold plate facing down.
5. Insert one side of the cover and press the cover down until it hooks over the cover
release button.
Notes: The normal SIM Card can be inserted and removed the same as you do on
mobile phone.
5.4 Connect Fax machine
Connect the fax machine’s out line port and the port which marked
“outline/extension” by the RJ11 line.
6. Quick Start
Follow these steps to dial and answer calls. For virtual network subscribers, you need to
configure the virtual network number first. Please refer to “7. Functions” and “4.5 Virtual
Network”.
6.1 Insert one end of the handset cord into the jack at the bottom of handset, and insert the
other end into the cord jack on the phone.
6.2 Connect to the power supply or install the batteries as “5. Installation” describes.
6.3 Switch the power to “ON”. Then wait for several seconds to searching for the network
and registering. Network signal indication, power indication, carrier name and the
date and time will be shown on the screen.
6.4 You can make calls when you hear the dial tone.
6.5 When the phone is idle, you can answer the calls by picking up the handset or press the
“Hand-free” key.
6.6 When install the fax machine, please put the two sides of RJ11 line into
the fax port of phone and the output fax line port of fax machine. Then switch
on the power
6.7 The usage of the fax machine can refer to the common fax machine.
8
7. Operations
From the idle display, press “Menu” to show the options. Press “Set/OK” key to set the
options. Press “Esc” to return to upper layer menu.
7.1 Menu:
1. Recent Calls
1.1 Received Calls
The list of received calls.
Press the navigation keys to select a received call. “√” means the call connected,
otherwise is a missed call. Press “Dial” to dial the selected number. Press “Set/OK” key to
view the details of the call. Press the navigation keys to scroll to view other calls’ details.
Note: Press “Set/OK” to display following options:
Recent Received Calls Menu:
1. Dial Out
Dial out the selected phone number.
2. Edit and Dial
Edit the selected phone number. Pick up the handset or press “Handfree” key, then
press “Dial” to dial the number.
3. Delete
Delete the selected number.
4. Delete All
Delete the records of all received calls
5. Send Message
Send a message to the selected number
6. Store
Save the selected number to the phone book
1.2 Dialed Calls
The list of dialed calls.
Press the navigation keys to select a dialed call. “√” means the call connected,
otherwise is a missed call. Press “Dial” to dial the selected number. Press “Set/OK” key to
view the details of the call. Press the navigation keys to scroll to view other calls’ details.
Note: Press “Set/OK” to display following options:
Recent Dialed Calls menu
1. Dial Out
Dial out the selected phone number.
2. Edit and Dial
9
3.
4.
5.
6.
Edit the selected phone number. Pick up the handset or press “Handsfree” key,
then press “Dial” to dial the number.
Delete
Delete the selected number.
Delete All
Delete the records of all dialed calls
Send Message
Send a message to the selected number
Store
Save the selected number to the phone book
2. Messages
【3】
2.1 Show
Select a message with navigation keys. “√” means a message has been read. No “√”
means unread. Press “Dial” to make a call to sender of the message.
To view the details, press “Set/OK” key. You can scroll up and down to other messages
to view the details.
<After reading current message, press navigation keys to scroll up or down to read the
next message.>
Note: Press “Set/OK” to display following options:
1. Delete
Delete the selected message. Press “Set/OK” to delete it. Press “Esc” to return.
2. Reply
Reply the selected message.
3. Forward
Forward the selected message.
4. Call Back
Call the sender of the message.
5. Delete All
Press “Set/OK” to delete all messages. Press “Esc” to return to upper layer menu.
2.2 New
Edit a new message.
2.3 Delete All
Press “Set/OK” to delete all messages. Press “Esc” to return to upper layer menu.
3.
PhoneBook
【3】
3.1 Show
Press “Dial/Redial” key to call the highlighted number.
10
Note: Press “Set/OK” to display following options:
1.
2.
3.
4.
5.
6.
Dial Out
Dial out the selected number.
Edit
Edit the selected number.
Send Message
Send a message to the selected number.
Delete
Delete the selected number.
New
Press “Change” key to enter a new item. Press “Set/OK” key to save. Press “Esc”
to return to the upper layer menu.
Delete All
To delete all of the records, press “Set/OK”. Press “Esc” to return to upper layer.
3.2 New
Add new items according to the prompts.
3.3 Delete All
Press “Set/OK” to delete all of the records. Press “Esc” to return to upper layer.
4. Settings
【6】
4.1 Ring Styles
Press “Change” key to select ring styles forGSM phones or messages. To save the
settings, please press “Set/OK” key. Or press “Esc” to return to upper layer menu.
4.2 Date and Time
Press “Up” and “Down” to move the cursor up and down. Press “Left” and
“Right” to move the cursor in a line to the left or to the right. To save the settings, press
“Set/OK” key. Press “Esc” to return to the upper layer menu.
4.3 Volume
Press the navigation keys to adjust the volume. To save the settings, press
“Set/OK” key. Press “Esc” to return to the upper layer menu.
4.4 Centrex
“Wireless” means the prefix of wireless centrex. “Len” means the len of GSM
centrex phone number.
4.5 Call Forward
4.5.1 Wireless
4.5.1.1 All condition
Press “Set/OK” to select “Cancel” to cancel the forward settings. Or select “Register”
11
to forward the coming calls to specified number.
(Note: In the idle screen, it will prompt you that the phone will forward all incoming
calls.)
4.5.1.2 Busy
Press “Set/OK” to select “Cancel” to cancel the forward settings. Or select “Register”
to forward the coming calls to specified number.
4.5.1.3 No Reply
Press “Set/OK” to select “Cancel” to cancel the forward settings. Or select “Register”
to forward the coming calls to specified number when incoming calls are not answered by a
designated number of rings.
4.5.1.4 No Reachable
Press “Set/OK” to select “Cancel” to cancel the forward settings. Or select “Register”
to forward the coming calls to specified number when the phone can not connect with the
base station.
4.5.1.5 Cancel All
Cancel of the settings about forwarding.
4.5.1.6 Forward Status
Check the current setting of forwarding.
4.6 SIM PIN
It is forbidden to use this function by normal subscribers.
4.7 Key Sound Off
Press “Set/OK” key to turn off the key sound, and return to upper layer menu. The
option will be changed to “Key Sound On”.
4.8 Dial Delay
Dial out without pressing “Dial” after keying in the phone numer. The minimum
delay may be 3 seconds.
5. Power Manage
The phone can be supplied with external power supply or four rechargeable batteries.
The phone may manage the charge of batteries intellectually. “ ” may be shown in the
screen when using external power supply.
Use this menu to check the status of external power supply, batteries status
6、Information
Use this menu to check the current version of the program, current function code, Area
code and the version and serial number of GSM module.
(Note: Before set the new options, please delete previous settings using “Backspace”
or “Del” key.)
12
7.2
Short cut
1. “CID” and “SMS”
Short cut for incoming calls and messages. Press “CID” or “SMS” to show the missed
calls and messages when
and
flashing on the screen, and showing “x missed
calls” or “check the messages) on the screen.
2. Navigation keys
“Left” is the short cut for “Recent Calls”.
“Right” is the short cut for “Settings”.
“Up” is the short cut for “Messages”.
“Down” is the short cut for “PhoneBook”.
7.3 Operations
1. Make a call
You can make a call by:
1.1 Picking up the handset or pressing “Handsfree” key. Then input the phone number
and wait to be connected. When speed dial is needed, press “Dial/Redial” key after
keying in the numbers.
1.2 Key in the phone number directly, phone will enter into edit mode automatically.
(Press left or right to move the cursor.)
Press “Del” to delete the number after the cursor. Press “Backspace” to delete the
number ahead of the cursor. Pick up the handset or press “Handsfree” key or press
“Dial/Redial” to make a call.
1.3 Picking up the handset or press “Handsfree” key, press “Dial/Redial” again to send out
the last number.
1.4 Press “Dial/Redial” key to show the dialed call list. Scroll up and down to select a
number, pressing “Dial/Redial” again to make the call.
1.5 Hang up to end the call.
(Note: You can press Up and Down to adjust the volume during a call. Press Left and
Right to adjust the brightness of the LCD.)
2. Make a call in PhoneBook
2.1 Press “Menu” to enter to main menu. Scroll to the third item “PhoneBook”. Press
“Set/OK”.
2.2 Scroll up and down to select a number.
13
2.3
Press “Dial/Redial” to make a call.
3. Answer a call
3.1 Pick up the handset or press “Handsfree” key to answer a call.
3.2 Press “Esc” to hang up it (GSM phones only). The caller will hear busy tone. The call
will be listed in missed call.
(Note: 1. If the “Forward ->Busy” is enabled, the call will be forwarded to specified
number if you refuse it .
2. You can press Up or Down to adjust the volume during a call.)
(Note: If the caller’s name can not be found in the PhoneBook, and last seven figures
of the caller’s phone number is the same with a number in the PhoneBook, an
incorrect name maybe shown for the number.)
4.Forward a call
Incoming calls will be forwarded to a specified number when you enable this service.
Please contact your service provider for details.
From “Forward” menu, select an option. Such as “Busy”. The incoming call will be
forwarded to the specified number when the line is busy or you refused to answer it.
Select “On” to enable the function. Select “Off” to cancel the settings. To check the
forward status, please return to the upper layer menu and select “Forward Status”.
To cancel the enabled options, please select “Cancel All”.
5.Calls list
You can view the records of calls and messages in “Recent Calls” an “Messages”.
The received calls and dialed calls may be recorded in the phone. Supporting by network,
the phone can also timer the calls.
5.1 Received and Dialed calls list
To view the last ten calls received, please select “Recent Calls”, then select “Received
Calls”. “√” means the calls be connected. No “√” means missed call.
(Note: From idle display, when “missed call” prompts on the screen, press “CID”
key or select “Menu”, “Recent Calls”, “Received Calls” for details. To call back,
please scroll up and down to the name or phone number.)
5.2 Dialed Calls
To view the last ten calls you dialed or attempt to dial, please select “Recent Calls”,
“Dialed Calls”.
5.3 Delete all recent calls
To delete records of calls, please press “Set/OK” key to enter the “Recent Calls” menu.
Select “Delete” to delete the highlighted record. Press “Delete All” to delete all records in
14
the received and dial out calls list.
6. Set date and time
Press “Menu” key to enter “Settings”, “Date and Time” to set the date and time. Press “Up”
and “Down” to scroll through the options. Press “Left” and “Right” to move the cursor in
the line.
7. Volume
Scroll up and down to adjust the volume.
(Note: Press Up and Down to adjust the volume during a call.)
8.Messages
7.4 Short Messages
1. Read messages
1.1
From idle display, a
will be prompted on the screen which means a new
message is received. Press “SMS” key or select “Menu”, “Messages”, “Read
Messages” and press “Set/OK” to read it.
1.2 If multiple messages are received, please use the navigation keys to select the
message you want to read, then press “Set/OK” to open it.
(Note: Scroll up and down to read the message. Press Down to read the next
message if you have finished reading the current one.)
2. Edit and Send out messages
2.1 Select “Edit”, “To”. Press “Change” to enter the receiver’s phone number.
2.2 After entering the phone number, press the navigation key to move to the content.
Then press “Change” to input the message.
(Note: Each message should be no more than 70 characters. Messages more than 70
characters will be divided into two messages.)
2.3 Press “Set/OK” key to send out the message.
3. Reply
While reading the message, press “Set/OK” to enter the “Info” menu. Select “Reply”
to edit the message, then press “Set/OK” to send it out.
(Note: From the “Info” menu, you can deleted the selected message, or call back, or
delete all messages received.)
15
7.5
Turn off
Switch the power to “Off”.
16
8. Maintenance
To maximize your phone’s performance:
• Use the phone in dry environments.
• Do not expose the phone to temperature too high or too low.
• Do not try to disassembly the phone without professional experts on site.
• Do not drop or shake the phone roughly.
• Do not clean the phone with strong chemical scour.
Above advices also be the same with the charger and other components.
9. Trouble Shooting
1.
Disconnect the power supply and use batteries only. Switch the power on. Screen
does not display.
(1) Open the battery holder. Make sure batteries have been installed.
(2) User outer power supply or change the batteries.
2.
Connect to electrical outlet. Switch on the phone. Screen does not display.
(1)Maybe the output voltage of the adapter can not meet the requirements of the phone.
Make sure to use the original adapter. Make sure the AC input is in normal range.
(2)Maybe the voltage is too low or unstable. Make sure the outer power supply is in
normal range. Or use batteries instead.
3.
The phone can not enter idle mode after the power is switched on. The screen
displays “Please insert SIM card after turn off the phone”.
(1) Make sure you have inserted the SIM card. Check the SIM card is well contacted and
has been inserted correctly.
(2) If the problem still exists, please contact your network carrier to make sure the phone
is in the signal range.
4.
Wait for rather a long time (about 10 seconds) before you can make a call after
17
dial the phone number.
(1) Make sure you have press the “Dial” key after keying in the number. Otherwise the
phone will sent out the number after 5 seconds.
(2)Contact your network carrier to make sure the phone is in the signal range.
5.
Hearing ring tone just when you pick up the handset or press Handsfree key.
Press “Handsfree” key to answer the call. You can answer the coming call if only you
are not making any call.
6.Can not find the phone book you want or display none record.
(1)Make sure the group has not been filtered. If it has been filtered, please check it again.
(2)Make sure the phone number has been saved in the phone book.
18