1
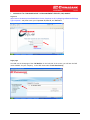
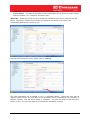
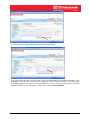
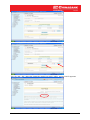
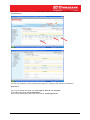
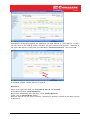
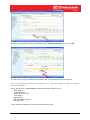
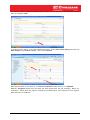
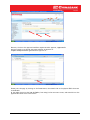
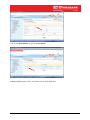
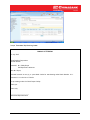
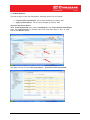
Check Depot
Client User Manual
User Manual
1
TABLE OF CONTENTS
I.
Logging on to China Bank Corporate Online Banking
II. Storing Check Details in the System
3
4
A. Corporate Data-Entry
4
B. Corporate File Upload
18
III. Inquiring Post-dated Check Status
IV. Sending Post-dated Checks to the Bank
22
V. Viewing Reports
23
VI. Requesting for Pull-out or Hold-out of Checks
VII. Annex A. File Layout
User Manual
26
2
I.
LOGGING ON TO CHINA BANK ONLINE- CASH MANAGEMENT SERVICES (CMS) MODULE
Log-on to
https://online.chinabank.ph/cms/BANKAWAY?Action.CorpUser.Init.001=y&AppSignonBankId=CBC&App
Type=corporate and please enter your Corporate ID, User ID, and Password.
Login page
You shall see the homepage of the CMS Module. On the left side of the screen, you will see the CMS
menu available for your Company. In the CMS menu select Check Warehousing.
User Manual
3
II. STORING CHECK DETAILS IN THE SYSTEM
For Check Warehousing, you have two (2) choices for sending data:
1) Corporate data entry – where you would encode the details of the postdated checks for
warehousing in the system
2) Corporate file upload – where you can upload a file containing the details of the postdated
checks for warehousing. You can either generate a text file using CBC required format, or use
an excel file converter that will generate a file compliance to the CBC format.
A. Corporate Data Entry
Maker
The first option is you can encode individually all the check details while logged on to the system.
Under Check Warehousing menu drop-down, select Check Maintenance.
Enter the following details in the fields (those in red font are mandatory):
- Accepting Branch - drop down menu for selecting the CBC branch where you intend to send the
physical PDCs (Note that the CBC branch/es should have been indicated in the enrollment form for
them to be defined in the system)
- Check Type – drop down menu for selecting the type of PDC, limited to Local or Regional (On-Us
checks should be entered as Local)
- Credit Account – drop-down menu for selecting the CBC deposit account number where the
maturing PDCs will be credited (Note that the CBC deposit account number/s should have been
indicated in the enrollment form for them to be defined in the system)
- Drawee Bank – drop down menu for selecting the Drawee Bank
- RT No. – or routing number; free text field for entering the Drawee Branch or the RT Number;
Limited to 9 alphanumeric chars.
- Number of First Check – Check Number of first PDC entered
- Date of First Payment – Date of first PDC maturing (please note that the system will not allow
warehousing of checks whose date is less than 7 days from current date); expressed in MM/DD/YY
or you may simply click on the date in the Calendar icon on the right side of the files
- Check Amount – Peso amount of PDC
- Number of Checks – Number of checks included in the batch of PDCs
- Frequency of Payment – You may use this field in case of multiple checks with regular maturity
dates (applicable for financing companies, insurance, leasing, etc.). Otherwise, select N.A.
User Manual
4
-
Client Name – drop down for selecting the name of the payer of PDC
Invoice Number – You may use this field for extra information such as invoice or receipt number,
reference numbers, etc.; Limited to 20 numeric chars.
IMPORTANT: Please ensure that the correct details are indicated as they will be verified by the CBC
Branch. Erroneous or unmatched records will be rejected by the Branch in the system, and
corresponding physical PDC returned to you.
Once you have entered the correct details, click on Continue
The check information will be showed to you in a horizontal manner. Please take note that for
multiple checks entered, the check date of the succeeding checks is adjusted per the Frequency of
Payment selected. Also the check number is sequential. You have the option to add more rows,
submit, or save. You can revise some of the fields before submitting or saving.
User Manual
5
To revise some parts of the fields, go the field and edit accordingly.
Once everything is okay and you would want to route the information to the Company Authorizer, click
on Submit. The next screen will give you a summary of the list of checks encoded. If in order, select
the Company Approver by clicking on the Look Up button. Or prior to this, you may want to check the
approval hierarchy for the transaction, in which case, click on Show Valid Rules.
User Manual
6
The rule “1LV + 2LV” means the transaction requires one level 1 maker, and two level 2 approvers
User Manual
7
The next screen will show you the list of Corporate Users/approvers. Click on the radio button on the
left side of the intended Corporate Users/approvers the then click on Select at the bottom part of the
screen.
Confirm the transaction by entering your User ID and Transaction Password. Then click on Submit.
You will receive a pop-up message that transaction has been approved and sent for approval:
“Transaction successfully entered and sent for approvals with Batch Number xxxx. Total number of
Checks xx. Total Amount PHPxxx.xx”
User Manual
8
System will generate a Cyber Receipt containing the batch details such as:
- Batch Number
- Accepting Branch
- Total Number of Checks
- Total Amount
- Requested By
- Requested Date and Time
- Next Authorizer
It also contains the details of the checks contained in that batch.
You have the option to print or save the Cyber Receipt. You can go back to the Check Warehousing
menu by clicking on Back.
To view the status of the checks, in the Check Warehousing menu, select Check Status Inquiry. Note
that the status of the checks is Initiated. This means that the batch has been initiated by the Maker,
and is now queued with the next Corporate User/approver. You can print this page by clicking on the
User Manual
9
Print button. You can also view the Batch Details, Batch History, and Check Details by clicking on
the View button.
You may now prompt the next Corporate User/Approver to approve the data entry transaction.
Approver A
Log on to the system and enter your Corporate ID, User ID, and Password.
In the CMS menu select Check Warehousing.
Under Check Warehousing menu drop-down, select Pending Approvals.
User Manual
10
You will see the List of Batches Pending Approvals.
Click on Next button to check if there are other batches pending approval.
To check the details of the batch, click on the Batch Number
Next page will show you the batch details and the check details under that batch. Click on Back
button to go back to the previous page.
User Manual
11
After checking correctness of the details, click on Approve/Reject button.
Default is Approve all. However, you can approve on a per check basis. If you like to reject a check,
remove the check mark by clicking on the radio button. You can put your comments in the Remarks
portion to guide the other Corporate users.
User Manual
12
After selecting the record to be approved or rejected, and after indicating your remarks (optional),
click on the Approve/Reject button.
Next page will show you the List of Instruments for Approval and List of Instruments for Rejection.
User Manual
13
Depending on the approval workflow, the transaction may need approval of a next approver. If this is
the case, click on the Look Up button, and select the next Corporate User/approver. Otherwise, is
you are the last approver, simply enter your User ID and Transaction Password. Then click on OK.
In the above example, another approver is required.
Approver B
Log on to the system and enter your Corporate ID, User ID, and Password.
In the CMS menu select Check Warehousing.
Under Check Warehousing menu drop-down, select Pending Approvals.
If okay, click on Approve/Reject button.
Note than there is only one check, Check #2, remaining for approval, as Check #2, has been rejected
by Approver A.
User Manual
14
Confirm the transaction by entering your User ID and Transaction Password. Then click on OK.
You will receive a pop-up message that transaction has been approved and sent for approval:
"You have successfully approved the transaction: 1111.
amount PHP5,000.01”
Approved number of checks 1. Approved
System will generate a Cyber Receipt containing the batch details such as:
- Batch Number
- Accepting Branch
- Total Number of Checks
- Total Amount
- Requested By
- Requested Date and Time
- Next Authorizer
It also contains the details of the checks contained in that batch.
User Manual
15
You have the option to print or save the Cyber Receipt. You can go back to the Check Warehousing
menu by clicking on Back.
To view the check status, in the Check Warehousing menu, select Check Status Inquiry and enter the
Batch Number in the Search Criteria. Then click on Retrieve.
Note that the status of the check no. 2 is Sent for Acceptance, while check no. 3 is Rejected.
Sent for Acceptance means that the check has been queued with the CBC Accepting Branch for
acceptance. Please print this page by clicking on the Print button, then attach this to the physical
PDCs when sent to the Branch.
User Manual
16
Offline Data-Entry System
You also have the option to encode the check details in an offline mode through an excel template
specially designed for this purpose. The template shall create a file which can be uploaded directly to
the system. You shall enter the following details in the template:
Batch Details:
? Accepting Branch
? Account Type( (Saving or Checking)
? Credit Account Number (Deposit account number where the PDC proceeds will be credited)
? Branch Name (CBC Branch where the Credit Account Number is maintained)
? File Serial Number: Starts with '0001' and automatically adds one when you click on Generate
File button
Check Details:
? Check Date
? Check Number
? Check Amount
? Check Deposit Date
? Type of Check
Payment Details:
? Payor Name (Name of Company or Individual who made the PDC payment)
? Invoice/Reference Number (Can be used to indicate details of the payment such as invoice
number, official receipt number, sales code, reference number, etc.)
Drawee Bank Details:
? Drawee Bank
? RT Number (refers to routing number or BRSTN of the drawee bank branch which is indicated in
the lower portion of the check)
After you have encoded the check details, generate the file by clicking on the Generate file button.
The generate file button will create the file for you. File naming convention is Corp ID-File Serial
Number-Date of File generation expressed in MMDDYYYY.
User Manual
17
Example: CASHMGT-974-07112012.txt
This file is automatically saved in the folder where the file converter is located.
Note that the generated file is a .txt file. See Annex A for the file format
B. CORPORATE FILE UPLOAD
The second option in storing check and collection information in the system is by uploading a file to
the system which contains check information.
Under Check Warehousing menu drop-down, select Upload, then click File Upload.
Encode the File Upload Details (mandatory fields are in red font):
? File Name – Name of the .txt file
? File Description
User Manual
18
?
?
?
?
Maximum Check Amount – Highest amount of PDC contained in the file
Total Amount – Total amount of PDCs contained in the file
File Processing Date – Date of upload; should be the same as the one indicated in the file
Remarks – Free field for indicating remarks. For example, PDCs for the period July 1-15, 2012
Select next authorizer/approver and click on Continue.
Select the file to be uploaded by clicking on the Browse button and selecting the file from your file
directory. After selecting the file, confirm the transaction by entering your User ID and Transaction
Password. Then click on Submit button.
You will receive a pop-up message that transaction has been approved and sent for approval:
"Your upload file is waiting approval. Your reference number is xxxx”
User Manual
19
System will generate a Cyber Receipt containing the batch details such as:
- File Name
- Description
- Amount
- File Processing Date
- Remarks
- Entered By
- Requested Date and Time
- Next Authorizer
You have the option to print or save the Cyber Receipt. You can go back to the Check Warehousing
menu by clicking on Back.
To view the status of the file upload, in the Check Warehousing menu, select Upload, then Status
Inquiry and enter the Upload Date Range in the Search Criteria. Then click on Retrieve.
User Manual
20
Note that the status of the upload file is Entered.
To view the details of the txt file, click on filename.
To view the details of the upload, click on Details.
You may also cancel submission of the file by clicking on Cancel Submission.
Upload Details screen shows you the reference number, file name, file description, among others.
It also gives you a history of the file, the corporate user who uploaded the file and the date.
To go to the previous screen, click on the Back button.
User Manual
21
If everything is okay, prompt your next authorizer/approver to approve the file.
Approver A
Log on to the system and enter your Corporate ID, User ID, and Password.
In the CMS menu select Check Warehousing.
Under Check Warehousing menu drop-down, select Upload, then Pending Approvals.
The next screen will show you the List of Files for Approval.
Select the file that you would like to approve by clicking on the radio button on the left hand side of
the filename.
? Before approving the file, you may want to check the txt file itself by clicking on the file
name.
? Or you may want to see the history of the transaction.
If everything is in order, approve or reject the file by clicking on the Approve/Reject button.
Next screen shows you the details of the file.
User Manual
22
Depending on the approval workflow, the transaction may need approval of a next approver. If this is
the case, click on the Look Up button, and select the next Corporate User/approver. Otherwise, is
you are the last approver, simply enter your User ID and Transaction Password. Then click on
Approve.
You will receive a pop-up message that transaction has been approved successfully
"File Approved Successfully”
System will generate a Cyber Receipt containing the batch details such as:
- File Name
- Description
- Amount
- File Processing Date
- Remarks
- Entered By
- Requested Date and Time
- Next Authorizer
You have the option to print or save the Cyber Receipt. You can go back to the Check Warehousing
menu by clicking on Back.
User Manual
23
To view the check status, in the Check Warehousing menu, select Upload, then Status Inquiry. Then
in the search criteria, enter the Upload Date Range. Then click on Retrieve.
Note that the status of the upload file is now Approved.
To view the details of the txt file, click on filename.
To view the details of the upload, click on Details.
You may also cancel submission of the file by clicking on Cancel Submission.
User Manual
24
However, the since the approval workflow requires another approver, Approver B.
Approver needs to go through the same workflow as Approver A.
A cyber receipt is likewise generated for Approver A.
Please print this page by clicking on the Print button, then attach this to the physical PDCs when sent
to the Branch.
Or the maker that print the List of Checks, from using his/her own user access, and attach this to the
physical PDCs when sent to the branch
User Manual
25
III. INQUIRING CHECK STATUS
All check and payment information entered or uploaded shall be stored in the Inventory or a
“warehouse” in the system. In the Inventory Module of the System, you can update/change the status
of a check or perform different actions with the checks and you can search/filter checks according to
your specified criteria as follows:
? Batch Number
? Credit Account
? Check Date - From - to
? CHeck Deposit Date - From - to
? Check Number
? Check Amount
? Check Type - Select Local or Regional
? Status- Select "Sent for Acceptance"
? Status Change Date
Under Check Warehousing menu drop-down, select Check Status Inquiry
You shall be able to view a summary of all checks stored in the inventory and its status.
In the sample below, the search criteria given is Check Date, from 07-09-12 to 07-13-12
After clicking of the Retrieve button, you will see the List of Check with varying statuses as follows:
?
?
?
?
Sent for Acceptance – This means that the check has been fully approved at the corporate
side and is now queued with the Accepting Branch. Note that the Accepting Branch will not
process the PDCs pending the receipt of the physical PDCs and accompanying printout of List of
Checks.
Pending for Warehousing – This means that the check has been verified and fully approved by
the Accepting Branch, and is now queued with the Warehousing branch (Warehousing Branch is
the backroom/operations unit of CBC which warehouses the PDCs and sends them to Clearing
upon maturity).
Warehoused – This means that the batch has been fully verified and approved for warehousing
by the Warehousing Branch.
Credited Online – Upon maturity date of the check, the status becomes credited online. You
can verify this versus your deposit account inquiry to confirm crediting to your account.
User Manual
26
?
Cleared – This means that the checks have undergone clearing and is not part of the available
balance.
You can click on next to get to the next page (in case of numerous checks), or print the page.
IV. SENDING POST-DATED CHECKS TO THE BANK
When sending post-dated checks to the Bank, please ensure the following:
1) Print the List of Checks
2) Attach physical PDCs to the List of Checks – Ensure that the physical PDCs tally with the List of
Checks
3) Secure the PDCs in an envelope with transmittal slip/covering letter
4) Send the envelope and covering letter to the Accepting Branch
How to get the List of Checks
Under Check Warehousing menu, select Batch Inquiry
Indicate Batch Number in the search criteria and click on the Retrieve button.
User Manual
27
Click on the Batch Number to get the List of Checks
Print the screen (print screen), and attach this to the physical PDCs.
User Manual
28
Sample Transmittal Slip/Covering Letter:
COMPANY LETTERHEAD
13 July 2012
China Banking Corporation
Binondo Branch
Attention: Mr. Gabby Reyes
CMS Operations Assistant
Dear Mr. Reyes,
Enclosed herewith is one (1) pc. post-dated checks for warehousing under Batch Number 1111.
Attached to it is the List of Checks.
For processing under the Check Depot facility.
Thank you.
Yours truly.
________________________
Authorized Representative
User Manual
29
V. VIEWING REPORTS
You shall be able to view and download the following reports from the system:
? Corporate PDC Status Report- list of checks arranged by maturity date
? Aging of Checks Report - list of checks arranged by maturity date
Corporate PDC Status Report
Under Check Warehousing menu, select Check Reports, then Corporate PDC Status Report.
Select your Search Criteria, for example, PDCS with check date range of July 1-31, 2012.
Click on the Retrieve button.
Next page will show you the Check Status Report – Grouped by Check Deposit Date
User Manual
30
At the lower part of that page is a Summary Checks by Deposit Date which shows the number of
checks maturing on a per date, and the total amount. You can Print, Save as CSV, or Save as Txt
Format
Aging of Checks Report
Under Check Warehousing menu, select Check Reports, then Aging of Checks Report.
Click on the Retrieve button.
Next page will show you the Aging of Checks Report containing the details of the check
User Manual
31
At the lower part of that page is a Summary For Each Age Group which shows the number of checks
maturing on a per date, and the total amount, and Summary by Beneficiary. You can Print, Save as
CSV, or Save as Txt Format
User Manual
32
VI. REQUESTING FOR PULL-OUT OR HOLD-OUT OF PDCS
All requests for pull-out or hold should be made via a Pull-out/Hold-out Instruction sent to the
Accepting Branch.
Note that said form should be received by the Accepting Branch not later than two (2) days prior to the
PDC’s maturity date.
Please see template of Request for Pull-out of PDC.
VII. ANNEX A. FILE LAYOUT
File Header
File Format
:
FILEHDR | CORP ID (mandatory) | File Serial num (optional) | value date (optional) |
Encryption Flag (Y/N) (optional) | Remarks
Example
:
FILEHDR|CASHMGT|930|05/14/2012|N|This is the PDC test file
Batch Details
User Manual
33
Details
1
Si
ze
3
REF_NUM
ACCEPT_BRANCH_ID
5
38
32
9
CR_PARTY
48
3
LN_ACCOUNT_NUM
52
80
PDC_TYPE
CR_ACC_TYPE
133
137
3
2
CR_ACID
140
24
WAREHOUSE_BRANC
H_ID
165
9
CR_PARTY_INFO
175
80
1
3
BAT_SUFFIX
CHK_SUFFIX
Start
DRAWEE_BANK
DRAWEE_BRANCH_NA
ME
CHK_DATE
CHK_NUM
CHK_AMT
CHK_DEPOSITDATE
5
15
9
80
96
107
117
127
10
9
9
10
PRODUCT_TYPE
138
3
User Manual
Description
This field value should be
BAT, used for differentiating
records.
Free text
Branch ID of Accepting
Branch
Customer(‘C’)or Bank(‘B’).
Deposit Account Number
when the PDCs will be
credited upon maturity
PDC Type
To specify the account type for
crediting the checks
Credit account for each of the
checks. For checks
warehoused for the bank, this
field will take the loan account
number
Branch ID of Warehousing
Branch
Free text
This field value should be
BAT, used for differentiating
records.
Free text
Free text
Check Date
Check Number
Check Amount
Check Deposit Date
Type of checks. Local
Checks(LOC) or Regional
Valid Values
BAT
No validation
A1001 (Binondo),
A1003 (Makati Main),
A1005 (Greenhills),
This value should be same as
the primary branch id of the
RM.
(Bank to provide you with the
valid branch ID to be used)
Valid values are ‘C’ or ‘B’
(Always put ‘C’ for corporate)
No Validation
Leave blank
Like SA/CA. No validation.
No validation.
A1001 (Binondo),
A1003 (Makati Main),
A1005 (Greenhills),
Etc
(Bank to provide you with the
valid branch ID to be used)
No Validation. Mandatory when
the CR_PARTY =’B’
CHK
No Validation
No Validation
MM/DD/YYYY
Numeric
Numeric
MM/DD/YYYY. It should be less
than
‘DAYS_FOR_VALIDATING_DE
POSIT_DATE_CWH’(PRPM
parameter) days from the check
date.
Valid values obtained from
COCD for
34
Checks (___)
PAYER_NAME
142
32
DR_ACCOUNT_TYPE
175
2
CR_ACID
CR_BRANCH_NAME
178
203
24
80
PDC_TYPE
REFERANCE_NUM
CHK_INV_NUM
DR_BRANCH_NAME
284
288
294
359
3
5
64
80
DR_ACID
440
24
Free text
Debit Account Type
Deposit account number
Branch ID of Branch where
Deposit Account Number is
maintained
PDC Type
Free text
Free text
Branch ID of Branch where
Deposit Account Number is
maintained
account number
code_type=’CWH’
If “COU”, then DR_ACID and
DR_BRANCH_NAME are
mandatory
No validation
Mandatory field validation
04 - for SA accounts
02 - for CA accounts
Mandatory for On Us Checks
No validation
A1001 (Binondo),
A1003 (Makati Main),
A1005 (Greenhills),
etc
Leave blank
No validation
No validation
Mandatory when
product type=”COU”
No validation. Mandatory if
Check Type is
'On-us Checks'
Sample FUPM entry:
BAT_SUFFIX=1,3|REF_NUM=5,32|ACCEPT_BRANCH_ID=38,9|CR_PARTY=48,3|LN_ACCOUNT_N
UM=52,80|PDC_TYPE=133,3|CR_ACC_TYPE=137,2|CR_ACID=140,24|WAREHOUSE_BRANCH_ID=165,9
CHK_SUFFIX=1,3|DRAWEE_BANK=5,9|DRAWEE_BRANCH_NAME=15,80|CHK_DATE=96,10|CHK_NUM=107,9|
CHK_AMT=117,9|CHK_DEPOSITDATE=127,10|PRODUCT_TYPE=138,3|PAYER_NAME=142,32|DR_ACCOUNT_
TYPE=175,2|CR_ACID=178,24|CR_BRANCH_NAME=203,80
A sample file for upload is as attached ( trial_newformat_bat939joseph).
Flow:
The process flow for the check warehousing feature is as discussed below:
1.
A corporate user enters information about checks to be warehoused to the system either as a batch of
checks or as a file. The batch goes through the corporate workflow before it reaches the bank.
2.
After the entry, the checks are dispatched to the accepting branch
3.
The accepting branch will verify the check details and the b atch will go through approvals on the accepting
branch.
4.
On approval, the checks are sent to the warehouse branch.
5.
At the warehousing branch, the checks are verified again and the batch will go through approvals on the
warehousing branch.
6.
On approval, the check will be warehoused.
User Manual
35