1
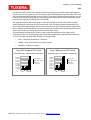
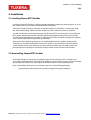
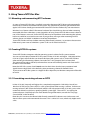
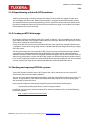
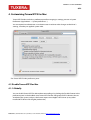
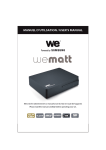
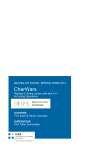
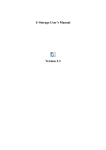
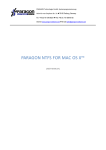
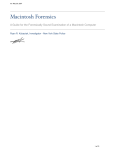
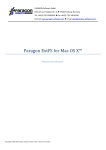
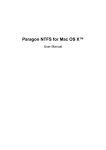
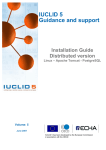
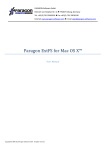
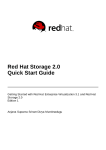
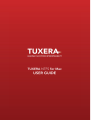
TUXERA NTFS for Mac USER GUIDE
2/13
Index
1. Introduction to Tuxera NTFS for Mac.................................................................................................................. 3
1.1 What is a file system driver?........................................................................................................................... 3
1.2 How does it work?............................................................................................................................................. 3
2. Installation................................................................................................................................................................... 5
2.1 Installing Tuxera NTFS for Mac...................................................................................................................... 5
2.2 Uninstalling Tuxera NTFS for Mac................................................................................................................ 5
3. Using Tuxera NTFS for Mac..................................................................................................................................... 6
3.1 Mounting and unmounting NTFS volumes............................................................................................. 6
3.2 Creating NTFS file systems............................................................................................................................. 6
3.2.1 Formatting an existing volume as NTFS.......................................................................................... 6
3.2.2 Repartitioning a disk with NTFS partitions..................................................................................... 7
3.2.3 Creating an NTFS disk image............................................................................................................... 7
3.3 Checking and repairing NTFS file systems............................................................................................... 7
4. Customizing Tuxera NTFS for Mac....................................................................................................................... 8
4.1 Disable Tuxera NTFS for Mac......................................................................................................................... 8
4.1.1 Globally........................................................................................................................................................ 8
4.1.2 For a volume.............................................................................................................................................. 9
4.2 Disable caching.................................................................................................................................................. 9
4.2.1 Globally........................................................................................................................................................ 9
4.2.2 For a volume.............................................................................................................................................. 9
4.3 Enable debug logging.................................................................................................................................. 10
4.4 Always mount unclean volumes............................................................................................................... 10
4.5 Disable recovery dialog for hibernated volumes................................................................................ 10
4.6 Disable filename normalization................................................................................................................. 10
4.6.1 For a volume............................................................................................................................................ 11
4.7 Store extended attributes natively........................................................................................................... 11
4.8 Apply Services for Mac translations for incompatible characters..................................................11
5. Acknowledgements............................................................................................................................................... 12
Tuxera Inc., Itälahdenkatu 23 A, 5th floor, 00210 Helsinki, Finland. http://www.tuxera.com/
TUXERA NTFS for Mac USER GUIDE
3/13
1. Introduction to Tuxera NTFS for Mac
Thank you for downloading Tuxera NTFS for Mac, a read/write file system driver for the Windows file
system NTFS. This document will explain what Tuxera NTFS for Mac is, how to install it and use it,
and how to perform certain other operations.
This version of Tuxera NTFS has been adapted to Mac OS X, and can be used with both Intel Macs
and older PowerPC Macs. It can be run on Mac OS X versions 10.8 (Mountain Lion), 10.7 (Lion), 10.6
(Snow Leopard), 10.5 (Leopard), and 10.4 (Tiger).
1.1 What is a file system driver?
A file system driver is the software component that interprets the structures of the file system and
presents a logical hierarchical view to the applications using it. It can be a part of the operating
system, or come as a third party module, like Tuxera NTFS for Mac. For instance, Mac OS X comes
with drivers for the following disk-based file systems after a clean install:
-
HFS / “Mac OS Original”
(full support)
-
HFS+ / “Mac OS Extended”
(full support)
-
HFSX / “Mac OS Extended (Case-sensitive)”
(full support)
-
Apple UFS / “UNIX File System”
(full support)
-
FAT / “MS-DOS File System”
(full support)
-
NTFS / “Windows NT Filesystem”
(read only)
-
ISO-9660 / “ISO 9660 File System”
(full support)
-
UDF / “Universal Disk Format”
(full support)
-
Mac OS X 10.5 only: ZFS / “ZFS File System”
(read only)
Tuxera NTFS for Mac is based on NTFS-3G, which is designed to extend not only Mac OS X, but also
other operating systems (Linux, FreeBSD, Solaris, ...) with the capabilities to write to NTFS partitions
and having them appear as native parts of the operating system environment.
1.2 How does it work?
Mac OS X has a kind of plugin-based file system interface, where anyone can extend the operating
system with new file system bundles, to make the operating system recognize, mount, create and
repair other file systems than the built in types. This is what this package uses to glue together the
operating system independent Tuxera NTFS driver with Mac OS X.
Tuxera Inc., Itälahdenkatu 23 A, 5th floor, 00210 Helsinki, Finland. http://www.tuxera.com/
TUXERA NTFS for Mac USER GUIDE
4/13
Usually file systems drivers live in the kernel of the operating system, which makes writing them a
risky business as they can easily crash the whole system if the developer makes mistakes. This is not
the case with Tuxera NTFS for Mac. Instead, it lives in “user space”, where all other programs run, and
is linked to the kernel through the file system bridge MacFUSE (a Mac version of FUSE, “Filesystem
in Userspace”, originally created for the Linux kernel).
This approach makes Tuxera NTFS for Mac a lot more portable, and safer, since system stability
won't be affected in the event of a file system driver crash. The only theoretical downside is that
CPU usage will be slightly higher due to increased kernel/user space communication, which could
result in slower read/write speeds. In practice, however, it has been shown that the performance of
Tuxera NTFS for Mac can easily compare with kernel-based drivers.
The performance of Tuxera NTFS for Mac is often more than double that of its open source
counterpart, NTFS-3G. The following graphs represent a performance comparison between NTFS3G and Tuxera NTFS on three different types of storage media:
•
SATA – Hard drive attached via a SATA link.
•
USBHD – Hard drive attached via a USB 2.0 cable.
•
USBMEM – USB 2.0 flash drive.
Copy DVD image to NTFS drive
Copy 1000 mp3s to NTFS drive
Finder file copy - Performance comparison
Finder file copy - Performance comparison
00:40:00
00:35:00
00:30:00
00:25:00
00:20:00
00:15:00
00:10:00
00:05:00
00:00:00
Tuxera NTFS
NTFS-3G (cached)
NTFS-3G
(uncached)
SATA
USBHD
USBMEM
00:40:00
00:35:00
00:30:00
00:25:00
00:20:00
00:15:00
00:10:00
00:05:00
00:00:00
Tuxera NTFS
NTFS-3G (cached)
NTFS-3G
(uncached)
SATA
USBHD
USBMEM
Tuxera Inc., Itälahdenkatu 23 A, 5th floor, 00210 Helsinki, Finland. http://www.tuxera.com/
TUXERA NTFS for Mac USER GUIDE
5/13
2. Installation
2.1 Installing Tuxera NTFS for Mac
Installing Tuxera NTFS for Mac is not more complicated than installing any other program, as it uses
the standard Mac OS X Installer package format for installation.
Tuxera NTFS for Mac, like most software on the Mac platform, is delivered as a disk image (.dmg
file). After downloading, double-click the .dmg file to make it mount and show its contents.
You will see two icons inside the disk image: “Install Tuxera NTFS” and “User Manual”. “Install Tuxera
NTFS” opens the package installer, which will guide you through installing Tuxera NTFS for Mac.
You will have to provide the password of an administrator of your computer during the installation,
since it needs to place files in protected system folders.
After you have installed the package, you are recommended but not required to reboot your
computer. It is recommended because some parts of Mac OS X cache certain data from the file
system bundle. In most cases however, you only need to unmount your NTFS file systems and
remount them in Disk Utility to activate the newly installed version of Tuxera NTFS for Mac.
2.2 Uninstalling Tuxera NTFS for Mac
Tuxera NTFS for Mac can be easily uninstalled using the Uninstall Tuxera NTFS... button in the
Tuxera NTFS preference pane, which will be available in System Preferences once you have installed
the package. See section 4 for a description of the other features in the preference pane.
If this should fail for some reason, an uninstall script exists at the following location:
/System/Library/Filesystems/fusefs_txantfs.fs/Support/uninstall-package.sh
Tuxera Inc., Itälahdenkatu 23 A, 5th floor, 00210 Helsinki, Finland. http://www.tuxera.com/
TUXERA NTFS for Mac USER GUIDE
6/13
3. Using Tuxera NTFS for Mac
3.1 Mounting and unmounting NTFS volumes
As soon as Tuxera NTFS for Mac is installed, it overrides the internal NTFS driver and automatically
mounts NTFS volumes connected into the system. Any volume that previously got mounted with
Apple's NTFS driver should get mounted with Tuxera NTFS for Mac without any user intervention.
Windows has a feature called “Safe remove hardware” that should always be used when removing
removable disks from a Windows system (regardless of using Tuxera NTFS for Mac to access them or
not). If this feature is not used, Tuxera NTFS for Mac may have problems with mounting the volume,
because it could be in an inconsistent state. If you get error messages when mounting an NTFS
volume, please use 'chkdsk' in Windows to correct the problems.
Tuxera NTFS for Mac will warn before mounting “hibernated” partitions, i.e. partitions that contain a
hibernated system state of a Windows system as this can also lead to data loss.
3.2 Creating NTFS file systems
Tuxera NTFS for Mac integrates with the operating system's utilities for file system creation.
You can use Disk Utility to create NTFS file systems in Mac OS X 10.5 and higher. Disk Utility in Mac
OS X 10.4 (Tiger) will not let the user choose third party file systems such as Tuxera NTFS for Mac
when creating and formatting volumes, but in Mac OS X 10.5 (Leopard) this has been fixed.
The command line utility diskutil (a command line version of Disk Utility) works with Tuxera NTFS
for Mac in 10.4 and above.
Note that NTFS file systems should not be used on hard drives that has been partitioned with
Apple Partition Map, which is the default system partitioning scheme for PowerPC Macs.
If you create an NTFS file system on a Apple Partition Map drive, no Windows computer will be able
to read it.
3.2.1 Formatting an existing volume as NTFS
In Mac OS X 10.5 (Leopard) and higher this is completely integrated in Disk Utility. You will see
Windows NT Filesystem (Tuxera NTFS) as a file system option when erasing a volume. To format an
existing volume as NTFS from the Terminal (which is the only option in Mac OS X 10.4), you use the
command diskutil eraseVolume, specifying the file system type “Tuxera NTFS”. Just typing the
command prints a brief help text. For more detailed usage information, consult the man page
(“man diskutil” in the Terminal).
Note: Mac OS X restricts the volume label of newly created NTFS volumes to 8-10 characters and
doesn't allow spaces and international characters. This is a Mac OS X issue, which only Apple could
solve.
Tuxera Inc., Itälahdenkatu 23 A, 5th floor, 00210 Helsinki, Finland. http://www.tuxera.com/
TUXERA NTFS for Mac USER GUIDE
7/13
3.2.2 Repartitioning a disk with NTFS partitions
Similarly to formatting an existing volume, Disk Utility can be used for this purpose in Mac OS X
10.5 and higher, but not in 10.4, where the only option is using the command line utility diskutil.
The command line to use when repartitioning a disk is diskutil eraseDisk, and works similar to the
previously mentioned diskutil eraseVolume. Please read the man page (“man diskutil”) for further
information on how to use this utility.
3.2.3 Creating an NTFS disk image
Disk images can be created holding NTFS file systems. In Mac OS X 10.5 and higher you can do this
from within Disk Utility, and you get to choose the file system type Windows NT Filesystem (Tuxera
NTFS) when creating an empty disk image.
In Mac OS X 10.4 you can instead use the command line utility hdiutil. For example “hdiutil create
-size 50M -fs “Tuxera NTFS” image.dmg” creates a 50 MiB unpartitioned image containing an empty
NTFS file system.
The only disk images that can contain NTFS file systems are plain read/write disk images (UDRW),
unpartitioned, or partitioned with the Master Boot Record or GUID Partition Table partitioning
schemes. However, hdiutil, which has only been written with Apple's file systems in mind, does not
allow you to put partition systems with NTFS file systems on the disk image out of the box (at least
in OS X 10.4). Instead you need to use diskutil to repartition the disk image after you have attached
it to the system if you want to put a Master Boot Record or GUID Partition Table onto it.
3.3 Checking and repairing NTFS file systems
Tuxera NTFS for Mac includes Tuxera's NTFS repair tool, ntfsck, which you can use if your NTFS
volume does not mount or exhibits problems.
You can access the repair tool through Disk Utility, much like you would normally repair a Mac OS X
volume. Just go to the 'First Aid' tab in Disk Utility and choose 'Repair Disk' to start repairing the
disk structures of your NTFS drive.
If you want to invoke the ntfsck tool manually from the command line, the full path is:
/System/Library/Filesystems/fusefs_txantfs.fs/Support/ntfsck
In addition, you can always check and repair NTFS volumes in Windows. Please see the following
link for more details:
http://support.microsoft.com/kb/315265
Tuxera Inc., Itälahdenkatu 23 A, 5th floor, 00210 Helsinki, Finland. http://www.tuxera.com/
TUXERA NTFS for Mac USER GUIDE
8/13
4. Customizing Tuxera NTFS for Mac
Tuxera NTFS for Mac includes a preference pane for managing its settings, present in System
Preferences (Apple Menu → System preferences...).
You are required to authenticate as an administrator in order to make changes to the driver's
settings, since they are applied system-wide.
The Tuxera NTFS for Mac preference pane
4.1 Disable Tuxera NTFS for Mac
4.1.1 Globally
You can disable Tuxera NTFS for Mac without uninstalling it by clicking the “Disable” button in the
preference pane. In the disabled state, Tuxera NTFS for Mac will ignore all NTFS volumes that are
attached to the system, and pass the mount request on to Apple's NTFS driver (or any other
installed NTFS driver with a higher probe order).
Tuxera Inc., Itälahdenkatu 23 A, 5th floor, 00210 Helsinki, Finland. http://www.tuxera.com/
TUXERA NTFS for Mac USER GUIDE
9/13
Once you click the “Disable” button all options will be greyed out, and the button text will be
changed to “Enable”.
Tuxera NTFS for Mac is enabled by default.
4.1.2 For a volume
If you don't need Tuxera NTFS for Mac to be globally disabled, but only need it to ignore a specific
volume when attached, you can do this by selecting the volume in the drop down list in the
Volumes section of the preference pane and check the box Disable Tuxera NTFS.
This setting is governed by the control file:
.Tuxera-NTFS/disable-driver
To re-enable the volume manually, remove this control file.
Once a volume is disabled in the eyes of Tuxera NTFS for Mac, you may have trouble re-enabling it
since it is no longer mounted read/write. To get around this, you can connect it to a Windows
machine and remove the file from there, or force mount it with Tuxera NTFS for Mac from the
command line.
4.2 Disable caching
4.2.1 Globally
You can disable the internal caching layer by checking the check box Enable file system caching in
the preference pane. This will reduce performance drastically and is not recommended.
The reason that you may want to do this could be that you are worried about data consistency in
the event of a system crash. For instance if you're running a database from the NTFS volume, you'd
normally want as few layers of caching as possible to guarantee the correctness of the data.
This option is off by default
4.2.2 For a volume
To disable the caching layer for one specific volume, select the volume in the Volumes section of
the preference pane and check the box Disable file system caching.
This setting is governed by the control file:
.Tuxera-NTFS/disable-caching
When this file is present in the root of a volume when mounting, caching is not activated when the
volume is mounted. To manually revert this option, you can delete the control file.
Tuxera Inc., Itälahdenkatu 23 A, 5th floor, 00210 Helsinki, Finland. http://www.tuxera.com/
TUXERA NTFS for Mac USER GUIDE
10/13
4.3 Enable debug logging
If something doesn't seem to work properly in Tuxera NTFS for Mac, or you want to find out what
happens when you attach an Tuxera NTFS for Mac volume for troubleshooting purposes, you can
enable debug logging to get more information on what happens during the mount process.
Tick the checkbox called Enable debug logging to enable this extended logging.
When debug logging is enabled, the utility that helps Tuxera NTFS for Mac to mount, format, probe
volumes (and that does a lot of other important things too) writes extensive debug logging
information to log files.
Normally, the script writes to the log file “/Library/Logs/fusefs_txantfs_util.log” (at the root of the
volume), but in case it doesn't have sufficient access (if it's not run with admin privileges) it falls
back to “~/Library/Logs/fusefs_txantfs_util.log”, i.e. in your home directory.
Note: The Tuxera NTFS for Mac utility script always tries to log errors, regardless of the setting of this
preference value. Debug logging provides extremely fine grained logging suitable for bug reports.
This option is off by default
4.4 Always mount unclean volumes
If you regularly attach volumes that were not been cleanly unmounted the last time they were
used, for instance if your colleagues regularly forget to use Windows' “Safe remove hardware”
feature before detaching NTFS drives from a Windows computer, then you may prefer to suppress
the dialog that Tuxera NTFS for Mac presents and automatically recover any attached NTFS volume
using this option.
This option is on by default.
4.5 Disable recovery dialog for hibernated volumes
This option disables the dialog that Tuxera NTFS for Mac displays when encountering a volume
containing a hibernated Windows session. The dialog enables the user to purge that session and
mount the volume. If this option is selected, mounting will silently fail when a hibernated Windows
session is encountered, and you won't risk losing any data just because you hit the wrong dialog
button.
This option is off by default
4.6 Disable filename normalization
Note: This is a compatibility option for volumes that have been used with NTFS-3G before version
2009.1.1.
Tuxera Inc., Itälahdenkatu 23 A, 5th floor, 00210 Helsinki, Finland. http://www.tuxera.com/
TUXERA NTFS for Mac USER GUIDE
11/13
If you experience problems with accessing files / directories that have western accented characters
or korean characters in their filenames, you could try to disable filename normalization.
This brings back the old NTFS-3G behavior so you can convert any files containing decomposed
Unicode characters in their filenames to composed form.
4.6.1 For a volume
Select the volume in the drop down list in Volumes and check the box Disable filename
normalization.
This setting is governed by the control file:
.Tuxera-NTFS/disable-normalization
4.7 Store extended attributes natively
This option makes Tuxera NTFS for Mac store extended attributes such as Finder metadata,
resource forks and other custom attributes natively, mapped to NTFS Alternate Data Streams. When
turned off, extended attributes are stored in an additional file prefixed with '._'.
This option is on by default
4.8 Apply Services for Mac translations for incompatible characters
This option enables automatic translations of characters in file names and attribute names that are
illegal in NTFS or invalid in Windows Explorer. The characters are translated according to a known
scheme used in Services for Mac in Windows.
This option is on by default
Tuxera Inc., Itälahdenkatu 23 A, 5th floor, 00210 Helsinki, Finland. http://www.tuxera.com/
TUXERA NTFS for Mac USER GUIDE
12/13
5. Acknowledgements
This package would not exist if it were not for the following projects/individuals:
The NTFS-3G project, led by Szabolcs Szakacsits
The MacFUSE project, led by Amit Singh
Csaba Henk and Alejandro Pulver, who integrated FUSE and NTFS-3G into FreeBSD, thus also
providing the foundation for NTFS-3G running on Mac OS X
The FUSE: Filesystem in Userspace project, led by Miklos Szeredi, which provides the foundation for
user space file system development
The Linux-NTFS project, led by Anton Altaparmakov, which provides many important tools used in
this package
Paul Marks, who created the first NTFS-3G file system bundle for Mac OS X and documented a lot of
aspects on how the DiskArbitration framework handles volumes
...and lots of other contributors and testers within the community.
Tuxera® is a trademark of Tuxera Inc.
Mac® and Mac OS® are trademarks of Apple Inc.
Windows® is a trademark of Microsoft Corporation.
Other trademarks are the property of their respective owners.
Tuxera Inc., Itälahdenkatu 23 A, 5th floor, 00210 Helsinki, Finland. http://www.tuxera.com/
TUXERA NTFS for Mac USER GUIDE
13/13
Tuxera Inc., Itälahdenkatu 23 A, 5th floor, 00210 Helsinki, Finland. http://www.tuxera.com/