1
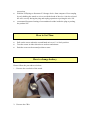
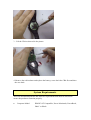
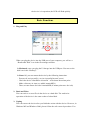
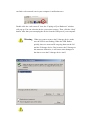
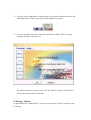
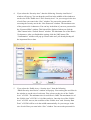
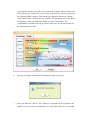
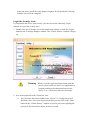
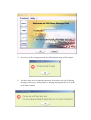
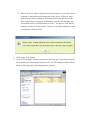
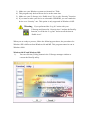
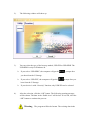
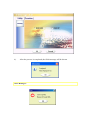
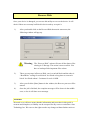
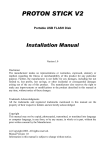
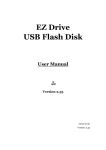
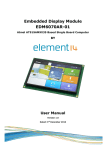
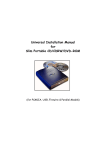
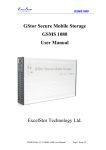
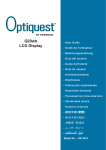
U-Storage User’s Manual
Version 2.3
Introduction
Thank you for purchasing the U-Storage device. The manual explains how to use the
U-Storage software bundled with the device.
Safety Precautions
Please follow the safety precautions carefully before you use the U-Storage device
and the application software (the product). Make sure that you use the product
correctly according to the procedures described in this guide.
Warnings
This mark indicates topics that could lead to serious
injury of your body or damage of the product if
ignored or handled incorrectly.
_____________________________________________________________________
Warnings
_____________________________________________________________________
z
Do not attempt to disassemble or alter any part of the product that is not
described in this guide.
z
Do not allow the product to come into contact with water or other liquids. In the
event that water or other liquids enter the interior, immediately unplug the
product from the computer. Continued use of the product may result in fire or
electrical shock. Please consult your product distributor or the closest support
center.
z
Do not handle the product to do the plug and unplug operation if your hands are
wet. Otherwise it will cause electrical shock.
z
Do not place the product near a heat source or expose them to direct flame or
heat.
z
Never place the product close to equipment generating strong electromagnetic
fields. Exposure to strong magnetic fields may cause malfunctions or corrupt
data.
z
protect the USB plug from salt water or any corrosive liquid to ensure the
reliable connection.
z
make sure the plug is dry before you connect U-Storage device to computer in
case the humidity results in short circuit which might damage your computer in
z
z
succession.
Hold the USB plug to disconnect U-Storage device from computer. Never unplug
by only holding the watch or wire to avoid the break of the wire. Also do no bend
the wire severely during the plug and unplug operation to prolong the wire life.
recommend frequent cleaning of accumulated residue inside the plug to prolong
the product life.
How to Set Time
z
Pull out the crown when the second hand arrives at 12 o’clock position.
Turn the crown in either direction to set hour and minute.
z
Push the crown to the normal position to start
z
How to change battery
Please follow the procedures as below:
1.Unscrew the case back of the watch
2.Unscrew the CBA
3.Lift the CBA as showed in the picture
4.Remove the red insulator and replace the battery, screw back the CBA first and then
the case back
System Requirements
There are minimum hardware and software requirements that must be satisfied to
ensure the product to function properly.
z
Computer Model
IBM PC/AT Compatible, Power Macintosh, PowerBook,
iMAC or iBook
z
OS
Windows 98 Second Edition, Windows Millennium
Edition (Windows ME), Windows 2000, Windows XP,
Linux 2.4 or higher, Mac OS 9.0 or higher
z
Interface
USB
z
Free Hard Disk Space
3 MB and more
¾
¾
¾
¾
Windows 98 SE does not support default Mass Storage Driver. You have to
install the driver bundled with the product.
The product can use the default driver in most of the OS. If you want to run
the application software bundled with the product, install the vendor driver
by the “U-StorageTools1.0.exe” utility. Then, the application software will
work properly.
The application software only can run with Microsoft Windows OS.
However, the U-Storage basic functions can be supported in all OS listed
above.
Guide to Components
USB Interface:
The interface connects to the USB port of the computer.
LED Display:
This LED Display will show the status of the device. Once
the device is in operation, the LED will flash quickly.
Basic Functions
1. Plug and Play
When you plug the device into the USB port of your computer, you will see a
“Removable Disk” icon in the file manager window.
In Macintosh, once you plug the U-Storage into the USB port. You can see the
disk icon in the “Desktop”.
In Linux OS, you can mount the device by the following instruction.
.Execute cd /etc/sysconfig/ ( cat /etc/sysconfig/hwconf | more )
.Check the device information in hwconf,write down the mount point.
.Make a directory in /mnt (ex: mkdir /mnt/usbHD )
.Then, execute mount /dev/sda1 /mnt/usbHD (if mount point was .dev/sda)
2. Read and Write
You can retrieve or store files in the device as a hard disk. The read/write
operation of the device is the same as that of a hard disk.
3. Unplug
You can remove the device after you finish the action with the device. However, in
Windows ME and Windows 2000, please follow the safe removal procedure. You
can find a safe removal icon in your computer’s notification area.
Double click the “safe removal” icon; the “Unplug or Eject Hardware” window
will pop up. You can select the device you want to remove. Then, click the “Stop”
button. After that you can unplug the device from the USB port of your computer.
Warning When you want to remove the U-Storage device, make
sure the LED is not flashing. When the LED flashes
quickly, there are some traffic on going between the OS
and the U-Storage device. Don’t remove the U-Storage at
this moment. Otherwise, it will cause some damages to
the data or even the U-Storage device itself.
Warning If you do not follow the safe removal procedure in
Windows ME and Windows 2000 systems, data loss
caused by the “write cache” issue may happen.
In Macintosh systems, you can drag the removable disk icon and put into the trash.
This action will perform the “Eject” function.
In Linux OS, please follow the “umount” command procedure to un-mount the
device.
Partition Type
The U-Storage may be partitioned into three types of disk. We will use the following
terms in this guide,
1. Public Area
2. Security Area
There is no “Security” function at all. You can do any basic
functions, described in the “Basic Functions” section, in this
area.
This area cannot be viewed without the application software.
Once you do the “Log In” action in the application software,
you will switch view from “Public Area” to “Security Area”.
After successful switch, you can do any basic functions,
described in the “Basic Functions” section, in this area.
) You can only view either “Public Area” or “Security
Area” at the same time in the same disk logic unit
number(LUN).
In U-Storage, you can select the following partition combinations:
1. Single Public Area
Make all the device area accessible by everybody.
2. Security Area
Make the device area into two partitions in the
same LUN, Public Area and Security Area.
Everybody can access the Public Area. The
Security Area can be accessed “Only” with a
password.
3. Public Area Plus Security Area Make the device area into three partitions in two
LUNs, Public Area and Security Area in LUN0,
and Public Area in LUN1. You can access these
partitions by the multiple-LUN driver. The
partition status was shown in the following figure.
The partitions in LUN 0 will perform as described
in item 2. The partition in LUN 1 will perform as
described in item1.
Public
LUN 0
Area
Security
Area
Change View
Through
Login & Logout
This figure shows detailed operations of single LUN.
Public
LUN 0
Area
Security
Area
Change View
Through
Login & Logout
Public
LUN 1
Area
This figure shows detailed operations of multiple LUNs.
Function
Security
Password
Type
Disk Logical Unit
Disk Letters
Number
in OS
1. Public Area Only
No
No
1 (LUN0)
1
2. Security Area
Yes
Yes
1 (LUN0)
1
3. Public Area Plus Security Area
Yes
Yes
2 (LUN0 & LUN1)
2
This table describes the functions of the three partition types.
Using the Software
On the Windows Platform
Installing/Uninstalling the Application Software:
Installing the software:
If you are installing the application software onto Windows OS, you must first log on
as the administrator and then install the application software.
Precaution about the USB Interface
¾
¾
¾
Please connect the device to the USB port of your computer when you install the
application software.
If you do not connect the device to the USB port and install the application
software in the Microsoft Windows XP and Windows2000, you have to install
the U-Storage driver again as you plug in the device.
In Windows 98 SE and Win Me, you need to unplug the U-Storage and plug
again after install the driver.
1. Find the “U-StorageTools.exe” program.
You can find the program in the U-Storage, CD-ROM, or Floppy.
2. Double-click the [U-StorageTools.exe] icon.
3. Follow the on-screen instructions to proceed.
Uninstalling the software:
To remove the installed software, you can click the windows [Start] menu and select
[Setting], [Control Panel] and [Add/Remove Programs]. The application software can
also be uninstalled by clicking the [Start] menu and selecting [Programs], [U-Storage],
[Uninstall U-Storage].
Notes:
¾
¾
The USB driver will be required to install, as the device links the PC by the USB
port at the fist connection. After then, the drive installation is not required.
Do not cancel the installation during the procedure. The U-Storage may not
¾
operate correctly if the installation is incomplete.
Read the “Troubleshooting” Section if the installation cancels itself during the
procedure, if the installation did not proceed as described, or if you feel that the
driver are not properly installed.
Installing the USB Driver:
For some Windows system, users should log on as the Administrator before
installation. Once you have attached the U-Storage to the computer. The OS will find
the appropriate driver or the “Add New Hardware Wizard” dialog will appear after a
moment. You can do the installation of the Driver manually. Or just find out the
“Setup.exe” program to do the driver installation.
During the installation procedure, if the “Digital Signature Not Found” message
displays, just click the [Yes] button in the showing window.
Using U-Storage.exe Program the First Time:
Warning Due to the U-Storage.exe can only handle one U-Storage
device at the same time. If you will not use the function of
the U-Storage.exe, like “Resize”, “Change Password”, or
“Log In”, etc., you can insert more than two U-Storage
devices. If you want to use the function of the program,
remove all other U-Storage device. Otherwise, the
U-Storage.exe may not perform properly or even cause
data loss.
After you install the software and driver correctly, the U-Storage icon will appear at
the notification area automatically.
Or
The display will depend on the status of the device.
¾
You can use the right button of your mouse to pop up the selection menus as the
following figures. Then, you can select the functions you want.
¾
Or you can double click the icon in the notification window. The U-Storage
manager window will pop up as,
By default, the device is non-security. So, the “Resize” function will be active
when you run this software first time.
U-Storage - Resize:
As described in the “Partition Type” section, you can do the “Resize” action to your
U-Storage.
Warning The “Resize” action will erase all the data or files
existing in U-Storage. The action is not reversible. You
have to backup all the important files or data. Also, please
close all the active programs and windows on the screen
of your computer.
1. Click the Resize button in the U-Storage manager window. The following “Resize
Partition” window pop up.
2.
3.
Select the partition type you want.
If you select the “Public Area Only”, then click the [OK] button. The
“Confirmation” window will pop up. Please make sure you already backup all
the important files or data.
4.
If you select the “Security Area”, then the following “Security Area Resize”
window will pop up. You can drag the scroll bar in the middle of the window to
set the size of the “Public Area” and “Security Area”. Or you can type in the size
of each Zone you want in the “Size” window. You can set the password for
accessing the security area in the “New Password” window. The maximum size
of the password is 8 characters. You can key in the hint of your new password in
the “Password Hint” window. This hint will be displayed when you click the
“Hint” button in the “Unlock Protect” window. The maximum size of the Hint is
32 characters. After you finished the setting, click the [OK] button. The
“Confirmation” window will pop up. Please make sure you already backup all
the important files or data.
5.
If you select the “Public Area + Security Area”, then the following
“Public/Security Area Resize” window will pop up. You can drag the scroll bar in
the window to set the size of each area. First, please set the size of the “Public
Area” of LUN1. The minimum size for each area is 1MB. The maximum size of
the “Public Area” of LUN1 is 1/4 of the total size. Once the size of the “Public
Area” of LUN1 was set, the scroll bar of the “Public Area” and “Security Data
Zone” of LUN0 will be set in the middle automatically. Or you can type in the
size of each Zone you want in the “Size” window. You can set the password for
accessing the security area in the “New Password” window. The maximum size
of the password is 8 characters. You can key in the hint of your new password in
the “Password Hint” window. This hint will be displayed when you click the
“Hint” button in the “Unlock Protect” window. The maximum size of the Hint is
32 characters. After you finish the setting, click the [OK] button. The
“Confirmation” window will pop up. Please make sure you already backup all
the important files or data.
6.
Once the resizing is finished, the following message will pop up.
7.
After you finish the “Resize”, the “Setup.exe” program will be copied into the
“Public Area” (in LUN 0) automatically. It’s removable. However, it is needed
when you insert your device into another computer. It will install the U-Storage
software for you in the computer.
Login the Security Area:
If you partition the device with security, you can execute the following “Login”
function to access the security Area.
1. Double click the U-Storage icon in the notification window or click the [Login]
button in the U-Storage manager window. The “Unlock Protect” window will pop
up.
Warning When you do the login and logout action with the
device, please make sure there is no application or
program running or document unclosed on the
device. If so, it will cause data loss or damage.
2. Key in the password in the “Password” area.
¾ You can create the password hint in the “Resize” or “Change Password”
functions. Once you create the password hint, you can click on the “Hint”
button in the “Unlock Protect” window to prevent you from forgetting the
password. The hint will be shown for three seconds.
¾
If you key in the wrong password, the following message will be shown.
¾
You have three tries to input the password. After three tries, the following
message will pop up. And you have to unplug and plug the device in order
to do future actions.
¾
When you do the login or logout action, please make sure you close all the
programs or documents open connection on the device. If there is some
application programs running or documents unclosed on the device, the
following message will pop up. In Win2000, even the “file manager” has
accessed the device it will be treated as “busy”. You have to close the file
manager in order to do the “Login”. However, not all the connection could
be checked in all kind of OS.
3. Click on the “OK” button.
4. Once the file manager window contains the “Security Area” pops up, you can do
the operation you want with the Security Area. The file manager window will be
like the following figure. The background is colorful.
Logout the Security Data Zone:
1. Double click the U-Storage icon in the notification window or select the [Logout]
button in the U-Storage manager window.
Warning When you do the login and logout action with the
device, please make sure there is no applications
running or documents unclosed on the device. If so,
it will cause data lose or damage.
¾
When you do the login or logout action, please make sure you have closed
all the programs or documents on the device. If there are any programs
running or documents unclosed on the device, the following message will
pop up. In Win2000, even the “file manager” has accessed the device it will
be treated as “busy”. You have to close the file manager in order to do the
“Login”. However, not all the connection could be checked in all kind of
OS.
2. Once the file manager window contains the “Public Area” pop up, you can do the
operation you want with the Public Area.
Change Password:
User can change password and key in the password hint using the “Change Password”
selection in the U-Storage menu. You can only select this item in “Security AP Zone”.
1. Click the U-Storage menu in the notification window using the right button of
your mouse and select the [Change Password] selection of the U-Storage menu.
The following “Change Password” window will pop up.
2. Key in your current password in the “Current Password” area.
3. Then, key in your new password and confirm in the “Confirm Password” area.
¾ The maximum size of the password is 8 characters.
4. You can key in the hint of your new password in the “Password Hint” window.
This hint will be displayed when you click the “Hint” button in the “Unlock
Protect” window.
Boot Up Function
The BootUp program in “Utility” manager window will build up the device as a
bootable disk. Before you run the program, please do the following preparations,
1) This program can run under Windows 98 SE, XP, and ME. (The program can’t
be supported in Windows 2000.)
2) Please turn off the anti-virus program during the procedure.
3)
4)
5)
6)
Make sure your Windows system was located in C Disk.
This program only deals with one device at the same time.
Make sure your U-Storage is in “Public Area” if it is with “Security” function.
If you want to make your device as a bootable USB HDD, you can’t make the
device as a “Security” one. This option is only supported in Windows 98 SE.
Warning If you performed the “Log In” action with your
U-Storage and located in “Security Area” and run the BootUp
function, it will do the “Log Out” and erase all the data in
“Public Area”.
When you are ready to process, follow the following procedures, the procedures for
Windows XP is different from Windows 98 and ME. This program cannot be run in
Windows 2000.
Windows 98 SE and Windows ME:
1).
You can click the [Utility] button in the U-Storage manager window to
execute the BootUp utility.
2).
The following window will show up.
3).
You can select the type of the boot up method, USB ZIP or USB HDD. The
USB HDD is only for Windows 98.
¾
If you select “USB HDD”, the computer will get the
prompt after
you boot from the U-Storage.
4).
¾
If you select “USB ZIP”, the computer will get the
¾
boot from the U-Storage.
If your device is with “Security” function, only USB ZIP can be selected.
prompt after you
After the selection, click the “OK” button. The following warning message
will be shown. The data in the “Public Area” will be lost. If it is OK, click the
“OK” button to continue the process.
Warning The program will do the format. The existing data in the
“Public Area”, which you want to make, will be lost.
5).
After the process is completed done, the finish message will be shown.
Windows XP:
1).
Please make a bootable floppy first. You can insert a floppy into the floppy
drive. Then, click on the icon of 3.5” floppy in the “My Computer” window
by using the right button of the mice. Select the “Format” item.
2).
Select the item for build up a bootable floppy in the format options. Then,
click on the “Start” button.
3).
Make a directory called XP_Bootable in the root directory of your computer
system disk.
4).
Copy all the files in the floppy to the XP_Bootable directory.
5).
Click on the [Utility] button in the U-Storage manager window. Then, select
the USB ZIP. Click on the “OK” button.
6).
After the process is completed, the finish message will be shown.
Error Messages:
When this message shows up, the possible reason is your Windows OS installation is
not completed. (Please make sure the path \WINDOWS\COMMAND\EBD in
Windows 98, \WINDOWS\COMMAND\EBD in Windows ME, or \XP_Bootable in
Windows XP is exists)
When this message shows up, please make sure the capacity of the “Public Area” is
enough.
Notes:
¾
¾
¾
¾
¾
After you finish the program, you will see different disk property when you
select different disk type. For example, if you select it as “USB HDD”, you will
see the hard disk icon in the file manager window. If you select it as “USB ZIP”,
you will see the removable disk icon in the file manager window. However, only
Windows 2000 and above can identify the difference. In Windows 98, you just
can see the “Removable Disk”.
After you finish the program, the device contains the files necessary for boot up
function. Please don’t remove any file in this area. Otherwise it will cause failure
when you do the boot up procedure of your computer.
When you want to use the U-Storage to boot up your computer, please select the
appropriate setting of the BIOS. Please refer to the user manual of the
motherboard.
Since the BIOS design of each motherboard is quite different, we cannot
guarantee the boot up device is suitable for every computer.
Since Award changed their BIOS spec. In March 2002, the boot up procedure is
different from before. We cannot identify if the BIOS is new or old. So, this boot
up utility is not suitable for Award’s new BIOS if you use USB ZIP boot up
option.
Recover Disk
Once your device is damaged, you can use this utility to recover the device. It will
check if there are too many bad block in device and try to repair it.
1).
After you double click on the RecoverDisk shortcut in start menu, the
following window will pop up.
Warning The “Recover Disk” action will erase all the data or files
existing in U-Storage. The action is not reversible. You
have to backup all the important files or data.
2).
There are two steps in Recover Disk, one is scan bad block and the other is
“Read/Write” testing for each block. It will take a long time to scan each
block. It will take about 1.5 minutes for each 16 MB.
3).
After you click the [Start] button in the window, the Recover process will be
started.
Once the job is finished, the complete message will be shown in the middle
area, or else it will show error message.
4).
Disclaimer
We made every effort to ensure that the information and procedure in this guide is
accurate and complete, no liability can be accepted for any errors or omissions. Ours
Technology Inc. We reserves the right to make any changes without further notice to
any products herein.
Trademark Acknowledgments
¾
¾
¾
¾
¾
IBM is a registered trademark of international Business Machines Corporation.
iBook and iMac are trademarks of Apple Computer, Inc.
Macintosh, PowerBook, Power Macintosh are trademarks of Apple Computer,
Inc.
Microsoft, Windows, Windows 98, Windows ME, Windows 2000, and Windows
XP are either registered trademarks of Microsoft Corporation in the United Stats
and/or other countries.
Other names and products not mentioned above may be registered trademarks of
their respective companies.