1
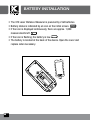
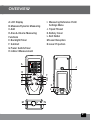
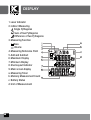
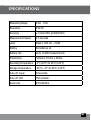
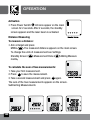
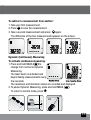
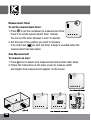
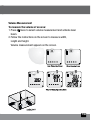
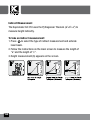
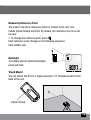
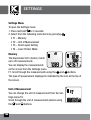
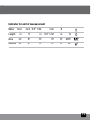
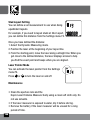
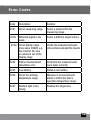
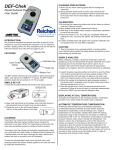
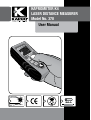
KAPROMETER K4 LASER DISTANCE MEASURER Model No. 370 User Manual 2AA 230'/70m Thank you for purchasing the Kapro Laser Distance Measurer. You are now the owner of one of our Innovative range of state-of-the-art tools. These tools incorporate new laser technology, enabling the professional user and the serious D.I.Y. enthusiast to quickly achieve accurate results. 2AA 230'/70m INCLUDED NOTE Keep this user manual for future reference. 2 Contents Features Safety Instructions Battery Installation Overview Display Specifications Operation Activation Distance Measuring Dynamic (Continuous) Measuring Area Measurement Volume Measurement Indirect Measurement Measuring Reference Point Laser Pointer Backlight Tripod Mount • Settings Settings Menu Memory Unit of Measurement Stud Layout Setting • Maintenance • Warranty • • • • • • • • 4 5 6 7 8 9 10 10 10 12 13 14 15 15 15 15 15 16 16 16 17 18 18 20 3 FEATURES • • • • • • • • • • • Indoor measuring distance of up to 70m (230') Outdoor measuring distance of up to 10m (39') Measures the shortest distance to target with Dynamic (continuous) measuring Backlit LCD display Measures area and volume Indirect measuring using Pythagorean theorem Choice of 3 reference points Advanced memory function Impact-resistant rubber Tripod-ready 1/4" thread Accuracy: 1.5mm/70m (0.00492126') NOTE Do not remove or deface warning labels from this product Standard Accessories • Kaprometer K4 device • Carrying case • Hand strap 4 • AA batteries x2 • User Manual SAFETY INSTRUCTIONS WARNING This product is a class II laser. • The use of protective eyewear is recommended • Serious eye injury can result from looking directly into the beam or by projecting the beam into the eyes of others. • Always position the laser so that it does not cause anyone to stare directly into the beam. • Do not operate the laser distance measurer near children or let children operate the laser measurer. • Do not look into a laser beam using magnifying optical equipment, such as binoculars or telescope, as this will increase the level of eye injury. • Do not take the unit apart • Do not drop the laser measurer • Do not use solvents to clean the laser measurer • Do not use at temperatures below -5°C (23°F) or above 40°C (104"F) • Do not store at temperatures below -20°C (-4°F) or above 60° (140°F) • Do not use in wet or very humid environments. • Do not use in combustible environments such as in the presence of flammable liquids, gases or dust. • When not in use, turn off the power, remove the batteries and store in a dry place. 5 BATTERY INSTALLATION • The 370 Laser Distance Measurer is powered by 2 AA batteries. • Battery status is indicated by an icon on the initial screen. • If the icon is displayed continuously, there are approx. 1,000 measurements left. • If the icon is flashing, the battery is low. • The battery is located at the back of the device. Open the cover and replace when necessary. 6 OVERVIEW I. Measuring Reference Point/ Settings Menu J.Tripod Thread K.Battery Cover L.Belt Holder M.Laser Reception N.Laser Projection A.LCD Display B.Measure/Dynamic Measuring C.Add D.Area & Volume Measuring Functions E.Backlight/Timer F. Subtract G.Power Switch/Clear H.Indirect Measurement A J B C D E F G H I K L M N 7 DISPLAY 1.Laser Indicator 2.Indirect Measuring Single Pythagoras Sum of two Pythagoras Difference of two Pythagoras 3.Measuring Function Area Volume 4.Measuring Reference Point 5.Add and Subtract 6.Maximum Display 7.Minimum Display 8.Stud Layout Indicator 9.Main screen display a.Measuring Timer b.Memory Measurement Count c.Battery Status d.Unit of Measurement 8 a b c d SPECIFICATIONS Measuring Range 0.5m - 70m Resolution 0.001m Accuracy ±1.5mm/70m (0.00492126) Measurement Speed 0.5 seconds Laser Class II, 650 nm, <1mW Battery AA batteries x2 Battery Life Up to 10,000 measurements Dimensions 120mm x 55 mm x 32mm Operating Temperature -5°C (23°F) to 40°C (104"F) Storage Temperature -20°C (-4°F) to 60°C (140°F) Auto-off: Laser 30 seconds Auto-off: Unit 180 seconds Beam size 25mm@30m 9 OPERATION Activation • Press Power Switch . All icons appear on the main screen for 2 seconds. After 2 seconds, the standby screen appears and the laser beam is activated. Distance Measuring To measure a distance: • Aim at target and press MEAS . The measured distance appears on the main screen. To change the units of measurement see Settings. Standby Screen Measurement Done Adding Measure mentsץ To calculate the sum of two measurements: 1.Take your first measurement. 2.Press to save the measurement. 3.Take a second measurement and press again. The sum of the two measurements appears on the screen. Subtracting Measurements 10 To subtract a measurement from another: 1.Take your first measurement. 2.Press to save the measurement. 3.Take a second measurement and press again. The difference of the two measurements appears on the screen. Dynamic (Continuous) Measuring To activate continuous measuring: 1.Press and hold MEAS to change from normal to Dynamic Measuring. The laser beam is activated and begins taking measurements every few seconds. The maximum and minimum values are recorded and displayed. 2.To pause Dynamic Measuring, press and hold MEAS . To return to normal mode, press 11 Measurement Timer To set the measurement timer: 1.Press to set the countdown to measurement timer. Press X to set the measurement timer interval. You can set the timer between 3 and 15 seconds. 2.Set the laser in the position you want to measure from and press to start the timer. A beep is sounded when the measurement has been taken. Area Measurement To measure an area: 1.Press once to select area measurement and activate laser beam. 2.Follow the instructions on the main screen to measure width and length. Area measurement appears on the screen. 12 Volume Measurement To measure the volume of an area: 1.Press twice to select volume measurement and activate laser beam. 2.Follow the instructions on the screen to measure width, length and height. Volume measurement appears on the screen. 13 Indirect Measurement The Kaprometer K4 370 uses the Pythagorean Theorem (a2+b2=c2) to measure height indirectly. To take an indirect measurement: 1.Press to select the type of indirect measurement and activate laser beam. 2.Follow the instructions on the main screen to measure the length of “a” and the length of “c”. 3.Height measurement (b) appears on the screen. Second 14 Measuring Reference Point The product has three reference points in relation to the unit: rear, middle (tripod thread) and front. By default, the reference point is set at the rear. • To change the reference point, press . Each reference point changes in the following sequence: front-middle-rear. Backlight To activate and de-activate backlight, press and hold . Tripod Mount You can mount the 370 to a tripod using the 1/4" threads located on the back of the unit. Tripod Thread 15 SETTINGS Settings Menu To open the Settings menu: 1. Press and hold for 2 seconds. 2. Select from the following menu items by pressing • F1 – Memory • F2 – Unit of Measurement • F3 – Stud Layout Setting • F4 – Laser Pointer Mode : Memory The Kaprometer K4’s memory holds up to 20 measurements. You can display the measurements on the screen from the Settings menu F1. Scroll through the measurements using the and buttons. The type of measurement displayed is indicated by the icon at the top of the screen . Unit of Measurement You can change the unit of measurement from the Settings menu F2. Scroll through the unit of measurement options using the and buttons. 16 Indicator for unit of measurement Meter Feet Length Inch 0’0” 1/32 inch R in 0’0” 1/32 in R m ft m² ft² ft² ft² ft² Sf/R² Volume m³ ft³ ft³ ft³ ft³ m³ Area 17 Stud Layout Setting You can define a set measurement to use when doing equidistant layouts. For example, if you need to layout studs at 24cm apart, you can define this distance from the Settings menu F3. Once you have defined the distance: 1.Select the Dynamic Measuring mode. 2.Position the laser at the beginning of your layout line. 3.From the starting point, move the laser along a straight line. When you get close to the defined distance, the laser displays arrows to help you find the exact point and beeps when you are aligned. Laser Pointer Mode You can activate the laser pointer from the Settings menu F4. Press or to turn the laser on and off. Maintenance • Clean the aperture lens and the Kapro Laser Distance Measurer body using a clean soft cloth only. Do not use solvents. • If the laser measurer is exposed to water, dry it before storing. • Remove the battery if the laser measurer will be unused for a long period of time. 18 Error Codes Code Description Solution Err01 Out of measuring range Select a target within the measuring range Err02 Reflected signal is too weak Select a different target surface Err03 Out of display range (max value: 99999) e.g. the result of the area or volume is out of the display range Divide the measurement span into sections and add the results Err04 Indirect measurement calculation error Verify that the measurements were taken correctly Err05 Low battery Install a new battery Err06 Out of the working temperature range Measure in an environment which is within the laser’s operation temperature range Err07 Ambient light is too strong Shadow the target area 19 Warranty This product is covered by a two-year limited warranty against defects in materials and workmanship. It does not cover products that are used improperly, altered, or repaired. Please register this warranty at www.kapro.com or return the enclosed warranty card. Kapro Industries Ltd. Kapro Tools Inc. Kadarim 20117, Israel 195 Enterprise Drive Tel: +972.4.698.6204 Lake Mills, Wl 53551, USA Fax: +972.4.698.7228 Tel: 1.800.4 LEVELS E-mail: [email protected] Website: www.kapro.com In the event of a problem with the laser product you have purchased, please return the product to the place of purchase with proof of purchase. Model no. 370 Serial number sticker is positioned on battery cover. ©2013 Kapro Industries Ltd. 20