1
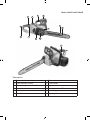
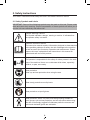
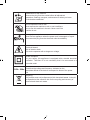
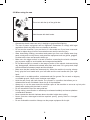
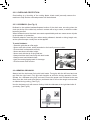
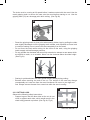
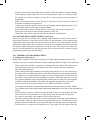
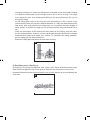
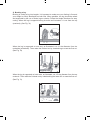
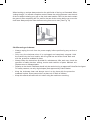
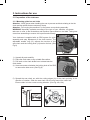
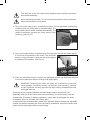
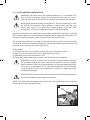
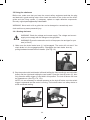
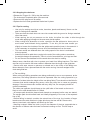
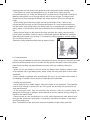
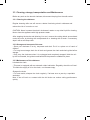
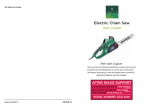
Electric Chain Saw
CS35E CS40E CS45E
WARNING!
Read all safety warnings and all instructions. Failure to follow the
warnings and instructions may result in electric shock, fire and/or serious injury. Keep
this manual safe.
Summary:
1. Introduction ………………………………………………………………….........................5
2. Safety instructions .…………………………………………………………….....................6
2.1 Safety Symbols and Labels …………………………………………….........................7
2.2 Before using the saw .…………………….……………………………………..................8
2.3 When using the saw ……………………………..……………………………...............9
2.3.1 Chain brake ………………………………………....……………..................................10
2.3.2 Overload protection …………...……………..............…………....……………..11
2.3.3 Kickback ..…………………………………………………………………………11
2.3.4 General behavior……………………………..……………………..……………11
2.3.5 Cutting logs …………………………………….…………………………………12
2.3.6 Cutting wood under tension ………………….………………….……………...13
2.3.7 General cutting instructions ……………..……………………….……………..13/ 14
De-limbing a tree..…………………………...………………..…….…………...14
3. Instructions for use...…………………………...………………..…….…...........………....17
3.1 Preparation of the chainsaw ……….………............……………………………..…...17
3.1.1 Mounting guide bar and chain ……….……………………………………..….............17
3.1.2.Tensioning chain ...................…………………………………………........................18
3.1.3 Chain and bar lubrication ...……….…………………………………………................ 20
3.2 Using the chainsaw…………………………………………………….............................21
3.2.1 Starting the chainsaw…………………………………………………………...............21
3.2.2 Stop the chainsaw…………………………………………………………….................22
3.2.3. Tips for cutting……………………………………………………………............22
3.3 Cleaning storage, transportation and Maintenance…………………………...............23
3.3.1 Cleaning the chainsaw………………………………………............................24
3.3.2 Storage and transport of the saw………………………………………………...........24
3.3.3 Maintenance of the chainsaw……………………………………………….................24
4. Specifications ...…………………………………………………………………………….25
5. Problems and solutions …………………………………………………………………...26
6. Environmental Protection …………………………………………………………………..27
7. After Sales Service ………………………………………………………………………...28
8. Guarantee ………………………………………………………………………………......28
9. Declaration of Conformity …………………………………………….............................29
2 / Instruction Manual
Model CS35E CS40E CS45E
2
5
4
3
7
12
1
10
9
6
8
11
Description
1 Power cable
2 Rear handle
3 Chain lubricant oil tank
4 Front handle
5 Front hand guard/chain brake lever
6 Guide bar
7 Saw chain
8 Locking knob for SDS
9 Side cover
10 Switch trigger
11 Lock-off button
12 Gripping teeth
1. Introduction
Thank you for purchasing a Cobra chainsaw.
We believe that, properly maintained, this unit will provide years of trouble-free
operation.
This saw has been designed and manufactured with the utmost care in accordance with
strict standards of security, reliability and ease of use.
Please read this manual carefully. Familiarise yourself with all the components of the
saw before starting to use it for the first time.
Please follow all the comments, explanations and instructions in this manual
for optimal and safe use of this chainsaw.
Please Register Your Chainsaw
If your dealer did not collect registration information from you, please take a few
minutes and register your purchase with Cobra.
You can register by completing and mailing the registration card that should be
in the box or by going online to:
www.cobragarden.co.uk and clicking on Product Registration
5
2. Safety Instructions
Your electric chainsaw should always be used in accordance with this manual.
2.1 Safety Symbols and Labels
IMPORTANT: Some of the following symbols may be used on this tool. Please study
them and learn their meaning. Proper interpretation of these symbols will allow you to
use the unit more effectively and reduce risk.
Danger! Warning! Caution!
This symbol indicates a danger, warning or caution. It indicates that
the operator safety is at stake.
Read the instruction manual
The instruction manual contains information designed to draw attention
to the possible problems of safety, the risk of damage to the machine
as well as useful tips for startup, operation and maintenance. Please
observe all notes, explanations and instructions in this manual for
optimal and safe use of this product.
Keep a safe distance
The operator is responsible for the safety of others present in the work
area of the machine. Never use a chainsaw while others, especially
children, or pets, are nearby.
Wear protection
Wear eye and ear protection when using the saw.
Wear sturdy protective non-slip boots.
Wear protective cut proof gloves.
Wear protection; Wear cut proof close-fitting clothing suitable for
work; gloves, eye and ear protection, and non-slip shoes when using
this saw. We strongly suggest full chainsaw protective trousers and
jacket and chainsaw gloves are advisable.
6
Maintenance of the machine
Remove the plug from the socket before all adjustment
operations, cleaning, transport, maintenance or when you leave
the chainsaw unattended
Do not expose the unit to rain
Never expose the machine to rain or wet conditions.
Do not use this machine in the rain. Never use if the
machine is wet.
Damaged power cord
Never use an appliance when the power cord is damaged or frayed.
Disconnect the plug from the electrical outlet immediately.
Electrical Hazard
Risk of electric shock
This device operates with a dangerous voltage
Double insulation
For your safety, this appliance is equipped with a double electrical
insulation. Therefore it is not necessary that it be connected to a
grounded outlet
Check that the voltage and frequency indicated on the
230V~ 50Hz nameplate affixed to the device correspond to those of the power
grid
Recycling
This product must not be disposed of with household waste. It should
be deposited at the collection site for the recycling and recovery of
electrical and electronic waste
7
2.2 Before using the saw
•
•
•
Study this manual thoroughly.
Familiarise yourself with the operation of the saw and learn how to use it properly.
Never allow others who have not read the manual to use the machine. Make sure
adequate training is given before use.
Never allow Children to use this machine.
•
If the chainsaw is re-sold make sure this manual is sold as part of the machine.
•
Never remove the labels or security elements.
•
Check that the voltage and frequency indicated on the nameplate affixed to the
electric chainsaw corresponds to the power electricity supply.
•
Check the chain oil level before each use. Never use ̀ the saw without chain oil in the tank or
when the oil level is low.
Check the condition of the guide bar, saw chain, fasteners and safety
components before each use. Replace excessively worn or missing parts.
Only Replace Parts with genuine Cobra spares. Faliure to do so will
negate your warranty and could cause serious personal injury.
Do not turn on the machine if the chain side cover is not installed or when the guide
bar is damaged or missing.
To connect the machine to the power supply, use only appropriate and compliant
equipment in perfect condition.
Keep the cord away from the radius of action of the chainsaw and make sure it
is not subjected to tension. Move the cable from water, heat and sharp edges.
Do not cut near other electrical equipment. Do not force the power cable.
Never use the cord for carrying, pulling or unplugging the machine.
Do not use the machine if the Power On /Off switch or the Chain Brake does not
work properly. If necessary, contact your dealer for any repair.
Never expose the electric chainsaw to rain or moisture. Never allow water or other
liquids to enter the machine.
Do not operate the electric chainsaw in explosive atmosperes. such as in the environment
where there are flammable liquids, gas and dust which may ignite the dust and fumes
•
•
•
•
•
•
•
•
•
•
•
•
Do not start cutting until the work area is clear and cleaned properly. Keep the
work area clean and tidy to reduce the risk of accidents.
During the first use, it is recommended that the user be accompanied by an
experienced chainsaw user.
8
2.3 When using the saw
Do not cut with the tip of the guide bar.
Hold the saw with both hands.
•
•
•
•
•
•
•
•
•
•
•
•
•
•
•
Operate the electric chain saw only in daylight or good artificial lighting.
The use of power equipment can be regulated. Remember to comply with legal
regulations which may differ from one location to another.
Do not use the machine if you are tired or ill. Also avoid use if you have consumed
alcohol or taken drugs. A lack of concentration can result in serious injury.
Wear close-fitting clothing, convenient and protect you from cuts. Always wear long
pants, sturdy and non-slip shoes, and protective equipment such as gloves, goggles,
a helmet with a visor and acoustic shield, etc.
Make sure the trigger switch is turned off before connecting the electric chainsaw
plug to power supply to avoid sudden and unexpected accidents.
Do not allow anyone to remain in the range of action of the electric chainsaw during
use. Keep people, children and animals away from work area. If it is group work, keep
sufficient distance between people and the machine.
Make sure that the handles are clean and dry. When the machine is running, always
firmly grip the front handle with your left hand and the rear handle with your right
hand.
Always work in a stable position, on balanced and firm ground. Do not work on slippery
or unstable ground. Never use a chainsaw up a ladder.
Hold the saw firmly with both hands. Put yourself in a position that allows you to
withstand the forces of kickback. Never let go of the chainsaw.
Always try to use the saw around the bumper spike of the machine to serve as a pivot point.
Always start sawing with the chain in motion.
Do not saw with the tip of the saw guide bar.
During cutting, some tension on wood may be released suddenly and cause splashes
or hazardous releases.
Never operate the electric chainsaw above shoulder height when cutting.
Never operate a damaged machine repaired poorly, poorly fitted or changed
arbitrarily.
Do not overload the machine. Always use the proper equipment for the job.
9
WARNING: To reduce the time of exposure to vibration and noise, it is preferable to use
the machine with frequent breaks, and limiting the duration of continuous work.
WARNING: The vibration level during actual use of the chainsaw may differ from the
declared depending on what material is being cut with different factors of stem diameter ̀
density and fibre composition to name a few.
2.3.1 CHAIN BRAKE.
The chain brake is a safety mechanism activated through the front hand guard. When
kickback occurs, the chain stops immediately through inertia. The following function
check should be carried out at regular intervals. The purpose of the chain brake testing
is to reduce the possibility of injury due to kickback.
WARNING! If the chain and motor fail to stop when the chain brake is engaged,Stop
using immediately take the saw to the nearest authorised dealer. Do not use the saw if
the chain brake is not in proper working order.
1). Make sure the chain brake level is disengaged; (See Fig. 1a)
2). Place the chain saw on any suitable flat surface;
3). Plug the unit into the power source;
4). Grasp the front handle with your left hand. Thumb and fingers should encircle the
handle;
5). Grasp the rear handle with your right hand. Thumb and fingers should encircle the
handle;
6). Press the lock-off button with your right thumb, then fully press the switch trigger with
your index finger and hold in this position;
7). While the motor is running, activate the chain brake by rolling your left hand
forward against the chain brake lever; (See Fig. 1b);
8). Chain and motor should stop immediately.
NOTE: The motor will not start if the chain brake lever is in the engaged position.
CAUTION! The chain brake lever should not be used for starting and stopping the
saw during normal operation.
1a
1b
10
2.3.2 OVERLOAD PROTECTION.
Overloading (e.g. blocking of the cutting blade, blade teeth jammed) causes the
machine to stop and the overload protector will be activated.
2.3.3 KICKBACK. (See Fig. 2)
Kickback is the sudden backward/upward motion of the chain saw, occurring when the
chain (at the tip of the chain bar) comes in contact with a log or wood, or when the chain
becomes jammed.
When kickback occurs the chain saw reacts unpredictably and can cause severe injuries
to the operator or bystanders.
Particular attention must be given when sawing sideward, slanted or during length cuts,
as the spiked bumper usually can not be applied.
To avoid kickback:
- Saw with guide bar at a flat angle
- Never work with a loose, widely stretched or the heavily worn out chain:
- Ensure chain is sharpened correctly:
2
- Never saw above shoulder height:
- Never work with the tip of the guide bar:
- Always hold the chain saw firmly with both hands
- Always use a low kickback chain:
- Apply the metal gripping teeth for leverage:
- Ensure correct chain tension:
2.3.4 GENERAL BEHAVIOR.
Always hold the chain saw firmly with both hands. Front grip with the left hand and rear
grip with the right hand. Fully grip both handles at all times during operation. Never
operate the chainsaw using only one hand. Ensure the power cord is located to the rear,
away from the chain and wood and so positioned that it will not be caught on branches
or material during cutting. (See Fig.2)
Use the chainsaw only with secure footing. Hold the chainsaw at the right-hand side of
your body. (See Fig.3a)
3a
The chain must be running at full speed before it makes contact with the wood. Use the
metal gripping teeth to secure the saw onto the wood before starting to cut. Use the
gripping teeth (12) as a leverage point while cutting. (See Fig.3b)
3b
- Reset the gripping teeth at a low point when sawing thicker logs by pulling the chain
saw slightly backwards until the gripping teeth release, and reposition at lower level
to continue sawing. Do not remove the saw completely from the wood.
- Do not force the chain while cutting, let the chain do the work, using the gripping
teeth to apply minimal leverage pressure.
- Do not operate the chainsaw with arms fully extended or attempt to saw areas which
are difficult to reach, or on a ladder. Never use the chainsaw above shoulder height.
(See Fig.3c)
3c
-
Sawing is optimised when the chain speed remains steady during cutting.
Beware when reaching the end of the cut. The weight of the saw may change
unexpectedly as it cuts free from the wood. Accidents can occur to your legs and
feet. Always remove the saw from a wood cut while the saw is running.
4
2.3.5 CUTTING LOGS.
Observe the following safety instructions:
- Support logs so that the face sides at the cut do not
close in against each other, which would result in the
chain being jammed or pinched. (See Fig.3a, Fig.4)
Instruction Manual / 11
- Position and set short logs safety prior to sawing. Only saw wood or wooden objects.
When sawing, always take care to avoid hitting stones, nails, etc, as these could
be thrown up or cause damage to the chain or serious injury to the operator or
bystanders.
- Keep a running saw clear of wire fencing or the ground. Use of the saw to thin out
branches or bushes is not approved.
- Length cuts must be carried out with care, as leverage with the gripping teeth (17) is
not possible. Saw at a flat angle to avoid kickback.
- When working on a slope, operate above or to the side of the trunk or laying tree.
- Be careful not to trip over tree stumps, branches, roots, etc.
Should the chain touch earth/soil the chain will become instantly blunt.
2.3.6 CUTTING WOOD UNDER TENSION. (See Fig.4)
There is a high risk of accidents when sawing logs, branches or stems under tension.
Be extremely careful. Leave saw jobs like these to professionals. When sawing logs
supported on both ends, start the cut from above (Y) about 1/3 of the diameter into the
log and then finish the cut (Z) from below, in order to avoid contact of the chain saw with
the ground. When sawing logs supported on only one end, start the cut from below (Y)
about 1/3 of the diameter into the log and finish the cut from above (Z) in order to avoid
log splitting or jamming of the chain saw.
2.3.7 GENERAL CUTTING INSTRUCTIONS.
1). Felling trees. (See Fig. 5)
Always wear a hard-hat with visor to protect your head against falling branches. The
chainsaw can only be used to fell trees smaller in diameter than the length of the guide bar.
- Secure work area. ensure no persons or animals are in the vicinity of the falling tree.
Never attempt to free a jammed saw with the motor running. Use tree wedges to
free chain and guide bar.
When cutting and felling operations are being performed by two or more persons, at
the same time, the felling operations should be separated from the cutting operation
by a distance of at least twice the height of the tree being felled. Trees should not
be felled in a manner that would endanger any person, strike any utility line or cause
any property damage. If the tree does make contact with any utility line, the company
should be notified immediately.The chain saw operator should keep on the uphill
side of the terrain as the tree is likely to roll or slide downhill after it is felled.
- An escape path should be planned and cleared as necessary before cuts are started.
The escape path should extend back and ideally diagonally to the rear of the expected line
of fall.
- Before felling is started, consider the natural lean of the tree, the location of larger
branches and the wind direction to judge which way the tree will fall. Remove
dirt, stones, loose bark, nails staples, and wire from the tree.
- Notching undercut: Make the notch (x-w)1/3 the diameter of the tree, perpendicular to
the direction of falls as make the lower horizontal notching cut. This will help to avoid
pinching either the saw chain or the guide bar when the second notch is being made.
- Felling back cut: make the felling back cut (Y)at least 50 mm higher than the
horizontal notching cut. Keep the felling back cut parallel to the horizontal notching
cut. Make the felling back cut so enough wood is left to act as a hinge. The hinge
wood keeps the tree from twisting and falling in the wrong direction. Do not cut
through the hinge.
- As the felling gets close to the hinge the tree should begin to fall. If there is any
chance that the tree may not fall in desired direction or it may rock back and bind the
saw chain, stop cutting before the felling back cut is complete and use wedges of
wood, plastic, or aluminum to open the cut and drop the tree along the desired line of
fall.
- When the tree begins to fall remove the chain saw from the cutting, stop the motor,
put the chainsaw down, and then use the retreat path planned. Be alert for overhead
limbs/branches falling and watch your footing. To complete the felling operation,
drive a wedge (Z) into the horizontal cut.
- Beware of falling branches when the tree starts to move.
5
2). De-limbing a tree. (See Fig. 6)
De-limbing is removing the branches from a fallen tree. When de-limbing leave larger
lower limbs to support the log off the ground. Remove the small limbs in one cut as
illustrated. Branches under tension should be cut from the bottom up to avoid binding the
chain saw.
6
3). Bucking a log.
Bucking is cutting a log into lengths. It is important to make sure your footing is firm and
your weight is evenly distributed on both feet. When possible, the log should be raised
and supported by the use of limbs, logs or chocks. Follow the simple directions for easy
cutting. When the log is supported along its entire as illustrated, it is cut from the top
(overbuck). (See Fig. 7a)
7a
When the log is supported on one end, as illustrated, cut 1/3 the diameter from the
underside (underbuck). Then make the finished cut by overbucking to meet the first cut.
(See Fig. 7b)
7b
When the log is supported on both ends, as illustrated, cut 1/3 the diameter from the top
overbuck. Then make the finished cut by underbucking the lower 2/3 to meet the first cut.
(See Fig. 7c)
7c
When bucking on a slope always stand on the uphill side of the log, as illustrated. When
“cutting through”, to maintain complete control release the cutting pressure near the end
of the cut without relaxing your grip on the chain saw handles. Don’t let the chain contact
the ground. After completing the cut, wait for the saw chain to stop before you move the
chain saw. Always stop the motor before moving from tree to tree. (See Fig. 7d)
7d
2.4.After using a chainsaw
•
•
•
•
•
Always unplug the unit from the power supply before performing any service or
control.
Only carry the chainsaw when it is unplugged and completely stopped. Hold
the machine by the front handle, with the guide bar and chain turned back and
with the protective scabbard in place
Always follow the instructions provided for maintenance. After each use, check the
operation of safety devices, setting, tension and condition of parts. Maintain unit.
Replace worn or damaged parts.
Repairs on the electric chainsaw should only be carried out by an approved Cobra Service Agent.
For safety reasons, use only original spare parts approved by Cobra Garden.
Keep the chainsaw clean and always store in a dry place with the protective
scabbard in place. Store power tools in a place out of reach of children.
•
Keep this manual safe and refer to it when using the machine or servicing.
3. Instructions for use
3.1 Preparation of the chainsaw
3.1.1 Mounting guide bar and chain
Attention: Wear gloves when handling the saw to prevent accidents relating to the the
chain and bar spikes that are extremely sharp.
Attention: Do not plug the machine in to the power source during assembly.
WARNING! Assembly methods according to the type of your machine, so please
take care to refer to the illustrations and machine type marked on the label. Take great
care when assembling to ensure this is performed correctly.
Your chainsaw is supplied with an SDS system for quick
assembly and easy adjustment of the chain tension. The
adjustable outside ring (13) adjusts the tension of the
saw chain and the locking knob (14) tension the bar. (See
Fig.8)
1). Unpack all parts carefully.
2). Place the chain saw on any suitable flat surface.
3). Pull back on the chain brake lever to deactivate the
chain brake.
4). Unscrew counter-clockwise the locking knob of the SDS
to remove the side cover. (See Fig.9)
8
9
5). Spread the saw chain out with the cutting edges (A) of the chain pointing in the
direction of rotation. Slide the saw chain into the slot around the chain bar.
Ensure chain is in the correct running direction. (See Fig.10a, 10b)
10a
10b
6). Mount the bar on the bar fastening bolt (16), fit the
chain onto the drive sprocket (17) and guide the guide
bar, so that the bar fastening bolt and the two guide
pins (B) fit into the keyway of the guide bar. (See Fig.
11)
7). Fit side cover, ensure that the bar fastening bolt fits into
the screw thread of the locking knob (14). Screw
on the locking knob to tighten the side cover. (See Fig.
12).
11
12
8). The chain is not yet tensioned now. Tensioning the chain applies as described under
“TENSIONING CHAIN”. After running the chain saw around 1 hour, adjust the chain
tension to 2mm by applying 9N of torque.
3.1.2 TENSIONING CHAIN
-Always check the chain tension before use, after the first cuts and regularly during
use, approx. every 5 cuts.
-Upon initial operation, new chains can lengthen considerably. This is normal during
the break-in period, and the interval between future adjustments will lengthen quickly.
WARNING: Unplug the chain saw from the power source before
adjusting the saw chain tension.
WARNING: Cutting edges on the chain are sharp. Use protective
gloves when handling the chain. The chain will be hot after cutting
material.
WARNING: Maintain proper chain tension always. A loose chain will
increase the risk of kickback. A loose chain may jump out of the guide
bar groove. This may injure the operator and damage the chain. A loose
chain will cause the chain, chain bar and sprocket to wear rapidly.
The chain life of the saw chain mainly depends upon sufficient lubrication
and correct tensioning.
Avoid tensioning the chain if it is hot, as this will cause the chain to become
over tensioned when it cools down.
1). Place the chain saw on any suitable flat surface. Screw adjustable outside ring
clockwise until the SDS system is screwed tightly. The
correct chain tension will be reached automatically. The 13
ratchet mechanism prevents the chain tension from
loosening. (See Fig. 13)
2). The correct chain tension is reached when the saw chain (24) can be raised approx.
2-3 mm from the guide bar in the centre. This should be
14
done by using one hand to raise the saw chain against
the weight of the machine. (See Fig.14)
3). When the saw chain loosens, unscrew the adjustable outside ring absolutely and then
screw on the side cover with the locking knob tightly again.
WARNING! Tensioning the chain too tightly will overload the motor and
cause damage, insufficient tension can provoke chain derailing, whereas
a chain tightened correctly provides the best cutting characteristics and
prolonged work life.
Check the tension regularly because the chain length tends to stretch with use
(especially when the chain is new; after the first assembly, the chain tension must be
checked after 5 minutes of machine operation); in any case do not tighten the chain
immediately after use, but wait until it cools down.
In cases where the loosened chain needs to be adjusted, always unscrew the adjustable
outside ring before adjusting the chain tensioning screw/knob; adjust the tension and
tighten the bar retaining the nut/knob accordingly.
3.1.3 CHAIN AND BAR LUBRICATIPON
WARNING! The chain saw is not supplied filled with oil. It is essential to fill
with oil before use. Never operate the chainsaw without chain oil or at an
empty oil tank level, as this will result in extensive damage to the chainsaw.
Never starve the bar and chain of lubrication oil. Running the saw dry or with
too little oil will decrease cutting efficiency, shorten chain saw life, and
cause rapid wear of the chain and excessive wear of the bar from
overheating. Too little is evidenced by smoke or bar discoloration.
Adequate lubrication of the saw chain during cutting operations is essential to minimize
friction with the guide bar. your chainsaw is equipped with an automatic oiler system. The
oiler automatically delivers the proper amount of oil to the bar and chain.
The oil tank holds 210mI of oil, enough to lubricate the chain for 20-25 minutes of cutting.
The oil tank level can be checked through the chain lubricant tank inspection window (10)
provided on the right side of the saw. (See Fig.15)
Filling oil tank:
1). Set the chain saw on any suitable surface with the oil filler cap (C) facing
upward. 2). Clean the area around the oil filler cap with the cloth.
3). Add chain saw oil until the reservoir is full.
4). Avoid dirt or debris entering the oil tank, refit the oil filler cap and tighten.
WARNING! To allow venting of the oil reservoir, small breather channels
are provided between the oil filler cap and the strainer, to prevent leakage
ensure machine is left in a horizontal position (oil filler cap uppermost) when
not in use. It is important to use only the recommended oil to avoid damage
to the chain saw. Never use recycled/old oil. Use of non approved oil will
invalidate the warranty.
CAUTION! The oil tank level should be frequently checked during operation
to avoid starving the bar and chain of lubrication.
NOTE: Your chain saw is equipped with an Automatic Oiler system and is the only source
of lubrication for the bar and saw chain.
15
3.2 Using the chainsaw
Before use, make sure that you have the correct safety equipment and that the plug
and lead are in good working order. Also check the status of the chain and the chain
guide and the fixing system. If necessary, replace or repair defective components.
Use only original parts approved by Cobra Garden.
WARNING: Never work with a guide bar and a damaged or excessively worn
chain as this may cause personal injury.
3.2.1 Starting chainsaw
WARNING! Check the voltage and current supply. The voltage and current
supply must comply with the ratings on the type plate.
WARNING! Ensure the extension cord is of the proper size and type for your
saw (≥1.5mm2)
1). Make sure the chain brake lever (1) is disengaged. The motor will not start if the
chain brake is in the engaged position. Disengage the chain brake lever by
pulling backward toward the front handle. (See Fig. 16).
16
2). Grip the product with both hands, left hand holding the front handle (do not hold chain
brake) and the right hand holding the rear handle. Press the lock-off button (5), then
fully press the switch trigger (6) and hold in this position. The lock-off button can now
be released now. (See Fig. 17a, 17b).
NOTE: It is not necessary to maintain pressure on the lock-off button once the switch
trigger is squeezed and the motor is running. The lock-off button is a safety device to
avoid accidental starting.
17a
17b
20
3.2.2 Stopping the chainsaw
• Release the Trigger On / Off to stop the machine.
• The chain stops completely after a few seconds.
• Disconnect the plug source for safety.
• Replace the front hand guard/chain brake level in place.
3.2.3 Tips for cutting
•
•
•
•
•
•
•
Use only for sawing wood (tree trunks, branches, planks and beams). Never use the
saw for cutting other materials.
Take care that the chain does not come into contact with the ground or foreign materials
other than wood.
When sawing, do not put pressure on the chain, but allow the chain to bite through the
wood while applying leverage on the area near the bar spikes.
When cutting thick branches or trunks, reposition the bar spikes at a lower point to
avoid strain and kickback during operation. To do this, pull the saw toward you
slightly to loosen the clutches of the bar spikes and reposition lower in the material. It
is not necessary to completely remove all of the chainsaw bar from the wood.
The best results are obtained when the cutting speed of the chain is maintained
at its top speed.
Attention should be paid when coming to the end of the cutting stroke, sometimes
the weight changes unexpectedly. There is a risk of an accident to your legs and feet.
Do not remove the chainsaw from the wood when the chain is rotating.
Always wear a hard-hat with visor to protect your head from falling branches. The chain
saw can only be used to fell trees smaller in diameter than the length of the guide bar.
- Secure work area. ensure no persons or animals are in the vicinity of the falling tree.
Never attempt to free a jammed saw with the motor running. Use tree wedges to free
chain and guide bar.
a. The tree felling
When cutting and felling operations are being performed by two or more persons, at the
same time, the felling operations should be separated from the cutting operation by a
distance of at least twice the height of the tree being felled. Trees should not be felled in
a manner that would endanger any person, strike any utility line or cause any property
damage. If the tree does make contact with any utility line, the company should be
notifed immediately.
The chain saw operator should keep on the uphill side of the terrain as the tree is
likely to roll or slide downhill after it is felled.
- An escape path should be planned and cleared as necessary before cuts are started.
The escape path should extend back and ideally diagonally to the rear of the expected
line of fall.
- Before felling is started, consider the natural lean of the tree, the location of larger
branches and the wind direction to judge which way the tree will fall. Remove dirt,
stones, loose bark, nails staples, and wire from the tree.
- Notching undercut: Make the notch (x-w)1/3 the diameter of the tree, perpendicular to
the direction of falls as make the lower horizontal notching cut first. This will help to
avoid
pinching either the saw chain or the guide bar when the second notch is being made.
- Felling back cut: make the felling back cut (Y) at least 50 mm higher than the
horizontal notching cut. Keep the felling back cut parallel to the horizontal notching cut.
Make the felling back cut so enough wood is left to act as a hinge. The hinge wood
keeps the tree from twisting and falling in the wrong direction. Do not cut through the
hinge.
- As the felling gets close to the hinge the tree should begin to fall. If there is any
chance that the tree may not fall in the desired direction or it may rock back and bind
the saw chain, stop cutting before the felling back cut is complete and use wedges of
wood, plastic, or aluminum to open the cut and drop the tree along the desired line of
fall.
- When the tree begins to fall remove the chain saw from the cutting, stop the motor,
put the chain saw down, and then use the retreat path planned. Be alert for overhead
limbs falling and watch your footing.To complete the felling operation, drive a wedge
(Z) into the horizontal cut.
18
-Beware of falling branches when the tree starts to move.
b. Cutting branches
• When using a chainsaw to remove the branches of a tree to the ground, start with the small
branches and those that are not in contact with the ground. Be careful when cutting limbs
under tension as they may be projected too quickly when you suddenly relieve the
tension.
• When you cut the branches, the tree could roll. Always have a backup channel open
in the opposite risk to get away quickly sense. Keep the work area clear to avoid treaswoodshed
• Never operate a chainsaw arms outstretched. Do not try to cut hard-to-reach areas or
by standing on a ladder. Never work at a height above the shoulders.
c.Cutting logs and planks
• Use a sawhorse or a stable support. Saw still outside of arm sawhorse. The substrate
must be high enough to prevent the tip of the guide bar touching the ground and the
chain becomes dull.
• If the saw gets stuck, stop the machine and remove it from the socket. Raise the
workpiece and change its position. Never attempt to free the trapped saw by pulling the
handle or the electric cable
• Place the saw on one end and put it on at full speed. Advance the saw without force
using the bar spikes as a pivot point. If necessary, reposition the spikes on the timber
to limit the angle of cut.
Note: The diameter of the work piece must not exceed the length of the guide bar
3.3 Cleaning, storage, transportation and Maintenance
Before any work on the electric chainsaw, disconnect the plug from the wall socket.
3.3.1 Cleaning the chainsaw
Regular cleaning after use will ensure a better functioning electric chainsaw and
reduce the risk of corrosion or rust.
CAUTION: Never immerse the electric chainsaw in water or any other liquid for cleaning.
Never clean the appliance with high pressure water.
After stopping the device and allowing it to cool, remove the cutting debris accumulated
under the cover by blowing with compressed air or cleaning with a brush. If necessary,
wipe it with a soft damp cloth.
3.3.2 Storage and transport of the saw
• Store your chainsaw in a dry, temperate and dark. Put it in a place out of reach of
children.
• For long term storage, drain the oil tank and grease the chain and chain guide before
storage.
• Only carry the chainsaw when it is unplugged and completely stopped. Hold the unit
by the front handle, the guide turned back and the protective scabbard in place.
3.3.3 Maintenance of the chainsaw
Lubricate the chain
• This saw is equipped with an automatic chain lubrication. Regularly check the oil level.
To initiate the supply of oil on the chain, run the saw empty.
Sharpen the chain
• For best results, sharpen the chain regularly, if at least once a year by a specialist
workshop.
Note: A low oil level or a contact with the dull chain can reduce cutting performance
quickly.
4. Specifications
In keeping with our policy of continuous improvement, we reserve the right to change
the design and configuration of any product without notice. Thus, the text and images
of this manual and packaging are for illustrative purposes only and may not under any
circumstances be the basis for a legal claim or another.
Model
CS35E CS40E CS45E
Product Name
Electric Chainsaw
Voltage
230 V ~50 Hz
Power
1800W(CS35E) 2000W(CS40E) 2400W(CS45E)
Chain Speed
13,5 m/s
Length of the chain guide
35cm (CS35E) 40cm (CS40E) 45cm (CS45E)
Chain
P 3/8” (9.53mm) – 0.050in (1.27mm)
Cable length
10m
Braking time
< 0.15 s
Sound pressure level LpA
93.69 dB(A)
Guaranteed sound power LwA
108 dB(A)
Volume of oil tank
110 ml
Chain Lubrication
Automatic
Class of protection
Double Isolation Class II
Net weight without guide bar
4,780 kg
Net weight with bar and chain
5,630 kg
Vibration level
6,047 m/s2 rear handle;6,153 m/s2 front
handle K=1,5m/s²
5. Problems and solutions.
Malfunction
Probable cause
The unit does not start There is no current
Troubleshooting
Check the power source.
If necessary, change the source
Check the condition of the cord or
plug. If they are damaged, change
them.
The electric chainsaw
works intermittently
The chain is dry
The recoil brake is
triggered
Arm the security system
pulling the hand guard to the handle
upwardly
The carbon brushes are
worn
Please contact your local dealer
The switch is faulty or
defective
Please contact your local dealer
The power cord is
damaged
Please contact your local dealer
The switch is faulty or
defective
Please contact your local dealer
No oil in the tank
Fill with correct oil
The tank cap vent
is clogged with oil
Wipe the top of the oil tank
The oil flow channel is
clogged
Drain the oil tank and clean the
compartment under the cap
Problem with the
The chain brake does
mechanism starting at the Please contact your local dealer
not work
hand guard
Chain derails from the
Problem with the
chain guide,
mechanism starting at the Please contact your local dealer
generates vibration or
hand guard
won't cut correctly
Chain heats up
excessively
The chain is too tight.
Re-tension chain
Malfunction
Chain heats up
excessively
Probable cause
Troubleshooting
No oil in the oil tank
Add oil
The chain is not
sufficiently lubricated
Check the flow of oil.
If necessary, unclog to allow the flow
of oil
The chain is dull or worn
Sharpen the chain or change the
chain
The teeth of the chain are Replace the chain with the teeth in
not in a good way.
the right direction.
6. Environmental Protection
To comply with the protection of the environment, we recommend
taking into consideration the following.
• Use a biodegradable lubricating oil.
• Use a funnel to avoid spilling oil when filling.
• Take care of your chainsaw regularly and replace damaged parts.
• When your machine is at end of life, return it to your dealer for recycling.
Waste Disposal
According to the European Directive on the disposal of waste electrical and
electronic equipment, power tools that are no longer usable must be collected
and follow a path of appropriate recycling. Do not dispose of electric tools
together with household waste.
7.After Sales Service
For more information or for after sales service, contact your local Cobra dealer.
Use only original parts approved by Cobra Garden.
8.Guarantee
Cobra Garden ensures the replacement of all defective parts by a fault or a manufacturing defect.
In no event shall the warranty allow for a refund to be made for inappropriate use of the
machine other that it is intended for.
Cobra Garden accepts no liability for any damage caused to persons or property from
using this machine.
Please complete the warranty form on www.cobragarden.co.uk by including the serial
number off the machine and user information.
The warranty does not cover:
•Abnormal or improper use of the chainsaw
• A lack of maintenance
• A lack of oil
• A use for business or rental purposes
• The installation, adjustment and commissioning of the unit
• Damage or loss occurring during transport or movement
• The damage due to shock or fall
• Shipping and packing material (collect shipments will be refused by After Sales Service)
• The so-called wear of consumable serviceable parts (chain guide, chain, the fasteners of the
chain guide, lubricating oil etc.).
The warranty will terminate automatically if:
• Changes have been made to the machine without the express permission of Cobra Garden
• On the misuse, not in accordance with the instructions and/or regulations.
• On the use of parts not being original or approved by Cobra Garden.
9.Declaration of Conformity
We, the undersigned,
Cobra Garden, Henton and Chattell Ltd., London Road, Nottingham NG2 3HW UK
Declare that
The following devices are appropriate and consistent with the basic safety Health and
EC directives (see point 3), based on their design and type, as circulated by us.
This declaration relates exclusively to the machinery in the state in which they were
placed on the market and excludes added and / or components operations carried out
subsequently by the end user.
1. Description / Function: Electric Chainsaw
2. Type: CS35E (4341-01) CS40E (4341-04) CS45E (4341-05)
3. EC directives: Directive machine 2006/42/EC
2006/95EC the low voltage
2004/108/EC on EMC
2000/14/EC the emission on noise
amended by directives 2005/88/EC.
4. Harmonized standards:
EN 55014-1 : 2006+A1+A2 ; EN61000-3-2 : 2006+A1+A2
EN60745-2-13 : 2009+A1 ; EN61000-3-3 : 2008
5. Responsible for documentation : Peter J. Chaloner
Cobra Garden, Henton and Chattell Ltd., London Road, Nottingham NG2 3HW UK
Sound Pressure level
93.69 dB(A) Guaranteed sound power
108 dB(A)
Conformity assessment body :
TÜV Rheinland (Shanghai) Co., Ltd. 10-15/F, Huatsing building, N°88, Lane 777, West
Guangzhong Road, Shanghai 200072, P.R.China
TÜV Rheinland LGA Products Gmbh, Tillystraße 2, 90431 Nürnberg.
Date: 2013-07-01
29