1
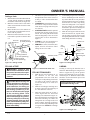
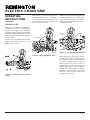
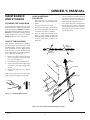
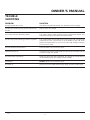
®
ELECTRIC CHAIN SAW
OWNER’S MANUAL
®
Model EL-3
IMPORTANT
Read and understand this manual before assembling or operating this
chain saw. Improper use of saw can cause severe injury. Keep this
manual for future reference.
®
ELECTRIC CHAIN SAW
SAFETY
WARNINGS
Do not assemble or handle guide
bar or saw chain while connected
to a power source.
1.
2.
3.
4.
5.
6.
7.
8.
9.
10.
11.
12.
13.
14.
Keep the work area clean. Cluttered
areas invite accidents.
Do not let the chain saw get wet. Don’t
use the chain saw in the rain or in damp
or wet locations. Keep the work area
well lit.
Keep bystanders and animals out of the
work area.
Store the chain saw in a safe place, out
of the reach of children.
Don’t force the chain saw. Only make
cuts within the capacity of your chain
saw.
Wear proper apparel: safety footwear,
snug fitting clothing, safety glasses,
head and hearing protection. Rubber
gloves and footwear are recommended
when working outdoors.
Never carry the chain saw by its cord.
Never yank the cord to disconnect the
plug. Keep the cord away from heat,
oil and sharp edges.
Secure your work by use of clamps or
chocks, freeing both hands to hold the
chain saw.
Don’t overreach. Keep proper footing
and balance at all times.
Always disconnect the cord when the
chain saw is not in use, when moving
from one location to another and before
servicing.
Keep the chain saw clean. Never
operate a chain saw that is damaged,
improperly adjusted or not completely
assembled. Keep the saw handles dry,
clean and free of oil.
Keep the saw chain properly tensioned
and the saw chain cutters properly
sharpened. Follow the lubricating
instructions.
Avoid having loose or missing parts.
Keep all the fasteners tight.
Remove all tools before touching the
switch trigger.
15. Never place your finger near the switch
trigger until you are ready to make a
cut.
16. Keep all parts of your body away from
the moving saw chain. Always carry the
chain saw with the motor stopped and
the guide bar and saw chain to the rear.
17. Never operate the chain saw when you
are fatigued.
18. Guard against kickback by following
the explanation in this manual.
19. Use extreme caution when cutting
small branches. Watch for limbs under
tension.
20. Use only extension cords suitable for
outdoor use and appropriately marked.
21. When replacing parts use only identical
replacement parts.
IMPORTANT: Do not use any
other attachments or accessories except those noted in this
manual.
IMPORTANT: Save these instructions for future use.
2
101755
OWNER’S MANUAL
CHAIN SAW NAMES
AND TERMS
Notching Undercut A notch cut in a tree
that directs the tree’s fall.
Boring The process involved in cutting
bar and saw chain.
with the saw chain at the nose (tip) of the
guide bar, in order to make a hole. This is not
recommended because of hazard of kickback.
Rear Handle The support handle located at
Bucking The process of cross cutting a
felled tree or log into lengths.
A chain saw
without the saw chain and guide bar.
Chain Saw Powerhead
Clutch A mechanism for connecting and
disconnecting a driven member to and from
a rotating source of power.
Drive Sprocket or Sprocket The toothed
part that drives the saw chain.
Felling The process of cutting down a tree.
Felling Back Cut The final cut in a tree
Oiler Control A system for oiling the guide
or toward the rear of the saw.
Reduced Kickback Guide Bar A guide
bar which has been demonstrated to reduce
kickback significantly.
Saw Chain A loop of chain having cutting
teeth, that cut the wood, and that is driven by
the motor and is supported by the guide bar.
Spiked Bumper (Spike) The pointed tooth
or teeth for use when felling or bucking to
pivot the saw and maintain position while
sawing.
Switch A device that when operated will
complete or interrupt an electrical power
circuit to the motor of the chain saw.
felling operation made on the opposite side
of the tree from the notching undercut.
Switch Linkage The mechanism that trans-
Front Handle The support handle located
Switch Lockout A movable stop that
prevents the unintentional operation of the
switch until manually actuated.
at or toward the front of the chain saw.
Front Handle Guard A structural barrier
mits motion from a trigger to the switch.
between the front handle of a chain saw and
the guide bar, typically located close to the
hand position on the front handle.
Guide Bar A solid railed structure that
supports and guides the saw chain.
Kickback The backward and/or upward
motion of the guide bar occurring when the
saw chain near the nose of the top area of the
guide bar contacts any object such as another log or branch, or when the wood closes
in and pinches the saw chain in the cut.
Kickback, Pinch The rapid pushback of
the saw which can occur when the wood
closes in and pinches the moving saw chain
in the cut along the top of the guide bar.
Kickback, Rotational The rapid upward
and backward motion of the saw which can
occur when the moving saw chain near the
upper portion of the tip of the guide bar
contacts an object, such as a log or branch.
Normal Cutting Position Those posi-
tions assumed in performing the bucking
and felling cuts.
101755
3
®
ELECTRIC CHAIN SAW
ASSEMBLY
INSTRUCTIONS
1.
H
ASSEMBLING GUIDE BAR,
SAW CHAIN AND HAND
GUARD
IMPORTANT: Do not clamp in a
vise or abuse during assembly.
Always wear gloves when handling the saw chain.
Remove two (2) guide bar nuts (D), two
(2) guide bar bolts (E) and one (1)
Phillips screw (N) from the plastic bag.
2. Lay the saw chain (C) out flat.
3. Install hand guard (K) by press fitting
the two bosses (L) into the hex shaped
holes in the saw body. Install the
Phillips screw (N) into the hand guard
and saw handle and tighten securely.
4. Turn
adjusting
screw
(A)
counterclockwise to move the adjusting
block (B) as far as it will go to the rear
of the mount (See Figure 1).
5. Slide the guide bar (G) on to the
adjusting plate (H) aligning adjusting
block (B) with the square adjusting hole
(I) in the guide bar.
6. Rotate the sprocket support (F) back
over the guide bar so the holes line up.
7. Insert ONLY the front guide bar bolt
(E) through the body of the saw and
through sprocket support (F). Tighten
the nut (D) only finger tight. This will
allow clearance for the installation of
the saw chain.
8. Slide the saw chain between the side
cover and the sprocket (J), in the top
groove of the guide bar (G) and around
the guide bar nose.
9. Insert remaining guide bar bolt (E) and
install nut (D) finger tight.
10. Adjust the saw chain tension by
following the tension adjustment
instructions.
2.
B
A
3.
4.
Figure 1 - Part Locations For Assembling
Guide Bar
1.
CAUTION: If saw chain is assembled backwards, the saw will
vibrate excessively and will not
cut.
N
5.
K
C
E
6.
L
J
I
G
Before adjusting the saw chain, make
sure the guide bar nuts (D) are only
finger tight (See Figure 1 and 2).
Turn adjusting screw (A) clockwise
until all slack is out of the saw chain.
Wear protective gloves and pull the saw
chain (C) around the guide bar. It
should move freely.
If necessary, readjust chain using
adjusting screw (A). There should be
no gap between the side links of the saw
chain and the bottom of the guide bar
(See Figure 3).
Tighten guide bar nuts (D) using a
wrench. Nuts not tightened securely
will allow guide bar movement
resulting in loose chain and increasing
the possibility of kickback and damage
to mating parts.
A new chain will stretch and should be
checked after the first few minutes of
operation. Disconnect saw from power
source. Adjust the chain tension after
it has had a few minutes to cool down.
Use protective gloves to protect hands
from chain teeth.
D
F
Figure 2 - Assembling Guide Bar, Chain,
and Hand Guard
Cutting Edges Forward
Guide Bar
SAW CHAIN
TENSION
ADJUSTMENT
CAUTION: The saw chain tension must be properly maintained. Failure to do so will cause
rapid saw chain, guide bar and
sprocket wear. A loose chain will
increase the possibility of kickback and may jump out of the
guide bar groove. This may cause
damage to the chain and injury to
the operator. Tighten guide bar
nuts securely.
4
Standard Chain
Correct Saw Chain
Tension
Guide Bar
Incorrect Saw
Chain Tension
Gap
Guide Bar
Figure 3 - Saw Chain Adjustment
101755
OWNER’S MANUAL
OPERATING
INSTRUCTIONS
FILLING OIL RESERVOIR
1.
2.
3.
4.
Remove the oil fill knob.
Fill the oil reservoir with SAE #30
motor oil.
Replace and tighten fill knob
IMMEDIATELY . This will avoid
continuous oil feed.
Wipe off excess oil.
Note: When cutting in temperatures below
30°F, use SAE #10 oil. In temperatures
above 75°F, use SAE #40 oil.
EXTENSION CORDS
Switch Lockout The moveable button that
prevents unintentional operation of the trigger. The trigger cannot be depressed to start
the saw again until the lockout is pushed in.
When the trigger is released the lockout will
automatically lock the trigger in the power
off position.
Guard The restraint in front of the handle
which prevents accidental contact of the
hand with the chain.
Oil Fill Knob By pushing the oil fill knob,
using only moderate pressure, oil will feed
on the guide bar and saw chain. To keep the
saw chain oiled, push the oil fill knob at least
once before each cut. Frequently check the
oil sight level hole located on the front left
side of the chain saw.
Guard
The proper extension cord must be used
with the chain saw. Use a HO7RN extension
cord no less than 1.5 square millimeters at
distances up to 30 meters. It is recommended
that a ground fault circuit interrupter be part
of the power supply system.
Use an extension cord heavy enough to
carry the current your saw will draw. An
undersized cord will cause a voltage drop at
the saw, loss of power and overheating.
Rear
Switch Handle
Lockout
LEFT SIDE
Switch
Trigger
Guide Bar
Front Handle
WARNING: Read and understand all instructions before operating the saw.
Manual Oil
Control
RIGHT SIDE
Power
Cord
Sprocket
the rear of the saw, houses the control trigger. A firm grip of this handle while cutting
is necessary to control the chain saw in the
cut.
Trigger Switch The control which starts
and stops the motor. The motor only operates at full speed.
101755
A properly installed Front Hand Guard can
help reduce injuries from kickback. Install
by following the assembly instructions in
this manual. DO NOT remove or replace it
with a substitute.
Causes of Kickback
Kickback occurs when a chain cutter going
around the upper quadrant of the guide bar
nose is suddenly stopped (See Figure 5).
This can happen when the cutter contacts a
solid object or is pinched. The result is a
sudden reverse action which kicks the saw
tip up and/or back toward the operator.
Kickback may also occur when a chain
cutter is pinched along the length of the bar.
The result is a sudden linear reverse action
which kicks the saw straight back at the
operator.
Saw
Chain
Front Handle The support located toward
Rear Handle The support located toward
Your saw is equipped with a low-kickback
saw chain and a reduced kickback guide bar.
Both devices reduce the possibility of rotational kickback which can occur when the
tip of the bar contacts a solid object. DO
NOT assume that kickback will not happen
because of these devices. Contact of the
guide bar tip with any object should be
avoided.
DIRECTION
SAW CONTROLS
the front of the chain saw which extends
from the left side of the chain saw. The
proper grip of this handle in the normal
cutting position gives you the greatest ability to control the chain saw in the cut (See
Figure 4).
Kickback Safety Devices On
Your Saw
Sprocket
Guard
Sprocket
Support
CONTACT HERE
90 DEGREE
QUADRANT
Figure 4 - Left and Right Sides
KICKBACK
WARNING: Guard against
kickback. Study this section before operating saw.
Kickback is the sudden upward and/or backward movement of the chain saw while
cutting. If the chain saw moves toward the
operator in an uncontrolled manner, serious
or fatal injuries may result. Understanding
why kickback occurs can help you reduce
the chance of kickback and maintain control.
5
Figure 5 - Causes of Kickback
®
ELECTRIC CHAIN SAW
OPERATING
INSTRUCTIONS
CUTTING WITH THE CHAIN
SAW
Continued
Examples of Kickback
Cutting with your electric chain saw can be
made easier and safer if you will follow
these simplified instructions. Before trying
to cut with the chain saw be sure to:
1. Read all the safety precautions on the
front cover.
2. Support the log to be cut off the ground
so the saw chain does not touch the
ground as it cuts through the wood.
3. Keep the nose of the guide bar from
contacting a log, branch, the ground or
any other obstruction.
4. DO NOT overreach.
5. Stand with your weight evenly
distributed on both feet and slightly to
the left side of the saw. This keeps your
body from being in a direct line with
the cutting chain (see figure 7).
With the saw in operation, kickback occurs
when:
• The chain at the guide bar nose
touches any solid object.
• Incorrectly starting a boring cut.
• A cutter on guide bar nose strikes the
bottom of the saw cut while the guide
bar is being reinserted in the cut (See
Figure 6).
• The chain is pinched in the cut.
Figure 6 - Examples of Kickback
To Help Reduce the Chance of
Kickback
1.
2.
3.
4.
5.
6.
Hold the chain saw firmly with both
hands with thumbs and fingers
encircling the handles.
Always be attentive to what you are
doing, be alert for shifting of the log or
other conditions which will cause a pinch.
Always know where the nose of the
guide bar is. DO NOT let the guide bar
nose contact any object (See Figure 6).
Never use a dull or loose chain. Always
use a correctly sharpened, properly
tensioned chain.
Use your saw within its capacity. DO
NOT bury the nose (See Figure 6).
Figure 7 - The Correct Stance
7.
8.
9.
When ready to make a cut, push in the
lockout button and squeeze the trigger
switch. Start the chain saw above the
log. Always bring the saw up to speed
before letting the chain touch the wood.
When starting a cut, be alert to possible
bouncing or skating (sideward
movement) of the saw.
Place the saw against the wood and
guide it using a light pressure.
10. DO NOT FORCE THE SAW SO
THAT THE CHAIN SPEED IS
GREATLY REDUCED. THIS WILL
OVERLOAD THE MOTOR AND
CAN CAUSE MOTOR BURN OUT.
11. Stop the saw by releasing the trigger
switch. Make sure the chain has come
to a complete stop before setting the
saw down.
12. If you have never used a chain saw
before, in addition to reading and
understanding the operating instructions,
you should seek informed practical
instruction from your chain saw dealer
or other knowledgeable individuals. As
a minimum, you should practice cutting
logs on a sawhorse or cradle until you
are able to maintain a steady even cutting
rate before attempting to cut limbs from
a tree.
TRIMMING A TREE
MAINTAIN SAFETY SYSTEM.
Normal Wear On Saw and its
Effects On Kickback Safety
Follow the maintenance instructions in this
manual on cleaning the saw, proper storage,
chain and guide bar maintenance. Regular
inspection and a good maintenance program will increase the service life of your
saw. Even with proper sharpening, kickback potential can increase with each filing.
Figure 9 - Operate With Both Hands
Figure 8 - Do Not Operate With One Hand
6.
DO NOT OPERATE WITH ONE
HAND (See Figure 8). Use a firm grip
with thumbs and fingers encircling both
handles as shown in Figure 9.
6
WARNING: DO NOT OPERATE
your chain saw while IN A TREE,
ON A LADDER, ON ANY OTHER
UNSTABLE SURFACE or IN ANY
AWKWARD POSITION which
might cause you to loose control
of the chain saw. DO NOT cut
limbs higher than your shoulder.
Note: When conditions are encountered
which are beyond your experience or capacity seek professional help.
101755
OWNER’S MANUAL
Cutting a Limb
1.
2.
3.
4.
1.
Make the first cut from the underside about
1/2 foot from the trunk and 1/3 through
the diameter of the limb (See Figure 10).
Make the second cut two to four inches
farther out on the limb from above until
the limb falls.
Make the third cut 1/3 the diameter of
the limb stub from underneath as close
to the trunk as possible.
Make the fourth cut from above as close
to the trunk as possible to meet the third
cut.
4th Final
Stub Cut
2nd Limbing Cut
(to avoid pinching)
2.
3.
4.
5.
6"
(15cm)
2" to 4"
(5-10 cm)
1st
Limbing Undercut
(to avoid splintering)
3rd Stub Undercut
(to avoid splintering)
Figure 10 - Cutting A Limb
The chain saw operator should keep on
the uphill side of the terrain as the tree
is likely to roll or slide downhill after
it is felled.
CONSIDER the natural lean of the tree,
the location of larger branches and the
wind direction to judge which way the
tree will fall.
A RETREAT PATH should be planned
and cleared as necessary before cuts are
started. The retreat path should extend
back and diagonally to the rear of the
expected line of fall as illustrated in
Figure 11.
CLEAR the work area around the tree
to be cut and on your retreat path.
REMOVE dirt, stones, loose bark, nails,
staples, and wire from the tree where
felling cuts are to be made.
CAUTION: When bucking and
felling operations are being performed by two or more persons
at the same time, the felling operation should be separated from
the bucking operation by a distance of at least twice the height
of the tree being felled. Trees
should not be felled in a manner
that would endanger any person,
strike any utility line or cause any
property damage. If the tree does
make contact with any utility line,
the utility company should be notified immediately.
5.
As the felling cut gets close to the hinge,
the tree should begin to fall. If there is
any chance that the tree may not fall in
the desired direction or it may rock back
and bind the saw chain, stop cutting
before the felling back cut is complete
and use wedges of wood, plastic or
aluminum to open the cut and drop the
tree along the desired line of fall.
When the tree begins to fall remove the
chain saw from the cut, stop the motor,
put the chain saw down, then use the
retreat path planned. Be alert for overhead
limbs falling and watch our footing.
Direction of
Fall
3rd Felling
Cut
Hinge
Approx. 2"
(5 cm)
Retreat Path
Direction of Fall
1st - Lower
Notching Cut
LIMBING
Figure 11 - Retreat Path From Tree
FELLING TECHNIQUES
1.
2.
3.
Make the first lower notching cut 1/3
the diameter of the tree and
perpendicular to the line of fall. This
will help to avoid pinching of either the
saw chain or the guide bar when the
second notching cut is made (See
Figure 12).
Make the second upper notching cut at
an angle to meet the first notching cut
at 1/3 the diameter of the tree.
Make the felling back cut at least 2
inches higher than the horizontal
notching cut as illustrated in Figure 12.
Keep the felling back cut parallel to the
horizontal notching cut. Make the
felling back cut so enough wood is left
to act as a hinge. The hinge wood keeps
the tree from twisting and falling in the
wrong direction. DO NOT cut through
the hinge.
Limbing is removing the branches from a
fallen tree. When limbing, leave larger lower
limbs to support the log off the ground.
Remove the small limbs in one cut as illustrated in Figure 13. Branches under tension
should be cut from the bottom up to avoid
binding the chain saw.
Keep work off ground. Leave support limbs until log is cut.
Figure 13 - Limbing A Tree
101755
2nd - Upper
Notching Cut
Figure 12 - Felling A Tree
45°
FELLING A TREE
WARNING: Felling a tree
should not be undertaken unless
the person has extensive experience or obtains professional assistance.
4.
7
®
ELECTRIC CHAIN SAW
OPERATING
INSTRUCTIONS
Continued
When the log is supported on one end as
illustrated in Figure 15, cut 1/3 of the diameter from the underside (underbuck). Then
make the finishing cut by overbucking the
top 2/3 to meet the first cut.
When the log is supported on both ends, as
illustrated in Figure 16, cut 1/3 of that diameter from the top, overbuck. Then make the
finishing cut by underbucking the lower 2/
3 to meet the first cut.
BUCKING A LOG
Bucking a log is cutting a log into lengths. It
is important to make sure your footing is
firm and your weight is evenly distributed
on both feet. When possible, the log should
be raised and supported by the use of limbs,
logs or chocks. Follow the simple directions
for easy cutting.
1st Cut
2nd Cut
When the log is supported along its entire
length as illustrated in Figure 14, it is cut
from the top (overbuck).
2nd Cut
1st Cut
Figure 15 - Log Supported One End
Figure 14 - Log Supported Along Entire
Length
8
Figure 16 - Log Supported On Both End
When bucking on a slope always stand on
the uphill side of the log, because the log
may roll after cut. When “cutting through,”
to maintain complete control, reduce the
cutting pressure near the end of the cut
without relaxing your grip on the chain saw
handles. Don’t let the chain contact the
ground. After completing the cut, wait for
the chain saw to stop before you move the
chain saw. Always stop the motor before
moving from tree to tree.
101755
OWNER’S MANUAL
MAINTENANCE
AND STORAGE
HAND SHARPENING
PROCEDURE
1.
CLEANING THE CHAIN SAW
To clean housing of dirt and oil, wipe with a
damp cloth using a solution of warm water
and a mild detergent. DO NOT use products
that contain ammonia, chlorine or abrasives,
DO NOT use chlorinated cleaning solvents,
carbon tetrachloride, kerosene or gasoline.
DO NOT submerge saw in any liquids.
CARE OF THE GUIDE BAR
2.
3.
4.
5.
Disconnect the saw from the power
source. Wear gloves when handling the
chain.
Properly tension the saw chain.
Position the cutter that is to be filed in
the center of the guide bar. Move the
chain after each cutter is finished.
Place the round file and guide on the
cutter so it rests on the top plate and
the depth gauge. Hold the file level and
with the guide marks parallel to the
guide bar.
Most guide bar problems are caused by
uneven bar wear. Incorrect filing of cutter
and depth gauge settings are the primary
cause of uneven bar wear. When the bar
wears unevenly it widens the bar slot and
causes chain clatter, rivet popping and difficulty in making a straight cut.
1. Remove saw dust from the guide bar
groove periodically with a putty knife
or a wire (See Figure 17).
2. Clean oil holes after each day of use.
3. Remove burrs and restore square edges
to an uneven rail top by filing with a
flat file.
4. Replace the guide bar if it is bent or
cracked.
6.
File from inside toward the outside of
the cutter in one direction only. Use a
light stroke, only one or two strokes are
needed. File all cutters the same.
Move to the other side of the guide bar
and file all cutters on the second side.
Care should be taken to never file into
the bottom of the top plate or it will
become dull faster.
Filing
Direction
Filing
Direction
Filing
Direction
30° Guide
Mark
File Guide
FILE
Note: See the section on Accessories for the
proper replacement guide bar and chain.
Round File
HOLDER
Figure 17 - Guide Bar Maintenance
Figure 18 - File and File Guide Placement On Chain
101755
9
®
ELECTRIC CHAIN SAW
MAINTENANCE
AND STORAGE
Continued
Correct Gauge
Clearance .025"
(0.64 mm)
FILING THE CUTTER DEPTH
GAUGES
Rounded
Off
The cutter depth gauge clearance is reduced
as the cutting edges are sharpened. The
cutter depth gauge clearance will need to be
set after every second or third sharpening.
1. Place the depth gauge set firmly across
the top of two cutters so the depth gauge
enters the slot in the gauge set.
2. With a flat file, use a firm forward
pressure to file gauge level with depth
gauge set.
3. Round off cutter gauge depth to
maintain original shape.
Note: After several hand filings of the saw
chain it is a good practice to have your
authorized service center or sharpening service shop precision sharpen the saw chain
on a sharpening machine to insure uniform
dimensions.
As The Cutters
Are Filed Back
The Gauge
Must Be
Lowered
And
Check Gauge
Clearance
Drive Link
Side Link
Depth Gauge Set
Cutter
Figure 19 - Chain Depth And Clearances
STORING YOUR CHAIN SAW
Follow these instructions when storing your
chain saw for more than 30 days.
1.
2.
3.
4.
5.
6.
Drain the oil reservoir.
Remove, clean and dry the guide bar
and chain.
Place the saw chain in a container filled
with oil to prevent rust.
Wipe on a coating of oil to the entire
surface of the guide bar and wrap in
heavy paper, cloth or plastic.
Wipe off the outside surfaces of the
saw.
Store the saw in a dry place out of the
reach of children.
ACCESSORIES AVAILABLE
FOR YOUR CHAIN SAW
FROM YOUR DEALER
Part No.
097570-01S
091374S
075752
097572-03S
091375S
Description
BAR, Guide 14" (350mm)
CHAIN, Saw, 14" (350mm)
SPROCKET, Drive
BAR, Guide 16" (400mm)
CHAIN, Saw, 16" (400mm)
Note: It is normal for oil seepage to occur
when the saw is not in use. Empty the oiler
reservoir after each use to prevent lubricant
from seeping.
10
101755
OWNER’S MANUAL
TROUBLE
SHOOTING
PROBLEM
SOLUTION
Saw operates but does not cut.
Saw chain is assembled backwards. See manual for correct assembly.
Saw does not cut unless heavily forced. Chips are fine,
dust like.
Dull saw chain. See manual.
Saw seems to run slow and easily stalled.
Low supply voltage. Check extension cord size noted in the manual. Low
voltage can cause poor performance and motor burnout.
Saw does not operate when trigger switch is squeezed.
Lock out button has not been depressed to release trigger. OR, extension cord
connections are loose. OR, line fuse or circuit breaker is open. OR, motor
brushes need replacement. See your service center. OR, wiring circuit open,
See your service center.
Saw runs but chain does not move.
Gear train failure. See your service center.
Chain does not get oil.
Oil slot in bar or mount is clogged with saw dust. Remove and clean. OR, oil
is not thin enough. See manual.
Saw chain comes off guide bar.
Chain is too loose and requires adjustment. See manual. Or, bar and chain are
not assembled properly. See manual, recheck assembly.
Saw smokes.
DO NOT operate. See your service center
Saw leaks oil.
Oil cap is not secure. Note: when storing, empty oil tank to avoid seepage.
101755
11
LIMITED WARRANTY
This product is warranted to be free from defects in materials and workmanship for six (6) months from the
date of first purchase when operated and maintained in accordance with instructions. This warranty is
extended only to the original retail purchaser.
This warranty covers only the cost of parts required to restore this to proper operating condition.
Transportation and incidental costs associated with warranty repairs are not reimbursable under this
warranty.
Warranty service is available only through authorized dealers or service centres.
This warranty does not cover commercial or rental usage nor defects resulting from misuse, accidents, lack
of proper maintenance, bar, chain.
The warrantor assumes no responsibility for indirect, incidental or consequential damages.
THIS EXPRESS WARRANTY IS GIVEN IN LIEU OF ANY OTHER WARRANTY EITHER EXPRESSED
OR IMPLIED, INCLUDING WARRANTIES OR MERCHANTABILITY AND FITNESS FOR A PARTICULAR PURPOSE.
2701 Industrial Drive
P.O. Box 90004
Bowling Green, KY 42102-9004
PRINTED IN USA
101755-01
REV. D
3/97