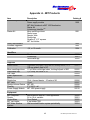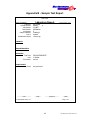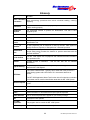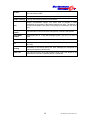
1
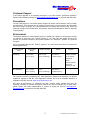
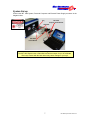
Micro Identification Technologies ® MIT 1000 Rapid Microbial Identification System User Guide Micro Identification Technologies 970 Calle Amanecer, Ste. F San Clemente, CA 92673 Tel: 949-388-4546 Fax: 949-388-4547 www.micro-identification.com e-mail: [email protected] MIT 1000 System User Guide V3.4 Copyright 2007 by Micro Identification Technologies, Inc. All rights reserved. Micro Identification Technologies believes the information furnished in this document to be accurate and reliable. However, Micro Identification Technologies assumes no responsibility for its use or for any infringements of patents or other rights of third parties, which may result from its use. No license is granted by implication or otherwise under any patent rights of Micro Identification Technologies. Use, duplication, or disclosure by the United States Government is subject to restrictions as set forth in subparagraph (c)(1)(ii) of the Rights in Technical Data and Computer software clause at 48 C.F.R, 252.227-7013, or in subparagraph (c)(2) of the Commercial Computer Software Registered Rights clause at 48 C.F.R., 52-227-19 as applicable. Micro Identification Technologies, 970 Calle Amanecer, Ste. F, San Clemente, CA 92673. MIT 1000™ and Identifier TM is a trademark of Micro Imaging Technology, Inc. All other brand and product names used in this document are trademarks or registered trademarks of their respective companies. MIT 1000 System User Guide V3.4 Table of Contents Table of Contents ........................................................................................................................... 3 Introduction .................................................................................................................................... 4 Purpose of This Guide ........................................................................................................ 4 Audience ............................................................................................................................. 4 Assumptions ........................................................................................................................ 4 Conventions Used In This Guide ........................................................................................ 4 User Guide Organization..................................................................................................... 4 Customer Support ............................................................................................................... 5 Precautions ......................................................................................................................... 5 Environment ........................................................................................................................ 5 Chapter 1: Getting Started ............................................................................................................ 6 Inside the Large Box ........................................................................................................... 6 Inside the Small Box ........................................................................................................... 6 1.59 Micron PSL Sphere Suspension Referigeration ......................................................... 6 System Set-up ..................................................................................................................... 7 Equipment and Materials Required For an Identification Test ............................................ 8 Chapter 2: Quick Reference Identification Test .......................................................................... 9 Chapter 3: MIT 1000 Application ................................................................................................ 10 MIT 1000 Application Display ........................................................................................... 10 MIT 1000 Application Display Button Functions ............................................................... 12 Logs and Reports .............................................................................................................. 13 Chapter 4: MIT Vial Cleaning and Storage ................................................................................. 25 Sterilizing the MIT Vial ...................................................................................................... 25 MIT Vial Cleaning .............................................................................................................. 25 Storing MIT Vials ............................................................................................................... 26 Chapter 5: Water Quality Test ..................................................................................................... 27 Water Test Results:........................................................................................................... 28 Chapter 6: Sample Preparation .................................................................................................. 29 Step 1: Fill the MIT Vial with Water ................................................................................... 29 Step 2: Clean the Micro-Centrifuge Tube ......................................................................... 30 Step 3: Fill the Micro-Centrifuge Tube with Water ............................................................ 30 Step 4: Collect a Test Sample .......................................................................................... 31 Step 5: Prepare the Micro-Centrifuge Tube Suspension .................................................. 32 Step 6: Vortex the Sample ................................................................................................ 32 Step 7: Prepare the MIT Vial Suspension ......................................................................... 33 Step 8: Clean the MIT Vial Outside Surface ..................................................................... 33 Step 9: Place the MIT Vial into the MIT 1000 System ...................................................... 34 Chapter 7: Performing an Identification Test ............................................................................ 35 MIT 1000 Application Start-up .......................................................................................... 35 Identification Test Sample Information .............................................................................. 35 Identification Test Operation ............................................................................................. 35 Identification Test Gauges and Indicators......................................................................... 37 Chapter 8: Troubleshooting ........................................................................................................ 40 Appendix A - MIT Products ......................................................................................................... 42 Appendix B - Sample Test Report .............................................................................................. 43 Glossary ........................................................................................................................................ 44 Index .............................................................................................................................................. 46 3 MIT 1000 System User Guide V3.4 Introduction Congratulations on purchasing the revolutionary MIT 1000 System. This instrument uses the principles of light scattering to identify a variety of bacteria in less than five minutes. Purpose of This Guide This Guide describes how to prepare, operate and troubleshoot the MIT 1000 Rapid Microbial Identification System. Audience This Guide is for users, technicians, microbiologists, scientists and researchers of all skill levels who will use and maintain the MIT 1000 System. Assumptions This Guide assumes the User is familiar with: ® ® Basic Microsoft Windows operations such as using a mouse, choosing and selecting commands, working with Windows Basic computer set-up skills that include connecting power module and USB cable to the appropriate ports on the computer Basic laboratory techniques and has a basic microbiological background Conventions Used In This Guide This Guide uses the following conventions: Notes are underlined and provide useful information or information that requires special emphasis. Warnings are in yellow and provide information to help avoid injuries to the User, damaging the equipment, or reducing the System’s performance. When using the MIT 1000 Application, items that you select or type are shown in bold. User Guide Organization This Guide is organized as follows: Introduction Chapter 1 Chapter 2 Chapter 3 Chapter 4 Chapter 5 Chapter 6 Chapter 7 Chapter 8 Appendix A Appendix B Glossary Index Describes the major features and benefits of the MIT 1000 System. Getting Started provides a list of components and materials included with the MIT 1000 System and those standard laboratory equipment and materials needed to complete an Identification Test. Quick Reference Operation Summary provides a quick reference guide to operate the System. Describes the features of the MIT 1000 Application. MIT Vial Cleaning and Storage Water Quality Test Sample Preparation Performing an Identification Test Troubleshooting MIT Products Sample Test Report 4 MIT 1000 System User Guide V3.4 Micro Identification Technologies ® Customer Support If the System appears to be operating incorrectly or you have specific operational questions, please contact Customer Service at [email protected] or call us at 949-388-4546. Precautions The MIT 1000 System is a universal system designed to identify various bacteria, many of which are pathogenic. Take extreme care in handling all specimens, microbial cultures and inoculated MIT Vials. Aseptic technique and usual precautions for handling the bacteria group should be observed throughout the Identification Test process. Ensure all biohazardous waste is disposed of appropriately. Environment This System operates on various power services (110/220 VAC, 50/60 Hz, 15/10 amps), requires no reagents or chemicals, has a small footprint of 1.25 cubic feet and weighs less than 25 pounds. The software included in the System operates on a Windows 7 platform in a personal computer. MIT recommends that the MIT 1000 be placed in an environment that does not exceed the following parameters. Environmental Factor Operating Temperature Range Relative Humidity Altitude Vibration 41°F to 95°F 20% to 90% Sea level to Vibration sensitive. (5°C to 35°C) (non-condensing) 10,000 ft (3 km) Do not operate near fans or motors. Normal keyboard and mouse activities are OK. Non-Operating -4°F to 140°F 95% Sea level to (20°C to 60°C) (non-condensing) 10,000 ft (3 km) TM The System uses MIT’s proprietary MIT 1000 Application software and Identifiers to identify organisms. Updates of the MIT 1000 Application software and a list of available Identifiers is available on the MIT web site: www.micro-identification.com. MIT offers all accessories (i.e. additional test vials, culturing media, pipettes and other lab supplies) necessary to operate the System. Should you wish to purchase any of these items, please contact your sales representative or contact us directly via email at [email protected] or telephone us at 949-388-4546. 5 MIT 1000 System User Guide V3.4 Micro Identification Technologies ® Chapter 1: Getting Started You will receive the MIT 1000 System in two boxes. Inside the Large Box The large box contains the MIT 1000 System and Starter Kit. The following items are included in the large box: MIT 1000 System Power Supply Module USB Cable Key Starter Kit - The starter kit provides the items needed to immediately use the MIT 1000 System. The kit includes the following items: o o o o o o o o o Twelve 0.6 mL micro-centrifuge tubes Twenty-five sterile inoculating loops 1 Six MIT Vials 10 MIT Vial Caps 12 Eppendorf 0.5 – 10 µL pipette tips 15 2” x 2” Parafilm squares 2 One MIT Vial Holder 15 #10 rubber bands One small vial of 1.59 micron PSL sphere suspension Inside the Small Box The small box contains the MIT 1000 Mini Laptop computer. The following items are included in the small box: The MIT 1000 Mini Laptop computer Computer battery Power module 1.59 Micron PSL Sphere Suspension Referigeration Immediately refrigerate the 1.59 micron PSL sphere suspension. 1 2 MIT Part Number 20007 MIT Part Number 30003 is used for both vial cleaning and ID Test preparation 6 MIT 1000 System User Guide V3.4 Micro Identification Technologies ® System Set-up Connect the MIT 1000 System, Personal Computer and External Power Supply as shown in the diagram below: Key MIT 1000 Computer Power Module USB Cable MIT 1000 Power Module Warning The MIT 1000 System uses a Class IIIb laser with an output of up to 45 milliwatts. Direct eye contact with the laser beam may cause damage to your eye! 7 MIT 1000 System User Guide V3.4 Micro Identification Technologies ® Equipment and Materials Required For an Identification Test Equipment Required MIT Vial holder (MIT Part Number 30003) Vortex mixer (See specifications in Appendix B) Pipette 0.5µL to 10 µL (See specifications in Appendix B) Incubator Autoclave BioSafety Cabinet Material Required 3 Low Particle Filtered (LPF) water 0.6 mL micro-centrifuge tube – See specifications in Appendix B Parafilm - See specifications in Appendix B 1 µL sterile disposable loop - See specifications in Appendix B #10 rubber band Kimwipes Pipette tips - See specifications in Appendix B MIT Vial (MIT Part Number 20007) 70% IPA 4 10% solution of Distilled White Vinegar Powder free gloves Trypticase Soy Agar with 5% sheep blood or BHI culture plate Biohazard disposal container 3 Low Particle Filtered Water. Typically, this water is the product of a water filtering system with a final filter of 0.1 micrometers absolute or smaller. The MIT 1000 Water Test function is the final decider on whether or not water can be used for Identification tests with the MIT 1000 System. 4 5% to 8% acetic acid in water with a pH of about 2.4. Available at most grocery stores. 8 MIT 1000 System User Guide V3.4 Micro Identification Technologies ® Chapter 2: Quick Reference Identification Test 1. Clean and rinse a MIT Vial with LPF water, see Chapter 4. 2. Add about 15 mL of LPF Water to the MIT Vial as shown in Figure 20 on page 29. The water level must new the middle of the vial neck. 3. Cover with Parafilm and secure with rubber band. 4. Clean and rinse a 0.6 mL micro-centrifuge tube with LPF water. 5. Fill the micro-centrifuge tube to about 0.2 mL with LPF water. 6. Remove a single colony from a culture plate with a 1-µL sterile inoculating loop. 7. Dislodge the colony material on the loop into the water in the micro-centrifuge tube. 8. Close the micro-centrifuge tube 9. Vortex the micro-centrifuge tube 10. Remove the rubber band and gently lift the Parafilm covering the MIT Vial and pipette 1µL from the micro-centrifuge tube into the MIT Vial. 11. Re-cover the MIT Vial with Parafilm and replace the rubber band. 12. Lift up the tails of the Parafilm to get the Parafilm off the neck. 13. Wipe the round bottom of the MIT Vial with a Kimwipe dampened with 70% IPA. 14. Wipe dry the round bottom of the MIT Vial with a second Kimwipe. 15. Place the MIT Vial in the MIT 1000 System. 16. Start the MIT 1000 Application. 17. Click the Identifiers button and select the appropriate Identifiers identification test. TM to use for the 18. Select IDENTIFY. 19. Fill in the Sample Identification form. 20. Click OK. 9 MIT 1000 System User Guide V3.4 Micro Identification Technologies ® Chapter 3: MIT 1000 Application There are three ways to start the MIT 1000 Application: Double click the MIT 1000 Application icon (Figure 1) on the desktop. Right click on the desktop MIT 1000 Application icon and select the Open menu item. Figure 1 – MIT Click on MIT 1000 Application icon in the MIT folder in the All Programs 1000 Application Icon menu under the Start button. MIT 1000 Application Display The MIT 1000 Application Display as shown in Figure 2 and 3 appears after the MIT 1000 Application has started. Display and select Identifiers Display this User Guide PDF Display the troubleshooting guide Display the test log Display the MIT 1000 configuration page Display the MIT web page Figure 2 – MIT Central Control Display The six buttons on the left side of the Display provide an easy method to configure the MIT 1000 Application. They provide the User with the capability to troubleshoot, review test log data, configure the MIT 1000 System and connect to the MIT 1000 website for technical updates and other announcements. TM Click the Identifiers button to select the Identifiers to use for Identification Testing. Click the User Guide button to display this User Guide. Click the Troubleshooting button to display the Troubleshooting Guide. Click the Log button to display the Sample Test Log. Click the Configure button to configure the MIT 1000 Application. Click the MIT Web button to display the Micro Identification Technologies web page: www.microidentification.com. 10 MIT 1000 System User Guide V3.4 Micro Identification Technologies ® System power indicator Cloud connection indicator System ready indicator List of active identifiers Start a Water Quality Test button Close the RMID application button Start an Identification Test button Figure 3 – MIT Central Control Display The System operation (Figure 3) status is shown on the right side of the Display: 5 The Power indicator is green when the MIT 1000 System is powered on and shows no color when the power is off. The MIT Cloud indicator is green when the MIT 1000 Application is connected to the MIT 1000 5 Cloud and flashed red when it is not connected. The Ready indicator is green when the MIT 1000 Application is properly configured and the MIT 1000 System is connected and operating properly. It blinks red when a configuration or connection error occurs. TM The Active Identifiers pane in the middle of the Display shows the Identifier that will be used during an Identification Test. Clicking the Identify button begins the identification process. Note, once the Identify button is clicked, the Sample Information form will appear. The User must enter the required information before the Identification Test can start. Clicking the Water Test button begins the Water Quality test. Water that does not pass this test MUST NOT be used for Identification Tests. Clicking the Close Program button will terminate the MIT 1000 Application. The MIT 1000 Application MUST be connected to the MIT Cloud to operate. 11 MIT 1000 System User Guide V3.4 Micro Identification Technologies ® MIT 1000 Application Display Button Functions License 6 Upon clicking the Identifers button (Figure 2), the Identifiers Form shown in Figure 4 will appear. TM The upper list, under the “Licensed Identifiers” caption, lists all the Identifiers for which you have a current license to use. The MIT 1000 System cannot be used to identify a specific species TM or genus unless the license for the Identifier for that species or genus is current. Visit the MIT TM website for a complete list of available Identifiers and to purchase a license to use them. The MIT 1000 System will identify only those bacteria that are in the bottom list below the Active TM Identifiers caption. The User must select the Identifiers that are to be active for Identification tests. TM In the example shown in Figure 4, the System has current license to the following Identifiers : E. coli Listeria spp Salmonella spp List of Licensed IdentifiersTM. Click the Up Arrow to remove the highlighted Licensed IdentifierTM from the Active IdentifierTM list. Click the Down Arrow to add the highlighted Licensed IdentifierTM to the Active IdentifierTM list. Only those IdentifiersTM listed here will be used during an Identification test. Figure 4 – License Display TM To use a specific Identifier during an Identification test, simply double-click the desired TM TM Identifier in the Licensed Identifiers list or highlight the Identifier and then click the Down (↓) TM Arrow. This moves the Identifier to the Active Identifiers list. The Active Identifiers list can TM contain more than one Identifier . The MIT 1000 System will test for the presence of species and TM genus associated with all selected Identifiers during a single Identification test. In the example TM in Figure 4, the E. coli and Listeria spp Identifiers are selected for an Identification Test. TM To remove an Identifier from the Active Identifiers list, simply double click it or select it by clicking on it and then click the Up (↑) Arrow. 6 For specific installation, operation and precautionary statements please refer to the Insert that TM accompanied the Identifier . 12 MIT 1000 System User Guide V3.4 Micro Identification Technologies ® To purchase additional licenses, contact your local representative or Customer Service. Logs and Reports Sample Test Log The MIT 1000 Application records all Identification Test activities. Click Log in the MIT 1000 Applicaiton Display to view the Sample Test Log, Figure 5. Maximizing the window enables the User to view more rows and columns of the Log. Figure 6 below shows a partial view of the Sample Test Report that can be viewed and printed for each entry in the Sample Test Log. Test Number Select Sample specific information to show a log of tests. Select a date to show all tests performed on that date. 2011 2012 000125 000145 000168 000178 000194 000206 000235 000357 000378 000397 000425 Date 2012-07-13 2012-07-16 2012-07-27 2012-08-29 2012-08-31 2012-10-16 2012-10-17 2012-10-18 2012-10-19 2012-08-31 09:40:20 2012-09-03 09:50:24 2012-09-04 09:52:33 2012-09-05 09:23:14 2012-09-06 09:45:54 2012-09-07 09:15:21 2012-09-10 09:55:47 2012-09-11 09:35:25 2012-09-12 09:47:41 2012-09-13 09:21:14 2012-09-14 09:32:52 MIT Foods Customer A BDFE Meats Cooking-2 Cooking-2 Cooking-2 Cooking-2 Cooking-2 Cooking-2 Cooking-2 Cooking-2 Cooking-2 Cooking-2 Cooking-2 Click View Report to show a Report for the selected test. 11-MITF-Burrito 12-MITF-Tamale 12-MITF-Burrito 12-MITF-Monitor Unknow n Unknow n Unknow n Unknow n Unknow n Unknow n Unknow n Unknow n Unknow n Unknow n Unknow n Not done Not done Not done Not done Not done Not done Not done Not done Not done Not done Not done 001-Burrito-1 002-Burrito-2 MIT Foods MIT Foods MIT Foods MIT Foods MIT Foods MIT Foods MIT Foods MIT Foods MIT Foods MIT Foods MIT Foods Burrito Burrito Burrito Burrito Burrito Burrito Burrito Burrito Burrito Burrito Burrito Cooking-1 Cooking-2 Cooking-3 Chilling-1 Chilling-2 Chilling-3 PrepBegin-1 PrepBegin-2 PrepBegin-3 -------T. Phillips G. Kessler C. Frank S. Pfeiffer 12-MITF 12-MITF 12-MITF 12-MITF 12-MITF 12-MITF 12-MITF 12-MITF 12-MITF 12-MITF 12-MITF Click Add Comment to add a comment to the selected test. Figure 5 – Sample Test Log Display 13 MIT 1000 System User Guide V3.4 Micro Identification Technologies ® Recorded Log Information Log entry Test # Time Sample Result Source of information MIT 1000 Application MIT 1000 Application User MIT 1000 Application Definition A unique index assigned to an Identification Test by the MIT 1000 Application program. The time and date the Identification Test started. Sample name or type. The result of the Identification Test. The result of a Gram Stain performed on the sample. The possible values are: Gram Stain Customer Name Project Number User Not done GNR : Gram Negative – Rod GPR : Gram Positive – Rod GNC : Gram Negative – Coccus GPC : Gram Positive – Coccus Yeast User The organization or company that provided the sample being tested. User The Project Number assigned to the purchase order or work order. PO Number User The Purchase Order number for the work being performed. Task Number Lot Number User User MIT 1000 Application User User User Identifiers User Media Media Lot Media Expiration Incubation Temp Incubation Start Incubation End Termination The Task Identifier in the Project. The Lot Number of the item(s) being tested for the selected Task. The Identifiers TM that were used during the Identification Test. The User that performed the Identification Test. The culture media used for bacteria growth. The lot number of the culture media. User The expiration date of the culture media. User The temperature used for bacteria growth. User The date and time the incubation period started. User The date and time the incubation process ended. MIT 1000 Application The reason the Identification Test was terminated, e.g., high concentration, low concentration, etc. Table 1 - Log Entry 14 MIT 1000 System User Guide V3.4 Micro Identification Technologies ® Finding a Test in the Sample Test Log The sample Test Log provides two independent methods of finding the tests: By date and by Sample. By Date Click the Year the test was performed in the Year list in the upper left corner of the form. Then click the date the test was performed in the Date list next to the Year list. After each year and date selection, all tests performed on the selected date will be listed. By Sample First, select the client name in the Customer list. All Project and PO numbers associated with this client will be listed below the Project No. – PO No caption. Select the Project and PO Numbers associated with the test. All Task and Lot Numbers associated with this Project and PO Number will be listed below the Task No. – Lot No. caption. Select the Task and Lot Numbers associated with the test. All Samples measured associated with the Task and Lot Numbers will be listed below the Sample Name caption. Select the Sample Name associated with the test. After each selection, all tests performed for the selected Sample job information will be listed. Test Report The MIT 1000 Application can create a test report for each test in the log as shown in Figure 6. To display the report, find the test in the Sample Test Log as described above. Then either: Click on the test entry and click on Show Report at the bottom of the page. The Show Report button is visible only when a test is selected. Double-click on the test entry. OR The Test Report Form appears, Figure 6. The report header is determined by the text shown in the Header Text box. MIT Foods Burrito 12-MITF 002-Burrito 2 Cooking-2 To change the header text, enter the new header in the Header Text box then click Apply. G. Kessler G. Kessler Click Print to print a copy. Figure 6 – Sample Test Report – Partial View 15 MIT 1000 System User Guide V3.4 Micro Identification Technologies ® Note: A full view of the Sample Test Report is shown in Appendix C. Test Report Header The text in the Header Text box will be displayed at the top of the Test Report. Follow the procedure below to customize the header: Enter the header text in the Header Text box and then click Apply. To remove the header, delete the text in the Header Text box and then click Apply. 16 MIT 1000 System User Guide V3.4 Micro Identification Technologies ® Configuring the System Click the Configure button to display the MIT 1000 Configuration Options Form as shown in Figure 7. A description of the options is shown in Table 2. MIT 1000 Serial Number Optional Log entries List of Culture Medias Test Options Sample Tracking Parameters Optional Test Report parameters List of Users Sample Tracking Parameter Summary Figure 7 – Configure Form 17 MIT 1000 System User Guide V3.4 Micro Identification Technologies ® General Function Descriptions: MIT 1000 S/N This is the serial number of the MIT 1000 System. This MUST match the six-digit serial number located on the back of the System. The MIT 1000 Application automatically fills in this value. Chime on Completion Checking this option causes the System to sound a chime when the Identification Test or Water Test is complete. User Termination Reason Checking this option will require that the User specify a reason for terminating an Identification Test. Required Log Entries Media Checking this option will require that the User specify the culture media used to grow the bacteria when an Identification Test is performed. Media Lot Number Checking this option will require that the User specify the lot number of the media used to grow the bacteria when an Identification Test is performed. Media Expiration Date Checking this option will require that the User specify the expiration date of the media used to grow the bacteria being tested when an Identification Test is performed Incubation Temperature Checking this option will require that the User specify the temperature the bacteria being tested was incubated. Incubation Time Checking this option will require the User to specify the incubation start and stop time and date for the bacteria being tested. Table 2 – General Function Descriptions Note: The Diagnostic Tools are for MIT Technical Representative usage only. 18 MIT 1000 System User Guide V3.4 Micro Identification Technologies ® Medium Configuration To configure the Medium, follow the instructions in Table 3. Medium List box The Medium list box shows the available options that the User can select prior to starting an Identification Test and the Required Log Entries – Media check box is selected. The MIT 1000 Application comes preconfigured with two predefined entries: BHI Brain Heart Infusion, and TSA w/5% SB Trypticase Soy Agar with 5% Sheep blood. New Click New to add a new media selection option. When the Media Name Form (Figure 8) appears, fill in a name for the new Media. Then click OK to accept the new Media or click Cancel to close the form without accepting the new Media. Edit Click Edit to modify the name of the selected media. When the Media Name Form (Figure 8) appears, the current Media Name is filled in. Modify the name and click OK to accept the change or click Cancel to close the form without accepting the edit. For example, “TSA with 5% SB” can be changed to “Blood agar.” Table 3 – Media Configuration Options Warning The MIT 1000 System currently only supports Tryptic Soy Agar with 5% sheep blood and BHI. Upon clicking the New or Edit button associated with Media, the Form shown in Figure 8 will open: To add a new or edit the Culture Media: 1. Enter the new name. 2. Click OK to accept the new entry, or click Cancel to close the dialog without accepting the new entry. Figure 8 – Media Name 19 MIT 1000 System User Guide V3.4 Micro Identification Technologies ® User Configuration: To add a User’s Name, follow the instructions in Table 4 below. User List box The User list box shows the available names that the User can select prior to starting an Identification Test. New Click New to add a new User option. When the User Name Form (Figure 9) appears, fill in a name for the new User. Then click OK to accept the new User or click Cancel to close the form without accepting the new User. Edit Click Edit to modify the User name. When the User Name Form (Figure 9) appears, the current User Name is filled in. Modify the name and click OK to accept the change or click Cancel to close the form without accepting the change. For example, “Susan B. Anthony” can be changed to “SBA." Table 4 – User Configuration Options Upon clicking the New or Edit button associated with User, the Form shown in Figure 9 will open: To add a new or edit the User: 1. Enter the new name. 2. Click OK to accept the new entry, or click Cancel to close the dialog without accepting the new entry. Figure 9 – User Name Information Entry Customer Configuration To input Customer information, follow instructions in Table 5 below: Customer List box Click the Down Arrow to show the list of Customers that have already been entered. Selecting a Customer will allow the entered Projects for that Customer to be viewed or changed, and new Projects added. The selected Customer is also shown in the lower left of the form. New Click New (right of the Customer list box) to add a new Customer to the list. When the Customer Form (Figure 10) appears, fill in the Customer Name and enter any comments or notes on the Customer. Then click OK to accept the new Customer or click Cancel to close the form without accepting the new Customer. Edit Click Edit (right of the New button) to modify the selected Customer. When the Customer Form (Figure 10) appears, the Customer Name and Notes fields will be fill in with the selected Customer’s information. Modify the fields as needed and click OK to accept the changes or click Cancel to close the form without accepting the changes. Table 5 – Customer Configuration Options 20 MIT 1000 System User Guide V3.4 Micro Identification Technologies ® Upon clicking the New or Edit button associated with Customer, the Form shown in Figure 10 opens. To add a new or edit the Customer: 1. Enter the new name. 2. Enter any notes or comments. 3. Click OK to accept the new entry, or click Cancel to close the dialog without accepting the new entry. Figure 10 – Customer Information Entry Project Configuration To input a Project Name, follow the instructions in Table 6: Project List box New Click the Down Arrow to show the list of Projects that have already been entered for the selected Customer. Selecting a Project will allow the entered Tasks for that Project to be viewed or changed, and new Tasks added. The parameters for the selected Customer and Project are shown in the lower left of the form. Click New (right of the Project List box) to add a new Project for the selected Customer to the list. When the Project Form (Figure 11) appears, fill in the Project Number and/or Purchase Order Number and enter any comments or notes on the Project. Then click OK to accept the new Project or click Cancel to close the form without accepting the new Project. Edit Click Edit (right of the New button) to modify the selected Project. When the Project Form (Figure 11) appears, the Project Number, PO Number, and Notes fields will be filled in with the selected Project’s information. Modify he fields as needed and click OK to accept the changes for click Cancel to close the form without accepting the changes. Table 6 – Project Information Entry 21 MIT 1000 System User Guide V3.4 Micro Identification Technologies ® Upon clicking the New or Edit button associated with a Project, the Form shown in Figure 11 will open. To add a new or edit the Project: 1. Enter the new Project Number and/or 2. Enter a Purchase Order Number 3. Enter any notes or comments. 4. Click OK to accept the new entry, or click Cancel to close the dialog without accepting the new entry. Figure 11 – Project Information Entry Task Configuration To input a Task Name, follow the instructions in Table 7: Task List box New Click the Down Arrow to show the list of Tasks that have already been entered for the selected Customer and Project. Selecting a Task will allow the entered Samples for that Task to be viewed or changed, and new Samples added. The parameters for the selected Customer, Project, and Task are shown in the lower left of the form. Click New (right of the Task List box) to add a new Task for the selected Customer’s Project to the list. When the Task Form (Figure 12) appears, fill in the Task Number and/or Lot Number and enter any comments or notes on the Task. Then click OK to accept the new Task or click Cancel to close the form without accepting the new Lot Number. Edit Click Edit (right of the New button) to modify the selected Task. When the Task Form (Figure 12) appears, the Task Number, Lot Number, and Notes fields will be filled in with the selected Task’s information. Modify the fields as needed and click OK to accept the changes or click Cancel to close the form without accepting the changes. Table 7 – Task Configuration Options 22 MIT 1000 System User Guide V3.4 Micro Identification Technologies ® Upon clicking the New or Edit button associated with Task, the Form shown in Figure 12 will open: To add a new or edit the Task: 1. Enter the new Task Number and/or 2. Enter a Lot Number 3. Enter any notes or comments. 4. Click OK to accept the new entry, or click Cancel to close the dialog without accepting the new entry. Figure 12 – Task Entry Information Sample Configuration To input a Sample Name and other related information, follow the instructions in Table 8: Sample List box New Click the Down Arrow to show the list of Samples that have already been entered for the selected Customer, Project, and Task. The parameters for the selected Customer, Project, Task, and Sample are shown in the lower left of the form. Click New (right of the Sample List box) to add a new Sample for the selected Customer’s Task to the list. When the Sample Form (Figure 13) appears, fill in the Sample Name and enter any comments or notes on the Sample. Then click OK to accept the new Sample or click Cancel to close the form without accepting the new Sample. Edit Click Edit (right of the New button) to modify the selected Sample. When the Sample Form (Figure 13) appears, the Sample Name and Notes fields will be filled in with the selected Sample’s information. Modify the fields as needed and click OK to accept the changes or click Cancel to close the form without accepting the changes. Table 8 – Sample Configuration Options 23 MIT 1000 System User Guide V3.4 Micro Identification Technologies ® Upon clicking the New or Edit button associated with Sample, the Form shown in Figure 13 will open: To add a new or edit the Sample: 1. Enter the new Sample Name 2. Enter any notes or comments. 3. Click OK to accept the new entry, or click Cancel to close the dialog without accepting the new entry. Figure 13 – Sample Entry Information Show in the Lab Test Report The Lab Test Report always shows the name of the Sample tested. In addition, the User has the option of displaying the Customer Name, Project Name, PO Number, Task Number and Lot Number on the Lab Test Report simply by checking the appropriate box in the Configure Form as shown in Figure 14. Figure 14 – Configure Form – Show in Lab Report 24 MIT 1000 System User Guide V3.4 Micro Identification Technologies ® Chapter 4: MIT Vial Cleaning and Storage Sterilizing the MIT Vial Items Needed Autoclave Contaminated MIT Vial Spray bottle with 5% bleach Kimwipe Biohazard Bin with Biohazard Bag MIT Vial Holder Figure 15 – MIT Vial Holder Procedure 1. Place a Kimwipe on the tabletop. 2. Soak the Kimwipe with 5% bleach. 3. Remove the Parafilm and rubber band. a. Deposit the contaminated Parafilm into the Biohazard Bag. b. Place the rubber band from the contaminated MIT Vial onto the 5% bleached soaked Kimwipe. 4. Carefully place the contaminated vial on the MIT Vial Holder. 5. Place the MIT Vial Holder(s) (with vials) into the autoclave. 6. After all autoclaved vials have been processed, soak the collection of contaminated rubber bands on the 5% bleach soaked Kimwipe by spraying them with more 5% bleach. Note: Allow the rubber bands to sit untouched for at least 20 minutes. 7. The rubber bands may be reused after at least a 20 soaking time. 8. Autoclave the contaminated MIT Vials at 121˚C for 45 minutes. 9. Carefully remove the MIT Vial Holder after the sterilization cycle. 10. Allow the sterilized vials to cool down to room temperature (~37˚C, approximately 2 hours cool time). 11. Discard the sterile solution in each vial. 12. Rinse the vial with LPF water. 13. Proceed to the MIT Vial Cleaning Procedure. Warning The MIT Vials MUST be cleaned using the procedure below before they can be used for Identification Tests. MIT Vial Cleaning Items Needed Autoclave Sterile MIT Vial MIT Vial Holder LPF water Dish Soap Distilled White Vinegar solution of about 5% to 8% acetic acid in water and a pH of about 2.4 2 – 2000 mL beakers or equivalent. 25 MIT 1000 System User Guide V3.4 Micro Identification Technologies ® Procedure 1. In one beaker, make a soapy solution by filling it with 2 liters of lukewarm water and ONE drop of dish soap. 2. Stir the soap drop into solution without making excessive bubbles. 3. In the second beaker, make at least one liter of a 10% Vinegar solution of LPF water and distilled white vinegar. (Example: 900 mL of LPF water + 100 mL of Vinegar.) 4. Stir the LPF Water and Vinegar solution to mix. 5. Hold the MIT Vial firmly and fully submerge the MIT Vial in the soapy water so that the vial neck is pointing upward. 6. When the MIT Vial is fully filled with soapy water, lift the filled vial out, quickly turn the vial upside down, and VIGOROUSLY SHAKE the content out so the content ejects with three shakes. Note: Do not return the vial content back into the beaker. 7. Repeat step 6 at least five times. 8. Rinse and fill the MIT Vial to the top with LPF Water and discard the content with VIGOROUS SHAKING so that the content ejects with three shakes. 9. Repeat step 8 at least five times. 10. Fully submerge the MIT Vial in the 10% vinegar solution with the neck pointing upward. 11. When the MIT Vial is fully filled with the 10% vinegar solution, lift the vial with the vinegar content out, quickly turn the vial upside down, and VIGOROUSLY SHAKE the content out so the content ejects with three shakes. Note: Do not return the vial content back into the beaker. 12. Repeat step 11 at least five times. 13. Rinse and fill the MIT Vial to the top with LPF Water and discard the content with VIGOROUS SHAKING so that the content ejects with three shakes. 14. Repeat step 13 at least five times. 15. Place the MIT Vial upside down in an MIT Vial Holder to air dry. Storing MIT Vials When stored in a clean room that has HEPA filters in continuous operation, the MIT Vials can be stored on an MIT Vial Holder. When the MIT Vials are stored in other, dirtier environments, cover the vial opening with a 2” x 2” square of Parafilm and hold it in place with a #10 rubber band, then store it on an MIT Vial Holder. 26 MIT 1000 System User Guide V3.4 Micro Identification Technologies ® Chapter 5: Water Quality Test The MIT 1000 System requires LPF water for proper operation. MIT recommends that a water quality test be performed before every Identification Test. The water filled MIT Vial can be used for Identification Tests only if it passes the 30-second Water Test. If a test failure occurs, dump the water in the vial, then clean, rinse, and fill the vial as described in Step 1 of Chapter 7, on page 29. To perform a Water Test: 1. Clean, rinse, and fill the MIT Vial as described in Step 1 in Chapter 7, on page 29. 2. Place the MIT Vial in the MIT 1000 System as described in Step 9 in Chapter 7 on page 34 and click Water Test as shown in Figure 16. Click Water Test to begin a water quality test. Figure 16 – Water Test Upon clicking the Water Test button, the following changes occur in the MIT 1000 Application window: Both the Identify and Close Program buttons are removed from the dialog The word “Busy” with a flashing green light appears. The Progress Bar appears After a few seconds, the Sample Concentration Gauge (SCG) appears. The indicator in the Gauge should remain at the lowest condition (see Figure 17) during the test The progress bar counts down the test. The Check Vial monitor will flash red when the vial must be repositioned. The SCG shows particle concentration and should remain in the left red zone. The Busy indicator flashes green during the test. Click Stop Water Test to prematurely quit the water quality test. Figure 17 – Water Testing In Operation 27 MIT 1000 System User Guide V3.4 Micro Identification Technologies ® Warning To conduct a valid test, verify that the System Lid is seated properly and MIT Vial is not glowing red. Note: If the Check Vial indicator blinks during the Water Test, the MIT 1000 Application will terminate the test. This means that there is a scratch on the MIT Vial in the path of the laser beam. The easiest corrective action is to rotate the flask until the “glare” is eliminated (see Figure 28 & Figure 29) and then restart the Test. Water Test Results: If the water quality is good, the test will require 30 seconds to execute and the MIT 1000 Application will display “Water Test: Pass.” (refer to Figure 18) When the Program reports “Water Test: Pass,” the Sample Vial may be used for an Identification test. Figure 18 – Pass Water Test If the water quality is not adequate to conduct an Identification Test, the Water Test will self-terminate as soon as that judgment is determined and will display “Water Test: Fail.” (refer to Figure 19) When the Program reports “Water Test: Fail” The MIT Vial MUST NOT be used for an Identification test. Rinse and refill the vial and try again. Figure 19 – Fail Water Test 28 MIT 1000 System User Guide V3.4 Micro Identification Technologies ® Chapter 6: Sample Preparation Prior to preparing a sample for MIT 1000 Identification Testing, it is imperative that prior microbiological functions were performed to create a single species incubated in MIT approved 7 solid medium. Step 1: Fill the MIT Vial with Water Items Needed MIT Vial 2” x 2” square of Parafilm ~ 15 mL of LPF water #10 Rubber band Procedure 1. Using LPF water, a. b. c. d. Start rinsing the MIT Vial by holding the vial upside down in the water stream. Slowly rotate the vial in the LPF water stream to the vertical position. Fill the vial with LPF Water. Quickly turn the vial upside down and VIGOROUSLUY SHAKE the water out of the vial. This should be quick enough that it requires three shakes to empty the vial. e. Repeat steps c through d five times. 2. Fill the vial with LPF Water it as shown in Figure 20. When properly filled, the vial neck should be about half full. The System will operate properly as long as the level is above the vial neck bottom and below the top lip. Figure 20 – Fill the MIT Vial to the indicated “Fill” Level Warning Under-filling and overfilling the Vial may cause ID inaccuracies and overfilling may result in spillage. 7 Current MIT approved medium is BHI or TSA with 5% sheep blood. 29 MIT 1000 System User Guide V3.4 Micro Identification Technologies ® 3. Immediately center the Parafilm square, with the paper protected side down, over the top of the vial and press it into place forming a seal with the outside of the neck as shown in Figure 21. Secure, by double wrapping the vial neck with a #10 rubber band. Lift up the sides of the Parafilm, away from the round bottom. Figure 21 – MIT Vial with Parafilm Cover Warning Immediately cover the filled MIT Vial with the Parafilm (paper “protected side” down) over the lip to avoid air particulates from entering the Vial and contaminating the water. 4. Perform a Water Quality Test as described in Chapter 5:. Note: Perform Steps 2 & 3 within 1 hour after completing Step 1. Warning DO NOT use the LPF Water filled MIT Vial for an Identification Test if it does not pass the Water Quality Test. Step 2: Clean the Micro-Centrifuge Tube Items Needed 0.6 mL micro-centrifuge tube LPF Water Procedure Using LPF Water: 1. Rinse the outside of the tube first starting from the bottom. 2. Rinse the inside of the tube by repeating the following sequence at least five times: a. Completely fill the tube with LPF Water. b. Turn the tube upside-down and VIGOROIUSLY SHAKE out all of the water. Step 3: Fill the Micro-Centrifuge Tube with Water Items Needed 0.6 µL micro-centrifuge tube LPF Water Procedure 1. Immediately after rinsing the tube, fill the tube with about 0.2 mL (about 1/3 full) with LPF Water, Figure 22. 30 MIT 1000 System User Guide V3.4 Micro Identification Technologies ® Fill the tube with 0.2 mL of LPF Water. Figure 22 – Micro-Centrifuge Tube with 0.2 mL of LPF Water 2. Snap the micro-centrifuge tube cover closed. Warning To prevent random air particulates from entering the micro-centrifuge tube and contaminating the water, close the micro-centrifuge tube immediately after filling. Step 4: Collect a Test Sample Items Needed Bacteria in isolated colonies 1 µL sterile inoculating loop Biohazard Bin and Biohazard Bag Single colony Procedure Examine the culture plate (Note: Cultures should be less than 48 hours after first appearance on culture plate) and select the isolated colony to be identified. Then: 1. Place the culture plate upside down (lid down) in the BioSafety Cabinet. 2. Using aseptic techniques hold the culture plate in your hand and slowly lift the culture plate off the lid. 3. Remove a small portion of a single colony by lightly placing the loop at the edge of the colony and dragging the loop through the colony to collect organism cells, as shown in Figure 23. Note: Avoid collecting culture media. 4. Put the culture plate back on the lid. 5. Immediately proceed to Step 5. 31 Figure 23 – Collecting a Test Sample MIT 1000 System User Guide V3.4 Micro Identification Technologies ® Step 5: Prepare the Micro-Centrifuge Tube Suspension Items Needed Inoculating loop containing organism cells Micro-centrifuge tube from Step 3 Procedure While holding the inoculating loop that contains the organism cells: 1. Hold the water-filled micro-centrifuge tube in one hand. 2. Open the tube and tilt it no more than 45º making sure not to spill the contents. 3. Insert the inoculating loop into the water in the microcentrifuge tube and dislodge the sample into the water by agitating the loop in the water as shown in Figure 24 – Dislodge the Organism Cells into the Water in the MicroFigure 24. centrifuge Tube 4. Withdraw the loop and immediately close the tube. 5. Properly dispose of the contaminated loop in a Biohazard Bag. Step 6: Vortex the Sample Items Needed Micro-centrifuge tube with the organism cells in dilution from step 5. Vortex mixer Procedure 1. Vortex the micro-centrifuge tube for at least 20 seconds, Figure 25. 2. Proceed directly to Step 7. Note: To ensure optimum performance, do not delay proceeding to Step 7. 32 Figure 25 – Vortex the Microcentrifuge Tube MIT 1000 System User Guide V3.4 Micro Identification Technologies ® Step 7: Prepare the MIT Vial Suspension Items Needed Micro-centrifuge tube with vortexed organism cells (suspension) 0.5 - 10 µL adjustable pipette with tip Covered MIT Vial containing LPF Water from Step 1 Procedure 1. Always vortex the micro-centrifuge tube immediately before this step. 2. Remove the rubber band from the MIT Vial Parafilm cover. 3. Remove or gently lift one side of the Parafilm. 4. Pipette 1-µL of the suspension into the MIT Vial as shown in Figure 26. 5. Properly dispose of the used tip into a biohazard Figure 26 – Inoculating the Colony Dilution into the MIT Vial container. 6. Immediately re-cover the MIT Vial in the same manner as done in Step 1 (on page 29) and shown in Figure 21. Warning DO NOT retract water back into the micro-centrifuge tip. Warning DO NOT allow the LPF Water filled MIT Vial to remain uncovered for more than 30 seconds. Note: To ensure optimum performance, it is recommended that Steps 8 and 9 are completed within 1 hour of completing step 7. Step 8: Clean the MIT Vial Outside Surface Items Needed MIT Vial Kimwipes 70% IPA Procedure 1. Dampen a Kimwipe with 70% IPA. 2. Wipe the entire exterior of the spherical part of the MIT Vial. 3. Immediately dry the MIT Vial with a clean dry Kimwipe. 33 MIT 1000 System User Guide V3.4 Micro Identification Technologies ® Step 9: Place the MIT Vial into the MIT 1000 System Items Needed MIT Vial Procedure 1. Start the MIT 1000 Application. 2. Lift the lid. 3. Place the MIT Vial in the MIT 1000 System in an upright position as shown in Figure 27. 4. Rotate the MIT Vial and stop at a point where laser glare on the MIT Vial is minimal. See Figure 28 and Figure 29 for unacceptable and acceptable glare. 5. Replace the lid. 6. Proceed to Chapter 9 to conduct an Identification Test. Figure 27 – Placing the MIT Vial into the System Warning The MIT Vial neck must be vertical. Figure 28 – MIT Vial Incorrectly Oriented with Unacceptable Glare Figure 29 – MIT Vial Correctly Oriented with Acceptable Glare Warning The MIT 1000 System uses a Class IIIb laser with an output of up to 45 milliwatts. Direct eye contact with the laser beam may cause damage to your eye! 34 MIT 1000 System User Guide V3.4 Micro Identification Technologies ® Chapter 7: Performing an Identification Test This chapter will describe how to perform Identification Testing using the MIT 1000 Application. MIT 1000 Application Start-up Start the MIT 1000 Application by clicking the icon (Figure 1, Page 10) on the computer desktop. Identification Test Sample Information Upon clicking the Identify button, the Sample Information Form below will appear. As a prerequisite to the Identification Test, the User is required to enter the information in Figure 30. Click OK to accept the Sample Information and continue with the Identification Test. Click Cancel to abort the test. Required Sample Information 1. User 2. Sample source information 3. Gram Stain results Optional Sample Tracking Information 1. Media parameters 2. Sample incubation parameters 3. Comments G. Kessler MIT Foods 12-MITF-Burrito 002-Burrito-2 Cooking-2 Figure 30 – Identification Test Sample Information Form 35 MIT 1000 System User Guide V3.4 Micro Identification Technologies ® Identification Test Operation During the Identification Test, the MIT 1000 Application Display changes to show test status and progress (Figure 31): Identification Test progress indicator. Sample Concentration Gauge. Doing an Identification test indicator. Manual stop identification process button. Figure 31 – Identification Test Progress Display The Busy indicator appears and flashes green. The Identification Test progress indicator appears and will change as the test progresses. The SCG provides a real-time estimate of the concentration of the sample being tested. If the indicator is in the “blue” or “red” zone, it is recommended that the User take action as described in the “Indicator Explanations” in the next section. The Identify button changes to a Stop Identify button. Click the Stop Identify button to stop and cancel the Identification Test at any time during the identification process. The Close Program and Water Test buttons are hidden. When the Identification Test completes, the Display reverts to its original state (Figure 32) and the sample is identified in bold blue letters above the Close Program button. If the sample is an Species, Genus, or Subspecies not identified by one of the Active Identifiers, the MIT 1000 Application will display “Test Result: Unknown.” Identification test result Figure 32 – Identification Completion Display 36 MIT 1000 System User Guide V3.4 Micro Identification Technologies ® Identification Test Gauges and Indicators Identification Test Progress Indicator This indicator provides the User with a coarse estimate of the test completion progress. Once the progress has reached the halfway mark, completion may occur abruptly. Typically, the test process takes 2 minutes but occasionally may complete as quickly as 30 seconds or as long as 5 minutes. Note: The Identification Test will terminate automatically after 5-minutes and display in blue “Terminated: time out.” Sample Concentration Gauge (SCG) During the identification process, the MIT 1000 Application estimates the concentration of the sample being tested. The Sample Concentration Gauge (SCG) gives a real-time indication of this estimate. The gauge pointer will point in the middle of the green zone when the sample is properly made. Warning The identification process will terminate automatically if a test does not complete in five minutes time indicating that the Test Sample concentration was too low and the test accuracy is compromised. A new Test Sample must be made. Concentration Indicator Low Concentration Indication When the sample concentration is too low, (Figure 33) the SCG will point in the blue zone and the Concentration indicator will blink blue. If this condition persists, stop the identification process by clicking Stop Identify and prepare a new sample. Note: If the gauge pointer drifts in and out of the blue zone, the test will likely be performed properly but could take several minutes longer than usual to complete. When the Concentration light is blue and blinking, the sample concentration is too low. The Sample Concentration Gauge indicates the sample concentration is low. Figure 33 – Low Concentration Condition 37 MIT 1000 System User Guide V3.4 Micro Identification Technologies ® High Concentration Indication When the sample concentration is too high (Figure 34), the SCG indicator will point in the right side red zone and the Concentration Indicator will begin blinking red. If this condition persists, stop the identification process by clicking Stop Identify and prepare a new sample with less concentration. Note: It is permitted to have the gauge pointer drift into and out of the red zone. When the Concentration light is red and blinking, the sample concentration is too high. The Sample Concentration Gauge indicates the sample concentration is high. Figure 34 – High Concentration Display Warning The identification Progress will terminate automatically if the Low or High Concentration continues for more than 10 consecutive seconds indicating that the Test Sample was not made properly and may compromise the test accuracy. A new Test Sample must be made. 38 MIT 1000 System User Guide V3.4 Micro Identification Technologies ® Check Vial indicator When the Check Vial indicator begins blinking red (Figure 35), MIT Vial was positioned in the System such that a vial surface scratch or defect is in the path of the laser beam. This causes excessive glare and prevents the System from completing an Identification Test. The Check Vial indicator will blink red and the SCG will point to the far left red zone, Figure 35. After five seconds, the MIT 1000 Application will terminate the Identification Test and display the text “Terminated: vial glare” in blue, Figure 36. To correct this, reposition the MIT Vial. If the condition persists, a different MIT Vial must be used. When the Check Vial light is red and blinking, the MIT 1000 system laser is illuminating a scratch or defect on the Sample Vial surface. The vial must be repositioned to eliminate the excessive glare. Figure 35 – Check Vial Display during a Water Quality Test or Identification Test When the MIT 1000 Application detects vial glare, it terminates and displays the Vial Glare warning. Terminated: vial glare Figure 36. The MIT 1000 Application terminates the Water Quality Test or Identification Test and displays the Vial Glare warning when it detects vial glare. 39 MIT 1000 System User Guide V3.4 Micro Identification Technologies ® Chapter 8: Troubleshooting Condition MIT Cloud Light blinks red Probable Cause The System has no connection to the internet Your network Firewall prohibits the MIT 1000 Application from communicating on port 12000-12010 Ready Light blinks red System is not powered or cables are not properly connected The MIT 1000 System was powered on after the MIT 1000 Application was started MIT 1000 Application is corrupted TM Recommended Action 1. Verify that the MIT 1000 Computer has network access. 2. Configure your firewall to allow the MIT 1000 Application to have access to TCPIP Ports 12000-12010. 1. Verify that power on the MIT 1000 System is ON. 2. Verify cables are connected properly. 3. Turn on the power to the MIT 1000 System then Restart the MIT 1000 Application. 4. If items 1- 3 do not correct the problem, contact MIT Customer Service. Identifier list does not match with what was ordered Possible MIT Cloud configuration error 1. Consult MIT Customer Service. System does not Identify or frequently does not recognize any bacteria examined Power is off 1. Verify the System is powered on. 2. Run a Water Quality Test. 3. Verify the lid is seated properly on the System. 4. Verify the laser is operating – look for red glow with Lid up. 5. If none of the above solves the problem, contact MIT Customer Service. Water particulate concentration is too high MIT Vial is dirty Lid is not seated properly Laser is not operating Check Vial light blinks red or “Terminated: vial glare” is displayed The Identification or Water Test will terminate when this condition persists for more than 10 seconds and displays “Terminated: vial glare.” The laser beam is illuminating a scratch or other defect on the surface of the MIT Vial causing it to glow red The water in the MIT Vial contains too many particulates 40 1. Stop the Identification or Water Test. The test will automatically terminate after 5 seconds. 2. Rotate the MIT Vial until the red glare seen in the vial neck is not visible. 3. If 2 does not solve the problem, replace the MIT Vial with a new one. 4. Restart the Identification or Water Test. 5. If none of the above solves the problem, contact MIT Customer Service. MIT 1000 System User Guide V3.4 Micro Identification Technologies Condition Concentration light blinks red or “Terminated: high concentration” is displayed The Identification Test will terminate when this condition persists for more than 10 seconds and display “Terminated: high concentration”. Concentration light blinks blue or “Terminated: low concentration” The Identification Test will automatically terminate when this condition persists for more than 10 seconds and display “Terminated: low concentration”. Terminated: time out The Identification Test will automatically terminate an Identification Test if there is no result after 5 minutes and display “Terminated: time out.” Probable Cause ® Recommended Action Excessive concentration bacteria or foreign particles in the MIT Vial 1. 2. 3. Discard the Sample and make a new one. Re-test. If this does not solve the problem, contact MIT Customer Service. Too low concentration of bacteria in the MIT Vial 1. 2. 3. Discard the Sample and make a new one. Re-test. If this does not solve the problem, contact MIT Customer Service. The sample was contaminated with particles (agar, more than one species of bacteria, dirt, etc.) that prevented identification 1. 2. 3. Discard the Sample and make a new one. Re-test. If this does not solve the problem, contact MIT Customer Service. 41 MIT 1000 System User Guide V3.4 Micro Identification Technologies ® Appendix A - MIT Products Item MIT 1000 System Starter Kit Yearly Maintenance Software Upgrades Calibration Description MIT 1000 system Power supply module MIT Mini Notebook w/MIT 1000 Application Starter Kit Listeria spp IdentifierTM Micro centrifuge tubes Sterile loops Sample Vials Pipette tips Parafilm 2” X 2” squares MIT Vial Holder Catalog # 1000 1001 6,9, or 12 month 1002 1003 1004 E. coli Listeria spp Salmonella spp 10000 10001 10002 Trypticase Soy Agar (TSA) with 5% Sheep Blood, 15 x 100 mm plates, pack of 10 1.5 μL Micro centrifuge tubes, Locking lid/pack of 500 1 μL Loop, 96 Packs of 10 20001 Identifiers Supplies Plated media Micro centrifuge tubes Disposable loop Vial Caps Water replacement filters Pipette tips MIT Vials Pipette Volume Device Parafilm Power Supply Module Equipment MIT Computer Pipette Vortex Mixer MIT Vial Holder MIT Water filtration System 3 Stage 20002 20003 20004 20005 10 μL, Aerosol-barrier - 10 racks of 96 15 mL MIT 200 2” X 250 ft. roll MIT 1000 power supply 20006 20007 20008 20009 20010 Mini Notebook with MIT 1000 Application 0.5 to 10 μL variable Fixed Speed 6 Vail holder TBD Wall mounted filtration system periodically 30000 30001 30002 30003 30004 42 MIT 1000 System User Guide V3.4 Micro Identification Technologies ® Appendix B - Sample Test Report Customer MIT FoodsX System #: 000009 000020 Customer: Project Number: PO Number: Task Number: Lot Number: Sample Identifier: Test #: Identification Result: Laboratory Report Printed: 10/24/12 12/22/11 11:36 Customer MIT FoodsX Weekly Burrito Surveys 2011-54-0132 12-MITF Butcher Table Survey 002-Burrito 2 12/19/2011 Zone 3 Cooking-2 000412 000211 Listeria spp Comments: Selected Identifiers: Listeria spp Test Details: Test Time: User: Termination: Sample Details: Gram stain result: ___________________ User 2011-12-21 09:40:37 11:22:48 2012-10-23 george G. Kessler Normal Not performed _________ Date ___________________ Approval MIT 1000 RMID version 1.0 _________ Date Page 1 of 1 43 MIT 1000 System User Guide V3.4 Micro Identification Technologies ® Glossary µL Microliter Basic Laboratory Basic microbiology procedures that include microbial handling, culturing, Procedures disposing Calibration The method that uses calibrated polystyrene spheres to determine if the MIT 1000 is working properly Equipment required The Equipment needed to perform an Identification Test that is NOT supplied by MIT ID Identification Test IPA Isopropyl Alcohol Identification Result The name of the bacteria, sphere or Unknown organism determined by an Identification Test Identifier TM An MIT proprietary set of data that is used by the MIT 1000 System to identify the Genus, Species, or Subspecies of a bacterial specimen Identification Test The test performed by the MIT 1000 System to determine if the microbial sample being tested contains the bacteria or particle associated with the TM selected Identifiers . Inside the Box The MIT 1000 System list of equipment and materials that was included in your purchase order License Provides access to Identifiers . Visit the MIT web site for available TM Identifiers . Light Scattering The phenomena that occurs when a particle passes through the laser beam inside the MIT 1000 System TM LPF Water Low Particle Filtered Water. Typically, this is water that is the product of a water filtering system with a final filter of 0.1 micrometers absolute or smaller. The MIT 1000 Application Water Test function is the final decider on whether or not water can be used for Identification tests with the MIT 1000 System. Material required The Material needed to perform an Identification Test that is NOT supplied by MIT MIT website www.micro-identification.com mL Milliliter Notes Useful information or information that requires special emphasis Power Services The AC electrical power that is typical for your country of usage PSL Polystyrene Latex spheres MIT 1000 Application The program used to control the MIT 1000 System MIT 1000 System MIT 1000 Rapid Microbial Identification System 44 MIT 1000 System User Guide V3.4 Micro Identification Technologies ® MIT Vial The vessel used to prepare a sample and conduct an Identification Test – MIT Part Number 10007 MIT Vial Holder A device to hold the MIT Vials. Sample Test Log The Log used to store pertinent test information SCG Sample Concentration Gauge. The meter used to provide a visual assessment of the quality of the Sample made by the User. The Sample is considered acceptable if the pointer in the gauge is consistently in the Green area. Setting up the System The schematic to connect all of the sub-systems of the MIT 1000 System Soapy Water Solution Approximate ratio of 1 drop dish detergent (Dawn, Joy, etc.) to 2 liters of water Starter Kit Materials needed to for first operation of the MIT 1000 System Lid The flap on top of the MIT 1000 System cover used for placing and removing MIT Vials Warning Information to help avoid injuring the User, damaging the equipment, or reducing the System’s performance Water Test The test performed to verify that the water being used in the Sample to be tested has no more than 3 particles after a 5 minute test 45 MIT 1000 System User Guide V3.4 Micro Imaging Technology ® Index Configuration Culture Medium Customer General Functions Medium Project Sample Task UseTor Test Report Header 17 Button Functions Culture usage Customer Support Equipment Required Gauges 31 5 8 Sample Concentration 37 Collection Preparation Vortex 37 36 35 9 7 Test Identification Water Quality 35 27 Troubleshooting Underlined sentence User Guide Conventions 13 Logs and Reports Lab Test Recorded Log Information Sample Test Log Test Report 43 45 Set-up 39 38 37 37 License Additional License Purchase 31 29 32 Sample Test Report Soapy water System Indicators Check Vial High Concentration Low Concentration Test Progress 25 34 25 26 33 Sample Identification Test Gauges and Indicators Operation Performing Quick Reference 12 42 Cleaning Placement Sterilizing Storing Suspension Preparation 12 8 32 10 MIT Products MIT Vial Control Display Button Functions License 16 Material Required Micro-Centrifuge Tube Suspension MIT 1000 Application Display Button Functions MIT 1000 Application User Interface 19 20 18 19 21 23 22 20 Notes Warnings 24 14 13 15 Warnings 46 40 4 4 4 4 MIT 1000 System User Guide V3.4