1
Atari on an FPGA
A Design Project Report
Presented to the Engineering Division of the Graduate School
of Cornell University
in Partial Fulfillment of the Requirements for the Degree of
Master of Engineering (Electrical)
by
Daniel Beer
Project Advisor: Bruce Land
Degree Date: May 2007
Abstract
Master of Electrical Engineering Program
Cornell University
Design Project Report
Project Title: Atari on an FPGA
Author: Daniel Beer
Abstract:
This report presents a full redesign of Atari 2600 computer system using modern digital
design techniques and modern hardware. The system is designed to be synchronous and
modular, is implemented in Verilog and VHDL, and run on an Altera Cyclone II using a
VGA display. The hardware package chosen for this project is the Altera DE2
development board, which pairs an Altera Cyclone II chip with a number of useful
components. Almost all of the major components of the system have been designed from
functional descriptions and schematics. This includes the MOS 6532 RIOT chip and
Atari TIA chip that provide most of the needed functionality for the system. However, the
Atari’s CPU, a MOS 6507, was adapted from an open source project and sound hardware
was not implemented in this project. Other hardware made for this project includes an
NTSC to VGA converter, clock generator, bus controller, and software cartridge
emulator. Each piece of hardware was first tested separately, then combined into the full
system which was tested again. The original Atari software “Combat” was run on the
system, and performed well despite a few execution flaws.
Report Approved by
Project Advisor:
Date:
Executive Summary
The Atari 2600 is a computer system from the early 1980s. One of the first
gaming consoles, it provides an interesting look at early hardware architecture and
programming for a system with limited resources. However, few working units of the
original hardware are available today, preventing easy access to the system. Furthermore,
any schematics and design details for the system use outdated design methodologies and
refer to obsolete hardware, making it hard to reconstruct a working system using them.
This project attempts to redesign an Atari 2600 using functional descriptions of
the parts coupled with original Atari schematics of the system. Software and hardware
solutions are considered for the actual realization of the system, but a hardware design
was chosen for this project. The design is implemented using two industry standard
hardware programming languages, tailored to run on prototyping hardware, and use
standard VGA displays. In redesigning the system, the parts are made so that they are run
synchronized to a common clock and are able to be easily reused in other projects.
Testing is done on the module level and system level to verify correct behavior of
the redesigned parts. The final design is programmed onto a development board which
has buttons and switches mapped to the Atari’s controls. Original unmodified Atari
software is tested with the system and the execution is mostly correct. Small problems
with the video generation and sprite system are the only noticeable errors.
Design Problem
The Atari 2600 is a computer system whose design has become very impractical
to reimplement. When the system was first designed in the 1980s, the logic technologies
available required optimized design using practices that are now outdated. For example,
almost all counters in the original design are polynomial counters, used for their quick
update time. However, polynomial counters do not count in numerical order, making all
logic that relies on the count difficult to understand. Also, many different clock signals
and cascading output registers prevent synchronous analysis of the system. These
practices and others result in complex schematics detailing a partially asynchronous
design.
The Atari 2600 System
In addition to this, the schematics reference discontinued commercial parts that
exist today only as documentation. The design calls for video, memory, and timer chips
manufactured by the now defunct MOS Technologies company and Atari hardware
division. Useful documentation for these include Atari programmer’s manuals, hardware
specification sheets, and readily available analyses of the parts from the Atari
community.
The goal of this project is to recreate the design of the Atari 2600 using modern
synchronous design and current technologies. Synchronous designs allow for a more
robust and flexible system, as one can ensure correct operation of the system as long as
input clock requirements are met. The technologies used include hardware description
languages (Verilog/VHDL), field programmable gate arrays (FPGAs), phase locked loop
(PLL) clock generation, and the video graphics array (VGA) standard for video
generation. Further, this project aims to create a clear and well organized implementation
of the system that is easily understandable, and can be used in different contexts with few
changes.
System Requirements
The design project consists of a mostly functioning Atari 2600 implemented in
Verilog/VHDL running on an Altera DE2 development board and displaying on a VGA
monitor. All functionality of the original system is implemented except for the built in
sound processor, a decision made to simplify the scope of the project. In addition to that,
a open source version of the Atari’s main processor is used instead of being made as part
of the project. Intricacies in the system and lack of full documentation make some
features hard to implement completely, so fully correct execution is not required for all
features.
Range of solutions
Software
Emulation of computer systems in software on a host computer is an effective but
potentially wasteful technique. A software simulator can be made to imitate all parts of
the original computer system including the CPU, memory, and I/O. To properly emulate
a computer system requires much overhead including memory overhead and extra
processing to interpret the instructions from the original system to ones that can be
executed on the host system. For this reason, emulation can only be done on a host that
has significantly more processing power than the original system. However, emulation
allows easy access to unavailable computer architectures, and allows new features to be
built in such as debuggers, memory dumpers and graphical enhancements.
A number of software emulators exist for the Atari 2600, the most well known of
which is the Stella emulator. While many of these emulators provide exact execution of
Atari code, they do require a personal computer to host them.
Hardware
Using hardware to implement an existing computer design is another option. This
allows a solution that can run without a host computer, and allows for further
optimization of power, space, and speed.
Recreation of the actual Atari hardware is impossible today due to the financial
restrictions on small amounts of hardware. However, FPGAs allow custom hardware to
be cheaply synthesized and are used widely for prototyping hardware before it is
manufactured. Two approaches can be taken to create an Atari on an FPGA: accurate
recreation of the hardware or redesign of the system. No projects attempt to truly
replicate the original design of the system, but a number of projects have implemented a
system that functions like the original Atari, usually following the basic structure.
Technologies Used
HDLs and FPGAs
Hardware description languages (HDLs) allow hardware designers to implement
digital circuit designs using a high level structured programming language. Unlike most
software programming languages which only specify functionality, HDLs also allow the
programmer to describe timing of the design. This frees the designer to focus on creating
the high level system while the underlying hardware can be synthesized automatically.
The two languages used in this project, Verilog and VHDL, are very similar languages
with Verilog being slightly more abstract and VHDL giving a little more control over the
actual hardware that is instantiated.
Most HDLs have a method for creating wires and registers. Logic primitives such
as gates and buffers are connected together using these and organized into larger
functional blocks. Libraries of commonly used circuits are often available, such as
Altera’s Megafunction library, which has wizard programs to help build the part needed.
Field programmable gate arrays (FPGAs) constitute the next stage of the design
process. An FPGA is a piece of hardware that contains many on the fly reconfigurable
logic cells with flexible connections between them. An HDL design is synthesized down
to a configuration of logic cells then programmed to the FPGA. In this way, the FPGA
can be used to prototype an actual hardware implementation of the design or even be
included in the final design.
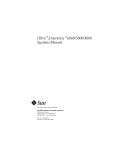
Altera DE2 Development Board (from the Altera website)
This project uses Verilog and VHDL along with the Altera Cyclone II FPGA on
an Altera DE2 Development board. These were chosen because they are widely used in
the industry today and easy to develop for.
PLL Clock Generation
Phase locked loops (PLLs) are circuits that can modulate the frequency of an
oscillating signal by a constant factor. This can be used to generate accurate frequencies,
but only for ones that can be obtained by an integer multiply and integer divide of the
original frequency. In other words, the frequency can only be multiplied by a rational
number.
The layout of a PLL is shown above. It operates by creating a feedback control
system, where the difference between the desired frequency and output frequency is
measured to get an error term, which is then used to modify the output. The phase
detector measures the difference in phase between the two signals, while the variable
oscillator responds to the phase difference and generates a new output signal. The
feedback loop will continue to modify the output frequency until the error term
disappears and the output frequency settles on the desired frequency.
VGA and NTSC
The video graphics array (VGA) and National Television Standards Committee
(NTSC) standards are widely used protocols for sending a video signal to a display. Both
define a way for a video producer to synchronize with the screen, blank the screen, and
display colors on the screen. The display is organized into lines that it scans across,
filling with incoming data. Horizontal sync signals are sent to tell the display to go to the
next line, while vertical sync signals tell the display to reset its position to the top of the
display.
VGA data consists of a 640 x 480 pixel screen sent to the display at a
communications rate of 25 Mhz with a variable refresh rate. NTSC runs at 3.58 Mhz and
uses a 262 line display, running at 30 frames per second. VGA colors are selected from a
preset palette of colors, while NTSC uses a color burst whose phase determines the colors
shown. The Atari is designed to create a NTSC signal, however this is converted to a
VGA signal in this project.
Design Techniques
Modular Design
This project is made up of a number of logical modules, with a top level module
which connects all the lower level modules. Each module has its own functionality and
can operate independently of the others, giving the system a hierarchical structure and
making it easier to understand. Modules can be reused in the project if needed, and also
exported and used as part of other projects. This also allows for a structured testing
process where a test suite can be made for each module, supplying it with test inputs and
checking for the correct output for those inputs.
Synchronous Design
Most digital circuits designed today in computer systems follow the technique of
synchronous design. The idea behind the technique is to reduce the entire system to a
state and logic to update the state. The update logic can include inputs to the system, and
output logic uses the current state to create the outputs. This gives the designer an easy
way to verify the correctness of their design: the resulting state machine can be
mathematically analyzed or simulated and checked for the correct outputs.
A diagram of a synchronous system is shown above. A global clock signal is
distributed throughout the system and used to signal all updates. The state is kept in
registers, and updated on every edge of the clock signal. Synchronous design simplifies
the timing analysis of the system. The maximum clock speed can be determined from the
amount of time the update logic takes to resolve. This can then be used to find the timing
requirements on the input and derive timing characteristics for the output.
High Level Design
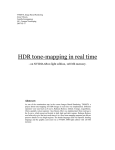
System Design
The full project block diagram is shown above. The Atari 2600 has three main
modules: the TIA chip which generates video, the RIOT chip which contains the RAM
and timers, and the 6507 CPU. All three modules share common data and address busses
which can also connected via a header to an external cartridge ROM. The CPU controls
the address bus, using it to address the cartridge ROM, the RAM, and various functions
on the modules like memory mapped I/O. All modules have an input and output data line
connected to the bus controller, which makes the correct connections between them
according to the address.
The system is driven by two clocks: a 3.58 Mhz pixel clock and a 1.19 Mhz bus
clock. The pixel clock runs at NTSC speed, running the video generator and pixel
counter. The bus clock runs the CPU, the bus communications, and all the module
operations. Both clocks are generated by the PLL clock generators from external clocks.
The RIOT and TIA chips handle controller input lines, letting the CPU read their
states. Video signals are generated in the TIA chips, passed to the NTSC to VGA
converter, then finally to the VGA controller to be output on the screen.
6507 CPU
The 6507 is a budget version of the widely used MOS6502 CPU from the MOS
Technology corporation. The 6502 processor is an 8-bit RISC processor that features an
accumulator, two general purpose registers, a stack pointer, and many different
addressing modes optimized for different situations. It has the ability to address 64
kilobytes of memory and supports both maskable and non-maskable interrupts. An enable
control allows the CPU to be halted. The 6507, on the other hand, can only address 8
kilobytes of memory and cannot respond to interrupts.
When the CPU is reset, it immediately jumps to the reset vector and begins
executing code. An instruction can take from 1 to 5 cycles to execute, as the processor is
able to overlap an instruction fetch and execution. Instructions are variable length, consist
of an opcode and possibly an immediate value, and can be 1 or 2 bytes long. One
interesting feature of the processor is that it has over 100 undocumented opcodes, many
of which vary depending on the manufacturing specifics of the chip. These opcodes were
used by Atari programmers to pack multiple operations into a single instruction.
As recreation of the processor is outside the scope of this project, an open source
VHDL version of the 6502 called T65 is used, found at Opencores.org. A 6507 shell
module is created to integrate the processor into the Atari design. The shell module
renames the I/O lines to match Atari nomenclature, leaves some of the address lines
floating, and ties the interrupt lines to ground.
RIOT Chip
The RIOT chip, or MOS Technology’s 6532, contains the Atari’s RAM, timers,
and partial I/O system. Communication with the CPU is done via an address line and data
line. There are 128 bytes of RAM on the chip, all of which can be read from and written
to. In addition there are 16 I/O lines, each of which can be set as an input or output using
an I/O direction register. An I/O data register is then used to either set the output levels or
read the input levels. One of the I/O lines can be used to detect input level edges and
signal an interrupt. Finally, the chip contains a counter and status register. The counter’s
update is tied to the input clock, but can be prescaled by 1, 8, 64, or 1024 counts. The
clock is continuously running, but can be reset by preloading it with a count. When the
count hits 0, an interrupt is signaled and a flag in the status register is raised.
The desired function of the chip is selected based on the address placed on the
address line. The ram is implemented using synchronous RAM on the FPGA. In the
original design, the I/O lines were implemented as single lines which could be tri-stated,
however in the project each I/O line has a separate output and input line. These I/O ports
are used primarily for controller direction input and console switches.
Design of the RIOT chip was done from the functional specifications given in the
MOS 6532 data sheet. It contains address assignments, high level descriptions of the
different functions the chip can perform, and timing diagrams which show the necessary
timing characteristics of the inputs and outputs. A module was created for the project that
is functionally identical to the MOS 6532.
The layout of the redesigned RIOT chip is shown above. The module contains a
synchronous memory module, timer unit and I/O registers, each with enable lines
controlled by the address input. A multiplexer controlled by the address input selects the
value to place on the output line. The timer is held in a register and a state machine and
prescale counter are used to update the timer. The I/O registers are updated every clock
cycle, and the status register is updated based on the I/O lines and the counter.
TIA Chip
The TIA chip, a custom chip from Atari, provides the Atari’s sprite and video
generation, sound generation, and extra I/O capabilities. Access to the TIA chip is done
using the shared address bus and data busses. Like the RIOT chip, the function of the
chip is selected by the address. Most addresses access registers that change the TIA
behavior, while a few trigger events when the address is strobed or written to. The audio
generation circuits are outside of the scope of this project, and as such are not discussed.
The video generator is effectively a shift register that can be loaded in parallel
with the screen objects. Video lines loaded into the TIA are constantly sent out to the
display at the correct speed, along with the horizontal sync signal needed to synchronize
the display to the video signal. Vertical sync signals must be manually triggered by the
Atari programmer as well as vertical blank signals. The Atari creates frames that are
160x192 pixels with 68 pixels of horizontal blanking per line, 40 lines of vertical sync
and vertical blank per frame, and 30 lines of overscan per frame.
Screen objects can include two 8 pixel wide sprites, a ball, two missiles, and a
background image or playfield. For every scanline the Atari programmer loads single line
sprite slices, ball and missile graphics, and a slice of the playfield into the TIA for each
line. The ball and missile graphics are picked from a list of preset graphics. The position
of each of these objects on the scanline can be changed, as well as their colors and
ordering. The graphics can be stretched and duplicated, while the playfield can be
reflected. Also, a delay bit allows graphics to be loaded but delayed to the next scanline.
The TIA performs collision detection between all the screen objects. If two
objects are drawn on the same pixel, a specific bit in the collision latch is set to high
depending on what layers the two objects are on. The collision latch register can be read
by the programmer to check for collisions.
Another feature the TIA provides is synchronization control. Synchronizing the
CPU with the video output is very important to proper execution of the software. The
main method the TIA provides is to halt the processor until the beginning of the next
scanline. An Atari programmer triggers this by strobing the WSYNC address, after which
they can be guaranteed that the next instruction executed corresponds to the next
scanline.
The TIA provides two special types of I/O ports for specific purposes. The first
are the two latched input ports, which latch to a low input until they are reset to high.
These are used for the controller button inputs, so the programmer can check if the user
pressed a button even if the button was not held down. There are also two dumped inputs,
which are normally pulled to logic low internally in the TIA. When they are triggered by
the programmer, the pull-down is disconnected allowing the line to be pulled externally
to logic high. The level of the line can then be read, allowing the programmer to check
how long it takes for the line to be pulled high and effectively determine the capacitance
on the port. This is used for to determine the state of a paddle controller connected to the
port, as the paddle consists of variable capacitor connected to a knob.
The design of the TIA module used in this project is primarily based off of the
Stella Programmer’s Guide, the main source book for Atari programmers. It contains a
high level description of each component in the TIA as well as tips on how to use each
part in Atari software. Also listed inside are tables of register listings, possible settings
and their meaning.
A block diagram of the TIA module is shown above. A horizontal counter keeps
track of the current location in the scanline. Settings for the video line are loaded into
screen object registers and pixel logic uses these registers to select the correct color for
each pixel. Like in the RIOT module, enable lines on the registers are connected to the
address input to selectively update the registers while the output register’s value is
selected using a multiplexer.
The pixel generation logic module is made to test if a screen object is on a pixel.
Objects can be stretched by a factor of 2 or 4, and can be duplicated a number of ways
across the screen. The inputs the module takes are the pixel position, object position,
object width, object duplication parameters and object graphic. The pixel position and
object position are tested to make sure the pixel can fall within the object. Next, the
object position is subtracted from the pixel position to get an index into the object’s
pixels. This object index is shifted down and checked against a mask table to make sure a
copy of the object should appear at this position. Finally, the object index is checked
against the object graphic to see if this pixel should be on. If all three tests pass, the
module gives an output of 1.
Bus Controller
In the original Atari, all the modules used the same data bus for reading and
writing with the help of tri-state buffers that removed their connection to the bus if they
were not being addressed. This relies on special hardware and can lead to line contention
on the data bus. Therefore, in the updated design, each module has its own input and
output data bus which is fed into the bus controller. Multiplexers are used to make
connections between the input and output data busses based on the value of the address
line.
Clock Generator
Execution of the Atari code and video generation rely on steady and accurate
global clocks. This is because the software written for the system is timed on a cycle by
cycle basis, with programmers required to count cycles when writing the code. For
example, the Atari video kernel is run in software, requiring exact synchronization with
the NTSC clock to display video on the screen.
The clock generator expects a 27 Mhz signal as an input. It then uses two PLLs to
multiply the clock by 17/8 and 17/24, generating 57.375 Mhz and 19.125 Mhz clock
signals. These are then divided by 16 using a 16 bit shift register where a bit is shifted
through before the output clock is negated. The final clock signals generated are very
close to 3.58 Mhz and 1.19 Mhz, the required values.
Color Table, NTSC to VGA Converter and VGA Controller
Video is generated in NTSC format by the Atari, but the system uses a VGA
display so the signal must be converted to VGA. Since VGA and NTSC run at different
clock rates, the pixel data must be stored in an intermediate format as it is impossible to
synchronize the two formats.
The converter works by emulating a screen. It keeps an NTSC size copy of the
current screen image in memory, filling in pixels as they come out of the Atari each pixel
clock. Since blanking signals are shown between lines and frames, the converter uses
them to find the ends of lines and frames and move it’s current pixel location
accordingly. The VGA controller then accesses this stored screen image and encodes a
VGA signal based on it.
This project uses a premade VGA controller provided by Altera. Because NTSC
has one fourth the number of pixels in a scanline as VGA, every four consecutive VGA
pixels are read from the same stored image pixel. The pixel colors stored in the SRAM
are indexes in an Atari color table. They must be passed into the color table to convert
them to RGB values, which are then passed to the VGA controller.
The screen image is too large to fit in memory on the FPGA, so the external
SRAM chip of the DE2 board is used. Since the SRAM only has one read/write port, a
state machine takes care of synchronizing accesses to it. When the VGA controller is not
blanking or syncing and needs access to the data, it is given access to the address and data
port of the SRAM so it can read pixels out. Otherwise, the NTSC to VGA converter has
access to the SRAM, filling the image with pixels. Pixels generated by the NTSC to VGA
converter are first placed in a circular buffer so they are not lost when the VGA controller
has access to the SRAM.
Game Cartridge
The basic Atari software cartridge is a simple addressable ROM chip containing 2
kilobytes or 4 kilobytes of memory, the largest amount of contiguous memory
addressable using the address lines. As the Atari got more mature, companies started
packing more into the cartridge including extra memory that could be bank switched,
more RAM, or even special processing units. Bank switching allows the Atari to address
more memory by separating the memory into 4 kilobyte banks, then specifying a special
address that can be used to switch the banks into the main address space. Using this
method, as much as 128 kilobytes of data were fit into a single Atari cartridge, though
only 4 kilobytes were accessible at a time.
For this project, 2 kilobyte and 4 kilobyte cartridge modules were created by
instantiating a block of ROM in the FPGA. The main difference between the two is that
the 2 kilobyte cartridge acts like a 4 kilobyte cartridge where the first half and second half
of the ROM are mirrors of each other.
DE2 Testbench
While the system is made general enough to use with many FPGA types, a test
bench must be made to tailor the system to the hardware that this project uses: the Altera
DE2 development board. This board has a number of useful components for the project
including a Cyclone II FPGA, VGA connector, external SRAM, pushbuttons and
switches. This testbench connects the NTSC to VGA controller data port to the SRAM
and the VGA controller to the VGA connector. The switches and pushbuttons are
connected to the data ports on the TIA and RIOT modules. Finally, a pushbutton is
connected to the global reset signal, a signal that resets all the components of the Atari
and restarts the PLLs.
Results
Testing and Results
Each component was first tested by itself to verify correctness. A sample system
was made with only a RIOT module in it, and test inputs were passed in while the outputs
were verified. Next, the same was done with the TIA module, setting up test scanlines
then manually checking the output to make sure the correct pixels were generated. The
VGA generation units were fed with a sample synthesized NTSC signal and the output on
the VGA display was verified.
After the components were verified, they were connected together in the testbench
using the original top level Atari schematics as a guide. Software was loaded into the
system by placing it in the cartridge module, and testing was done on the system as a
whole. This was done mostly by tracing the execution of the program and analyzing
various wires inside the design, verifying them for the correct values. The Altera
SignalTap module, a logic analyzer that can be included in the system, allowed these
values to be extracted, stored in a log and verified.
The test program used was an original unmodified Atari game, Combat. This
game was used as it is very prolific and many disassemblies and analyses are available
online for it. The game consists of two players steering enemy tanks and firing missiles at
each other. Execution could be traced one instruction at a time, while the state of the
system could be verified so it matched the analysis of what the instruction should do.
While the original cartridge was available and could have been connected directly to the
FPGA, there was insufficient time to build a header for it. Therefore, a binary capture of
the cartridge was used instead, it’s contents programmed into the cartridge module on the
FPGA.
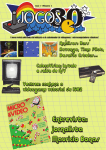
Finally, a test of gross functionality was done with only the DE2 board and a
VGA monitor. The Atari system was used to play Combat and test the actual gameplay.
Most features worked correctly: the game could be run, screen objects were displayed on
the VGA screen, controls could be used to play the game, and the game seemed to
execute correctly in general. A photo of the test display is shown below.
Incorrect
missile
placement
Too many
scanlines
Stretched
sprites
There were a few problems with the final test, all of which are highlighted on the
photo above. Debugging the entire system is time consuming and involved, as it involves
analyzing millions of instructions per second. Even a scanline consists of hundreds of
instructions and can be hard to isolate.
The first problem was that too many scanlines were being drawn by the Atari per
frame, causing the bottom of the display to be cut off. In addition to this, execution of the
game was slow, running at less than 30 frames per second. Some scanlines were
obviously doubled where they shouldn’t have been, stretching parts of the sprites
vertically.
This symptom was very hard to diagnose, as it could be caused by many parts of
the Atari system. The problem seems to be caused by a WSYNC signal behaving
improperly: if a WSYNC is signaled at the beginning of the next scanline instead of
being at the end of the scanline before, the scanline will be doubled and a scanline worth
of time will be wasted. One possible cause of this is that the CPU might not be cycle
accurate, however it was not created as part of this project and debugging of it proved to
be too hard. It is also possible that the WSYNC signal is not implemented properly,
however closer debugging has turned up no specific problems. Finally, the NTSC to
VGA converter might be doubling lines, but this would not account for the slow down of
the software.
The other problem with the system is improper missile behavior. In the Combat
game, missiles should remain stationary until they are launched. However, the missiles
would move in a vertical line until they were launched. Since the vertical placement of
the missile is determined by the software, this problem was also deemed a CPU problem
pertaining to incorrect execution of an instruction.
Conclusions and Future Work
In this project, the Atari 2600 was redesigned using modern design techniques
and technologies. The resulting system was programmed onto an Altera DE2
development board and tested with original Atari software. Tests showed that the system
has all of the needed functionality to properly execute the software, and only a few minor
problems exist in the implementation.
Future work that could be done on the project includes an extension of the
hardware part of the project to include connections for Atari cartridges and controllers.
References
[1] “6502 Introduction”. http://www.obelisk.demon.co.uk/6502/
[2] “Atari 2600 Schematics – NTSC”.
http://www.atariage.com/2600/archives/schematics/index.html
[3] Wright, Steve. “Stella Programmer’s Guide”. Dec 1979.
http://www.urchlay.com/stelladoc/v2/
[4] “Definitive Combat Disassembly”.
http://www.atariage.com/2600/archives/combat_asm/dicombat.asm
[5] “Atari 2600 Specifications”. http://nocash.emubase.de/2k6specs.htm
User’s Manual
This project requires Altera Quartus II 6.0 or higher to compile, and an Altera
DE2 development board to run on. Since this project relies on a number of pieces of other
software, these must be retrieved before the compilation.
1)
Download the T65 CPU package from opencores.org which can be found at
http://www.opencores.org/projects.cgi/web/t65/ and decompress the archive. Copy the
following files from the archive’s t65\rtl\vhdl directory to the project’s 6502 directory:
T65.vhd, T65_ALU.vhd, T65_MCode.vhd, T65_Pack.vhd.
2)
Download the DE2 System package from http://www.terasic.com/downloads/cd-
rom/de2/ and decompress the archive. Copy the following files from the archive’s
DE2_demonstrations\DE2_Default
directory
to
the
project’s
VGA
directory:
VGA_Audio_PLL.v, Reset_Delay.v. Then, copy the following files from the archive’s
DE2_demonstrations\DE2_Default\VGA_Controller directory to the project’s VGA
directory: VGA_Controller.v, VGA_Param.h.
3)
Software to be loaded into the compiled Atari must be placed in the project’s root
directory. It should be in Intel HEX format and named cartridge.hex. If the software you
have is in binary format, it can be converted to Intel HEX format using the binex
software found at http://home.hetnet.nl/~newlife-software/Binex/binex.htm . The project
is set up to use 2k Atari cartridges, but this can be switched to use the 4k cartridge
module by editing MySystem.v.
4)
Next, open the project in Quartus II and make sure that the top level module is
MySystem.v. Compile the project and program it to a DE2 board. Connect a VGA
monitor to the VGA connector.
The controls are as follows:
Select: Pushbutton 0
Start: Pushbutton 1
Reset: Pushbutton 3
Color/BW Selection: Switch 0
Difficulty Selection: Switches 1-2
Joystick A: Switches 3-7
Joystick B: Switches 8-12
Appendix: Diagrams and Code Listing
The following is an overview of the code files created for the project and a short
description of each. Block diagrams from the text are shown after the files they were
created from. The code listing for the files is shown after the overview.
MySystem.v: Top level system for synthesis and programming on a DE2 board.
MySystemSim.v: Top level system for simulation purposes. This can be run in the
Quartus II simulator by supplying it with the necessary clocks and
inputs.
Atari2600.v: Atari system module. Expects clock, controller and switch inputs and a
ROM port. Outputs are the video signal and NTSC control signals.
RIOT.v: Redesign of the MOS 6532 chip. Provides RAM, I/O and timers to the Atari.
RIOT.h: Header file that contains useful definitions for the RIOT module.
TIA.v: Redesign of the Atari TIA chip. Provides the Atari with video generation, sound
generation and I/O.
TIA.h: Header file that contains useful definitions for the TIA module.
TIAColorTable.v: Synchronous color lookup table that maps the Atari indexed colors to
RGB.
ClockDiv16.v: Clock divider used to generate Atari clocks. Divides the clock by 16
counts.
MOS6507.v: Wrapper for a 6502 CPU module that emulates the MOS 6507.
The following files are part of the code created for the project, but their listing is
not included in the project. This is because these files were generated by the design
software and do not provide any information as hardware descriptor language files.
AtariClockGenerator.v: Clock Generator using PLL Megafunction
Cartridge2k.v: Cartridge ROM instantiation using Synchronous RAM Megafunction
Cartridge4k.v: Cartridge ROM instantiation using Synchronous RAM Megafunction
MySystem.v
/*
1/5
Atari on an FPGA
Masters of Engineering Project
Cornell University, 2007
Daniel Beer
MySystem.v
Top level system for synthesis and programming on a DE2 board.
*/
module MySystem(
////////////////////
CLOCK_27,
CLOCK_50,
////////////////////
SRAM_DQ,
SRAM_ADDR,
SRAM_UB_N,
SRAM_LB_N,
SRAM_WE_N,
SRAM_CE_N,
SRAM_OE_N,
////////////////////
VGA_CLK,
VGA_HS,
VGA_VS,
VGA_BLANK,
VGA_SYNC,
VGA_R,
VGA_G,
VGA_B,
TD_RESET,
KEY,
LEDG,
LEDR,
SW,
HEX0, HEX1, HEX2, HEX3,
HEX5, HEX6, HEX7);
Clock Input
////////////////////
27 MHz
50 MHz
SRAM Interface
////////////////
//
SRAM Data bus 16 Bits
//
SRAM Address bus 18 Bits
//
SRAM High−byte Data Mask
//
SRAM Low−byte Data Mask
//
SRAM Write Enable
//
SRAM Chip Enable
//
SRAM Output Enable
VGA
////////////////////////////
//
VGA Clock
//
VGA H_SYNC
//
VGA V_SYNC
//
VGA BLANK
//
VGA SYNC
//
VGA Red[9:0]
//
VGA Green[9:0]
//
VGA Blue[9:0]
// 27 Mhz Enable
// Push Buttons
// Green LEDs
// Red LEDs
// Switches
HEX4,
// 7−Segment displays
////////////////////////
Clock Input
input
CLOCK_27;
input
CLOCK_50;
////////////////////////
SRAM Interface
inout
[15:0] SRAM_DQ;
output [17:0] SRAM_ADDR;
output
SRAM_UB_N;
output
SRAM_LB_N;
output
SRAM_WE_N;
output
SRAM_CE_N;
output
SRAM_OE_N;
////////////////////////
VGA
output
VGA_CLK;
output
VGA_HS;
output
VGA_VS;
output
VGA_BLANK;
output
VGA_SYNC;
output [9:0]
VGA_R;
output [9:0]
VGA_G;
output [9:0]
VGA_B;
output
TD_RESET;
input
output
output
input
[3:0]
KEY;
[8:0] LEDG;
[17:0] LEDR;
[17:0] SW;
//
//
////////////////////////
//
27 MHz
//
50 MHz
////////////////////////
//
SRAM Data bus 16 Bits
//
SRAM Address bus 18 Bits
//
SRAM High−byte Data Mask
//
SRAM Low−byte Data Mask
//
SRAM Write Enable
//
SRAM Chip Enable
//
SRAM Output Enable
////////////////////////////
//
VGA Clock
//
VGA H_SYNC
//
VGA V_SYNC
//
VGA BLANK
//
VGA SYNC
//
VGA Red[9:0]
//
VGA Green[9:0]
//
VGA Blue[9:0]
//
output [6:0] HEX0, HEX1, HEX2, HEX3, HEX4, HEX5, HEX6, HEX7;
// Turn off
assign HEX0
assign HEX1
assign HEX2
assign HEX3
assign HEX4
all LEDs
= 7’h7F;
= 7’h7F;
= 7’h7F;
= 7’h7F;
= 7’h7F;
Pushbutton[3:0]
MySystem.v
assign HEX5 = 7’h7F;
assign HEX6 = 7’h7F;
assign HEX7 = 7’h7F;
assign LEDG = 0;
assign LEDR = 0;
// Turn on the 27 Mhz clock
assign TD_RESET = 1’b1;
// Atari System
wire ATARI_CLOCKPIXEL, ATARI_CLOCKBUS;
wire [7:0] ATARI_COLOROUT;
wire ATARI_ROM_CS;
wire [11:0] ATARI_ROM_Addr;
wire [7:0] ATARI_ROM_Dout;
wire ATARI_HSYNC, ATARI_HBLANK, ATARI_VSYNC, ATARI_VBLANK;
wire ATARI_SW_COLOR, ATARI_SW_SELECT, ATARI_SW_START;
wire [1:0] ATARI_SW_DIFF;
wire [4:0] ATARI_JOY_A_in, ATARI_JOY_B_in;
wire RES_n;
Atari2600(.CLOCKPIXEL(ATARI_CLOCKPIXEL), .CLOCKBUS(ATARI_CLOCKBUS),
.COLOROUT(ATARI_COLOROUT), .ROM_CS(ATARI_ROM_CS),
.ROM_Addr(ATARI_ROM_Addr), .ROM_Dout(ATARI_ROM_Dout),
.HSYNC(ATARI_HSYNC), .HBLANK(ATARI_HBLANK), .VSYNC(ATARI_VSYNC),
.VBLANK(ATARI_VBLANK), .RES_n(RES_n), .SW_COLOR(ATARI_SW_COLOR),
.SW_DIFF(ATARI_SW_DIFF), .SW_SELECT(ATARI_SW_SELECT),
.SW_START(ATARI_SW_START), .JOY_A_in(ATARI_JOY_A_in),
.JOY_B_in(ATARI_JOY_B_in));
// Cartridge module
Catridge2k
#(.romFile("cartridge.hex"))
(.address(ATARI_ROM_Addr[10:0]),
.clken(ATARI_ROM_CS),
.clock(ATARI_CLOCKBUS),
.q(ATARI_ROM_Dout));
// Uncomment this block to use 4k cartridges
/*
Catridge4k
#(.romFile("cartridge.hex"))
(.address(ATARI_ROM_Addr),
.clken(ATARI_ROM_CS),
.clock(ATARI_CLOCKBUS),
.q(ATARI_ROM_Dout));
*/
// Clock generation modules
wire ATARI_CLOCKPIXEL16, ATARI_CLOCKBUS16;
wire DLY_RST;
AtariClockGenerator (
.areset(~DLY_RST),
.inclk0(CLOCK_50),
.c0(ATARI_CLOCKPIXEL16),
.c1(ATARI_CLOCKBUS16));
ClockDiv16(.inclk(ATARI_CLOCKPIXEL16),
.outclk(ATARI_CLOCKPIXEL),
.reset_n(RES_n));
ClockDiv16(.inclk(ATARI_CLOCKBUS16),
.outclk(ATARI_CLOCKBUS),
.reset_n(RES_n));
// Peripherals
assign RES_n = DLY_RST;
assign ATARI_SW_COLOR = SW[0];
assign ATARI_SW_SELECT = KEY[0];
assign ATARI_SW_START = KEY[1];
2/5
MySystem.v
3/5
assign ATARI_SW_DIFF = SW[2:1];
assign ATARI_JOY_A_in = ~SW[7:3];
assign ATARI_JOY_B_in = ~SW[12:8];
// NTSC to VGA converter
// Circular pixel buffers to temporarily store pixel data when the
// VGA controller has control of the SRAM
reg [7:0] pixelColor[511:0];
reg [8:0] pixelX[511:0], pixelY[511:0];
reg [8:0] curWriteIndex, curReadIndex;
// NTSC Emulator
reg [7:0] ATARI_Video_PixelX;
reg [8:0] ATARI_Video_PixelY;
reg R_ATARI_HBLANK;
reg [7:0] R_ATARI_COLOROUT;
always @(negedge ATARI_CLOCKPIXEL)
begin
// Registered signals
R_ATARI_HBLANK <= ATARI_HBLANK;
R_ATARI_COLOROUT <= ATARI_COLOROUT;
if (~RES_n)
begin
ATARI_Video_PixelX <= 8’d0;
ATARI_Video_PixelY <= 9’d0;
curWriteIndex <= 9’d0;
end
else begin
// Use the end of the horizontal blanking signal to find the end of the
// scanline.
if (ATARI_HBLANK)
begin
ATARI_Video_PixelX <= 8’d0;
// At the end of a scanline, move down one scanline
if (~R_ATARI_HBLANK & ~ATARI_VBLANK)
ATARI_Video_PixelY <= ATARI_Video_PixelY + 9’d1;
end
// If we are not blanking, go to the next pixel in the scanline.
else
ATARI_Video_PixelX <= ATARI_Video_PixelX + 8’d1;
// Use the vertical blanking signal to find the end of the frame.
if (ATARI_VBLANK)
ATARI_Video_PixelY <= 9’d0;
// Write the pixel location and color to the circular buffer
pixelColor[curWriteIndex] <= R_ATARI_COLOROUT;
pixelX[curWriteIndex] <= {1’b0, ATARI_Video_PixelX};
pixelY[curWriteIndex] <= ATARI_Video_PixelY;
curWriteIndex <= curWriteIndex + 9’d1;
end
end
// VGA Controller
wire
VGA_CTRL_CLK;
wire
AUD_CTRL_CLK;
wire [9:0]
mVGA_R;
wire [9:0]
mVGA_G;
wire [9:0]
mVGA_B;
wire [19:0]
mVGA_ADDR;
wire [9:0] Coord_X, Coord_Y;
Reset_Delay
;
r0
(.iCLK(CLOCK_50),.oRESET(DLY_RST), .iRESET(KEY[3])
VGA_Audio_PLL
p1
(.areset(~DLY_RST),.inclk0(CLOCK_27),.c0(VGA_CTRL_CLK),
.c1(AUD_CTRL_CLK),.c2(VGA_CLK) );
VGA_Controller
u1
(
//
Host Side
)
MySystem.v
4/5
.iCursor_RGB_EN(4’b0111),
.oAddress(mVGA_ADDR),
.oCoord_X(Coord_X),
.oCoord_Y(Coord_Y),
.iRed(mVGA_R),
.iGreen(mVGA_G),
.iBlue(mVGA_B),
//
VGA Side
.oVGA_R(VGA_R),
.oVGA_G(VGA_G),
.oVGA_B(VGA_B),
.oVGA_H_SYNC(VGA_HS),
.oVGA_V_SYNC(VGA_VS),
.oVGA_SYNC(VGA_SYNC),
.oVGA_BLANK(VGA_BLANK),
//
Control Signal
.iCLK(VGA_CTRL_CLK),
.iRST_N(DLY_RST)
);
// SRAM registers and controls
reg [17:0] addr_reg; // Memory address register for SRAM
reg [15:0] data_reg; // Memory data register for SRAM
reg we;
// Write enable for SRAM
assign
assign
assign
assign
assign
assign
assign
SRAM_ADDR
SRAM_DQ =
SRAM_UB_N
SRAM_LB_N
SRAM_CE_N
SRAM_WE_N
SRAM_OE_N
= addr_reg;
(we)? 16’hzzzz : data_reg ;
= 0;
= 0;
= 0;
= we;
= 0;
// hi byte select enabled
// lo byte select enabled
// chip is enabled
// write when ZERO
//output enable is overidden by WE
// Connect the color table to the SRAM
wire CT_clk;
wire [3:0] CT_lum;
wire [3:0] CT_hue;
wire [1:0] CT_mode;
wire [23:0] CT_outColor;
TIAColorTable(.clk(CT_clk), .lum(CT_lum), .hue(CT_hue), .mode(CT_mode),
.outColor(CT_outColor));
assign CT_clk = ~VGA_CTRL_CLK;
assign CT_lum = SRAM_DQ[3:0];
assign CT_hue = SRAM_DQ[7:4];
assign CT_mode = 2’b00;
// Show
assign
assign
assign
the color table output on the VGA
mVGA_R = {CT_outColor[23:16], {2{CT_outColor[23:16]!=2’b0}}} ;
mVGA_G = {CT_outColor[15:8], {2{CT_outColor[15:8]!=2’b0}}} ;
mVGA_B = {CT_outColor[7:0], {2{CT_outColor[7:0]!=2’b0}}} ;
// State machine to synchronize accesses to the SRAM
wire syncing;
assign syncing = (~VGA_VS | ~VGA_HS);
always @(posedge VGA_CTRL_CLK)
begin
if (~RES_n)
begin
// Clear the screen
addr_reg <= {Coord_X[9:2],Coord_Y[9:1]} ;
we <= 1’b0;
data_reg <= 16’h0000;
curReadIndex <= 9’d0;
end
// If we are syncing, read pixels from the circular buffer and write them to
// the SRAM
else if (syncing)
begin
addr_reg <= {pixelX[curReadIndex],pixelY[curReadIndex]};
we <= 1’b0;
data_reg <= {8’b0,pixelColor[curReadIndex]};
curReadIndex <= curReadIndex + 9’d1;
end
MySystem.v
// When the VGA controller needs the SRAM, retreive pixels from SRAM
else
begin
addr_reg <= {Coord_X[9:2],Coord_Y[9:1]} ;
we <= 1’b1;
end
end
endmodule
5/5
MySystemSim.v
/*
1/1
Atari on an FPGA
Masters of Engineering Project
Cornell University, 2007
Daniel Beer
MySystemSim.v
Top level system for simulation purposes. This can be run in the Quartus II
simulator by supplying it with the necessary clocks and inputs.
*/
module MySystemSim(CLOCK_50,
// 50 Mhz clock input
CLOCK_27,
// 27 Mhz clock input
RES_n,
// Active low reset input
ATARI_CLOCKBUS16,
// Atari 1.19 Mhz clock input
ATARI_CLOCKPIXEL16, // Atari 3.58 Mhz clock input
ATARI_ROM_CS,
// ROM chip select output
ATARI_ROM_Addr,
// ROM address output
ATARI_ROM_Dout);
// ROM data input
input CLOCK_50, CLOCK_27, RES_n;
input ATARI_CLOCKBUS16, ATARI_CLOCKPIXEL16;
output ATARI_ROM_CS;
output [11:0] ATARI_ROM_Addr;
output [7:0] ATARI_ROM_Dout;
wire
wire
wire
wire
wire
wire
wire
ATARI_CLOCKPIXEL, ATARI_CLOCKBUS;
[7:0] ATARI_COLOROUT;
ATARI_ROM_CS;
[11:0] ATARI_ROM_Addr;
[7:0] ATARI_ROM_Dout;
ATARI_HSYNC, ATARI_HBLANK, ATARI_VSYNC, ATARI_VBLANK;
RES_n;
// Atari System
Atari2600(.CLOCKPIXEL(ATARI_CLOCKPIXEL), .CLOCKBUS(ATARI_CLOCKBUS),
.COLOROUT(ATARI_COLOROUT), .ROM_CS(ATARI_ROM_CS),
.ROM_Addr(ATARI_ROM_Addr), .ROM_Dout(ATARI_ROM_Dout),
.RES_n(RES_n));
// Cartridge
Catridge2k
#(.romFile("cartridge.hex"))
(.address(ATARI_ROM_Addr[10:0]),
.clken(ATARI_ROM_CS),
.clock(ATARI_CLOCKBUS),
.q(ATARI_ROM_Dout));
// Uncomment this block to use 4k cartridges
/*
Catridge4k
#(.romFile("cartridge.hex"))
(.address(ATARI_ROM_Addr),
.clken(ATARI_ROM_CS),
.clock(ATARI_CLOCKBUS),
.q(ATARI_ROM_Dout));
*/
// Clock Dividers
wire ATARI_CLOCKPIXEL16, ATARI_CLOCKBUS16;
ClockDiv16(.inclk(ATARI_CLOCKPIXEL16),
.outclk(ATARI_CLOCKPIXEL),
.reset_n(RES_n));
ClockDiv16(.inclk(ATARI_CLOCKBUS16),
.outclk(ATARI_CLOCKBUS),
.reset_n(RES_n));
endmodule
Atari2600.v
/*
1/2
Atari on an FPGA
Masters of Engineering Project
Cornell University, 2007
Daniel Beer
Atari2600.v
Atari system module. Expects clock, controller and switch inputs and a ROM port.
Outputs are the video signal and NTSC control signals.
*/
module Atari2600(CLOCKPIXEL,
// 3.58 Mhz pixel clock input
CLOCKBUS,
// 1.19 Mhz bus clock input
COLOROUT,
// 8 bit indexed color output
ROM_CS,
// ROM chip select output
ROM_Addr,
// ROM address output
ROM_Dout,
// ROM data input
RES_n,
// Active low reset input
HSYNC,
// Video horizontal sync output
HBLANK,
// Video horizontal blank output
VSYNC,
// Video verical sync output
VBLANK,
// Video verical blank output
SW_COLOR,
// Color/BW switch input
SW_DIFF,
// Difficulty switch input
SW_SELECT,
// Select switch input
SW_START,
// Start switch input
JOY_A_in,
// Joystick A inputs
JOY_B_in);
// Joystick B inputs
input CLOCKPIXEL, CLOCKBUS;
output [7:0] COLOROUT;
output ROM_CS;
output [11:0] ROM_Addr;
output HSYNC, HBLANK, VSYNC, VBLANK;
input [7:0] ROM_Dout;
input RES_n;
input SW_COLOR, SW_SELECT, SW_START;
input [1:0] SW_DIFF;
input [4:0] JOY_A_in, JOY_B_in;
// MOS6507 CPU
wire [12:0] CPU_Addr;
reg [7:0] CPU_Din;
wire [7:0] CPU_Dout;
wire CPU_R_W_n;
wire CPU_CLK_n;
wire CPU_RDY;
wire CPU_RES_n;
MOS6507 cpu(.A(CPU_Addr), .Din(CPU_Din), .Dout(CPU_Dout), .R_W_n(CPU_R_W_n),
.CLK_n(CPU_CLK_n), .RDY(CPU_RDY), .RES_n(CPU_RES_n));
assign CPU_CLK_n = CLOCKBUS;
assign CPU_RES_n = RES_n;
assign ROM_Addr = CPU_Addr[11:0];
assign ROM_CS = CPU_Addr[12];
// MOS6532 "RIOT" module
wire [6:0] RIOT_Addr;
wire [7:0] RIOT_Din;
wire [7:0] RIOT_Dout;
wire RIOT_CS, RIOT_CS_n, RIOT_R_W_n, RIOT_RS_n, RIOT_RES_n, RIOT_CLK;
wire RIOT_IRQ_n;
wire [7:0] RIOT_PAin, RIOT_PBin;
wire [7:0] RIOT_PAout, RIOT_PBout;
RIOT(.A(RIOT_Addr), .Din(RIOT_Din), .Dout(RIOT_Dout), .CS(RIOT_CS), .CS_n(RIOT_CS_n),
.R_W_n(RIOT_R_W_n), .RS_n(RIOT_RS_n), .RES_n(RIOT_RES_n), .IRQ_n(RIOT_IRQ_n),
.CLK(RIOT_CLK), .PAin(RIOT_PAin), .PAout(RIOT_PAout), .PBin(RIOT_PBin),
.PBout(RIOT_PBout));
assign RIOT_Addr = CPU_Addr[6:0];
assign RIOT_Din = CPU_Dout;
assign RIOT_CS = CPU_Addr[7];
assign RIOT_CS_n = CPU_Addr[12];
assign RIOT_R_W_n = CPU_R_W_n;
assign RIOT_RS_n = CPU_Addr[9];
assign RIOT_RES_n = RES_n;
assign RIOT_CLK = CLOCKBUS;
Atari2600.v
assign RIOT_PAin = {JOY_A_in[3:0], JOY_B_in[3:0]};
assign RIOT_PBin = {SW_DIFF, 2’d0, SW_COLOR, 1’d0, SW_SELECT, SW_START};
// TIA module
wire [5:0] TIA_Addr;
wire [7:0] TIA_Din;
wire [7:0] TIA_Dout;
wire [2:0] TIA_CS_n;
wire TIA_CS;
wire TIA_R_W_n;
wire TIA_RDY;
wire TIA_MASTERCLK;
wire TIA_CLK0;
wire TIA_CLK2;
wire [1:0] TIA_Ilatch;
wire [3:0] TIA_Idump;
wire TIA_HSYNC, TIA_HBLANK;
wire TIA_VSYNC, TIA_VBLANK;
wire [7:0] TIA_COLOROUT;
wire TIA_RES_n;
TIA(.A(TIA_Addr), .Din(TIA_Din), .Dout(TIA_Dout), .CS_n(TIA_CS_n), .CS(TIA_CS),
.R_W_n(TIA_R_W_n), .RDY(TIA_RDY), .MASTERCLK(TIA_MASTERCLK), .CLK2(TIA_CLK2),
.Idump(TIA_Idump), .Ilatch(TIA_Ilatch), .HSYNC(TIA_HSYNC), .HBLANK(TIA_HBLANK),
.VSYNC(TIA_VSYNC), .VBLANK(TIA_VBLANK), .COLOROUT(TIA_COLOROUT), .RES_n(TIA_RES_n));
assign TIA_Addr = CPU_Addr[5:0];
assign TIA_Din = CPU_Dout;
assign TIA_CS_n = {CPU_Addr[12], CPU_Addr[7], 1’b0};
assign TIA_CS = 1’b1;
assign TIA_R_W_n = CPU_R_W_n;
assign TIA_RDY = CPU_RDY;
assign TIA_CLK2 = CLOCKBUS;
assign TIA_MASTERCLK = CLOCKPIXEL;
assign TIA_RES_n = RES_n;
assign COLOROUT = TIA_COLOROUT;
assign HSYNC = TIA_HSYNC;
assign HBLANK = TIA_HBLANK;
assign VSYNC = TIA_VSYNC;
assign VBLANK = TIA_VBLANK;
assign TIA_Ilatch = {JOY_B_in[4], JOY_A_in[4]};
// Bus Controller
always @(CPU_Addr, RIOT_Dout, TIA_Dout, ROM_Dout)
begin
if (CPU_Addr[12])
CPU_Din <= ROM_Dout;
else if (CPU_Addr[7])
CPU_Din <= RIOT_Dout;
else
CPU_Din <= TIA_Dout;
end
endmodule
2/2
RIOT.v
/*
1/3
Atari on an FPGA
Masters of Engineering Project
Cornell University, 2007
Daniel Beer
RIOT.v
Redesign of the MOS 6532 chip. Provides RAM, I/O and timers to the Atari.
*/
‘include "RIOT.h"
module RIOT(A,
// Address
Din,
//
Dout,
//
CS,
//
CS_n,
//
R_W_n, //
RS_n,
//
RES_n, //
IRQ_n, //
CLK,
//
PAin,
//
PAout, //
PBin,
//
PBout); //
bus input
Data bus input
Data bus output
Chip select input
Active low chip select input
Active low read/write input
Active low rom select input
Active low reset input
Active low interrupt output
Clock input
8 bit port A input
8 bit port A output
8 bit port B input
8 bit port B output
input [6:0] A;
input [7:0] Din;
output [7:0] Dout;
input CS, CS_n, R_W_n, RS_n, RES_n, CLK;
output IRQ_n;
input [7:0] PAin, PBin;
output [7:0] PAout, PBout;
// Output register
reg [7:0] Dout;
// RAM allocation
reg [7:0] RAM[127:0];
// I/O registers
reg [7:0] DRA, DRB; // Data registers
reg [7:0] DDRA, DDRB; // Data direction registers
wire PA7;
reg R_PA7;
assign PA7 = (PAin[7] & ~DDRA[7]) | (DRA[7] & DDRA[7]);
assign PAout = DRA & DDRA;
assign PBout = DRB & DDRB;
// Timer registers
reg [8:0] Timer;
reg [9:0] Prescaler;
reg [1:0] Timer_Mode;
reg Timer_Int_Flag, PA7_Int_Flag, Timer_Int_Enable, PA7_Int_Enable, PA7_Int_Mode;
// Timer prescaler constants
wire [9:0] PRESCALER_VALS[3:0];
assign PRESCALER_VALS[0] = 10’d0;
assign PRESCALER_VALS[1] = 10’d7;
assign PRESCALER_VALS[2] = 10’d63;
assign PRESCALER_VALS[3] = 10’d1023;
// Interrupt
assign IRQ_n = ~(Timer_Int_Flag & Timer_Int_Enable | PA7_Int_Flag & PA7_Int_Enable);
// Operation decoding
wire [6:0] op;
reg [6:0] R_op;
assign op = {RS_n, R_W_n, A[4:0]};
// Registered data in
reg [7:0] R_Din;
RIOT.v
2/3
integer cnt;
// Software operations
always @(posedge CLK)
begin
// Reset operation
if (~RES_n) begin
DRA <= 8’b0;
DDRA <= 8’b0;
DRB <= 8’b0;
DDRB <= 8’b0;
Timer_Int_Flag <= 1’b0;
PA7_Int_Flag <= 1’b0;
PA7_Int_Enable <= 1’b0;
PA7_Int_Mode <= 1’b0;
// Fill RAM with 0s
for (cnt = 0; cnt < 128; cnt = cnt + 1)
RAM[cnt] <= 8’b0;
R_PA7 <= 1’b0;
R_op <= ‘NOP;
R_Din <= 8’b0;
end
// If the chip is enabled, execute an operation
else if (CS & ~CS_n) begin
// Register inputs for use later
R_PA7 <= PA7;
R_op <= op;
R_Din <= Din;
// Update the timer interrupt flag
casex (op)
‘WRITE_TIMER: Timer_Int_Flag <= 1’b0;
‘READ_TIMER: Timer_Int_Flag <= 1’b0;
default: if (Timer == 9’b111111111) Timer_Int_Flag <= 1’b1;
endcase
// Update the port A interrupt flag
casex (op)
‘READ_INT_FLAG: PA7_Int_Flag <= 1’b0;
default: PA7_Int_Flag <= PA7_Int_Flag |
(PA7 != R_PA7 & PA7 == PA7_Int_Mode);
endcase
// Process the current operation
casex(op)
// RAM access
‘READ_RAM: Dout <= RAM[A];
‘WRITE_RAM: RAM[A] <= Din;
// Port A data access
‘READ_DRA: Dout <= (PAin & ~DDRA) | (DRA & DDRA);
‘WRITE_DRA: DRA <= Din;
// Port A direction register access
‘READ_DDRA: Dout <= DDRA;
‘WRITE_DDRA: DDRA <= Din;
// Port B data access
‘READ_DRB: Dout <= (PBin & ~DDRB) | (DRB & DDRB);
‘WRITE_DRB: DRB <= Din;
// Port B direction register access
‘READ_DDRB: Dout <= DDRB;
‘WRITE_DDRB: DDRB <= Din;
// Timer access
‘READ_TIMER: Dout <= Timer[7:0];
// Status register access
‘READ_INT_FLAG: Dout <= {Timer_Int_Flag, PA7_Int_Flag, 6’b0};
RIOT.v
3/3
// Enable the port A interrupt
‘WRITE_EDGE_DETECT: begin
PA7_Int_Mode <= A[0]; PA7_Int_Enable <= A[1];
end
endcase
end
// Even if the chip is not enabled, update background functions
else begin
// Update the timer interrupt
if (Timer == 9’b111111111)
Timer_Int_Flag <= 1’b1;
// Update the port A interrupt
R_PA7 <= PA7;
PA7_Int_Flag <= PA7_Int_Flag | (PA7 != R_PA7 & PA7 == PA7_Int_Mode);
// Set the operation to a NOP
R_op <= ‘NOP;
end
end
// Update the timer at the negative edge of the clock
always @(negedge CLK)
begin
// Reset operation
if (~RES_n) begin
Timer <= 9’b0;
Timer_Mode <= 2’b0;
Prescaler <= 10’b0;
Timer_Int_Enable <= 1’b0;
end
// Otherwise, process timer operations
else casex (R_op)
// Write value to the timer and update the prescaler based on the address
‘WRITE_TIMER: begin
Timer <= {1’b0, R_Din};
Timer_Mode <= R_op[1:0];
Prescaler <= PRESCALER_VALS[R_op[1:0]];
Timer_Int_Enable <= R_op[3];
end
// Otherwise decrement the prescaler and if necessary the timer.
// The prescaler holds a variable number of counts that must be
// run before the timer is decremented
default:
if (Timer != 9’b100000000) begin
if (Prescaler != 10’b0)
Prescaler <= Prescaler − 10’b1;
else begin
if (Timer == 9’b0) begin
Prescaler <= 10’b0;
Timer_Mode <= 2’b0;
end
else
Prescaler <= PRESCALER_VALS[Timer_Mode];
Timer <= Timer − 9’b1;
end
end
endcase
end
endmodule
RIOT.h
/*
1/1
Atari on an FPGA
Masters of Engineering Project
Cornell University, 2007
Daniel Beer
RIOT.h
Header file that contains useful definitions for the RIOT module.
*/
‘define
‘define
‘define
‘define
‘define
‘define
‘define
‘define
‘define
‘define
‘define
‘define
‘define
‘define
‘define
READ_RAM
WRITE_RAM
READ_DRA
WRITE_DRA
READ_DDRA
WRITE_DDRA
READ_DRB
WRITE_DRB
READ_DDRB
WRITE_DDRB
WRITE_TIMER
READ_TIMER
READ_INT_FLAG
WRITE_EDGE_DETECT
NOP
‘define
‘define
‘define
‘define
TM_1
TM_8
TM_64
TM_1024
2’b00
2’b01
2’b10
2’b11
7’b01xxxxx
7’b00xxxxx
7’b11xx000
7’b10xx000
7’b11xx001
7’b10xx001
7’b11xx010
7’b10xx010
7’b11xx011
7’b10xx011
7’b101x1xx
7’b11xx1x0
7’b11xx1x1
7’b100x1x0
7’b0100000
TIA.v
/*
1/7
Atari on an FPGA
Masters of Engineering Project
Cornell University, 2007
Daniel Beer
TIA.v
Redesign of the Atari TIA chip. Provides the Atari with video generation,
sound generation and I/O.
*/
‘include "TIA.h"
module TIA(A,
Din,
Dout,
CS_n,
CS,
R_W_n,
RDY,
MASTERCLK,
CLK2,
Idump,
Ilatch,
HSYNC,
HBLANK,
VSYNC,
VBLANK,
COLOROUT,
RES_n);
// Address bus input
// Data bus input
// Data bus output
// Active low chip select input
// Chip select input
// Active low read/write input
// CPU ready output
// 3.58 Mhz pixel clock input
// 1.19 Mhz bus clock input
// Dumped I/O
// Latched I/O
// Video horizontal sync output
// Video horizontal blank output
// Video vertical sync output
// Video vertical sync output
// Indexed color output
// Active low reset input
input [5:0] A;
input [7:0] Din;
output [7:0] Dout;
input [2:0] CS_n;
input CS;
input R_W_n;
output RDY;
input MASTERCLK;
input CLK2;
input [1:0] Ilatch;
inout [3:0] Idump;
output HSYNC, HBLANK;
output VSYNC, VBLANK;
output [7:0] COLOROUT;
input RES_n;
// Data output register
reg [7:0] Dout;
// Video control signal registers
wire HSYNC;
reg VSYNC, VBLANK;
// Horizontal pixel counter
reg [7:0] hCount;
reg [3:0] hCountReset;
// Pixel counter update
always @(posedge MASTERCLK)
begin
// Reset operation
if (~RES_n) begin
hCount <= 8’d0;
hCountReset[3:1] <= 3’d0;
end
else begin
// Increment the count and reset if necessary
if ((hCountReset[3]) ||(hCount == 8’d227))
hCount <= 8’d0;
else
hCount <= hCount + 8’d1;
// Software resets are delayed by three cycles
TIA.v
2/7
hCountReset[3:1] <= hCountReset[2:0];
end
end
assign HSYNC = (hCount >= 8’d20) && (hCount < 8’d36);
assign HBLANK = (hCount < 8’d68);
// Screen object registers
// These registers are set by the software and used to generate pixels
reg [7:0] player0Pos, player1Pos, missile0Pos, missile1Pos, ballPos;
reg [4:0] player0Size, player1Size;
reg [7:0] player0Color, player1Color, ballColor, pfColor, bgColor;
reg [3:0] player0Motion, player1Motion, missile0Motion, missile1Motion,
ballMotion;
reg missile0Enable, missile1Enable, ballEnable, R_ballEnable;
reg [1:0] ballSize;
reg [19:0] pfGraphic;
reg [7:0] player0Graphic, player1Graphic;
reg [7:0] R_player0Graphic, R_player1Graphic;
reg pfReflect, player0Reflect, player1Reflect;
reg prioCtrl;
reg pfColorCtrl;
reg [14:0] collisionLatch;
reg missile0Lock, missile1Lock;
reg player0VertDelay, player1VertDelay, ballVertDelay;
// Pixel number calculation
wire [7:0] pixelNum;
assign pixelNum = (hCount >= 68)? hCount − 8’d68 : 8’d227;
//
//
//
//
Pixel tests. For each pixel and screen object, a test is done based on the
screen objects register to determine if the screen object should show on that
pixel. The results of all the tests are fed into logic to pick which displayed
object has priority and color the pixel the color of that object.
// Playfield pixel test
wire [5:0] pfPixelNum;
wire pfPixelOn, pfLeftPixelVal, pfRightPixelVal;
assign pfPixelNum = pixelNum[7:2];
assign pfLeftPixelVal = pfGraphic[pfPixelNum];
assign pfRightPixelVal = (pfReflect == 1’b0)? pfGraphic[pfPixelNum − 6’d20]:
pfGraphic[6’d39 − pfPixelNum];
assign pfPixelOn = (pfPixelNum < 6’d20)? pfLeftPixelVal : pfRightPixelVal;
// Player 0 sprite pixel test
wire pl0PixelOn;
wire [7:0] pl0Mask, pl0MaskDel;
assign pl0MaskDel = (player0VertDelay)? R_player0Graphic : player0Graphic;
assign pl0Mask = (!player0Reflect)? pl0MaskDel : {pl0MaskDel[0], pl0MaskDel[1],
pl0MaskDel[2], pl0MaskDel[3],
pl0MaskDel[4], pl0MaskDel[5],
pl0MaskDel[6], pl0MaskDel[7]};
objPixelOn(pixelNum, player0Pos, player0Size[2:0], pl0Mask, pl0PixelOn);
// Player 1 sprite pixel test
wire pl1PixelOn;
wire [7:0] pl1Mask, pl1MaskDel;
assign pl1MaskDel = (player1VertDelay)? R_player1Graphic : player1Graphic;
assign pl1Mask = (!player1Reflect)? pl1MaskDel : {pl1MaskDel[0], pl1MaskDel[1],
pl1MaskDel[2], pl1MaskDel[3],
pl1MaskDel[4], pl1MaskDel[5],
pl1MaskDel[6], pl1MaskDel[7]};
objPixelOn(pixelNum, player1Pos, player1Size[2:0], pl1Mask, pl1PixelOn);
// Missile 0 pixel test
wire mis0PixelOn, mis0PixelOut;
wire [7:0] mis0ActualPos;
reg [7:0] mis0Mask;
always @(player0Size)
begin
case(player0Size[4:3])
2’d0: mis0Mask <= 8’h01;
2’d1: mis0Mask <= 8’h03;
2’d2: mis0Mask <= 8’h0F;
TIA.v
3/7
2’d3: mis0Mask <= 8’hFF;
endcase
end
assign mis0ActualPos = (missile0Lock)? player0Pos : missile0Pos;
objPixelOn(pixelNum, mis0ActualPos, player0Size[2:0], mis0Mask, mis0PixelOut);
assign mis0PixelOn = mis0PixelOut && missile0Enable;
// Missile 1 pixel test
wire mis1PixelOn, mis1PixelOut;
wire [7:0] mis1ActualPos;
reg [7:0] mis1Mask;
always @(player1Size)
begin
case(player1Size[4:3])
2’d0: mis1Mask <= 8’h01;
2’d1: mis1Mask <= 8’h03;
2’d2: mis1Mask <= 8’h0F;
2’d3: mis1Mask <= 8’hFF;
endcase
end
assign mis1ActualPos = (missile1Lock)? player1Pos : missile1Pos;
objPixelOn(pixelNum, mis1ActualPos, player1Size[2:0], mis1Mask, mis1PixelOut);
assign mis1PixelOn = mis1PixelOut && missile1Enable;
// Ball pixel test
wire ballPixelOut, ballPixelOn, ballEnableDel;
reg [7:0] ballMask;
always @(ballSize)
begin
case(ballSize)
2’d0: ballMask <= 8’h01;
2’d1: ballMask <= 8’h03;
2’d2: ballMask <= 8’h0F;
2’d3: ballMask <= 8’hFF;
endcase
end
objPixelOn(pixelNum, ballPos, 3’d0, ballMask, ballPixelOut);
assign ballEnableDel = ((ballVertDelay)? R_ballEnable : ballEnable);
assign ballPixelOn = ballPixelOut && ballEnableDel;
// Playfield color selection
// The programmer can select a unique color for the playfield or have it match
// the player’s sprites colors
reg [7:0] pfActualColor;
always @(pfColorCtrl, pfColor, player0Color, player1Color, pfPixelNum)
begin
if (pfColorCtrl)
begin
if (pfPixelNum < 6’d20)
pfActualColor <= player0Color;
else
pfActualColor <= player1Color;
end
else
pfActualColor <= pfColor;
end
// Final pixel color selection
reg [7:0] pixelColor;
assign COLOROUT = (HBLANK)? 8’b0 : pixelColor;
// This combinational logic uses a priority encoder like structure to select
// the highest priority screen object and color the pixel.
always @(prioCtrl, pfPixelOn, pl0PixelOn, pl1PixelOn, mis0PixelOn, mis1PixelOn,
ballPixelOn, pfActualColor, player0Color, player1Color, bgColor)
begin
// Show the playfield behind the players
if (!prioCtrl)
begin
if (pl0PixelOn || mis0PixelOn)
pixelColor <= player0Color;
else if (pl1PixelOn || mis1PixelOn)
pixelColor <= player1Color;
else if (pfPixelOn)
TIA.v
4/7
pixelColor <= pfActualColor;
else
pixelColor <= bgColor;
end
// Otherwise, show the playfield in front of the players
else begin
if (pfPixelOn)
pixelColor <= pfActualColor;
else if (pl0PixelOn || mis0PixelOn)
pixelColor <= player0Color;
else if (pl1PixelOn || mis1PixelOn)
pixelColor <= player1Color;
else
pixelColor <= bgColor;
end
end
// Collision register and latching update
wire [14:0] collisions;
reg collisionLatchReset;
assign collisions = {pl0PixelOn && pl1PixelOn, mis0PixelOn && mis1PixelOn,
ballPixelOn && pfPixelOn,
mis1PixelOn && pfPixelOn, mis1PixelOn && ballPixelOn,
mis0PixelOn && pfPixelOn, mis0PixelOn && ballPixelOn,
pl1PixelOn && pfPixelOn, pl1PixelOn && ballPixelOn,
pl0PixelOn && pfPixelOn, pl0PixelOn && ballPixelOn,
mis1PixelOn && pl0PixelOn, mis1PixelOn && pl1PixelOn,
mis0PixelOn && pl1PixelOn, mis0PixelOn && pl0PixelOn};
always @(posedge MASTERCLK, posedge collisionLatchReset)
begin
if (collisionLatchReset)
collisionLatch <= 15’b000000000000000;
else
collisionLatch <= collisionLatch | collisions;
end
// WSYNC logic
// When a WSYNC is signalled by the programmer, the CPU ready line is lowered
// until the end of a scanline
reg wSync, wSyncReset;
always @(hCount, wSyncReset)
begin
if (hCount == 8’d3)
wSync <= 1’b0;
else if (wSyncReset && hCount > 8’d5)
wSync <= 1’b1;
end
assign RDY = ~wSync;
// Latched input registers and update
wire [1:0] latchedInputsValue;
reg inputLatchEnabled, inputLatchReset;
reg [1:0] latchedInputs;
always @(Ilatch, inputLatchReset)
begin
if (inputLatchReset)
latchedInputs <= 2’b11;
else
latchedInputs <= latchedInputs & Ilatch;
end
assign latchedInputsValue = (inputLatchEnabled)? latchedInputs : Ilatch;
// Dumped input registers update
reg inputDumpEnabled;
assign Idump = (inputDumpEnabled)? 4’b0000 : 4’bzzzz;
// Software operations
always @(posedge CLK2)
begin
// Reset operation
TIA.v
5/7
if (~RES_n) begin
inputLatchReset <= 1’b0;
collisionLatchReset <= 1’b0;
hCountReset[0] <= 1’b0;
wSyncReset <= 1’b0;
Dout <= 8’b00000000;
end
// If the chip is enabled, execute an operation
else if (CS && !CS_n) begin
// Software reset signals
inputLatchReset <= ({R_W_n, A[5:0]} == ‘VBLANK && Din[6] && !inputLatchEnabled);
collisionLatchReset <= ({R_W_n, A[5:0]} == ‘CXCLR);
hCountReset[0] <= ({R_W_n, A[5:0]} == ‘RSYNC);
wSyncReset <= ({R_W_n, A[5:0]} == ‘WSYNC) && !wSync;
case({R_W_n, A[5:0]})
// Collision latch reads
‘CXM0P: Dout <= {collisionLatch[1:0],6’b000000};
‘CXM1P: Dout <= {collisionLatch[3:2],6’b000000};
‘CXP0FB: Dout <= {collisionLatch[5:4],6’b000000};
‘CXP1FB: Dout <= {collisionLatch[7:6],6’b000000};
‘CXM0FB: Dout <= {collisionLatch[9:8],6’b000000};
‘CXM1FB: Dout <= {collisionLatch[11:10],6’b000000};
‘CXBLPF: Dout <= {collisionLatch[12],7’b0000000};
‘CXPPMM: Dout <= {collisionLatch[14:13],6’b000000};
// I/O reads
‘INPT0: Dout
‘INPT1: Dout
‘INPT2: Dout
‘INPT3: Dout
‘INPT4: Dout
‘INPT5: Dout
<=
<=
<=
<=
<=
<=
{Idump[0], 7’b0000000};
{Idump[1], 7’b0000000};
{Idump[2], 7’b0000000};
{Idump[3], 7’b0000000};
{latchedInputsValue[0], 7’b0000000};
{latchedInputsValue[1], 7’b0000000};
// Video signals
‘VSYNC: VSYNC <= Din[1];
‘VBLANK: begin
inputLatchEnabled <= Din[6];
inputDumpEnabled <= Din[7];
VBLANK <= Din[1];
end
‘WSYNC:;
‘RSYNC:;
// Screen object register access
‘NUSIZ0: player0Size <= {Din[5:4],Din[2:0]};
‘NUSIZ1: player1Size <= {Din[5:4],Din[2:0]};
‘COLUP0: player0Color <= Din;
‘COLUP1: player1Color <= Din;
‘COLUPF: pfColor <= Din;
‘COLUBK: bgColor <= Din;
‘CTRLPF: begin
pfReflect <= Din[0];
pfColorCtrl <= Din[1];
prioCtrl <= Din[2];
ballSize <= Din[5:4];
end
‘REFP0: player0Reflect <= Din[3];
‘REFP1: player1Reflect <= Din[3];
‘PF0: pfGraphic[3:0] <= Din[7:4];
‘PF1: pfGraphic[11:4] <= {Din[0], Din[1], Din[2], Din[3],
Din[4], Din[5], Din[6], Din[7]};
‘PF2: pfGraphic[19:12] <= Din[7:0];
‘RESP0: player0Pos <= pixelNum;
‘RESP1: player1Pos <= pixelNum;
‘RESM0: missile0Pos <= pixelNum;
‘RESM1: missile1Pos <= pixelNum;
‘RESBL: ballPos <= pixelNum;
// Audio controls − not implemented
‘AUDC0:;
‘AUDC1:;
‘AUDF0:;
TIA.v
6/7
‘AUDF1:;
‘AUDV0:;
‘AUDV1:;
// Screen object register access
‘GRP0: begin
player0Graphic <= {Din[0], Din[1], Din[2],
Din[4], Din[5], Din[6],
R_player1Graphic <= player1Graphic;
end
‘GRP1: begin
player1Graphic <= {Din[0], Din[1], Din[2],
Din[4], Din[5], Din[6],
R_player0Graphic <= player0Graphic;
R_ballEnable <= ballEnable;
end
‘ENAM0: missile0Enable <= Din[1];
‘ENAM1: missile1Enable <= Din[1];
‘ENABL: ballEnable <= Din[1];
‘HMP0: player0Motion <= Din[7:4];
‘HMP1: player1Motion <= Din[7:4];
‘HMM0: missile0Motion <= Din[7:4];
‘HMM1: missile1Motion <= Din[7:4];
‘HMBL: ballMotion <= Din[7:4];
‘VDELP0: player0VertDelay <= Din[0];
‘VDELP1: player1VertDelay <= Din[0];
‘VDELBL: ballVertDelay <= Din[0];
‘RESMP0: missile0Lock <= Din[1];
‘RESMP1: missile1Lock <= Din[1];
Din[3],
Din[7]};
Din[3],
Din[7]};
// Strobed line that initiates an object move
‘HMOVE: begin
player0Pos <= player0Pos − {{4{player0Motion[3]}},
player0Motion[3:0]};
player1Pos <= player1Pos − {{4{player1Motion[3]}},
player1Motion[3:0]};
missile0Pos <= missile0Pos − {{4{missile0Motion[3]}},
missile0Motion[3:0]};
missile1Pos <= missile1Pos − {{4{missile1Motion[3]}},
missile1Motion[3:0]};
ballPos <= ballPos − {{4{ballMotion[3]}},ballMotion[3:0]};
end
// Motion register clear
‘HMCLR: begin
player0Motion <= Din[7:4];
player1Motion <= Din[7:4];
missile0Motion <= Din[7:4];
missile1Motion <= Din[7:4];
ballMotion <= Din[7:4];
end
‘CXCLR:;
default: Dout <= 8’b00000000;
endcase
end
// If the chip is not enabled, do nothing
else begin
inputLatchReset <= 1’b0;
collisionLatchReset <= 1’b0;
hCountReset[0] <= 1’b0;
wSyncReset <= 1’b0;
Dout <= 8’b00000000;
end
end
endmodule
// objPixelOn module
// Checks the pixel number against a stretched and possibly duplicated version of the
// object.
module objPixelOn(pixelNum, objPos, objSize, objMask, pixelOn);
input [7:0] pixelNum, objPos, objMask;
input [2:0] objSize;
TIA.v
output pixelOn;
wire [7:0] objIndex;
wire [8:0] objByteIndex;
wire objMaskOn, objPosOn;
reg objSizeOn;
reg [2:0] objMaskSel;
assign objIndex = pixelNum − objPos − 8’d1;
assign objByteIndex = 9’b1 << (objIndex[7:3]);
always @(objSize, objByteIndex)
begin
case (objSize)
3’d0: objSizeOn <= (objByteIndex & 9’b00000001) != 0;
3’d1: objSizeOn <= (objByteIndex & 9’b00000101) != 0;
3’d2: objSizeOn <= (objByteIndex & 9’b00010001) != 0;
3’d3: objSizeOn <= (objByteIndex & 9’b00010101) != 0;
3’d4: objSizeOn <= (objByteIndex & 9’b10000001) != 0;
3’d5: objSizeOn <= (objByteIndex & 9’b00000011) != 0;
3’d6: objSizeOn <= (objByteIndex & 9’b10010001) != 0;
3’d7: objSizeOn <= (objByteIndex & 9’b00001111) != 0;
endcase
end
always @(objSize, objIndex)
begin
case (objSize)
3’d5: objMaskSel <= objIndex[3:1];
3’d7: objMaskSel <= objIndex[4:2];
default: objMaskSel <= objIndex[2:0];
endcase
end
assign objMaskOn = objMask[objMaskSel];
assign objPosOn = (pixelNum > objPos) && ({1’b0, pixelNum} <= {1’b0, objPos} + 9’d72);
assign pixelOn = objSizeOn && objMaskOn && objPosOn;
endmodule
7/7
TIA.h
/*
1/1
Atari on an FPGA
Masters of Engineering Project
Cornell University, 2007
Daniel Beer
TIA.h
Header file that contains useful definitions for the TIA module.
*/
‘define
‘define
‘define
‘define
‘define
‘define
‘define
‘define
‘define
‘define
‘define
‘define
‘define
‘define
CXM0P
CXM1P
CXP0FB
CXP1FB
CXM0FB
CXM1FB
CXBLPF
CXPPMM
INPT0
INPT1
INPT2
INPT3
INPT4
INPT5
7’h70
7’h71
7’h72
7’h73
7’h74
7’h75
7’h76
7’h77
7’h78
7’h79
7’h7A
7’h7B
7’h7C
7’h7D
‘define
‘define
‘define
‘define
‘define
‘define
‘define
‘define
‘define
‘define
‘define
‘define
‘define
‘define
‘define
‘define
‘define
‘define
‘define
‘define
‘define
‘define
‘define
‘define
‘define
‘define
‘define
‘define
‘define
‘define
‘define
‘define
‘define
‘define
‘define
‘define
‘define
‘define
‘define
‘define
‘define
‘define
‘define
‘define
‘define
VSYNC
VBLANK
WSYNC
RSYNC
NUSIZ0
NUSIZ1
COLUP0
COLUP1
COLUPF
COLUBK
CTRLPF
REFP0
REFP1
PF0
PF1
PF2
RESP0
RESP1
RESM0
RESM1
RESBL
AUDC0
AUDC1
AUDF0
AUDF1
AUDV0
AUDV1
GRP0
GRP1
ENAM0
ENAM1
ENABL
HMP0
HMP1
HMM0
HMM1
HMBL
VDELP0
VDELP1
VDELBL
RESMP0
RESMP1
HMOVE
HMCLR
CXCLR
7’h00
7’h01
7’h02
7’h03
7’h04
7’h05
7’h06
7’h07
7’h08
7’h09
7’h0A
7’h0B
7’h0C
7’h0D
7’h0E
7’h0F
7’h10
7’h11
7’h12
7’h13
7’h14
7’h15
7’h16
7’h17
7’h18
7’h19
7’h1A
7’h1B
7’h1C
7’h1D
7’h1E
7’h1F
7’h20
7’h21
7’h22
7’h23
7’h24
7’h25
7’h26
7’h27
7’h28
7’h29
7’h2A
7’h2B
7’h2C
TIAColorTable.v
/*
Atari on an FPGA
Masters of Engineering Project
Cornell University, 2007
Daniel Beer
TIAColorTable.v
Synchronous color lookup table that maps the Atari indexed colors to RGB.
*/
module TIAColorTable(clk,
// Clock input
lum,
// 4 bit luminance input
hue,
// 4 bit hue input
mode,
// Mode input (0 = NTSC, 1 = PAL, 2 = SECAM)
outColor); // 24 bit color output
input clk;
input [3:0] lum;
input [3:0] hue;
input [1:0] mode;
output [23:0] outColor;
// Output register
reg [23:0] outColor;
// Implicit instantiation of ROM on the FPGA to store the color table
always @(posedge clk)
begin
case ({mode, hue, lum[3:1]})
// NTSC Colors
9’d0: outColor = 24’h000000;
9’d1: outColor = 24’h404040;
9’d2: outColor = 24’h6C6C6C;
9’d3: outColor = 24’h909090;
9’d4: outColor = 24’hB0B0B0;
9’d5: outColor = 24’hC8C8C8;
9’d6: outColor = 24’hDCDCDC;
9’d7: outColor = 24’hECECEC;
9’d8: outColor = 24’h444400;
9’d9: outColor = 24’h646410;
9’d10: outColor = 24’h848424;
9’d11: outColor = 24’hA0A034;
9’d12: outColor = 24’hB8B840;
9’d13: outColor = 24’hD0D050;
9’d14: outColor = 24’hE8E85C;
9’d15: outColor = 24’hFCFC68;
9’d16: outColor = 24’h702800;
9’d17: outColor = 24’h844414;
9’d18: outColor = 24’h985C28;
9’d19: outColor = 24’hAC783C;
9’d20: outColor = 24’hBC8C4C;
9’d21: outColor = 24’hCCA05C;
9’d22: outColor = 24’hDCB468;
9’d23: outColor = 24’hECC878;
9’d24: outColor = 24’h841800;
9’d25: outColor = 24’h983418;
9’d26: outColor = 24’hAC5030;
9’d27: outColor = 24’hC06848;
9’d28: outColor = 24’hD0805C;
9’d29: outColor = 24’hE09470;
9’d30: outColor = 24’hECA880;
9’d31: outColor = 24’hFCBC94;
9’d32: outColor = 24’h880000;
9’d33: outColor = 24’h9C2020;
9’d34: outColor = 24’hB03C3C;
9’d35: outColor = 24’hC05858;
9’d36: outColor = 24’hD07070;
9’d37: outColor = 24’hE08888;
9’d38: outColor = 24’hECA0A0;
9’d39: outColor = 24’hFCB4B4;
9’d40: outColor = 24’h78005C;
9’d41: outColor = 24’h8C2074;
9’d42: outColor = 24’hA03C88;
9’d43: outColor = 24’hB0589C;
9’d44: outColor = 24’hC070B0;
1/6
TIAColorTable.v
9’d45: outColor = 24’hD084C0;
9’d46: outColor = 24’hDC9CD0;
9’d47: outColor = 24’hECB0E0;
9’d48: outColor = 24’h480078;
9’d49: outColor = 24’h602090;
9’d50: outColor = 24’h783CA4;
9’d51: outColor = 24’h8C58B8;
9’d52: outColor = 24’hA070CC;
9’d53: outColor = 24’hB484DC;
9’d54: outColor = 24’hC49CEC;
9’d55: outColor = 24’hD4B0FC;
9’d56: outColor = 24’h140084;
9’d57: outColor = 24’h302098;
9’d58: outColor = 24’h4C3CAC;
9’d59: outColor = 24’h6858C0;
9’d60: outColor = 24’h7C70D0;
9’d61: outColor = 24’h9488E0;
9’d62: outColor = 24’hA8A0EC;
9’d63: outColor = 24’hBCB4FC;
9’d64: outColor = 24’h000088;
9’d65: outColor = 24’h1C209C;
9’d66: outColor = 24’h3840B0;
9’d67: outColor = 24’h505CC0;
9’d68: outColor = 24’h6874D0;
9’d69: outColor = 24’h7C8CE0;
9’d70: outColor = 24’h90A4EC;
9’d71: outColor = 24’hA4B8FC;
9’d72: outColor = 24’h00187C;
9’d73: outColor = 24’h1C3890;
9’d74: outColor = 24’h3854A8;
9’d75: outColor = 24’h5070BC;
9’d76: outColor = 24’h6888CC;
9’d77: outColor = 24’h7C9CDC;
9’d78: outColor = 24’h90B4EC;
9’d79: outColor = 24’hA4C8FC;
9’d80: outColor = 24’h002C5C;
9’d81: outColor = 24’h1C4C78;
9’d82: outColor = 24’h386890;
9’d83: outColor = 24’h5084AC;
9’d84: outColor = 24’h689CC0;
9’d85: outColor = 24’h7CB4D4;
9’d86: outColor = 24’h90CCE8;
9’d87: outColor = 24’hA4E0FC;
9’d88: outColor = 24’h003C2C;
9’d89: outColor = 24’h1C5C48;
9’d90: outColor = 24’h387C64;
9’d91: outColor = 24’h509C80;
9’d92: outColor = 24’h68B494;
9’d93: outColor = 24’h7CD0AC;
9’d94: outColor = 24’h90E4C0;
9’d95: outColor = 24’hA4FCD4;
9’d96: outColor = 24’h003C00;
9’d97: outColor = 24’h205C20;
9’d98: outColor = 24’h407C40;
9’d99: outColor = 24’h5C9C5C;
9’d100: outColor = 24’h74B474;
9’d101: outColor = 24’h8CD08C;
9’d102: outColor = 24’hA4E4A4;
9’d103: outColor = 24’hB8FCB8;
9’d104: outColor = 24’h143800;
9’d105: outColor = 24’h345C1C;
9’d106: outColor = 24’h507C38;
9’d107: outColor = 24’h6C9850;
9’d108: outColor = 24’h84B468;
9’d109: outColor = 24’h9CCC7C;
9’d110: outColor = 24’hB4E490;
9’d111: outColor = 24’hC8FCA4;
9’d112: outColor = 24’h2C3000;
9’d113: outColor = 24’h4C501C;
9’d114: outColor = 24’h687034;
9’d115: outColor = 24’h848C4C;
9’d116: outColor = 24’h9CA864;
9’d117: outColor = 24’hB4C078;
9’d118: outColor = 24’hCCD488;
2/6
TIAColorTable.v
9’d119:
9’d120:
9’d121:
9’d122:
9’d123:
9’d124:
9’d125:
9’d126:
9’d127:
3/6
outColor
outColor
outColor
outColor
outColor
outColor
outColor
outColor
outColor
=
=
=
=
=
=
=
=
=
24’hE0EC9C;
24’h442800;
24’h644818;
24’h846830;
24’hA08444;
24’hB89C58;
24’hD0B46C;
24’hE8CC7C;
24’hFCE08C;
// PAL Colors
9’d128: outColor
9’d129: outColor
9’d130: outColor
9’d131: outColor
9’d132: outColor
9’d133: outColor
9’d134: outColor
9’d135: outColor
9’d136: outColor
9’d137: outColor
9’d138: outColor
9’d139: outColor
9’d140: outColor
9’d141: outColor
9’d142: outColor
9’d143: outColor
9’d144: outColor
9’d145: outColor
9’d146: outColor
9’d147: outColor
9’d148: outColor
9’d149: outColor
9’d150: outColor
9’d151: outColor
9’d152: outColor
9’d153: outColor
9’d154: outColor
9’d155: outColor
9’d156: outColor
9’d157: outColor
9’d158: outColor
9’d159: outColor
9’d160: outColor
9’d161: outColor
9’d162: outColor
9’d163: outColor
9’d164: outColor
9’d165: outColor
9’d166: outColor
9’d167: outColor
9’d168: outColor
9’d169: outColor
9’d170: outColor
9’d171: outColor
9’d172: outColor
9’d173: outColor
9’d174: outColor
9’d175: outColor
9’d176: outColor
9’d177: outColor
9’d178: outColor
9’d179: outColor
9’d180: outColor
9’d181: outColor
9’d182: outColor
9’d183: outColor
9’d184: outColor
9’d185: outColor
9’d186: outColor
9’d187: outColor
9’d188: outColor
9’d189: outColor
9’d190: outColor
=
=
=
=
=
=
=
=
=
=
=
=
=
=
=
=
=
=
=
=
=
=
=
=
=
=
=
=
=
=
=
=
=
=
=
=
=
=
=
=
=
=
=
=
=
=
=
=
=
=
=
=
=
=
=
=
=
=
=
=
=
=
=
24’h000000;
24’h282828;
24’h505050;
24’h747474;
24’h949494;
24’hB4B4B4;
24’hD0D0D0;
24’hECECEC;
24’h000000;
24’h282828;
24’h505050;
24’h747474;
24’h949494;
24’hB4B4B4;
24’hD0D0D0;
24’hECECEC;
24’h805800;
24’h947020;
24’hA8843C;
24’hBC9C58;
24’hCCAC70;
24’hDCC084;
24’hECD09C;
24’hFCE0B0;
24’h445C00;
24’h5C7820;
24’h74903C;
24’h8CAC58;
24’hA0C070;
24’hB0D484;
24’hC4E89C;
24’hD4FCB0;
24’h703400;
24’h885020;
24’hA0683C;
24’hB48458;
24’hC89870;
24’hDCAC84;
24’hECC09C;
24’hFCD4B0;
24’h006414;
24’h208034;
24’h3C9850;
24’h58B06C;
24’h70C484;
24’h84D89C;
24’h9CE8B4;
24’hB0FCC8;
24’h700014;
24’h882034;
24’hA03C50;
24’hB4586C;
24’hC87084;
24’hDC849C;
24’hEC9CB4;
24’hFCB0C8;
24’h005C5C;
24’h207474;
24’h3C8C8C;
24’h58A4A4;
24’h70B8B8;
24’h84C8C8;
24’h9CDCDC;
TIAColorTable.v
9’d191:
9’d192:
9’d193:
9’d194:
9’d195:
9’d196:
9’d197:
9’d198:
9’d199:
9’d200:
9’d201:
9’d202:
9’d203:
9’d204:
9’d205:
9’d206:
9’d207:
9’d208:
9’d209:
9’d210:
9’d211:
9’d212:
9’d213:
9’d214:
9’d215:
9’d216:
9’d217:
9’d218:
9’d219:
9’d220:
9’d221:
9’d222:
9’d223:
9’d224:
9’d225:
9’d226:
9’d227:
9’d228:
9’d229:
9’d230:
9’d231:
9’d232:
9’d233:
9’d234:
9’d235:
9’d236:
9’d237:
9’d238:
9’d239:
9’d240:
9’d241:
9’d242:
9’d243:
9’d244:
9’d245:
9’d246:
9’d247:
9’d248:
9’d249:
9’d250:
9’d251:
9’d252:
9’d253:
9’d254:
9’d255:
4/6
outColor
outColor
outColor
outColor
outColor
outColor
outColor
outColor
outColor
outColor
outColor
outColor
outColor
outColor
outColor
outColor
outColor
outColor
outColor
outColor
outColor
outColor
outColor
outColor
outColor
outColor
outColor
outColor
outColor
outColor
outColor
outColor
outColor
outColor
outColor
outColor
outColor
outColor
outColor
outColor
outColor
outColor
outColor
outColor
outColor
outColor
outColor
outColor
outColor
outColor
outColor
outColor
outColor
outColor
outColor
outColor
outColor
outColor
outColor
outColor
outColor
outColor
outColor
outColor
outColor
=
=
=
=
=
=
=
=
=
=
=
=
=
=
=
=
=
=
=
=
=
=
=
=
=
=
=
=
=
=
=
=
=
=
=
=
=
=
=
=
=
=
=
=
=
=
=
=
=
=
=
=
=
=
=
=
=
=
=
=
=
=
=
=
=
24’hB0ECEC;
24’h70005C;
24’h842074;
24’h943C88;
24’hA8589C;
24’hB470B0;
24’hC484C0;
24’hD09CD0;
24’hE0B0E0;
24’h003C70;
24’h1C5888;
24’h3874A0;
24’h508CB4;
24’h68A4C8;
24’h7CB8DC;
24’h90CCEC;
24’hA4E0FC;
24’h580070;
24’h6C2088;
24’h803CA0;
24’h9458B4;
24’hA470C8;
24’hB484DC;
24’hC49CEC;
24’hD4B0FC;
24’h002070;
24’h1C3C88;
24’h3858A0;
24’h5074B4;
24’h6888C8;
24’h7CA0DC;
24’h90B4EC;
24’hA4C8FC;
24’h3C0080;
24’h542094;
24’h6C3CA8;
24’h8058BC;
24’h9470CC;
24’hA884DC;
24’hB89CEC;
24’hC8B0FC;
24’h000088;
24’h20209C;
24’h3C3CB0;
24’h5858C0;
24’h7070D0;
24’h8484E0;
24’h9C9CEC;
24’hB0B0FC;
24’h000000;
24’h282828;
24’h505050;
24’h747474;
24’h949494;
24’hB4B4B4;
24’hD0D0D0;
24’hECECEC;
24’h000000;
24’h282828;
24’h505050;
24’h747474;
24’h949494;
24’hB4B4B4;
24’hD0D0D0;
24’hECECEC;
// SECAM Colors
9’d256: outColor
9’d257: outColor
9’d258: outColor
9’d259: outColor
9’d260: outColor
9’d261: outColor
9’d262: outColor
=
=
=
=
=
=
=
24’h000000;
24’h2121FF;
24’hF03C79;
24’hFF50FF;
24’h7FFF00;
24’h7FFFFF;
24’hFFFF3F;
TIAColorTable.v
9’d263:
9’d264:
9’d265:
9’d266:
9’d267:
9’d268:
9’d269:
9’d270:
9’d271:
9’d272:
9’d273:
9’d274:
9’d275:
9’d276:
9’d277:
9’d278:
9’d279:
9’d280:
9’d281:
9’d282:
9’d283:
9’d284:
9’d285:
9’d286:
9’d287:
9’d288:
9’d289:
9’d290:
9’d291:
9’d292:
9’d293:
9’d294:
9’d295:
9’d296:
9’d297:
9’d298:
9’d299:
9’d300:
9’d301:
9’d302:
9’d303:
9’d304:
9’d305:
9’d306:
9’d307:
9’d308:
9’d309:
9’d310:
9’d311:
9’d312:
9’d313:
9’d314:
9’d315:
9’d316:
9’d317:
9’d318:
9’d319:
9’d320:
9’d321:
9’d322:
9’d323:
9’d324:
9’d325:
9’d326:
9’d327:
9’d328:
9’d329:
9’d330:
9’d331:
9’d332:
9’d333:
9’d334:
9’d335:
9’d336:
outColor
outColor
outColor
outColor
outColor
outColor
outColor
outColor
outColor
outColor
outColor
outColor
outColor
outColor
outColor
outColor
outColor
outColor
outColor
outColor
outColor
outColor
outColor
outColor
outColor
outColor
outColor
outColor
outColor
outColor
outColor
outColor
outColor
outColor
outColor
outColor
outColor
outColor
outColor
outColor
outColor
outColor
outColor
outColor
outColor
outColor
outColor
outColor
outColor
outColor
outColor
outColor
outColor
outColor
outColor
outColor
outColor
outColor
outColor
outColor
outColor
outColor
outColor
outColor
outColor
outColor
outColor
outColor
outColor
outColor
outColor
outColor
outColor
outColor
5/6
=
=
=
=
=
=
=
=
=
=
=
=
=
=
=
=
=
=
=
=
=
=
=
=
=
=
=
=
=
=
=
=
=
=
=
=
=
=
=
=
=
=
=
=
=
=
=
=
=
=
=
=
=
=
=
=
=
=
=
=
=
=
=
=
=
=
=
=
=
=
=
=
=
=
24’hFFFFFF;
24’h000000;
24’h2121FF;
24’hF03C79;
24’hFF50FF;
24’h7FFF00;
24’h7FFFFF;
24’hFFFF3F;
24’hFFFFFF;
24’h000000;
24’h2121FF;
24’hF03C79;
24’hFF50FF;
24’h7FFF00;
24’h7FFFFF;
24’hFFFF3F;
24’hFFFFFF;
24’h000000;
24’h2121FF;
24’hF03C79;
24’hFF50FF;
24’h7FFF00;
24’h7FFFFF;
24’hFFFF3F;
24’hFFFFFF;
24’h000000;
24’h2121FF;
24’hF03C79;
24’hFF50FF;
24’h7FFF00;
24’h7FFFFF;
24’hFFFF3F;
24’hFFFFFF;
24’h000000;
24’h2121FF;
24’hF03C79;
24’hFF50FF;
24’h7FFF00;
24’h7FFFFF;
24’hFFFF3F;
24’hFFFFFF;
24’h000000;
24’h2121FF;
24’hF03C79;
24’hFF50FF;
24’h7FFF00;
24’h7FFFFF;
24’hFFFF3F;
24’hFFFFFF;
24’h000000;
24’h2121FF;
24’hF03C79;
24’hFF50FF;
24’h7FFF00;
24’h7FFFFF;
24’hFFFF3F;
24’hFFFFFF;
24’h000000;
24’h2121FF;
24’hF03C79;
24’hFF50FF;
24’h7FFF00;
24’h7FFFFF;
24’hFFFF3F;
24’hFFFFFF;
24’h000000;
24’h2121FF;
24’hF03C79;
24’hFF50FF;
24’h7FFF00;
24’h7FFFFF;
24’hFFFF3F;
24’hFFFFFF;
24’h000000;
TIAColorTable.v
9’d337:
9’d338:
9’d339:
9’d340:
9’d341:
9’d342:
9’d343:
9’d344:
9’d345:
9’d346:
9’d347:
9’d348:
9’d349:
9’d350:
9’d351:
9’d352:
9’d353:
9’d354:
9’d355:
9’d356:
9’d357:
9’d358:
9’d359:
9’d360:
9’d361:
9’d362:
9’d363:
9’d364:
9’d365:
9’d366:
9’d367:
9’d368:
9’d369:
9’d370:
9’d371:
9’d372:
9’d373:
9’d374:
9’d375:
9’d376:
9’d377:
9’d378:
9’d379:
9’d380:
9’d381:
9’d382:
9’d383:
endcase
end
endmodule
outColor
outColor
outColor
outColor
outColor
outColor
outColor
outColor
outColor
outColor
outColor
outColor
outColor
outColor
outColor
outColor
outColor
outColor
outColor
outColor
outColor
outColor
outColor
outColor
outColor
outColor
outColor
outColor
outColor
outColor
outColor
outColor
outColor
outColor
outColor
outColor
outColor
outColor
outColor
outColor
outColor
outColor
outColor
outColor
outColor
outColor
outColor
6/6
=
=
=
=
=
=
=
=
=
=
=
=
=
=
=
=
=
=
=
=
=
=
=
=
=
=
=
=
=
=
=
=
=
=
=
=
=
=
=
=
=
=
=
=
=
=
=
24’h2121FF;
24’hF03C79;
24’hFF50FF;
24’h7FFF00;
24’h7FFFFF;
24’hFFFF3F;
24’hFFFFFF;
24’h000000;
24’h2121FF;
24’hF03C79;
24’hFF50FF;
24’h7FFF00;
24’h7FFFFF;
24’hFFFF3F;
24’hFFFFFF;
24’h000000;
24’h2121FF;
24’hF03C79;
24’hFF50FF;
24’h7FFF00;
24’h7FFFFF;
24’hFFFF3F;
24’hFFFFFF;
24’h000000;
24’h2121FF;
24’hF03C79;
24’hFF50FF;
24’h7FFF00;
24’h7FFFFF;
24’hFFFF3F;
24’hFFFFFF;
24’h000000;
24’h2121FF;
24’hF03C79;
24’hFF50FF;
24’h7FFF00;
24’h7FFFFF;
24’hFFFF3F;
24’hFFFFFF;
24’h000000;
24’h2121FF;
24’hF03C79;
24’hFF50FF;
24’h7FFF00;
24’h7FFFFF;
24’hFFFF3F;
24’hFFFFFF;
ClockDiv16.v
/*
1/1
Atari on an FPGA
Masters of Engineering Project
Cornell University, 2007
Daniel Beer
ClockDiv16.v
Clock divider used to generate atari clocks. Divides the clock by 16 counts.
*/
module ClockDiv16(inclk,
// Input clock signal
outclk,
// Output clock signal
reset_n); // Active low reset signal
input inclk, reset_n;
output outclk;
// Count register
reg [15:0] cnt;
reg outclk;
// Use a 16 bit shift register to divide the clock by 16 counts.
always @(posedge inclk, negedge reset_n)
begin
if (!reset_n)
cnt <= 16’d0;
else
begin
cnt <= {cnt[14:0], ~cnt[15]};
outclk <= cnt[15];
end
end
endmodule
MOS6507.v
/*
1/1
Atari on an FPGA
Masters of Engineering Project
Cornell University, 2007
Daniel Beer
MOS6507.v
Wrapper for a 6502 CPU module that emulates the MOS 6507.
*/
module MOS6507 (A,
// 13 bit address bus output
Din,
// 8 bit data in bus
Dout,
// 8 bit data out bus
R_W_n, // Active low read/write output
CLK_n, // Negated clock signal
RDY,
// Active high ready line
RES_n); // Active low reset line
output [12:0] A;
input [7:0] Din;
output [7:0] Dout;
output R_W_n;
input CLK_n;
input RDY;
input RES_n;
// Instatiate a 6502 and selectively connect used lines
wire [23:0] T65_A;
wire T65_CLK;
T65(.Mode(2’b0), .Res_n(RES_n), .Clk(T65_CLK), .Rdy(RDY), .Abort_n(1’b1), .IRQ_n(1’b1),
.NMI_n(1’b1), .SO_n(1’b1), .R_W_n(R_W_n), .A(T65_A), .DI(Din), .DO(Dout),
.Sync(), .EF(), .MF(), .XF(), .ML_n(), .VP_n(), .VDA(), .VPA());
assign A = T65_A[12:0];
assign T65_CLK = ~CLK_n;
endmodule