1
Front Laser ShifterPros (Continued)
Individual Sensor Installation
1 Using bolts, nuts and washers, mount sensor to
supplied L-shaped bracket and tighten firmly.
2 Using screws, mount L-shaped bracket (with
sensor attached) to solid surface of vehicle grill.
3 Use supplied bubble level to check alignment of
the sensor and ensure it is parallel to the road.
4 Repeat for additional sensor(s).
If you must install sensors behind the front grill of
the vehicle, it is crucial that they be positioned in
such a way that the receiver and transmitter components have unobstructed “views” of the road.
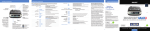
The image at right shows the positions of both the
receiver and transmitter components within the
sensor. The 19.5 mm ellipse (0.77 in) represents
the receiver lens, while the 5 mm (0.20 in) circle
represents the laser diode transmitter.
E
Front Laser ShifterPros (Continued)
Securing Connectors with Shrink Tube
Once you’ve installed all components properly and
tested to ensure all parts are working properly, use
cable ties to fasten sensor cables to a solid surface,
keeping them away from heat and any moving
parts. It is advisable to use the supplied heatshrink tubes to protect connectors against water,
moisture, dust, etc.
Additional ShifterPro Sensors
• Two (2) additional ShifterPro Sensors with
hardware sold separately.
• ShifterPro Sensor software updates available
through ShifterPro Tools at EscortRadar.com
GPS Antenna Yellow Shrink
1 Determine the best location for the GPS antenna.
The GPS Antenna requires a clear view of the sky.
The magnetic base can be used on most vehicles to
mount to the roof of the car or the trunk lid. For
vehicles with non-magnetic surfaces such as
aluminum or plastic, a window-mounted bracket is
included for interior mounting. It can also be
mounted to the dashboard or rear deck using
double-sided tape.
1 Choose a location on the inside of the windshield
or rear window that will provide a wide, clear view
of the sky. This is usually near the base of the
window or just left of the rearview mirror for
metalized windshields.
2 Mount the GPS Antenna, being sure that roof
racks or other obstructions do not block its view of
the GPS satellites.
3 Clean window thoroughly with alcohol.
3 Locate a suitable entry point into the vehicle.
Refer to the Installation Tips section for locating a
suitable entry point.
4 Route the cable through the entry point and
secure along its path. If mounting near the front or
rear window, it is usually possible to tuck the cable
under the gasket surrounding the glass.
5 Once inside the vehicle’s interior, route the cable
to the Interface and plug into the connector labeled
“GPS Module.”
80.00 mm
3.150 in
6 Secure and conceal the cable under interior trim
panels.
19.50 mm
0.768 in
19.50 mm
0.768 in
5.00 mm
0.197 in
9.75 mm
0.384 in
10
Interior Mounting Bracket
11
GPS Antenna
2 Insert the three suction cups into the holes on the
mounting bracket.
4 Place the bracket on the window and press the
bases of the suction cups firmly.
• Tip: To increase the adhesion of the each cup to the
window, squirt a small amount of hairspray or
other light adhesive onto the surface of the suction
cup that mates with the window and then apply
firmly.
5 Place the GPS Antenna onto the mount using the
magnetic base and align the edges. The cable
should point toward the window.
6 Route the cable to the Interface and plug into the
connector labeled “GPS Module.”
7 Secure and conceal the cable under trim panels.