1
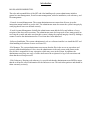
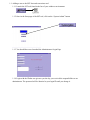
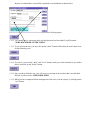
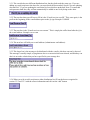
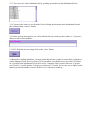
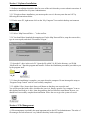
Support Services Tool (SST)
Correction Delivery and Alerts Handling
Administrator's Manual
TABLE OF CONTENTS
Introduction: 1
General Account Management: 4
E-mail Account Management: 8
Software Installation: 11
File Management: 12
Web Coherency: 13
Introduction
ROLES & RESPONSIBILITIES:
The roles and responsibilities of the SST and Alert handling tool system administrator include a
general account management, E-mail account management, software installation, web coherency, and
file management.
~General Account Management: The system administrator must ensure that all users given the
instruction manual on how to use the tool. The administrator must also ensure the system's integrity by
certifying that all users are defined correctly.
~E-mail Account Management: Initially the administrator must add the full e-mail address of every
recipient of the alerts and corrections. The administrator must also keep track of how many people are
receiving the e-mails and make sure that their system is doing the required integrity check by sending a
counter e-mail to the administrator after 25 accounts have been addressed.
~Software Installation: The system administrator's role as a software installer is to install the SST and
Alert handling tool software on new or old user PCs.
~File Manager: The system administrator must ensure that the files in the server are up-to-date and
correctly named and numbered. Also, since the administrator is the only person with contact to the
files, he/she is responsible for any corruption, which may occur in the system. In addition, the
administrator must keep one copy of each e-mail sent to the recipients as a log of all corrections and
alerts that the tool has processed.
~Web Coherency: Keeping web coherency is a special task that the administrator must fulfill to ensure
that the web has the correct information for the end users to use. This task takes patience and should be
taken extremely seriously.
Section 1. General Account Management:
1. Start the process by giving new SST and Alert handling tool users the user-manual and asking
them to fill out the form below. Once they have given you all the appropriate information, create
their user identifications in the server. Instructions for this will be on the next page.
1.1 Adding a user to the SST alert and corrections tool.
1.1.1 Launch the SST tool found in the bar of your windows environment.
1.1.2 Once in the Start page of the SST tool, click on the “System Admin” button
1.1.3 You should have now launched the Administrators Login Page
1.1.4 Login with the ID that was given to you the day you received the responsibilities as an
administrator. The password will be identical to your login ID until you change it.
1.1.5 By entering the correct login ID and password you should have launched the “define system
users” page.
1.1.6 Using this page you will define a new users by their name, employee id, login ID, and their
passwords.
1.1.7 First enter their full name in all caps in the user name box.
1.1.8
Now enter the Employee ID into the “Employee ID” box. The Employee ID crypting used in
the system is the employee id of the user is done as follows.
1.1.8.1 For Example, if the Employee ID of the user were 98745; you would make the following
changes to the number.
1.1.8.2 First take the 4th number in this example (4) and move it to the beginning of the sequence of
numbers, so now you should have 49875.
1.1.8.3 Where the 4th number use to be, copy the first number of the original sequence (in this example
9) in its place so now you should have 498795. This number is your crypted employee id and
will be present on any correction that user wish to release.
1.1.9
Now enter the Login ID, which is simply their company id. For the example of John Doe, it is
USJDOE.
1.1.10 Their password should be their company id for convenience, until they change it for
themselves.
By now you should have successfully completed a user definition as shown below.
1.1.11 Now click on the add button found on the console of this program.
1.1.12 You should receive a message in the text box that user has been added. It will be stated
“JOHN DOE ADDED TO THE USERS”
1.1.13 To see all current users you may click on the “show” button followed by the next button to see
all the following users.
1.1.14 To remove a user use the “show” and “next” buttons, until you see the desired user you wish to
delete, and click on the “delete” button.
1.1.15 Once you have deleted a user, you will receive a message in the text box that a user has been
deleted. It will be stated “USER IS DELETED”
1.1.16 When you have completed all the management of the users, exit the system by clicking on the
“exit” button
Section 2. E-mail Account Management:
2. Administrating the e-mail accounts begins with knowing all the correct recipients of the e-mail and
making sure that all the recipients receive the e-mail. The administrator must also be aware that
any e-mail sent by the SST tool has the administrator as its responsible party and he/she will have
to represent organization when queries regarding the tool are asked.
2.1 To begin the process you will have to have access to the actual server through your PC. Your
manager will provide this access to you.
2.2 Once you have gained access to the server, use windows explorer find the public directory in your
mapped drive.
2.3 Once in the directory called “public,” go to the directory called “mailer” then click on the
“mailer.exe” file
2.4 Now you should have launched the e-mail program. It looks like the figure below.
2.5.1 This e-mailer has two different distribution lists, but they both work the same way. If you are
adding an e-mail recipient to the alerts list, you must check the box marked “check if you are updating
alert mail list”. If you are updating the correction list leave this box unchecked. Note: You must add
each person to both lists; they will not automatically be added to one list by being on the other.
2.5.2 The next box that you will have to fill in is the “E-mail receiver user ID.” This, once again, is the
prefix at the beginning of the e-mail address prior to the @ sign. Example: USJDOE
2.5.3 The next box is the “E-mail receiver server name.” This is simply the suffix found after the @ in
the e-mail address. Example: server.com
2.5.4 This next box will hold your e-mail address (Administartor emil address):
2.5.5 This larger box is the message to be distributed with the e-mails, which are sent out by the tool.
This message is usually simple, saying that an alert or a correction has been released, and that they can
check it out at the website that you have specified in your message box.
2.5.6 When you wish to add a recipient to either distribution list, fill out the boxes recognized in
section 2.5.2 and 2.5.3 with the correct information and click on the “add” button.
2.5.7 You can review either distribution list by scrolling up and down in the distribution list box.
2.5.8 You may also remove a user from the list by clicking on their name in the distribution list and
then clicking on the “remove” button.
2.5.9 In the systems message box you will be informed of any actions you have taken, i.e. if you have
added, or removed list members.
2.5.10 To finish the process simply click on the “close” button.
2.6 Being the e-mailing distributor, you must ensure that all your e-mails are sent to their recipients, to
test the integrity of this, for every group of 25 list members, you should receive an e-mail. So if there
are 15 people in the distribution list you will receive 1 integrity check e-mail. If there are 27 people
you’ll receive 2 e-mails, and for 55 people you will receive 3 e-mails. For an easy way to figure out the
number just take the number of users, divide it by 25, and always round up.
Section 3. Software Installation:
3.1 Software installation should be done for users of the tool when they want to submit corrections. It
must also be installed for all system Administrators.
3.2.1 To begin software installation, you must map the server’s directory onto the user's PC by
following the instructions below.
3.2.2 In the users PC, right mouse click on the “My Computer” Icon on their desktop environment.
3.2.3 Select “Map Network Drive…” in the tool bar.
3.2.4 You should have launched the mapping tool. In the Map Network Drive, map the correct drive,
type its correct path, and check "Reconnect at logon."
3.3 Open the Z: drive in the user's PC. Open the file called Vb_dll. In the directory you’ll find
“Msvbvm50.exe.” Run this program and install it. Follow the installation procedures provided to you
by the program itself.
3.3.1 Once the installation is complete, you must reboot the computer. Do not interrupt the setup or
“Program Group Control” until it is successfully completed.
3.3.2 Add the S-Serv Icon to their Start scroll button so that they can access the tool.
You will be provided with a disk, which has the icon in it. Simply open the "my computer" icon on
their desktop and look in A: drive, then drag and drop the Icon into their start button. By now you
should have successfully completed an installation. Allow the user to give the system a test run.
Section 4. File Management:
4.1 File management is probably the most important task as the SST tool administrator. The tasks of
file manager and web master are very linked in that they both work together.
4.2 Understanding the setup of the files is the first and foremost important task as file manager.
4.2.1 To begin you must learn the pattern in which files are stored in the server, and their relation with
the way things are presented and stored on the web.
4.2.1.1 First there is the drive or server itself. Then you have access to the next two important directory
which are the “SST”, and the “Alerts” directory, these are the main directory where all the correction
and alerts are held respectively.
4.3.1 The Alerts portion of the tool is very self reliant, and does not to be maintained.
4.3.2 In the case of the corrections you must address the following issues. Is the last SST number
correct that is being submitted for this system type. If an engineer make a mistake, can I edit the files
or rename the files to ensure system integrity
4.3.3
The way a correction is stored is as follows. This information is key to you when you need to
address a specific problem with a correction.
4.3.3.1 Their first parent directory is dependant of what kind of correction it is. If it is a generic or site
specific. The next directory is the “system type” directory, these are determined by allocated
alphabetical letter which the system can recognize. The next level is dependent on the Revision
of a system, the next level is the Correction level and finaly correction numbers.
4.3.3.2 With knowledge of the treeing of files you can easily find a document which you are interested
in.
4.4.
Editing of documents is up to your jurisdiction, and depending on how you wish for the
information to be submitted you can change it to match your current documentation for
coherency.
4.5.
Basically file handling is an important part of running the tool smoothly, but it is important for
the file manager to be competent, but this can only be a limited guide.
Section 5. Web Coherency:
5.1 Web Coherency is a small part of the administrator. The tool practically builds the website by
itself.
5.2 The only essential times when an administrator has to worry about web coherency is when
something has happened to cause the site to be in disarray, or a submitting engineer must make a small
correction.
5.3 To ensure that the system does not go completely out of control is essential to make back up files
on a regular basis. These back up files should be in a remote drive, other than the server and have all
the important files stored in them in case of an emergency situation.
5.3.1The most important files to back up are the folders labeled “Alerts” and the other labeled
“Corrections”. Most everything else can be lost with no remorse.
5.4 For correction with the engineer, find the exact file or files they wish to edit, and edit their HTML
code by using “note pad” and make sure to save them as text files. Editing the files in “word” or even
sometimes “word pad” can cause the file to become corrupted. It is important not to open any page of
this tool with the Frontpage or Netpe composer or any other page-composing tool.
5.5 In the “suggestions:” make sure to have the administrator’s e-mail address, and the name of the
group for which they work.