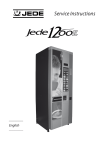
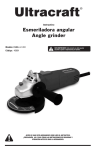
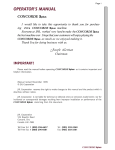
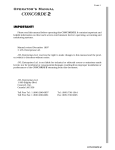
1
SDK for APS Master Interface®
Version 3.0
User Manual
APS®, Automatic Payment Systems
March 2011
Revision Sheet
Release No.
1.0
2.0
Date
Feb 3rd, 2009
March 9, 2011
APS Master Interface® User's Manual
Revision Description
Initial Release
APS Master Interface Version 3.0 is released with new
features, drivers and software interface.
1.0 GENERAL INFORMATION
1.1 System Overview
The APS Master Interface® allows connecting a Bill Validator and/or Coin Acceptor using the
standard MDB Vending Protocol to a PC running Microsoft Windows XP. The APS Master
Interface® is connected to one of the USB ports in the PC.
A Multidrop Bus (MDB) is a computer bus in which all components are connected to the same
set of electrical wires. A process of arbitration determines which device gets the right to be the
sender of information at any point in time. The other devices must listen for the data that is
intended to be received by them.
Multidrop Buses are used by Vending Machine controllers to communicate with the vending
machine's components. The APS Master Interface® opens the doors for a wide range of
customized applications using a simple PC to control all the machine's components.
The Software Development Kit (SDK) for the APS Master Interface® includes all the drivers
required to operate the equipment and also a Visual Basic sample code to speed up the learning
process on creating new applications with this system.
1.2 Authorized Use Permission
Usage of the APS Master Interface® software is limited to its owner via the APS Terms and
Conditions (26/08/2004).
1.3 Points of Contact
For additional information, APS Team can be contacted through our technical support email at
[email protected]
1.4 Acronyms and Abbreviations
MDB
SDK
APS
AMI
Multidrop Bus
Software Development Kit
Automatic Payment Systems
APS Master Interface
APS Master Interface® User's Manual
2.0 SYSTEM SUMMARY
2.1 Hardware Configuration
The APS Master Interface® (AMI) is configured to be connected to one available USB port in a
PC Running Windows XP. Using the MDB Master Interface Cable it is possible to connect a Bill
Validator and/or a Coin Acceptor.
Bill Validator
PC Running
Windows XP
with one USB Port
Available
Coin Acceptor
CPU
USB Cable
MDB Master
Interface Cable
APS Master Interface
PowerPower
SupplySupply
24V 5A
Power Source: 120V
AMI is powered up by the USB connection. An additional External Power Supply is required to
power up the Bill Validator and/or Coin Acceptor.
AMI contains the electrical interface for MDB master, the device is compliant with the timing of
the MDB 4.0 Specification. Some low level parts of the MDB communication is implemented
directly on the interface microcontroller. This allow to meet the MDB timing specification and to
control the mode bit of the MDB protocol.
To communicate with a MDB slave, we must use the MDB master of the interface. The timing
and mode bit control is handled by the interface microcontroller. The full MDB Data Frame,
including command and checksum, is send to the interface endpoint. The response of the MDB
slave is then read from the interface endpoint.
APS Master Interface® User's Manual
2.2 Software Configuration
APS Master Interface Software was developed to allow the interaction of any application written
in any programming language that is able to communicate and change "Windows Registry"
values in the Windows XP Operative System.
AMI Software consists on two different modules:
a) APS Master Interface Drivers: Used to control the AMI Hardware via USB Port.
b) APS Master Interface Engine: Used to control the functions of the AMI Hardware including
the operation of one Bill Validator and/or one Coin Acceptor. The AMI Engine is also the link
that communicates those devices with Your Application using Windows Registry
variables/values.
Data Base
Used by
Application
Bill Validator
And/or
Coin Acceptor
APS Master Interface
Engine
+
APS Master Interface
Drivers
Windows Registry
Settings/Status
Variables
Your Application
Windows Registry values are used to store AMI Engine settings such as General Settings for Bill
Validator and Coin Acceptor, type of bills to accept, value of the type of bills accepted, type of
coins to accept, enable/disable delivery of change, etc.
The AMI Engine must be initialized before the payment procedure starts. The AMI Engine will
run in the background waiting for the Application to trigger the payment process.
A typical Application consist on a software that request the user to provide an account number or
a selection of a product, then the system connects to a Data Base to get the amount of money that
the user will pay using the Bill Validator and/or Coin Acceptor.
APS Master Interface® User's Manual
Once the amount of money to be paid is defined, Your Application will write this value in a
Windows Registry variable. The AMI Engine continuously monitoring the Windows Registry
variables will detect that the value to charge, will activate the Bill Validator and/or Change
Acceptor and wait for the user to complete the payment.
While the AMI Engine is receiving the payment from the user it will continue updating the
Windows Registry variables with the due amount, the status of the equipments and the credit
already paid. At the same time, your application will wait and monitor the Windows Registry
variables until the payment is done, before continuing with the next step in the selling process.
You can also setup in Your Application a "Cancel" button, so the user is able to cancel the
payment process at any time. This is also done using the Windows Registry variables
communicating with the AMI Engine.
Once the payment is done the AMI Engine will calculate the difference between the due amount
and the credit, if your Coin Acceptor is able to dispense change and that function is enabled in
the AMI Engine Settings, the user will receive his change in coins.
2.3 Software License
Every APS Master Interface Hardware is sold with one license of the APS Master Interface
Engine software. If you want to install the AMI Engine in a different computer from the one that
the AMI will be used, you need to request a new license to APS.
If you have any questions regarding our License Policy please contact us (Use contact
information provided in Section 1.3 of this Manual).
2.4 System Requirements
Before you install your APS Master Interface Engine software, please make sure your computer
meets the following minimal system requirements:
•
•
•
•
Microsoft(R) Windows XP(R) Professional with SP2
Intel(R) Pentium(R) Processor (1.73 GHZ)
1 LAN Network Port
1 Universal Serial Bus (USB 2.0)
APS Master Interface® User's Manual
2.5 Hardware and Software Compatibility
As we continue looking to increase the amount of Bill Validators and Change Acceptors tested
with our APS Master Interface we can say that most of the MDB protocol devices are compatible
with our equipment with minor adjustments.
With the development of the APS Master Interface Engine now you are able to configure each
Brand and Model according to the factory settings preloaded in every equipment. If for any
reason you need to change the Brand of the equipment used, you can easily do it using the AMI
Engine Console to update your settings.
Here is the list of the equipment successfully tested by APS:
Change Acceptor
Brand: MEI
Model: Cashflow 7000
Protocol: MDB
Change Acceptor
Brand: MEI
Model: Cashflow 690/691
Protocol: MDB
Bill Validator
Brand: CashCode
Model: Backload Validator
Protocol: MDB
Bill Validator
Brand: ICT
Model: TAO V MXP4
Protocol: MDB
Change Acceptor
Brand: COINCO
Model: GLOBAL MXPF703
Protocol: MDB
If you have a different equipment not listed in this table, please feel free to contact our Technical
Support Staff to get the latest information on tested equipment (Use contact information
provided in Section 1.3 of this Manual).
APS Master Interface® User's Manual
3.0 GETTING STARTED
3.1 Extracting from the .zip files
3.1.1 APS_Master_Interface_Driver_V3.0.zip
The APS Master Interface hardware requires USB drivers to work with your computer, those
drivers are distributed in a .zip file (APS_Master_Interface_Driver_V3.0.zip) containing 2
files that you will need once the Interface is connected for the first time to your computer's USB
port (Details on how to install the Interface will be described in the next chapters).
3.1.2 APS_Master_Interface_Engine_V3.0.zip
The APS Master Interface Engine is the main application that will be used to setup the
parameters and also is used to run in the background to communicate with your application and
control the functions of the Bill Validator and/or Coin Acceptor. The installation files are
distributed in the APS_Master_Interface_Engine_V3.0.zip file. After your have uncompressed
it you will find the following files (Details on how to install the APS Master Interface Engine
will be described in the next chapters).
3.1.3 SDK_APS_Master_Interface_V3.0.zip
The SDK for APS Master Interface is distributed in a .zip file containing a sample application
that will help you to develop your own applications (SDK_APS_Master_Interface_V3.0.zip).
After you have uncompressed it you will find the following files:
APS Master Interface® User's Manual
3.1.3.1 APS_Master_Interface_Engine.exe
As mentioned before, the APS_Master_Inteface_Engine.exe is the main application that controls
all the functions of the Bill Validator and Coin Acceptor. Please note that this file might not run
properly if the installation is not completed correctly as it will be described in the next chapters.
This executable file requires several additional components that normally are not installed in a
regular Windows XP environment. If you start this application prior to the installation of the
files, it will return an error message related to the missing components.
3.1.3.2 SDK_APS_Master_Interface.vbp
SDK_APS_Master_Interface.vbp is a sample application written in Microsoft(R) Visual Basic
6.0 to demonstrate the use of the AMI Engine. Feel free to modify the source code to integrate it
to your application.
3.2 Installing the APS Master Interface
3.2.1 Connecting the Interface and Installing the Drivers
After you uncompressed the drivers in your computer follow the next steps to Install your APS
Master Interface for the first time:
1. Connect the APS Master Interface to your
computer using an USB Cable.
Note: At this stage it is not necessary to
connect the MDB Master Cable to your Bill
Validator and/or Coin Acceptor.
The APS Master Interface hardware is
powered up directly from the USB port so it
is not necessary to connect the power supply
neither.
APS Master Interface® User's Manual
2. Windows XP will detect your new
hardware and start the "Found New
Hardware Wizard".
Select the "No, not this time" option.
Click the "Next >" button.
3. The wizard will show the name of the
"APS Master Interface" and ask if you have
the installation files.
Select the "Install from a list or specific
location (Advanced)" option.
Click the "Next >" button.
4. The wizard will ask you to choose your
search and installation options.
Select "Search for the best drivers in this
locations." and disable "Search removable
media (floppy, CD-ROM...)".
Select "Include this location in the search:"
then click the "Browse" button to find the
folder "APS_Master_Interface_Driver_V3".
APS Master Interface® User's Manual
5. The wizard will search for the APS
Master Interface drivers in the selected
folder.
6. If the destination folder was selected
correctly the wizard will show the "APS
Master Interface" driver.
Select the "APS Master Interface".
Click the "Next >" button.
7. You will receive a notification stating that
the APS Master Interface "has not passed
Windows Logo testing to verify its
compatibility with Windows XP".
Ignore the message and click the "Continue
Anyway" button.
9. Congratulations! now your APS Master
Interface is installed and ready to use.
Click "Finish".
APS Master Interface® User's Manual
3.2.2 Checking the correct installation of the APS Master Interface
At this point, you already installed the drivers that will be used to control the APS Master
Interface. You can check if the drivers were installed correctly by following the next steps:
1. Using the Control Panel go to the
“Components Manager”, then look for the
“Ports (COM & LPT)” section. If the APS
Master Interface was correctly installed you
will find it there.
The COM port between parentheses
indicates the port number where the APS
Master Interface is currently connected. If
you change to another port this number will
be updated.
2. Right click on the APS Master Interface
icon and select “Properties.
Look for the “Port Configuration” tab and
make sure the parameters are setup like the
image on the left.
APS Master Interface® User's Manual
3.3 Installing the APS Master Interface Engine
As we explained before the APS Master Interface Engine (AMI Engine) is the main software that
will be used to setup the parameters of the Bill Validator and/or Coin Acceptor. Once your
application is operating, the AMI Engine will be running in the background to communicate with
your application and control the equipment connected to the interface.
IMPORTANT: The AMI Engine license can be used in only one computer. If you
need to install the AMI Engine in a different computer you need to buy a new
license (Please refer to chapter 2.3 for more details on this matter). Once the
software is installed, you cannot uninstall and install it again in a new computer.
1. Find the "Setup.exe" file inside the
APS_Master_Interface_Engine_V3.0 folder and
double click on it. Follow the instructions from the
install wizard until the application is fully installed.
2. Find the “APS Master Interface Engine V3.0” in
the Start Menu and click on it.
3. You will receive a warning message indicating
that your copy of the software is not registered yet:
"APS Software Not Registered".
The AMI Engine software will generate an unique
Serial Number for your computer.
APS Master Interface® User's Manual
4. Send an email to APS requesting
your Validation Key (email address
can be found in chapter 1.3).
Write the name of your Company.
Copy and paste the Serial Number
into the body of your message.
5. You will receive an email back
from APS with your Validation Key
number.
6. Once you get the Validation Key you will need to
open the AMI Engine again, once you get to the
"APS Software Not Registered" screen write your
Company Name and Validation Key in the
appropriate text boxes.
Click the "Save" button (The screen will be closed).
7. In the next chapters you will learn that there are two
methods of opening the AMI Engine. One is by double
clicking in the .exe file and the second is calling it directly
from the Command prompt (used to run the application in
the background).
Regardless of the method you use, if you Registered your
software correctly, you will see this screen every time you
run the AMI Engine application.
APS Master Interface® User's Manual
3.4 Connecting the Bill Validator and/or Coin Acceptor
Once you have installed your APS Master Interface Engine software and registered it you are
ready to connect the Bill Validator and/or Coin Acceptor to you APS Master Interface. As we
mentioned before, the AMI will get the power from the USB connection. You will need a Power
Supply for the Bill Validator and/or Coin Acceptor (Power requirements change between
different brands, usually a 24V to 36V @ 4A power supply should work with your MDB
devices).
Please follow the picture bellow as a guide to connect your equipments to the AMI. You can use
a stand alone Coin Acceptor or Bill Validator. In case you want to use both equipments, first you
must connect your Bill Validator to the MDB Master Cable and then use the built in cable to
connect your Coin Acceptor as it is shown in the picture bellow.
BILL VALIDATOR
COIN ACCEPTOR
MDB MASTER
CABLE
CABLE TO 24V 5A
POWER SUPPLY
APS
MASTER
INTERFACE
COIN ACCEPTOR
MDB CABLE
USB CABLE
CONNECTED TO
COMPUTER
BILL VALIDATOR
MDB CABLE
Some equipment have to be configured to support the MDB protocol. Please make sure your
equipment meet this requirement before connecting it to the AMI. If your equipment is already
included in the list of equipment tested by APS (Chapter 2.5) and you need additional
information on how to set it up, please feel free to contact us to support you on this task.
APS Master Interface® User's Manual
4.0 USING THE SOFTWARE
The APS Master Interface Engine software has two operating modes: APS Master Interface
Engine Console (Used to setup parameters, debug your application and test Bill Validator and/or
Coin Acceptor) and the APS Master Interface Engine Hide (Used to control the Bill Validator
and/or Coin Acceptor while your application is running. In this mode the AMI Engine will be
running in the background and won't be visible to the user).
4.1 APS Master Interface Engine Console
Before starting the APS Master Interface Engine Console make sure your APS Master Interface,
Bill Validator and/or Coin Acceptor are connected and powered.
To start the AMI Engine Console you just need to double click on the file
APS_Master_Interface_Engine.exe or open it directly from Start Menu and you will see the
following screen:
The AMI Engine Console is divided into four sections: Test Console, General Settings, Coin
Acceptor and Bill Validator. In the following chapters we will describe in detail every single
one.
APS Master Interface® User's Manual
4.1.1 General Settings
The AMI Engine V3.0 is different from the previous versions in
the General Settings section. For this new version the only
parameter to setup is the COM Port assigned to the APS Master
Interface connected to the USB.
If you don’t know what COM Port has been assigned to the APS
Master Interface, follow the steps on Section 3.2.2 (“Checking the
correct installation of the APS Master Interface”).
If you select a wrong Port or the APS Master Interface is not
connected properly to that Port you will receive an Port Error
message asking you to select another Port.
The Error message will disappear when you have selected the
correct Port and the communication is established between your
computer and the APS Master Interface.
If you have a computer that doesn't meet the specification
described in chapter 2.4, please contact us to help you to define the
best parameters for your system (Please note that not all the
systems will work with the AMI).
If you make changes to the General Settings you need to press the
"Save" button so they are available next time you run the AMI
Engine Console.
APS Master Interface® User's Manual
4.1.2 Bill Validator Settings
Bill Validator Settings are used to enable/disable the use of a Bill Validator and also to specify
the value of a bill assigned to each type.
Click on the Bill Validator Enabled checkbox to activate/deactivate the Bill Validator.
MDB protocol requires Bill Validators to send the "Bill Type" inserted by the user when the
equipment is operating. There are 16 different types of bill supported by the MDB protocol.
The "Bill Type" is a number from 1 to 16. Each Bill Validator manufacturer has different
assignments for the value of the "Bill Type". This setting must be updated manually once you
have the right value for each type of bill.
Default values for the Bill Validator Settings were defined using an ICT Bill Validator where the
"Bill Type" number 01 is not used, number 02 is 20 pesos, etc... "Bill Type" from number 06 to
number 16 are not used in this type of Bill Validator.
You can disable the use of a "Bill Type" by clicking in the checkbox next to it. Don't forget to
click "Save" if you want to keep your changes.
All the fields showing a N/A value will be updated automatically once the Bill Validator is
activated an has established the communication with the APS Master Interface.
APS Master Interface® User's Manual
4.1.3 Coin Acceptor Settings
Coin Acceptor Settings are used to enable/disable the use of a Coin Acceptor and also to specify
the type of coins to be used. Please note that unlike the Bill Validator in the Coin Acceptor is not
possible to assign the value to each type of coin. This information is already programmed in the
Coin Acceptor and will be communicated to the AMI Engine once the equipment is activated
and has established communication with the APS Master Interface.
To enable/disable the use of a coin, just click on the checkbox next to the "Coin Type" number.
With Version 3.0 of the AMI Engine Console now is possible to get the actual value of the coins
programmed in the Coin Acceptor, also now is possible to know the exact quantity of coins in
the tubes, their values and the total amount in those tubes. These features were not available in
previous versions.
If you want to dispense change using your Coin Acceptor you just need to activate the function
by clicking in the "Enable Change" checkbox.
All the fields showing a N/A value will be updated automatically once the Coin Acceptor is
activated an has established communication with the APS Master Interface.
APS Master Interface® User's Manual
4.1.4 Test Console
Once you have finished with the setup of your parameters you can use the Test Console to verify
that your Bill Validator and/or Coin Acceptor are working correctly.
To test your equipment you just need to type the Amount of money to be charged in the
"Amount" textbox, then click the "Pay" button. The AMI Engine Console will activate the Bill
Validator and/or Coin Acceptor so you can start inserting the money.
When you click the "Pay" button, the text in the button will change to "Stop Payment...". You
can click on this button at any time to cancel the payment process.
Once the payment operation is in process, the Status Display will change to an active role
displaying the status and balance of the amont due. The Status Display is divided in 3 sections:
a. The top section displays the amount of money due.
b. The middle section displays the credit or amount of money already paid.
c. The botton section display the status of the AMI Engine Status.
AMI Engine Test Console is very usefull when you are writing your applications, you can
always use it to debug your code and monitor the payment functions. When you integrate AMI
Engine to your application, this is the same software that will communicate with your devices,
but the AMI Engine will be hidden to the user.
APS Master Interface® User's Manual
4.2 APS Master Interface Engine Console "Hide"
The APS Master Interface Engine Console "Hide" is the same application described in the
previous chapter, the only difference is that the application runs in the background without
displaying any Forms. While your are using the AMI Engine Console using the "Hide"
parameter, your will be able to control the payment process using your Bill Validator and/or
Coin Acceptor, but you won't be able to change the parameters.
Here an example of how you can call the AMI Engine Console using a regular DOS line
command with the “/hide” parameter.
Once you are programming your application, you need to find the right code to call the AMI
Engine Console from your selected platform. Check our SDK for APS Master Interface with a
real example using Visual Basic code.
4.2.1 Windows Registry Settings for AMI Engine Console
The Windows Registry is a database which stores settings and options for Microsoft Windows
operating systems. It contains information and settings for hardware, operating system software,
most non-operating system software, and per-user settings. The registry also provides a window
into the operation of the kernel, exposing runtime information such as performance counters and
currently active hardware.
AMI Engine Console uses the Windows Registry database to save the application parameters and
also to communicate with you application. By using this database we are able to support any
programming language since the values are available from any platform.
APS Master Interface® User's Manual
Windows Registry can be accessed manually using the "Regedit" utility from Windows XP.
Once the Windows Registry editor is open, you can find the AMI Engine Console parameters
under the HKEY_USERS directory in My PC:
My PC\HKEY_USERS\S???\Software\VB and VBA Program Settings\APS
Note: As the "S???" can be different from one computer to another, you can also search for the
right path using the "Search" menu option typing "VB and VBA Program Settings" as the
searched item.
AMI Engine Console uses five Windows Registry categories to storage all the parameters and
variables to communicate with your applications: BillValidator, CoinAcceptor, License, Settings
and Status.
APS Master Interface® User's Manual
4.2.2 License Windows Registry
License Windows Registry is used to record the values used by the AMI Engine Console
validation software to authenticate the license number registered by the customer. As this value
can be changed manually we don't recommend it because any mistake on typing the numbers can
block you from using the AMI Engine Console application.
4.2.3 Settings Windows Registry
Settings Windows Registry is used to record the values used by the AMI Engine Console to set
the parameters of the Bill Validator and Coin Acceptor. As this values can be changed manually
we recommend using the AMI Engine Console described in Chapter 4.1
APS Master Interface® User's Manual
4.2.3 Status Windows Registry
Status Windows Registry values are used to communicate the AMI Engine Console with your
application. While there are seven variables under this section, only three (Due, Cancel, Exit)
should be updated by your application and the other four (Change, Credit, Status, Tubes) will be
automatically updated by the AMI Engine Console.
APS Master Interface® User's Manual
4.3 SDK APS Master Interface – Main Form
Integrating the APS Master Interface Engine to your application is very simple. We have
developed a Visual Basic sample application that can be used to explain how to control the
payment systems connected to your machine.
The SDK APS Master Interface is distributed in a .zip file as described in chapter 3.1.3. The
Visual Basic Project has one form named “Main.frm”.
4.3.1 Main Form elements: “due”
The Main Form has several labels that are used to display the current status of the payment
process. The “due” Label is used to display the amount to be paid by the customer when the
customer clicks on the “Pay” button.
This is a fix value that won’t change during the payment.
4.3.2 Main Form elements: “display”
The “display” Label is used to show the amount of money introduced into the Bill Validator
and/or Coin Acceptor during the payment process. This value is not fix and will change every
time a coin or bill is inserted.
APS Master Interface® User's Manual
4.3.3 Main Form elements: “status”
The “status” Label is used to show the current step on the payment process after the Pay Button
is pressed. The APS Master Interface Engine will report 4 possible conditions: “Insert Coins or
Bills…”, “Payment Completed”, “Transaction Cancelled”, “Dispensing change…”.
4.3.3.1 Insert Coins or Bills...
“Insert Coins or Bills…” status will be displayed after the Pay Button is pressed. If the setup is
properly configured in this step the Bill Acceptor and/or Coin Validator should be active and
ready to receive Bills and/or Coins.
4.3.3.2 Payment Completed
“Payment Completed” status is used to indicate that the user has completed the payment process.
At this step the “due” and “credit” amounts have the same monetary value.
4.3.3.3 Transaction Cancelled
After they Pay Button is pressed to start the payment process, it will change the text displayed in
the Button from “Pay” to “Cancel”.
If the Cancel button is pressed, it will stop the payment process and the “status” Label will
display the “Transaction Cancelled” legend.
If the APS Master Interface is setup to dispense change, the application will return the credit
amount using coins only.
4.3.3.4 Dispensing change...
“Dispensing change…” status is used to indicate that the Coin Acceptor is returning coins to the
client. Dispensing change process time can vary depending on the amount to be returned.
APS Master Interface® User's Manual
4.4 SDK APS Master Interface – Visual Basic Code
As we explained in the previous section, the SDK APS Master Interface sample application has
one form called “Main.frm”. In this section we will explain the 4 “Subroutines” used to
communicate the application with the “APS Master Interface Engine”.
Option Explicit
Private Sub Form_Load()
Dim InitEngine As Double
'
'
'
'
'
Open APS Master Interface Engine
This Engine will perform all the functions and communication between your computer and
the payment systems: Bill Validator and/or Coin Acceptor
If you want to debug your application, you can ommit the /hide parameter to view the
APS Master Interface Engine Console.
InitEngine = Shell("APS_Master_Interface_Engine.exe /hide", 1)
'
'
Reset "Regedit" variables
These variables are used to communicate your application with the APS Master Interface Engine
SaveSetting "APS", "Status", "Due", "0"
SaveSetting "APS", "Status", "Credit", "0"
SaveSetting "APS", "Status", "Status", ""
SaveSetting "APS", "Status", "Cancel", ""
SaveSetting "APS", "Status", "Exit", ""
display.Caption = Format(0, "currency")
status.Caption = ""
due.Caption = "DUE AMOUNT: " & Format(0, "currency")
End Sub
Private Sub Form_Terminate()
SaveSetting "APS", "Status", "Exit", "1"
End Sub
Private Sub Pay_Click()
If Pay.Caption = "Pay" Then
SaveSetting "APS", "Status", "Due", Val(amountToPay.Text)
Timer1.Enabled = True
Pay.Caption = "Cancel"
Else
Pay.Caption = "Pay"
SaveSetting "APS", "Status", "Cancel", "1"
display.Caption = Format(0, "currency")
status.Caption = ""
due.Caption = "DUE AMOUNT: " & Format(0, "currency")
Timer1.Enabled = False
End If
End Sub
Private Sub Timer1_Timer()
display.Caption = Format(Val(GetSetting("APS", "Status", "credit", "")), "currency")
due.Caption = "DUE AMOUNT: " & Format(Val(GetSetting("APS", "Status", "due",
"currency")
status.Caption = GetSetting("APS", "Status", "Status", "")
If Val(GetSetting("APS", "Status", "due", "")) <= 0 Then
Timer1.Enabled = False
Pay.Caption = "Pay"
End If
End Sub
APS Master Interface® User's Manual
"")),
4.4.1 Sub Form Load()
The “Sub Form Load()” is the first code executed when the application is launched. The “Shell”
function is used to start the “APS_Master_Interface_Engine.exe” with the “/hide” parameter set
as we described in chapter 4.2. The number “1” parameter of the “Shell” function is used to stop
the execution of next steps until the “APS_Master_Interface_Engine.exe” is loaded.
Private Sub Form_Load()
Dim InitEngine As Double
'
'
'
'
'
Open APS Master Interface Engine
This Engine will perform all the functions and communication between your computer and
the payment systems: Bill Validator and/or Coin Acceptor
If you want to debug your application, you can ommit the /hide parameter to view the
APS Master Interface Engine Console.
InitEngine = Shell("APS_Master_Interface_Engine.exe /hide", 1)
'
'
Reset "Regedit" variables
These variables are used to communicate your application with the APS Master Interface Engine
SaveSetting "APS", "Status", "Due", "0"
SaveSetting "APS", "Status", "Credit", "0"
SaveSetting "APS", "Status", "Status", ""
SaveSetting "APS", "Status", "Cancel", ""
SaveSetting "APS", "Status", "Exit", ""
display.Caption = Format(0, "currency")
status.Caption = ""
due.Caption = "DUE AMOUNT: " & Format(0, "currency")
End Sub
“SaveSetting” is the Visual Basic Function used to write into the Regedit variables. As we
explained before, these variables are being monitored by the “APS_Master_Interface_Engine”
application that is running in the background.
4.4.2 Sub Form Terminate()
The “Sub Form Terminate()” will request to stop the “APS_Master_Interface_Engine”
application by Saving the value “1” into the “Exit” Regedit variable.
Private Sub Form_Terminate()
SaveSetting "APS", "Status", "Exit", "1"
End Sub
APS Master Interface® User's Manual
4.4.3 Sub Form Pay_Click()
The “Sub Form Pay_Click()” is the action attached to the “Pay CommandButton” from the
“Main.frm”. When the button is clicked the application will check the current legend on the
button, based in this information will decide if the application should start the payment process
or cancel it.
The payment process starts by setting the “Due” Regedit variable to a value greater than 0. At
this moment, the APS Master Interface Engine will activate the Bill Validator and/or Coin
Acceptor according to the parameters setup.
In order to monitor the payment process and know when the process is completed we use a
“Timer” control. In this case our “Timer1” control is setup to cycle every 5ms once it is enabled.
Private Sub Pay_Click()
If Pay.Caption = "Pay" Then
SaveSetting "APS", "Status", "Due", Val(amountToPay.Text)
Timer1.Enabled = True
Pay.Caption = "Cancel"
Else
Pay.Caption = "Pay"
SaveSetting "APS", "Status", "Cancel", "1"
display.Caption = Format(0, "currency")
status.Caption = ""
due.Caption = "DUE AMOUNT: " & Format(0, "currency")
Timer1.Enabled = False
End If
End Sub
To notify to the APS Master Interface Engine that the payment process should Stop it is
necessary to setup the “Cancel” Regedit variable to “1”. If the dispense change parameter is
setup the current credit amount will be returned to the client.
4.4.4 Sub Timer1_Timer()
The “Sub Timer1_Timer()” will be running in cycles every 5ms to monitor the status of the
“credit”, “due” and “status” Regedit variables. The information will be displayed in the
“Main.frm” Text Labels. Once the “due” amount is equal or less than 0 the cycle stops.
Private Sub Timer1_Timer()
display.Caption = Format(Val(GetSetting("APS", "Status", "credit", "")), "currency")
due.Caption = "DUE AMOUNT: " & Format(Val(GetSetting("APS", "Status", "due",
"currency")
status.Caption = GetSetting("APS", "Status", "Status", "")
If Val(GetSetting("APS", "Status", "due", "")) <= 0 Then
Timer1.Enabled = False
Pay.Caption = "Pay"
End If
End Sub
APS Master Interface® User's Manual
"")),
APS®, Automatic Payment Systems
Camino del Canelo 214
San Martin del Tajo
Tlajomulco de Zuñiga, Jalisco
C.P. 45643, México
Teléfono Oficina: +52 (33) 1522 9938
Correo Electrónico: [email protected]
Página en Internet: www.apsmx.com
APS es una marca registrada de Automatic
Payment Systems. APS Master InterfaceR
es una marca registrada de APS. Todos los
derechos reservados.
APS Master Interface® User's Manual