1
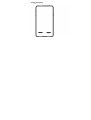
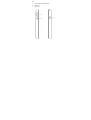
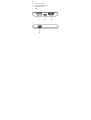
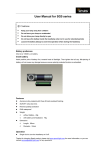
K3 User Manual
www.innovative.com.sg
Contents
Appearance, parts and name of product………2
Product specification..……………………………..….3
Charge the projector…………………………….….….3
Connection of projector………………………..…….4
Startup and operation of projector………………4
Volume adjustment………………………………..……5
Manual focusing………………………………….………5
Use the projector to charge other product….5
Important safety information……………………..5
Trouble shooting…………………………………….…..8
Trademarks…………………………………………………8
[Parts of projects]
Front
backside
Side
1.
Volume adjustment/FOCUS key
2.
Mode key
3.
Power key
Side
1.
2.
3.
4.
USB 5V OUT interface
Micro USB charging interface
HDMI/MHL interface
LENS
[Product specification]
Dimension: 135*68*10.5mm
Brightness: 30LM
Dimension of projection image (recommended): 10" ~
60"
Projection distance (recommended): 383mm~2267mm
Contrast: 1500:1
(
)
Resolution: 640*360 WVGA
:
Screen ratio: 16 9
Charger specification: DC 5V 2.1A (use 5V 800MA
charger when charging the projector. The
project shall be shut down when
charging)
Built-in battery: 3.7V/3400mA
Battery life:
>2.5hours
Built-in speaker: 2 pieces of 1W speaker
[Use instruction]
1. Charge the projector
1.1. Use the power adapter (not included) and power
wire (included) to charge the projector. Using nonstandard power wire may cause charging abnormity.
1.2. There are 4 charging LED indicators. The white
indicators will flash in turn when charging, and will stop
flashing and stay lightened when the charging is
completed.
Attention: For the initial use, the battery of the
projector shall be fully charged for about 4-5 hours. The
working hour of projector is above 2.5 hours.
1.3
Press the power key to check the battery status.
When only one lightened LED indicator is left, it means
the battery of the projector is low. Connect the power
adapter and charge the projector promptly to avoid the
automatic power off when the battery is low.
.
2. Connection of projector
.
2.1 Connect the power adapter with the power
connected to the USB power interface of the projector.
2.2. Connect one end of the HDMI data wire (included
in the packaging) to the HDMI interface of the
projector, and other end to a device like notebook,
smart phone, pad etc. (Notes: certain device may
need a converter to connect the HDMI data wire). Or
connect the HDMI interface of MHL data wire
(included in the packaging) to the projector, and Micro
USB interface of the data wire to smart phone.
Attention! when connecting to Apple device,
please use Apple Data AV adapter (to be purchased
separately) to connect the HDMI data wire (included
in the packaging).
When connecting to other device, please inquire the
manufacturer or distributor of the product. The
connection may need other converter to connect the
HDMI data wire (such as Micro or Mini HDMI
converter).
3. Startup and operation of projector
3.1. Long press the power button (about 5 seconds) to
start the projector.
3.2. Choose and play your favorable movie or file by the
device connected to the projector.
3.3. The projector can work at any time and any place!
We recommend to aim the lens of projector at light
background (smooth and white background would be
preferred) if need picture effect with higher quality. The
dimension of projection image can be adjusted
according to the distance between the projector and
background. Image of 60" will be the best. Use the
projector in a dark ambient environment will improve
the image effect.
Attention: the projector will become warm at
both upper and down side during working.
This is a normal phenomenon of heat
emission which won’t impact the operation
of projector.
4. Volume adjustment
Move the mode key to the central position. Press + or key to adjust the volume as per demands.
5. Manual focusing
Move the mode key upwards to the top. Press + or -
key and check the symbol “↑” and “↓” on screen to
adjust the image to the optimum status. When the
screen indicating the symbol of “
”, it means the
focusing has arrived at the top end. When the screen
indicating the symbol of “ ”, it means the focusing
has arrived at the bottom end.
6. Use the projector to charge other
product
The projector can be used for charging smart
phone.
6.1. Connect one end of USB data wire (to be
purchased separately) to a smart phone, and other
end of USB data wire to the USB interface of the
projector (fully charged).
6.2. The screen of smart phone will indicate “charging”
until the charging is completed.
[Important safety information]
Please carefully read the instructions in the
user manual before using the projector, and operate
the projector as per the instructions. Any damages
caused by failure of complying with instructions will
invalidate the warranty.
Warning
Please do not block any air vents. To ensure the
normal
operation
of
projector
and
prevent
overheating, the location of projector shall not
influence the normal ventilation of projector.
To reduce the risk of electric shock, do not
open the housing of product. No part inside the
product can be repaired by user.
To reduce the risk of fire or electric shock, do
not expose the product to rain or moisture.
The lightning flash with
arrowhead symbol within an
equilateral triangle is
intended to alert the user to
the presence of uninsulated
“dangerous voltage” within
the product’s enclosure that
may be of sufficient
magnitude to constitute a risk
of electric shock to persons.
The exclamation point within
an equilateral triangle is
intended to alert the user to
the presence of important
operating and maintenance
(servicing) instructions in the
literature accompanying the
appliance.
Danger
To reduce the risk of electric shock, burn, fire and
injury:
1. Do not use the product during showering.
2. Do not locate the product at a place that may
cause the product falling into a bathtub or flume.
3. Do not expose the product to water or any kind of
liquid.
4. If the product falls into water, do not take it out by
hand, cut off the power immediately.
5. During operating, prevent the product from falling
into or being exposed to water or liquid.
Warning
1. Please pay special attention to child or mental
patient who is present or using the product.
2. Please operate the product as per the instructions
of user manual.
3. Please pull out the power plug during thunder
storm or when the product is idle.
4. Prevent any articles entering into the product.
5. Prevent treading or squeezing the power wire,
especial the plug, power outlet and vent.
6. Prevent the power wire to contact with heater or
any heat source. Use loose packaging to store the
product. Avoid the extreme bending of power wire.
7. Do not expose the product to direct sunlight or
any heat source, such as radiator, warming machine,
stove or any device that will generate heat
(including magnifier). Do not place the product on
the top of stereo equipment which will generate
radiant heat.
8. Prevent the cloth, plastic bag or paper material
blocking the air vent of products. Do not place the
product on the surface that may block the air vent,
such as sofa or bed.
9. Do not over load the power outlet. Only use the
exclusively appointed power voltage.
10. Do not move or place the product by pulling the
power wire.
11. If the product cannot be used due to the
damage of power wire or plug, damages caused by
falling, or immersion, do not use the product. Do not
repair the damaged power wire or plug individually.
12. To avoid the electric shock, do no open the
product housing or repair the product. Improper
repair may expose you in dangerous voltage or other
hazardous.
13. Do not store the product in flammable or
explosive environment
14. Hold the plug or connector when pulling out the
plug. Do not pull the power wire
Warning!
The product is with rechargeable battery
built in.
.
Do not place the product in any area with high
temperature, moisture or direct sunlight.
. Do not disassemble the product.
. Do not put the product into fire or water, which
may cause explosion or injury.
. Keep the product out of the reach of children.
.
Do not touch the product with damp hands.
. Please properly dispose the waste product.
. Do not discard the product as common household
rubbish.
. Please contact the local recycle center to properly
dispose the product.
[Trouble shooting]
Q: The projector cannot project video image.
A: Please charge the battery of device, and check
whether the interface of HDMI data wire is correctly
connected to the projector and device.
Q: The projection image is fuzzy.
A: Toggle the focusing adjustment knob to adjust the
image to the optimal projection effect. The fuzzy
image may probably be caused by the selected
background. Please select smooth background for
projection.
Q: The projector has been fully charged and is
connected to my device, but still cannot project.
A: Check whether the data wire is correctly
connected.
Q: No signal – my device has no data output.
A: Check whether your device has been started up
and is fully charged.
[Trademarks]
HDMI, HDMI logo and Highdefinition Multimedia Interface are trademarks or
registered trademarks of HDMI Licensing LLC in the
United States and other countries or districts.