1
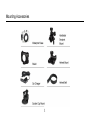
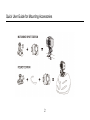
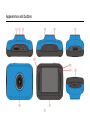
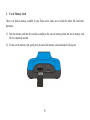
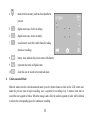
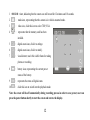
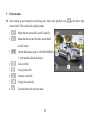
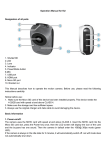
What’s Included The following components are included with your purchased product: Tokio Action Waterproof Case Camera Shield Suction Mount Car Charger Handle Bar Mount Helmet Mount Helmet Belt USB Cable Instruction Manual Mounting Accessories 1 Quick User Guide for Mounting Accessories 2 Appearance and buttons 3 ⑴Memory card slot ⑻Lens ⑵Reset ⑼LCD TFT ⑶USB slot ⑽Working Indicator Light ⑷Power button ⑾Indicator Light for charging ⑸MIC ⑿ Wrist strap eyelet ⑹Shutter button ⑺Mode Switch: 4 Getting Started Before operating your Tokio Active for the first time, please read this manual carefully and follow the instructions as described below. 1. Charge the built-in lithium battery Indicator light for charging. USB Cable Turn off your Tokio Active and connect it with PC via USB cable for charging. The indicator light for charging is on at this time and will be off after charging. Normally, the device can be fully charged after 3-4 hours. 5 2. Use of Memory Card There is no built-in memory available in your Tokio Active, make sure to install the Micro SD card before operations. 2.1 Push the memory card into the card slot according to the concave lettering beside the slot of memory card till it is completely inserted. 2.2 To take out the memory card, gently press the end of the memory card inward and it will pop out. 6 3. Startup/Shutdown 3.1 Startup: press and hold the POWER button for 3 seconds, the screen will be displayed and the camera is on. 3.2 Shutdown: press on the POWER button, and the camera will be shut down. 3.3 Automatic shutdown: when the idle time of your Tokio Active reaches the time for automatic shutdown, it will be shut down automatically to save power. The defaulted automatic shutdown time of your Tokio Ative is 5 minutes. 3.4 Shutdown in case of power shortage: when the power of the battery is insufficient, the LCD display screen will display the low power icon, please charge it in time. When the indicate light turns red and flickering, your Tokio Active will be shut down automatically. 7 4. Switching Between Function Modes There are three modes available for your Toiko Active, photo taking mode; video recording mode and vehicle-mounted mode, you can switch to different modes after startup. Picture taking mode: for taking photos Video recording mode: video can be recorded; Vehicle-mounted mode: videotape can be recorded. Photo taking mode Mode Switch Video recording mode Vehiclemounted mode 8 5. Indicator light Busy light: when the camera is busy (such as, recording a film, taking photos, automatic off-screen), the busy light will be on. Charging light: when the light is on for a long time, it prompts the user that the camera is charging. 6. Video Recording Mode When the mode switch has been slided to video recording mode, press the shutter button once or click on the LCD center once to begin recording under previewing state; press the shutter button once again if you want to stop recording, and the camera will also stop recording, automatically when the memory card is full or the power is insufficient 1 2 00:12:18: Timer means that video recording can still last for 12 minutes and 18 seconds. : mode icon, represents that the camcorder is in video recording mode. 3 : videoing size, clicks this icon and you can choose 720P/VGA. 9 7 4 : means that the memory card has been installed at present. 5 : digital zoom icon, click it to enlarge 6 : digital zoom icon, click it to minify. 7 : visual shutter, touch this visible frame for taking photos or recording. 8 : battery icon, represents the power status of the battery. 9 : represents the status of digital zoom. 10 : click this icon to switch to the playback mode. Photo Taking Mode: Slide the mode switch to the Photo Taking Mode, press the shutter button or click on the LCD center once under the previewing state to take a photo: 1 0/1234: Counter, indicating number of photos already taken /total number of photos can be taken. 2 : mode icon, indicating that the camera is in photo taking mode. 3 : video size, click this icon to select the photo resolution. 10 4 : means that the memory card has been installed at present. 5 : digital zoom icon, click it to enlarge. 6 : digital zoom icon, click it to minify. 7 : visual shutter, touch this visible frame for taking 8 : battery icon, indicates the power status of the battery. 9 : represents the status of digital zoom. 10 : click this icon to switch to the playback mode. photos or recording. 8 Vehicle-mounted Mode: Slide the mode switch to vehicle-mounted mode, press the shutter button or click on the LCD center once under the preview state to begin recording, save a segment for recording every 5 minutes, then start to record the next segment of video. When the storage card is full, the earliest segment of video will be deleted to release the corresponding space for continuous recording. 11 1 00:12:18 : timer, indicating that the camera can still record for 12 minutes and 18 seconds. 2 : mode icon, representing that the camera is in vehicle-mounted mode. 3 : video size, click this icon to select 720P, VGA. 4 : represents that the memory card has been intalled . 5 : digital zoom icon, click it to enlarge. 6 : digital zoom icon, click it to minify. 7 : visual shutter, touch this visible frame for taking 8 : battery icon, representing the current power 9 : represents the status of digital zoom. 10 : click this icon to switch into the playback mode. photos or recording. status of the battery. Note: the screen will be off automatically during recording process in order to save power; user can press the power button shortly to start the screen and restore the display. 12 9 Playback mode: 9.1 After starting up and entering the previewing state, click on the playback icon ( corner of the LCD to switch to the playback mode: 1 : 2 : Means that the current file is an AVI video file. Means that there is one file in the current folder/ one file in total. 3 : Current folder name (such as: I:\DCIM\100MEDIA 4 : To see next file. 5 : To see previous file. 6 : To delete current file. 7 : To play the current file. 8 : To switch back to the previous mode. I: is the movable disk of the device). 13 ) at the lower right 9.2 Movie Clips Playing: Click to pause playing, click to play forward, and click to play backward. 9.3 File Deletion: Click Yes to delete the current file immediately, or click No to cancel the request of deletion. 14 Connection With PC Use the USB cable provided to connect your Tokio Active with PC. After connecting with PC, an icon of movable disk will appear in the window of “my computer”. Photos/videos which have taken are saved in folder I:\DCIM\100MEDIA (I is the movable disk of this device) in the movable disk. Files recorded in vehicle-mounted mode are saved in I:\DCIM\RECORDER. 15 Technical Parameters Image sensor Function mode Camera lens Digital zooming Shutter LCD display screen Image resolution Video resolution White balance Exposure File formats Storage medium USB interface Power Supply Dimension(L×W×H) Weight 1.3 million pixel (CMOS) videoing, taking photos, vehicle-mounted mode, removable disk, PC cam F3.1 f=9.3mm 4 times Electronic shutter 2.0-inch touch screen 5M (2592×1944), 3M (2048×1536), 1M(1280×1024) VGA: 640x480 (60 frames/second), 720P:1280x720 (30 frames/second) Automatic Automatic Image JPEG Video AVI Micro SD card (not included), maximum up to 32GB High-speed USB 2.0 interface Built-in 3.7V rechargeable lithium 66*45*25mm about 48 grams 16 Operating System CPU Internal Memory Sound Card and Display Card CD Driver Hard Disk Others System Requirements Microsoft Windows2000, XP, Vista, 7 Intel Pentium III of more than 800MHz or other CPU with equivalent performance Larger than 512MB The sound card and display card shall support DirectX8 or higher version. Speed of 4 times or faster Free space of more than 500MB One standard USB1.1 or USB2.0 port 17 Important Maintenances Precautions In order to offer your Tokio Active good maintenances, please always follow the below basic precautions: Do not expose the device to sunshine directly, nor point its lens to sunlight. Otherwise, the image sensor of the video camera may get damaged. Take good care of the device and prevent water or sand particles from entering the device when it is used on the beach or water, because water, sand particles, dust or component containing salt may damage the device. Keep the device contaminated free of dust and chemical materials. Place it in a cool, dry and well ventilated place. Do not place the device in a high temperature, moist or dusty place. Please check if the video camera can operate normally before use. If dirt or stain is accumulated on the device or on its lens, use soft, clean and dry rag to wipe it away gently. If the device or its lens is stained with sand particles, blow them away gently. Do not use cloth to wipe arbitrarily, otherwise, it may scratch the surface of device or its lens. If it is required to clean camera surface, firstly blow away the sand dust accumulated on this surface, and then wipe the camera gently with rag or tissue applicable to optical equipments. Please use the cleaning 18 agent of camera for wiping if necessary. Do not use organic solvent to clean the video camera. Do not touch the lens surface with fingers. Please use branded Micro SD card only. The data inside the Micro SD card may be lost or damaged under the following circumstances: 1. Improper use of the memory card. 2. The memory card is bent, dropped or collided. 3. The memory card is under high temperature or moist environment or expose to sunshine directly. 4. Electrostatic or electromagnetic field exists around the memory card. 5. The memory card is taken out or power supply is interrupted when it is being reading or writing. 6. Scratches on the metal contact surface of the memory card. 19 Battery Management The built-in battery is not fully charged from factory, so it is recommended that you charge the battery for at least 4 hours before you start to use the device. The rechargeable battery is designed and manufactured to be used and recharged frequently. As same with all of lithium batteries, the capacity of the battery reduces each time it is charged. However, you can still try to prolong the battery’s lifetime by following the suggestions below: Use your Phone at least once a week. Fully charge the battery regularly. Never leave the battery fully discharged for a long period of time. Always keep the device and the battery away from heat and moisture. 20