1
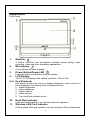
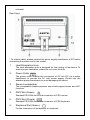
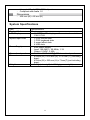
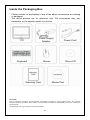
User Manual Rev 1.0 1 CONTENTS Copyright Notice ............................................................................... 3 Safety Instructions ............................................................................ 3 Warning ............................................................................................ 3 Appearance ...................................................................................... 4 Side View ......................................................................................... 7 When Put on the Desk ...................................................................... 8 Mainboard Specifications .................................................................. 8 System Specifications ....................................................................... 9 Thank you for choosing this PC. The PC series is the best choice for your personal computing. Featuring all-in-one design and thin, attractive style, it is sure to give you superb personal computing experience. 2 Copyright Notice The material in this document is the intellectual property of the company. We take every care in the preparation of this document, but no guarantee is given as to the correctness of its contents. Our products are under continual improvement and we reserve the right to make changes without notice. Safety Instructions 1. 2. 3. 4. 5. 6. Always read this User Manual carefully. Keep this User Manual for your reference in the future. Keep this device on a stable surface. Check AC input: 100-240V~, 50-60Hz, 1.7A. Check DC output: 19V 3.42A. Make sure the power supply voltage is between 110-240V before plugging in this device. 7. Keep the power cord away from foot traffic, and do not put anything on the power cable. 8. Make sure to unplug the device before inserting any add-on card or module. 9. Read the notices and warnings on the device carefully. 10. Do not pour any liquid into the opening to avoid damage or electric shock. 11. Contact service staff in case of any one of the following situations: The power cord or plug is damaged; There's liquid poured into the device; The device gets wet; The device is unable to function properly, or be operated in accordance with instructions in the User Manual; The device drops off and is damaged; or There’s a notable sign of cracking in the device. 12. Do not use this device in places without an air conditioner, or with o temperatures above 35 C to avoid damage. Warning: 1. 2. 3. 4. 5. When using power cables other than those supplied by the original manufacturer, please make sure that such power cables are permitted with specifications. The internal parts of the device are movable dangerous parts. Do not touch them with your finger or other parts of your body. Power sockets of plug-in devices should be kept at easy-to-maintain places near the devices. This device shall be connected to sockets with grounding protection. Make sure that Ground Fault Circuit Interrupt (GFCI) is used. The output frequency or sound or the sound pressure level of headphones or earphones would increase when the sound volume or the equalizer is adjusted to middle or higher levels. 3 Appearance Front Panel 1. WebCam A built-in WebCam and microphone enabled picture taking, video recording, video and other interactive applications. 2. Microphone A microphone for video chatting. 3. Power Button/Power LED Press the button to start/shut down the system. 4. LCD Display 18.5”TFT LCD display, with optimal resolution: 1366 X 768 5~9. Key Shortcuts Key shortcuts allow the tuning of display brightness, sound volume of the loudspeaker, the turning-on/off of wireless device. 5 Higher brightness 6 Lower brightness 7 Higher volume 8 Lower volume 9 Turn on/off the wireless device 10. Hard Disk Indicator If the hard disk indicator is on, the hard disk is in operation. 11. Wireless LAN Card Indicator If the wireless LAN card indicator is on, the wireless LAN card has been 4 activated. Rear Panel * To ensure safety, please connect the power supply transformer to PC before connecting the power cord to the socket. 1. Heat Dissipation Hole The heat dissipation hole is designed for the cooling of the device. To ensure proper ventilation, please do not cover the hole. 2. Power Outlet The power outlet enables the conversion of AC into DC via a power transformer to provide the PC with power supply. Please use the attached power transformer to avoid damaging the device. 3. Stereo Loudspeaker The loudspeaker enables premium sound and support stereo and Hi-Fi functions. 4. PS/2 Slot (Green) Standard PS/2 DIN slot for the connection of PS/2 mouse. 5. PS/2 Slot (Purple) Standard PS/2 DIN slot for the connection of PS/2 keyboard. 6. Earphone Slot (Green) For the connection of loudspeaker or earphone. 5 7. Microphone Slot (Pink) For the connection of microphone. 8. USB Slot USB (Universal Serial Bus) slot is for the connection of keyboard, mouse and other USB-compatible devices. 9. Internet Slot Standard RJ-45 slot for LAN access; you may connect the network cable directly to the slot. LED Color L Yellow LED Status Off On (stable) On (blinking) R Green Orange 10. Off On On Specification The network cable is not connected. The network cable has been connected. The computer is being connected with another computer. Data rate: 10 Mbit/s Data rate: 100 Mbit/s Data rate: 1000 Mbit/s Supporting Stand For the support of the display and the adjustment of its angles 6 Side View 1. Exit Button/ DVD LED Indicator Press the button to activate the DVD driver. If the DVD LED indicator is on, the computer is reading from or writing into CD/DVD.Eject hole available near exit button 2. Slot-IN Type DVD Drive 3. USB Ports: 2 USB (Universal Serial Bus) ports are for the connection with the keyboard, mouse or other USB-compatible devices. 4. Card Reader The built-in card reader supports XD (eXtreme Digital), SD (Secure Digital), SDHC (SD High Capacity), MS (Memory Stick), MS Pro (Memory Stick Pro) and MMC (Multi-Media Card). It is often used in digital cameras, MP3 players, handsets, PDA and a number of other devices. Please consult your local dealer about the latest information about memory cards supported, which is subject to change without prior notice. 7 When Put on the Desk To ensure that your PC is put stably on your desk, please pull the supporting rack behind the display to the installation position and adjust the angle to 0-20 degrees from the desk as appropriate for your need. Mainboard Specifications CPU ® TM Intel Atom processor N270 Front-side Bus (FSB) 533 MHz Thermal Design Power (TDP) 2.5 W Chipset ® Intel 945GSE North Chip ® Intel ICH7M South Chip Memory One DDR2 SO-DIMM slot (Non-ECC) Supports DDR2 LAN ® Realtek RL8111C, supports PCI ExpressTM LAN 10/100/1000 fast LAN card Compliant with PCI 2.3; supports ACPI power management Sound Effect 8 ® Integrated Realtek ALC662 chipset Compliant with Azalia 1.0 Dimensions 430 mm (W) x 85 mm (H) System Specifications Item Product Code LCD Display Input/Output Slots Power Supply Stereo Loudspeaker Dimensions Weight Specifications Ezeebee 18.5”TFT LCD display, with maximal resolution: 1366 X 768 1 PS/2 mouse slots 1 PS/2 keyboard slots 2 sound effect slots 4 USB slots 65W power supply Input: 100-240V~, 50-60Hz, 1.7A Output: 19VDC, 3.42A 2 built-in 78dB+/-3dB@ 3W stereo loudspeakers 474mm (W) x 393 mm (H) x 122 mm (T) (including base) 474mm (W) x 393 mm (H) x 71mm(T) (not including base) 5.4kg (net weight) / 7.9 kg (gross weight) 9 Inside the Packaging Box * Please contact us immediately if any of the above accessories are missing or damaged. * The above pictures are for reference only. The accessories may vary depending on the specific model you choose. PC Power Supply Adapter Power Cord Keyboard Mouse Driver CD Warranty Card Mouse Pad Disclaimer: Due to continuous innovation & improvements, specification is subject to change without notice. Any changes therefore will be incorporated in future editions. The manufacturer assumes no responsibility for errors or omissions in this document. Actual product may vary from photos shown in this guide. 10