1
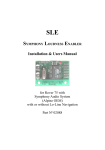
User manual
Contents
Page
What’s included
3
Features
4
Installing My-Speed
5
Installing My-Speed using the Suction Cup bracket
Intstallation Trouble shooting
6
Replacing the fuse
Operating Instructions 7
1. Using My-Speed for the first time
2. Standby Screen
3. Screen themes - Display face
4. Adjusting the Volume
5. ‘P’ User point button
6. Muting an alert
7. Cancelling an Alert
8. Set Alert Tone
8
9. My-Speed alert
10. Speed limit alerts
11. Change language
12. Adjust Brightness
13. Satellite Status
14. Speed Type
9
15. Key Sound
Customer services and troubleshooting
10
Service under Warranty 2
What’s included
1 x Snooper My-Speed
1 x Windscreen suction cup bracket
1 x USB PC connection lead
1 x USB cigarette lighter adaptor
1 x CD ROM
PLEASE NOTE
Due to our desire to continually improve our products, the specification may change without notice.
Return to contents
UK • 3
Features
1 Standby/Power Button
5 Menu button
2 User Point Button
6 USB Socket
3 Full Colour Graphical Display
7 Volume/Menu Navigation Control
4 OK button
8 Windscreen Bracket Mounting Slots
1
3
2
4
7
5
8
6
9
11
10
9 Time Display
10 GPS Signal Strength
11 Compass Direction
17 Speed Limit
18 Your speed
17
If we do not have access to the official speed limit for a
stretch of road My Speed will sometimes display a speed
limit accompanied by an asterisk (*)If the speed limit is
displayed together with an aster ice this means that the
speed limit displayed is advisory only and may not be the
official speed limit for that stretch of road.
Return to contents
UK • 4
18
In some cases it may not be
possible to display the speed
limit of a stretch or road. In these
situations an exclamation mark
(!) will be displayed.
Installing My-Speed
My-Speed comes with a windscreen suction cup bracket to mount the unit on to your vehicles windscreen.
When installing your My-Speed please consider the following:
●●
●●
The unit’s built-in GPS antenna has a clear view of the sky.
It is located in a position where you can easily view the LCD display without having to take your eyes too far from the road ahead
and that you can reach the controls safely.
●●
Does not interfere with the vehicles controls
●●
Does not jeopardise the drivers or passengers safety.
●●
You will be able to remove the device to perform downloads.
When adjusting the angle of the windscreen bracket please remove the My-Speed from the bracket FIRST before adjusting.
PLEASE NOTE: Be careful to choose a location that does not obscure the drivers view or where it might endanger the driver or
passengers should your vehicle suddenly come to a stop or be involved in an accident.
DO NOT leave the unit in view when the car is unattended during hot conditions. Exposing My-Speed
to extremely high temperatures can temporarily impair performance. Keep My-Speed out of sight
when not in use to help avoid potential theft.
Installing My Speed using the windscreen Suction Cup bracket
Select a position within the windscreen so that the top of the unit has a clear view of the sky,
remembering that you need to connect the power connection cable as well as ensuring that
you can read the LCD display and reach the controls safely.
●●
●●
Clean the area where you wish to position the bracket thoroughly with a good quality
glass cleaner
Adjust the angle of the bracket so that when the unit is attached to it you can view the
display and operate the controls safely. Do not adjust the angle of the bracket when MySpeed is attached.
●●
Press the suction cup against the windscreen
●●
Slide My-Speed onto the bracket.
●●
●●
To remove My-Speed from the windscreen bracket, simply slide the unit upwards off the
plate.
Power the device using the power cable provided. Connect the USB plug on one end of
the power cable into the socket marked USB on the back of My-Speed and plug the larger
plug into the cigarette lighter socket of your vehicle.
To turn on My-Speed press and hold the power button on the front of the device for 2
seconds.
Please note that no power cable other than the one provided with My Speed should be
used. My Speed operates on 5V DC and the power cable included is specifically designed
to provide this voltage. Using an alternative power cable could damage the unit and will
void the warranty.
Do not leave My-Speed plugged into the cigarette lighter socket when you start your
vehicle. The cigarette lighter socket is prone to power surges as the vehicle is started and
this may cause damage to your unit.
Return to contents
UK • 5
If the device does not power up please check that the cigarette lighter socket is clean of any debris, remembering not to insert metal
objects into the socket. Check that the cigarette lighter adaptor is inserted all the way into the socket and check that the fuse in the
cigarette lighter adaptor is operational. If My-Speed will still not power up, please check that the cigarette lighter in your vehicle is
functioning correctly.
Installation Troubleshooting
Replacing the Fuse
If My-Speed does not switch on the fuse in the cigarette lighter plug may have blown. To ascertain if the fuse has blown, follow the
steps below and if necessary replace it with a 2 amp, 5 x 20mm fast acting fuse.
Caution: Using a fuse that does not meet these ratings or defeating
fuse protection can damage your unit, the power cable, or the vehicles
electrical system.
1. Grasp the ring near the tip of the cigarette lighter plug, and then carefully
unscrew the ring by turning it counter clockwise.
Caution: If you must use pliers to loosen the ring, be careful not to
crush the tip. Never use pliers orother tools to retighten the ring on the
cigarette lighter plug.
2. Pull the ring straight out, then remove the metal tip and old fuse.
3. Check the fuse to see if it has blown. If it has, replace it.
4. Replace the metal tip inside the ring, then place the fuse inside the cigarette lighter plug and screw the ring back onto the plug.
Make sure the metal tip is visible when you reassemble the cigarette lighter plug.
Return to contents
UK • 6
Operating Instructions
1. Using My-Speed for the first time
Make sure your vehicle is parked in as open a space as possible, clear of tall trees and buildings so that the built-in GPS antenna has
as clear a view of the sky above. Switch the unit on by pressing the Power button for two seconds. The LCD display will briefly display
the ‘My-Speed’ logo, then the speed limit of the road you are currently travelling on. My-Speed needs to acquire a minimum of four
satellites in order to work. Once this has been achieved the GPS indicator displayed on the top right hand corner of the screen will
show the current GPS strength and will show your correct speed when driving. Once a good GPS connection has been obtained MySpeed is ready to use.
As the GPS engine and antenna have never been used before, the first ‘Cold’ start could take anywhere from 15 – 50 minutes
to establish a satellite connection. Once initialised, subsequent start ups will take less time and eventually should take only a
matter of minutes.
Please Note: If the unit is not used for some time the initial GPS start up may take longer than when the unit is used regularly.
2. Standby Screen
You can change the background screen colour between black and white. To change the screen colour:
●●
●●
Press the ‘M’ button on the right hand side of the unit to enter the menu.
Use the up and down buttons on the left hand side of the unit until ‘Change Screen Colour’ is displayed and then press the ‘OK’
button. Finally select either ‘Black’ or ‘White’.
3. Screen themes – Display face
My-Speed has two different themes to choose from. As standard My-Speed will display a green ‘smiley’ face if you are travelling above
the speed limit or a red ‘sad’ face if you are travelling above the speed limit. If you do not want these icons to be displayed enter the
menu and scroll through until you see ‘Display face’ and press the ‘OK’ button. Select ‘Off’ and then the ‘OK’ button to confirm your
selection.
4. Adjusting the Volume
Use the up and down buttons on the left hand side of the unit to adjust the volume.
5. ‘P’ User point button
My-Speed enables you to save a number of your own ‘user points’ within in it’s memory. If you save a ‘User point’ My-Speed will
alert you to that position every time you drive past it. To save a ‘User point’ press and hold the ‘P’ button on the front of the unit for 2
seconds. To edit or delete any ‘User points’ you have saved, enter the menu and scroll until ‘User points’ is displayed and press the ‘OK’
button. Next select ‘Edit name’, ‘Delete’ or ‘Delete All’
6. Muting an alert.
If during an alert you decide that you would like to mute the audible alert, but still retain a visual alert simply press the MUTE button.
The screen will continue to display a visual alert but no audible alert will be produced. After you have travelled out of range of that
location the unit will automatically reset so that the next time you encounter a fixed speed camera location you will receive both an
audible and a visual alert as normal.
7. Cancelling an Alert
If during an alert you decide that you would like to cancel it simply press and hold either the MEM or MUTE buttons. The display will
confirm that the alert has been cancelled and will return to the standby screen.
Return to contents
UK • 7
8. Set Alert Tone
There are three audible settings to choose from:
●●
Hard Tone
●●
Soft Tone
●●
Off
To select your alert tone:
●●
Enter the menu and scroll until ‘Set alert tone’ is displayed.
●●
Highlight your desired option and press the ‘OK’ button to confirm your selection.
9. My-Speed alert
This safety feature has been designed to let you program My-Speed to alert you when you reach any speed you choose.
To set My-Speed alert:
●●
●●
Enter the menu and scroll until ‘My-Speed alert’ is displayed and press the ‘OK’ button.
Use the up and down buttons to increase or decrease the speed limit you would like to be alerted to and press the ‘OK’ button to
confirm your selection.
Note: The speed limit alert will only activate once you exceed your speed limit setting. If you remain above your speed limit you
will not receive another alert until your speed drops below your speed limit setting and you then increase your speed again.
10. Speed limit alerts
My Speed will alert you audibly to speed limit changes and when you exceed a speed limit. Both audible alerts are set to ‘On’ as the
factory default setting but can be switched off individually if required.
To change the audible alert settings:
●●
●●
Enter the menu and scroll until ‘Audible alerts’ is displayed and press the ‘OK’ button.
Use the up and down buttons to select either ‘Speed zone’ if you want to change the audible alert heard when you drive from one
speed to limit to another. Or select ‘Speed limit’ if you want to change the audible alert heard when you exceed the speed limit of
the road you are travelling on.
11. Change language
To change language, enter the menu and scroll until ‘Change language’ is displayed and press the ‘OK’ button. Next scroll until the
language you require is displayed and press the ‘OK’ button to confirm your selection.
12. Adjust Brightness
You can adjust the brightness of the display to accommodate different driving conditions.
To adjust the brightness of the display
●●
Enter the menu and scroll until ‘Adjust Brightness’ is displayed and press the ‘OK’ button.
●●
Use the up and down buttons to adjust the brightness to the desired level and press the ‘OK’ button to confirm your selection.
13. Satellite Status
My-Speed comes with a facility to check the GPS status. Enter the menu and scroll until ‘Satellite Status’ is displayed and press the ‘OK’
button.
Return to contents
UK • 8
14. Speed Type
This feature allows you to choose between either kilometres per hour (KMH) or miles per hour (MPH). The device is supplied with
MPH turned ON as the factory default setting.
●●
Enter the menu and scroll until ‘Speed Type’ is displayed and press the ‘OK’ button.
●●
Highlight either ‘MPH’ or ‘KMH’ and press the ‘OK’ button to confirm your selection.
15. Key Sound
When pressing any of the buttons on My-Speed an audible beep is heard. This audible beep is ‘On’ by default but can be switched off
if not required.
●●
Enter the menu and scroll until ‘Key Sound’ is displayed and press the ‘OK’ button.
●●
Highlight your desired option, ‘ON’ or ‘OFF’ and press the ‘OK’ button to confirm your selection.
Return to contents
UK • 9
Customer services and troubleshooting
If you need further advice on the operation of My-Speed or are experiencing any problems please visit the Troubleshooting section
of our website www.snooperneo.co.uk
If you cannot find the information you are looking for please contact our technical department on 01928 579 579.
Service under Warranty
Your My-Speed comes with a standard one year manufacturer’s warranty.
If, for some reason, your unit requires service under warranty return your My-Speed, via special delivery (insured) and in suitable
packaging to:
The Returns Department
Performance Products Limited
Cleaver House
Sarus Court
Manor Park
Cheshire WA7 1UL
Enclose the following information:
(a) Your name, address and a full description of the problem.
(b) A telephone number where you can be reached during business hours.
(c) Your units’ serial number.
Return to contents
UK • 10