1
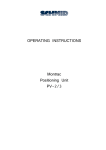
USER MANUAL ELECTRICAL ROTARY UNIT DAE-60 Mechanical Part BA-100074 Starting from serial number 430044 English, Edition 02/2008 User Manual Electrical Rotary Unit DAE-60 Contents 1. Important information ____________________________________________________________ 3 1.1. Introduction ______________________________________________________________________ 3 1.2. EU conformance (to EU Directive on Machine, Appendix II A) __________________________ 3 1.3. Product description and application _________________________________________________ 3 1.4. Dangers _________________________________________________________________________ 4 1.5. Additional information_____________________________________________________________ 4 1.6. Validity of User Manual ____________________________________________________________ 5 2. Technical data ___________________________________________________________________ 6 2.1. Technical data for DAE-60 _________________________________________________________ 6 2.2. Option permanent magnet brake ___________________________________________________ 8 2.3. DAE-60 travel time ________________________________________________________________ 9 2.4. Dimensions______________________________________________________________________ 10 2.4.1. Dimensions of DAE-60 ___________________________________________________________ 10 2.4.2. Dimensions of DAE–60 with permanent magnet brake _______________________________ 11 2.5. Scope of delivery ________________________________________________________________ 12 2.6. Load calculation _________________________________________________________________ 12 2.7. Calculation of mass moments of inertia of parts _____________________________________ 13 2.8. Calculation of mass moments of inertia of add-on units _______________________________ 14 3. Commissioning _________________________________________________________________ 15 3.1. Installation position and assembly__________________________________________________ 15 3.2. Mounting of the add-on units (load) ________________________________________________ 16 3.3. Internal wiring and cable connections ______________________________________________ 17 3.3.1. Motor __________________________________________________________________________ 18 3.3.2. Encoder ________________________________________________________________________ 18 3.3.3. Inductive proximity switch ________________________________________________________ 19 3.3.4. Permanent magnet brake _________________________________________________________ 19 3.4. Wiring the controller (ECMR) ______________________________________________________ 19 4. Mechanical design ______________________________________________________________ 20 4.1. Lubrication ______________________________________________________________________ 20 4.2. Replacing the motor______________________________________________________________ 21 4.3. Replacing the toothed belt ________________________________________________________ 23 1 User Manual Electrical Rotary Unit DAE-60 4.4. Toothed belt tension_____________________________________________________________ 24 4.5. Zero point adjustment ___________________________________________________________ 25 4.6. Adjustment of gear play __________________________________________________________ 26 4.7. Option: permanent magnet brake _________________________________________________ 29 4.7.1. Mounting the permanent magnet brake____________________________________________ 30 4.7.2. Replacement of the permanent magnet brake ______________________________________ 32 4.7.3. Air gap adjustment of the permanent magnet brake_________________________________ 34 4.7.4. Lubrication (DAE-60 with permanent magnet brake) _________________________________ 35 4.7.5. Replacing the motor (DAE-60 with permanent magnet brake) ________________________ 36 4.7.6. Replacing the toothed belt (DAE-60 with permanent magnet brake)___________________ 36 4.7.7. Toothed belt tension (DAE-60 with permanent magnet brake) ________________________ 37 4.7.8. Zero point adjustment (DAE-60 with permanent magnet brake) _______________________ 37 4.7.9. Gear play adjustment (DAE-60 with permanent magnet brake)________________________ 38 5. Parts list for DAE-60 ____________________________________________________________ 39 5.1. Parts list for DAE-60 permanent magnet brake (option) ______________________________ 42 6. General information ____________________________________________________________ 43 6.1. Environmental compatibility and disposal___________________________________________ 43 2 User Manual Electrical Rotary Unit DAE-60 1. Important information 1.1. Introduction This User Manual describes the mechanical design, the technical data, the load limits, assembly, maintenance and spare parts of the electrical rotary units. 1.2. EU conformance (to EU Directive on Machine, Appendix II A) Rules and standards complied with: Machinery Directives 89/392/EEC, 91/368/EEC Manufacturer: Montech AG, Gewerbestrasse 12 CH–4552 Derendingen Tel. +41 32 681 55 00, Fax +41 32 682 19 77 1.3. Product description and application The electrical rotary units are electrically operated, position-controlled rotary units for executing regular, rotational forward and backward movements. The electrical rotary units are equipped with a hollow shaft (internal diameter 15 mm). Usually, the electrical rotary units are fixed to the housing. The scope of delivery includes a EC Motor Controller (ECMR). This is preset at the factory and covers the whole operating range. Accordingly, subsequent adjustment is unnecessary. The electrical rotary units are obtainable in the following versions: Standard version: electrical rotary units – 60 (DAE-60) The electrical rotary drives (DAE–60) in the standard version are assembled with vertical drive shafts. Option: DAE-60 permanent magnet brake Equipped with a permanent magnet brake, can be mounted in any installation position. The load limits which were specified by the technical data must be complied with in all circumstances. Overloading can lead to faults and failure of the device. 3 User Manual Electrical Rotary Unit DAE-60 1.4. Dangers The use of DAE-60 in installations is only permissible when they are guarded by moveable, isolating protective devices according to EN 292-2, section 4.2.2.3. Failure to comply with this safety measure can result in injuries due to crushing and impact, particularly in machines which start up automatically. It is essential to comply with the operating conditions and safety instructions described in the controller User Manual. It is essential to comply with the stated load limits. – During operation, the surfaces of motor and permanent magnet brake may reach up to 100°C. The parts must not be touched if the temperature has exceeded 40°C (measurement of surface temperature). . – When working on the DAE-60, it must be ensured that the unit energy has been switched off and cannot be switched on by unauthorized persons. 1.5. Additional information The aim of the present User Manual is to enable users to employ the DAE-60 correctly and safely. Should further information be required in relation to your particular application, please contact the manufacturer. When reordering User Manuals, it is essential to quote the reference number, the product name and serial number. This document can be obtained from our homepage www.montech.com. Nameplate Reference number Product name Serial number Montech AG Management U. D. Wagner 4 C. Wullschleger User Manual Electrical Rotary Unit DAE-60 1.6. Validity of User Manual Our products are continually updated to reflect the latest state of the art and practical experience. In line with product developments, our User Manuals are continually updated. Every User Manual has a reference number (e.g. BA-100074) and an edition number (e.g. 02/2008). The reference number and the edition number are shown on the title page. Validity Main device: Full name Short name Reference number Electrical rotary unit –60 DAE–60 57835 Full name Short name Reference number DAE-60 permanent magnet brake - 57550 Option: 5 User Manual Electrical Rotary Unit DAE-60 2. Technical data 2.1. Technical data for DAE-60 Vertical drive shaft Horizontal drive shaft 6) Max. rotation angle φ max Max. mass moment of inertia J max 1) [kgcm²] 400 250 Max. torque (dynamic) M Dmax 2) [Nm] 2.4 3.0 Max. holding moment (static) M Hmax 3) [Nm] 4.5 4.5 Max. tilting moment (static) M Kmax 4) [Nm] 10 10 Max. axial force (static) F amax [N] ± 450 ± 450 Max. rotational speed ω 1) [°/s] 500 300 Max. angular acceleration α 1) [°/s²] 3000 2500 [°] Weight [kg] Drive 3600 (10 rotations) 2.20 Brushless, electronic commutated DC motor, toothed belt and angular gear Motor rated power [W] 60 Encoder system Encoder Protective class IP 40 Repeat precision Play 5) [°] ± 0.01 [°] Low backlash and adjustable Supply voltage / current 24VDC / 4A Reference point proximity switch Integrated, inductive proximity switch PNP ≤ 63 Noise pressure level [dBA] Ambient Temperature [°C] 10…50 Rel. humidity [%] 5%-85% (without condensation) Purity of the air 6 Normal workshop atmosphere User Manual Electrical Rotary Unit DAE-60 Maintenance Grease miter gear Warranty period 2 years from date of delivery Material Steel, aluminum, plastic 1) Measured at max. mass moment of inertia, max. rotational speed, and max. angular acceleration ! see travel time diagram Section 2.3. 2) Torque or movement moment. Corresponds to the moment which is available on the drive shaft in order to move a load. ! Section 2.6 Load calculation. 3) Holding moment or load of the drive due to a load on the drive shaft at standstill without it moving. ! Section 2.6 Load calculation. 4) Tilting moment or load of the drive shaft due to a radial force element. ! Section 2.6 Load calculation. 5) Measured at constant motor temperature, max. mass moment of inertia, max. rotational speed, max. angular acceleration, and 100 successive rotary movements in the same direction. 6) For use with drive horizontal drive shaft, a permanent magnet brake should be used. ! Section 2.2 Optional permanent magnet brake. 7 User Manual Electrical Rotary Unit DAE-60 Electrical rotary unit DAE-60, installation position: vertical drive shaft Option permanent magnet brake With integrated permanent magnet brake 0.4 Nm, including housing and fixing screws. The permanent magnet brake is recommended when the driving shaft of the DAE-60 is not oriented vertically. 2.2. Reference number Weight (without DAE-60) 57550 [kg] Permanent magnet single-surface brake for dry running Type Rated power Voltage 0.18 [W] 6.2 24VDC Electrical rotary unit DAE-60 with Permanent magnet brake, installation position: horizontal drive shaft 8 User Manual Electrical Rotary Unit DAE-60 2.3. DAE-60 travel time Travel times were determined under the following conditions: Symbol Unit Position of the drive shaft Value • • • J Kgcm² horizontal 250 vertical φ °/1000 - ω °/s horizontal 400 variable 300 vertical ±α °/s² horizontal vertical 500 2500 3000 Beginning of the measurement with the “Start motion task“ signal on ECMR terminal X5-6 End of the measurement with the “INPOS“ (in position) signal on ECMR terminal X7-3 The travel time is measured between the signals “Start motion task” and “INPOS”. “In position window” setting (ECMR software) = 250°/1000 horizontal vertical Symbol Unit Designation J [Kgcm²] Mass moment of inertia of add-ons and/or load t [ms] Travel time per rotation angle φ φ [°] Rotation angle or stroke ω [°/s] Rotational speed ±α [°/s²] + α angular acceleration / - α angular delay 9 User Manual Electrical Rotary Unit DAE-60 2.4. Dimensions 2.4.1. Dimensions of DAE-60 Direction of rotation from reference point (f=0°) Cable length 3m Reference number DAE-60 10 57835 User Manual Electrical Rotary Unit DAE-60 2.4.2. Dimensions of DAE–60 with permanent magnet brake Direction of rotation from reference point (f=0°) Cable length 3m Reference number DAE-60 + permanent magnet brake 57835 + 57550 11 User Manual Electrical Rotary Unit DAE-60 2.5. Scope of delivery – Mechanical part including 3 m cable1) with loose ends for connecting to the ECMR controller. – 1) 3 m power cable: shielded and towable. – 1) 3 m data cable: unshielded and towable. – ECMR controller completely configured with all counter connection terminals for connecting the loose wires. – CD-ROM with Windows commissioning software and Operating Instructions in German, English, French and Italian. 2.6. Load calculation Fa MH MD Mk In Section 2.1 the maximum values are listed. They must not be exceeded. This means: Add-ons and load 12 Condition Maximum value Section 2.1 Unit Remark ≤ α max [°/s²] Angular acceleration J ≤ J max [Kgcm²] Mass moment of inertia MD ≤ M Dmax [Nm] Torque (dynamic) MH ≤ M Hmax [Nm] Holding moment (static) Mk ≤ M kmax [Nm] Tilting moment (static) I±FaI ≤ F amax [N] Max. axial force (static) identical for tractive and compressive User Manual Electrical Rotary Unit DAE-60 2.7. Calculation of mass moments of inertia of parts Calculation of mass moments of inertia generally d z x x h z a z m= 1 ⋅ ρ ⋅ π ⋅ d2 ⋅ h 4 Jz = 1 ⋅ m ⋅ d2 8 Jx = 1 4 ⋅ m ⋅ d 2 + h2 16 3 b h m = ρ⋅a⋅b⋅h 1 Jz = ⋅ m ⋅ a2 + b 2 12 ( ) z Jz Jx m ρ a b d h [kgcm2] [kgcm2] [kg] [kg/cm3] [cm] [cm] [cm] [cm] Mass moment of inertia with axis of rotation z – z Mass moment of inertia with axis of rotation x – x Mass Density Length Width Diameter Height 13 User Manual Electrical Rotary Unit DAE-60 2.8. Calculation of mass moments of inertia of add-on units Total mass moments of inertia JTot= Jz1 JTot = 2 · (Jz1 + m1 · a2) + Jz2 JTot = Jz1 + m1 · a2 + Jz2 + m2 · b2 JTot = Jz1 + m1 · a2 + Jz2 + m2 · b2 + Jz3 + m3 · d2 a, b, c, d JTot Jz1, Jz2, Jz3 m1, m2, m3 Z-Z 14 [cm] [kgcm2] [kgcm2] [kg] [-] Length Total mass moment of inertia of add-on units with axis of rotation Z – Z Mass moment of inertia of the individual parts Mass of the individual parts Axis of rotation User Manual Electrical Rotary Unit DAE-60 3. Commissioning 3.1. Installation position and assembly Reference: Exploded view in chapter 5 As a rule, the housing (item 10) is fixed and the rotational movement is performed by the output shaft (item 90). The position of the output shaft (item 90) provides information about the DAE-60 version which is to be used. − The output shaft (item 90) is vertical: Device DAE–60 (reference number 57490) is suitable. − The drive shaft pos. 90 is not vertical: the DAE–60 device (article no. 57490) with the optional permanent magnet brake (article no. 57550) is suitable. Properties of the permanent magnet brake: − In the case of a currentless (torque-free) motor, the load is held by the permanent magnet brake. A movement of the load is thus prevented. This is important especially if the output shaft (item 90) is not positioned vertically and the load would move by itself to the lowest position. − The permanent magnet brake is not used by the motor for braking, since otherwise premature wear of the permanent magnet brake would occur. − The permanent magnet brake becomes active only if the motor control unit is disabled or there is a power failure. The DAE-60 is assembled by means of Quick-Set fixing elements on the dovetail of the housing (item 10). During assembly, the total length of the dovetail should as far as possible be used, as with a clamping element SLL-55-40 and a clamping element SLL-20-40. Installation position and assembly SLL-20-40 SLL-55-40 10 15 User Manual Electrical Rotary Unit DAE-60 3.2. Mounting of the add-on units (load) Reference: Exploded view in chapter 5 While complying with the permissible loads (see chapter 2.5), any add-on units can be fixed to the DAE-60. The add-on units (load) are mounted by means of Quick-Set fixing elements SLR-15-40 on the output shaft (item 90). Mounting of the load SLR-15-40 90 16 User Manual Electrical Rotary Unit DAE-60 3.3. Internal wiring and cable connections Introduction: The DAE-60 is delivered completely wired. Only the cable ends have to be connected to the motor control. Electrical terminal group: Usually, it is not necessary to carry out work on the terminal group (item 130 and item 150). Reference: Exploded view in chapter 5 The terminal groups are located under the cover (item 20). Loosen the 2 screws (item 530) and the screw (item 540) in order to remove the cover (item 20). Legend: Item 130c: terminal strip c Item 150a: terminal strip a Item 150b: terminal strip b Item 370: screen connection 17 User Manual Electrical Rotary Unit DAE-60 3.3.1. Motor Output cable 3x0.5mm2 Inside device Designation Wire color Terminal Wire color Terminal Motor winding 1 Red a1 White b1 Motor winding 2 Black a2 Brown b2 Motor winding 3 White a3 Green b3 Screen connection n.c. n.c. Screen Item 370 Output cable 18x0.14mm2 Inside device Designation Wire color Terminal Wire color Terminal n.c. n.c. n.c. White n.c. n.c. n.c. n.c. Brown n.c. n.c. n.c. n.c. Green n.c. Hall sensor 1 Yellow a8 Yellow b8 Hall sensor 2 Brown a9 Grey b9 Hall sensor 3 Grey a 10 Pink b 10 GND Hall sensor Blue a 0V Blue b 0V U Hall sensor Green a+ Red b+ Note: n.c.: Not connected. 3.3.2. Encoder Output cable 18x0.14mm2 Inside device Designation Wire color Terminal Vcc Encoder Grey-pink c2 GND Encoder Red-blue c3 A emer. White-green c5 Brown-green c6 White-yellow c7 B Yellow-brown c8 I emer. White-grey c9 I Grey-brown c 10 A B emer. 18 Wire color Flat cable Terminal Multipoint connector (plug) User Manual Electrical Rotary Unit DAE-60 3.3.3. Inductive proximity switch Output cable 18x0.14mm2 Inside device Designation Wire color Terminal Wire color Terminal U ind. proximity switch Brown a+ (Red)* (b+)* GND ind. proximity switch Blue a 0V (Blue)** (b 0V)** Output Black a 11 Black b 11 Note: *: U ind. proximity switch is connected internally to U Hall sensors. **: GND ind. proximity switch is connected internally to GND Hall sensors. 3.3.4. Permanent magnet brake Output cable 18x0.14mm2 Inside device Designation Wire color Terminal Wire color Terminal GND permanent magnet brake Blue b 0V (Blue)* (b 0V)* U permanent magnet brake Red a 12 Violet b 12 Note: *: GND permanent magnet brake is connected internally to GND Hall sensors. 3.4. Wiring the controller (ECMR) Please refer to Operating Instructions BA-100078 ECMR (EC Motor Controller), electrical and software part. 19 User Manual Electrical Rotary Unit DAE-60 4. Mechanical design 4.1. Lubrication Reference: exploded view in chapter 5 Shaft teeth item 200 DAE-60 without lubrication stopper (item 340) Output shaft item 90 Only the miter gears (item 120 and item 200) require subsequent lubrication. It is essential to use only Klüber grease “Staburags NBU12/300KP“ (Montech ref. no. 508501). Lubrication interval: – – 800 operating hours During operation the surfaces of the motor and permanent magnet brake can reach 100°C. Do not touch the parts until they have cooled to below 40°C (measure the surface temperature). When working on the DAE-60, it is necessary to ensure that the unit energy of the EC Motor Controller (ECMR) is switched off and cannot be switched on by unauthorized persons. Preparation: 1. Stop all travel jobs. 2. Disable the motor control. 3. Switch off the voltage of the EC Motor Controller (ECMR) and ensure that it cannot be switched on by unauthorized persons. Lubrication: 4. Remove the lubrication stopper (item 340). 5. Lubricate the teeth of the shaft (item 200) by means of a thin and long object, e.g. a screwdriver. .> approx. 5ml Klüber grease “Staburags NBU12/300KP“ 6. Turn the shaft (item 90) through approx. 45°. 7. Carry out the lubrication again as described above. 8. Repeat the lubrication process until a full revolution of the output shaft (item 90) has been achieved. 9. Install the lubrication stop (item 340) again and tighten. 10. If possible, move the output shaft (item 90) manually back and forth through 360° so that the grease is uniformly distributed. Final work: 11. Switch on the voltage of the EC Motor Controller (ECMR). 12. Enable the EC Motor Controller (ECMR). 13. Carry out the reference travel. 20 User Manual Electrical Rotary Unit DAE-60 4.2. Replacing the motor Reference: exploded view in chapter 5 Motor with toothed disk Multipoint connector (plug) of encoder flat cable Encoder flat cable (end) Encoder flat cable Flange of the toothed disk Encoder Item 50 Motor wires Motor Item 50 Toothed disk Item 50 Introduction: The motor with toothed disk (item 50) is a unit consisting of the following components: - A motor with 8 wires. - An encoder with flat cable and multipoint connector (plug) - A toothed disk. In order to replace the motor, the DAE must be dismantled and possibly even the add-on units. – – During operation the surfaces of the motor and permanent magnet brake can reach 100°C. Do not touch the parts until they have cooled to below 40°C (measure the surface temperature). During work on the DAE-60, it must be ensured that the unit energy of the EC Motor Controller (ECMR) is switched off and cannot be switched on by unauthorized persons. Preparation: 1. Stop all travel jobs. 2. Disable the EC Motor Controller (ECMR). 3. Switch off the voltage of the EC Motor Controller (ECMR) and ensure that it cannot be switched on by unauthorized persons. 4. Dismantle the DAE-60 and if necessary also the add-on units. 5. Loosen the 2 screws (item 530) and the screw (item 540) and remove the cover (item 20). 6. Unplug the encoder multipoint connector (plug) (item 50). 7. Loosen the 2 screws (item 520) and remove the terminal group (item 150). 8. Loosen the screw (item 360) and remove the cover (item 40). 21 User Manual Electrical Rotary Unit DAE-60 Replacing the motor: 9. Remove all wires of the motor (item 50) from the terminal strip (item 150). ! Chapter 3.3.1 10. Remove the 4 screws (item 390) so that the motor (item 50) is free. 11. Tilt the motor (item 50) as obliquely as possible and remove carefully. 12. Insert the new motor (item 50) obliquely into the housing (item 30). Carefully push the toothed belt over the flange of the toothed disk (item 50). Slowly position the motor (item 50) perpendicular to the housing (item 30). 13. Fix the motor (item 50) with the 4 screws (item 390) on the housing (item 30). Tighten the screws (item 390) only lightly so that the motor can still be moved. 14. Connect all wires of the motor (item 50) to the terminal strip (item 150). ! Chapter 3.3.1. 15. Fix the terminal group (item 150) with the 2 screws (item 520) on the housing (item 10). Do not forget the screen connection (item 370) or cable lug. 16. Insert the encoder multipoint connector (plug) (item 50) on the terminal group (item 130). 17. Fix the cover (item 20) with 2 screws (item 530) and the screw (item 540) on the housing (item 10). Toothed belt tension: 18. Remove the motor (item 50) so that the toothed belt (item 400) is slightly tensioned. 19. Hold the motor (item 50) and tighten the 4 screws (item 390). 20. Fix the cover (item 40) with the screw (item 360) on the housing (item 30). The zero point adjustment: ! Chapter 4.5 from point 3. 22 User Manual Electrical Rotary Unit DAE-60 4.3. Replacing the toothed belt Reference: exploded view in chapter 5 – – – During operation the surfaces of the motor and permanent magnet brake can reach 100°C. Do not touch the parts until they have cooled to below 40°C (measure the surface temperature). During work on the DAE-60, it must be ensured that the unit energy of the EC Motor Controller (ECMR) is switched off and cannot be switched on by unauthorized persons. Excessively strong tensioning of the toothed belt (item 400) can lead to destruction of the motor bearing. Preparation: 1. Stop all travel jobs. 2. Disable the EC Motor Controller (ECMR). 3. Switch off the voltage of the EC Motor Controller (ECMR) and ensure that it cannot be switched on by unauthorized persons. 4. Loosen the screw (item 360) and remove the cover (item 40) Replacement of toothed belt: 5. Remove the 4 screws (item 390) so that the motor (item 50) is free. 6. Tilt the motor (item 50) as obliquely as possible. 7. Remove the toothed belt (item 400). 8. First push the new toothed belt (item 400) onto the toothed disk of the motor (item 50). 9. Carefully push the toothed belt over the toothed disk (item 180). Slowly position the motor (item 50) perpendicular to the housing (item 30). 10. Fix the motor (item 50) with the 4 screws (item 390) on the housing (item 30). Only slightly tighten the 4 screws (item 390) so that the motor can still be moved. Toothed belt tension: ! Chapter 4.4 from point 6. 23 User Manual Electrical Rotary Unit DAE-60 4.4. Toothed belt tension Reference: exploded view in chapter 5 – – – During operation the surfaces of the motor and permanent magnet brake can reach 100°C. Do not touch the parts until they have cooled to below 40°C (measure the surface temperature). During work on the DAE-60, it must be ensured that the unit energy of the EC Motor Controller (ECMR) is switched off and cannot be switched on by unauthorized persons. Excessively strong tensioning of the toothed belt (item 400) can lead to destruction of the motor bearing. Preparation: 1. Stop all travel jobs. 2. Disable the EC Motor Controller (ECMR). 3. Switch off the voltage of the EC Motor Controller (ECMR) and ensure that it cannot be switched on by unauthorized persons. Toothed belt tension: 4. Loosen the screw (item 360) and remove the cover (item 40). 5. Slightly loosen the 4 screws (item 390). The motor (item 50) can be moved but is not loose. 6. Move the motor (item 50) so that the toothed belt (item 400) is lightly tensioned. 7. Hold the motor (item 50) and tighten the 4 screws (item 390). 8. Fix the cover (item 40) with the screw (item 360) on the housing (item 30). Final work: 9. Switch on the voltage of the EC Motor Controller (ECMR). 10. Enable the EC Motor Controller (ECMR). 11. Carry out the reference travel. 12. Check the position of the add-on units. 13. Small positional corrections can be made with the function “reference offset” in the software. If larger positional corrections are required, the load can be repositioned. 24 User Manual Electrical Rotary Unit DAE-60 4.5. Zero point adjustment Reference: exploded view in chapter 5 Introduction: In the zero point adjustment, mechanical zero point (reference) of the DAE-60 is established. In order to determine the zero point, reference travel is initiated. If the reference travel is started, the following takes place: The output shaft (item 90) first rotates counter clockwise until the inductive proximity switch (item 550) responds. Once the inductive proximity switch (item 550) has responded, the output shaft (item 90) stops and then rotates more slowly in the opposite direction. On reaching the encoder index, the output shaft (item 90) stops again. The reference travel is now complete. The entire procedure takes place automatically. – – During operation the surfaces of the motor and permanent magnet brake can reach 100°C. Do not touch the parts until they have cooled to below 40°C (measure the surface temperature). During work on the DAE-60, it must be ensured that the unit energy of the EC Motor Controller (ECMR) is switched off and cannot be switched on by unauthorized persons. Preparation: 1. Stop all travel jobs. 2. Disable the EC Motor Controller (ECMR). 3. Switch off the voltage of the EC Motor Controller (ECMR) and ensure that it cannot be switched on by unauthorized persons. 4. Build up the DAE-60 on a firm substructure, unless this has already been done. 5. Remove the add-on units if necessary. 6. Switch on the voltage of the EC Motor Controller (ECMR) again. Zero point adjustment: 7. Start the reference travel with the software and wait until the output shaft (item 90) finally remains stationary. 8. Using the software, check that the reference travel is complete. 9. Switch off the voltage of the EC Motor Controller (ECMR) and ensure that it cannot be switched on by unauthorized persons. 10. Mount the add-on units again. Ensure that the output shaft (item 90) is moved as little as possible. Final work: 11. Switch on the voltage of the EC Motor Controller (ECMR). 12. Start the reference travel with the software again. Ensure that the add-on units permit reference travel and that there is no obstacle in the way. 13. Small positional corrections can be made with the function “reference offset” in the software. If larger corrections to the position are required, the load can be repositioned. 25 User Manual Electrical Rotary Unit DAE-60 4.6. Adjustment of gear play Reference: exploded view in chapter 5 Isometric view from above (without cover, item 40) Isometric view from below Bore, access to item 190 Bores in item 190 Sectional view A-A Side view Bores in item 190 Bores in item 190 26 User Manual Electrical Rotary Unit DAE-60 Note: The gear play has already been set at the factory and usually does not need to be adjusted. Overview: The housing (item 10) contains a miter gear consisting of a crown wheel (item 120) and a pinion (shaft) (item 200). The gear play is adjusted by moving the housing (item 30) with the screws (item 430 and 440). The screws (item 430 and item 440) are used for adjusting the gear play and must never be tightened. The screw (item 430) is reached through a bore in the flange (item 60). The housing is guided by 2 guides (item 70) and is screwed tight by means of 4 screws (item 360). In order to reach the 4 screws (item 360) through the bores in the flange (item 190) and the pinion (item 180), the pinion (item 180) is turned until the position according to the above drawing “side view” is reached. – – – During operation the surfaces of the motor and permanent magnet brake can reach 100°C. Do not touch the parts until they have cooled to below 40°C (measure the surface temperature). During work on the DAE-60, it must be ensured that the unit energy of the motor control is switched off and cannot be switched on by unauthorized persons. The adjustment of the gear play must be carried out carefully, since otherwise premature wear of the teeth and/or overloading of the motor may occur. Preparation: 1. Stop all travel jobs. 2. Disable the motor control. 3. Switch off the voltage of the motor control and ensure that it cannot be switched on by unauthorized persons 4. Loosen the screw (item 360) and remove the cover (item 40). 5. Turn on the pinion (item 180) until all 4 bores correspond to the positions of the screws (item 360). 6. Loosen the screws (item 360) as far as they will go and then tighten again by two revolutions. The screws (item 360) cannot be removed. 7. Slightly loosen the screws (item 430 and 440). The screw (item 430) cannot be removed. The housing (item 30) can now be pushed to and fro. 27 User Manual Electrical Rotary Unit DAE-60 The adjustment: 8. Slightly tighten the screw (item 440) until there is marked play. Never tighten the screw (item 440) firmly. 9. Lightly tighten the screw (item 430) until the housing (item 30) can no longer move. Never tighten the screw (item 430) firmly. 10. Alternately and in sequence: loosen the screw (item 440) by 1/6 turn; tighten the screw (item 430) by 1/6 turn; check the play. Use this procedure until play is no longer noticeable. The play is best checked by the following procedure: the output shaft (item 90) is moved with one hand and the screws (item 300) of the flange (item 190) are held with the other hand. The play should be checked approximately every 90° over a full revolution of the output shaft (item 90). Due to the manufacturing tolerances, the backlash cannot always be completely eliminated over a whole turn of the driving shaft Pos.90. The adjustment is complete as soon as a free backlash adjustment is reached, in any position of the driving shaft Pos.90. Final work: 11. Tighten the 4 screws (item 360). 12. Fix the cover (item 40) with screw (item 360) on the housing (item 30). 13. Switch on the voltage of the EC Motor Controller (ECMR). 14. Enable the EC Motor Controller (ECMR). 15. Carry out the reference travel. 28 User Manual Electrical Rotary Unit DAE-60 4.7. Option: permanent magnet brake – – – – During operation the surfaces of the motor and permanent magnet brake can reach 100°C. Do not touch the parts until they have cooled to below 40°C (measure the surface temperature). During work on the DAE-60, it must be ensured that the unit energy of the EC Motor Controller (ECMR) is switched off and cannot be switched on by unauthorized persons. The air gap must not exceed or be less than the specified value. ! Chapter 4.7.3 The mounted components, in particular the friction surfaces, must be free of grease. Note: The chapter 1 up to and including 3 is also applicable to the permanent magnet brake. Permanent magnet brake actuation in the automatic mode: The scope of delivery of the DAE-60, ref. no. 57490, includes a EC Motor Controller (ECMR) with housing, ref. no. 57332. The EC Motor Controller (ECMR) is preset at the factory and autonomously performs the actuation of the permanent magnet brake. Permanent magnet brake actuation in manual mode: In the next operations, the permanent magnet brake is to be manually vented while the EC Motor Controller (ECMR) is switched off. For this purpose, it is necessary to provide a switch which makes it possible to switch the voltage supply of the permanent magnet brake manually on and off. Function: 1. Voltage applied !permanent magnet brake vented ! air gap between armature and hub of the permanent magnet brake ! shaft torque–free. 2. No voltage applied ! permanent magnet brake fixed ! no air gap between armature and hub of the permanent magnet brake! shaft fixed. 29 User Manual Electrical Rotary Unit DAE-60 4.7.1. Mounting the permanent magnet brake Reference: exploded view in chapter 5.1 Validity: For retrofitting an existing DAE-60 device, ref. no. 57490, with a DAE-60 permanent magnet brake, ref. no. 57550. State on delivery of DAE-60 permanent magnet brake, ref. no. 57550 The permanent magnet brake DAE-60 is completely assembled. A protective transport foil is present between the 2 brake surfaces of the permanent magnet brake (item 100). This protective transport foil must be removed before installation. – – During operation the surfaces of the motor and permanent magnet brake can reach 100°C. Do not touch the parts until they have cooled to below 40°C (measure the surface temperature). During work on the DAE-60, it must be ensured that the unit energy of the EC Motor Controller (ECMR) is switched off and cannot be switched on by unauthorized persons. DAE-60 with permanent magnet brake without cover (item 10), sectional view from above. Installation site of the screws, item Air gap, item 100 (adjustable) Item 100 hub Item 100 armature Item 100 2 wires *: Parts list Chapter Fehler! Verweisquelle konnte nicht Preparation: 1. Stop all travel jobs. 2. Disable the EC Motor Controller (ECMR). 3. Switch off the voltage of the EC Motor Controller (ECMR) and ensure that it cannot be switched on by unauthorized persons. --> Reference: exploded view in chapter 5 4. Loosen the 2 screws (item 530) and the screw (item 540) and remove the cover (item 20). 5. Loosen the screw (item 360) and remove the cover (item 40). These parts are no longer required. 6. Remove stopper (item 410). This part is no longer required. 30 User Manual Electrical Rotary Unit DAE-60 Mounting the permanent magnet brake: --> Reference: exploded view in chapter 5.1 1. Loosen the screw (item 110) and remove the cover (item 10). 2. Remove the hub (item 100) and take away the protective transport foil (in the air gap). 3. Loosen the 2 screws (item 180) but do not remove. 4. Mount the hub (item 100) on the shaft (item 200*). The hub should be pushed on to the shaft by approx. 2 mm, so that it is not flush. 5. Tighten the 2 screws (item 180). 6. Lead the 2 wires of the permanent magnet brake (item 100) through the bore (Ø 4.0 mm) of the housing (item 30*). --> Reference: exploded view in chapter 5 14. The 2 wires are laid further between the motor (item 50) and the housing (item 10). In the DAE-60 (below the cover, item 20), the 2 wires are led with the motor wires (item 50) to the terminal (item 150). Connect wires to the terminal group (item 150) ! Chapter 3.3.4 15. Fix the cover (item 20) with the 2 screws (item 530) and the screw (item 540) on the housing (item 10). --> Reference: exploded view in chapter 5.1 16. Fix the holder (item 20) with the 2 screws (item 190) on the housing (item 30*). The following should be noted in this operation. The wires of the permanent magnet brake (item 100) must be lightly tightened during mounting so that no loop forms behind the holder (item 20). Adjustment or checking of the air gap: ! Chapter 4.7.1 from point 5. 31 User Manual Electrical Rotary Unit DAE-60 4.7.2. Replacement of the permanent magnet brake Reference: exploded view in chapter 5.1 DAE-60 with permanent magnet brake without cover (item 10). ISO view . Sectional view (viewed from above) 3 openings (offset 120°) on item 30: 1) Adjustment of air gap of item 100 Installation site of the screws, item Air gap, item 100 (adjustable) Item 100 hub Item 100 armature Item 100 2 wires *: parts list “chapter 5, DAE-60“ Lateral opening of item 30 for 2 wires from item 100 – – Wires, item 100 During operation the surfaces of the motor and permanent magnet brake can reach 100°C. Do not touch the parts until they have cooled to below 40°C (measure the surface temperature). During work on the DAE-60, it must be ensured that the unit energy of the EC Motor Controller (ECMR) is switched off and cannot be switched on by unauthorized persons. Preparation: 1. Stop all travel jobs. 2. Disable the EC Motor Controller (ECMR). 3. Switch off the voltage of the EC Motor Controller (ECMR) and ensure that it cannot be switched on by unauthorized persons. 4. Loosen the screw (item 110) and remove the cover (item 10). --> Reference: exploded view in chapter 5 5. Loosen the 2 screws (item 530) and the screw (item 540) and remove the cover (item 20). 32 User Manual Electrical Rotary Unit DAE-60 Removing the existing permanent magnet brake: 6. Remove the 2 wires (item 100) (ref. exploded view in chapter 5.1) from the terminal group (item 150) (ref. exploded view in chapter 5). ! chapter 3.3.4 --> Reference: exploded view in chapter 5.1 7. Carefully pull the 2 wires (item 100) out of the bore (Ø 4.0 mm) in the holder (item 20). 8. Vent the permanent magnet brake. ! Chapter 4.7 9. Loosen the 3 screws (item 140) and remove the cover (item 30). The armature (item 100) is present in the cover (item 30). 10. Switch off the voltage of the permanent magnet brake. 11. Loosen the 6 screws (item 120) and remove the armature (item 100). 12. Loosen the 2 screws (item 180) and remove the hub (item 100) from the shaft (item 200*). Mounting the new permanent magnet brake: 13. Lead the 2 wires of the permanent magnet brake (item 100) through the lateral opening of the cover (item 30). The wires are led from the inside to the outside. 14. Guide the permanent magnet brake (item 100) into the cover (item 30). In this operation, the following should be noted. During the introduction of the permanent magnet brake (item 100), hold the 2 wires close to the armature housing (item 100). The wires must not form a loop in the cover (item 30). Note the positioning of the armature (item 100). The wires should be led straight to the lateral opening of the cover (item 30) and not wound around the armature (item 100). 15. Fix the armature (item 100) with the 6 screws (item 120) in the cover (item 30). 16. Fix the cover (item 30) (with the new permanent magnet brake, item 100) using the 3 screws (item 140) on the holder (item 20). Note the positioning of the cover (item 30) on the holder (item 20). 17. Lead the 2 wires (item 100) through the bore (Ø 4.0 mm) in the holder (item 20). Further work: ! Chapter 4.7.1 from point 9. 33 User Manual Electrical Rotary Unit DAE-60 4.7.3. Air gap adjustment of the permanent magnet brake Reference: exploded view in chapter 5.1 DAE-60 with permanent magnet brake without cover (item 10) ISO view Sectional view (viewed from above) 3 openings (offset 120°) on item 30: 1) Adjustment of air gap of item 100 Installation site of screws, item 180 Air gap, item 100 (adjustable) Item 100 hub Item 100 armature Item 100 2 wires *: Parts list “chapter 5, DAE-60“ Lateral opening of item 30 for the 2 wires from item 100 – – Wires, item 100 During operation the surfaces of the motor and permanent magnet brake can reach 100°C. Do not touch the parts until they have cooled to below 40°C (measure the surface temperature). During work on the DAE-60, it must be ensured that the unit energy of the EC Motor Controller (ECMR) is switched off and cannot be switched on by unauthorized persons. Preparation: 1. Stop all travel jobs. 2. Disable the EC Motor Controller (ECMR). 3. Switch off the voltage of the EC Motor Controller (ECMR) and ensure that it cannot be switched on by unauthorized persons. 4. Loosen the screw (item 110) and remove the cover (item 10). 34 User Manual Electrical Rotary Unit DAE-60 Adjustment: 5. Vent the permanent magnet brake. ! Chapter 4.7 6. Turn the output shaft (item 90) (exploded view in chapter 5) until both screws (item 180) are visible in one opening each of the cover (item 30). 7. The air gap between the brake surfaces of the permanent magnet brake (item 100), reachable through the openings of the cover (item 30), should be within the tolerance. Air gap tolerance Nominal value [mm] 0.3-0.05 Minimum value [mm] 0.15 Maximum value [mm] 0.35 7. 9. 10. 11. Slightly loosen the 2 screws (item 180). Adjust the air gap and tighten the 2 screws (item 180). Check the air gap. Switch off the voltage of the permanent magnet brake. Final work: 11. Carefully fold the 2 wires (item 100) and fix the cover (item 10) with the screw (item 110). 12. Switch on the voltage of the EC Motor Controller (ECMR). 13. Enable the EC Motor Controller (ECMR). 14. Carry out the reference travel. 4.7.4. Lubrication (DAE-60 with permanent magnet brake) All relevant information is mentioned in the chapter 4.1, it being necessary to take into account the following differences: Specific operation for DAE-60 with permanent magnet brake: 5a. Additional operation. Vent the permanent magnet brake. ! Chapter 4.7. 10a. Additional operation. Switch off the voltage of the permanent magnet brake. 35 User Manual Electrical Rotary Unit DAE-60 4.7.5. Replacing the motor (DAE-60 with permanent magnet brake) All relevant information is mentioned in the chapter 4.2, it being necessary to take into account the following differences: Specific operation for DAE-60 with permanent magnet brake: --> Reference: exploded view in chapter 5.1 8. Replaces the description in the chapter 4.2 Loosen the screw (item 110) and remove the cover (item 10). 8a. Additional operation. Vent the permanent magnet brake. ! Chapter 4.7 8b. Additional operation. Loosen the 2 screws (item 190) and carefully remove the holder (item 20). The following should be noted: The 2 wires of the permanent magnet brake should not be subjected to mechanical stress. 20. Replaces the description in the chapter 4.2 Fix the holder (item 20) with the 2 screws (item 190) on the housing (item 30*). In this operation, the following should be noted. The wires of the permanent magnet brake (item 100) must be lightly tightened during mounting so that no loop forms behind the holder (item 20). 20a. Additional operation. Check the air gap. ! Chapter 4.7.3 20b. Additional operation. Carefully fold the 2 wires (item 100) and fix the cover (item 10) with the screw (item 110). 4.7.6. Replacing the toothed belt (DAE-60 with permanent magnet brake) All relevant information is mentioned in the chapter 4.3 it being necessary to take into account the following differences: Specific operation for DAE-60 with permanent magnet brake: --> Reference: exploded view in chapter 5.1 5. Replaces the description in the chapter 4.3 Loosen the screw (item 110) and remove the cover (item 10). 5a. Additional operation. Vent the permanent magnet brake. ! Chapter 4.7 5b. Additional operation. Loosen the 2 screws (item 190) and carefully remove the holder (item 20). The following should be noted: The 2 wires of the permanent magnet brake (item 100) should not be subjected to mechanical stress. 8. Replaces the description in the chapter 4.3 Carefully push the toothed belt over the holder (item 20) and the cover (item 30) and remove. 9. Replaces the description in the chapter 4.3 First carefully push the new toothed belt over the holder (item 20) and the cover (item 30) and then push onto the toothed disk of the motor (item 50). Toothed belt tension ! Chapter 4.7.7 36 User Manual Electrical Rotary Unit DAE-60 4.7.7. Toothed belt tension (DAE-60 with permanent magnet brake) All relevant information is mentioned in the chapter 4.4, it being necessary to take into account the following differences: Specific operation for DAE-60 with permanent magnet brake: --> Reference: exploded view in chapter 5.1 4. Replaces the description in the chapter 4.4 Loosen the screw (item 110) and remove the cover (item 10). 4a. Additional operation. Vent the permanent magnet brake. ! Chapter 4.7 4b. Additional operation. Loosen the 2 screws (item 190) and carefully remove the holder (item 20). The following should be noted: The 2 wires of the permanent magnet brake (item 100) should not be subjected to mechanical stress. 8. Replaces the description in the chapter 4.4 Fix the holder (item 20) with the 2 screws (item 190) on the housing (item 30*). In this operation, the following should be noted. The wires of the permanent magnet brake (item 100) must be lightly tightened during mounting so that no loop forms behind the holder (item 20). 8a. Additional operation. Check the air gap. ! Chapter 4.7.3 8b. Additional operation. Switch off voltage of the permanent magnet brake. 8c. Additional operation. Carefully fold the 2 wires (item 100) and fix the cover (item 10) with the screw (item 110). 4.7.8. Zero point adjustment (DAE-60 with permanent magnet brake) All relevant information is mentioned in the chapter 4.5. 37 User Manual Electrical Rotary Unit DAE-60 4.7.9. Gear play adjustment (DAE-60 with permanent magnet brake) All relevant information is mentioned in the chapter 4.6, it being necessary to take into account the following differences: Specific operation for DAE-60 with permanent magnet brake: --> Reference: exploded view in chapter 5.1 4. Replaces the description in the chapter 4.6 Loosen the screw (item 110) and remove the cover (item 10). 4a. Additional operation. Vent the permanent magnet brake. ! Chapter 4.7 4b. Additional operation. Loosen the 2 screws (item 190) and carefully remove the holder (item 20). The following should be taken into account: The 2 wires of the permanent magnet brake (item 100) should not be subjected to mechanical stress. 12. Replaces the description in the chapter 4.6 Fix the holder (item 20) with the 2 screws (item 190) on the housing (item 30*). In this operation, the following should be taken into account. The wires of the permanent magnet brake (item 100) must be lightly tightened during mounting so that no loop forms behind the holder (item 20). 12a. Additional operation. Check the air gap. ! Chapter 4.7.3 12b. Additional operation. Switch off the voltage of the permanent magnet brake. 12c. Additional operation. Carefully fold the 2 wires (item 100) and fix the cover (item 10) with the screw (item 110). 38 User Manual Electrical Rotary Unit DAE-60 5. Parts list for DAE-60 Exploded view 39 User Manual Electrical Rotary Unit DAE-60 Item Sym. Designation Ref. No. ◘ Electrical rotary unit DAE-60 complete 57835 10 ◊ Housing 57509 Al 20 ◊ Cover, one-part 57510 Al 30 ◊ Housing, gear 57507 Al 40 ◊ Cover, gear, coated 57587 Al 50 ● Motor with toothed disk 57475 Diverse 60 ◊ Flange, bottom 57317 Al 70 ◊ Guide 57382 Steel 90 ◊ Output shaft 57319 Steel 100 ◊ Flange, internal 57312 Al 120 ◊ Crown wheel z130 57504 Steel 130 ◊ Encoder terminal group 57085 Diverse 150 ◊ Motor + sensor terminal group 57281 Diverse 160 ◊ Clamping piece for proximity switch 47906 Steel 170 ◊ Clamping screw for 47906 47904 Steel 180 ◊ Toothed disk GT 2MR 80S 57611 Al 190 ◊ Flange for clamping set 7x10x4 5 57508 Steel 200 ◊ Shaft, gear 57304 Steel 210 ◊ Gear ring 57506 Al 220 ◊ Nameplate CE 41620 Polyester 230 ◊ Nameplate cover 48508 Polyester 300 ◊ Cylinder head screw hex socket M4x12 vz BN3 502506 Steel 310 ◊ Circlip, shaft 8x0.8 sw BN818 502446 Steel 320 ◊ Deep-groove ball bearing 1r 8x22x7 608.2RSR 520117 Steel 330 ◊ Circlip, bore 22x1 sw BN822 520286 Steel 340 ◊ Cylinder head screw hex socket M8x8 sw BN1206 520267 Steel 350 ◊ Ribbed washer M4x7x0 5 vz BN792 502606 Steel 360 ◊ Cylinder head screw hex socket M4x18 vz BN3 508473 Steel 370 ◊ Cable lug fork M3 0.5-1 insulated 520345 Diverse 380 ◊ Ribbed washer M3x5 5x0.45 sw BN791 502363 Steel 390 ◊ Cylinder head screw hex socket M3x6 sw BN272 501602 Steel 400 ● Toothed belt GT 2MR 208x9 520357 Polyurethane 410 ◊ Protective stopper 4x6x4 PE black 520348 PE 420 ◊ Cylinder head screw hex socket M4x14 vz BN3 508472 Steel 430 ◊ Cylinder head screw hex socket M3x14 vz BN3 520057 Steel 440 ◊ Cylinder head screw hex socket M3x20 vz BN3 520107 Steel 460 ◊ Deep-groove ball bearing 1r 25x47x12 6005.2RSR 504916 Steel 470 ◊ Shrink disk 24x21 M5x16 TLK603 half S 520327 Steel 480 ◊ Deep-groove ball bearing 1r 20x37x9 6904.RS 508130 Steel 490 ◊ Cable screw union M12x1 5 short 520197 Brass 500 ◊ Cable PU 18x0 14mm2 520261 Diverse 40 Material User Manual Electrical Rotary Unit DAE-60 510 ◊ Cable PU 3x0.5mm2 screened 520260 Diverse 520 ◊ Thread-grooving cheesehead screw M3x6 vz BN13916 506341 Steel 530 ◊ Countersunk screw hex socket M4x35 vz BN21 520284 Steel 540 ◊ Countersunk screw hex socket M4x12 vz BN21 506845 Steel 550 ● Inductive proximity switch PNP 6.5x22x2000 508842 Diverse 560 ◊ Clamping set 7x10x4 5 520268 Steel ◊ Cable screw union M12x1 5 short 520406 Brass ● EC Motor Controller (ECMR) 57332 Diverse 570 ● These are wearing parts and are available from stock ◊ Not available from stock individually (upon request) ◘ Price-listed items available from stock 41 User Manual Electrical Rotary Unit DAE-60 5.1. Parts list for DAE-60 permanent magnet brake (option) Exploded view Item Sym. Designation Ref. no Material ◘ DAE-60 permanent magnet brake (option) 57550 10 ◊ Cover, gear PM brake, coated 57547 Al 20 ◊ Holder, permanent magnet brake 57548 Al 30 ◊ Cover, permanent magnet brake 57549 Al 100 ● Permanent magnet brake 0.4 Nm 510017 Diverse 110 ◊ Cylinder head screw hex socket M4x22 vz BN3 506183 Steel 120 ◊ Cylinder head screw hex socket M2x6 vz BN11 520335 Steel 130 ◊ Ribbed washer M4x7x0.5 vz BN792 502606 Steel 140 ◊ Cylinder head screw hex socket nK M3x6 vz BN17 520040 Steel 150 ◊ Ribbed washer M2x4x0.35 vz BN14083 520334 Steel 160 ◊ Ribbed washer M3x5.5x0.45 sw BN791 502363 Steel 170 ◊ Straight pin 3h6x6 bl hardened BN858 502018 Steel 180 ◊ Setscrew hex socket cone M3x4 sw BN24 501884 Steel 190 ◊ Cylinder head screw hex socket M3x10 vz BN3 502503 Steel ● These are wearing parts and are available from stock ◊ Not available from stock individually (upon request) ◘ Price-listed items available from stock 42 User Manual Electrical Rotary Unit DAE-60 6. 6.1. General information Environmental compatibility and disposal Materials used: − Aluminum − Steel − Copper − PU (polyurethane) − Brass − Polyester Surface treatment: − Anodization of aluminum − Nickel-plating of brass − Coating of aluminum Shaping processes: − Machining of aluminum and steel − Aluminum casting Emissions during operation: None Disposal: Devices which cannot be used anymore should be recycled not as complete units but dismantled into components and disposed of according to the type of material. The type of material used for each part is shown in the spare parts lists. Material which cannot be recycled should be appropriately disposed of. 43 MONTECH AG Gewerbestrasse 12, CH-4552 Derendingen Fon +41 32 681 55 00, Fax +41 32 682 19 77 [email protected], www.montech.com