1
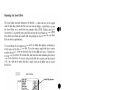
Desk Pack 1
User's Manual
Berkeley Softworks
2150 Shattuck Avenue
Berkeley, California 94704
•
Update Policy
To participate in Berkeley Softworks' update service, fill out and relurn ule Wriler's
Workshop Registration card found at the back of the manual. Regislered users w ill
be scnt notices ouLlining the procedure for obtaining updates and revi sions.
Wa rranty
Berkeley Softworks warrants that this product is free fTom defects in materials and
workm anship under normal use for a period of ninety (90) days from the date of
purchase. If a defcct occurs during this period, you may return your disk to Berkeley
Softworks or its authorized dealer, along with a dated proof of purchase, where it will
be replaced fTee of charge.
There are no other warranties, express or implied regarding the disk and rcl :ucd
materials, their fiUlCSS for any purpose, their qualiry or merchantability. Berkeley
Softworks shall not be liable for any incidental, consequential, or direct damage
rcsulling from the breach of any express or implied warranty, including damage (0
property.
GEOS, diskTurbo, deskTop, Desk Pack 1, geoWrite, geoPainl, Graphics Grabber,
arc (C) Copyright Berkeley Soft works, 1985, 1986.
Print Shop is a trademark of Broderbund Software, Inc ., PrintMastcr is a trdemark of
Unison World, Inc., Newsroom is a lTademark of Springboard Software, Inc.
License
This manual and software are copyrighted by Be rkeley Softworks and are intended for
usc on a single machine. You may no t copy this manual or software whole or in
part, except in the normal usc of the so ftware or to make a backup copy. You may
not makc copies to lend, rent or lease to othcrs. You may transfer this program and
license it to another if (1) all of the materials purchased (including backup cop ies)
are sold, given or loaned to another person and (2) the transferee agrees to be bound
by all the tenns and conditions of this agreement.
The software program(s) and manual in this package arc provided "as is" without
warranty of any kind, eilhcr express or implied, including, but not limited to the
implied warranties of merchantability or fitness for a panicular purpose.
Manual by: John Miller and Lee L1evano
Graphic Design: Nancy Kellennan
Desk Pack 1 Design Team: Eric E. Dcl Scsto. Chris Hawley. Clayton Jung, John
Wedgcwood
Printed 10/86
'e
Desk Pack 1
User's Manual
Berkeley Softworks
2150 Shattuck Avenue
Berkeley, California 94704
r----------
.-
Welcome to Desk Pack 1
Desk Pack I includes two new programs, the Graphics Grabber and the Icon Editor,
two new desk accessories (an appointment calendar and a realistic version of the
game blackjack), and updated printer and input drivers used with Commodore
rputers. Here is a brief description of each.
1: llefore You Begin Working guides you through thc initial processes of
installing Desk Pack 1, making a backup disk, and making work disks.
2: Graphics Grabber lets you convert m1work from other popular Commodore
64 programs ofr use in GEOS applications, like geoWrite and geoPaint.
3: Icon Editor converts non-GEOS files to the special GEOS format, and lets
you customize the icons of those files.
4: Calendar is a desk accessory which allows you to make notes about and keep
track of important engagements.
5: Blackjack is a desk accessory which simulates the popular game of the same
name.
~
•
deskTop and Drivers describes GEOS deskTop version 1.3 and new and
enhanced input and printer drivers.
Table of Contents
Chapter 1: Before You Begin Working
Make a Backup
1-1
Chapter 2: Graphics Grabber
Using the Graphics Grabber
Working with Print Shop or PrintMaster
Loading a Newsroom Graphic
Working with Photo Albums
Shortcuts
Icons within the Graphics Grabber
Description of Menu Items
2-2
2-3
2-6
2-7
2-9
2-10
2-11
Chapter 3: The Icon Editor
Running the Icon Editor
Things to Consider before Converting a File
Editing a New Icon
Special Drawing Functions
3-2
3-3
3-5
3-8
Chapter 4: Calendar Desk Accessory
The Calendar Desk Accessory
4-2
Chapter 5: The Blackjack Desk Accessory
The Blackjack Desk Accessory
5-2
Chapter 6: deskTop and Drivers
New GEOS deskTop
New Input and Printer Drivers
6-2
6-3
Appendix A: Comparison of Standard & GEOS Formats
Appendix B: Graphics Grabber Error Messages
Appendix C: Icon Editor Error Messages
Chapter 1: Before You Begin Working
•
•
•
Check the programs on the Desk Pack 1 disk
Make a backup copy of your disk
Make a work disk
l. Boot your GEOS boot disk as described in your GEOS manual.
2. Close your GEOS boot disk.
3. Insert the Desk Pack 1 disk into your disk drive and open it.
4. Open the file Graphics Grabber by clicking on the Grphics Grabber icon and
selecting open from the file menu. (You could also double-click on the Graphics
Grabber icon.) The Graphics Grabber screen will appear with a dialog box over the
top of it.
e
5. Select OK to return to the deskTop.
6. Using steps 4 and 5, open and close each of the other programs and desk
accessories on the disk, then close the Desk Pack 1 disk and place a write protect
tab on it.
7. Use the Backup or Disk Copy program supplied on your GEOS disk to make a
backup copy of Desk Pack 1. Put this backup copy in a safe place. If you ever
have difficulty with your original Desk Pack 1 disk, use this backup disk.
You arc now ready to make work disks with the programs and accessories on Desk
Pack l. When we discuss the Graphics Grabber and Icon Editor, we suggest
configurations that may be helpful. The desk accessories can be placed on any
work disk that has room.
1-1
Before You Begin
Chapter 2: Graphics Grabber
The GEOS Graphics Grabber is a program designed to convert artwork available
with other Commodore 64 programs for use in GEOS programs. The Graphics
Grabber is compatible with and able to load graphics from PrintMaster, Print
Shop, and Newsrcx)m.
This chapter explains:
•
•
•
•
•
•
•
Using the Graphics Grabber
Working with Print Shop or PrintMaster
Loading a Newsroom graphic
Working with Photo Albums
Shortcuts
Icons within the Graphics Grabber
Description of menu items
2-1
The Graphics Grabber
Using the Graphics Grabber
The Graphics Grabber will most often be used with the GEOS applications
geoPaint and geoWrite. These combinations allow you to customize professionally
designed art for specific applications, and to paste it into a document created in the
word processor. A good way to organize a work disk for this activity is to have the
Graphics Grabber, geoPaint, geoWrite, and the Photo Manager on the same disk.
Because the Graphics Grabber can read files on different disks, it is not necessary to
place it on the same disk as the artwork you wish to grab.
The Graphics Grabber icon appears on the Notepad as a small Christmas tree with
the comer bent over.
Selecting the Graphics Grabber
To run the program, select Graphics Grabber by clicking on its icon and select
open from the file menu, or simply double-click on the Graphics Grabber icon.
The Graphics Grabber appears, displaying a screen with a new menu bar at the top.
The Graphics Grabber
2-2
_
,.,
Working with Print Shop or Print Master
To load a Print Shop, PrintMaster, or Newsroom graphic, select the file menu.
The menu will drop down, displaying each type of graphic, and the quit option.
File Sub·Menu
Selecting Graphics
Make your selection and a dialog box will ask you to insert a disk containing that
type of graphic into one of the di sk drives. If you are using a single·drive system ,
remove the disk containing the Graphics Grabber, and insert the data disk into the
same disk drive. If you are using a dual disk drive system, just insert the data disk
into the second disk drive, leaving the Graphics Grabber in the original disk drive.
NOTE: You can also run the Graphics Grabber from a RAM Expansion Unit
(RED) if you have the REU GEOS Kernel.
Dialog Box Asks You to Insert Graphics Disk
2-3
The Graphics Grabber
After you insert the graphic program disk and click on OK, a dialog box appears
listing the rust five files of the type selected. To view other file names, click on
the down arrow at the bottom of the file box. The file names scroIl up one at a
time, with new file names appearing from the bottom of the file box. The files
continue scroIling until you release the mouse or joystick button, or there are no
more files on the disk. Clicking on the up arrow scroIls the files down in a similar
fashion.
Select Graphics to Grab
To grab one of the files, click on the file name. The file name wiII appear in
reverse video. After you have selectcd the file name, click grab. The program
loads the graphic and displays it on the scrcen.
Icons Within
Graphics Grabber
Open Graphics Grabber
The Graphics Grabber
2-4
e
Once the graphic has been loaded, you can save it on your disk for use in geoWrite
or geoPaint. To save the artwork, select in a scrap or in an album from the
save menu. Saving in a scrap is similar to using a clipboard. Each time you
add something to the clipboard, it replaces the item that is on the clipboard. Saving
in an album is more permanent. Each graphic is stored as one picture in a Photo
Album. The Photo Album can be manipulated by the Photo Manager Desk
Accessory, allowing you to "cut and paste" artwork into different application
programs.
2-5
The Graphics Grabber
Loading a Newsroom Graphic
Loading a newsroom graphic is similar to loading a Print Shop or PrintMaster
graphic. Select Newsroom from the file menu. The program tells you to insert
the disk containing the graphic and to click on the OK box when you are finished.
As with PrintMaster or Print Shop a dialog box appears allowing you to select a
file. Select a file and click on grab. The first graphic in the file selected appears
on the screen. (Each Newsroom file has several graphics in it, but the Graphics
Grabber displays only one graphic at a time.)
Several icons appear along the left-hand side of the graphic. These icons function
exactly as described earlier, with the exception of the first/prev/nextJlast icon.
This icon allows you to cycle through each of the graphics in the file currently in
memory. Click on next to see the next graphic in the file. Click on prev to see
the previous graphic. Click on first or last to display the first or last graphic in
the file. Only the graphic being displayed will be saved if you save to Photo Scrap
or Photo Album.
The Graphics Grabber
2-6
_
..
Working with Photo Albums
Saving in a Photo Album
In addition to saving a single graphic into a Photo Scrap, the Graphics Grabber is
able to save one or more graphics into a Photo Album. The Photo Album allows
you to build collections of artwork and graphics for future usc. To save artwork to
a Photo Album, simply load a Print Shop, PrintMaster, or Newsroom graphic into
memory. After the graphic is displayed on the screen, select in an album under
the save menu.
Select "in an album" to Save Artwork
The first time you choose this, a file dialog box appears, listing all of the Photo
Albums on the disk. (If there arc no Photo Albums on the program disk, it will be
necessary to create one -- see Creating a new Photo Album, below). The
name of the Photo Album currently in use appears in the album file name box.
The program then saves the graphic currently displayed in the Photo Album.
If the Photo Manager is on the same disk as the Graphics Grabber, you can check
to see that the graphic was saved into the Photo Album. Move to the geos menu
and select it. (All desk accessories on the disk appear in the menu.) Select the
Photo Manager and open the Photo Album in which you saved the graphic. The
artwork should be the first graphic in the Photo Album.
2-7
The Graphics Grabber
Album File Name Box
This box is located in the upper right-hand corner of the screen and list') the name
of the currently selected Photo Album. If there is no file name in the album file
name box, no Photo Album file has been selected. If there is a file name in the
box, then all future album saves will be to that album. If a different album is
desired, select change album from the options menu; the album name in the
album file name box changes accordingly.
Creating a New Photo Album
If you need to create a new Photo Album, you can usc the create album option in
the Graphics Grabber or create it from the Photo Manager. To create a Photo
Album, select create album from the options menu. A dialog box appears,
asking you to type in the name of the new album. When you enter the name, a
new album is created and becomes the current album. Its name appears in the
album file name box.
The Graphics Grabber
2-8
Shortcuts
It may be desirable to take a group of graphics from an Art Gallery or some other
disk and put them together into one Photo Album.You could process th~m one at a
time, but Graphics Grabber has features that make it easier and faster. Follow the
procedure above for loading a PrintMaster (print Shop, Newsroom) graphic and
save it to a Photo Album. You can now load the next graphic on the disk simply
by clicking on the next icon. The next graphic on the disk is displayed. 'The
first, last, and prey options work in the same way. To save the graphic to a
Photo Album quickly, click on the Photo Album icon. By alternating between the
preY/next icons and the Photo Album icon, you can save several graphics
veryquickly on a two-disk drive system. On a single-disk drive system, this
process is slowed down considerably because the disks must be swapped for each
operation.
If you wish to select graphics on the same disk at random, click on the icon that
looks like a file dialog box. This takes you directly to the file dialog box for the
disk. You can then scroll around and select any graphic on a disk. This approach is
faster than using the file menu because there will be no insert disk dialog box
on a dual-disk drive system. If you would like to start saving artwork to a different
Photo Album, select change album from the options menu. A file dialog box
appears with a list of Photo Albums from which to choose.
2-9
The Graphics Grabber
Icons within the Graphics Grabber
When a graphic is selected, it appears on the screen with [our icons on the left side.
These icons do many of the same things as the selections in the menu bar, but
they do them faster.
•
The top icon looks like a file dialog box. Clicking on this icon displays the
original list of graphics, with the graphic most recently loaded still selected.
You can scroll around and select another graphic from the same disk.
•
The next icon is the Photo Scrap icon. This works the same as the in a
scrap option in the save menu -- it saves the currently displayed graphic into
a Photo Scrap.
•
The third icon is the Photo Album icon. This works the same as the in an
album option in the save menu -- it saves the currently displayed graphic into
a Photo Album. The first time you select this option the program asks you for
the name of the Photo Album. When the icon is clieked again, the displayed
graphic is saved to that Photo Alhum. Use change albums under the
options menu to select a different Photo Album.
•
The bottom icon has several functions. It is a combination first/prev/
next/last icon. For Newsroom graphies, clicking on one of these functions
displays a different graphic in the current file. Clieking on first or last
displays the first or last graphic in the fiIe; clicking on pre v or next displays
the previous or next graphic in the fiIe.
If the graphic currently displayed is a Print Shop or PrintMaster graphic, the icon
works differently. Clicking on first or last displays the first or last graphic on
the disk [rom which the last ~,'Taphic was displayed. Clicking on prey or next
displays the previous or next graphic on the disk.
The Graphics Grabber
2-10
..,
Description of Menu Items
e
You can use this handy reference to the selections in the menu bar of the Graphics
Grabber while you are using the program.
File Menu
PrintMaster -- Select this to load graphics from a PrintMaster disk, an Art
Gallery disk, or a disk containing a user graphic made with PrintMaster. You will
be asked to insert the disk containing the graphic into the disk drive and then to
select the graphic to grab.
Print Shop -- Select this to load graphics from a Print Shop disk, a Graphics
Library disk, or from a disk containing a user graphic made with Print Shop. You
will be asked to insert the disk containing the graphic into the disk drive and then
to select the graphic to grab.
Newsroom -- Select this to load a graphic from a Newsroom disk or a Clip Art
disk. You will be asked to insert the disk containing the graphic into the disk drive
and then to choose the graphic to grab.
Quit -- Select this to exit the program and return to the deskTop.
Save Menu
In a scrap -- Select this to save a graphic that has been loaded and displayed on
the screen into a Photo Scrap. The Photo Scrap created can then be "pasted" into
geoPaint, geoWrite, or some other GEOS application that supports the Photo
Scrap.
In an album -- Select this to save a graphic that has been loaded and displayed
into a Photo Album. The first time you do tllis, the program asks you for a Photo
Album in which to save the graphic. If there are no Photo Albums on the program
disk, you must cancel this operation and select create album in the options
menu to create a Photo Album to copy the graphic into. After you have chosen an
album, the album's name is displayed in the upper-right corner and a\1 future saves
to an album will be saved into this album. To change albums, choose change
album from the options menu.
2-11
The Graphics Grabber
Options Menu
Choose or Change Album -- Select this option to initially choose a Photo
Album or to change from working on one Photo Album to another.
Create Album-- Select this option if you want to create a new Photo Album on
the program disk. This is equivalent to going into the Photo Manager desk
accessory and choosing create album. The program asks you for a name to give
the newly created Photo Album. All future saves will be to this album until you
change Photo Albums.
The Graphics Grabber
2-12
Chapter 3: The Icon Editor
The Icon Editor is a GEOS application program that allows Commodore 64, 64c,
and 128 GEOS users to convert non-GEOS files to the special GEOS file format,
to customize the icons of the newly converted files, and to save the new icons on
to the disk. The Icon Editor can also be used to customize the icons of existing
GEOS files, such as geoPaint documents.
During the conversion process the area on the disk where the file is described is
modified, so that icons and other information needed by GEOS can be added.
NOTE: A short description of the differences between GEOS and non-GEOS files
is given in Appendix C.
This chapter explains:
•
•
•
•
Running the Icon Editor
Things to consider before Converting a file to GEOS format
Editing a new Icon
Special Drawing Functions
3-1
The Icon Editor
Running the Icon Editor
The Icon Editor has been designed to be flexible -- it does not have to be copied
onto the disk that contains the file icon you want to change. A good idea is to put
the Icon Editor on a work disk that contains other GEOS Utilities and Desk
Accessories. It is generally not a good idea to keep the Icon Editor on your GEOS
Boot Disk. Boot Disks are usually full, and placing the Icon Editor on your boot
disk can limit its pcrfonnance.
The Icon Editor file will appear on the screen. A dialog box appears, containing a
list of names of the files on the disk. If you are using a single-disk drive system
and the desired file is not on that disk, click on the disk icon once. A dialog box
requests that you remove the current disk, and insert the disk containing the desired
file into the disk drive. If you are using a dual-disk drive system, and the desired
file is on a disk in the other disk drive, simply click on the drive icon to switch
disk elri ves.
Icon Ed
Scroll Up Arrow
Select File:
DESK lOP
GEOWRITE
calendar
Dote Book
Icon Editor
'a hies
(obbe,
Actual Size:
Scroll Down Arrow
Selecting the File or Icon
The dialog box will list the names of the first six files on the disk. If the name of
the desired file is not visible, place the cursor on the down arrow icon and hold
the joystick/mouse button down until the desired file name is visible. You may
scroll upward in the list of file names by using the up arrow icon. When the
narne of thp 4csired file is visible in the window, mo\'e the cursor to the name and
click once to select itithen click on the open button.
Modifying Write Protected Files
If the file you have selected is write protected, a dialog box appears telling you so
and asking: Ignore wTite protection? If you select no the Select File dialog
box reappears, and you can choose another file. If you select yes the Icon Editor
allows you to change the file's icon, even though the file is write protected.
The Icon Editor
3-2
e
Things to Consider Before Converting a File to
GEOS Format
If you want to add an icon to a non-GEOS file, the Icon Editor must first convert
the file to GEOS format. There arc several things to consider before converting a
file to GEOS format:
·The conversion process will not alter the information in the file or the
way in which it is stored on the disk, so the file will work as it was
originally designed after conversion.
·"Relative" (REL) type data files cannot be converted to GEOS format.
·The conversion process allocates one block on the disk. The file's new
icon and some other information associated with the file is stored on this
block. This information is only visible using the GEOS deskTop info
command.
·The standard Commodore directory command does not reveal any clues
that the file has been converted. When a file has been converted, you will
only be able to tell by viewing the disk from the GEOS deskTop.
·Once a file has been converted DO NOT USE the Commodore
"validate" command on that disk. (It will ruin the disk.) You must
use the GEOS deskTop validate command (sec Undoing Changes for
recovery from this situation).
·You should not use the Commodore copy command to copy a converted
file. The standard copy command does not recognize the new GEOS
format, and the file cannot be copied correctly. You must use the GEOS
deskTop copy command.
·The process is. reversible. You can use the remove icon command in
the. Icon Editor file menu to restore a file's original header block.
3-3
The Icon Editor
If you select a non-GEOS file in the Icon Editor Select File dialog box, a second
dialog box appears confinning the non-GEOS origin of that file and asks you if
you want to convert the file. If you select no, the file is not modified and the
Select File dialog box reappears.
If you select yes, a dialog hox asks you what type of file it is: Basic, Asm
(assembly), or Data. You must choosc onc. This selection does not affect your
usage of the file in non-GEOS applications, but it is checked when you open the
file from the GEOS deskTop (GEOS must know the file type, so that it can run it
properly).
You will then be asked to enter a permanent name, or class, for the file. The name
you enter will only be visible using the GEOS deskTop info eommand, and
cannot be changed later using the rename command. Because you will probably
want to make the pennanent name the same as the file name, the file name is
displayed with the cursor to the immediate right. To use this name, simply press
RETURN. To change this name, use the DEL key to crase the characters, type in
the new name, and press RETURN.
NOTE: The penn anent name for a file is listed as Class in the info Box on the
deskTop. A Class consists of a group of files related by a common function or usc.
If the file you arc converting is written in Basic or assembly language, another
dialog box appears, asking that you enter an author name for the file. Type in the
name and press RETURN.
If the file you have selected is one of the following:
•
•
•
•
A
A
A
A
file on a GEOS boot or GEOS application (geoCalc, etc.) disk
file created by a GEOS application such as geoPaint
"non-GEOS" file that has been previously converted to GEOS fonnat
copy of one of the files listed above
it is considered a GEOS file, and you can go on to the next section.
The Icon Editor
3-4
_
Editing aNew Icon
After you have selected a file (and it has been converted to GEOS fonnat if
necessary), it, icon is displayed on the screen. The icon created for this file is
completely blank. You may now proceed to edit or customize the icon.
File: qraphics qHlbbef
Disk: 2nd disk
Icon Edit Window
Shift Right
Shift Left
Mirror Horizontally
Icon Editor Main Window
The name of the current file and the name of the disk are displayed at the top of the
Icon Editor screeln the center of the screen arc two large windows, positioned side
by side. The left window is called Icon Edit Window. It displays the icon in an
enlarged fonnat, similar to the pixel edit mode in geoPaint. The right window is
called Icon Buffer.
An actual sized version of the icon is displayed directly below the Icon Edit
Window.
The Icon Edit Window displays a bitmap of the current icon. For our purposes, a
bitmap is a drawing composed of small, equal sized squares called "pixels." The
icon is "drawn" in a rectangle which is 24 pixels wide and 21 pixels high.
When you move the curser into the Icon Edit Window, the pointer changes shape
and color. It becomes a small yellow square. You may also notice that it does not
move smoothly, rather it skips from pixel to pixel. If you are using a joystick,
you will also notice that it moves at a constant speed.
3-5
The Icon Editor
You can draw and make changes to the icon by pointing to the pixel you would
likc to change and clicking the mouse or joystick once. The Draw Mode can be
used simply by placing the cursor on a blank pixel ancI clicking once. The yellow
cursor becomes a black square, and you can draw your Icon. Another click and the
cursor returns to the original yellow (nondrawing) state. If you place the yellow
cursor on a black pixel and click once again, you can use the Erase Mode. In erase
mode, the cursor becomes a red square and acts like an eraser. You can alternate
between Draw and Erase mocles until you have completed your icon. You can create
any 24x21 pixel icon you want.
Undoing Changes
If you ever want to recall the original icon that appeared when you first selected the
fIle, use the recover icon command in the file menu. The Icon Editor displays
the file's originpl icon.
If you inadvertently use the Commodore validate command, you may still be
able to recover the disk by using the GEOS validate command located under
Disk in the menu bar.
Saving Your Icon
Once you have finished editing the icon and would like to save it onto the disk, use
the quit command in the file menu. The Icon Editor exits to the deskTop. If you
would like to edit another file's icon, use the save icon command in the file
menu. The icon you are working with is saved and a dialog box appears asking you
to select another file.
NOTE: Under normal conditions, there is no way to quit the Icon Editor without
saving the icon. If you want to get the original back before you quit, use the
recover icon command in the file menu.
Copying Icons from Other Files
The Icon Buffer window can be used to copy an icon from one fIle
several other files. To do this, select the file that has the icon you
When the icon is shown in the Icon Edit Window, click once on
Buffer arrow. The file icon is copied into the buffer and is visible
hand side of the screen.
The Icon Editor
3-6
to another or
want to use.
the Copy to
on the right-
_
WI'
Selecting save icon from the file menu leaves the image in the Icon Buffer, but
saves the original icon back to it5 file. When the dialog box appears, select the
destination file. The destination file's icon appears in the Icon Edit Window (the
icon from the first file still appears in the Icon Buffer). Click once on the Load
from Buffer arrow, and the icon in the Icon Buffer will be copied into the Icon
Edit Window. To save the new icon to its file, select save icon from the file
menu. This process (select file, load from buffer, save icon) can be repeated several
times to copy the icon in the Icon Duffer into several files
3-7
The Icon Editor
Special Drawing Functions
There arc eight Drawing Icons locatcd in thc center of the screen (below the
windows). Each alters the file icon in the Icon Edit Window in a special way. To
use one of these drawing icons, click on it once. The Icon Edit Window is updated
accordingly. These icons are:
Shift Up
Click once on this drawing icon to shift the file icon upward one
pixel in the Icon Edit Window. The line of pixels that disappears
off the top of the Icon Edit Window reappears or "wraps" to the
bottom line of the Icon Edit Window.
Shift Down
Click once on this drawing icon to shift the file icon downward
one pixel in the Icon Edit Window. The line of pixels that
disappears off the bottom of the Icon Edit Window "wraps" to the
top line of the Icon Edit Window.
Shift Left
Click once on this drawing icon to shift the file icon one pixel to
the left in the Icon Edit Window. The column of pixels that
disappears from the left-hand side of the Icon Edit Window
"wraps" to the right-hand side of the Icon Edit Window.
Shift Right
Invert
Mirror
Horizontally
Clear Icon
:Mirror
Horizontally
Click once on this drawing icon to shift the file icon one pixel to
the right in the Icon Edit Window. The column of pixels that
disappears 0[[ the right-hand side of the Icon Edit Window "wraps"
to the left-hand side of the Icon Edit Window.
Click once on this drawing icon to invert each pixel in the file
icon -- creating a "negative" of the icon.
Click once on this drawing icon to flip the Icon along the
horizontal axis.
Click once on this drawing icon to clear the file icon.
Click once on this drawing icon to flip the icon along the vertical
axis.
The Icon Editor
3-8
e
Chapter 4: Calendar Desk Accessory
The Calendar Desk Accessory provides an easily accessible deskTop Calendar for
any month in any year. It also doubles as a handy datebook, allowing you to write
yourself notes to remind you of important occasions.
4-1
Calendar
The Calendar Desk Accessory
To open the Calendar Desk Accessory, simply select it from the geos menu, or
double-click on the Calendar icon on the disk notepad. The Calendar will open to
display the month selected in the Preference Manager. Since the Commodore 64
does not support a real-time clock, it is not possible to have it automatically
display the current month. You can, however, set the month by using the
preference manager (sec Preferen~e Manager , Chapter 6 of the GEOS Manual) .
Once the Calendar has been drawn, there are two easy ways to change the month
displayed. To advance the Calendar one month at a time, simply click on the
turned up edge (dog-ear) of the Calendar in the lower right-hand comer. To turn the
Calendar back one month, click on the pad just below the dog-ear.
To change the Calendar several months or even years at a time, select the month
option under the change menu. When you do this, you will be asked to supply
the month and year in the lower left-hand corner. For the month, specify any
number between 1 and 12, corresponding to January through December. For the
year, type in any year consisting of fonr digits . You may also type in two digits to
move to the corresponding year in the 20th century (i.e., typing "86" means 1986).
List Icon
The Calendar
Calendar
4-2
e
Making Notes
To use the datebook or notekeeping features of the Calendar, move the cursor up to
the date for which you wish to leave a note, and click on that square. The Calendar
field clears, revealing a notepad on which you can type your reminder. Three option
icons appear toward the bottom of the notepad area. These icons represent specific
actions you might want to take in handling the notepad.
•
The CLEAR Icon -- The box on the left clears any text that you have typed
into the notepad.
•
The OK Icon -- The square in the middle (with the OK) saves the notes you
have written to the Datebook data file. If you clear out previously existing
notes, selecting the OK option will also delete the entry from the datebook.
•
The EXIT Icon -- The square on the right exits the notepad and goes back
to the Calendar without affecting the current datebook entry. Any changes you
make will be ignored and the orginal contents of the page will be restored.
The LIST (?) icon appears below the Calendar on the bottom. When selected,
you will see a list of dates for which there are notes in the datebook. Up to 20
dates are listed on one page. If there are more than 20 entries in the datebook, the
"dog-ear" moves you to the next or previous list of dates. The first and last pages
of dates wrap around to each other. A simple click on any of the listed dates
displays the entry for that date. You will then be back in the datebook notepad,
with all the options outlined above.
Like most desk accessories, you may leave the Calendar by selecting either the
quit option under the file menu, or by clicking the Close block in the upperright comer. Once back in the deskTop, notice that an additional file called
DateBook has been created by the Calendar. You won't be able to do anything with
it ( i.e., it cannot be opened from the deskTop), but don't throw it away. This is a
4-3
Calendar
data file full of the databook entries you have made and is used by the Calendar
Desk Accessory.
The New DateBook Icon
Calendar
4-4
Chapter 5: Blackjack Desk Accessory
The Blackjack Desk Accessory is a one-person simulation of the popular card
game. You play against the dealer (the computer). You start out with $1,000 in
your account, and can playas long as you like, provided that you still have some
money. The program uses a single 52 card deck, so counting cards is possible.
5-1
Blackjack
The Blackjack Desk Accessory
You can open the Blackjack Desk Accessory either from the icon on the disk
notepad or by selecting it from the geos menu. The first screen you will see will
be blank with two selections in the menu bar, and the standard Close block in the
upper right-hand comer. The large blank area in the middle is the playing field
where the cards are displayed. The smaller blank area on the bottom is the
command and status window.
The Blackjack Game
There are some sound effects in this game, so you may want to turn the volume
either up or down to suit your preference. Once you start the game, the deck will
be internally shuffled twice to ensure a random sequence of cards. Hands are played
until the deck runs out of cards. The deck is then reshuffled automatically.
At the beginning of the hand, you must specify your bet. The bet is initially set to
$10. If you do not alter it, the current bet and the amount of money in your
account are displayed in the lower lefthand corner of the command and status
window . The text area shows Bet:, which indicates the dealer is waiting for you to
specify your bet. If you want to keep the same bet, simply move the pointer to the
Same icon and select it. If you want to change the amount of the current bet,
select the Alter icon. When altering the bet, you are prompted to enter the new
amount. You may specify any number up to the amount of money currently in
your account. You may change the bet by using the INST/DEL key to backspace
Blackjack
5-2
e
over what you have typed. When satisfied with the amount, press RETURN. If the
bet is illegal, the computer will ask you for a new amount. There is also a third
option in betting. After winning a hand, it is possible to let your winnings "ride",
i.e., to add your winnings to the current bet, by selecting the Ride icon when it
appears.
When the bet is set, the hands are dealt in the playing field. The dealer's hand
appears on top and yours is on the bottom. To get another card, select Hit. When
you are satisfied with the total, select Stay. Once you stay, the dealer completes
its own hand, dealing cards according to the normal specific rules (i.e., hit on soft
17s and anything equal to or below] 6). When the dealer is finished, the winner is
declared, and the results appear in the text area of the status bar. A Deal icon then
appears in the lower right-hand corner. Select this option if you wish to go on to
the next hand.
A normal hand consists of hitting and/or staying. There are some special cases,
however, whcre the computer will ask you to respond to a question after the hands
are dealt.
• Splitting the Hand -- If you are dcalt two equal cards, you will be asked if
you want to split the hand. If you do, your hand is split and two more cards are
dealt. Play each hand individually, upper hand first. When satisfied with the
upper hand, select the Stay icon; the Hit and Stay icons will appear for the
second (lower) hand.
•
Double DO~ll -- If your initial hand totals either 10 or 11, you will be asked
if you want to "double down." If you do, your bet will be doubled (up to the
amount in your account) and one card will be dealt to you. The dealer then
automatically starts to handle its own hand.
• Insurance -- If the dealer's initial "up" card is an ace, you will be asked if you
want insurance against blackjack. Insurance costs half of your current bet. It
pays 2: 1 odds, so if the dealer does have blackjack, although you lose your bet,
you win the insurancc, and nothing happens to your account. If the dealer
doesn't have blackjack, the insurance money is automatically deducted from
your account and play continues normally.
As in a real casino, when you run out of money you are not allowed to play any
more. If you wish to play again, you may start over by choosing the play/start
option. You may exit blackjack by choosing the quit option under the file
submenu or by clicking on the Close block when it is active. Enjoy~
5-3
Blackjack
Chapter 6: deskTop and Drivers
Desk Pack 1 features an improved deskTOP and newly added GEOS supported
printer and input drivers.
6-1
deskTop and Drivers
New GEOS deskTop
The new GEOS deskTop file, which is located on the back side of the Desk Pack 1
disk, contains added features that improve the perfonnance of GEOS.
Current Printer Driver Name Displayed
.-
The new deskTop displays the name of the currently selected printer driver in a box
below the printer icon at the bottom of the Disk Notepad.
•
Keyboard Shortcuts to: Open/Close Disk, Move Cursor
If you should boot you GEOS disk and do not have the input device that is set as
the default device on that disk, you can use the following keyboard shortcuts to
move the cursor around the screen and to open and close the disk.
To open the disk:
To close the disk:
To put up the "Select Input
Driver" dialog box:
(Commodore key)
C= and 0
C= and C
C= and I
(This aIIows you now to use the keyboard
cursor keys-next to the righthand Shift keyto move the cursor. Press the Return key to
select an input driver.)
You should use the latest version of deskTop with your GEOS applications. To
detennine which deskTop version is the latest, select the deskTop icon, and click
on info in the disk puII-down menu (located on the command bar at the top of
the deskTop). The most recent date wiII be the latest version. Copy the file of the
latest version onto your work disks.
deskTop and Drivers
6-2
New Input and Printer Drivers
Severdl. new printer and input drivers are now supported by GEOS. A list of them
is located in a Read Me file found on the back side of the Desk Pack 1 disk.
Copy this file onto a work disk that contains any version of geoWrite and open it.
Scroll through the list to find detailed information about your printer and its
interface setup.
The printer driver and input driver files are also located on the back side of the Desk
Pack 1 disk. You can copy anyone (or several) of these files onto your work disks
in order to print your documents, and to use new input devices.
NOTE: The new printer drivers are faster than the old drivers, and contain
additional features that will improve your printing performance. You should,
therefore, replace any old printer driver files that you may be using with copies of
the new ones.
6-3
deskTop and Drivers
e
APPENDIX A:
Comparison of Standard and
GEOS Formats
Standard Commodore fonnatted floppy disks are divided into a number of circular
tracks. Each track consists of a number of sectors. All of the sectors on one of the
tracks are devoted to the directory for the disk. These sectors contain an entry for
each file stored on the disk. Each entry contains the following information about
the file: its file name, the track/sector address where the file begins, the file type,
etc.
GEOS disks (disks that have been formatted by the Graphic Environment
Operating System) are slightly different. The most significant difference is that the
directory on a GEOS disk contains an additional sector to keep track of files that
have been moved from the Disk Notepad down to the "border" area.
GEOS files (files that have been created using GEOS application programs or
copies of files from an original GEOS disk) are also slightly different from standard
Commodore files. One difference is that the directory entries for GEOS files
contain some additional information. This information includes the file's last
modification date, GEOS file type, and the location (track and sector) on the disk of
the file's "header". A file "header" is a sector associated with that file that contains
additional information about the file, including the bitmap data for the file's icon.
The deskTop info command displays the information contained in a file's header.
A-I
Appendicies
APPENDIX B:
Graphics Grabber Error Messages a Brief Look
Graphics Grabber is unable to load this desk accessory.
Something went wrong while reading the desk accessory from the disk. The disk
could be inserted incorrectly, or there maybe a problem with the disk or the desk
accessory selected.
e
Graphics Grabber cannot read this graphic.
The Graphics Grabber is unable to grab one of the graphics on the disk. Check to
see that the disk is inserted correctly. This could also mean that there is a problem
with that file or that disk.
Insert a disk containing ...
The Graphics Grabber is asking you to insert the disk containing the graphic into
the disk drive. Double check to see that you are inserting the disk into the correct
disk drive.
Re-insert your GEOS disk in Drive ...
The program wants you to insert the disk that you used to run the program. This
requires that you insert this disk to save to a Photo Scrap or to a Photo Album.
You must also have this disk inserted to run a desk accessory or to exit the
program. Check again to make sure that you are inserting the disk in the correct
disk drive.
e
There is no graphic to save.
There is no graphic currently loaded and displayed. You must "grab" a graphic
before you can save it to a Photo Scrap or Photo Album.
There is not enough space on disk to save this graphic.
There is not enough disk space to save the graphic into a Photo Album or Photo
Scrap. You will probably need to exit the program and free up some space on the
disk before you can save a graphic.
Graphics Grabber is unable to save the graphic on this disk.
There is a problem with the disk that prevented the Graphics Grabber from saving
the graphic. Make sure that the disk is inserted correctly. This message could also
mean that something is wrong with your disk.
Appendicies
A-2
e
Graphics Grabber cannot read one or more of the graphics in this
file.
_
There are no readable graphics in this file.
There is insufficient memory to convert this graphic.
Something is preventing the Graphics Grabber from reading a Newsroom graphic
file correctly. Either the Newsroom disk is bad, or the Graphics Grabber file itself
is bad. If the problem persists, call customer service.
A-3
Appendicies
APPENDIX C:
Icon Editor Error Messages A Brief Look
Bad disk/no disk
The Icon Editor cannot read your disk. The disk is either bad or is not fully inserted
into the disk drive.
Disk full
While converting a non-GEOS file, the Icon Editor has found that there are no frcc
blocks on the disk, so it cannot create a header block.
Devices not found
The Icon Editor cannot find your disk drive. Make sure the disk drive cables are
connected properly.
File not found
The desk accessory you have selected is not on the current disk.
Disk ID mismatch
You have switched disks without using the Disk or Drive icon while selecting a
file. Replace the original disk to continue.
Verify failed
The Icon Editor was unable to verify that a block written to the disk was written
correctly. Your disk may be bad, or the disk drive may be unreliable.
Disk write protected
You have a write-protect tab on your disk. Remove the tab to continue.
Unexpected error
The Icon Editor has encountered an unusual error. There may be a problem with
your copy of the Icon Editor or with your hardware. Try using a backup copy on a
different Commodore computer. If the problem persists, contact customer service.
Appendicies
A-4
..
..