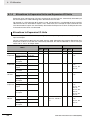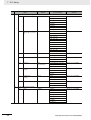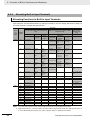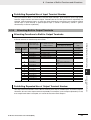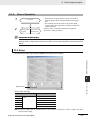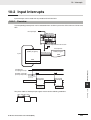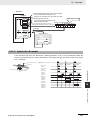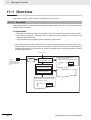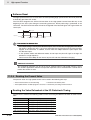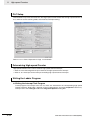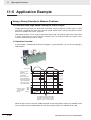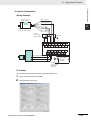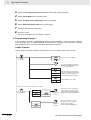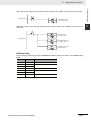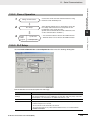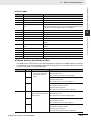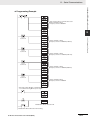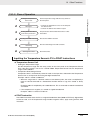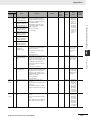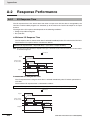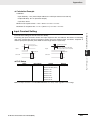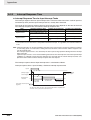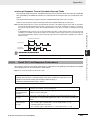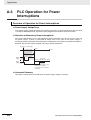
1
Cat. No. W480-E1-01
SYSMAC CP Series
CP1E-E@@D@-A
CP1E-N@@D@-@
CP1E CPU Unit Software
USER’S MANUAL
© OMRON, 2009
All rights reserved. No part of this publication may be reproduced, stored in a retrieval system, or transmitted, in any form, or
by any means, mechanical, electronic, photocopying, recording, or otherwise, without the prior written permission of
OMRON.
No patent liability is assumed with respect to the use of the information contained herein. Moreover, because OMRON is constantly striving to improve its high-quality products, the information contained in this manual is subject to change without
notice. Every precaution has been taken in the preparation of this manual. Nevertheless, OMRON assumes no responsibility
for errors or omissions. Neither is any liability assumed for damages resulting from the use of the information contained in
this publication.
SYSMAC CP Series
CP1E-E@@D@-A
CP1E-N@@D@-@
CP1E CPU Unit Software
User’s Manual
Revised March 2009
Introduction
Thank you for purchasing a SYSMAC CP-series CP1E Programmable Controller.
This manual contains information required to use the CP1E. Read this manual completely and be sure
you understand the contents before attempting to use the CP1E.
Intended Audience
This manual is intended for the following personnel, who must also have knowledge of electrical systems (an electrical engineer or the equivalent).
• Personnel in charge of installing FA systems
• Personnel in charge of designing FA systems
• Personnel in charge of managing FA systems and facilities
Applicable Products
CP-series CP1E CPU Units
• Basic Models CP1E-ED-A
A basic model of CPU Unit that support basic control applications using instructions such as
basic, movement, arithmetic, and comparison instructions.
• Application Models CP1E-ND-
An application model of CPU Unit that supports connections to Programmable Terminals, inverters, and servo drives.
The CP Series is centered around the CP1H, CP1L, and CP1E CPU Units and is designed with the
same basic architecture as the CS and CJ Series.
Always use CP-series Expansion Units and CP-series Expansion I/O Units when expanding I/O
capacity. I/O words are allocated in the same way as for the CPM1A/CPM2A PLCs, i.e., using fixed
areas for inputs and outputs.
CP1E CPU Unit Software User’s Manual(W480)
1
CP1E CPU Unit Manuals
Information on the CP1E CPU Units is provided in the following manuals.
Refer to the appropriate manual for the information that is required.
This Manual
CP1E CPU Unit Hardware
User’s Manual(Cat. No. W479)
CP1E CPU Unit Software
User’s Manual(Cat. No. W480)
CP1E CPU Unit Instructions
Reference Manual(Cat. No. W483)
Mounting and
1 Setting Hardware
· Names and specifications of the parts of all Units
· Basic system configuration for each CPU Unit
· Connection methods for Expansion I/O Units
and Expansion Units
2 Wiring
· Wiring methods for the power supply
· Wiring methods between external I/O devices
and Expansion I/O Units or Expansion Units
Connecting
3 Online to the PLC
Connecting Cables for CX-Programmer
Support Software
Procedures for connecting the
CX-Programmer Support Software
4 Software Setup
Software setting methods for the CPU
Units (PLC Setup)
5 Creating the Program
· Program types and basic information
· CPU Unit operation
· Internal memory
· Built-in CPU functions
· Settings
Detailed information on
programming instructions
Checking and
6 Debugging Operation
Maintenance and
· Checking I/O wiring, setting the Auxiliary Area
settings, and performing trial operation
· Monitoring and debugging with the
CX-Programmer
7 Troubleshooting
Error codes and remedies if a problem occurs
2
CP1E CPU Unit Software User’s Manual(W480)
Manual Configuration
The CP1E CPU manuals are organized in the sections listed in the following tables. Refer to the appropriate section in the manuals as required.
CP1E CPU Unit Software User’s Manual (Cat. No. W480)
(This Manual)
Section
Contents
Section 1 Overview
This section gives an overview of the CP1E, describes its application
procedures.
Section 2 CPU Unit Memory
This section describes the types of internal memory in a CP1E CPU
Unit and the data that is stored.
Section 3 CPU Unit Operation
This section describes the operation of a CP1E CPU Unit.
Section 4 Programming Concepts
This section provides basic information on designing ladder programs
for a CP1E CPU Unit.
Section 5 I/O Memory
This section describes the types of I/O memory areas in a CP1E CPU
Unit and the details.
Section 6 I/O Allocation
This section describes I/O allocation used to exchange data between
the CP1E CPU Unit and other units.
Section 7 PLC Setup
This section describes the PLC Setup, which are used to perform basic
settings for a CP1E CPU Unit.
Section 8 Overview and Allocation
of Built-in Functions
This section lists the built-in functions and describes the overall application flow and the allocation of the functions.
Section 9 Quick-response Inputs
This section describes the quick-response inputs that can be used to
read signals that are shorter than the cycle time.
Section 10 Interrupts
This section describes the interrupts that can be used with CP1E PLCs,
including input interrupts and scheduled interrupts.
Section 11 High-speed Counters
This section describes the high-speed counter inputs, high-speed
counter interrupts, and the frequency measurement function.
Section 12 Serial Communications
This section describes communications with Programmable Terminals
(PTs) without using communications programming, no-protocol communications with general components, and connections with a ModbusRTU Easy Master, Serial PLC Link, and host computer.
Section 13 Built-in Functions
This section describes PID temperature control, clock functions, DM
backup functions, security functions.
Section 14 Operating the Programming Device
This section describes basic functions of the CX-Programmer for CP1E,
such as using the CX-Programmer for CP1E to write ladder programs to
control the CP1E CPU Unit, to transfer the programs to the CP1E CPU
Unit, and to debug the programs.
Appendices
The appendices provide lists of the Auxiliary Area, cycle time response
performance, PLC performance at power interruptions.
CP1E CPU Unit Software User’s Manual(W480)
3
CP1E CPU Unit Hardware User’s Manual (Cat. No. W479)
Section
Contents
Section 1 Overview and Specifications
This section gives an overview of the CP1E, describes its features, and
provides its specifications.
Section 2 Basic System Configuration and Devices
This section describes the basic system configuration and unit models
of the CP1E.
Section 3 Part Names and Functions This section describes the part names and functions of the CPU Unit,
Expansion I/O Units, and Expansion Units in a CP1E PLC .
Section 4 Programming Device
This section describes the features of the CX-Programmer used for programming and debugging PLCs, as well as how to connect the PLC with
the Programming Device by USB.
Section 5 Installation and Wiring
This section describes how to install and wire CP1E Units.
Section 6 Troubleshooting
This section describes how to troubleshoot problems that may occur
with a CP1E PLC, including the error indications provided by the CP1E
Units.
Section 7 Maintenance and Inspection
This section describes periodic inspections, the service life of the Battery, and how to replace the Battery.
Section 8 Using Expansion Units
and Expansion I/O Units
This section describes application methods for Expansion Units.
Appendices
The appendices provide information on dimensions, wiring diagrams,
and wiring serial communications for the CP1E.
CP1E CPU Unit Instructions Reference Manual (Cat. No. W483)
Section
4
Contents
Section 1 Summary of Instructions
This section provides a summary of instructions used with a CP1E CPU
Unit.
Section 2 Instruction
This section describes the functions, operands and sample programs of
the instructions that are supported by a CP1E CPU Unit.
Section 3 Instruction Execution
Times and Number of Steps
This section provides the execution times for all instructions used with a
CP1E CPU Unit.
Section 4 Monitoring and
Computing the Cycle Time
This section describes how to monitor and calculate the cycle time of a
CP1E CPU Unit that can be used in the programs.
Appendices
The appendices provide a list of instructions by Mnemonic and ASCII
code table for the CP1E CPU Unit.
CP1E CPU Unit Software User’s Manual(W480)
Manual Structure
Page Structure and Icons
The following page structure and icons are used in this manual.
Installation
Level 1 heading
Level 2 heading
Level 3 heading
Installation Location
Gives the current
headings.
5 Installation and wiring
Level 2 heading
Level 3 heading
5-2
5-2-1
DIN Track Installation
1
Use a screwdriver to pull down the DIN Track mounting pins from the back of the Units to release
them, and mount the Units to the DIN Track.
Indicates a step in a
procedure.
DIN Track mounting pins
5
Fit the back of the Units onto the DIN Track by catching the top of the Units on the Track and then
pressing in at the bottom of the Units, as shown below.
DIN Track
3
5-2-1 Installation Location
Release
2
5-2 Installation
Step in a procedure
Page tab
Gives the number
of the section.
Press in all of the DIN Track mounting pins to securely lock the Units in place.
Special Information
(See below.)
Icons are used to indicate
precautions and
additional information.
DIN Track mounting pins
Precautions for Correct Use
Tighten terminal block screws and cable screws to the following torques.
M4: 1.2 N·m
M3: 0.5 N·m
Manual name
CP1E CPU Unit Hardware User’s Manual(W479)
5-3
This illustration is provided only as a sample and may not literally appear in this manual.
Special Information
Special information in this manual is classified as follows:
Precautions for Safe Use
Precautions on what to do and what not to do to ensure using the product safely.
Precautions for Correct Use
Precautions on what to do and what not to do to ensure proper operation and performance.
Additional Information
Additional information to increase understanding or make operation easier.
References to the location of more detailed or related information.
CP1E CPU Unit Software User’s Manual(W480)
5
Terminology and Notation
Term
E-type CPU Unit
Description
A basic model of CPU Unit that support basic control applications using instructions such
as basic, movement, arithmetic, and comparison instructions.
Basic models of CPU Units are called “E-type CPU Units” in this manual.
N-type CPU Unit
An application model of CPU Unit that supports connections to Programmable Terminals,
inverters, and servo drives.
CX-Programmer
A programming device that applies for programming and debugging PLCs.
Application models of CPU Units are called “N-type CPU Units” in this manual.
The CX-Programmer includes the CX-Programmer for CP1E and the CX-Programmer
(CX-One).
This manual describes the unique applications and functions of the CX-Programmer for
CP1E.
“CX-Programmer” refers to the CX-Programmer for CP1E in this manual.
6
CP1E CPU Unit Software User’s Manual(W480)
Sections in this Manual
2
Overview
Internal Memory
in the CPU Unit
11
12
2
12
3
13
4
14
5
High-speed Counters
Serial
Communications
3
CPU Unit Operation
13
Other Functions
4
Understanding
Programming
14
Programming
Device Operations
5
I/O Memory
6
I/O Allocation
A
11
APP
1
1
Appendices
6
7
8
9
7
PLC Setup
10
8
Overview of Built-in
Functions and
Allocations
9
Quick-response
Inputs
10
Interrupts
CP1E CPU Unit Software User’s Manual(W480)
7
CONTENTS
Introduction ............................................................................................................... 1
CP1E CPU Unit Manuals ........................................................................................... 2
Manual Structure ....................................................................................................... 5
Safety Precautions .................................................................................................. 16
Precautions for Safe Use........................................................................................ 19
Regulations and Standards.................................................................................... 21
Related Manuals ...................................................................................................... 22
Section 1
1-1
Overview
CP1E Overview ........................................................................................................................ 1-2
1-1-1
1-2
Basic Operating Procedure .................................................................................................... 1-3
Section 2
2-1
Internal Memory in the CPU Unit
Internal Memory in the CPU Unit............................................................................................ 2-2
2-1-1
2-1-2
2-1-3
2-1-4
Section 3
3-1
CPU Unit Operation ................................................................................................................. 3-2
Section 4
Programming ........................................................................................................................... 4-2
User Programs ............................................................................................................................ 4-2
Program Capacity ....................................................................................................................... 4-3
Basics of Programming ............................................................................................................... 4-3
Tasks, Sections, and Symbols ............................................................................................... 4-6
4-2-1
4-2-2
4-2-3
8
CPU Unit Memory Configuration................................................................................................. 3-5
Backing Up Ladder Programs and PLC Setup............................................................................ 3-6
I/O Memory Backup .................................................................................................................... 3-6
Initializing I/O Memory at Startup................................................................................................ 3-8
Understanding Programming
4-1-1
4-1-2
4-1-3
4-2
Overview of CPU Unit Operation ................................................................................................ 3-2
CPU Unit Operating Modes......................................................................................................... 3-3
Backing Up Memory ................................................................................................................ 3-5
3-2-1
3-2-2
3-2-3
3-2-4
4-1
CPU Unit Memory Backup Structure .......................................................................................... 2-2
Memory Areas and Stored Data ................................................................................................. 2-3
Transferring Data from a Programming Device ........................................................................... 2-4
Backup ........................................................................................................................................ 2-4
CPU Unit Operation
3-1-1
3-1-2
3-2
Overview of Features .................................................................................................................. 1-2
Overview of Tasks ....................................................................................................................... 4-6
Overview of Sections .................................................................................................................. 4-6
Overview of Symbols .................................................................................................................. 4-6
CP1E CPU Unit Software User’s Manual(W480)
4-3
Programming Instructions...................................................................................................... 4-8
4-3-1
4-3-2
4-3-3
4-3-4
4-3-5
4-3-6
4-3-7
Basic Understanding of Instructions ........................................................................................... 4-8
Operands .................................................................................................................................... 4-9
Instruction Variations................................................................................................................. 4-10
Execution Conditions ................................................................................................................ 4-10
Specifying Data in Operands .................................................................................................... 4-12
Data Formats ............................................................................................................................ 4-13
I/O Refresh Timing .................................................................................................................... 4-15
4-4
Constants ............................................................................................................................... 4-16
4-5
Specifying Offsets for Addresses ........................................................................................ 4-19
4-5-1
4-5-2
4-6
Ladder Programming Precautions...................................................................................... 4-22
4-6-1
Section 5
5-1
Overview ................................................................................................................................... 4-19
Application Examples for Address Offsets ................................................................................ 4-21
Special Program Sections......................................................................................................... 4-22
I/O Memory
Overview of I/O Memory Areas............................................................................................... 5-2
5-1-1
5-1-2
5-1-3
I/O Memory Areas....................................................................................................................... 5-2
I/O Memory Area Address Notation ............................................................................................ 5-5
I/O Memory Areas....................................................................................................................... 5-6
5-2
I/O Bits ...................................................................................................................................... 5-7
5-3
Work Area (W) .......................................................................................................................... 5-8
5-4
Holding Area (H) ...................................................................................................................... 5-9
5-5
Data Memory Area (D) ........................................................................................................... 5-11
5-6
Timer Area (T) ........................................................................................................................ 5-13
5-7
Counter Area (C) .................................................................................................................... 5-15
5-8
Auxiliary Area (A)................................................................................................................... 5-17
5-9
Condition Flags...................................................................................................................... 5-19
5-10 Clock Pulses .......................................................................................................................... 5-21
Section 6
6-1
I/O Allocation
Allocation of Input Bits and Output Bits ............................................................................... 6-2
6-1-1
6-1-2
6-1-3
6-1-4
Section 7
I/O Allocation............................................................................................................................... 6-2
I/O Allocation Concepts............................................................................................................... 6-3
Allocations on the CPU Unit........................................................................................................ 6-3
Allocations to Expansion Units and Expansion I/O Units ............................................................ 6-4
PLC Setup
7-1
Overview of the PLC Setup..................................................................................................... 7-2
7-2
PLC Setup Settings ................................................................................................................. 7-3
7-2-1
7-2-2
7-2-3
7-2-4
7-2-5
7-2-6
Startup and CPU Unit Settings ................................................................................................... 7-3
Timing and Interrupt Settings...................................................................................................... 7-3
Input Constant Settings............................................................................................................... 7-4
Built-in RS-232C Port.................................................................................................................. 7-5
Serial Option Port........................................................................................................................ 7-8
Built-in Inputs ............................................................................................................................ 7-11
CP1E CPU Unit Software User’s Manual(W480)
9
Section 8
Overview of Built-in Functions and Allocations
8-1
Built-in Functions .................................................................................................................... 8-2
8-2
Overall Procedure for Using CP1E Built-in Functions ......................................................... 8-3
8-3
Terminal Allocations for Built-in Functions .......................................................................... 8-4
8-3-1
8-3-2
8-3-3
8-3-4
Section 9
9-1
Specifying the Functions to Use.................................................................................................. 8-4
Selecting Functions in the PLC Setup......................................................................................... 8-4
Allocating Built-in Input Terminals ............................................................................................... 8-6
Allocating Built-in Output Temrinals ............................................................................................ 8-7
Quick-response Inputs
Quick-response Inputs............................................................................................................ 9-2
9-1-1
9-1-2
Section 10
Overview ..................................................................................................................................... 9-2
Flow of Operation........................................................................................................................ 9-3
Interrupts
10-1 Interrupts ................................................................................................................................ 10-2
10-1-1
Overview ................................................................................................................................... 10-2
10-2 Input Interrupts ...................................................................................................................... 10-3
10-2-1
10-2-2
10-2-3
Overview ................................................................................................................................... 10-3
Flow of Operation...................................................................................................................... 10-4
Application Example.................................................................................................................. 10-7
10-3 Scheduled Interrupts........................................................................................................... 10-10
10-3-1
10-3-2
Overview ................................................................................................................................. 10-10
Flow of Operation.................................................................................................................... 10-11
10-4 Precautions for Using Interrupts........................................................................................ 10-13
10-4-1
10-4-2
10-4-3
Section 11
Interrupt Task Priority and Order of Execution ........................................................................ 10-13
Related Auxiliary Area Words and Bits ................................................................................... 10-13
Duplicate Processing in each Task ......................................................................................... 10-13
High-speed Counters
11-1 Overview................................................................................................................................. 11-2
11-1-1
11-1-2
11-1-3
Overview ................................................................................................................................... 11-2
Flow of Operation...................................................................................................................... 11-3
Specifications ............................................................................................................................ 11-6
11-2 High-speed Counter Inputs................................................................................................... 11-7
11-2-1
11-2-2
11-2-3
11-2-4
11-2-5
Pulse Input Methods Settings ................................................................................................... 11-7
Counting Ranges Settings ........................................................................................................ 11-8
Reset Methods .......................................................................................................................... 11-9
Reading the Present Value ..................................................................................................... 11-10
Frequency Measurement ........................................................................................................ 11-11
11-3 High-speed Counter Interrupts........................................................................................... 11-12
11-3-1
11-3-2
11-3-3
Overview ................................................................................................................................. 11-12
Present Value Comparison ..................................................................................................... 11-15
High-speed Counter Interrupt Instruction................................................................................ 11-18
11-4 Related Auxiliary Area Bits and Words ............................................................................. 11-23
11-5 Application Example .......................................................................................................... 11-24
10
CP1E CPU Unit Software User’s Manual(W480)
Section 12
Serial Communications
12-1 Serial Communications......................................................................................................... 12-2
12-1-1
12-1-2
Types of CPU Units and Serial Ports ........................................................................................ 12-2
Overview of Serial Communications......................................................................................... 12-3
12-2 Program-free Communications with Programmable Terminals ........................................ 12-5
12-2-1
12-2-2
12-2-3
Overview................................................................................................................................... 12-5
Flow of Connection ................................................................................................................... 12-6
PLC Setup and PT System Settings......................................................................................... 12-6
12-3 No-protocol Communications with General Components................................................. 12-8
12-3-1
12-3-2
12-3-3
12-3-4
Overview................................................................................................................................... 12-8
Flow of Operation ..................................................................................................................... 12-9
PLC Setup ................................................................................................................................ 12-9
Related Auxiliary Area Bits and Words................................................................................... 12-10
12-4 Modbus-RTU Easy Master Function .................................................................................. 12-11
12-4-1
12-4-2
12-4-3
12-4-4
Overview................................................................................................................................. 12-11
Flow of Operation ................................................................................................................... 12-11
Setting and Word Allocation ................................................................................................... 12-12
Programming Examples ......................................................................................................... 12-14
12-5 Serial PLC Links .................................................................................................................. 12-20
12-5-1
12-5-2
12-5-3
12-5-4
12-5-5
Overview................................................................................................................................. 12-20
Flow of Operation ................................................................................................................... 12-21
PLC Setup .............................................................................................................................. 12-21
Operating Specifications......................................................................................................... 12-23
Example Application ............................................................................................................... 12-28
12-6 Connecting the Host Computer
(Not Including Support Software) ...................................................................................... 12-30
12-6-1
12-6-2
12-6-3
Section 13
Overview................................................................................................................................. 12-30
Flow of Processing ................................................................................................................. 12-30
Command/response Format and List of Commands .............................................................. 12-31
Other Functions
13-1 PID Temperature Control ...................................................................................................... 13-2
13-1-1
13-1-2
13-1-3
Overview................................................................................................................................... 13-2
Flow of Operation ..................................................................................................................... 13-3
Application Example ................................................................................................................. 13-4
13-2 Clock ....................................................................................................................................... 13-7
13-3 DM Backup Function ............................................................................................................. 13-8
13-3-1
13-3-2
Backing Up and Restoring DM Area Data ................................................................................ 13-8
Procedure ............................................................................................................................... 13-10
13-4 Security Functions .............................................................................................................. 13-12
13-4-1
Section 14
Ladder Program Read Protection ........................................................................................... 13-12
Programming Device Operations
14-1 Programming Devices Usable with the CP1E ..................................................................... 14-2
14-2 Overview of CX-Programmer................................................................................................ 14-3
14-2-1
14-2-2
14-2-3
CX-Programmer........................................................................................................................ 14-3
CX-Programmer Flow from Startup to Operation ..................................................................... 14-3
Help .......................................................................................................................................... 14-6
14-3 Creating a Ladder Program .................................................................................................. 14-7
14-3-1
14-3-2
14-3-3
Inputting a Ladder Program ...................................................................................................... 14-7
Saving and Reading Ladder Programs................................................................................... 14-14
Editing Ladder Programs ........................................................................................................ 14-15
CP1E CPU Unit Software User’s Manual(W480)
11
14-4 Connecting Online to the CP1E and Transferring the Program ...................................... 14-18
14-4-1
14-4-2
14-4-3
14-4-4
Connecting Online................................................................................................................... 14-18
Changing Operating Modes .................................................................................................... 14-19
Transferring a Ladder Program and the PLC Setup ................................................................ 14-20
Starting Operation................................................................................................................... 14-21
14-5 Online Monitoring and Debugging..................................................................................... 14-23
14-5-1
14-5-2
14-5-3
Section A
Monitoring Status .................................................................................................................... 14-23
Force-set/Reset Bits................................................................................................................ 14-25
Online Editing.......................................................................................................................... 14-26
Appendices
A-1 Auxiliary Area Allocations by Address..................................................................................A-2
A-1-1
A-1-2
Read-only Words ........................................................................................................................A-2
Read/Write Words.....................................................................................................................A-17
A-2 Response Performance.........................................................................................................A-26
A-2-1
A-2-2
A-2-3
I/O Response Time ...................................................................................................................A-26
Interrupt Response Time ..........................................................................................................A-28
Serial PLC Link Response Performance...................................................................................A-29
A-3 PLC Operation for Power Interruptions ...............................................................................A-30
Index ....................................................................................................................................... Index-1
Revision History ..........................................................................................................Revision-1
12
CP1E CPU Unit Software User’s Manual(W480)
Read and Understand this Manual
Please read and understand this manual before using the product. Please consult your OMRON representative
if you have any questions or comments.
Warranty and Limitations of Liability
WARRANTY
OMRON’s exclusive warranty is that the products are free from defects in materials and workmanship for a
period of one year (or other period if specified) from date of sale by OMRON.
OMRON MAKES NO WARRANTY OR REPRESENTATION, EXPRESS OR IMPLIED, REGARDING NONINFRINGEMENT, MERCHANTABILITY, OR FITNESS FOR PARTICULAR PURPOSE OF THE
PRODUCTS. ANY BUYER OR USER ACKNOWLEDGES THAT THE BUYER OR USER ALONE HAS
DETERMINED THAT THE PRODUCTS WILL SUITABLY MEET THE REQUIREMENTS OF THEIR
INTENDED USE. OMRON DISCLAIMS ALL OTHER WARRANTIES, EXPRESS OR IMPLIED.
LIMITATIONS OF LIABILITY
OMRON SHALL NOT BE RESPONSIBLE FOR SPECIAL, INDIRECT, OR CONSEQUENTIAL DAMAGES,
LOSS OF PROFITS OR COMMERCIAL LOSS IN ANY WAY CONNECTED WITH THE PRODUCTS,
WHETHER SUCH CLAIM IS BASED ON CONTRACT, WARRANTY, NEGLIGENCE, OR STRICT
LIABILITY.
In no event shall the responsibility of OMRON for any act exceed the individual price of the product on which
liability is asserted.
IN NO EVENT SHALL OMRON BE RESPONSIBLE FOR WARRANTY, REPAIR, OR OTHER CLAIMS
REGARDING THE PRODUCTS UNLESS OMRON’S ANALYSIS CONFIRMS THAT THE PRODUCTS
WERE PROPERLY HANDLED, STORED, INSTALLED, AND MAINTAINED AND NOT SUBJECT TO
CONTAMINATION, ABUSE, MISUSE, OR INAPPROPRIATE MODIFICATION OR REPAIR.
CP1E CPU Unit Software User’s Manual(W480)
13
Application Considerations
SUITABILITY FOR USE
OMRON shall not be responsible for conformity with any standards, codes, or regulations that apply to the
combination of products in the customer’s application or use of the products.
At the customer’s request, OMRON will provide applicable third party certification documents identifying
ratings and limitations of use that apply to the products. This information by itself is not sufficient for a
complete determination of the suitability of the products in combination with the end product, machine,
system, or other application or use.
The following are some examples of applications for which particular attention must be given. This is not
intended to be an exhaustive list of all possible uses of the products, nor is it intended to imply that the uses
listed may be suitable for the products:
• Outdoor use, uses involving potential chemical contamination or electrical interference, or conditions or
uses not described in this manual.
• Nuclear energy control systems, combustion systems, railroad systems, aviation systems, medical
equipment, amusement machines, vehicles, safety equipment, and installations subject to separate
industry or government regulations.
• Systems, machines, and equipment that could present a risk to life or property.
Please know and observe all prohibitions of use applicable to the products.
NEVER USE THE PRODUCTS FOR AN APPLICATION INVOLVING SERIOUS RISK TO LIFE OR
PROPERTY WITHOUT ENSURING THAT THE SYSTEM AS A WHOLE HAS BEEN DESIGNED TO
ADDRESS THE RISKS, AND THAT THE OMRON PRODUCTS ARE PROPERLY RATED AND INSTALLED
FOR THE INTENDED USE WITHIN THE OVERALL EQUIPMENT OR SYSTEM.
PROGRAMMABLE PRODUCTS
OMRON shall not be responsible for the user’s programming of a programmable product, or any
consequence thereof.
14
CP1E CPU Unit Software User’s Manual(W480)
Disclaimers
CHANGE IN SPECIFICATIONS
Product specifications and accessories may be changed at any time based on improvements and other
reasons.
It is our practice to change model numbers when published ratings or features are changed, or when
significant construction changes are made. However, some specifications of the products may be changed
without any notice. When in doubt, special model numbers may be assigned to fix or establish key
specifications for your application on your request. Please consult with your OMRON representative at any
time to confirm actual specifications of purchased products.
DIMENSIONS AND WEIGHTS
Dimensions and weights are nominal and are not to be used for manufacturing purposes, even when
tolerances are shown.
PERFORMANCE DATA
Performance data given in this manual is provided as a guide for the user in determining suitability and does
not constitute a warranty. It may represent the result of OMRON’s test conditions, and the users must
correlate it to actual application requirements. Actual performance is subject to the OMRON Warranty and
Limitations of Liability.
ERRORS AND OMISSIONS
The information in this manual has been carefully checked and is believed to be accurate; however, no
responsibility is assumed for clerical, typographical, or proofreading errors, or omissions.
CP1E CPU Unit Software User’s Manual(W480)
15
Safety Precautions
Definition of Precautionary Information
The following notation is used in this manual to provide precautions required to ensure safe usage of a
CP-series PLC. The safety precautions that are provided are extremely important to safety. Always read
and heed the information provided in all safety precautions.
WARNING
Indicates an imminently hazardous situation which,
if not avoided, will result in death or serious injury.
Additionally, there may be severe property damage.
Caution
Indicates a potentially hazardous situation which,
if not avoided, may result in minor or moderate
injury, or property damage.
Precautions for Safe Use
Indicates precautions on what to do and what not to do to ensure using the product safely.
Precautions for Correct Use
Indicates precautions on what to do and what not to do to ensure proper operation
and performance.
Symbols
The triangle symbol indicates precautions (including
warnings). The specific operation is shown in the triangle
and explained in text. This example indicates a precaution for electric shock.
The circle and slash symbol indicates operations that you
must not do. The specific operation is shown in the circle
and explained in text.
The filled circle symbol indicates operations that you
must do. The specific operation is shown in the circle and
explained in text. This example shows a general precaution for something that you must do.
The triangle symbol indicates precautions (including
warnings). The specific operation is shown in the triangle
and explained in text. This example indicates a general
precaution.
The triangle symbol indicates precautions (including
warnings). The specific operation is shown in the triangle
and explained in text. This example indicates a precaution for hot surfaces.
16
CP1E CPU Unit Software User’s Manual(W480)
Caution
Be sure to sufficiently confirm the safety at the destination when you transfer
the program or I/O memory or perform procedures to change the I/O memory.
Devices connected to PLC outputs may incorrectly operate regardless of the operating mode of the CPU Unit.
With an E-type CPU Unit or with an N-type CPU Unit without a Battery, the contents
of the DM Area (D) *, Holding Area (H), the Counter Present Values (C), the status of
Counter Completion Flags (C), and the status of bits in the Auxiliary Area (A) related
to clock functions may be unstable when the power supply is turned ON.
*This does not apply to areas backed up to EEPROM using the DM backup function.
If the DM backup function is being used, be sure to use one of the following methods
for initialization.
1. Clearing All Areas to All Zeros
Select the Clear Held Memory (HR/DM/CNT) to Zero Check Box in the Startup
Data Read Area in the PLC Setup.
2. Clearing Specific Areas to All Zeros or Initializing to Specific Values
Make the settings from a ladder program.
If the data is not initialized, the unit or device may operate unexpectedly because of
unstable data.
Execute online edit only after confirming that no adverse effects will be caused
by extending the cycle time.
Otherwise, the input signals may not be readable.
The DM Area (D), Holding Area (H), Counter Completion Flags (C), and Counter
Present Values (C) will be held by the Battery if a Battery is mounted in a CP1EN- CPU Unit. When the battery voltage is low, however, I/O memory areas
that are held (including the DM, Holding, and Counter Areas) will be unstable. The
unit or device may operate unexpectedly because of unstable data.
Use the Battery Error Flag or other measures to stop outputs if external outputs are performed from a ladder program based on the contents of the DM
Area or other I/O memory areas.
Sufficiently check safety if I/O bit status or present values are monitored in the
Ladder Section Pane or present values are monitored in the Watch Pane.
If bits are set, reset, force-set, or force-reset by inadvertently pressing a shortcut key,
devices connected to PLC outputs may operate incorrectly regardless of the operating mode.
CP1E CPU Unit Software User’s Manual(W480)
17
Caution
Program so that the memory area of the start address is not exceeded when
using a word address or symbol for the offset.
For example, write the program so that processing is executed only when the indirect
specification does not cause the final address to exceed the memory area by using
an input comparison instruction or other instruction.
If an indirect specification causes the address to exceed the area of the start address,
the system will access data in other area, and unexpected operation may occur.
Set the temperature range according to the type of temperature sensor connected to the Unit.
Temperature data will not be converted correctly if the temperature range does not
match the sensor.
Do not set the temperature range to any values other than those for which temperature ranges are given in the following table.
An incorrect setting may cause operating errors.
18
CP1E CPU Unit Software User’s Manual(W480)
Precautions for Safe Use
Observe the following precautions when using a CP-series PLC.
Handling
• To initialize the DM Area, back up the initial contents for the DM Area to backup memory using
one of the following methods.
• Set the number of words of the DM Area to be backed up starting with D0 in the Number of CH
of DM for backup Box in the Startup Data Read Area.
• Include programming to back up specified words in the DM Area to built-in EEPROM by turning
ON A751.15 (DM Backup Save Start Bit).
• Check the ladder program for proper execution before actually running it on the Unit. Not checking
the program may result in an unexpected operation.
• The ladder program and parameter area data in the CP1E CPU Units are backed up in the built-in
EEPROM backup memory. The BKUP indicator will light on the front of the CPU Unit when the
backup operation is in progress. Do not turn OFF the power supply to the CPU Unit when the
BKUP indicator is lit. The data will not be backed up if power is turned OFF and a memory error
will occur the next time the power supply is turned ON.
• With a CP1E CPU Unit, data memory can be backed up to the built-in EEPROM backup memory.
The BKUP indicator will light on the front of the CPU Unit when backup is in progress. Do not turn
OFF the power supply to the CPU Unit when the BKUP indicator is lit. If the power is turned OFF
during a backup, the data will not be backed up and will not be transferred to the DM Area in RAM
the next time the power supply is turned ON.
• Before replacing the battery, supply power to the CPU Unit for at least 30 minutes and then complete battery replacement within 5 minutes. Memory data may be corrupted if this precaution is
not observed.
• The equipment may operate unexpectedly if inappropriate parameters are set. Even if the appropriate parameters are set, confirm that equipment will not be adversely affected before transferring the parameters to the CPU Unit.
• Before starting operation, confirm that the contents of the DM Area is correct.
• After replacing the CPU Unit, make sure that the required data for the DM Area, Holding Area, and
other memory areas has been transferred to the new CPU Unit before restarting operation.
• Do not attempt to disassemble, repair, or modify any Units. Any attempt to do so may result in malfunction, fire, or electric shock.
• Confirm that no adverse effect will occur in the system before attempting any of the following. Not
doing so may result in an unexpected operation.
• Changing the operating mode of the PLC (including the setting of the startup operating mode).
• Force-setting/force-resetting any bit in memory.
• Changing the present value of any word or any set value in memory.
External Circuits
• Always configure the external circuits to turn ON power to the PLC before turning ON power to the
control system. If the PLC power supply is turned ON after the control power supply, temporary
errors may result in control system signals because the output terminals on DC Output Units and
other Units will momentarily turn ON when power is turned ON to the PLC.
• Fail-safe measures must be taken by the customer to ensure safety in the event that outputs from
output terminals remain ON as a result of internal circuit failures, which can occur in relays, transistors, and other elements.
CP1E CPU Unit Software User’s Manual(W480)
19
• If the I/O Hold Bit is turned ON, the outputs from the PLC will not be turned OFF and will maintain
their previous status when the PLC is switched from RUN or MONITOR mode to PROGRAM
mode. Make sure that the external loads will not produce dangerous conditions when this occurs.
(When operation stops for a fatal error, including those produced with the FALS instruction, all outputs from PLC will be turned OFF and only the internal output status in the CPU Unit will be maintained.)
20
CP1E CPU Unit Software User’s Manual(W480)
Regulations and Standards
Trademarks
SYSMAC is a registered trademark for Programmable Controllers made by OMRON Corporation.
CX-One is a registered trademark for Programming Software made by OMRON Corporation.
Windows is a registered trademark of Microsoft Corporation.
Other system names and product names in this document are the trademarks or registered trademarks
of their respective companies.
CP1E CPU Unit Software User’s Manual(W480)
21
Related Manuals
The following manuals are related to the CP1E. Use them together with this manual.
Manual name
SYSMAC CP Series
CP1E CPU Unit Software User’s Manual
(this manual)
Cat. No.
W480
Model numbers
CP1E-ED-A
CP1E-ND-
Application
To learn the software
specifications of the
CP1E PLCs
Contents
Describes the following information for CP1E
PLCs.
• CPU Unit operation
• Internal memory
• Programming
• Settings
• CPU Unit built-in functions
• Interrupts
• High-speed counter inputs
• Serial communications
• Other functions
Use this manual together with the CP1E CPU Unit Hardware User’s
Manual (Cat. No. W479) and Instructions Reference Manual (Cat. No.
W483).
SYSMAC CP Series
CP1E CPU Unit Hardware User’s Manual
W479
CP1E-ED-A
CP1E-ND-
To learn the hardware specifications
of the CP1E PLCs
Describes the following information for CP1E
PLCs.
• Overview and features
• Basic system configuration
• Part names and functions
• Installation and settings
• Troubleshooting
Use this manual together with the CP1E CPU Unit Software User’s
Manual (Cat. No. W480) and Instructions Reference Manual (Cat. No.
W483).
SYSMAC CP Series
CP1E CPU Unit Instructions Reference Manual
W483
CS/CJ/CP/NSJ Series
Communications Commands Reference Manual
W342
CP1E-ED-A
CP1E-ND-
CS1G/H-CPUH
CS1G/H-CPU-V1
CS1D-CPUH
CS1D-CPUS
CS1W-SCU-V1
CS1W-SCB-V1
CJ1G/H-CPUH
CJ1G-CPUP
CJ1M-CPU
To learn programming instructions in
detail
Describes each programming instruction in
detail.
To learn communications commands for
CS/CJ/CP/NSJseries Controllers in
detail
Describes
When programming, use this manual together
with the CP1E CPU Unit Software User’s Manual (Cat. No. W480).
1) C-mode commands and
2) FINS commands in detail.
Read this manual for details on C-mode and
FINS commands addressed to CPU Units.
Note This manual describes commands addressed to CPU Units. It
does not cover commands addressed to other Units or ports (e.g.,
serial communications ports on CPU Units, communications ports
on Serial Communications Units/Boards, and other Communications Units).
CJ1G-CPU
CJ1W-SCU-V1
22
CP1E CPU Unit Software User’s Manual(W480)
1
Overview
This section gives an overview of the CP1E and describes its procedures.
1-1 CP1E Overview . . . . . . . . . . . . . . . . . . . . . . . . . . . . . . . . . . . . . . . . . . . . . . . . 1-2
1-1-1
Overview of Features . . . . . . . . . . . . . . . . . . . . . . . . . . . . . . . . . . . . . . . . . . . . 1-2
1-2 Basic Operating Procedure . . . . . . . . . . . . . . . . . . . . . . . . . . . . . . . . . . . . . . 1-3
CP1E CPU Unit Software User’s Manual(W480)
1-1
1 Overview
1-1
CP1E Overview
1-1-1
Overview of Features
The SYSMAC CP1E Programmable Controller is a package-type PLC made by OMRON that is
designed for easy application. The CP1E includes E-type CPU Units (basic models) for standard control operations using basic, movement, arithmetic, and comparison instructions, and N-type CPU Units
(application models) that supports connections to Programmable Terminals, Inverters, and Servo
Drives.
Basic Models
(E-type CPU Units)
CPU with 20 I/O
CPU Unit with 30 or 40 I/O
Points
Points
CP1E Application Models
(N-type CPU Units)
CPU with 20 I/O CPU Unit with 30 or 40 I/O
Points
Points
Appearance
Program capacity
DM Area capacity
Mounting Expansion I/O Units and
Expansion Units
Model with transistor outputs
Pulse outputs
Built-in serial communications port
Option Board
Connection port
for Programming
Device
Clock
Using a Battery
Backup time of
built-in capacitor
Battery-free operation
2K steps
2K words
Of these 1,500 words can be written to the built-in
EEPROM.
Not possible.
3 Units maximum
8K steps
8K words
Of these 7,000 words can be written to the
built-in EEPROM.
Not possible.
3 Units maximum
Not available.
Available
Not supported.
Not provided.
Supported (Model with transistor outputs only)
RS-232C port provided
Not supported.
USB port
Not supported.
USB port
Not provided.
Cannot be used.
50 hours at 25°C
Provided
Can be used (sold separately).
40 hours at 25°C
Always battery-free operation.
Only data in the built-in EEPROM will be retained if
power is interrupted for longer than 50 hours.
Battery-free operation if no battery is attached.
Only data in the built-in EEPROM will be
retained if power is interrupted for longer than
40 hours.
Supported (for one port)
Precautions for Correct Use
For CP1E CPU Units, the following I/O memory area will be unstable after a power interruption.
• DM Area (D) (excluding words backed up to the EEPROM using the DM function)
• Holding Area (H)
• Counter Present Values and Completion Flags (C)
• Auxiliary Area related to clock functions(A)
Mount the CP1W-BAT01 Battery (sold separately) to an N-type CPU Unit if data in the above
areas need to be retained after a power interruption. A Battery cannot be mounted to an E-type
CPU Unit.
1-2
CP1E CPU Unit Software User’s Manual(W480)
1 Overview
1-2 Basic Operating Procedure
1-2
Basic Operating Procedure
In general, use the following procedure.
1. Setting Devices and Hardware
1
Connect the CPU Unit, Expansion I/O Units, and Expansion Units.
Set the DIP switches on the Option Board and Expansion Units as required.
Refer to Section 3 Part Names and Functions and Section 5 Installation and Wiring in the CP1E CPU Unit
Hardware User’s Manual (Cat. No. W479).
2. Wiring
Wire the power supply, I/O, and communications.
Refer to Section 5 Installation and Wiring in the CP1E CPU Unit Hardware User’s Manual (Cat. No. W479).
3. Connecting Online to the PLC
Connect the personal computer online to the PLC.
Refer to Section 4 Programming Device in the CP1E CPU Unit Hardware User’s Manual (Cat. No. W479).
4. I/O Allocations
Allocations for built-in I/O on the CPU Unit are predetermined and memory is allocated automatically
to Expansion I/O Units and Expansion Units, so the user does not have to do anything.
Refer to Section 6 I/O Allocation in the CP1E CPU Unit Software User’s Manual (Cat. No. W480).
5. Software Setup
Make the PLC software settings.
With a CP1E CPU Unit, all you have to do is set the PLC Setup.
When using an E-type CPU Unit or when using an N-type CPU Unit without a Battery, be sure to
consider selecting the Clear retained memory area (HR/DM/CNT) Check Box in the Startup Data
Read Area in the PLC Settings.
Refer to 3-2-4 Initializing I/O Memory at Startup, Section 7 PLC Setup in the CP1E CPU Unit Software
User’s Manual (Cat. No. W480).
6. Writing the Programs
Write the programs using the CX-Programmer.
Refer to Section 4 Programming Concepts in the CP1E CPU Unit Software User’s Manual (Cat. No. W480).
7. Checking Operation
Check the I/O wiring and the Auxiliary Area settings, and perform trial operation.
The CX-Programmer can be used for monitoring and debugging.
Refer to Section 8 Overview and Allocation of Built-in Functions.
8. Basic Program Operation
Set the operating mode to RUN mode to start operation.
CP1E CPU Unit Software User’s Manual(W480)
1-3
1 Overview
1-4
CP1E CPU Unit Software User’s Manual(W480)
2
Internal Memory in the CPU Unit
This section describes the types of internal memory in a CP1E CPU Unit and the data
that is stored.
2-1 Internal Memory in the CPU Unit . . . . . . . . . . . . . . . . . . . . . . . . . . . . . . . . . . 2-2
2-1-1
2-1-2
2-1-3
2-1-4
CPU Unit Memory Backup Structure . . . . . . . . . . . . . . . . . . . . . . . . . . . . . . . .
Memory Areas and Stored Data . . . . . . . . . . . . . . . . . . . . . . . . . . . . . . . . . . . .
Transferring Data from a Programming Device. . . . . . . . . . . . . . . . . . . . . . . . .
Backup . . . . . . . . . . . . . . . . . . . . . . . . . . . . . . . . . . . . . . . . . . . . . . . . . . . . . . .
CP1E CPU Unit Software User’s Manual(W480)
2-2
2-3
2-4
2-4
2-1
2 Internal Memory in the CPU Unit
2-1
Internal Memory in the CPU Unit
2-1-1
CPU Unit Memory Backup Structure
The internal memory in the CPU Unit consists of built-in RAM and built-in EEPROM. The built-in RAM is
used as execution memory and the built-in EEPROM is used as backup memory.
CPU Unit
Built-in EEPROM
Built-in RAM
Backup memory
Execution Memory
Automatic backup
User Program Area
(Backup)
Read at startup
User Program Area
Area where data is backed up
even if the power supply is
interrupted for longer than the
back-up time of the built-in
capacitor. *
Automatic backup
PLC Setup
PLC Setup
Read at startup
Area where data is cleared if
the power supply is
interrupted for longer than the
back-up time of the built-in
capacitor. *
I/O Memory Areas
Backup using bit in Auxiliary Area
DM Area
DM Area
DM Area data read at startup
* E-type CPU Units: 50 hours at 25,
N-type CPU Units: 40 hours at 25
Data is retained even if the power
supply is interrupted for longer
than the backup time of the built-in
capacitor.
If a CP1W-BAT01 Battery (sold
separately) is mounted to an N-type
CPU Unit, which is normally backed up
by a built-in capacitor, data will be
backed up by the battery.
Built-in RAM
The built-in RAM is the execution memory for the CPU Unit.
The user programs, PLC Setup, and I/O memory are stored in the built-in RAM.
The data is unstable when the power is interrupted.
If a CP1W-BAT01 Battery (sold separately) is mounted to an N-type CPU Unit, the data is backed up by
the Battery.
The user programs and parameters are backed up to the built-in EEPROM, so they are not lost.
Built-in EEPROM
The built-in EEPROM is the backup memory for user programs, PLC Setup, and Data Memory backed
up using control bits in the Auxiliary Area.
Data is retained even if the power supply is interrupted. Only the Data Memory Area words that have
been backed up using the Auxiliary Area control bits are backed up (Refer to 13-3 DM Backup Function). All data in all other words and areas is not backed up.
2-2
CP1E CPU Unit Software User’s Manual(W480)
2 Internal Memory in the CPU Unit
2-1 Internal Memory in the CPU Unit
Caution
With an E-type CPU Unit or with an N-type CPU Unit without a Battery, the contents
of the DM Area (D) *, Holding Area (H), the Counter Present Values (C), the status of
Counter Completion Flags (C), and the status of bits in the Auxiliary Area (A) related
to clock functions may be unstable when the power supply is turned ON.
*This does not apply to areas backed up to EEPROM using the DM backup function.
If the DM backup function is being used, be sure to use one of the following methods
for initialization.
1. Clearing All Areas to All Zeros
2
Select the Clear retained memory area (HR/DM/CNT) to Zero Check Box in
the Startup Data Read Area in the PLC Setup.
2-1-2 Memory Areas and Stored Data
2. Clearing Specific Areas to All Zeros or Initializing to Specific Values
Make the settings from a ladder program.
If the data is not initialized, the unit or device may operate unexpectedly because of
unstable data.
2-1-2
Memory Areas and Stored Data
The following table lists the CPU Unit memory areas and the data stored in each area.
Memory area and stored data
Details
User Program Area
User Program
The User Program Area stores the object code for executing
the user program that was created using the CX-Programmer.
Symbol Table
The symbol table contains symbols created using the CX-Programmer (symbol names, addresses, and I/O comments).
Comments
Comments are created using the CX-Programmer and include
annotations and row comments.
Program Index
The program index provides information on program sections
created using the CX-Programmer, as well as program comments.
Parameter Area
Setting PLC Setup
Built-in
RAM
Built-in
EEPROM
Stored
Stored
Stored
Stored
Stored
Not stored
Stored
Stored
Various initial settings are made in the PLC Setup using software switches.
Refer to Section 7 PLC Setup.
I/O Memory Areas
The I/O Memory Areas are used for reading and writing from
the user programs.It is partitioned into the following regions
according to purpose.
• Regions where data is cleared when power to the CPU Unit
is reset, and regions where data is retained.
• Regions where data are exchanged with other Units, and
regions that are used internally.
DM Area words backed up to backup memory (built-in
EEPROM) using control bits in the Auxiliary Area.
CP1E CPU Unit Software User’s Manual(W480)
2-3
2 Internal Memory in the CPU Unit
2-1-3
Transferring Data from a Programming Device
Data that has been created using the CX-Programmer is transferred to the internal memory in the CPU
Unit as shown in the following diagram.
CX-Programmer
User-created Programs
CPU Unit
User Program Area
User programs
User programs
Symbol Table
Symbol Table
Comments and
program index
Comments and
program index
Parameter Area
PLC Setup
PLC Setup
PLC Memory
I/O Memory Areas
CIO Area, Work Area, Holding
Area, Timer Area, Counter
Area, DM Area, and Auxiliary
Area
2-1-4
· The CX-Programmer can be
used to set status in each I/O
memory area and to write data
to the I/O memory areas.
Backup
The CPU Unit will access the backup memory in the following process.
• The program or PLC Setup are transferred from the CX-Programmer.
• The program is changed during online editing.
• DM backup is operated by the Auxiliary Area.
During these processes, BKUP LED will light, indicating that the CX-Programmer is being backed up.
There are the following limitations during backup.
• The operation mode cannot be switched from PROGRAM mode to MONITOR/RUN mode.
• If the power is interrupted when the program or PLC Setup are being backed up, memory error may
occur the next time power is turned ON.
• If the power is interrupted when the DM area is being backed up, the reading of backed up DM area
will fail the next time power is turned ON.
2-4
CP1E CPU Unit Software User’s Manual(W480)
CPU Unit Operation
3
This section describes the operation of the CP1E CPU Unit. Make sure that you understand the contents of this section completely before writing ladder programs.
3-1 CPU Unit Operation. . . . . . . . . . . . . . . . . . . . . . . . . . . . . . . . . . . . . . . . . . . . . 3-2
3-1-1
Overview of CPU Unit Operation . . . . . . . . . . . . . . . . . . . . . . . . . . . . . . . . . . . 3-2
3-1-2
CPU Unit Operating Modes . . . . . . . . . . . . . . . . . . . . . . . . . . . . . . . . . . . . . . . 3-3
3-2 Backing Up Memory . . . . . . . . . . . . . . . . . . . . . . . . . . . . . . . . . . . . . . . . . . . . 3-5
3-2-1
CPU Unit Memory Configuration . . . . . . . . . . . . . . . . . . . . . . . . . . . . . . . . . . . 3-5
3-2-2
3-2-3
3-2-4
Backing Up Ladder Programs and PLC Setup . . . . . . . . . . . . . . . . . . . . . . . . . 3-6
I/O Memory Backup . . . . . . . . . . . . . . . . . . . . . . . . . . . . . . . . . . . . . . . . . . . . . 3-6
Initializing I/O Memory at Startup . . . . . . . . . . . . . . . . . . . . . . . . . . . . . . . . . . . 3-8
CP1E CPU Unit Software User’s Manual(W480)
3-1
3 CPU Unit Operation
3-1
CPU Unit Operation
This section gives an overview of the CPU Unit operation, describes the operating modes, and explains
how the Unit operates when there is a power interruption.
3-1-1
Overview of CPU Unit Operation
The CPU Unit reads and writes data to the internal I/O memory areas while executing user ladder programs by executing the instructions in order one at a time from the start to the end.
CPU Unit Internal Memory
Overhead processing
(self-diagnosis)
Program execution
Access
CPU Unit
processing
cycle
I/O memory
0 0 0 0 0
0 0 0 0 0
1 1 0 1 1
0 0 1 1 1
1 0 1 0 1
0
0
0
0
0
0
0
0
1
0
0
0
0
0
1
Change in status
after all instructions
have been executed
0 1 0 1 0 1 0 0
0 1 1 0 1 0 1 0
1 1 0 0 1 0 1 0
1 0 1 1 1 0 1 1
1 0 0 0 1 1 0 1
Inputs
Exchange
Outputs
I/O refreshing
Refreshes external devices at this timing
Peripheral servicing
Overhead Processing (Self-diagnosis)
Self-diagnosis, such as an I/O bus check, is performed.
Ladder Program Execution
Instructions are executed from the beginning of the program and I/O memory is refreshed.
I/O Refresh
Data to and from external devices, such as sensors and switches, directly connected to the built-in I/O
terminals and expansion I/O terminals, is exchanged with data in the I/O memory of the PLC. This process of data exchange is called the I/O refresh.
Peripheral Servicing
Peripheral servicing is used to communicate with devices connected to the communications port or for
exchanging data with the CX-Programmer.
Cycle Time
The cycle time is the time between one I/O refresh and the next. The cycle time can be determined
beforehand for SYSMAC PLCs.
3-2
CP1E CPU Unit Software User’s Manual(W480)
3 CPU Unit Operation
Additional Information
The average cycle time during operation will be displayed in the status bar on the bottom right of
the Ladder Program Window on the CX-Programmer.
These are the PLC memory areas that are accessed by the ladder programs. SYSMAC PLCs refer to
these areas as the I/O memory. It can be accessed by specifying instruction operands. There are words
in the I/O memory area where data is cleared and words where data is retained when recovering from a
power interruption. There are also words that can be set to be cleared or retained. Refer to Section 5
I/O Memory.
3-1-2
3
CPU Unit Operating Modes
CPU Units have the following three operating modes.
PROGRAM mode:
The programs are not executed in PROGRAM mode.This mode is used for the initial
settings in PLC Setup, transferring ladder programs, checking ladder programs, and
making prepartions for executing ladder programs such as force-setting/resetting bits.
MONITOR mode:
In this mode, it is possible to perform online editing, force-set/reset bits, and change
I/O memory present values while the ladder programs are being executed. Adjustments during trial operation are also made in this mode.
RUN mode:
This is the mode in which the ladder program is executed. Some operations are disabled during this mode. It is the startup mode at initial value when the CPU Unit is
turned ON.
Changing the Operating Mode
The operating mode can be changed from the CX-Programmer.
Changing the Startup Mode
The default operating mode when the CPU Unit is turned ON is RUN mode.
To change the startup mode to PROGRAM or MONITOR mode, set the desired mode in Startup
Setting in PLC Setup from the CX-Programmer.
3-3
3-1-2 CPU Unit Operating Modes
Overview of Operating Modes
CP1E CPU Unit Software User’s Manual(W480)
3-1 CPU Unit Operation
I/O Memory
3 CPU Unit Operation
Changing the Operating Mode after Startup
Use one of the following procedures.
• Select PROGRAM, MONITOR, or RUN from the Startup Mode Menu.
• Right-click the PLC in the project tree, and then select PROGRAM, MONITOR, or RUN from the
Startup Mode Menu.
Operating Modes and Operation
The following table lists status and operations for each mode.
Operating mode
PROGRAM
MONITOR
RUN
Ladder program execution
Stopped
Executed
Executed
I/O refresh
Executed
Executed
Executed
External I/O status
OFF after changing to
PROGRAM mode but
can be turned ON from
the CX-Programmer
afterward.
Controlled by
the ladder programs.
Controlled by
the ladder programs.
I/O memory
Non-retained memory
Cleared
Retained memory
Retained
Controlled by
the ladder programs.
Controlled by
the ladder programs.
CX-Programmer operations
I/O memory monitoring
Yes
Yes
Yes
Ladder program monitoring
Yes
Yes
Yes
Ladder program transfer
From CPU Unit
Yes
Yes
Yes
To CPU Unit
Yes
No
No
Checking programs
Yes
No
No
Setting the PLC Setup
Yes
No
No
Changing ladder programs
Yes
Yes
No
Forced-set/reset operations
Yes
Yes
No
Changing timer/counter SV
Yes
Yes
No
Changing timer/counter PV
Yes
Yes
No
Change I/O memory PV
Yes
Yes
No
The Retaining of I/O Memory When Changing the Operating Mode
Non-retained areas
Mode changes
•
•
•
•
•
Retained areas
I/O bits
Serial PLC Link Words
Work bits
Timer PV/Completion Flags
Data Registers
(Auxiliary Area bits/words are retained or
not retained depending on the address.)
• Holding Area
• DM Area
• Counter PV and Completion Flags
(Auxiliary Area bits/words are
retained or not retained depending
on the address.)
RUN or MONITOR to
PROGRAM
Cleared*
Retained
PROGRAM to RUN or
MONITOR
Cleared*
Retained
RUN to MONITOR or
MONITOR to RUN
Retained*
Retained
* The data is cleared when the IOM Hold Bit is OFF. The outputs from the Output Units will be turned OFF when a
fatal error is occurred, regardless of the status of the IOM Hold Bit, and the status of the output bits in CPU Unit’s
I/O memory is retained.
Refer to Section 5 I/O Memory for details on the I/O memory.
3-4
CP1E CPU Unit Software User’s Manual(W480)
3 CPU Unit Operation
3-2
Backing Up Memory
This section describes backing up the CP1E CPU Unit memory areas.
CPU Unit Memory Configuration
3-2 Backing Up Memory
3-2-1
Data backup to the CP1E CPU Unit’s built-in RAM memory describes as below.
Ladder programs and PLC Setup
Automatically backed up to the built-in EEPROM whenever changed.
DM Area in the I/O memory
Data in specified words of the DM Area can be backed up to the built-in EEPROM by using bits in
the Auxiliary Area. Other words are not backed up.
3-2-1 CPU Unit Memory Configuration
Other areas in the I/O memory (including Holding Area data, Counter PVs,
and Counter Completion Flags)
Not backed up to the built-in EEPROM.
CP1E CPU Unit
Built-in EEPROM
backup memory
Built-in RAM
Ladder programs
Ladder programs
Changing program
PLC power turned ON
Parameter Area
PLC Setup changed
Parameter Area
PLC Setup
PLC Setup
I/O Memory Areas
PLC power turned ON
Operation using control
bits in Auxiliary Area
· I/O Area
· Work Area
· Holding Area
· Auxiliary Area
· Timer/Counter
Areas
· DM Area
Part of DM Area
PLC power turned ON
CP1E CPU Unit Software User’s Manual(W480)
3
3-5
3 CPU Unit Operation
3-2-2
Backing Up Ladder Programs and PLC Setup
Ladder programs and the PLC Setup are automatically backed up to and restored from the built-in
EEPROM backup memory.
Backing Up Memory
Ladder programs and PLC Setup are backed up to the built-in EEPROM backup memory by transferring them from the CX-Programmer or writing them using online editing.
Restoring Memory
Ladder programs and PLC Setup are automatically transferred from the built-in EEPROM backup
memory to the RAM memory when power is turned ON again or at startup.
Precautions for Safe Use
The BKUP indicator on the front of the CPU Unit turns ON when data is being written to the builtin EEPROM backup memory. Never turn OFF the power supply to the CPU Unit when the BKUP
indicator is lit.
3-2-3
I/O Memory Backup
I/O memory is backed up to the built-in EEPROM backup memory only when a bit in the Auxiliary Area
is turned ON to back up specified words in the DM Area.
Area
CIO Area
Backup to built-in
EEPROM backup
memory
Not backed up.
Status at startup
N-type CPU Unit with no
Battery mounted or
E-type CPU Unit
N-type CPU Unit with
Battery mounted
Cleared to all zeros.
Work Area (W)
Timer Area (T)
Holding Area (H)
Unstable when the power
supply is OFF for longer
than the I/O memory
backup time.*
The values immediately
before power interruption
are retained.
Initialized (For N-type
CPU Units, status of bits
related to clock functions
is unstable when the
power supply is OFF for
longer than the I/O memory backup time.*)
Initialized (For N-type
CPU Units, status of bits
related to clock functions
are retained at their status immediately before
power interruption.)
Counter Area (C)
Auxiliary Area (A)
DM Area
(D)
Number of words starting from D0 set in the
Number of CH of DM for
backup Box in the Startup Data Read Area in
the PLC Settings.
The specified number of
words starting from D0 is
backed up by turning ON
A751.15 (DM Backup
Save Start Bit).
The specified number of words starting from D0 is
restored from the built-in EEPROM backup memory if
the Restore D0- from backup memory Check Box is
selected in the Startup Data Read Area in the PLC Settings.
Ranges not given
above.
Not backed up.
Unstable when the power
supply is OFF for longer
than the I/O memory
backup time.
The values immediately
before power interruption
are retained.
* The values will be cleared to all zeros at startup if the Clear retained memory area (HR/DM/CNT) Check Box is
selected in the PLC Settings.
3-6
CP1E CPU Unit Software User’s Manual(W480)
3 CPU Unit Operation
I/O Memory Backup Time
The built-in capacitor’s backup time for I/O memory during a power interruption is listed below for E-type
CPU Units and N-type CPU Units.
3-2 Backing Up Memory
E-type CPU Units: 50 hours at 25°C
N-type CPU Units (without a battery): 40 hours at 25°C
CP1E E-type CPU Unit
Backup time for I/O memory
50 hours
40 hours
CP1E N-type CPU Unit
without a battery
25 hours
3
20 hours
25˚C
40˚C
60˚C
Ambient temperature
The following areas are unstable when power is interrupted for longer than the I/O memory backup
times given above.
• DM Area (D) (excluding words backed up to the EEPROM using the DM backup function)
• Holding Area (H)
• Counter PVs and Completion Flags (C)
• Auxiliary Area related to clock function (A)
Additional Information
Words in the Auxiliary Area related to clock function are unstable. Others are cleared to default
values.
Power interruption time
Words
Name
Less than I/O
memory backup
time
Retained
Longer than I/O
memory backup
time
Unstable
CPU Unit
E-type CPU
Unit
A100 to A199
Error Log Area
A300
Error Log Pointer
Supported
A351 to A354
Clock Area
Not supported.
A510 to A511
Startup Time
Not supported.
A512 to A513
Power Interruption Time
Not supported.
A514
Number of Power Interruptions
Supported
N-type CPU
Unit
Supported
Supported
A515 to A517
Operation Start Time
Not supported.
A518 to A520
Operation End Time
Not supported.
A720 to A749
Power ON Clock Data 1 to 10
Not supported.
Precautions for Correct Use
Use an N-type CPU Unit with a Battery mounted if it is necessary to retain the contents of the
DM Area (D) and Holding Area (A), the Counter Present Values (C), the status of Counter Completion Flags (C), and the status of bits in the Auxiliary Area (A) related to clock functions when
the power supply is turned ON after the power has been OFF for a period of time. These contents and status cannot be retained with an E-type CPU Unit.
CP1E CPU Unit Software User’s Manual(W480)
3-7
3-2-3 I/O Memory Backup
9 hours
7 hours
3 CPU Unit Operation
3-2-4
Initializing I/O Memory at Startup
For E-type or N-type (without a battery) CPU Units, the held areas in I/O memory (i.e., Holding Area,
Counter Present Values, Counter Completion Flags, and DM Area) may be unstable when the power
supply is turned ON. Therefore, use one of the following ways to clear these areas.
Clearing All Held Areas to Zero at Startup
Select the Clear retained memory area (HR/DM/CNT) Check Box in the PLC Settings.
Note If the Restore D0- from backup memory Check Box is selected, only the specified words in the DM Area will
be restored from the built-in EEPROM backup memory when the power supply is turned ON.
Initializing Specific Held Areas at Startup
Write the following type of ladder programming.
Example
P_First_Cycle
BSET
First Cycle Flag
(A200.11)
#0000
D100 to D2047 are cleared
to Zero
D100
D2047
BSET
#0000
H10 to H49 are cleared
to Zero
H10
D49
CNR
C0
C0 to C255 are cleared
to Zero
C255
3-8
CP1E CPU Unit Software User’s Manual(W480)
Understanding Programming
This section provides basic information on ladder programming for CP1E CPU Units.
4
4-1 Programming. . . . . . . . . . . . . . . . . . . . . . . . . . . . . . . . . . . . . . . . . . . . . . . . . . 4-2
4-1-1
User Programs . . . . . . . . . . . . . . . . . . . . . . . . . . . . . . . . . . . . . . . . . . . . . . . . . 4-2
4-1-2
4-1-3
Program Capacity . . . . . . . . . . . . . . . . . . . . . . . . . . . . . . . . . . . . . . . . . . . . . . . 4-3
Basics of Programming. . . . . . . . . . . . . . . . . . . . . . . . . . . . . . . . . . . . . . . . . . . 4-3
4-2 Tasks, Sections, and Symbols. . . . . . . . . . . . . . . . . . . . . . . . . . . . . . . . . . . . 4-6
4-2-1
Overview of Tasks. . . . . . . . . . . . . . . . . . . . . . . . . . . . . . . . . . . . . . . . . . . . . . . 4-6
4-2-2
Overview of Sections . . . . . . . . . . . . . . . . . . . . . . . . . . . . . . . . . . . . . . . . . . . . 4-6
4-2-3
Overview of Symbols . . . . . . . . . . . . . . . . . . . . . . . . . . . . . . . . . . . . . . . . . . . . 4-6
4-3 Programming Instructions . . . . . . . . . . . . . . . . . . . . . . . . . . . . . . . . . . . . . . . 4-8
4-3-1
Basic Understanding of Instructions . . . . . . . . . . . . . . . . . . . . . . . . . . . . . . . . . 4-8
4-3-2
Operands . . . . . . . . . . . . . . . . . . . . . . . . . . . . . . . . . . . . . . . . . . . . . . . . . . . . . 4-9
4-3-3
Instruction Variations . . . . . . . . . . . . . . . . . . . . . . . . . . . . . . . . . . . . . . . . . . . 4-10
4-3-4
Execution Conditions . . . . . . . . . . . . . . . . . . . . . . . . . . . . . . . . . . . . . . . . . . . 4-10
4-3-5
Specifying Data in Operands . . . . . . . . . . . . . . . . . . . . . . . . . . . . . . . . . . . . . 4-12
4-3-6
Data Formats . . . . . . . . . . . . . . . . . . . . . . . . . . . . . . . . . . . . . . . . . . . . . . . . . 4-13
4-3-7
I/O Refresh Timing . . . . . . . . . . . . . . . . . . . . . . . . . . . . . . . . . . . . . . . . . . . . . 4-15
4-4 Constants. . . . . . . . . . . . . . . . . . . . . . . . . . . . . . . . . . . . . . . . . . . . . . . . . . . . 4-16
4-5 Specifying Offsets for Addresses . . . . . . . . . . . . . . . . . . . . . . . . . . . . . . . . 4-19
4-5-1
Overview. . . . . . . . . . . . . . . . . . . . . . . . . . . . . . . . . . . . . . . . . . . . . . . . . . . . . 4-19
4-5-2
Application Examples for Address Offsets . . . . . . . . . . . . . . . . . . . . . . . . . . . 4-21
4-6 Ladder Programming Precautions . . . . . . . . . . . . . . . . . . . . . . . . . . . . . . . 4-22
4-6-1
Special Program Sections . . . . . . . . . . . . . . . . . . . . . . . . . . . . . . . . . . . . . . . 4-22
CP1E CPU Unit Software User’s Manual(W480)
4-1
4 Understanding Programming
4-1
Programming
4-1-1
User Programs
Structure of User Programs
User programs are created by using the CX-Programmer.
The user programs consist of the following parts.
• Programs
A program consists of more than one instruction and ends with an END instruction.
• Tasks (Smallest Executable Unit)
A program is assigned to an interrupt task to execute it. (In the CX-Programmer, the interrupt task
number is specified in the program properties.)
Tasks include cyclic tasks (executed with normal cyclic processing), interrupt tasks (executed when
interrupt conditions have been completed), scheduled interrupt tasks (executed at specified intervals), and the power OFF interrupt task (executed when the power is interrupted).
The CP1E can use only one cyclic task.
• Sections
When creating and displaying programs with the CX-Programmer, the one program can be divided
into any number of parts.
Each part is called a section.
Sections are created mainly to make programs easier to understand.
• Subroutines
You can create subroutines within a program.
User Program Data
The user programs are saved in a project file (.CXP) for the CX-Programmer along with other parameters, such as the symbol table, PLC Setup data, and I/O memory data.
Programming Languages
Programs can be written using only ladder programs.
4-2
CP1E CPU Unit Software User’s Manual(W480)
4 Understanding Programming
4-1-2
Program Capacity
The maximum program capacities of the CP1E CPU Units for all ladder programs (including symbol
table and comments) are given in the following table.
The total number of steps must not exceed the maximum program capacity.
Unit type
Model numbers
E-type CPU Unit
Program capacity
CP1E-E-
2K steps
N-type CPU Unit CP1E-N-
8K steps
4-1 Programming
It is possible to check the program size by selecting Program - Memory View in the CX-Programmer.
The size of a ladder instruction depends on the specific instruction and operands that are used.
4-1-3
Basics of Programming
This section describes the basics of programming for the CP1E.
4
Basic Concepts of Ladder Programming
Basic Points in Creating Ladder Programs
Order of Ladder Program Execution
When the ladder diagram is executed by the CPU Unit, the execution condition (i.e., power flow)
flows from left to right and top to bottom.
The flow is different from that for circuits that consist of hard-wired control relays.
For example, when the diagram in figure A is executed by the CPU Unit, power flows as though the
diodes in brackets were inserted so that output R2 is not controlled by input condition D.
The actual order of execution is indicated on the right with mnemonics.
To achieve operation without these imaginary diodes, the diagram must be rewritten. Also, the power
flow in figure B cannot be programmed directly and must be rewritten.
Figure A (Good example)
A �
C
Signal flow
(�)
� (�)
D
(�)
B
�
�
R1
�
E�
��
Order of execution (mnemonics)
�LD A
�AND B
�LD C
�OUT R1
�OUT TR0
�LD TR0
�AND D
�AND E
�OR LD
��OUT R2
R2
Figure B (Bad example)
B
A
R1
E
C
E
R2
CP1E CPU Unit Software User’s Manual(W480)
4-3
4-1-2 Program Capacity
Instructions are executed in the order that they are stored in memory (i.e., in the order of the mnemonic
code). Be sure you understand the concepts of ladder programming, and write the programs in the
proper order.
4 Understanding Programming
Number of Times Bits Can be Used and Connection Method
• There is no limit to the number of I/O bits, work bits, timers, and other input bits that can be used.
Program structure should be kept as clear and simple as possible to make the programs easier to
understand and maintain even if it means using more input bits.
• There is no limit to the number of input conditions that can be connected in series or in parallel on
the rungs.
• Two or more OUT instructions can be connected in parallel.
0.00
0.05
TIM
0000
#100
102.00
• Output bits can also be used in input conditions.
102.00
102.00
Ladder Programming Restrictions
• A rung error will occur if a ladder program is not connected to both bus bars.
The ladder program must be connected to both bus bars so that the execution condition will flow
from the left bus bar to the right bus bar.
If the rungs are not connected to both bus bars, a rung error will occur during the program check
on the CX-Programmer and program transfer will be impossible.
• A rung error will occur if the instruction shown below is made to directly connect to the bus bar
without an input condition.
OUT instructions, timers, counters, and other output instructions cannot be connected directly to
the left bus bar.
If one of these instructions is connected directly to the left bus bar, a rung error will occur and program transfer will be impossible.
MOV
4-4
CP1E CPU Unit Software User’s Manual(W480)
4 Understanding Programming
• A location error will occur if an instruction is not connected directly to the right bus bar.
An input condition cannot be inserted after an OUT instruction or other output instruction. The
input condition must be inserted before an OUT instruction or other output instruction. If it is
inserted after an output instruction, then a location error will occur during the program check in the
CX-Programmer.
0.00
0.01
0.03
102.01
0.04
102.01
4-1 Programming
• A warning will occur if the same output bit is used more than once in an OUT instruction.
One output bit can be used in one instruction only. Instructions in a ladder program are executed
in order from the top rung in each cycle. The result of an OUT instruction in a lower rung will be
eventually saved in the output bit. The results of any previous instructions controlling the same bit
will be overwritten and not output.
Output bit CIO 100.00
4
Output bit CIO 100.00
4-1-3 Basics of Programming
CP1E CPU Unit Software User’s Manual(W480)
4-5
4 Understanding Programming
4-2
Tasks, Sections, and Symbols
4-2-1
Overview of Tasks
There are basically two types of tasks.
Task settings must be made to use interrupt tasks with a CP1E CPU Unit.
Task type
Cyclic task
Description
Executed once per cycle
Applicable
programming
language
Ladder diagram
Execution condition
Only one for the CP1E.
(Normally, the user does not have to consider this.)
Interrupt tasks
Executed when a specific
condition occurs. The process
being executed is interrupted.
Ladder diagram
An interrupt task is placed into READY
status when the interrupt condition
occurs. A condition can be set for the following interrupt tasks.
• Scheduled interrupt tasks
• I/O interrupt tasks
4-2-2
Overview of Sections
With the CX-Programmer, programs can be created and displayed in functional units called sections.
Any program in a task can be divided into sections.
Sections improve program legibility and simplifies editing.
4-2-3
Overview of Symbols
Symbols
I/O memory area addresses or constants can be specified by using character strings registered as symbols.
The symbols are registered in the symbol table of the CX-Programmer.
Programming with symbols enables programming with names without being aware of the addresses.
The symbol table is saved in the CX-Programmer project file (.CXP) along with other parameters, such
as the user programs.
Symbol Types
There are two types of symbols that can be used in programs.
Global Symbols
Global symbols can be accessed from all ladder programs in the PLC.
Local Symbols
Local symbols can be accessed from only one task. They are assigned to individual tasks.
4-6
CP1E CPU Unit Software User’s Manual(W480)
4 Understanding Programming
Addresses are allocated to symbols using one of the following methods.
• User Specified allocation
• Automatic allocation using the CX-Programmer
The area of memory used for automatic allocations is set by selecting Memory Allocation - Automatic Address Allocation from the PLC Menu in the CX-Programmer.
Scope
Project tree in the
CX-Programmer
Global
symbols
PLC tree
Local
symbols
Program tree
Not
possible.
Access
from other
tasks
Access
from the
local task
Address and I/O
comment (without a symbol
name)
Possible.
Possible.
Supported
Not
possible.
Possible.
Not supported
4-2 Tasks, Sections, and Symbols
Types of symbols
Access
using symbols from a
network
4
• The same addresses is used for two different local symbols.
• The same addresses is used for a global symbol and a local symbol.
Additional Information
In programs in the CX-Programmer, global symbols and local symbols can be identified by the
following character colors and symbol icons.
Classification
Global symbols
Display color
Black (default)
Example (default color)
Start
3.00
Local symbols
Blue (default)
Error
W0.00
Select Tools - Options, and select Local Symbols or Global Symbols in Appearance to change
the color.
CP1E CPU Unit Software User’s Manual(W480)
4-7
4-2-3 Overview of Symbols
Note “Global” and “local” indicate only the applicable scope of the symbol.
They have nothing to do with the applicable scope of memory addresses.
Therefore, a warning but not an error will occur in the following cases, and it will be possible to
transfer the user program.
4 Understanding Programming
4-3
Programming Instructions
4-3-1
Basic Understanding of Instructions
Structure of Instructions
Programs consist of instructions. The conceptual structure of the inputs to and outputs from an instruction is shown in the following diagram.
Power flow (P.F., execution condition)
Instruction
Instruction condition
Flags
Power flow (P.F., execution condition)*1
Instruction condition*2
Flag
*1: Input instructions only.
*2: Not output for all instructions.
Operands
(sources)
Operands
(destinations)
I/O memory
Power Flow
The power flow is the execution condition that is used to control the execution and instructions when
programs are executing normally. In a ladder program, power flow represents the status of the execution condition.
Input Instructions
• Load instructions indicate a logical start and outputs the execution condition.
Outputs the execution
condition.
• Intermediate instructions input the power flow as an execution condition and output the power flow
to an intermediate or output instruction.
Outputs the execution
condition.
=
D0
#1215
Output Instructions
Output instructions execute all functions, using the power flow as an execution condition.
LD power flow
Power flow for
output instruction
Input block
4-8
Output block
CP1E CPU Unit Software User’s Manual(W480)
4 Understanding Programming
4-3-2
Operands
Operands specify preset instruction parameters that are used to specify I/O memory area contents or
constants. Operands are given in boxes in the ladder programs.
Addresses and constants are entered for the operands to enable executing the instructions.
4-3 Programming Instructions
Operands are classified as source, destination, or number operands.
Example:
SBS
MOV
&0
S (source)
D0
D (destination)
Operand type
Source operand
Specifies the address of
the data to be read or a
constant.
2
N (number)
Operand
symbol
Description
S
Source operand
Source operand other than control
data (C)
C
Control data
Compound data in a source operand
that has different meanings depending on bit status.
4
Specifies the address
where data will be written.
D
−
Number
Specifies a particular
number used in the
instruction, such as a
subroutine number.
N
With numbers, it is not possible to specify an address
for indirect specification (except for jump instruction
numbers).
Operands are also called the first operand, second operand, and so on, starting from the top of the
instruction.
MOV
#0
First operand
D0
Second operand
CP1E CPU Unit Software User’s Manual(W480)
4-9
4-3-2 Operands
Destination
operand
(results)
4 Understanding Programming
4-3-3
Instruction Variations
The following variations are available for instructions to differentiate executing conditions and to refresh
data when the instruction is executed (immediate refreshing).
Variation
Symbol
Differentiation
variations
Description
−
These instructions are executed once every cycle while
the execution condition is satisfied.
ON
@
These instructions are executed only once when the execution condition turns ON.
OFF
%
These instructions are executed only once when the execution condition turns OFF.
No variation used.
Immediate refreshing
!
Data in the built-in I/O area specified by the operands is
refreshed when the instruction is executed.
Example:
!
@ MOV
Instruction (mnemonic)
Differentiation variation
Immediate refresh variation
4-3-4
Execution Conditions
The following two types of basic and special instructions can be used.
• Non-differentiated instructions: Executed every cycle
• Differentiated instructions: Executed only once
Non-differentiated Instructions
Output Instructions (Instructions That Require Input Conditions)
These instructions are executed once every cycle while the execution condition is satisfied (ON or
OFF).
Non-differentiated
Output instructions
executed every cycle
Example:
MOV
Input Instructions (Logical Starts and Intermediate Instructions)
These instructions read bit status, make comparisons, test bits, or perform other types of processing
every cycle. If the results are ON, the input condition is output (i.e., the execution condition is turned
ON).
Input instruction executed every cycle
4-10
Example:
CP1E CPU Unit Software User’s Manual(W480)
4 Understanding Programming
Input-differentiated Instructions
Upwardly Differentiated Instructions (Instructions Preceded by @)
@ Upwardly
differentiated
instruction
Example:
1.02
@MOV
Executes the MOV instruction once
when CIO 1.02 turns ON.
• Input Instructions (Logical Starts and Intermediate Instructions)
The instruction reads bit status, makes comparisons, tests bits, or performs other types of processing every cycle and will output an ON execution condition (power flow) when the result
changes from OFF to ON.
The execution condition will turn OFF the next cycle.
1.03
Example:
ON execution condition created for one
cycle when CIO 1.03 turns ON.
Downwardly Differentiated Instructions (Instruction Preceded by %)
• Output Instructions
The instruction is executed only during the cycle in which the execution condition changes from
ON to OFF.
The instruction is not executed in the following cycle.
% Downwardly
differentiated
instruction
Example:
1.02
%SET
Executes the SET instruction once
when CIO 1.02 turns OFF.
• Input Instructions (Logical Starts and Intermediate Instructions)
The instruction reads bit status, makes comparisons, tests bits, or performs other types of processing every cycle and will output an ON execution condition (power flow) when the result
changes from ON to OFF.
The execution condition will turn OFF the next cycle.
Downwardly differentiated instruction
Example:
1.03
ON execution condition created for one cycle
when CIO 1.03 turns ON.
CP1E CPU Unit Software User’s Manual(W480)
4
4-3-4 Execution Conditions
Upwardly differentiated instruction
4-3 Programming Instructions
• Output Instructions
The instruction is executed only during the cycle in which the execution condition changes from
OFF to ON.
The instruction is not executed in the following cycle.
4-11
4 Understanding Programming
4-3-5
Specifying Data in Operands
Specifying Addresses
Operand
Specifying
bit
addresses
Description
The word address and bit number are specified directly to specify a bit.
Example
Application
examples
1.02
1 . 02
Bit number 02
.
Word address CIO 1
Bit number
(00 to 15)
Word address
Specifying
word
addresses
The word address is specified directly to
specify a 16-bit word.
MOV 3 D200
3
Word address CIO 3
D200
Word address D200
Word address
Specifying
offsets for bit
addresses
In brackets, specify the number of bits to offset the specified starting bit address.
10.00[2]
.
Offset Constant
0 to 15 or word
address in I/O memory
Starting bit address
10.00[2]
Number of bits to offset the address
→Specify 10.02
Starting bit address
10.00 [W0]
Number of bits to offset the address
When W0 = &2→Specify 10.02
Starting bit address
A symbol can also be specified for the starting bit address. Only Holding, Work, and DM
Area addresses can be used regardless of
whether a physical address or symbol is
used.
A constant or word address in I/O memory
can be used for the offset. If a word address
is specified, the contents of the word is used
as the offset.
Specifying
offsets for
word
addresses
In brackets, specify the number of words to
offset the specified starting bit address.
[
]
Offset Constant of 0 or
higher or word address in
I/O memory
Starting word address
MOV 3 D0[200]
D0[2]
Number of words to offset the address
→Specify D2
Starting word address
D0 [W0]
Number of bits to offset the address
When W0 = &2→Specify D2
Starting word address
A symbol can also be specified for the starting word address. Only Holding, Work, and
DM Area addresses can be used regardless
of whether a physical address or symbol is
used.
A constant or word address in I/O memory
can be used for the offset. If a word address
is specified, the contents of the word is used
as the offset.
4-12
CP1E CPU Unit Software User’s Manual(W480)
4 Understanding Programming
Operand
Description
Specifying
indirect DM
addresses in
Binary Mode
An offset from the beginning of the DM Area
is specified. The contents of the address will
be treated as binary data (00000 to 32767)
to specify the word address in DM Area.
Application
examples
Example
MOV #0001 @D300
@D300
Contents
&256 decimal
Add the @ symbol at the front to specify an
indirect address in Binary Mode.
(#0100 hexadecimal)
Add @
Specifying
indirect DM
Addresses
in BCD
Mode
An offset from the beginning of the DM Area
is specified. The contents of the address will
be treated as BCD data (0000 to 9999) to
specify the word address in the DM Area.
Add an asterisk (*) at the front to specify an
indirect address in BCD Mode.
MOV #0001 *D200
* D200
Contents
#0100
Specify D100
4
Add *
Data Formats
The following table shows the data formats that the CP1E CPU Units can handle.
Type
Decimal
equivalent
Data format
Unsigned
binary
Binary→
Hexadecimal→
15
14
13
12
11
10
9
8
7
6
5
4
3
2
1
0
215
23
214
22
213
21
212
20
211
23
210
22
29
21
28
20
27
23
26
22
25
21
24
20
23
23
22
22
21
21
20
20
64
32
16
8
4
2
1
Decimal→ 32768 16384 8192 4096 2048 1024 512 256 128
Signed
binary
Binary: →
Hexadecimal: →
15
14
13
12
11
10
9
8
7
6
5
4
3
2
1
0
215
23
214
22
213
21
212
20
211
23
210
22
29
21
28
20
27
23
26
22
25
21
24
20
23
23
22
22
21
21
20
20
64
32
16
8
4
2
1
Decimal: → -32768 16384 8192 4096 2048 1024 512 256 128
Sign bit:
1:Negative, 0:Non-negative
4-digit
hexadecimal
&0 to
&65535
#0000 to
#FFFF
Negative:
-1 to
- 32768
Negative:
#8000 to
#FFFF
Positive:
0 to 32767
Positive:
#0000 to
#7FFF
The data is treated as 16-bit signed binary data using the leftmost bit as the
sign bit. The value is expressed in 4-digit hexadecimal.
Positive numbers: If the leftmost bit is OFF, it indicates a non-negative value.
For 4-digit hexadecimal, the value will be 0000 to 7FFF hex.
Negative numbers: If the leftmost bit is ON, it indicates a negative value. For 4digit hexadecimal, the value be 8000 to FFFF hex. It will be expressed as the
2’s complement of the absolute value of the negative value (decimal).
CP1E CPU Unit Software User’s Manual(W480)
4-13
4-3-6 Data Formats
Note For Timer Completion Flags and Counter Completion Flags, there is no distinction between word addresses and bit
addresses.
4-3-6
4-3 Programming Instructions
Specify D00256
4 Understanding Programming
Type
BCD (binary
coded decimal)
BCD →
15
14
13
12
11
10
9
8
7
6
5
4
3
23
22
21
20
23
22
21
20
23
22
21
20
23
Decimal →
Single-precision floatingpoint decimal
Decimal
equivalent
Data format
31
30
0 to 9
29
Sign of
mantissa
0 to 9
23
22
Exponent
21
20
2
22
0 to 9
19
1
0
21
20
4-digit
hexadecimal
#0 to #9999 #0000 to
#9999
0 to 9
2
1
0
*
−
Mantissa
Binary
sign
Exponent
Value = (-1) ×1.[Mantissa] × 2
· Sign bit (bit 31): 1: Negative, 0: Positive
· Mantissa: The 23 bits from bit 00 to bit 22 contain the mantissa, i.e., the portion
below the decimal point in 1. .....,in binary.
Indicates this value.
· The 8 bits from bit 23 to bit 30 contain the exponent. The exponent
n
n-127
is expressed in binary as the n in 2 . The actual value is 2 .
This format conforms to the IEEE 754 standard for single-precision floatingpoint data. It is used only with instructions that convert or calculate floatingpoint data.
• Input using operands in the CX-Programmer as signed decimal or 32-bit
hexadecimal with the # symbol.
• When inputting operands in the I/O Memory Edit/Monitor Window of the CXProgrammer as signed decimal values with seven digits or less, the value will
be automatically converted to scientific notation (mantissa× 10Exponent) for
setting and monitoring. Inputs must be made using scientific notation for values with eight or more digits.
Example: When -1234.00 is input, it will become -1.234000e+003 in scientific
notation. For the mantissa×10Exponent, the value before the e is the mantissa and the value after the e is the signed exponent.
* Data range for single-precision floating-point decimal: -3.402823 × 1038 ≤ Value ≤ -1.175494 × 10-38, 0, +1.175494 ×
10-38 ≤ Value ≤ 3.402823 × 1038
4-14
CP1E CPU Unit Software User’s Manual(W480)
4 Understanding Programming
4-3-7
I/O Refresh Timing
The following methods are used to refresh external I/O.
• Cyclic refreshing
• Immediate refreshing (instructions with the ! variation and IORF)
4-3 Programming Instructions
Cyclic Refreshing
I/O is all refreshed after ladder programs are executed.
Start
LD1.01
15
0
15
0
CIO 0001
OUT2.09
16-bit increments
CIO 0002
END
All actual I/O data
4
I/O refresh
Execute an instruction with the immediate refresh variation or an IORF instruction to perform I/O
refreshing while ladder programming is being executed.
Immediate Refresh
The method of specifying immediate refreshing depends on whether the object to be refreshed is builtin I/O or an Expansion Unit.
• To specify immediate refreshing for the CPU Unit’s built-in I/O, specify the immediate refresh variation
(!) of the instruction.
• To specify immediate refreshing for Expansion I/O or an Expansion Unit, use the IORF instruction.
Instructions with Refresh Variation (!)
Add an exclamation mark (!) in front of the instruction to specify immediate refreshing.
I/O will be refreshed as shown below when an instruction is executing if a real I/O bit in the CPU
Unit’s built-in I/O is specified as an operand.
• Bit Operands: I/O refreshing for the bit will be performed.
• Word Operands: I/O refreshing for the 16 specified bits will be performed.
• Input or Source Operands: Inputs are refreshed immediately before the instruction is executed.
• Output or Destination Operands: Outputs are refreshed immediately after the instruction is executed.
IORF(097) Instruction
An I/O refresh (IORF) instruction is supported as a special instruction to refresh actual I/O data in
the specified word range. By using this instruction, it is possible to refresh all data or data in a specified range of actual I/O in CP-series Expansion I/O and Expansion Unit during the cycle.
Precautions for Correct Use
It is not possible to use the immediate refresh variation (!) for the actual I/O of Expansion I/O or
an Expansion Unit. Use the IORF instruction.
CP1E CPU Unit Software User’s Manual(W480)
4-15
4-3-7 I/O Refresh Timing
Cyclic refreshing
(batch)
4 Understanding Programming
4-4
Constants
Overview
Constants are numeric values expressed in 16 or 32 bits and can be specified as instruction operands.
The following types of constants are supported.
• Bit Strings or Numeric Values (Integers)
Decimal values (with & symbol), hexadecimal values (with # symbol), BCD values (with # symbol), or
signed decimal values (with + or - symbol)
• Operands Specifying Numbers
Decimal Notation (No Symbol)
• Floating Point (Real Number) Notation
Signed decimal notation (with + or - symbol and decimal point)
Notation and Ranges
Using Operands for Bit Strings or Numeric Values (Integers)
Unsigned Binary
Data type
Notation
Decimal values
With & symbol
With # symbol
#
& 10
4-16
Hexadecimal values
000A
Decimal value
(integer)
Hexadecimal value
using 0 to F
Decimal symbol
Hexadecimal symbol
Application
example
MOV &10 D0
MOV #000A D0
Stores 10 decimal (#000A hex) in D0.
Stores #000A hex (&10 decimal) in D0.
Precautions for
correct use
• An error will occur and the left bus bar
will be displayed in red if a hexadecimal
value including A to F is input with &
from the CX-Programmer.
• The input will be treated as an address
in the CIO Area and the contents of that
address will be specified if a decimal
value without & is input from the CXProgrammer.
• An error will occur and the left bus bar will be
displayed in red if a hexadecimal value
including A to F is input without # from the
CX-Programmer.
• The input will be treated as an address in the
CIO Area and the contents of that address
will be specified if a decimal value without #
is input from the CX-Programmer.
Range
16 bits
&0 to 65535
#0000 to #FFFF
32 bits
&0 to 4294967295
#00000000 to #FFFFFFFF
CP1E CPU Unit Software User’s Manual(W480)
4 Understanding Programming
Signed Binary
Data type
Notation
Decimal values
Hexadecimal values
Signed + or -
With # symbol
#
10
FFF6
Decimal value
(integer)
Hexadecimal value
using 0 to F
+ or - sign
Hexadecimal symbol
Application
example
MOV -10 D0
Stores 10 decimal (#FFF6 hex) in D0.
Stores #FFF6 hex (10 decimal) in D0.
Precautions for
correct use
The input will be treated as an address in
the CIO Area and the contents of that
address will be specified if a decimal
value without + or - is input from the CXProgrammer.
• An error will occur and the left bus bar will be
displayed in red if a hexadecimal value
including A to F is input without # from the
CX-Programmer.
• The input will be treated as an address in the
CIO Area and the contents of that address
will be specified if a decimal value without #
is input from the CX-Programmer.
4-4 Constants
Range
Negative: -32768 to -1
Negative: #8000 to #FFFF
4
Positive: 0 to +32767
Positive: #0000 to #7FFF
Negative: -2147483648 to -1
Negative: #80000000 to #FFFFFFFF
Positive: 0 to +2147483647
Positive: #00000000 to #7FFFFFFF
16 bits
32 bits
MOV # FFF6 D0
Unsigned BCD
Data type
Notation
Decimal values
None
BCD values
#
0010
Decimal value using
0 to 9
BCD symbol
Application
example
+B #0010 D0 D1
Precautions for
correct use
The input will be treated as an address in the CIO
Area and the contents of that address will be
specified if a decimal value without # is input from
the CX-Programmer.
Range
16 bits
Adds #0010 and the contents of D0 as BCD data
and stores the result in D1.
None
32 bits
CP1E CPU Unit Software User’s Manual(W480)
#0000 to #9999
#0000 0000 to #99999999
4-17
4 Understanding Programming
Using Operands to Specify Numbers
Data type
Notation
Decimal values
No symbol (value only)
Hexadecimal values or BCD values
Not possible.
10
Number only
Application
example
SBS 0
Precautions for
correct use
An error will occur and the left bus bar
will be displayed in red if a decimal
value is input with & from the CX-Programmer.
Jumps to subroutine 0.
Using Floating-point (Real Number) Notation for Operands
Data type
Notation
Decimal values
With + or -
Hexadecimal values
With # symbol
(for single-precision data)
+ 0.10
Decimal value
(real number)
+ or - sign
#
3DCCCCCD
Hexadecimal value
using 0 to F
Hexadecimal symbol
Application
example
FIX +0.10 D0
Converts floating point +0.10 into 16bit signed binary data and stores the
integer portion in D0.
FIX #3DCCCCCD D0
Converts floating point #3DCCCCCD (+0.10 decimal) into 16-bit signed binary data and stores the
integer portion in D0.
Precautions for
correct use
The input will be treated as an address
in the CIO Area, an error will occur,
and the left bus bar will be displayed in
red if a decimal value with a decimal
point is input without + from the CXProgrammer.
The input will be treated as an address in the CIO
Area, an error will occur, and the left bus bar will be
displayed in red if a hexadecimal value including A
to F is input without # from the CX-Programmer.
Additional Information
• Zero suppression can be used when inputting any data type.
For example, “&2” and “&02”, “#000F” and “#F” are treated as the same.
• “BIN” indicates binary data.
• BCD data is binary coded decimal.
4-18
CP1E CPU Unit Software User’s Manual(W480)
4 Understanding Programming
4-5
4-5-1
Specifying Offsets for Addresses
Overview
0.00[W0]
MOV
When the start address
is CIO 0.00 and W0 is
&2, 2 is added,
resulting in CIO 0.02.
When the start
address is D100 and
W1 is &3, 3 is added,
resulting in D103.
Examples of
Specifying Bit
Address Offsets
10.00[4]
Examples of
Specifying Word
Address Offsets
MOV
An offset of 4 is added
to the start address of
CIO 10.00, resulting in
CIO 10.04.
An offset of 12 is
added to the start
address of D100,
resulting in D112.
4
The bit address is offset by the amount specified by n (number of bits) from A (start bit address).
A [n]
Offset
Starting bit address
Number of bits to offset: +n
15 14 13 12
11 10 9
8
7
6 5
4
3
2 1
0
Word
Starting bit address A
Start Bit Address
It is possible to specify the start bit address with a bit address or with a symbol (except the NUMBER
data type cannot be used).
Offsetting is possible for all addresses except the DM Areas.
When specifying symbols, make the symbol table setting as the array variation. The number of
arrays will be the maximum number of offset + 1 bit at least.
The I/O comment for the start bit address is displayed.
Offset
The offset can be specified as a decimal constant, word address (but CIO Area addresses cannot
be specified), or a one-word symbol (i.e., symbols with the following data types: INT, UINT, WORD,
CHANNEL).
Words in the Auxiliary Area (A) can only be specified as a decimal constant.
If a word address is specified, the contents of the specified word is used as the offset.
If the offset exceeds bit 15 in the specified word, offsetting will continue from bit 00 in the next word.
If the offset is specified indirectly, make sure that the final bit address does not exceed the upper
limit of the memory area by using input comparison or other instruction.
CP1E CPU Unit Software User’s Manual(W480)
4-19
4-5-1 Overview
Bit Addresses
Bit
4-5 Specifying Offsets for Addresses
When an address is specified for an instruction operand, it is possible to change the specified address
by specifying in brackets an offset for the specified address.
4 Understanding Programming
Examples:
a [2] 10.02
10.02
10.0 [2]
Offset (decimal value)
Offset (decimal value)
Start bit address; symbol a = 10.0
(bit symbol named a)
Start bit address
(bit address in I/O memory)
10.00 [W0] 10.02
a [b] 10.02
Offset when W0 = &2
(word address in I/O memory)
Start bit address
(bit address in I/O memory)
Offset; symbol b = &2
Start bit address; symbol a = 10.0
Word Addresses
The word address is offset by the amount specified by n (number of offset words) from A (start word
address).
A [n]
Word
Start word address
Offset
Bit 15 14 13 12 11 10 9 8 7 6 5 4 3 2 1 0
A
+n
Start Word Address
It is possible to specify the start word address with a word address or with a symbol (except the
NUMBER data type cannot be used).
Offsetting is possible only for addresses in the Holding, Word, and DM Areas.
The I/O comment for the start bit address is displayed.
When specifying symbols, make the symbol table setting as the array variation. The number of
arrays will be the maximum number of offset + 1 word at least.
Offset
The offset can be specified as a decimal constant, word address (but CIO Area addresses cannot
be specified), or one-word symbol (i.e., symbols with the following data types: INT, UINT, WORD,
CHANNEL).
If a word address or symbol is specified, the contents of the specified word is used as the offset.
If the offset exceeds bit 15 in the specified word, offsetting will continue from bit 00 in the next word.
If the offset is specified indirectly, make sure that the final bit address does not exceed the upper
limit of the memory area by using input comparison or other instruction.
Examples:
D0[2]
D2
Offset (decimal value)
Start word address
(word address in I/O memory)
D0 [W0] D2
Offset; W0 = &2
(word address in I/O memory)
Start bit address
(bit address in I/O memory)
4-20
a [2] D2
Offset (decimal value)
Start word address;
symbol a (one-word symbol) = D0
a [b] D2
Offset;
symbol b(one-word symbol) = &2
Start word address;
symbol a (one-word symbol) = D0
CP1E CPU Unit Software User’s Manual(W480)
4 Understanding Programming
Caution
Program so that the memory area of the start address is not exceeded when using a
word address or symbol for the offset.
If an indirect specification causes the address to exceed the area of the start address,
the system will access data in other area, and unexpected operation may occur.
4-5-2
Application Examples for Address Offsets
It is possible to dynamically specify the offset by specifying a word address in I/O memory for the offset
in the brackets. The contents of the specified word address will be used as the offset.
For example, execution can be performed by increasing the address by incrementing the value in the
brackets and using only one instruction.
4
Ladder Program Example
The contents of corresponding words are added starting from the specified starting point, W0, to the
end of the areas and the sums are output to D200 to D299 starting from the specified offset from
D200.
For example, if W0 is 30, the corresponding words from D30 to D99 and D130 to D199 are added,
and the sums are output to D230 to D299.
Set the value of W0 to the offset word (W1) using the MOV instruction.
Use
the operand of the addition instruction to specify and execute D0[W1] +
D100[W1] = D200[W1].
Increment W1 to increase the offset.
Repeat this process
100 times.
Each process is performed with an input comparison instruction (<) as the execution condition so
that W1 does not exceed &100 to make sure that the upper limit of the indirect addressing range is
not exceeded.
Execution condition
a
<
W1
&100
MOV
W0
W1
When execution condition a (upwardly
differentiated) turns ON, the value of W0 is
set to W1.
FOR
&100
Starts FOR loop
+
D0[W1]
D100[W1]
D200[W1]
If execution condition a is ON and the
value of W1 is less than &100, the data
from the start position until D99 and
the data until D199 are added, and the
sum for each is output until D299.
++
While execution condition a is ON, W0 is
incremented.
W1
NEXT
CP1E CPU Unit Software User’s Manual(W480)
Returns to FOR
4-21
4-5-2 Application Examples for Address Offsets
In this example, two areas of consecutive data are used: D0 to D99 and D100 to D199.
Execution condition
a
4-5 Specifying Offsets for Addresses
For example, write the program so that processing is executed only when the indirect
specification does not cause the final address to exceed the memory area by using
an input comparison instruction or other instruction.
4 Understanding Programming
4-6
Ladder Programming Precautions
4-6-1
Special Program Sections
For CP1E CPU Units, programs have special program sections that will control instruction conditions.
The following special program sections are available.
Instructions
Instruction
conditions
Subroutine sections
SBS, SBN, and RET instructions
Subroutine program
is executed.
The subroutine program
section between SBN and
RET instructions is executed.
IL-ILC sections
IL and ILC instructions
During IL
Step ladder sections
STEP instructions
The output bits are turned
OFF and timers are reset.
Other instructions will not be
executed and previous status will be maintained.
FOR-NEXT sections
FOR and NEXT instructions
Break in progress.
Looping
Program sections
Status
Instruction Combinations
The following table shows which of the special instructions can be used inside other program sections.
Subroutine
sections
IL-ILC
sections
MILH and
MILR-MILC
sections
Step ladder
sections
FOR-NEXT
sections
Subroutine sections
No
No
No
No
No
IL-ILC sections
Yes
No
No
No
Yes
MILH and MILR-MILC sections
Yes
No
Yes
No
Yes
Step ladder sections
No
Yes
Yes
No
No
FOR-NEXT sections
Yes
Yes
Yes
No
Yes
Subroutines
Place all the subroutines together just after all of the main program and before the END instruction.
A subroutine cannot be placed in a step ladder, block program, or FOR-NEXT section.
If instructions other than those in a subroutine are placed after a subroutine (SBN to RET), those
instructions will not be executed.
Program
Subroutines
4-22
CP1E CPU Unit Software User’s Manual(W480)
4 Understanding Programming
Instructions not Supported in Subroutines
The following instructions cannot be used in a subroutine.
Step Ladder
Instructions
Mnemonic
Instruction
STEP
STEP DEFINE
SNXT
STEP NEXT
4-6 Ladder Programming Precautions
Classification
by function
Instructions not Supported in Step Ladder Program Sections
The following instructions cannot be used in step ladder program sections.
Classification
by function
Sequence Control Instructions
Instruction
FOR, NEXT, and BREAK
FOR, NEXT, and BREAK LOOP
END
END
IL and ILC
INTERLOCK and INTERLOCK CLEAR
JMP and JME
JUMP and JUMP END
CJP
CONDITIONAL JUMP and CONDITIONAL JUMP NOT
SBN and RET
SUBROUTINE ENTRY and SUBROUTINE RETURN
4
Note A step ladder program section can be used in an interlock section (between IL and ILC).
The step ladder section will be completely reset when the interlock condition is ON.
CP1E CPU Unit Software User’s Manual(W480)
4-23
4-6-1 Special Program Sections
Subroutines
Mnemonic
4 Understanding Programming
4-24
CP1E CPU Unit Software User’s Manual(W480)
I/O Memory
This section describes the types of I/O memory areas in a CP1E CPU Unit and the
details.
Be sure you understand the information in the section before attempting to write ladder
diagrams.
Refer to the CP1E CPU Unit Instructions Reference Manual (Cat. No. W483) for
detailed information on programming instructions.
5-1 Overview of I/O Memory Areas . . . . . . . . . . . . . . . . . . . . . . . . . . . . . . . . . . . 5-2
5-1-1
5-1-2
I/O Memory Areas . . . . . . . . . . . . . . . . . . . . . . . . . . . . . . . . . . . . . . . . . . . . . . 5-2
I/O Memory Area Address Notation . . . . . . . . . . . . . . . . . . . . . . . . . . . . . . . . . 5-5
5-1-3
I/O Memory Areas . . . . . . . . . . . . . . . . . . . . . . . . . . . . . . . . . . . . . . . . . . . . . . 5-6
5-2 I/O Bits . . . . . . . . . . . . . . . . . . . . . . . . . . . . . . . . . . . . . . . . . . . . . . . . . . . . . . . 5-7
5-3 Work Area (W) . . . . . . . . . . . . . . . . . . . . . . . . . . . . . . . . . . . . . . . . . . . . . . . . . 5-8
5-4 Holding Area (H) . . . . . . . . . . . . . . . . . . . . . . . . . . . . . . . . . . . . . . . . . . . . . . . 5-9
5-5 Data Memory Area (D) . . . . . . . . . . . . . . . . . . . . . . . . . . . . . . . . . . . . . . . . . 5-11
5-6 Timer Area (T) . . . . . . . . . . . . . . . . . . . . . . . . . . . . . . . . . . . . . . . . . . . . . . . . 5-13
5-7 Counter Area (C) . . . . . . . . . . . . . . . . . . . . . . . . . . . . . . . . . . . . . . . . . . . . . 5-15
5-8 Auxiliary Area (A) . . . . . . . . . . . . . . . . . . . . . . . . . . . . . . . . . . . . . . . . . . . . . 5-17
5-9 Condition Flags . . . . . . . . . . . . . . . . . . . . . . . . . . . . . . . . . . . . . . . . . . . . . . 5-19
5-10 Clock Pulses . . . . . . . . . . . . . . . . . . . . . . . . . . . . . . . . . . . . . . . . . . . . . . . . . 5-21
CP1E CPU Unit Software User’s Manual(W480)
5-1
5
5 I/O Memory
5-1
Overview of I/O Memory Areas
This section describes the I/O memory areas in a CP1E CPU Unit.
5-1-1
I/O Memory Areas
Data can be read and written to I/O memory from the ladder programs. I/O memory consists of an area
for I/O with external devices, user areas, and system areas.
System Areas
Input bits (starting from CIO 0)
User Areas
Auxiliary Area
(A)
Timer Area (T)
Work Area (W)
DM Area (D)
Counter Area (C)
Holding Area (H)
Condition Flags
Clock Pulses
Output bits (starting from CIO 100)
CIO Area (CIO 0 to CIO 289)
In the CIO Area, input bit addresses range from CIO 0 to CIO 99, output bit addresses range from CIO
100 to CIO 199 and addresses for serial PLC links range from CIO 200 to CIO 289.
The bits and words in the CIO Area are allocated to built-in I/O terminals on the CP1E CPU Unit and to
the Expansion Units and Expansion I/O Units.
Input words and output bits that are not allocated may be used as work bits in programming.
Refer to 5-2 I/O Bits
5-2
CP1E CPU Unit Software User’s Manual(W480)
5 I/O Memory
User Areas
These areas can be used freely by the user.
Work Area (W)
The Word Area is part of the internal memory of the CPU Unit. It is used in programming. Unlike the
input bits and output bits in the CIO Area, I/O to and from external devices is not refreshed for this
area.
Refer to 5-3 Work Area (W)
Holding Area (H)
The Holding Area is part of the internal memory of the CPU Unit. It is used in programming. Unlike
the input bits and output bits in the CIO Area, I/O to and from external devices is not refreshed for
this area.
These words retain their content when the PLC is turned ON or the operating mode is switched
between PROGRAM mode and RUN or MONITOR mode.
This data is unstable if power is reset when the battery is not mounted.
5-1 Overview of I/O Memory Areas
Use this area for work words and bits before using any words in the CIO Area. These words should
be used first in programming because they will not be assigned to new functions in future versions of
CP1E CPU Units.
5
Refer to 5-4 Holding Area (H)
This data area is used for general data storage and manipulation and is accessible only by word (16
bits).
These words retain their content when the PLC is turned ON or the operating mode is switched
between PROGRAM mode and RUN or MONITOR mode.
Specified words can be retained in the built-in EEPROM backup memory using Auxiliary Area bits.
This data is unstable if power is reset when the battery is not mounted.
Refer to 5-5 Data Memory Area (D)
Timer Area (T)
There are two parts to the Timer Area: the Timer Completion Flags and the timer Present Values
(PVs).
Up to 256 timers with timer numbers T0 to T255 can be used.
• Timer Completion Flags
Each Timer Completion Flag is accessed as one bit using the timer number.
A Completion Flag is turned ON when the set time of the timer elapses.
• Timer PVs
Each timer PV is accessed as one word (16 bits) using the timer number.
The PV increases or decreases as the timer operates.
Refer to 5-6 Timer Area (T)
CP1E CPU Unit Software User’s Manual(W480)
5-3
5-1-1 I/O Memory Areas
Data Memory Area (D)
5 I/O Memory
Counter Area (C)
There are two parts to the Counter Area: the Counter Completion Flags and the Counter Present
Values (PVs).
Up to 256 counters with counter numbers C0 to C255 can be used.
These words retain their content when the PLC is turned ON or the operating mode is switched
between PROGRAM mode and RUN or MONITOR mode.
This data is unstable if power is reset, when the battery is not mounted.
• Counter Completion Flags
Each Counter Completion Flag is accessed as one bit using the counter number.
A Completion Flag is turned ON when the set value of the counter is reached.
• Counter PVs
Each counter PV is accessed as one word (16 bits) using the timer number.
The PVs count up or down as the counter operates.
Refer to 5-7 Counter Area (C)
System Areas
System Areas contain bits and words with preassigned functions.
Auxiliary Area (A)
The words and bits in this area have preassigned functions.
Refer to A-1 Auxiliary Area Allocations by Address
Condition Flags
The Condition Flags include the flags that indicate the results of instruction execution, as well as the
Always ON and Always OFF Flags.
The Condition Flags are specified with global symbols rather than with addresses. For example: P_on
Clock Pulses
The Clock Pulses are turned ON and OFF by the CPU Unit’s internal timer.
The Clock Pulses are specified with global symbols rather than with addresses. For example: P_0_02
5-4
CP1E CPU Unit Software User’s Manual(W480)
5 I/O Memory
5-1-2
I/O Memory Area Address Notation
An I/O memory can be addressed using word addresses or bit addresses. The word addresses and bit
addresses are given in decimal format.
Word Addresses
Specifies a16-bit word.
1
I/O memory area
designator
Examples: D, A, W
0
0
5-1 Overview of I/O Memory Areas
W
The word number within
the area given in decimal
Bit Addresses
A bit addresses specifies one of the 16 bits in a word.
The word number and bit number are separated with a period.
W
0
0
Word number
.
0
Period
2
5
Bit number
(00 to 15)
On the CX-Programmer, addresses in the CIO Area (including addresses for Serial PLC Links) are
given with no I/O memory area designator. “CIO” is used as the I/O memory area designator in this
manual for clarity.
0
Inputs begin from CIO 0
Outputs begin from CIO 100
.
Period
CP1E CPU Unit Software User’s Manual(W480)
0
3
Bit number
(00 to 15)
IN
CIO 0
C
1
0
3
2
5
4
7
6
9
8
11
10
5-5
5-1-2 I/O Memory Area Address Notation
I/O memory
area designator
1
5 I/O Memory
5-1-3
I/O Memory Areas
Name
No. of bits
Word addresses
Remarks
Reference
Input Bits
1,600 bits
(100 words)
CIO 0 to CIO 99
−
Output Bits
1,600 bits
(100 words)
CIO 100 to CIO 199
−
Serial PLC
Link Words
1,440 bits
(90 words)
CIO 200 to CIO 289
−
Refer to Section 12 Serial
Communications.
Work Area (W)
1,600 bits
(100 words)
W0 to W99
−
Refer to 5-3 Work Area
(W).
Holding Area (H)
800 bits (50 words)
H0 to H49
The data is unstable if
power is interrupted, when
the battery is not mounted.
E-type CPU
Unit
2K words
D0 to D2047
Data in specified words of
Refer to 5-5 Data Memory
the DM Area can be
Area (D).
retained in the built-in
EEPROM in the backup
memory by using a bit in
the Auxiliary Area. Applicable words: D0 to D1499
(One word can be specified at a time.)
N-type CPU
Unit
8K words
D0 to D8191
Data in specified words of
the DM Area can be
retained in the built-in
EEPROM in the backup
memory by using a bit in
the Auxiliary Area.Applicable words: D0 to D6999
(One word can be specified at a time.)
Present values
256
T0 to T255
−
Timer Completion Flags
256
Present values
256
C0 to C255
The data is unstable if
power is interrupted, when
the battery is not mounted.
Counter Completion Flags
256
Read only
7,168 bits
(448 words)
A0 to A447
Read-write
4,896 bits
(306 words)
A448 to A753
CIO Area
Data Memory
Area (D)
Timer Area (T)
Counter Area (C)
Auxiliary Area
(A)
5-6
Refer to 5-2 I/O Bits.
Refer to 5-4 Holding Area
(H).
Refer to 5-6 Timer Area
(T).
Refer to 5-7 Counter Area
(C).
−
The data is unstable if
power is interrupted, when
the battery is not mounted.
Refer to A-1 Auxiliary Area
Allocations by Address.
CP1E CPU Unit Software User’s Manual(W480)
5 I/O Memory
5-2
I/O Bits
Overview
These words are allocated to built-in I/O terminals of CP1E CPU Units and CP-series Expansion Units
and Expansion I/O Units.
Notation
0 . 02
Bit number: 02
Word number: 0
I/O memory area designator:
None on CX-Programmer,
“CIO” in documentation
5-2 I/O Bits
Input bits: CIO 0.00 to CIO 99.15 (100 words)
5
Range
Output bits: CIO 100.00 to CIO 199.15 (100 words)
Applications
Built-in inputs can be used as basic inputs, interrupt inputs, quick-response inputs or high-speed
counters.
Built-in outputs can only be used as basic outputs.
Refer to Section 8 Overview of Built-in Functions and Allocations for details.
Details
• Bits in the CIO Area can be force-set and force-reset.
• The contents of the CIO Area will be cleared in the following cases:
• When the operating mode is changed between PROGRAM or MONITOR mode and RUN mode
• When the PLC power is reset
• When the CIO Area is cleared from the CX-Programmer
• When PLC operation is stopped due to a fatal error other than an FALS error occurs. (The contents of the CIO Area will be retained when FALS is executed.)
Additional Information
Words that are not allocated to the built-in I/O terminals of the CPU Units and the Expansion
Units and Expansion I/O Units can only be used in programming. It is the same as the Work
Area.
CP1E CPU Unit Software User’s Manual(W480)
5-7
5 I/O Memory
5-3
Work Area (W)
Overview
The Work Area is part of the internal memory of the CPU Unit. It is used in programming. Unlike the
input bits and output bits in the CIO Area, I/O to and from external devices is not refreshed for this area.
Notation
W 20 . 02
Bit number: 02
Word number: 20
I/O memory area designator: W
Range
The Work Area contains 100 words with addresses ranging from W0 to W99.
Applications
It is sometimes necessary to use the same set of input conditions many times in the same program. In
this case a work bit can be used to store the final condition to simplify programming work and program
design.
W10.0
W10.0
NO bit
W10.0
NC bit
Storing a Condition in a Work Bit
Details
• Bits in the Work Area can be force-set and force-reset.
• The contents of the Work Area will be cleared in the following cases:
• When the operating mode is changed between PROGRAM or MONITOR mode and RUN mode
• When the PLC power is reset
• When the Work Area is cleared from the CX-Programmer
• When PLC operation is stopped due to a fatal error other than an FALS error occurs. (The contents of the Work Area will be retained when FALS is executed.)
5-8
CP1E CPU Unit Software User’s Manual(W480)
5 I/O Memory
5-4
Holding Area (H)
Overview
The Holding Area is part of the internal memory of the CPU Unit. It is used in programming. Unlike the
input bits and output bits in the CIO Area, I/O to and from external devices is not refreshed for this area.
These words retain their content when the PLC is turned ON or the operating mode is switched
between PROGRAM mode and RUN or MONITOR mode.
Precautions for Safe Use
* This does not apply to areas backed up to EEPROM using the DM backup function.
If the DM backup function is being used, be sure to refer to 3-2-4 Initializing I/O Memory at Startup for details.
5
Notation
H 20 . 02
Bit number: 02
Word number: 20
I/O memory area designator: H
Range
The Holding area contains 50 words with addresses ranging from H0 to H49.
Applications
The Holding Area is used when you want to resume operation after a power interruption using the same
status as before the power interruption.
CP1E CPU Unit Software User’s Manual(W480)
5-4 Holding Area (H)
With an E-type CPU Unit or with an N-type CPU Unit without a Battery, the contents of the DM
Area (D) *, Holding Area (H), the Counter Present Values (C), the status of Counter Completion
Flags (C), and the status of bits in the Auxiliary Area (A) related to clock functions may be unstable when the power supply is turned ON.
5-9
5 I/O Memory
Details
• Bits in the Holding Area can be force-set and force-reset.
• When a self-maintaining bit is programmed with a Holding Area bit, the self-maintaining bit will not be
cleared even when the power is reset.
• If a Holding Area bit is not used for the self-maintaining bit, the bit will be turned OFF and the selfmaintaining bit will be cleared when the power is reset.
H0.00
H0.00
• If a Holding Area bit is used but not programmed as a self-maintaining bit, the bit will be turned OFF
by execution condition A when the power is reset.
H0.00
A
Precautions for Correct Use
• When a Holding Area bit is used in a KEEP instruction, never use a normally closed condition
for the reset input.
When the power supply goes OFF or is temporarily interrupted, the input will go OFF before
the PLCs internal power supply and the Holding Area bit will be reset.
B
Bad
Input Unit
A
~
5-10
H1.00
Reset
Set
Input Unit
~
KEEP
B
A
OK
A
Set
A
KEEP
H1.00
Reset
CP1E CPU Unit Software User’s Manual(W480)
5 I/O Memory
5-5
Data Memory Area (D)
Overview
This data area is used for general data storage and manipulation and is accessible only by word (16
bits).
These words retain their contents when the PLC is turned ON or the operating mode is switched
between PROGRAM mode and RUN or MONITOR mode.
Precautions for Safe Use
With an E-type CPU Unit or with an N-type CPU Unit without a Battery, the contents of the DM
Area (D) *, Holding Area (H), the Counter Present Values (C), the status of Counter Completion
Flags (C), and the status of bits in the Auxiliary Area (A) related to clock functions may be unstable when the power supply is turned ON.
* This does not apply to areas backed up to EEPROM using the DM backup function.
If the DM backup function is being used, be sure to refer to 3-2-4 Initializing I/O Memory at Startup for details.
Notation
D 200
Word number: 200
I/O memory area designator: D
Range
• E-type CPU Units have DM Area addresses ranging from D0 to D2047.
Of these, D0 to D1499 can be backed up in backup memory (built-in EEPROM).
• N-type CPU Units have DM Area addresses ranging from D0 to D8191.
Of these, D0 to D6999 can be backed up in backup memory (built-in EEPROM).
[ E-type CPU Unit ]
[ N-type CPU Unit ]
· All CPU Units Regardless
of I/O Capacity
D0
to
D0
to
Words that can be
backed up to backup
memory
D1499
· CPU Unit with 30 or 40 I/O Points
· CPU Unit with 20 I/O Points
Words that can be backed
up to backup memory
D1199
D1200
to
D1299
D0
to
D1199
DM Fixed Allocation Words
for the Modbus-RTU Easy
Master (for Built-in RS232C Port)
D1200
to
D1299
D1500
to
D1300
D1300
to
D2047
to
D6999
D1399
D1400
to
D6999
D7000
to
D8191
D7000
to
D8191
CP1E CPU Unit Software User’s Manual(W480)
Words that can be backed
up to backup memory
DM Fixed Allocation Words
for the Modbus-RTU Easy
Master (for Built-in RS-232C
Port)
DM Fixed Allocation Words
for the Modbus-RTU Easy
Master (for Serial Option
Port)
5-11
5-5 Data Memory Area (D)
Some words in the DM Area can be saved to the built-in EEPROM backup memory using Auxiliary Area
bits. These words are specifically referred to as the backed up words in the DM Area.
5
5 I/O Memory
Applications
The DM Area is for storing numeric data. It can be used for data exchange with Programmable Terminals, serial communications devices, such as Inverters, and Analog I/O Units or Temperature I/O Units.
Details
Bits in the DM Area cannot be addressed individually.
Backing Up to the Built-in EEPROM Backup Memory
• The number of words set in the PLC Setup can be saved to the built-in EEPROM backup memory
during operation by turning ON the DM Backup Start bit (A751.15).
• Specify in the PLC Setup whether to read the data in the DM Area words to the RAM as the initial
values when the power supply is turned ON.
Refer to 13-3 DM Backup Function for how to use DM Area words and bits.
DM Fixed Allocation Words for the Modbus-RTU Easy Master
The following DM area words are used as command and response storage areas with the ModbusRTU Easy Master function. These words are used for other applications if the Modbus-RTU Easy
Master function is not served.
Refer to 12-4 Modbus-RTU Easy Master Function for how to use the DM Area words and bits.
Indirect Addressing of the DM Area
Indirect addressing can be used in the DM Area.
There are two modes that can be used.
Binary-mode Addressing (@D)
If a “@” symbol is input before a DM Area address, the contents of that DM Area word is treated as
a hexadecimal (binary) address and the instruction will operate on the DM Area word at that
address.
The entire DM Area can be indirectly addressed with hexadecimal values 0000 to 1FFF.
Example: @D0
0100
D256
Address actually used.
BCD-mode Addressing (*D)
If a * symbol is input before a DM Area address, the content of that DM Area word is treated as a
BCD address and the instruction will operate on the DM Area word at that address.
Only part of the DM Area (D0 to D8192) can be indirectly addressed with BCD values 0 to 8192.
Example: *D0
0100
D100
Address actually used.
5-12
CP1E CPU Unit Software User’s Manual(W480)
5 I/O Memory
5-6
Timer Area (T)
Overview
The Timer Area contains Timer Completion Flags (1 bit each) and timer PVs (16 bits each). The Completion Flag is turned ON when a decrementing timer PV reaches 0 (counting out) or an incrementing/decrementing timer PV reaches the set value or 0.
Notation
T
002
5-6 Timer Area (T)
Time number: 002
I/O memory area designator: T
Range
Timer numbers range from T0 to T255.
5
Details
Types of Timers
The following table shows which instructions are used to refresh timer PVs in BCD and binary mode.
Timer instruction
BCD mode
Binary mode
TIM
TIMX
TEN-MS TIMER
TIMH
TIMHX
ONE-MS TIMER
TMHH
TMHHX
ACCUMULATIVE TIMER
TTIM
TTIMX
HUNDRED-MS TIMER
Timer numbers 0 to 255 are used by all timers listed above.
Timer Example: Timer Number 0 and a Timer Set Value of 1 s
· BCD mode
Timer Completion Flag
T000
TIM
000
#10
· Binary mode
Timer Completion Flag
T000
TIMX
000
#A
or &10
CP1E CPU Unit Software User’s Manual(W480)
5-13
5 I/O Memory
Timer PV Refresh Method
Timer numbers
T0 to T255
Timer PV refresh method
The timer PV is refreshed when the instruction is executed. This can cause a delay depending
on the cycle time.
• When the cycle time is longer than 100 ms, delay is generated by the TIM/TIMX instruction.
• When the cycle time is longer than 10 ms, delay is generated by the TIMH/TIMHX instruction.
• When the cycle time is longer than 1 ms, delay is generated by the TMHH/TMHHX instruction.
Precautions for Correct Use
It is not recommended to use the same timers number in two timer instructions because the timers will not operate correctly if they are operating simultaneously.
Do not use the same timer number for more than one instruction.
If two or more timer instructions use the same timer number, an error will be generated during
the program check.
Resetting or Maintaining Timers
• Timer Completion Flags can be force-set and force-reset.
• Timer PVs cannot be force-set or force-reset, although the PVs can be refreshed indirectly by
force-setting/resetting the Completion Flag.
• There are no restrictions in the order of using timer numbers or in the number of N.C. or N.O. conditions that can be programmed.
• Timer PVs can be read as word data and used in programming.
• The following table shows when timers will be reset or maintained.
Instruction
TIM/TIMX
TIMH/TIMHX
TMHH/
TMHHX
TTIM/
TTIMX
HUNDRED-MS
TIMER
TEN-MS TIMER
ONE-MS TIMER
ACCUMULA
TIVE TIMER
When the operating mode is
changed between PROGRAM or
MONITOR mode and RUN mode*1
PV=0
When the PLC power is reset
PV=0
Flag=OFF
Flag=OFF
CNR/CNRX instructions
(timer/counter reset)*2
PV= 9999/FFFF
Jumps (JMP-JME)
Retained
Interlocks (IL-ILC) with OFF interlock conditions
Reset (PV = SV, Timer Completion Flag = OFF)
Flag=OFF
Retained
*1 If the IOM Hold Bit (A500.12) is ON, the PV and Completion Flag will be retained when a fatal error occurs
(including execution of FALS instructions) or the operating mode is changed from PROGRAM mode to
RUN or MONITOR mode or vice-versa. (The PV and Completion Flag will be cleared when power is
cycled.)
*2 Since the TIML/TIMLX instructions do not use timer numbers, they are reset under different conditions.
The PV for a TIML/TIMLX instruction is reset to the SV.
Refer to the descriptions of these instructions for details.
5-14
CP1E CPU Unit Software User’s Manual(W480)
5 I/O Memory
5-7
Counter Area (C)
Overview
The Counter Area contains Completion Flags (1 bit each) and counter PVs (16 bits each). A Completion Flag is turned ON when the counter PV reaches the set value (counting out).
Precautions for Safe Use
* This does not apply to areas backed up to EEPROM using the DM backup function.
If the DM backup function is being used, be sure to refer to 3-2-4 Initializing I/O Memory at Startup for details.
Notation
5
C 002
Counter number: 002
I/O memory area designator: C
Range
Counter numbers range from C0 to C255.
.
Details
Types of Counters
The following table shows which instructions are used to refresh counter PVs in BCD and binary
mode.
Counter instruction
COUNTER
REVERSIBLE COUNTER
BCD mode
Binary mode
CNT
CNTX
CNTR
CNTRX
Counter numbers 0 to 255 are used by all counters given above.
The refresh method for counter PVs can be set from the CX-Programmer to either BCD or binary.
Built-in high-speed counters 0 to 5 do not use counter numbers.
CP1E CPU Unit Software User’s Manual(W480)
5-7 Counter Area (C)
With an E-type CPU Unit or with an N-type CPU Unit without a Battery, the contents of the DM
Area (D) *, Holding Area (H), the Counter Present Values (C), the status of Counter Completion
Flags (C), and the status of bits in the Auxiliary Area (A) related to clock functions may be unstable when the power supply is turned ON.
5-15
5 I/O Memory
Precautions for Correct Use
It is not recommended to use the same counter number in two counter instructions because the
counters will not operate correctly if they are counting simultaneously.
If two or more counter instructions use the same counter number, an error will be generated during the program check.
Counter Example: Counter Number 0 with a Counter Set Value of 10
· BCD mode
Counter Completion Flag
C000
CNT
000
#10
· Binary mode
Counter Completion Flag
C000
CNTX
000
&10
or #A
Resetting or Maintaining Counter PVs
• Counter Completion Flags can be force-set and force-reset.
• Counter PVs cannot be force-set or force-reset, although the PVs can be refreshed indirectly by
force-setting/resetting the Counter Completion Flag.
• There are no restrictions in the order of using counter numbers or in the number of N.C. or N.O.
conditions that can be programmed.
• Counter PVs can be read as word data and used in programming.
• The following table shows when counters PVs are reset or maintained.
Instruction
PV and Counter Completion Flag when counter
is reset
CNT/CNTX
CNTR/CNTRX
COUNTER
REVERSIBLE COUNTER
PV=0
Counter Completion Flag = OFF
When the operating mode is changed between Retained
PROGRAM or MONITOR mode and RUN mode
When the PLC power is reset
Retained (Unstable when the battery is not mounted)
Reset Input
Reset
CNR/CNRX instructions
Reset
Interlocks (IL-ILC) with OFF interlock conditions Retained
5-16
CP1E CPU Unit Software User’s Manual(W480)
5 I/O Memory
5-8
Auxiliary Area (A)
Overview
The words and bits in this area have preassigned functions.
Refer to A-1 Auxiliary Area Allocations by Address for details.
Precautions for Safe Use
• Words in the Auxiliary Area related to clock function are unstable.
Power interruption time
Bit/word
Name
Within I/O
memory
backup time
Retained
Longer than
I/O memory
backup time
Unstable
CPU Unit
E-type CPU
Unit
N-type CPU
Unit
Supported
Supported
A100 to A199
Error Log Area
A300
Error Log Pointer
Supported
A351 to A354
Calendar/Clock Area
Not provided.
A510 to A511
Startup Time
Not provided.
A512 to A513
Power Interruption Time
Not provided.
A514
Number of Power Interruptions
Supported
A515 to A517
Operation Start Time
Not provided.
A518 to A520
Operation End Time
Not provided.
A720 to A749
Power ON Clock Data 1 to 10
Not provided.
Notation
A
20.
02
Bit number: 02
Word number: 20
I/O memory area designator: A
Range
The Auxiliary Area contains 754 words with addresses ranging from A0 to A753.
CP1E CPU Unit Software User’s Manual(W480)
5 - 17
5-8 Auxiliary Area (A)
• With an E-type CPU Unit or with an N-type CPU Unit without a Battery, the contents of the DM
Area (D) *, Holding Area (H), the Counter Present Values (C), the status of Counter Completion Flags (C), and the status of bits in the Auxiliary Area (A) related to clock functions may be
unstable when the power supply is turned ON.
* This does not apply to areas backed up to EEPROM using the DM backup function.
If the DM backup function is being used, be sure to refer to 3-2-4 Initializing I/O Memory at
Startup for details.
5
5 I/O Memory
Applications
Applications of the bits and words in the Auxiliary Area are predefined. Ladder programs can be simplified and controllability can be improved by effectively using the bits and words in this area.
Details
• Some words or bits are set automatically by the system and others are set and manipulated by the
user.
The Auxiliary Area includes error flags set by self-diagnosis, initial settings, control bits, and status
data.
• Words and bits in this area can be read and written from the program or the CX-Programmer.
• The Auxiliary Area contains words that are read-only (A0 to A447) and words that can be read and
written (A448 to A753).
• Even the read/write bits in the Auxiliary Area cannot be force-set and force-reset continuously.
Auxiliary Area Words and Bits in the CX-Programmer’s System-defined
Symbols
The following table gives the Auxiliary Area bits and words pre-registered in the CX-Programmer’s
global symbol table as system-defined symbols.
Refer to A-1 Auxiliary Area Allocations by Address for details.
Word/Bit
5-18
Name
Name in CX-Programmer
A200.11
First Cycle Flag
P_First_Cycle
A200.12
Step Flag
P_Step
A200.15
First Cycle Task Flag
P_First_Cycle_Task
A262
Maximum Cycle Time
P_Max_Cycle_Time
A264
Present Cycle Time
P_Cycle_Time_Value
A401.08
Cycle Time Too Long Flag
P_Cycle_Time_Error
A402.04
Battery Error Flag
P_Low_Battery
A500.15
Output OFF Bit
P_Output_Off_Bit
CP1E CPU Unit Software User’s Manual(W480)
5 I/O Memory
5-9
Condition Flags
Overview
These flags include the flags that indicate the results of instruction execution, as well as the Always ON
and Always OFF Flags. These bits are specified with symbols rather than addresses.
The CX-Programmer treats condition flags as system-defined symbols (global symbols) beginning with P_.
Notation
5-9 Condition Flags
P_ ER
Condition flag name: ER
I/O memory area designator:
P_ (indicates a system symbol name)
Details
The Condition Flags are read-only; they cannot be written from instructions or from the CX-Programmer.
The Condition Flags cannot be force-set and force-reset.
Types of Condition Flags
Refer to 4-6 Ladder Programming Precautions for details.
Name
Always ON Flag
Name in CXProgrammer
Function
P_On
Always ON.
Always OFF Flag
P_Off
Always OFF.
Error Flag
P_ER
Turned ON when the operand data in an instruction is incorrect (an
instruction processing error) to indicate that an instruction ended
because of an error.
When the PLC Setup is set to stop operation for an instruction error
(Instruction Error Operation), program execution will be stopped and
the Instruction Processing Error Flag (A295.08) will be turned ON
when the Error Flag is turned ON.
Access Error Flag
P_AER
Turned ON when an Illegal Access Error occurs. The Illegal Access
Error indicates that an instruction attempted to access an area of
memory that should not be accessed.
When the PLC Setup is set to stop operation for an instruction error
(Instruction Error Operation), program execution will be stopped and
the Instruction Processing Error Flag (A4295.10) will be turned ON
when the Access Error Flag is turned ON.
Carry Flag
P_CY
Turned ON when there is a carry in the result of an arithmetic operation or a 1 is shifted to the Carry Flag by a Data Shift instruction.
The Carry Flag is part of the result of some Data Shift and Symbol
Math instructions.
Greater Than Flag
P_GT
Turned ON when the first operand of a Comparison Instruction is
greater than the second or a value exceeds a specified range.
Equals Flag
P_EQ
Turned ON when the two operands of a Comparison Instruction are
equal or the result of a calculation is 0.
CP1E CPU Unit Software User’s Manual(W480)
5-19
5
5 I/O Memory
Name in CXProgrammer
Name
Function
Less Than Flag
P_LT
Turned ON when the first operand of a Comparison Instruction is less
than the second or a value is below a specified range.
Negative Flag
P_N
Turned ON when the most significant bit of a result is ON.
Overflow Flag
P_OF
Turned ON when the result of calculation overflows the capacity of the
result word(s).
Underflow Flag
P_UF
Turned ON when the result of calculation underflows the capacity of
the result word(s).
Greater Than or
Equals Flag
P_GE
Turned ON when the first operand of a Comparison Instruction is
greater than or equal to the second.
Not Equal Flag
P_NE
Turned ON when the two operands of a Comparison Instruction are
not equal.
Less than or Equals
Flag
P_LE
Turned ON when the first operand of a Comparison Instruction is less
than or equal to the second.
Using the Condition Flags
The Condition Flags are shared by all of the instructions. Their status may change after each
instruction execution in a single cycle.
Therefore, be sure to use Condition Flags on a branched output with the same execution condition
immediately after an instruction to reflect the results of instruction execution.
Example: Using Instruction A Execution Results
Instruction A
Instruction
Operand
LD
The result from instruction A
is reflected in the Equals Flag
Condition Flag
Example: =
Instruction A
AND
=
Instruction B
Instruction B
Precautions for Correct Use
The Condition Flags are shared by all of the instructions. This means that program operation can
be changed from its expected course by interruption of a single task. Be sure to consider the
effects of interrupts when writing ladder programs to prevent unexpected operation.
5-20
CP1E CPU Unit Software User’s Manual(W480)
5 I/O Memory
5-10 Clock Pulses
Overview
The Clock Pulses are turned ON and OFF by the CPU Unit’s internal timer. These bits are specified
with symbols rather than addresses.
The CX-Programmer treats condition flags as system-defined symbols (global symbols) beginning with P_.
Notation
P_ 0_02s
5-10 Clock Pulses
Clock pulse name: 0_02s
I/O memory area designator:
P_ (indicates a system symbol name)
Details
The Clock Pulses are read-only; they cannot be written from instructions or from the CX-Programmer.
Clock Pulses
Name
0.02-s Clock Pulse
Name in CXProgrammer
Description
P_0_02s
0.01s
ON for 0.01 s
OFF for 0.01 s
0.01s
0.1-s clock pulse
P_0_1s
0.05s
ON for 0.05 s
OFF for 0.05 s
0.05s
0.2-s clock pulse
P_0_2s
0.1s
ON for 0.1 s
OFF for 0.1 s
0.1s
1-s clock pulse
P_1s
0.5s
ON for 0.5 s
OFF for 0.5 s
30s
ON for 30 s
OFF for 30 s
0.5s
1-min clock pulse
P_1min
30s
CP1E CPU Unit Software User’s Manual(W480)
5-21
5
5 I/O Memory
Using the Clock Pulses
The following example turns a bit ON and OFF at 0.5-s intervals.
P_1s
5-22
100.00
Instruction
LD
OUT
Operand
P_1s
100.00
100.00
0.5s
0.5s
CP1E CPU Unit Software User’s Manual(W480)
I/O Allocation
This section describes I/O allocation used to exchange data between the CP1E CPU
Unit and other units.
Be sure you understand the information in the section before attempting to write ladder
diagrams.
6-1 Allocation of Input Bits and Output Bits . . . . . . . . . . . . . . . . . . . . . . . . . . . 6-2
6-1-1
I/O Allocation . . . . . . . . . . . . . . . . . . . . . . . . . . . . . . . . . . . . . . . . . . . . . . . . . . 6-2
6-1-2
I/O Allocation Concepts . . . . . . . . . . . . . . . . . . . . . . . . . . . . . . . . . . . . . . . . . . 6-3
6-1-3
6-1-4
Allocations on the CPU Unit . . . . . . . . . . . . . . . . . . . . . . . . . . . . . . . . . . . . . . 6-3
Allocations to Expansion Units and Expansion I/O Units . . . . . . . . . . . . . . . . . 6-4
CP1E CPU Unit Software User’s Manual(W480)
6-1
6
6 I/O Allocation
6-1
Allocation of Input Bits and Output
Bits
This section describes the allocation of input bits and output bits.
6-1-1
I/O Allocation
OMRON calls allocating I/O bits in memory “I/O allocation.”
The I/O on Expansion I/O Units are allocated I/O bits in the words following the allocated words to the
built-in I/O on the CPU Units.
Allocated 12 bits
Allocated 12 bits
in the next word
00 to 11
00 to 11
Inputs
Outputs
0CH (CIO 0)
1CH (CIO 1)
CPU Unit
Expansion I/O Unit
100CH (CIO 100)
101CH (CIO 101)
00 to 07
00 to 07
Allocated 8 bits
Allocated 8 bits in
the next word
Bit 03 in CIO 0
Bit 05 in CIO 1
0CH (CIO 0)
Inputs
C
1
0
3
2
5
4
7
1CH (CIO 1)
9
6
8
11
10
C
1
0
CPU Unit
0
Outputs
C
1
C
100CH (CIO 100)
6-2
5
4
7
6
9
8
11
10
Expansion I/O Unit
2
C
3
2
4
3
5
c
7
6
0
C
1
C
2
C
4
3
5
c
7
6
Bit 02 in CIO 101
Bit 03 in CIO 100 101CH
(CIO 101)
CP1E CPU Unit Software User’s Manual(W480)
6 I/O Allocation
6-1-2
I/O Allocation Concepts
The CPU Unit automatically allocates I/O bits to the Expansion I/O Units and Expansion Units, if connected when the power supply is turned ON.
It is not necessary to specify I/O bits allocation.
6-1-3
Allocations on the CPU Unit
The first word from which input bits are allocated is CIO 0. The first word from which output bits are allocated is CIO 100. These cannot be changed.
Words Allocated by the System and the Number of Connected Units
The starting words for inputs and outputs are predetermined for a CP1E CPU Unit. Input bits in CIO 0,
or CIO 0 and CIO 1, and output bits in CIO 100, or CIO 100 and CIO 101, are automatically allocated to
the built-in I/O on the CPU Unit.
The words from which bits are allocated by the system and the number of Expansion I/O Units and
Expansion Units that can be connected are given in the following table.
Allocated words
CPU Unit
Input Bits
Number of Expansion
Units and Expansion I/O
Units connected
Output Bits
CIO 0
CIO 100
0 Unit
CPU Unit with 30
I/O points
CIO 0 and CIO 1
CIO 100 and CIO 101
3 Units
CPU Unit with 40
I/O points
CIO 0 and CIO 1
CIO 100 and CIO 101
3 Units
6
6-1-2 I/O Allocation Concepts
CPU Unit with 20
I/O points
Application Example: CPU Unit with 40 I/O Points
CPU Unit with 40 I/O Points
CIO 0 (CIO 0.00 to CIO 0.11)
CIO 1 (CIO 1.00 to CIO 1.11)
Input Bits
24 inputs
16 outputs
Output Bits
15
Input Bits
CIO 0
CIO 100 (CIO 100.00 to CIO 100.07)
CIO 101 (CIO 101.00 to CIO 101.07)
14
13
12
11
Cannot be used
10
09
08
07
06
05
04
03
02
01
00
Input bits: 24
CIO 1
Output Bits
CIO 100
Cannot be used
Output bits: 16
CIO 101
For a CPU Unit with 40 I/O points, a total of 24 input bits are allocated to the input terminal block. The
bits that are allocated are input bits CIO 0.00 to CIO 0.11 (i.e., bits 00 to 11 in CIO 0) and input bits CIO
1.00 to CIO 1.11 (i.e., bits 00 to 11 in CIO 1).
In addition, a total of 16 output bits are allocated to the output terminal block. The bits that are allocated
are output bits CIO 100.00 to CIO 100.07 (i.e., bits 00 to 07 in CIO 0) and output bits CIO 101.00 to CIO
101.07 (i.e., bits 00 to 07 in CIO 1).
CP1E CPU Unit Software User’s Manual(W480)
6-1 Allocation of Input Bits and Output Bits
Input bits are allocated from CIO 0 and output bits are allocated from CIO 100
6-3
6 I/O Allocation
6-1-4
Allocations to Expansion Units and Expansion I/O Units
Expansion Units and Expansion I/O Units connected to the CPU Unit are automatically allocated input
bits and output bits in words following those allocated to the CPU Unit.
For example, if a CPU Unit with 40 I/O points is used, CIO 0 and CIO 1 are allocated for inputs and CIO
100 and CIO 101 are allocated for outputs. Thus, words from CIO 2 onward for inputs and words from
CIO 102 onward for outputs are automatically allocated to the Expansion I/O Units and Expansion Units
in the order that the Units are connected.
Allocations to Expansion I/O Units
There are Expansion I/O Units for expanding inputs, for expanding outputs, and for expanding both
input and outputs.
I/O bits starting from bit 00 in the next word after the word allocated to the previous Expansion Unit,
Expansion I/O Unit, or CPU Unit are automatically allocated. This word is indicated as “CIO m” for input
words and as “CIO n” for output words.
Input bits
Model
No. of
bits
No. of
words
Output bits
Addresses
No. of
bits
No. of
words
CIO m, bits 00 to 07
−
None
Addresses
8-point Input Unit
CP1W-8ED
8
1
8-point
Relay outputs
Output Unit Sinking transistor
outputs
CP1W-8ER
−
None
None
8
1
CP1W-8ET
CIO n, bits 00
to 07
−
None
None
16
2
CIO n, bits 00
to 07
Sourcing transistor outputs
CP1W-8ET1
16-point
Relay outputs
Output Unit Sinking transistor
outputs
CP1W-16ER
20-point
I/O Units
Sourcing transistor outputs
CP1W-16ET1
Relay outputs
CP1W-20EDR1
Sinking transistor
outputs
CP1W-20EDT
Sourcing transistor outputs
CP1W-20EDT1
32-point
Relay outputs
Output Unit Sinking transistor
outputs
40-point
I/O Unit
6-4
CP1W-16ET
CP1W-32ER
None
CIO n+1, bits
00 to 07
12
1
−
None
CIO m, bits 00 to 11
8
1
CIO n, bits 00
to 07
None
32
4
CIO n, bits 00
to 07
CP1W-32ET
CIO n+1, bits
00 to 07
Sourcing transistor outputs
CP1W-32ET1
Relay outputs
CP1W-40EDR
Sinking transistor
outputs
CP1W-40EDT
Sourcing transistor outputs
CP1W-40EDT1
CIO n+2, bits
00 to 07
CIO n+3, bits
00 to 07
24
2
CIO m, bits 00 to 11
CIO m+1, bits 00 to
11
16
2
CIO n, bits 00
to 07
CIO n+1, bits
00 to 07
CP1E CPU Unit Software User’s Manual(W480)
6 I/O Allocation
I/O Bits Allocation with Expansion I/O Units Connected
Allocation Example: Expansion I/O Unit with 40 I/O Points (CP1W-40ED)
Twenty-four input bits in two words are allocated (bits 00 to 11 in CIO m and bits 00 to 11 CIO m+1).
Sixteen output bits in two words are allocated in two words (bits 00 to 07 in CIO n and bits 00 to 07
in CIO n+1).
Input bits
bit
CIO m
CIO m+1
14
13
12
11
10
09
08
07
06
05
04
03
02
01
00
Cannot be used
CIO n
Cannot be used
CIO n+1
Two input words (24 bits) and two output words (16 bits) are allocated to a 40-point I/O Unit.
Allocation Example: Expansion Input Units and Expansion Output Units
If Expansion Input Units or Expansion Output Units are connected, the input or output word not used
by an Expansion I/O Unit is allocated to the next Unit that requires it.
1st Unit:
8-point Expansion
Input Unit
CPU Unit with 30 I/O Points
Input bits
CIO 0.00 to CIO 0.11
CIO 1.00 to CIO 1.05
8 inputs
CIO 1
CIO 2
8 outputs
No outputs
CIO 102.00 to CIO 102.07
CIO 103.00 to CIO 103.07
14
13
12
11
10
09
08
07
06
05
CIO 104.00 to CIO 104.07
04
03
01
00
CPU Unit with 30 I/O Points
Cannot be used
8-point Expansion Input Unit
20-point Expansion I/O Unit
CIO 3
CIO 100
CPU Unit with
30 I/O Points
CIO 101
Output bits
02
6
6-1-4 Allocations to Expansion Units and Expansion I/O Units
15
12 inputs
16 outputs
CIO 100.00 to CIO 100.07
CIO 101.00 to CIO 101.03
CIO 0
Input bits
CIO 3.00 to CIO 3.11
No inputs
18 inputs
bit
3rd Unit:
20-point Expansion
I/O Unit
CIO 2.00 to CIO 2.07
12 outputs
Output bits
2nd Unit:
16-point Expansion
Output Unit
CIO 102
CIO 103
CIO 104
CP1E CPU Unit Software User’s Manual(W480)
Cannot be used
6-1 Allocation of Input Bits and Output Bits
Output bits
15
16-point Expansion Output Unit
20-point Expansion I/O Unit
6-5
6 I/O Allocation
Allocations for Expansion Units
I/O Word Allocations to Expansion Units
m: Indicates the next input word after the input word allocated to the Expansion Unit, Expansion I/O
Unit, or CPU Unit connected to the left of the current Unit.
n: Indicates the next output word after the output word allocated to the Expansion Unit, Expansion
I/O Unit, or CPU Unit connected to the left of the current Unit.
Name
Input words
Model number
No. of words
Output words
Addresses
No. of words
Analog I/O Unit
CP1W-MAD11
2 words
CIO m and
m+1
Analog Input Unit
CP1W-AD041
4 words
CIO m to m+3 None
Analog Output Unit
CP1W-DA041
None
Temperature Sensor Units
CP1W-TS001
2 words
CIO m and
m+1
None
−
CP1W-TS002
4 words
CIO m to m+3 None
−
CP1W-TS101
2 words
CIO m and
m+1
None
−
CP1W-TS102
4 words
CIO m to m+3 None
−
CP1W-SRT21
1 word
CIO m
CompoBus/S I/O Link Unit
1 word
Addresses
−
CIO n
−
4 words
CIO n to CIO
n+3
1 word
CIO n
I/O Word Allocations to Expansion Units
Allocation Example: CPU Unit with 40 I/O Points + Temperature Senser Unit
(TS002) + Analog Output Unit (DA041) + Expansion I/O Unit with 40 I/O points
Input bits
CPU Unit with 40 I/O Points
1st Unit:
CP1W-TS002
Temperature Sensor Unit
CIO 0.00 to CIO 0.11
CIO 1.00 to CIO 1.11
CIO 2 to CIO 5
24 inputs
Output bits
16 outputs
CIO 100.00 to CIO 100.07
CIO 101.00 to CIO 101.07
bit
CIO 0
15
14
13
12
CIO 6.00 to CIO 6.11
CIO 7.00 to CIO 7.11
None
24 inputs
TS002
DA041
None
CIO 102 to CIO 105
11
Cannot be used
CIO 1
10
3rd Unit:
Expansion I/O Unit with 40
I/O Points
2nd Unit:
CP1W-DA041
Analog Output Unit
09
08
07
06
16 outputs
05
CIO 106.00 to CIO 106.07
CIO 107.00 to CIO 107.07
04
03
02
01
00
CPU Unit with 40 I/O Points
CIO 2
Input bits
CIO 3
Temperature Sensor Unit
CIO 4
CIO 5
CIO 6
Cannot be used
Expansion I/O Unit with 40 I/O Points
CIO 7
CIO 100
Cannot be used
CPU Unit with 40 I/O Points
CIO 101
CIO 102
Output bits
CIO 103
Analog Output Unit
CIO 104
CIO 105
CIO 106
Cannot be used
Expansion I/O Unit with 40 I/O Points
CIO 107
6-6
CP1E CPU Unit Software User’s Manual(W480)
PLC Setup
This section describes the parameters in the PLC Setup, which are used to make basic
settings for the CP1E CPU Unit.
7-1 Overview of the PLC Setup . . . . . . . . . . . . . . . . . . . . . . . . . . . . . . . . . . . . . . 7-2
7-2 PLC Setup Settings . . . . . . . . . . . . . . . . . . . . . . . . . . . . . . . . . . . . . . . . . . . . 7-3
7-2-1
7-2-2
7-2-3
7-2-4
7-2-5
7-2-6
Startup and CPU Unit Settings . . . . . . . . . . . . . . . . . . . . . . . . . . . . . . . . . . . . 7-3
Timing and Interrupt Settings . . . . . . . . . . . . . . . . . . . . . . . . . . . . . . . . . . . . . 7-3
Input Constant Settings . . . . . . . . . . . . . . . . . . . . . . . . . . . . . . . . . . . . . . . . . . 7-4
Built-in RS-232C Port . . . . . . . . . . . . . . . . . . . . . . . . . . . . . . . . . . . . . . . . . . . 7-5
Serial Option Port . . . . . . . . . . . . . . . . . . . . . . . . . . . . . . . . . . . . . . . . . . . . . . 7-8
Built-in Inputs . . . . . . . . . . . . . . . . . . . . . . . . . . . . . . . . . . . . . . . . . . . . . . . . . 7-11
CP1E CPU Unit Software User’s Manual(W480)
7-1
7
7 PLC Setup
7-1
Overview of the PLC Setup
The PLC Setup contains basic CPU Unit software parameter settings that the user can change to customize PLC operation.
These settings can be changed from a CX-Programmer. Change the PLC Setup in the following case.
There is no need to reset, if the default (initial) settings are correct.
The setting from the CX-Programmer are saved to the built-in EEPROM backup memory.
Application
Reading the DM area words saved to the backup memory when
power is turned ON.
Changing the Startup Mode to PROGRAM or MONITOR mode
when debugging.
Detection of low-battery errors is not required when using battery-free operation.
Finding instruction errors when debugging.
A minimum cycle time setting to create a consistent I/O refresh
cycle.
Setting a watch cycle time.
Recording user-defined errors for FAL in the error log is not
required.
Parameter
Startup Data Read
Startup Mode
Detect Low Battery
Stop CPU on Instruction Error
Minimum Cycle Time
Watch Cycle Time
FAL Error Log Registration
Related Auxiliary Area Flags
Name
Word
PLC Setup Error
A402.10
Flag (Non-fatal error)
Description
ON when there is a setting error in the PLC Setup.
Read/write
Read only
Setting Methods for the PLC Setup
Set using the CX-Programmer
CX-Programmer
CP1E CPU Unit
PLC Setup
PLC Setup
7-2
CP1E CPU Unit Software User’s Manual(W480)
7 PLC Setup
7-2
PLC Setup Settings
7-2-1
Startup and CPU Unit Settings
Startup Data Read Setting
Name
1
Clear Held Memory (HR/DM/CNT) to Zero
Default
Do not clear.
Possible settings
Do not clear.
When setting is read by
CPU Unit
When power is turned ON
Clear.
2
Read D0- from backup memory
Do not read.
Do not read.
When power is turned ON
Read.
3
Number of CH of DM for backup
0
E-type CPU Unit: 0 to 1,499
When power is turned ON
N-type CPU Unit: 0 to 6,999
Startup Mode Setting
1
Startup Mode Setting
Default
Run: RUN mode
Possible settings
Program: PROGRAM mode
When setting is read by
CPU Unit
When power is turned ON
Monitor: MONITOR mode
Run: RUN mode
Execute Process Settings
Name
1
Stop CPU on Instruction Error
Default
Do not stop.
Possible settings
Do not stop.
When setting is read by
CPU Unit
At start of operation
7-2 PLC Setup Settings
Name
7
Stop.
Don’t register FAL to error log
Register.
3
Do not detect Low Battery
Do not detect.
Register.
When power is turned ON
7-2-1 Startup and CPU Unit Settings
2
Do not register.
(N-type CPU Unit only)
7-2-2
Do not detect.
Every cycle
Detect.
Timing and Interrupt Settings
Timing and Interrupt Settings
Name
1
Watch Cycle Time
Default
1s
Possible settings
Other than initial setting (any)
When setting is read by
CPU Unit
At start of operation
1ms
:
1,000 ms
2
Constant Cycle Time
No setting (variable)
Setting
At start of operation
1ms
:
1,000 ms
CP1E CPU Unit Software User’s Manual(W480)
7-3
7 PLC Setup
7-2-3
Input Constant Settings
Input Constants
Name
1
0CH: CIO 0
Default
8 ms
Possible settings
No filter (0 ms)
When setting is read by
CPU Unit
When power is turned ON
1 ms
2 ms
4 ms
8 ms
16 ms
32 ms
2
1CH: CIO 1
3
2CH: CIO 2
4
3CH: CIO 3
5
4CH: CIO 4
6
5CH: CIO 5
7
6CH: CIO 6
8
7CH: CIO 7
9
8CH: CIO 8
10
9CH: CIO 9
11
10CH: CIO 10
12
11CH: CIO 11
13
12CH: CIO 12
14
13CH: CIO 13
15
14CH: CIO 14
16
15CH: CIO 15
17
16CH: CIO 16
18
17CH: CIO 17
Same as above.
Same as above.
Same as above.
Note The input constants of CP1W-40EDR/EDT/EDT1 are always 16ms regardless of the settings.
7-4
CP1E CPU Unit Software User’s Manual(W480)
7 PLC Setup
7-2-4
Built-in RS-232C Port
The settings are applicable to the N-type CPU Units.
Since this setting is reflected by power OFF and ON, the PLC Setup and the actual operation settings
may be different. The actual operation settings can be confirmed in words A617/A618.
Communications Settings
Name
1
Communications Settings
Default
Possible settings
Standard (9,600;
1, 7, 2, E)
Standard
(Default settings)
Start bits: 1 bit
When setting is read by
CPU Unit
When power is turned ON
Baud rate: 9,600 bps
Data length: 7 bits
Parity: Even
Stop bits: 2 bits
Host Link
Custom
2
Mode
Host Link
(When custom settings have been selected.)
Host Link
When power is turned ON
7-2 PLC Setup Settings
NT Link (1:N): 1:N NT Links
RS-232C (No-protocol)
PC Link (Slave)
PC Link (Master)
Modbus-RTU Easy Master
2-1
Host Link Settings
2-1-1
Baud
9,600 bps
1,200 bps
When power is turned ON
2,400 bps
4,800 bps
7
9,600 bps
19,200 bps
38,400 bps
7-2-4 Built-in RS-232C Port
57,600 bps
115,200 bps
2-1-2
Format (data length, stop
bits, parity)
7 bits, 2 bits, even
7 bits, 2 bits, even
When power is turned ON
7 bits, 2 bits, odd
7 bits, 2 bits, no parity
7 bits, 1 bit, even
7 bits, 1 bit, odd
7 bits, 1 bit, no parity
8 bits, 2 bits, even
8 bits, 2 bits, odd
8 bits, 2 bits, no parity
8 bits, 1 bit, even
8 bits, 1 bit, odd
8 bits, 1 bit, no parity
2-1-3
Unit Number
0
0
When power is turned ON
:
31
2-2
NT Link (1:N) Settings
2-2-1
Baud
115,200 bps
38,400 bps (standard)
When power is turned ON
115,200 bps (high speed)
2-2-2
No.NT/PC Link Max.
(Highest unit number of PT
that can be connected to
the PLC)
CP1E CPU Unit Software User’s Manual(W480)
1
0
When power is turned ON
:
7
7-5
7 PLC Setup
Name
2
2-3
Default
Possible settings
When setting is read by
CPU Unit
RS-232C (No-protocol) Settings
2-3-1
Baud
9,600 bps
1,200 bps
When power is turned ON
2,400 bps
4,800 bps
9,600 bps
19,200 bps
38,400 bps
57,600 bps
115,200 bps
2-3-2
Format
(data length, stop bits, parity)
7 bits, 2 bits, even
7 bits, 2 bits, even
When power is turned ON
7 bits, 2 bits, odd
7 bits, 2 bits, no parity
7 bits, 1 bit, even
7 bits, 1 bit, odd
7 bits, 1 bit, no parity
8 bits, 2 bits, even
8 bits, 2 bits, odd
8 bits, 2 bits, no parity
8 bits, 1 bit, even
8 bits, 1 bit, odd
8 bits, 1 bit, no parity
2-3-3
Start Code
Disable.
2-3-4
Start Code (setting)
00 Hex
Disable.
When power is turned ON
Set.
00 Hex
When power is turned ON
:
FF hex
2-3-5
End Code
None
(Received Bytes)
Received Bytes (no end code)
256 bytes
256 bytes
When power is turned ON
CR, LF
Set End Code
2-3-6
Received Bytes
(setting)
When power is turned ON
1 byte
:
255 bytes
2-3-7
Set End Code
(setting)
00 Hex
Delay
0 ms
00 Hex
When power is turned ON
:
FF Hex
2-3-8
0 (×10 ms)
When power is turned ON
:
9999 (×10 ms)
2-5
Modbus-RTU Easy Master Settings
2-5-1
Baud
9,600 bps
1,200 bps
When power is turned ON
2,400 bps
4,800 bps
9,600 bps
19,200 bps
38,400 bps
57,600 bps
115,200 bps
7-6
CP1E CPU Unit Software User’s Manual(W480)
7 PLC Setup
Name
2
2-5
2-5-2
Format
(data length, stop bits, parity)
Default
7 bits, 2 bits, even
Possible settings
7 bits, 2 bits, even
When setting is read by
CPU Unit
When power is turned ON
7 bits, 2 bits, odd
7 bits, 2 bits, no parity
7 bits, 1 bit, even
7 bits, 1 bit, odd
7 bits, 1 bit, no parity
8 bits, 2 bits, even
8 bits, 2 bits, odd
8 bits, 2 bits, no parity
8 bits, 1 bit, even
8 bits, 1 bit, odd
8 bits, 1 bit, no parity
2-5-3
Response Timeout
5s
5s
When power is turned ON
1 (×100 ms)
:
255 (×100 ms)
2-6
PC Link (Slave) Settings
2-6-1
Baud
9,600 bps
1,200 bps
When power is turned ON
7-2 PLC Setup Settings
2,400 bps
4,800 bps
9,600 bps
19,200 bps
38,400 bps
57,600 bps
115,200 bps
2-6-2
PLC Link Unit No.
0
0
When power is turned ON
:
7
7
2-7
PC Link (Master) Settings
2-7-1
Baud
9,600 bps
1,200 bps
When power is turned ON
7-2-4 Built-in RS-232C Port
2,400 bps
4,800 bps
9,600 bps
19,200 bps
38,400 bps
57,600 bps
115,200 bps
2-7-2
Link Words
10 Words
1 word
When power is turned ON
:
10 words
2-7-3
PC Link Mode
ALL
ALL
When power is turned ON
Masters
2-7-4
No.NT/PC Link Max.
(Highest unit number of PT
that can be connected to
the PLC)
CP1E CPU Unit Software User’s Manual(W480)
1
0
When power is turned ON
:
7
7-7
7 PLC Setup
7-2-5
Serial Option Port
The setting are applicable to the N-type CPU Units with 30 or 40 I/O Points.
Since this setting is reflected by power OFF and ON, the PLC Setup and the actual operation settings
may be different. The actual operation settings can be confirmed in words A617/A618.
Communications Settings
Name
1
Communications Settings
Default
Standard (9600;
1, 7, 2, E)
(Default settings)
Possible settings
When setting is read by
CPU Unit
When power is turned ON
Standard
Baud rate: 9,600 bps
Start bits: 1 bit
Data length: 7 bits
Parity: Even
Stop bits: 2 bits
Custom
2
Mode
Host Link
Host Link
When power is turned ON
NT Link (1:N): 1:N NT Links
RS-232C (No-protocol)
PC Link (Slave)
PC Link (Master)
Modbus-RTU Easy Master
2-1
Host Link Settings
2-1-1
Baud
9,600 bps
1,200 bps
When power is turned ON
2,400 bps
4,800 bps
9,600 bps
19,200 bps
38,400 bps
57,600 bps
115,200 bps
2-1-2
Format
(data length, stop bits, parity)
7 bits, 2 bits, even
7 bits, 2 bits, even
When power is turned ON
7 bits, 2 bits, odd
7 bits, 2 bits, no parity
7 bits, 1 bit, even
7 bits, 1 bit, odd
7 bits, 1 bit, no parity
8 bits, 2 bits, even
8 bits, 2 bits, odd
8 bits, 2 bits, no parity
8 bits, 1 bit, even
8 bits, 1 bit, odd
8 bits, 1 bit, no parity
2-1-3
Unit Number
0
0
When power is turned ON
:
31
2-2
NT Link (1:N) Settings
2-2-1
Baud
115,200 bps
2-2-2
No. NT/PC Link Max.
(Highest unit number of PT
that can be connected to
the PLC)
1
38,400 bps (standard)
When power is turned ON
115,200 bps (high speed)
7-8
0
When power is turned ON
:
7
CP1E CPU Unit Software User’s Manual(W480)
7 PLC Setup
Name
2
2-3
Default
Possible settings
When setting is read by
CPU Unit
RS-232C (No-protocol) Settings
2-3-1
Baud
9,600 bps
1,200 bps
When power is turned ON
2,400 bps
4,800 bps
9,600 bps
19,200 bps
38,400 bps
57,600 bps
115,200 bps
2-3-2
Format
(data length, stop bits, parity)
7 bits, 2 bits, even
7 bits, 2 bits, even
When power is turned ON
7 bits, 2 bits, odd
7 bits, 2 bits, no parity
7 bits, 1 bit, even
7 bits, 1 bit, odd
7 bits, 1 bit, no parity
8 bits, 2 bits, even
8 bits, 2 bits, odd
8 bits, 2 bits, no parity
7-2 PLC Setup Settings
8 bits, 1 bit, even
8 bits, 1 bit, odd
8 bits, 1 bit, no parity
2-3-3
Start Code
Disable.
Disable.
2-3-4
Start Code
(setting)
00 hex
00 hex
When power is turned ON
Set.
When power is turned ON
:
FF hex
2-3-5
End Code
None
(Received Bytes)
Received Bytes (no end code)
When power is turned ON
7
CR, LF
Set End Code
2-3-6
Received Bytes (setting)
256 bytes
256 bytes
When power is turned ON
7-2-5 Serial Option Port
1 byte
:
255 bytes
2-3-7
Set End Code (setting)
00 hex
00 hex
When power is turned ON
:
FF hex
2-3-8
Delay
0 ms
0 (×10 ms)
When power is turned ON
:
9999 (×10 ms)
2-5
Modbus-RTU Easy Master Settings
2-5-1
Baud
9,600 bps
1,200 bps
When power is turned ON
2,400 bps
4,800 bps
9,600 bps
19,200 bps
38,400 bps
57,600 bps
115,200 bps
CP1E CPU Unit Software User’s Manual(W480)
7-9
7 PLC Setup
Name
2
2-5
2-5-2
Format
(data length, stop bits, parity)
Default
7 bits, 2 bits, even
Possible settings
7 bits, 2 bits, even
When setting is read by
CPU Unit
When power is turned ON
7 bits, 2 bits, odd
7 bits, 2 bits, no parity
7 bits, 1 bit, even
7 bits, 1 bit, odd
7 bits, 1 bit, no parity
8 bits, 2 bits, even
8 bits, 2 bits, odd
8 bits, 2 bits, no parity
8 bits, 1 bit, even
8 bits, 1 bit, odd
8 bits, 1 bit, no parity
2-5-3
Response Timeout
5s
5s
When power is turned ON
1 (×100 ms)
:
255 (×100 ms)
2-6
PC Link (Slave) Settings
2-6-1
Baud
9,600 bps
1,200 bps
When power is turned ON
2,400 bps
4,800 bps
9,600 bps
19,200 bps
38,400 bps
57,600 bps
115,200 bps
2-6-2
PLC Link Unit No.
0
0
When power is turned ON
:
7
2-7
PC Link (Master) Settings
2-7-1
Baud
9,600 bps
1,200 bps
When power is turned ON
2,400 bps
4,800 bps
9,600 bps
19,200 bps
38,400 bps
57,600 bps
115,200 bps
2-7-2
Link Words
10 words
1 word
When power is turned ON
:
10 words
2-7-3
PC Link Mode
ALL
ALL
When power is turned ON
Masters
2-7-4
7-10
No. NT/PC Link Max.
(Highest unit number of PT
that can be connected to
the PLC)
1
0
When power is turned ON
:
7
CP1E CPU Unit Software User’s Manual(W480)
7 PLC Setup
7-2-6
Built-in Inputs
High-speed Counter Settings
Name
1
Use high-speed counter 0
Default
Do not use.
Possible settings
Do not use.
When setting is read by
CPU Unit
When power is turned ON
Use.
1-1
Counting mode
Linear mode
1-1-1
0
Linear mode
At start of operation
Circular mode
Circular Max. Count
0
At start of operation
:
4,294,967,295
1-2
Reset
Note Only a software reset can be
set if an increment pulse
input is set for the input setting.
Z phase, software reset
(stop comparing)
Z phase, software reset (stop
comparing)
When power is turned ON
Software reset
(stop comparing)
Phase Z, software reset (comparing)
Software reset (comparing)
Input Setting
Note Make the same input setting
for high-speed counters 0, 1,
and 2.
Differential phase input
(×4)
Differential phase input (×4)
When power is turned ON
Pulse + direction input
Up/Down pulse input
Increment pulse input
2
Use high-speed counter 1
Do not use.
2-1
Linear mode
Do not use.
When power is turned ON
Use.
Counting mode
Linear mode
At start of operation
7-2 PLC Setup Settings
1-3
Circular mode
2-1-1
Circular Max. Count
0
0
7
At start of operation
:
4,294,967,295
Reset
Note Only a software reset can be
set if an increment pulse
input is set for the input setting.
Z phase, software reset
(stop comparing)
Z phase, software reset (stop
comparing)
When power is turned ON
Software reset
(stop comparing)
Phase Z, software reset (comparing)
Software reset (comparing)
2-3
Input Setting
Note Make the same input setting
for high-speed counters 0, 1,
and 2.
Differential phase input
(×4)
Differential phase input (×4)
When power is turned ON
Pulse + direction input
Up/Down pulse input
Increment Pulse input
3
Use high-speed counter 2
Do not use.
Do not use.
When power is turned ON
Use.
3-1
Counting mode
Linear mode
3-1-1
0
Linear mode
At start of operation
Circular mode
Circular Max. Count
0
At start of operation
:
4,294,967,295
3-2
Reset
Software reset
Software reset
When power is turned ON
Software reset (comparing)
3-3
Input Setting
CP1E CPU Unit Software User’s Manual(W480)
Increment pulse input
Increment pulse input
When power is turned ON
7-11
7-2-6 Built-in Inputs
2-2
7 PLC Setup
Name
4
Use high-speed counter 3
Default
Do not use.
Possible settings
Do not use.
When setting is read by
CPU Unit
When power is turned ON
Use.
4-1
Counting mode
Linear mode
Linear mode
At start of operation
Circular mode
4-1-1
Circular Max. Count
0
0
At start of operation
:
4,294,967,295
4-2
Reset
Software reset
Software reset
When power is turned ON
Software reset (comparing)
4-3
5
Input Setting
Increment pulse input
Use high-speed counter 4
Do not use.
Increment pulse input
When power is turned ON
Do not use.
When power is turned ON
Use.
5-1
Counting mode
Linear mode
Linear mode
At start of operation
Circular mode
5-1-1
Circular Max. Count
0
0
At start of operation
:
4,294,967,295
5-2
Reset
Software reset
Software reset
When power is turned ON
5-3
Input Setting
Increment pulse input
Increment pulse input
When power is turned ON
Do not use.
Do not use.
When power is turned ON
Software reset (comparing)
6
Use high-speed counter 5
Use.
6-1
Counting mode
Linear mode
Linear mode
At start of operation
Circular mode
6-1-1
Circular Max. Count
0
0
At start of operation
:
4,294,967,295
6-2
Reset
Software reset
Software reset
When power is turned ON
Software reset (comparing)
6-3
Input Setting
Increment pulse input
Increment pulse input
When power is turned ON
Interrupt Input Settings
Name
1
IN2: CIO 0.02
Default
Normal
Possible settings
Normal
When setting is read by
CPU Unit
When power is turned ON
Interrupt
Quick
2
IN3: CIO 0.03
Normal
Normal
When power is turned ON
Interrupt
Quick
3
IN4: CIO 0.04
Normal
Normal
When power is turned ON
Interrupt
Quick
4
IN5: CIO 0.05
Normal
Normal
When power is turned ON
Interrupt
Quick
5
IN6: CIO 0.06
Normal
Normal
When power is turned ON
Interrupt
Quick
6
IN7: CIO 0.07
Normal
Normal
When power is turned ON
Interrupt
Quick
7-12
CP1E CPU Unit Software User’s Manual(W480)
Overview of Built-in Functions
and Allocations
This section describes the built-in functions, overall procedure, and allocations for functions of the CP1E.
8-1 Built-in Functions . . . . . . . . . . . . . . . . . . . . . . . . . . . . . . . . . . . . . . . . . . . . . . 8-2
8-2 Overall Procedure for Using CP1E Built-in Functions. . . . . . . . . . . . . . . . . 8-3
8-3 Terminal Allocations for Built-in Functions . . . . . . . . . . . . . . . . . . . . . . . . . 8-4
8-3-1
8-3-2
8-3-3
8-3-4
Specifying the Functions to Use . . . . . . . . . . . . . . . . . . . . . . . . . . . . . . . . . . . .
Selecting Functions in the PLC Setup . . . . . . . . . . . . . . . . . . . . . . . . . . . . . . .
Allocating Built-in Input Terminals. . . . . . . . . . . . . . . . . . . . . . . . . . . . . . . . . . .
Allocating Built-in Output Temrinals . . . . . . . . . . . . . . . . . . . . . . . . . . . . . . . . .
8-4
8-4
8-6
8-7
8
CP1E CPU Unit Software User’s Manual(W480)
8-1
8 Overview of Built-in Functions and Allocations
8-1
Built-in Functions
The following built-in functions are provided by the CP1E E-type and N-type CPU Units.
Type
CP1E Basic Models (E-type CPU Units)
CP1E Application Models (N-type CPU Units)
Quick-response inputs
6 inputs
6 inputs
Section 9
Input interrupts
6 inputs
6 inputs
Section 10
Function
Reference
Appearance
Scheduled interrupts
1 interrupt
1 interrupt
High-speed counter
• Incremental: 10 kHz×6 counters
• Incremental: 100 kHz × 2 counters, 10 kHz×4
counters
• Up/down: 10 kHz×2 counters
• Pulse plus direction: 10 kHz×2 counters
• Differential phases (4×): 5 kHz×2
counters
Section 11
• Up/down: 100 kHz×1 counter, 10 kHz×1
counter
• Pulse plus direction: 100 kHz×2 counters
• Differential phases (4×): 50 kHz×1 counter, 5
kHz×1 counter
communications
Not supported
CPU Units with 20 I/O Points: 1 port
Section 12
CPU Units with 30 or 40 I/O Points: One standard port plus option slot
PID temperature control
Supported
Supported
13-1
Clock functions
Not supported
Supported (While power is supplied.)
13-2
DM backup
Supported
Supported
13-3
Security function
Supported
Supported
13-4
8-2
CP1E CPU Unit Software User’s Manual(W480)
8 Overview of Built-in Functions and Allocations
8-2
Overall Procedure for Using CP1E
Built-in Functions
The overall procedure for using built-in CP1E functions is described in this section.
1
Select the functions to use.
Select Functions
Make the Settings in
the PLC Setup
Set the functions with the applicable numbers
using the CX-Programmer.
Example: Using input interrupt IN3 and highspeed counter 0, parameters in the
PLC Setup must be set for the following functions.
• Input interrupts
• Quick-response
inputs
• High-speed counters
3
Create Ladder Program
Special Instructions
Writing Related
Auxiliary Area Words
Reading Related
Auxiliary Area Words
4
5
6
Transfer PLC Setup
and Ladder Program
Restart the CP1E
Refer to Section 7
PLC Setup and 8-3
Terminal Allocations
for Built-in Functions.
• Origin searches
• Minimum cycle time
• Serial communications
Write ladder diagrams using the CX-Programmer.
Example: Permitting interrupts with the
MSKS instruction and programming high-speed counters with the
CTBL instruction.
8-2 Overall Procedure for Using CP1E Built-in Functions
2
Example: Interrupts, high-speed counter
inputs, and pulse outputs.
Example: Stopping high-speed counters.
Example: Reading the present value of a
high-speed counter.
8
Refer to A-1 Auxiliary Area Allocations by Address.
Transfer the PLC Setup and ladder program
from the CX-Programmer to the CP1E CPU
Unit.
Once turn OFF the power supply to the CP1E
CPU Unit, then turn ON again.
Start the CP1E CPU Unit operation.
Start Operation
CP1E CPU Unit Software User’s Manual(W480)
8-3
8 Overview of Built-in Functions and Allocations
8-3
8-3-1
Terminal Allocations for Built-in
Functions
Specifying the Functions to Use
A CP1E CPU Unit uses the same built-in I/O terminals for different functions. Allocate the I/O terminals
in advance, making sure that each terminal is used for only one function.
Specify the input functions in the PLC Setup from the CX-Programmer, and specify the output functions
in PLC Setup and programming instructions.
8-3-2
Selecting Functions in the PLC Setup
Functions are enabled by setting parameters in the PLC Setup. Set the functions so that no more than
one function uses the same terminal. Select function numbers so that high-speed counter inputs and
inputs for other functions, such as interrupt inputs, quick-response inputs, and origin inputs do no conflict with each other.
• Input functions can be selected by selecting the Use high speed counter Check Box in a Highspeed Counter Area on the Built-in Input Tab Page or by setting an input to Interrupt or Quick in the
Interrupt Input Area of the same page.
Select the Use high speed
counter Check Box for a Highspeed Counter
8-4
CP1E CPU Unit Software User’s Manual(W480)
8 Overview of Built-in Functions and Allocations
• The input and output terminals used by the origin search function can be enabled by selecting the
Use define origin operation Check Box on a Pulse Output Tab Page.
Select the Use define origin
operation Check Box.
8-3 Terminal Allocations for Built-in Functions
8
8-3-2 Selecting Functions in the
PLC Setup
CP1E CPU Unit Software User’s Manual(W480)
8-5
8 Overview of Built-in Functions and Allocations
8-3-3
Allocating Built-in Input Terminals
Allocating Functions to Built-in Input Terminals
Input terminals are allocated functions by setting parameters in the PLC Setup. Set the PLC Setup so
that each terminal is used for only one function.
PLC Setup
Terminal
block
label
CIO 0
Terminal
number
00
Interrupt input settings on Built-in Input Tab
Page
Normal
Interrupt
Normal input
Interrupt
inputs
−
Normal input 0
Quick
Quickresponse
inputs
−
High-speed counter 0 to 3 settings on Builtin Input Tab Page
Use
Differential
phase ×4 or
up/down
Increment
pulse input
Counter 0,
Counter 0,
increment input phase A or up
Pulse/direction
Origin search settings on Pulse
Output 0/1 Tab
Page
Use
Origin search
−
Counter 0,
pulse input
input
01
−
Normal input 1
−
Counter 1,
Counter 0,
Counter 1,
increment input phase B or
pulse input
−
down input
02
Normal input 2
Interrupt
Quick-
Counter 2,
input 2
response
increment input phase A or up
Counter 1,
input 2
03
04
Normal input 3
Normal input 4
Normal input 5
Counter 1,
Counter 1,
input 3
response
phase B or
direction
input 3
down input
Quick-
input 4
response
Interrupt
Quick-
input 5
response
input 5
06
Normal input 6
Interrupt i
Quick-
nput 6
response
input 6
07
Normal input 7
input
−
Quick-
input 4
05
direction
Interrupt
Interrupt
Interrupt
Quick-
input 7
response
−
Counter 0,
Counter 3,
increment input
Counter 4,
increment input
Counter 0,
Counter 0,
phase Z or
reset input
Counter 1,
Counter 1,
phase Z or
reset input
−
reset input
−
Pulse 0: Origin input
signal
increment input
−
−
reset input
−
Counter 5,
−
−
−
Pulse 1: Origin input
signal
input 7
08
Normal input 8
−
−
−
−
−
09
Normal input 9
−
−
−
−
−
−
10
Normal input 10
−
−
−
−
−
11
Normal input 11
−
−
−
−
−
00
Normal input 12
−
−
−
−
−
−
01
Normal input 13
−
−
−
−
−
−
02
Normal input 14
−
−
−
−
−
−
03
Normal input 15
−
−
−
−
−
−
04
Normal input 16
−
−
−
−
−
−
05
Normal input 17
−
−
−
−
−
−
06
Normal input 18
−
−
−
−
−
−
07
Normal input 19
−
−
−
−
−
−
08
Normal input 20
−
−
−
−
−
−
09
Normal input 21
−
−
−
−
−
−
10
Normal input 22
−
−
−
−
−
−
11
Normal input 23
−
−
−
−
−
−
−
Pulse 0, Origin
proximity input signal
Pulse 1, Origin
proximity input signal
CIO 1
Note 1 The same pulse inputs must be used for high-speed counter 0 and high-speed counter 1.
2 High-speed counter 2 cannot be used if the input setting of high-speed counter 0 or high-speed counter 1
is set for differential phase inputs (4×), pulse + direction inputs, or up/down pulse inputs.
8-6
CP1E CPU Unit Software User’s Manual(W480)
8 Overview of Built-in Functions and Allocations
Prohibiting Repeated Use of Input Terminal Number
The input terminals 00 to 11 of CIO 0 are used for input interrupts, quick-response inputs, high-speed
counters, origin searches and normal inputs. Therefore, do not use the input terminals repeatedly. For
example, if quick-response input 2 is used, then input terminal 02 is occupied, so it cannot be used for
normal input 2, input interrupt 2, quick-response input 2, counter 2 (increment), counter 1 (phaseA/increment) or counter 0 (direction).
8-3-4
Allocating Built-in Output Temrinals
Allocating Functions to Built-in Output Terminals
Output terminals are allocated functions by setting parameters in the PLC Setup. Set the PLC Setup so
that each terminal is used for only one function.
Terminal
block label
Terminal
number
Other than those
shown at the right
When a pulse output instruction (SPED, ACC, PLS2, or
ORG) is executed
PLC Setup
Origin search settings on
Pulse Output 0/1 Tab Page
CIO 100
Variable-duty-factor output
Fixed duty ratio pulse output
Normal outputs
Pulse + Direction Mode
When the PWM
instruction is executed
Use
00
Normal output 0
Pulse output 0, pulse
−
01
Normal output 1
Pulse output 1, pulse
−
PWM output
−
PWM output 0
02
Normal output 2
Pulse output 0, direction
−
−
03
Normal output 3
Pulse output 1, direction
−
−
04
Normal output 4
−
Pulse 0, Error counter reset
−
output
05
Normal output 5
−
Pulse 1, Error counter reset
−
output
CIO 101
06
Normal output 6
−
−
−
07
Normal output 7
−
−
−
00
Normal output 8
−
−
−
01
Normal output 9
−
−
−
02
Normal output 10
−
−
−
03
Normal output 11
−
−
−
Normal output 12
−
−
−
Normal output 13
−
−
−
06
Normal output 14
−
−
−
07
Normal output 15
−
−
−
8
Prohibiting Repeated Use of Output Terminal Number
The output terminals 00 to 07 of CIO 100 are used for pulse outputs, PWM outputs and normal outputs.
Therefore, do not use the output terminals repeatedly. For example, if pulse output 0 (direction) is used,
then output terminal 02 is occupied, so it cannot be used for normal output 2.
CP1E CPU Unit Software User’s Manual(W480)
8-7
8-3-4 Allocating Built-in Output
Temrinals
04
05
8-3 Terminal Allocations for Built-in Functions
Output terminal block
8 Overview of Built-in Functions and Allocations
8-8
CP1E CPU Unit Software User’s Manual(W480)
Quick-response Inputs
This section describes the quick-response inputs that can be used to read signals that
are shorter than the cycle time.
9-1 Quick-response Inputs . . . . . . . . . . . . . . . . . . . . . . . . . . . . . . . . . . . . . . . . . . 9-2
9-1-1
Overview. . . . . . . . . . . . . . . . . . . . . . . . . . . . . . . . . . . . . . . . . . . . . . . . . . . . . . 9-2
9-1-2
Flow of Operation . . . . . . . . . . . . . . . . . . . . . . . . . . . . . . . . . . . . . . . . . . . . . . . 9-3
9
CP1E CPU Unit Software User’s Manual(W480)
9-1
9 Quick-response Inputs
9-1
Quick-response Inputs
Quick-response inputs can be used with any model of CP1E CPU Unit.
9-1-1
Overview
The quick-response inputs can read pulses with an ON time as short as 50 µs even if they are shorter
than the cycle time. Use the quick-response inputs to read signals shorter than the cycle time, such as
inputs from photomicrosensors.
Pulse signal from photomicrosensor
or other device
I/O refresh
Cycle time
Built-in input
Input bit
Input bit
ON for one scan
in the next cycle
Cyclic tasks
(ladder programs)
Cycle time
Can read ON signals
shorter than this time.
END
I/O refresh
The pulse widths of quick-response input signals must meet the following conditions.
50μs min. 50μs min.
9-2
CP1E CPU Unit Software User’s Manual(W480)
9 Quick-response Inputs
9-1-2
Flow of Operation
1
• Set IN2 to IN7 for quick-response inputs on the Built-in
Input Tab Page of the PLC Setup using the CX-Programmer.
• The terminals 02 to 07 of CIO 0 can be used for quickresponse inputs. Bits CIO 0.02 to CIO 0.07 correspond to
terminals 02 to 07.
PLC Setup
2
Create ladder
program
Cyclic task or
interrupt task
Read the status of CIO 0.02 to CIO 0.07 using the LD
instruction or other instructions.
Precautions for Correct Use
A built-in input cannot be used as a quick-response input if it is being used as a normal input,
interrupt input, or high-speed counter input. Refer to 8-3-3 Allocating Built-in Input Terminals for
details.
PLC Setup
Click the Built-in Input Tab and select Quick in the interrupt input settings.
9-1 Quick-response Inputs
9
9-1-2 Flow of Operation
Select Quick
Built-in Input Tab Page
Quick-response input setting
IN2
IN3
Select Quick for IN2
to IN7.
Corresponding bit address
CIO 0.02
CIO 0.03
IN4
CIO 0.04
IN5
CIO 0.05
IN6
CIO 0.06
IN7
CIO 0.07
Note The power supply must be restarted after the PLC Setup is transferred in order to validate the quickresponse input settings.
CP1E CPU Unit Software User’s Manual(W480)
9-3
9 Quick-response Inputs
Quick-response Input Terminal
The following terminals can be used for quick-response inputs.
Input Terminal Block on CPU Unit with 20 I/O Points
Quick-response input IN5: CIO 0.05
Quick-response input IN7: CIO 0.07
Quick-response input IN3: CIO 0.03
Upper Terminal Block
L1 L2/N COM 01
NC
00
03
02
05
04
07
06
09
08
11
10
CIO 0
DC Power Supply
+
-
COM
NC
Quick-response input IN2: CIO 0.02
Quick-response input IN6: CIO 0.06
Quick-response input IN4: CIO 0.04
Creating Ladder Programs
Pulse inputs shorter than the cycle time can be read in the CPU Unit I/O memory using normal instructions. Simply set the interrupt setting for the required input to Quick in the PLC Setup.
The status of CIO 0.02 to CIO 0.07 can be read using instructions such as the LD instruction.
Example: Setting IN2 to Quick in the PLC Setup Interrupt Settings.
Even if the signal that is input to terminal 02 on terminal block
0CH is shorter than the cycle time, the signal will be latched in
one cycle and the status will be stored in CIO 0.02.
0.02
• The minimum pulse width (ON time) that can be read for a quick-response input is 50 µs.
• The status of the input that is stored in the I/O memory for a short input will be cleared during the next
I/O refresh period.
9-4
CP1E CPU Unit Software User’s Manual(W480)
Interrupts
This section describes the interrupts that can be used with CP1E PLCs, including input
interrupts and scheduled interrupts.
10-1 Interrupts . . . . . . . . . . . . . . . . . . . . . . . . . . . . . . . . . . . . . . . . . . . . . . . . . . . 10-2
10-1-1
Overview . . . . . . . . . . . . . . . . . . . . . . . . . . . . . . . . . . . . . . . . . . . . . . . . . . . . 10-2
10-2 Input Interrupts . . . . . . . . . . . . . . . . . . . . . . . . . . . . . . . . . . . . . . . . . . . . . . . 10-3
10-2-1
Overview . . . . . . . . . . . . . . . . . . . . . . . . . . . . . . . . . . . . . . . . . . . . . . . . . . . . 10-3
10-2-2
Flow of Operation . . . . . . . . . . . . . . . . . . . . . . . . . . . . . . . . . . . . . . . . . . . . . 10-4
10-2-3
Application Example . . . . . . . . . . . . . . . . . . . . . . . . . . . . . . . . . . . . . . . . . . . 10-7
10-3 Scheduled Interrupts . . . . . . . . . . . . . . . . . . . . . . . . . . . . . . . . . . . . . . . . . 10-10
10-3-1
Overview . . . . . . . . . . . . . . . . . . . . . . . . . . . . . . . . . . . . . . . . . . . . . . . . . . . 10-10
10-3-2
Flow of Operation . . . . . . . . . . . . . . . . . . . . . . . . . . . . . . . . . . . . . . . . . . . . 10-11
10-4 Precautions for Using Interrupts . . . . . . . . . . . . . . . . . . . . . . . . . . . . . . . 10-13
10-4-1
Interrupt Task Priority and Order of Execution . . . . . . . . . . . . . . . . . . . . . . . 10-13
10-4-2
10-4-3
Related Auxiliary Area Words and Bits . . . . . . . . . . . . . . . . . . . . . . . . . . . . 10-13
Duplicate Processing in each Task . . . . . . . . . . . . . . . . . . . . . . . . . . . . . . . 10-13
10
CP1E CPU Unit Software User’s Manual(W480)
10-1
10 Interrupts
10-1 Interrupts
10-1-1 Overview
CP1E CPU Units normally repeat processes in the following order: overseeing processes, program execution, I/O refreshing, peripheral servicing. During the program execution stage, cyclic tasks (ladder
programs) are executed.
The interrupt function, on the other hand, allows a specified condition to interrupt a cycle and execute a
specified program.
Interrupts can thus be used to perform high-speed processing that is not restricted by the cycle time.
The CP1E performs the following processing when an interrupt occurs.
(1)When an interrupt occurs, execution of the ladder programs in cyclic tasks is interrupted.
(2)The ladder program in the interrupt task is executed.
(3)When the interrupt task is finished, the ladder program that was being executed is returned to.
(2)Interrupt task executed
Cyclic tasks
(ladder programs)
(1)Interrupt occurs
Ladder program
END
Cycle
END
I/O refreshing
(3)When the interrupt task is finished,
the ladder diagram that was being
executed is returned to.
Interrupt Factors and Types of Interrupts
Interrupts are classified by the interrupt factor. There are the following three types of interrupts.
• Changes in status of built-in inputs on the CPU Unit → Input Interrupts in Page 10-3
10-2
• Specified intervals measured by internal timers
→ Scheduled Interrupts in Page 10-10
• PVs of high-speed counter
→ High-speed Counter Interrupts in Page 11-12
CP1E CPU Unit Software User’s Manual(W480)
10 Interrupts
10-2 Input Interrupts
Input interrupts can be used with any model of CP1E CPU Unit.
10-2-1 Overview
A corresponding interrupt task can be executed when a built-in input on the CPU Unit turns ON or turns
OFF.
Interrupt input
Built-in input
Interrupt input bit turns ON or OFF
Cyclic tasks
(ladder programs)
Interrupt task
Interrupt occurs
Ladder program
Cycle
END
END
I/O refreshing
Example: CIO 0.02
(interrupt input IN2)
MSKS instruction
executed to enable
the interrupt
Cyclic task execution
Processing
interrupted
Interrupt task
2 executed
Cyclic task execution
10-2 Input Interrupts
Condition for
accepting interrupt
Processing
interrupted
10
Interrupt task
2 executed
10-2-1 Overview
The pulse widths of interrupt input signals must meet the following conditions.
50μs min.50μs min.
CP1E CPU Unit Software User’s Manual(W480)
10-3
10 Interrupts
10-2-2 Flow of Operation
1
PLC Setup
2
Interrupt task
Create
ladder
program
Execute MSKS
instruction in a
cyclic task
• Set IN2 to IN7 for interrupt inputs on the Built-in Input
Tab Page of the PLC Setup using the CX-Programmer.
• Terminals 02 to 07 on the CIO 0 terminal block can be
used for interrupt inputs. Bits CIO 0.02 to CIO 0.07 correspond to terminals 02 to 07.
Write the program in the interrupt task. Interrupt tasks 2 to
7 correspond to interrupt inputs 2 to 7.
• Specify whether the interrupt is executed when the input
turns ON or when it turns OFF in the MSKS instruction.
Set N to 112 to 117 in the MSKS instruction.
• Enable input interrupts in the MSKS instruction. Set N to
102 to 107 in the MSKS instruction.
Precautions for Correct Use
A built-in input cannot be used as a normal input, high-speed counter input, or quick-response
input if it is being used as an interrupt input. Refer to 8-3-3 Allocating Built-in Input Terminals for
details.
PLC Setup
Click the Built-in Input Tab and select Interrupt in the interrupt intput settings.
Select Interrupt
10-4
CP1E CPU Unit Software User’s Manual(W480)
10 Interrupts
Built-in Input Tab Page
Interrupt input settings
IN2
Corresponding
bit address
Scheduled
interrupt task
Select Interrupt for
IN2 to IN7.
CIO 0.02
2
CIO 0.03
3
IN4
CIO 0.04
4
IN5
CIO 0.05
5
IN6
CIO 0.06
6
IN7
CIO 0.07
7
IN3
Note The power supply must be restarted after the PLC Setup is transferred in order to enable the interrupt input
settings.
Assigning Interrupt Input Terminals
The following input terminals can be used for interrupt inputs. These terminals correspond to CIO 0.02
to CIO 0.07 in I/O memory.
Input Terminal Block on CPU Unit with 20 I/O Points
Interrupt input IN5: CIO 0.05
Interrupt input IN7: CIO 0.07
Interrupt input IN3: CIO 0.03
Upper Terminal Block
L1 L2/N COM 01
03
05
07
09
11
DC Power Supply
+
-
NC
COM
00
02
04
06
08
10
CIO 0
NC
Interrupt input IN2: CIO 0.02
Interrupt input IN6: CIO 0.06
Interrupt input IN4: CIO 0.04
Writing the Interrupt Task’s Ladder Program
Create ladder programs for interrupt tasks 2 to 7, which are executed for the corresponding interrupt
inputs. Right-click a program in the CX-Programmer and select Properties. Select interrupt tasks 2
to 7 in the Task Type Field of the Program Properties Dialog Box.
10-2 Input Interrupts
Writing the Ladder Program
10
10-2-2 Flow of Operation
CP1E CPU Unit Software User’s Manual(W480)
10-5
10 Interrupts
Execute MSKS Instruction in a Cyclic Task
Execute the MSKS instruction from the ladder program in a cyclic task to use input interrupts.
MSKS has the following two functions and two of this instruction are normally used in combination.
(1)Specifying whether to detect ON or OFF signals.
(2)Enabling input interrupts.
Execution condition
@MSKS
N
C
(1)Specifies creating an interrupt when
the input turns OFF or when it turns
ON.
@MSKS
N
C
(2)Enables input interrupts.
The MSKS instruction must be executed only once to make the settings, so in general execute
MSKS in just one cycle using the upwardly differentiated variation of the instruction.
The first MSKS instruction can be omitted. If it is omitted, an interrupt will be created when the input
turns ON by default.
Specifying MSKS Operands (N and C)
(1)Specifying to Detect ON or OFF Input Signals
Terminal
Corresponding bit address
PLC Setup on
Built-in Input
Tab Page
Interrupt
task
number
Operand N
Operand C
Interrupt identifier
Specifying to
detect ON or OFF
02 on CIO 0 terminal block
CIO 0.02
Interrupt input
IN2
2
112
#0000:
03 on CIO 0 terminal block
CIO 0.03
Interrupt input
IN3
3
113
04 on CIO 0 terminal block
CIO 0.04
Interrupt input
IN4
4
114
05 on CIO 0 terminal block
CIO 0.05
Interrupt input
IN5
5
115
06 on CIO 0 terminal block
CIO 0.06
Interrupt input
IN6
6
116
07 on CIO 0 terminal block
CIO 0.07
Interrupt input
IN7
7
117
Interrupt
task
number
Operand N
Operand C
Interrupt identifier
Enable/Disable
Detect ON
#0001:
Detect OFF
(2)Enabling the Input Interrupt
Terminal
10-6
Corresponding bit address
PLC Setup on
Built-in Input
Tab
02 on CIO 0 terminal block
CIO 0.02
Interrupt input
IN2
2
102
03 on CIO 0 terminal block
CIO 0.03
Interrupt input
IN3
3
103
04 on CIO 0 terminal block
CIO 0.04
Interrupt input
IN4
4
104
05 on CIO 0 terminal block
CIO 0.05
Interrupt input
IN5
5
105
06 on CIO 0 terminal block
CIO 0.06
Interrupt input
IN6
6
106
07 on CIO 0 terminal block
CIO 0.07
Interrupt input
IN7
7
107
#0000:
Enable interrupt
#0001:
Disable interrupt
CP1E CPU Unit Software User’s Manual(W480)
10 Interrupts
• Example
(1)Specifying Detecting ON or OFF Input Signals
For interrupt input IN2: Specify 112.
Specifies an interrupt when the input turns ON.
Cyclic task
MSKS
112
#0000
(2)Enabling Input Interrupt
CIO 0.02 turns ON
For interrupt input IN2: Specify 102.
Enables Input interrupt.
Built-in input terminal
The specified input interrupt (here, IN2) is
01 03 05 07 09 11
enabled when the MSKS instruction is executed.
00 02 04 06 08 10
MSKS
102
#0000
CIO 0
Interrupt
Interrupt task 2
END
END
10-2-3 Application Example
In this example, bent parts are detected in a moving workpiece, such as an IC component. When the
sensor input (terminal 02 on terminal block 0CH = CIO 0.02) changes from OFF to ON, the interrupt
task is executed.
Sensor input (interrupt)
Workpiece
Sensor input 1
Sensor input 2
Interrupt task
execution
Interrupt task
execution
Interrupt task
execution
Sensor input
CIO 0.00
Sensor input
CIO 0.01
10-2 Input Interrupts
Sensor input 3
Sensor input (interrupt input 2)
CIO 0.02
Sensor input
CIO 0.03
Reset input
CIO 0.04
OK output
CIO 100.00
NG output 1
CIO 100.01
NG output 2
CIO 100.02
10
NG output 3
CIO 100.03
NG output 4
CIO 100.04
10-2-3 Application Example
CP1E CPU Unit Software User’s Manual(W480)
10-7
10 Interrupts
1
PLC Setup
Set IN2 to Interrupt in the interrupt input settings on the Built-in Input Tab Page.
2
Connecting Interrupt Input Terminals
Terminal 2 on terminal block 0CH is interrupt input IN2.
Interrupt task 2 corresponds to interrupt input 2.
Sensor input 3: CIO 0.03
Sensor input 2: CIO 0.01
Sensor input 1: CIO 0.00
OK output: CIO 100.00
NG output 1: CIO 100.01
10-8
Interrupt input (sensor input):
CIO 0.02
Reset input: CIO 0.04
NG output 2: CIO 100.04
NG output 3: CIO 100.03
NG output 4: CIO 100.02
CP1E CPU Unit Software User’s Manual(W480)
10 Interrupts
Programming Example
Cyclic Task
Interrupt input 2
Specifies executing
interrupt when input
turns ON.
The MSKS instruction is used
to specify an interrupt when the
input turns ON and then it is
used to unmask the input
interrupt.
Interrupt input 2
Unmasks the input
interrupt.
NG output sensor input 1
NG output sensor input 2
NG output sensor input 3
0.04
Reset input
10-2 Input Interrupts
Interrupt Task 2
10
10-2-3 Application Example
OK output
Sensor input 1
Sensor input 2
Sensor input 1
Sensor input 2
Sensor input 3
CP1E CPU Unit Software User’s Manual(W480)
Sensor input 3
NG output 2
Sensor input 1
NG output 3
Sensor input 2
NG output 4
Sensor input 3
10-9
10 Interrupts
10-3 Scheduled Interrupts
Scheduled interrupts can be used with any model of CP1E CPU Unit.
10-3-1 Overview
Scheduled interrupts can be used to execute interrupt tasks at fixed time intervals measured by the
CPU Unit’s internal timer.
Minimum interval: 1 ms
Specified interval
Interrupt task
Cyclic tasks
(ladder programs)
Ladder program
Interrupt occurs
Cycle
END
END
I/O refresh
Condition for
accepting interrupts
MSKS instruction executed Scheduled Interrupt Interval =
to set the scheduled
0.5 ms (example)
interrupt interval
Internal timer
1ms
Cyclic task execution
1ms
Execution
interrupted
Executing
scheduled
interrupt
task 1
10-10
Cyclic task
execution
1ms
Execution
interrupted
Executing
scheduled
interrupt
task 1
Cyclic task
execution
Execution
interrupted
Executing
scheduled
interrupt
task 1
CP1E CPU Unit Software User’s Manual(W480)
10 Interrupts
10-3-2 Flow of Operation
Create
ladder
program
Interrupt task
Write the program for the corresponding interrupt task 1 (fixed).
Execute MSKS
instruction in a cyclic
task
Use MSKS to specify the scheduled interrupt interval.
The setting can be 1 ms or longer.
Set N to 4 or 14 in the MSKS instruction.
Writing the Ladder Program
Writing the Interrupt Task Program
Create the program for interrupt task 1, which is executed for the scheduled interrupt. Right-click a
program in the CX-Programmer and select Properties. Select Interrupt Tasks 01 (scheduled interrupt) in Task Type Field of the Program Properties Dialog Box.
10-3 Scheduled Interrupts
Execute MSKS in a Cyclic Task
The MSKS instruction must be executed from the ladder program in a cyclic task in order to use
scheduled interrupts.
10
Execution condition
Specifies scheduled interrupt (interrupt task 1)
Sets the scheduled interrupt interval and starts timing
The MSKS instruction must be executed only once to make the settings, so in general execute
MSKS in just one cycle using the upwardly differentiated variation of the instruction.
CP1E CPU Unit Software User’s Manual(W480)
10-11
10-3-2 Flow of Operation
@MSKS
N
C
10 Interrupts
Specifying MSKS Operands (N and C)
MSKS Operands
MSKS Operands
N
C
Interrupt number
Scheduled interrupt interval
Scheduled interrupt (interrupt
task 1)*
14: Reset and restart
4: Reset and restart
0 decimal: Disable interrupt (stop internal timer)
10 to 9,999 decimal:Enable interrupt (Reset internal timer
and then start timer with interrupt interval between 1.0
and 999.9 ms)
* Either is reset.
Example
Scheduled Interrupt Time Unit
Scheduled interrupt
Cyclic tasks
1 ms
MSKS
4
&10
In intervals of 1 ms
Interrupt
Interrupt task 1
END
END
Precautions for Correct Use
• Set a scheduled interrupt interval is longer than the time required to execute the corresponding interrupt task.
• If you shorten the scheduled interrupt interval and increase the execution frequency of the
scheduled interrupt task, the cycle time will increase, and this will affect the execution timing of
cyclic tasks.
• If an interrupt task is being executed for another interrupt (input interrupt or high-speed
counter interrupt) when the scheduled interrupt occurs, the scheduled interrupt will not be executed until the other interrupt task had been completed.
Even in this case, measurement of internal timer is continually executed in parallel, so the execution of scheduled interrupt tasks will not be delayed.
• Scheduled interrupt interval cannot be changed during the startup of scheduled interrupt.
Change the interval after the scheduled interrupt has stopped.
10-12
CP1E CPU Unit Software User’s Manual(W480)
10 Interrupts
10-4 Precautions for Using Interrupts
10-4-1 Interrupt Task Priority and Order of Execution
The priority of interrupt tasks is the same order for input interrupts, scheduled interrupts and high-speed
counter interrupts. Therefore, if interrupt task A (an input interrupt, for example) is being executed when
interrupt task B (a scheduled interrupt, for example) occurs, task A execution will not be interrupted.
Task B execution will be started when task A had been completed.
For example, if an interrupt task is being executed for another interrupt (input interrupt or high-speed
counter interrupt) when a scheduled interrupt occurs, the scheduled interrupt will not be executed until
execution of the other interrupt task had been completed. Even in this case, internal timer is continually
measured in parallel, so the execution of the scheduled interrupt task will not be delayed.
10-4-2 Related Auxiliary Area Words and Bits
When the processing time of an interrupt task exceeds 0.1ms, the processing time of the interrupt task
and the task number of the interrupt with the maximum processing time can be found in the Auxiliary
Area. The actual processing time can also be checked.
Name
Addresses
Description
A440
Contains the maximum interrupt task processing time in units of 0.1 ms.
This value is cleared at the start of operation.
Interrupt Task
With Maximum
Processing Time
A441
Contains the task number of the interrupt task with the maximum processing
time. Here, #8000 to #80FF correspond to tasks 0 to 15 (00 to FF hex).
A441.15 will turn ON when the first interrupt occurs after the start of operation.
The maximum processing time for subsequent interrupt tasks will be stored in
the rightmost digit in hexadecimal. This value is cleared at the start of operation.
10-4-3 Duplicate Processing in each Task
Observe the following precautions, if a word address in I/O memory is manipulated by instructions both
in a cyclic task and an interrupt task.
• If the interrupt task overwrites an I/O memory address used by one of the interrupted instruction’s
operands, the data may be overwritten when the saved data is restored when processing returns to
the cyclic task.
Additional Information
Normally, if an interrupt occurs, execution of the cyclic task will be interrupted immediately, even
during execution of an instruction in the cyclic task, and the partially processed data is saved.
After the interrupt task had been completed, the cyclic task restarts with the data saved before
the interrupt processing.
CP1E CPU Unit Software User’s Manual(W480)
10-13
10
10-4-1 Interrupt Task Priority and
Order of Execution
• To prevent certain instructions from being interrupted during processing, insert the DI or EI instruction
just before and after the instructions, using the DI or EI instruction before the instructions to disable
interrupts and the DI or EI instruction after the instructions to enable interrupts again.
10-4 Precautions for Using Interrupts
Maximum
Interrupt Task
Processing Time
10 Interrupts
10-14
CP1E CPU Unit Software User’s Manual(W480)
11
High-speed Counters
This section describes the high-speed counter inputs, high-speed counter interrupts,
and the frequency measurement function.
11-1 Overview . . . . . . . . . . . . . . . . . . . . . . . . . . . . . . . . . . . . . . . . . . . . . . . . . . . . 11-2
11-1-1
Overview . . . . . . . . . . . . . . . . . . . . . . . . . . . . . . . . . . . . . . . . . . . . . . . . . . . . 11-2
11-1-2
Flow of Operation . . . . . . . . . . . . . . . . . . . . . . . . . . . . . . . . . . . . . . . . . . . . . 11-3
11-1-3
Specifications . . . . . . . . . . . . . . . . . . . . . . . . . . . . . . . . . . . . . . . . . . . . . . . . . 11-6
11-2 High-speed Counter Inputs . . . . . . . . . . . . . . . . . . . . . . . . . . . . . . . . . . . . . 11-7
11-2-1
11-2-2
Pulse Input Methods Settings . . . . . . . . . . . . . . . . . . . . . . . . . . . . . . . . . . . . 11-7
Counting Ranges Settings . . . . . . . . . . . . . . . . . . . . . . . . . . . . . . . . . . . . . . . 11-8
11-2-3
Reset Methods . . . . . . . . . . . . . . . . . . . . . . . . . . . . . . . . . . . . . . . . . . . . . . . . 11-9
11-2-4
Reading the Present Value . . . . . . . . . . . . . . . . . . . . . . . . . . . . . . . . . . . . . 11-10
11-2-5
Frequency Measurement . . . . . . . . . . . . . . . . . . . . . . . . . . . . . . . . . . . . . . . 11-11
11-3 High-speed Counter Interrupts . . . . . . . . . . . . . . . . . . . . . . . . . . . . . . . . . 11-12
11-3-1
11-3-2
Overview . . . . . . . . . . . . . . . . . . . . . . . . . . . . . . . . . . . . . . . . . . . . . . . . . . . 11-12
Present Value Comparison . . . . . . . . . . . . . . . . . . . . . . . . . . . . . . . . . . . . . 11-15
11-3-3
High-speed Counter Interrupt Instruction . . . . . . . . . . . . . . . . . . . . . . . . . . 11-18
11-4 Related Auxiliary Area Bits and Words . . . . . . . . . . . . . . . . . . . . . . . . . . 11-23
11-5 Application Example . . . . . . . . . . . . . . . . . . . . . . . . . . . . . . . . . . . . . . . . . 11-24
CP1E CPU Unit Software User’s Manual(W480)
11-1
11 High-speed Counters
11-1 Overview
High-speed counters can be used with any model of CP1E CPU Unit.
11-1-1 Overview
High-speed counters are used to measure high-speed pulse input signals that cannot be measured by
counter (CNT) instructions.
Applications
• Detecting the position or length of a workpiece with an input from an incremental rotary encoder.
• Measuring the speed of a workpiece from its position data using frequency measurement and
rotational speed conversion.
• High-speed processing according to the workpiece’s position data.
The present value of the high-speed counter is stored in the Auxiliary Area and can be used as position data. When it reaches preset values, interrupts can be generated. The count can be started and
stopped. Depending on the instruction, the frequency (speed) can be read from the present value of
the high-speed counter.
Changes to PV
Encoder
· Phase A/phase B
· Up/down pulse inputs
· Reset input (phase Z)
Etc.
Count
input
High-speed counter PV
(stored in Auxiliary Area)
Read
· Reading PV (from Auxiliary Area
or using PRV instruction)
· Reading frequency (using PRV instruction)
PRV
Read
High-speed counter PV comparison
Target value comparison
Range comparison for
upper and lower limits
Interrupt task
Settings
· Setting target values or range upper/lower
limits and starting comparison, specifying
interrupt task to be started
CTBL
11-2
CP1E CPU Unit Software User’s Manual(W480)
11 High-speed Counters
1
Create
ladder
program
Read counter PV
Read counter frequency
• Enable the required high-speed counters.
• Select the Use high speed counter Check Box for highspeed counters 0 to 5. Set the input setting, counting
mode and reset method on the Built-in Input Tab Page of
the PLC Setup using the CX-Programmer.
• Terminals 00 to 06 on the CIO 0 terminal block can be
used for high-speed counters. High-speed counters 0 to
5 correspond to terminals 00 to 06.
• Read the PV from Auxiliary Area or by executing a PRV
instruction.
• Execute a PRV instruction.
Precautions for Correct Use
A built-in input cannot be used as a normal input, interrupt input, or quick-response input if it is
being used as a high-speed counter input. Refer to 8-3-3 Allocating Built-in Input Terminals for
details.
PLC Setup
Click the Built-in Input Tab and select the Use high speed counter Check Box for high-speed counters
0 to 5. Set the counting mode, reset method, and input setting.
CP1E CPU Unit Software User’s Manual(W480)
11
11-1-2 Flow of Operation
2
PLC Setup
11-1 Overview
11-1-2 Flow of Operation
11-3
11 High-speed Counters
Built-in Input Tab Page
Item
Use high
speed
counter 0
to 5
Setting
Use high-speed
counter
Select Use high speed counter for each counter to be used.
Counting Mode
Select Linear mode or Circular mode.
Circular Max. Count
If circular mode is selected, set the maximum ring count.
(maximum ring count) 0 to 4,294,967,295 decimal
Reset
•
•
•
•
Phase Z and software reset
Software reset*
Phase Z and software reset (continue comparing)
Software reset (continue comparing)*
Input Setting
•
•
•
•
Differential phase inputs (4×)
Pulse + direction inputs
Up/down pulse inputs
Increment pulse input
* Only a software reset can be used if an increment pulse input is specified.
Note The power supply must be restarted after the PLC Setup is transferred in order to enable the high-speed
counter settings.
Determining High-speed Counter
Pulse Input Method and High-speed Counter Input Terminals
The following input terminals can be used for high-speed counters with the pulse input method.
Input terminal block
Terminal
block
Terminal
label
CIO 0
Pulse input method (Counting mode)
Increment
pulse input
Differential phase
×4 or up/down
input
Pulse/
direction
input
Other functions that cannot be used at the same time
Normal input
Interrupt
input
Quickresponse
input
Origin searches for
pulse outputs 0 and 1
00
High-speed
Counter 0,
increment
input
High-speed
High-speed
Counter 0, phase A Counter 0,
or up input
pulse input
Normal input 0
−
−
−
01
High-speed
Counter 1,
increment
input
High-speed
High-speed
Counter 0, phase B Counter 1,
or down input
pulse input
Normal input 1
−
−
−
02
High-speed
Counter 2,
increment
input
High-speed
High-speed
Counter 1, phase A Counter 0,
or up input
direction
Normal input 2 Interrupt input 2 Quickresponse
input 2
−
High-speed
High-speed
Counter 1, phase B Counter 1,
or down input
direction
Normal input 3 Interrupt input 3 Quickresponse
input 3
−
03
−
04
High-speed
Counter 3,
increment
input
High-speed
High-speed
Counter 0, phase Z Counter 0,
or reset input
reset input
Normal input 4 Interrupt input 4 Quickresponse
input 4
−
05
High-speed
Counter 4,
increment
input
High-speed
High-speed
Counter 1, phase Z Counter 1,
or reset input
reset input
Normal input 5 Interrupt input 5 Quickresponse
input 5
−
06
High-speed
Counter 5,
increment
input
07
−
−
−
Normal input 6 Interrupt input 6 Quickresponse
input 6
Pulse 0:
Origin input signal
−
−
Normal input 7 Interrupt input 7 Quickresponse
input 7
Pulse 1:
Origin input signal
Note 1 The same pulse input must be used for high-speed counter 0 and high-speed counter 1.
2 High-speed counter 2 cannot be used if the input setting of high-speed counter 0 or high-speed counter 1
is set for differential phase inputs (4x), pulse + direction inputs, or up/down pulse inputs.
11-4
CP1E CPU Unit Software User’s Manual(W480)
11 High-speed Counters
Wiring Example for High-speed Counter Input Terminals
The following example shows the connections of an encoder with phase-A, phase-B, and phase-Z
inputs to high-speed counter 0.
CP1E CPU Unit
(Differential Phase Input Mode)
Black Phase A 0.00
Encoder
(power supply: 24 VDC)
White Phase B 0.01
Orange Phase Z
Brown+Vcc COM
11
(High-speed counter 0: Phase A 0 V)
(High-speed counter 0: Phase B 0 V)
(High-speed counter 0: Phase Z 0 V)
11-1-2 Flow of Operation
Example: E6B2-CWZ6C
NPN open-collector output
0.04
(COM 24V)
Blue 0V(COM)
24 VDC power supply
0V
+24V
(Do not use the same I/O power supply as other equipment.)
Power provided
Encoder
1
2
0V Power supply
0V
24V
Shielded twisted-pair cable
Phase A
Phase B
Phase Z
IA
CP1E CPU Unit
0.00
IB
0.01
IZ
0.04
COM
Writing the Ladder Program
Execution
Program
Reference
Generating interrupts for the
high-speed counter PV (number of pulses) and perform
high-speed processing.
Specify interrupt tasks with CTBL
instructions.
Reading the high-speed
counter PV (number of
pulses).
Read the high-speed counter PV from 11-2-4 Reading the
Present Value
the Auxiliary Area and convert it to
position or length data using instructions or measure the length using conmparison instructions such as =, >,
and <.
Reading the high-speed
counter frequency (speed).
Execute a PRV instruction.
CP1E CPU Unit Software User’s Manual(W480)
11-1 Overview
Using a 24-VDC Open-collector Encoder
11-3 High-speed
Counter Interrupts
11-2-5 Frequency
Measurement
11-5
11 High-speed Counters
11-1-3 Specifications
Item
Description
Pulse input method
(Counting mode)
Increment pulse
inputs
Differential phase
inputs (×4)
Up/down pulse
inputs
Pulse + direction inputs
Input signal
Increment
Phase-A
Up pulse
Pulse
−
Phase-B
Down pulse
Direction
−
Phase-Z
Reset
Reset
Frequency and
number of highspeed counters
N-type CPU Unit
100 kHz:
2 counters,
10 kHz:
4 counters
50 kHz:
1 counter,
5 kHz: 1 counter
100 kHz:
100 kHz:
1 counter,
2 counters
10 kHz: 1 counter
E-type CPU Unit
10 kHz:
6 counters
5 kHz:
2 counters
10 kHz:
2 counters
10 kHz:
2 counters
Counting mode
Linear mode or circular (ring) mode
Count values
Linear mode: 8000 0000 to 7FFF FFFF hex
Ring Mode: 0000 0000 to Ring SV
High-speed counter PV storage
locations
High-speed counter 0: A271 (upper 4 digits) and A270 (lower 4 digits)
High-speed counter 1: A273 (upper 4 digits) and A272 (lower 4 digits)
High-speed counter 2: A317 (upper 4 digits) and A316 (lower 4 digits)
High-speed counter 3: A319 (upper 4 digits) and A318 (lower 4 digits)
High-speed counter 4: A323 (upper 4 digits) and A322 (lower 4 digits)
High-speed counter 5: A325 (upper 4 digits) and A324 (lower 4 digits)
The PVs are refreshed in the overseeing processes at the start of each
cycle. Use PRV to read the most recent PVs.
Data format: 8 digit hexadecimal
• Range in linear mode: 8000 0000 to 7FFF FFFF hex
• Range in Ring Mode: 0000 0000 to Ring SV (Circular Max. Count)
Control method
Target value
comparison
Up to 6 target values and corresponding interrupt task numbers can be
registered.
Range comparison
Up to 6 ranges can be registered, with a separate upper limit, lower limit,
and interrupt task number for each range.
Counter reset method
• Phase-Z + Software reset
The high-speed counter is reset when the phase-Z signal goes ON while
the Reset Bit (A531.00 to A531.05) is ON. (Phase Z cannot be used for
the increment pulse.)
• Software reset
The high-speed counter is reset when the Reset Bit (A531.00 to
A531.05) is turned ON.
Operation can be set to stop or continue the comparison operation when
the high-speed counter is reset.
11-6
CP1E CPU Unit Software User’s Manual(W480)
11 High-speed Counters
11-2 High-speed Counter Inputs
11-2 High-speed Counter Inputs
11-2-1 Pulse Input Methods Settings
There are four pulse input methods for high-speed counters.
• Increment pulse input
11
• Differential phase input (4×)
• Up/Down pulse input
Increment Pulse Input
The Increment Pulse Input counts signals on a single-phase pulse input. Only incrementing the count is
possible in this mode.
Conditions for Incrementing
the Count
Pulse
Pulse
0
1
2
3
4
5
6
7
8
9
10
11
12
13
14
15
Count value
OFF→ON Increment
ON
No change
ON→OFF No change
No change
OFF
· Only rising edges are counted.
16
Differential Phase Input (4×)
The Differential Phase Input uses two phase signals (phase A and phase B) and increments/decrements the count according to the status of Differential Phase (4×).
Conditions for Incrementing/
Decrementing the Count
Phase A
Phase A Phase B
OFF→ON
Phase B
ON
ON→OFF
OFF
×4
0
1 2 3 4 5 6 7 8 9 10 11
12
11 10 9 8 7 6 5 4 3 2
1
2 3 4 5 6 7 8
Count value
OFF
Increment
OFF→ON Increment
ON
Increment
ON→OFF Increment
OFF
OFF→ON Decrement
OFF→ON
ON
ON
ON→OFF
Decrement
ON→OFF Decrement
Decrement
OFF
Up/Down Pulse Input
The Up/Down Pulse Input uses two signals, an increment pulse and a decrement pulse.
Conditions for Incrementing/
Decrementing the Count
Increment
pulse
Decrement
pulse
0
1
2
3
4
5
6
7
8
7
6
5
4
3
2
1
0
Decrement
pulse
OFF→ON
ON
ON→OFF
OFF
OFF
OFF→ON
ON
ON→OFF
Increment
pulse
OFF
OFF→ON
ON
ON→OFF
OFF→ON
ON
ON→OFF
OFF
Count value
Decrement
Increment
No change
No change
Increment
Decrement
No change
No change
· The count is incremented for each increment
pulse and decremented for each decrement
pulse.
· Only rising edges are counted.
CP1E CPU Unit Software User’s Manual(W480)
11-7
11-2-1 Pulse Input Methods Settings
• Pulse+direction input
11 High-speed Counters
Pulse + Direction Input
The Pulse + Direction Input uses a direction signal and a pulse signal. The count is incremented or decremented depending on the status (ON or OFF) of the direction signal.
Conditions for Incrementing/
Decrementing the Count
Pulse
Direction
Direction
0
1
2
3
4
5
6
7
8
7
6
5
4
3
2
1
0
Pulse
Count value
No change
OFF→ON OFF
OFF→ON Increment
ON
No change
ON→OFF ON
ON→OFF No change
OFF
OFF→ON Decrement
OFF
No change
OFF→ON ON
ON→OFF No change
ON
No change
ON→OFF OFF
· The count is incremented when the
direction signal is ON and
decremented when it is OFF.
· Only rising edges are counted.
Additional Information
The count of a high-speed counter can be monitored to see if it is currently being incremented or
decremented. The count in the current cycle is compared with the count in the previous cycle to
determine if it is being incremented or decremented.
The results are reflected in the High-speed Counter Count Direction Flags.
High-speed counter
Address of High-speed
Counter Count Direction Flag
High-speed counter 0
A274.10
High-speed counter 1
A275.10
High-speed counter 2
A320.10
High-speed counter 3
A321.10
High-speed counter 4
A326.10
High-speed counter 5
A327.10
11-2-2 Counting Ranges Settings
The following counting modes can be selected for high-speed counters: Linear Mode that counts in a
fixed range and Circular (Ring) Mode that counts in a set range of any maximum value.
Linear Mode
Input pulses can be counted in the range between the lower limit and upper limit values. If the pulse
count goes beyond the lower/upper limit, an underflow/overflow will occur and counting will stop.
• Increment Mode
0
(000000 Hex)
4294967295
(FFFFFFFF Hex)
PV overflow
• Up/Down Mode
-2147483648
(80000000 Hex)
PV underflow
11-8
0
(00000000 Hex)
+2147483647
(7FFFFFFF Hex)
PV overflow
CP1E CPU Unit Software User’s Manual(W480)
11 High-speed Counters
Input pulses are counted in a loop within the set range.
• If the count is incremented from the maximum ring count, the count will be reset to 0 automatically
and incrementing will continue.
• If the count is decremented from 0, the count will be set to the maximum ring count automatically and
decrementing will continue.
Consequently, underflows and overflows cannot occur when Ring Mode is used.
11
11-2-3 Reset Methods
Count value
11-2 High-speed Counter Inputs
Circular (Ring) Mode
2 32-1
Maximum ring
count
0
Maximum Ring Count
Use the PLC Setup to set the maximum ring count (Circular Max. Count), which is the maximum
value of the input pulse counting range. The maximum ring count can be set to any value between
0000 0001 and FFFF FFFF hex (1 to 4,294,967,295 decimal).
Precautions for Correct Use
• There are no negative values in Ring Mode.
• If the maximum ring count is set to 0 in the PLC Setup, the counter will operate with a maximum ring count of FFFF FFFF hex.
11-2-3 Reset Methods
It is called reset that a high-speed counter’s PV is set to 0.
There are two reset methods
• Phase-Z signal + software reset
• software reset
Phase-Z Signal + Software Reset
The high-speed counter’s PV is reset when the phase-Z signal (reset input) goes from OFF to ON while
the corresponding High-speed Counter Reset Bit (A531.00 to A531.05) is ON.
The CPU Unit recognizes the ON status of the High-speed Counter Reset Bit only at the beginning of
the PLC cycle during the overseeing processes. Consequently, when the Reset Bit is turned ON in the
ladder program, the phase-Z signal does not become effective until the next PLC cycle.
One cycle
Phase Z
Reset bit
PV not
reset
PV reset
PV reset
PV reset
PV not reset
PV reset
Note The phase-Z signal cannot be used if an incremental counter is specified. Only a software reset can be used.
CP1E CPU Unit Software User’s Manual(W480)
11-9
11 High-speed Counters
Software Reset
The high-speed counter’s PV is reset when the corresponding High-speed Counter Reset Bit (A531.00
to A531.05) goes from OFF to ON.
The CPU Unit recognizes the OFF-to-ON transition of the High-speed Counter Reset Bit only at the
beginning of the PLC cycle during the overseeing processes. Reset processing is performed at the
same time. The OFF-to-ON transition will not be recognized if the Reset Bit goes OFF again within the
same cycle.
One cycle
Reset bit
PV reset
PV not reset
PV not reset
PV not reset
Precautions for Correct Use
• If the input setting is set for pulse+direction inputs, use it so that the changing interval of direction inputs is longer than 2ms + the sum of execution time for interrupt tasks that may possibly
happen at the same time. In addition, reserve more than 500µs before the pulse inputs after
the direction inputs.
• In the up/down mode and differential mode, do not input the phase-Z signal or change the
direction at a high frequency.
Reserve more than 500µs for the interval of phase-Z and that of direction changing.
Additional Information
The comparison operation can be set to stop or continue when a high-speed counter is reset.
This enables applications where the comparison operation can be restarted from a counter PV of
0 when the counter is reset.
11-2-4 Reading the Present Value
The present value of a high-speed counter can be read in the following two ways.
• Value refreshed at the I/O refresh timing
→ Read PV from Auxiliary Area.
• Value updated when a ladder program is executed → Read PV by executing a PRV instruction.
Reading the Value Refreshed at the I/O Refrefresh Timing
The PV that is stored in the following words can be read using the MOVL instruction or other instructions.
Read PV
Auxiliary Area word
High-speed counter 0 A271 (upper digits) and A270 (lower digits)
High-speed counter 1 A273 (upper digits) and A272 (lower digits)
High-speed counter 2 A317 (upper digits) and A316 (lower digits)
High-speed counter 3 A319 (upper digits) and A318 (lower digits)
High-speed counter 4 A323 (upper digits) and A322 (lower digits)
High-speed counter 5 A325 (upper digits) and A324 (lower digits)
11-10
CP1E CPU Unit Software User’s Manual(W480)
11 High-speed Counters
11-2 High-speed Counter Inputs
Reading the Value When a Ladder Program is Executed
Reading the High-speed Counter PV with a PRV Instruction
Execution condition
@PRV
#0010
#0000
D100
C1: Port specifier (example for high-speed counter input 0 (fixed))
C2: Control data (for reading PV)
S: First destination word
11-2-5 Frequency Measurement
15
D100
D101
11
0
PV data lower bytes
PV data upper bytes
High-speed counter PV that was read
11-2-5 Frequency Measurement
Overview
This function measures the frequency of the high-speed counter (input pulses.)
The input pulse frequency can be read by executing the PRV instruction. The measured frequency is
output in 8-digit hexadecimal and expressed in Hz. The frequency measurement function can be used
with high-speed counter 0 only.
The frequency can be measured while a high-speed counter 0 comparison operation is in progress.
Frequency measurement can be performed at the same time as functions such as the high-speed
counter and pulse output without affecting the performance of those functions.
Reading the High-speed Counter Frequency with a PRV Instruction
Execution condition
@PRV
#0010
#0013
D100
C1: Port specifier (example for high-speed counter input 0 (fixed))
C2: Control data for reading frequency (10-ms sampling)
S: First destination word
15
D100
D101
Present frequency
data lower bytes
Present frequency
data upper bytes
0
High-speed counter frequency
that was read
Precautions for Correct Use
The frequency measurement function can be used with high-speed counter 0 only.
Specifications
Item
Specifications
Number of frequency measurement inputs
1 input (high-speed counter 0 only)
Frequency measurement
range
High-speed counter 0:
Differential phase inputs: 0 to 50 kHz
All other input modes: 0 to 100 kHz*
Measurement method
Execution of the PRV instruction
Stored data
Unit
Hz
Output data
range
Differential phase input: 0000 0000 to 0003 0D40 hex
All other input modes: 0000 0000 to 0001 86A0 hex
* If the frequency exceeds the maximum value, the maximum value will be stored.
CP1E CPU Unit Software User’s Manual(W480)
11-11
11 High-speed Counters
11-3 High-speed Counter Interrupts
High-speed counter interrupts can be used with any model of CP1E CPU Unit.
11-3-1 Overview
This function counts input pulses with the CPU Unit’s built-in high-speed counter and executes an interrupt task when the count reaches the preset value or falls within a preset range (target-value or zone
comparison). An interrupt task between 0 and 15 can be allocated with the CTBL instruction.
Rotary Encoder
Built-in input
Present value
Present value matches set target value
Time
Interrupt task
Cyclic tasks
(ladder programs)
Cycle
Ladder diagram
Interrupt occurs
END
END
I/O refresh
Target value comparison
Range comparison
The specified interrupt program can be started when the
present value of the high-speed counter matches a target
value.
The specified interrupt program can be started when the
present value of the high-speed counter enters a set range.
Instruction execution
condition
Instruction execution
condition
CTBL instruction executed
CTBL instruction executed
High-speed
Counter Unit
High-speed
Counter Unit
High-speed counter PV
High-speed counter PV
Target value 1
Target value range
Target value 2
0
0
Time
Counting enabled
Cyclic task
execution
Interrupted
Interrupt task
execution
11-12
Time
Counting enabled
Cyclic task
execution
Interrupted
Interrupt task
execution
Cyclic task
execution
Cyclic task
execution
Interrupted
Interrupt task
execution
Cyclic task
execution
Interrupted
Cyclic task
execution
Interrupt task
execution
CP1E CPU Unit Software User’s Manual(W480)
11 High-speed Counters
11-3 High-speed Counter
Interrupts
Flow of Operation
1
PLC Setup
11
11-3-1 Overview
2
• Enable the required high-speed counters.
• Select the Use high speed counter Check Box for
high-speed counters 0 to 5. Set the input setting,
counting mode and reset method on the Built-in
Tab Page of the PLC Setup using the CX-Programmer.
• Terminals 00 to 06 on the 0CH terminal block can
be used for high-speed counters. High-speed
counters 0 to 5 correspond to terminals 00 to 05.
Write a program for interrupt tasks 0 to 15.
Interrupt task
Create
ladder
program
Execution of CTBL and
INI instructions in a
cyclic task
• Set the comparison values for the high-speed
counter and the interrupt tasks (0 to 15) to be
started using the CTBL instruction.
• Start the comparison using the INI instruction.
The comparison can be started simultaneously
when registering the comparison values using
the CTBL instruction.
High-speed Counter Interrupts Settings
Setting in PLC Setup
on Built-in Input Tab Page
High-speed counter 0
High-speed counter 1
Select Use Check
Box.
Instruction
CTBL
CTBL port specifier (C1)
#0000
#0001
High-speed counter 2
#0002
High-speed counter 3
#0003
High-speed counter 4
#0004
High-speed counter 5
#0005
Interrupt task
number
0 to 15 (Specified by
user.)
Precautions for Correct Use
A built-in input cannot be used as a normal input, interrupt input, or quick-response input if it is
being used as a high-speed counter input. Refer to 8-3-3 Allocating Built-in Input Terminals for
details.
CP1E CPU Unit Software User’s Manual(W480)
11-13
11 High-speed Counters
PLC Setup
Click the Built-in Input Tab and select the Use high-speed counter Check Box for high-speed counters 0
to 5, and then set the counting mode, reset method, and input setting.
Refer to 11-1-2 Flow of Operation in Page 11-3 for details.
Determining High-speed Counter
High-speed counters 0 to 5 can be used for high-speed counter interrupts.
• Refer to 8-3-3 Allocating Built-in Input Terminals for high-speed counter interrupt.
• Refer to 10-1 Interrupts for the interrupts excluding high-speed counter interrupts.
Writing the Ladder Program
Writing the Interrupt Task Program
Create programs for interrupt tasks 0 to 15, which are executed for the corresponding high-speed
counter interrupts. Right-click a program in the CX-programmer and select Properties. Select any
interrupt task in the Task type Field of the Program Properties Dialog Box.
11-14
CP1E CPU Unit Software User’s Manual(W480)
11 High-speed Counters
Execute the instructions in the following order.
Register the comparison table
Register the comparison table with the CTBL (COMPARISON
TABLE LOAD) instruction. Specify the interrupt tasks to be
started in this step.
Start comparison with the CTBL (COMPARISON TABLE
LOAD) or INI (MODE CONTROL) instruction. Here, highspeed counter interrupts will be valid.
Start comparison
11
Refer to 11-3-2 Present Value Comparison for details.
11-3-2 Present Value Comparison
The comparison of the high-speed counter PV has the following two ways: Target Value Comparison
and Range Comparison.
Target Value Comparison
The specified interrupt task is executed when the high-speed counter PV matches a target value registered in the table.
• The comparison conditions (target values and counting directions) are registered in the comparison
table along with the corresponding interrupt task number. The specified interrupt task will be executed when the high-speed counter PV matches the registered target value.
• Comparison is executed in the order set in the comparison table. Once comparison has cycled
through the comparison table, it will return and wait for a match with the first target value again.
The following examples show the operation of an interrupt task for a comparison table.
Example 1
High-speed counter PV
Comparison is
executed according
to the order of the
values in the table.
Comparison table
Number of values = 4
Target value 1 (when counting up)
Interrupt task = 0
Target value 2 (when counting up)
Interrupt task = 1
Target value 3 (when counting up)
Interrupt task = 5
Target value 4 (when counting up)
Interrupt task = 8
Target value 4
Target value 3
Target value 2
Target value 1
Time
Interrupt task number that is started.
No.0 No.1
No.5 No.8
CP1E CPU Unit Software User’s Manual(W480)
No.0
11-15
11-3-2 Present Value Comparison
Stop with the INI (MODE CONTROL) instruction.
Stop comparison
11-3 High-speed Counter
Interrupts
Execution of CTBL and INI Instructions for Cyclic Task
11 High-speed Counters
Example 2
High-speed counter PV
Comparison is
executed according
to the order of the
values in the table.
Comparison table
Number of values = 4
Target value 1 (when counting up)
Interrupt task = 0
Target value 2 (when counting down)
Interrupt task = 1
Target value 3 (when counting down)
Interrupt task = 5
Target value 4 (when counting down)
Interrupt task = 8
Target value 1
Target value 2
Target value 3
Target value 4
Time
Interrupt task number that is started.
No.0
No.1 No.5 No.8
• Up to 6 target values (between 1 and 6) can be registered in the comparison table.
• A different interrupt task can be registered for each target value.
• If the PV is changed, the changed PV will be compared with the target values in the table, even if the
PV is changed while the target value comparison operation is in progress.
Precautions for Correct Use
• When the count direction (incrementing/decrementing) changes at a PV that matches a target
value or a count after a target value, the next target value cannot be matched in that direction.
Set the target values so that they do not occur at the peak or trough of count value changes.
Bad
OK
Match / Target value + 1
Target value 1
Match
Target value + 2 min.
Target value 1
Target value 2
Target value 2
Match
Match not recognized
• The maximum response frequencies of the high-speed counters are given in the following table.
Item
Incremental pulse
E-type CPU Unit
10kHz
N-type CPU Unit
100kHz
Up and down pulses
High-speed counter 0
Pulse plus direction
Differential phase (×4)
5kHz
50kHz
Incremental pulse
10kHz
100kHz
Up and down pulses
10kHz
High-speed counter 1
Pulse plus direction
100kHz
Differential phase (×4)
5kHz
5kHz
High-speed counter 2
Incremental pulse
10kHz
10kHz
High-speed counter 3
Incremental pulse
High-speed counter 4
Incremental pulse
High-speed counter 5
Incremental pulse
• When using target matching, the processing frequency for high-speed counter 0 or 1 must
be 20kHz or less (5 kHz or less for differential phase (×4)).
• When using target matching, the interval between interrupts for target matches and the
interval between interrupts for the next target matches after the count direction (incrementing/decrementing) changing must be longer than 2 ms plus the sum of execution time for
interrupt tasks that may possibly happen at the same time.
11-16
CP1E CPU Unit Software User’s Manual(W480)
11 High-speed Counters
The specified interrupt task is executed when the high-speed counter PV is within the range defined by
the upper and lower limit values.
• The comparison conditions (upper and lower limits of the range) are registered in the comparison
table along with the corresponding interrupt task number. The specified interrupt task will be executed once when the high-speed counter PV is in the range (Lower limit ≤ PV ≤ Upper limit).
High-speed counter PV
Upper limit 1
Lower limit 1
Comparison is executed
regardless of the order of
the ranges in the table.
Upper limit 2
Lower limit 2
Time
Interrupt task number to execute
No.2
No.1
No.1
No.2
• A total of 6 ranges (upper and lower limits) are registered in the comparison table.
• The ranges can overlap.
• A different interrupt task can be registered for each range.
• The counter PV is compared with the 6 ranges once each cycle.
• The interrupt task is executed just once when the comparison condition goes from unmet to met.
Precautions for Correct Use
When more than one comparison condition is met in a cycle, the first interrupt task in the table
will be executed in that cycle. The next interrupt task in the table will be executed in the next
cycle.
Additional Information
The range comparison table can be used without starting an interrupt task when the comparison
condition is met. The range comparison function can be useful when you just want to know
whether or not the high-speed counter PV is within a particular range.
Use the Range Comparison Condition Met Flags to determine whether the high-speed counter
PV is within a registered range.
CP1E CPU Unit Software User’s Manual(W480)
11-17
11
11-3-2 Present Value Comparison
Comparison table
Upper limit 1
Lower limit 1
Interrupt task = 1
Upper limit 2
Lower limit 2
Interrupt task = 2
11-3 High-speed Counter
Interrupts
Range Comparison
11 High-speed Counters
11-3-3 High-speed Counter Interrupt Instruction
COMPARISON TABLE LOAD Instruction: CTBL
The CTBL instruction compares the PV of a high-speed counter (0 to 5) to target values or ranges and
executes the corresponding interrupt task (0 to 15) when the specified condition is met.
Execution condition
@CTBL
C1
C2
S
C1: Port specifier
C2: Control data
S: First comparison table word
Operand
C2
Control data
Settings
#0000
High-speed counter 0
~
Port specifier
~
C1
S
#0005
High-speed counter 5
#0000
Registers a target-value comparison table and starts the comparison operation.
#0001
Registers a range comparison table and starts the comparison
operation.
#0002
Registers a target-value comparison table.
#0003
Registers a range comparison table.
First compari- Specifies the first word address of the comparison table, which is described
son table word below.
Contents of the Comparison Table
• Target-value Comparison Table
Depending on the number of target values in the table, the target-value comparison table requires
a continuous block of 4 to 19 words.
15
S
0
Number of target values
S+1
Lower word of target value 1
S+2
Upper word of target value 1
0001 to 0006 hex (1 to 6 target values)
00000000 to FFFFFFFF hex
S+3 Interrupt task number for target value 1
S+16
Lower word of target value 6
S+17
Upper word of target value 6
00000000 to FFFFFFFF hex
S+18 Interrupt task number for target value 6
Interrupt Task Number
15 14 12 11
87
0 0 0
Direction
OFF: Incrementing,
ON: Decrementing
11-18
4 3
0
0
Interrupt task number
00 to 0F hex (0 to 15)
CP1E CPU Unit Software User’s Manual(W480)
11 High-speed Counters
15
0
S Lower word of range 1 lower limit
0000 0000 to FFFF FFFF hex (See note.)
11-3 High-speed Counter
Interrupts
• Range Comparison Table
The range comparison table requires a continuous block of 30 words for comparison conditions 1
to 6 require 5 words each (two words for the upper range value, two words for the lower range
value, and one word for the interrupt task number).
S+1 Upper word of range 1 lower limit
S+2 Lower word of range 1 upper limit
S+3 Upper word of range 1 upper limit
11
0000 0000 to FFFF FFFF hex (See note.)
Range 1 interrupt task number
11-3-3 High-speed Counter Interrupt Instruction
S+25 Lower word of range 6 lower limit
0000 0000 to FFFF FFFF hex (See note.)
S+26 Upper word of range 6 lower limit
S+27 Lower word of range 6 upper limit
S+28 Upper word of range 6 upper limit
0000 0000 to FFFF FFFF hex (See note.)
S+29 Range 6 interrupt task number
Interrupt task number
0000 to 000F hex: Interrupt task number 0 to 15
AAAA hex:
Do not execute interrupt task.
FFFF hex:
Ignore the settings for this range.
Note Always set the upper limit greater than or equal to the lower limit for any one range.
MODE CONTROL Instruction: INI
The INI instruction is used for the following items.
• Starting and stopping comparison with the high-speed counter comparison table
Use the CTBL instruction to register the target value or range comparison table before using INI to
start or stop comparison.
If the comparison is started simultaneously when registering the comparison table and then the
high-speed counter interrupts are always valid, the INI instruction is not required.
• Changing the PV of a High-speed Counter
Execution condition
@INI
C1
C2
S
C1: Port specifier
C2: Control data
S: First word of new PV
Operand
C2
Control data
#0010
S
First word of
new PV
High-speed counter 0
~
Port specifier
~
C1
Settings
#0015
High-speed counter 5
#0000
Start comparison.
#0001
Stop comparison.
#0002
Change the PV.
S contains the first word of the new PV when C is set to #0002
(change the PV).
CP1E CPU Unit Software User’s Manual(W480)
11-19
11 High-speed Counters
Example 1: Target Value Comparison
In this example, high-speed counter 0 operates in linear mode and starts interrupt task 10 when the
PV reaches 30,000 (0000 7530 hex) and starts interrupt task 11 when the PV reaches 20,000 (0000
4E20 hex).
1
Set high-speed counter 0 in the PLC Setup's Built-in Input Tab.
Item
Setting
High-speed counter 0
Use counter
Counting mode
Linear mode
−
Circular Max. Count
2
Reset method
Software reset
Input Setting
Up/Down inputs
Set the target-value comparison table in words D1000 to D1006.
Word
Setting
Function
D1000
#0002
Number of target values = 2
D1001
#7530
Rightmost 4 digits of the target value 1 data (30000)
D1002
#0000
Leftmost 4 digits of the target value 1 data (30000)
D1003
#000A
Target value 1
Target value =
30,000(0000 7530 hex)
Bit 15: 0 (incrementing)
Bits 00 to 07: A hex (interrupt task number 10)
D1004
#4E20
Rightmost 4 digits of the target value 2 data (20000)
D1005
#0000
Leftmost 4 digits of the target value 2 data (20000)
D1006
#800B
Target value =
20,000(0000 4E20 hex)
Target value 2
Bit 15: 1 (decrementing)
Bits 00 to 07: B hex (interrupt task number 11)
3
4
Create the programs for interrupt tasks 10 and 11.
Use the CTBL instruction to start the comparison operation with high-speed counter 0 and interrupt tasks 10 and 11.
W0.00
@CTBL
#0000
#0000
D1000
Use high-speed counter 0.
Register a target-value comparison
table and start comparison operation.
First comparison table word.
When execution condition W0.00 turns ON, the comparison starts with high-speed counter 0.
When the PV of high speed counter 0 reaches 30,000, cyclic task execution is interrupted, and
interrupt task 10 is executed.
When the PV of high speed counter 0 reaches 20,000, cyclic task execution is interrupted, and
interrupt task 11 is executed.
When interrupt task 10 or 11 execution has been completed, execution of the interrupted cyclic
task resumes.
11-20
CP1E CPU Unit Software User’s Manual(W480)
11 High-speed Counters
11-3 High-speed Counter
Interrupts
W0.00
0.00
0.01
Upper limit: 30,000 (7530 Hex)
High-speed counter 0 PV
(in A270 and A271)
Lower limit: 20,000 (4E20 Hex)
11
0
Cyclic task
execution
Processing
interrupted
Cyclic task
execution
Processing
interrupted
Cyclic task
execution
Interrupt task
11 execution
Interrupt task
10 execution
Example 2: Range Comparison
In this example, high-speed counter 1 operates in circular (ring) mode and starts interrupt task 12
when the PV is between 25,000 (0000 61A8 hex) and 25,500 (0000 639C hex).
The maximum ring count is set to 50,000 (0000 C350 hex).
1
Set high-speed counter 1 on the PLC Setup’s Built-in Input Tab Page.
Item
2
Setting
High-speed counter 1
Use counter
Counting mode
Circular mode
Circular Max. Count
50,000
Reset method
Software reset (continue comparing)
Input Setting
Up/Down inputs
Set the range comparison table starting at word D20000. Even though range 1 is the only range
being used, all 30 words must still be dedicated to the range comparison table.
Word
Setting
Function
D2000
#61A8
Rightmost 4 digits of range 1 lower
limit
D2001
#0000
Leftmost 4 digits of range 1 lower limit
D2002
#639C
Rightmost 4 digits of range 1 upper
limit
D2003
#0000
Leftmost 4 digits of range 1 upper limit
Lower limit value: 25,000
Upper limit value: 25,500
D2004
#000C
Range 1 interrupt task number = 12 (C hex)
D2005
All
to
#0000
Range 2 lower and upper limit values
(Not used and do not need to be set.)
D2009
#FFFF
Disables range 2.
D2014
#FFFF
Set the fifth word for ranges 3 to 6 (listed at left) to #FFFF (Range
settings are invalid) to disable those ranges.
Range 2 settings
~
D2008
D2019
D2024
D2029
CP1E CPU Unit Software User’s Manual(W480)
11-21
11-3-3 High-speed Counter Interrupt Instruction
Counting enabled
11 High-speed Counters
3
4
Create the program for interrupt task 12.
Use the CTBL instruction to start the comparison operation with high-speed counter 1 and interrupt task 12.
W0.00
@CTBL
#0001
#0001
D2000
Use high-speed counter 1.
Register a range comparison table
and start comparison operation.
First comparison table word.
When execution condition W0.00 turns ON, the comparison starts with high-speed counter 1.
When the PV of high speed counter 1 is between 25,000 and 25,500, cyclic task execution is
interrupted, and interrupt task 12 is executed.
When interrupt task 12 execution is completed, execution of the interrupted cyclic task resumes.
W0.00
0.02
0.03
High-speed counter 1 PV
(in A272 and A273)
Upper limit: 25,500 (639C hex)
Lower limit: 25,000 (61A8 hex)
Counting enabled
Cyclic task
execution
Processing
interrupted
Interrupt task
12 execution
11-22
Cyclic task
execution
Processing
interrupted
Cyclic task
execution
Interrupt task
12 execution
CP1E CPU Unit Software User’s Manual(W480)
11 High-speed Counters
Bits and Words Allocated in the Auxiliary Area
Contents
Highspeed
counter 0
Highspeed
counter 1
Highspeed
counter 2
Highspeed
counter 3
Highspeed
counter 4
Highspeed
counter 5
High-speed
counter PV
storage
words
Leftmost 4 digits
A271
A273
A317
A319
A323
A325
Rightmost 4 digits
A270
A272
A316
A318
A322
A324
Range
Comparison
Condition
Met Flags
Range 1 Comparison Condition Met
Flag (ON for
match.)
A274.00
A275.00
A320.00
A321.00
A326.00
A327.00
Range 2 Comparison Condition Met
Flag (ON for
match.)
A274.01
A275.01
A320.01
A321.01
A326.01
A327.01
Range 3 Comparison Condition Met
Flag (ON for
match.)
A274.02
A275.02
A320.02
A321.02
A326.02
A327.02
Range 4 Comparison Condition Met
Flag (ON for
match.)
A274.03
A275.03
A320.03
A321.03
A326.03
A327.03
Range 5 Comparison Condition Met
Flag (ON for
match.)
A274.04
A275.04
A320.04
A321.04
A326.04
A327.04
Range 6 Comparison Condition Met
Flag (ON for
match.)
A274.05
A275.05
A320.05
A321.05
A326.05
A327.05
Comparison
In-progress
Flags
ON when a comparison operation
is being executed
for the high-speed
counter.
A274.08
A275.08
A320.08
A321.08
A326.08
A327.08
Overflow/
Underflow
Flags
ON when an overflow or underflow
has occurred in
the high-speed
counter’s PV.
A274.09
A275.09
A320.09
A321.09
A326.09
A327.09
Count Direction Flags
0: Decrementing
1: Incrementing
A274.10
A275.10
A320.10
A321.10
A326.10
A327.10
High-speed
Counter
Reset Flags
ON at a software
reset
A531.00
A531.01
A531.02
A531.03
A531.04
A531.05
CP1E CPU Unit Software User’s Manual(W480)
11 - 23
11-4 Related Auxiliary Area Bits
and Words
11-4 Related Auxiliary Area Bits and Words
11
11 High-speed Counters
11-5 Application Example
Using a Rotary Encoder to Measure Positions
Functions Used: High-speed Counting for a Built-in Input
A high-speed counter input can be used by connecting a rotary encoder to a built-in input. A CP1E
CPU Unit is equipped with more than one high-speed counter input, making it possible to control
devices for multiple axes with a single PLC.
High-speed counters can be used for high-speed processing, using either target value comparison
or range comparison to create interrupts. Interrupt tasks are executed when the counter value
reaches a specific target value or range.
Operation Overview
A sheet feeder is controlled to feed constant lengths in a given direction, e.g., for vacuum packing of
food products.
Motor speed
Motor start input:
CIO 0.02
Motor run output:
CIO 100.00
Motor low speed
output: CIO 100.01
Normal stop position
output: CIO 100.02
Error stop position
output: CIO 100.03
3550
Number of pulses 3500
counted by high3000
speed counter
(Pulses)
(A270)
The High-speed Counter Reset Bit
(A531.00) is turned ON in the ladder
program as soon a operation starts
and the reset process is performed.
While the pulse count is between 3,500 and 3,550, normal stop position output (CIO 100.02) will be
ON. If the pulse count exceeds 3550, the error stop position output (CIO 100.03) will turn ON.
11-24
CP1E CPU Unit Software User’s Manual(W480)
11 High-speed Counters
11-5 Application Example
System Configuration
Wiring Example
Encoder (power
supply: 24 VDC)
Black
Phase A
White Phase B
Orange Phase Z
11
Brown
Example: E6B2-CWZ6C
NPN open-collector output
Blue
24 VDC
power supply
Start motor
100 to 240 VAC
CP1E-N20DR-A
Motor running: CIO 100.00
Error stop
position output:
CIO 100.03
(indicator)
Motor low speed output: CIO 100.01
Example: Inverter
Normal stop
position output:
CIO 100.02
(indicator)
PLC Setup
Use the following procedure to enable high-speed counter 0.
1
Open the PLC Settings Dialog Box.
2
Click the Built-in Input Tab.
CP1E CPU Unit Software User’s Manual(W480)
11-25
11 High-speed Counters
3
Select the Use high speed counter 0 Check Box for high-speed counter 0.
4
Select Linear Mode for the counting mode.
5
Select Software reset (comparing) for the reset method.
6
Select Differential phase input for the input setting.
7
Close the PLC Settings Dialog Box.
8
Restart the PLC.
The changes made to the PLC Setup is applied.
Programming Example 1
In this example, the CTBL (COMPARISON TABLE LOAD) instruction is used to create an interrupt
when the target value is reached. Slowing and stopping are executed as interrupt tasks, allowing
high-speed processes to be executed without affecting the cycle time.
Ladder Program
Use the CTBL instruction to execute interrupt tasks when the target positions are reached.
Reset with motor stopped
Motor start
The High-speed Counter Reset
Bit 0 is turned ON and the reset
process is performed
Specifies high-speed counter 0
Specifies comparision with target
values and starts comparison
First word of comparision table
Turns ON motor run output
After motor stops, the stop position is checked.
Motor stopped
&3500
&3550
11-26
&3550
Normal stop
position
Error stop
position
The stop position is normal if the
present value of the high-speed
counter (A270) is between 3500
(0DAC hex) and 3550 (0DDE hex).
The stop position is in error if
the present value of the highspeed counter (A270) is
greater than 3550 (0DDE hex).
CP1E CPU Unit Software User’s Manual(W480)
11 High-speed Counters
Interrupt task 4
Turns ON the motor
low speed output
When the present vale of the high-speed counter matches target value 2 (3500), interrupt task 5 is
executed.
Turns OFF the
motor run output
Interrupt task 5
Turns OFF the motor
low speed output
Turns OFF the motor
stopped output
DM Area Setup
The comparison table for the CTBL (COMPARISON TABLE LOAD) instruction is set in D600 through
D606.
Word
Value
Contents
D600
0002
Number of target values: 2
D601
0BB8
Target value 1: 3000 (BB8 hex)
D602
0000
D603
0004
Target value 1: Interrupt task No.4
D604
0DAC
Target value 2: 3500 (DAC hex)
D605
0000
D606
0005
Target value 2: Interrupt task No.5
CP1E CPU Unit Software User’s Manual(W480)
11-27
11-5 Application Example
When the PV of the high-speed counter matches target value 1 (3000), interrupt task 4 is executed.
11
11 High-speed Counters
11-28
CP1E CPU Unit Software User’s Manual(W480)
12
Serial Communications
This section describes communications with Programmable Terminals (PTs) without
using communications programming, no-protocol communications with general components, and connections with a Modbus-RTU Easy Master, Serial PLC Link, and host
computer.
12-1 Serial Communications . . . . . . . . . . . . . . . . . . . . . . . . . . . . . . . . . . . . . . . . 12-2
12-1-1
12-1-2
Types of CPU Units and Serial Ports . . . . . . . . . . . . . . . . . . . . . . . . . . . . . . . 12-2
Overview of Serial Communications . . . . . . . . . . . . . . . . . . . . . . . . . . . . . . . 12-3
12-2 Program-free Communications with Programmable Terminals . . . . . . . 12-5
12-2-1
12-2-2
12-2-3
Overview . . . . . . . . . . . . . . . . . . . . . . . . . . . . . . . . . . . . . . . . . . . . . . . . . . . . 12-5
Flow of Connection . . . . . . . . . . . . . . . . . . . . . . . . . . . . . . . . . . . . . . . . . . . . 12-6
PLC Setup and PT System Settings . . . . . . . . . . . . . . . . . . . . . . . . . . . . . . . 12-6
12-3 No-protocol Communications with General Components . . . . . . . . . . . . 12-8
12-3-1
12-3-2
12-3-3
12-3-4
Overview . . . . . . . . . . . . . . . . . . . . . . . . . . . . . . . . . . . . . . . . . . . . . . . . . . . . 12-8
Flow of Operation . . . . . . . . . . . . . . . . . . . . . . . . . . . . . . . . . . . . . . . . . . . . . 12-9
PLC Setup . . . . . . . . . . . . . . . . . . . . . . . . . . . . . . . . . . . . . . . . . . . . . . . . . . . 12-9
Related Auxiliary Area Bits and Words . . . . . . . . . . . . . . . . . . . . . . . . . . . . 12-10
12-4 Modbus-RTU Easy Master Function . . . . . . . . . . . . . . . . . . . . . . . . . . . . . 12-11
12-4-1
12-4-2
12-4-3
12-4-4
Overview . . . . . . . . . . . . . . . . . . . . . . . . . . . . . . . . . . . . . . . . . . . . . . . . . . .
Flow of Operation . . . . . . . . . . . . . . . . . . . . . . . . . . . . . . . . . . . . . . . . . . . .
Setting and Word Allocation . . . . . . . . . . . . . . . . . . . . . . . . . . . . . . . . . . . .
Programming Examples . . . . . . . . . . . . . . . . . . . . . . . . . . . . . . . . . . . . . . .
12-11
12-11
12-12
12-14
12-5 Serial PLC Links . . . . . . . . . . . . . . . . . . . . . . . . . . . . . . . . . . . . . . . . . . . . . 12-20
12-5-1
12-5-2
12-5-3
12-5-4
12-5-5
Overview . . . . . . . . . . . . . . . . . . . . . . . . . . . . . . . . . . . . . . . . . . . . . . . . . . .
Flow of Operation . . . . . . . . . . . . . . . . . . . . . . . . . . . . . . . . . . . . . . . . . . . .
PLC Setup . . . . . . . . . . . . . . . . . . . . . . . . . . . . . . . . . . . . . . . . . . . . . . . . . .
Operating Specifications . . . . . . . . . . . . . . . . . . . . . . . . . . . . . . . . . . . . . . .
Example Application . . . . . . . . . . . . . . . . . . . . . . . . . . . . . . . . . . . . . . . . . .
12-20
12-21
12-21
12-23
12-28
12-6 Connecting the Host Computer (Not Including Support Software) . . . . 12-30
12-6-1
12-6-2
12-6-3
Overview . . . . . . . . . . . . . . . . . . . . . . . . . . . . . . . . . . . . . . . . . . . . . . . . . . . 12-30
Flow of Processing . . . . . . . . . . . . . . . . . . . . . . . . . . . . . . . . . . . . . . . . . . . 12-30
Command/response Format and List of Commands . . . . . . . . . . . . . . . . . . 12-31
CP1E CPU Unit Software User’s Manual(W480)
12-1
12 Serial Communications
12-1 Serial Communications
Serial communications can be used only with the CP1E N-type CPU Unit.
12-1-1 Types of CPU Units and Serial Ports
N-type CPU Unit
• CPU Units with 20 I/O Points have one built-in RS-232C port. There are no option slots.
• CPU Units with 30 or 40 I/O Points have one built-in RS-232C port and one option slot. An
RS-232C or RS-422A/485 Option Board can be mounted for serial communications.
E-type CPU Unit
There is no serial port.
Standard built-in RS-232C port
Connected devices
Connected devices
NS-series PT or NP-series PT
NS-series PT or NP-series PT
1:N NT Link
1:N NT Link
CP1E N-type
CPU Unit
General component
CPU with 20
I/O Points
One Option Board for serial communications (CP1WNo-protocol
communications
CIF01 RS-232C Option Board, CP1W-CIF11 RS-
General component
No-protocol
communications
422A/485 Option Board, or CP1W-CIF12 RS422A/485 Option Board) can be mounted in the
option slot.
Inverter
Inverter
Standard built-in RS-232C port
Modbus-RTU Easy
Master communications
Modbus-RTU Easy
Master communications
CP-series PLC
or CJ1M PLC
CP-series PLC or CJ1M PLC
Serial PLC Links*
CP1E N-type
CPU Unit
CPU Unit with 30 or 40 I/O Points
Serial PLC Links*
Host computer (A Programming
Device cannot be connected.)
Host computer
(A Programming Device cannot be connected.)
Host Link
Host Link
* Serial PLC Links cannot be used
on two ports at the same time.
12-2
CP1E CPU Unit Software User’s Manual(W480)
12 Serial Communications
The CP1E CPU Units support the following types of serial communications.
Connected devices
Programmable Terminal
NS/NP-series PT
Description
Data can be exchanged with
PTs without using a communications program in the CPU
Unit.
Communications
protocol
Built-in
RS-232C
Optional
serial port
1:N NT Links
(Host Link is also
supported.)
OK
OK
Note Only one PT can be connected when using a 1:N
NT Link. It is not possible
to connect two PTs.
RS-232C
NT Link
CP1E
CP1E
RS-232C or RS-422A/485
General device with
serial communications
Modbus-RTU slave devices, such as inverters (Modbus-RTU Easy Master)
CP1E
RS-422A/485 Option Board
RS-232C or RS-422A/485
12
No-protocol
Communicates with general
communications
devices, such as barcode
readers, with an RS-232C or
RS-422A/485 port without a
command-response format.
The TXD and RXD instructions
are executed in the ladder program in the CPU Unit to transmit data from the transmission
port or read data in the reception port.
OK
OK
Data can be easily exchanged
with general devices that support Modbus-RTU slave functionality (such as inverters)
and are equipped with an RS232C port or RS-422A/485
port.
Modbus-RTU Easy
Master Function
OK
OK
Data links can be created for
up to nine CP-series or CJ1M
CPU Units, including one Polling Unit and up to eight Polled
Units. Up to 10 words can be
shared per Unit.*1
Serial PLC Links
OK
OK
12-1-2 Overview of Serial Communications
General component
Inverter
Data links between CPU Units
CP1E CPU Unit Polling Unit
RS-422A/485 Option Board
RS-422A/485
Shared data
CP1E CPU Unit Polled Unit
CP1L CPU Unit Polled Unit
CP1E CPU Unit Software User’s Manual(W480)
12-1 Serial Communications
12-1-2 Overview of Serial Communications
12-3
12 Serial Communications
Connected devices
Host computers
Computer
(Not including the CX-Programmer and other
Support Software.)
RS-232C
Host Link
Description
PLC data can be read by the
host computer or written to the
PLC from the computer. The
host computer sends a Host
Link command (C Mode) or a
FINS command to the CPU
Unit to read/write I/O memory,
change the operating mode, or
to force-set/reset bits in the
CPU Unit.*2
Communications
protocol
Built-in
RS-232C
Optional
serial port
Host Link
OK
OK
*1 A PT cannot be included in the Serial PLC Links.
*2 Connecting to the CX-Programmer is not possible with this protocol. Use the USB port.
Additional Information
Refer to A-3 Wiring for Serial Communications in the CP1E CPU Unit Hardware User’s Manual
(Cat.No.479) for Serial communication wiring.
12-4
CP1E CPU Unit Software User’s Manual(W480)
12 Serial Communications
Programmable Terminal communications can be used only with the CP1E N-type CPU Unit.
12-2-1 Overview
Communications without special communications programming is possible between a CP1E CPU Unit
and a Programmable Terminal (PT) by using the 1:N NT Link protocol.
Connect the serial port of the CP1E CPU Unit and PT with NT Link (1:N) communication mode, and
connect the CP1E CPU Unit and PT 1:1 as shown below.
12-2 Program-free Communications with
Programmable Terminals
12-2 Program-free Communications with
Programmable Terminals
12
12-2-1 Overview
PT: NS, NP, or NT31/631 V3
RS-232C
1:N NT Link
CP1E N-type CPU Unit
Connectable Programmable Terminals (PTs)
High-speed NT Links (115,200 bps) can be used with NS-series, NP-series, or NT-series PTs.
Precautions for Correct Use
• Communications are not possible for CP1E CPU Units using the 1:1 NT Link protocol. Do not
connect more than one PT to a CP1E CPU Unit even if the 1:N NT Link protocol is used.
• SAP (Smart Active Parts) on NS-series PTs cannot be used for CP1E CPU Units.
• The main unit of NT31/31C/631/631C cannot be connected with NT Link for the system programs preinstalled prior to Ver.1 and system programs in Chinese (Simplified and Traditional)
version and Korean version. Connect with Host Link.
CP1E CPU Unit Software User’s Manual(W480)
12-5
12 Serial Communications
12-2-2 Flow of Connection
CP1E CPU Unit
1
PLC Setup
2
Select Built-in RS232C Port or Serial
Option Port in the PLC Setup of the CP1E
CPU Unit using the CX-Programmer. Set
the serial communications mode to NT
Link (1:N), set the baud rate, and set the
highest unit number to at least 1.
Transfer the PLC Setup.
3
PT (e.g. NS-series)
CX-Designer
Create a project using the CXDesigner and select Serial Port A or
Serial Port B in the communications
settings.
Transfer screen data created
Transfer screen using the CX-Designer to the NSseries PT.
Check the communications settings
NS-series PT in the NS-series PT on the Comm
System Menu Settings Tab Page in the system
menu.
4
Set the same communications settings in the CP1E CPU Unit’s PLC Setup and in the NS-series PT.
5
Connect the CP1E CPU Unit and external devices using the RS-232C or RS-422A/485 ports.
12-2-3 PLC Setup and PT System Settings
Set the parameters in the PLC Setup and the PT’s System Menu.
PLC Setup
Click the Built-in RS232C Port or Serial Option Port Tab in the PLC Settings Dialog Box.
12-6
CP1E CPU Unit Software User’s Manual(W480)
12 Serial Communications
12-2 Program-free Communications with
Programmable Terminals
Built-in RS232C Port or Serial Option Port Tab Page
Parameter
Setting
Communications Settings
Select the Custom Option and set the baud rate to 115,200 (same as the 1:N
NT Link High-speed Mode). It is not necessary to change the format setting.
Mode
Select NT Link (1:N).
NT/PC Link
Max.
If only one NS-series PT (unit number 0) is connected, set this parameter to 1.
In any other case of NS-series PTs, select the unit number (1 to 7) of the connected NS-series PT. In case of NP and NT-series PTs, select the unit number
(0 to 7) of the connected NP and NT-series PT.
PT System Menu
12
Set the PT as follows:
1
2
Select NT Links (1:N) from Serial Port A or Serial Port B on the Memory Switch Menu under the
System Menu on the PT.
Press the SET Touch Switch to set the baud rate to high speed. (A baud rate of 115,200 bps in
the PLC Setup is the same as setting high speed for the PT.)
Connection with Other Company’s Display Devices
Select Host Link in the serial communications mode settings of the CP1E N-type CPU Unit and set all
other communications parameters to the same values as the other company’s display device.
CP1E CPU Unit Software User’s Manual(W480)
12-7
12-2-3 PLC Setup and PT System Settings
Example: NS-series PT
12 Serial Communications
12-3 No-protocol Communications with
General Components
No-protocol communications can be used only with the CP1E N-type CPU Unit.
12-3-1 Overview
CP1E CPU Units and general devices with serial communications ports can be used for no-protocol
communications.
No-protocol communications enable sending and receiving data using the TRANSMIT (TXD) and
RECEIVE (RXD) instructions without using a protocol and without data conversion (e.g., no retry processing, data type conversion, or process branching based on received data).
The serial communications mode is set to RS-232C.
CP1E N-type CPU Unit
TXD or RXD
Sending/
receiving data
RS-232C or RS422A/485
General component
(e.g., barcode reader)
No-protocol communications are used to send data in one direction to or from general external devices
that have an RS-232C or RS-422A/485 port using TXD or RXD.
For example, simple (no-protocol) communications can be used to input data from a barcode reader or
output data to a printer.
The following table lists the no-protocol communication functions supported by CP1E PLCs.
Communications
Transfer
direction
Method
Max.
amount of
data
Data
transmission
PLC →
External
device
Execution
of TXD in
the ladder
program
256 bytes
Data
reception
External
device →
PLC
Execution
of RXD in
the ladder
program
256 bytes
12-8
Frame format
Start code
End code
Yes: 00 to FF
hex
No: None
Yes: 00 to FF
hex or CR+LF
No: None (The
amount of data
to receive is
specified
between 1 and
256 bytes when
no end code is
specified.)
Other functions
• Send delay time (delay
between TXD execution and
sending data from specified
port): 0 to 99,990 ms at the
minimum(unit: 10 ms)
• Controlling RS and ER signals
Monitoring CS and DR signals
CP1E CPU Unit Software User’s Manual(W480)
12 Serial Communications
12-3 No-protocol Communications with
General Components
12-3-2 Flow of Operation
1
Wiring communications
2
PLC Setup
Create
ladder
Program
Cyclic tasks
Select Built-in RS232C Port or Serial Option Port in the
PLC Setup and transfer the PLC Setup from the CXProgrammer to the CP1E CPU Unit.
(Set the serial communications mode to RS-232C, and
set the communications conditions.)
12
• PLC to External device: Execute the TXD instruction.
• External device to PLC: Execute the RXD instruction.
12-3-2 Flow of Operation
3
Connect the CP1E CPU Unit and external device using
RS-232C or RS-422A/485 ports.
Interrupt tasks
12-3-3 PLC Setup
Click the Built-in RS232C Port or Serial Option Port Tab in the PLC Settings Dialog Box.
Built-in RS232C Port or Serial Option Port Tab Page
Parameter
Setting
Communications
Settings
Set the communications settings to the same values as the connected device.
If the connected device is set to 9,600 bps, two stop bits, and even parity, select the
Custom Option, set the baud rate to 9,600 and format to 7,2,E.
Mode
Select RS-232C.
End Code
• To specify the number of bytes of received data, select Received bytes and set the
number of bytes from 1 to 256.
• To use CR+LF as the end code, set CR+LF.
• To set the end code to any value between 00 to FF hex, set a value between
0x0000 and 0x00FF.
CP1E CPU Unit Software User’s Manual(W480)
12-9
12 Serial Communications
12-3-4 Related Auxiliary Area Bits and Words
Name
Details
A392.04
Address
Built-in RS-232C Port
Communications Error Flag
• Turns ON when a communications error occurs at the built-in RS-232C
port. (Disabled in NT link mode.)
• Turns ON when a timeout error, overrun error, framing error, parity error,
or BCC error occurs in Modbus-RTU Easy Master Mode.
A392.05
Built-in RS-232C Port Send
Ready Flag
(No-protocol mode)
ON when the built-in RS-232C port is able to send data in no-protocol
mode.
A392.06
Built-in RS-232C Port
Reception Completed Flag
(No-protocol mode)
ON when the built-in RS-232C port has completed the reception in no-protocol mode.
Built-in RS-232C Port
Reception Overflow Flag
(No-protocol mode)
ON when a data overflow occurred during reception through the built-in
RS-232C port in no-protocol mode.
A392.07
• When the number of bytes was specified: ON when the specified
number of bytes is received.
• When the end code was specified: ON when the end code is received or
256 bytes are received.
• When the number of bytes was specified:
ON when more data is received after the reception was completed but
before RXD was executed.
• When the end code was specified:
ON when more data is received after the end code was received but
before RXD is executed.
ON when 257 bytes are received before the end code.
If a start code is specified, ON when the end code is received after the
start code is received.
A392.12
Serial Option Port
• ON when a communications error has occurred at the serial option port.
Communications Error Flag
(Not valid in NT Link mode.)
• ON when a timeout error, overrun error, framing error, parity error, or
BCC error occurs in Modbus-RTU Easy Master mode.
A392.13
Serial Option Port Send
Ready Flag
(No-protocol Mode)
ON when the serial option port is able to send data in no-protocol mode.
A392.14
Serial Option Port
Reception Completed
Flag (No-protocol Mode)
ON when the serial option port has completed the reception in
no-protocol mode.
A392.15
Serial Option Port
Reception Overflow Flag
(No-protocol Mode)
ON when a data overflow occurred during reception through the serial
option port in no-protocol mode.
A393.00 to
A393.07
Built-in RS-232C Port PT
Communications Flags
The corresponding bit will be ON when the built-in RS-232C port is communicating with a PT in NT Link. Bits 0 to 7 correspond to units 0 to 7.
A393.00 to
A393.15
Built-in RS-232C Port
Reception Counter
(No-protocol Mode)
• Indicates (in binary) the number of bytes of data received when the
built-in RS-232C port is in no-protocol mode.
• The start code and end code are not included.
A394.00 to
A394.07
Serial Option Port Communicating with PT Flags
The corresponding bit will be ON when the serial option port is
communicating with a PT in NT link mode.
Bits 0 to 7 correspond to units 0 to 7.
A394.00 to
A394.15
Serial Option Port
Reception Counter
(No-protocol Mode)
• Indicates (in binary) the number of bytes of data received when the
serial option port is in no-protocol mode.
• The start code and end code are not included.
12-10
• When the number of bytes was specified: ON when the specified
number of bytes is received.
• When the end code was specified: ON when the end code is received or
256 bytes are received.
CP1E CPU Unit Software User’s Manual(W480)
12 Serial Communications
The Modbus-RTU Easy Master Function can be used only with the CP1E N-type CPU Unit.
12-4-1 Overview
Using the Modbus-RTU Easy Master enables easy control of Modbus-compatible slaves, such as
inverters, using serial communications. The serial communications mode is set to Modbus-RTU Easy
Master.
15
D1200
D1201
Communications are easily achieved
by simply turning ON A640.00 after
setting the Modbus-RTU command in
the DM fixed allocation words.
-
-
12
07
00
Slave address
Function code
Number of communications data bytes
Communications data
~
D1203
-
12-4-1 Overview
D1202
08
-
Slave address Function code
Slave address Function code
Communications data
Communications data
Modbus-RTU
Modbus-RTU Master Execution
Bit for Port 1 A640.00
OMRON Inverters
3G3JX, 3G3MX, 3G3RX,
3G3JV, 3G3MV, or 3G3RV
CP1E N-type CPU Unit
Modbus-RTU commands can be sent simply by turning ON a software switch after setting the Modbus
slave address, function, and data in the DM fixed allocation words for the Modbus-RTU Easy Master.
The response when received is automatically stored in the DM fixed allocation words for the ModbusRTU Easy Master.
12-4-2 Flow of Operation
1
Wiring communications
2
PLC Setup
3
Create
ladder
Program
Cyclic tasks
Interrupt tasks
CP1E CPU Unit Software User’s Manual(W480)
12-4 Modbus-RTU Easy Master Function
12-4 Modbus-RTU Easy Master Function
Connect the CP1E CPU Unit and Modbus-RTU Slave
using RS-422A/485 ports.
Select Built-in RS232C Port or Serial Option Port in the
PLC Setup and transfer the PLC Setup from the CX-Programmer to the CP1E CPU Unit. (Set the serial communications mode to Modbus Easy Master, and set the
communications conditions.)
• Set the Modbus-RTU frame in the DM Fixed Allocation
Words.
• Turn ON the Modbus-RTU Master Execution Bit
(A640.00 or A641.00).
12-11
12 Serial Communications
12-4-3 Setting and Word Allocation
DM fixed allocation words and Auxiliary Area words are allocated for the Modbus-RTU Easy Master
according to the CPU Unit type and connected port as shown below.
CP1E CPU Unit serial port
DM fixed allocation words
Auxiliary Area bits
CP1E N-type CPU Unit
with 20 I/O Points
Built-in RS-232C port
D01200 to D01299
A640.00 to A640.02
CP1E N-type CPU Unit
with 30 or 40 I/O Points
Built-in RS-232C port
D01200 to D01299
A640.00 to A640.02
Serial option port
D01300 to D01399
A641.00 to A641.02
DM Fixed Allocation Words
Word
Built-in
RS-232C
port of CP1E
N-type CPU
Unit with 20,
30 or 40 I/O
Points
Serial option port of
CP1E N-type CPU
Unit with 30 or 40
I/O Points
D01200
D01300
D01201
D01301
00 to 07
Contents
Command
Slave address (00 to F7 hex)
08 to 15
Reserved (Always 00 hex.)
00 to 07
Function code
08 to 15
Reserved (Always 00 hex.)
D01202
D01302
00 to 15
Number of communications data bytes (0000 to
005E hex)
D01203 to
D01249
D01303 to D01349
00 to 15
Communications data (94 bytes maximum)
D01250
D01350
00 to 07
D01251
D01351
D01252
12-12
Bits
D01352
Response
Slave address (01 to F7 hex)
08 to 15
Reserved (Always 00 hex.)
00 to 07
Function code
08 to 15
Reserved
00 to 07
Error code
(See error codes in the following table. )
08 to 15
Reserved (Always 00 hex.)
D01253
D01353
00 to 15
Number of response bytes (0000 to 03EA hex)
D01254 to
D01299
D01354 to D01399
00 to 15
Response data (92 bytes maximum)
CP1E CPU Unit Software User’s Manual(W480)
12 Serial Communications
Code
Description
Description
−
00 hex
Normal end
01 hex
Illegal address
The slave address specified in the parameter is illegal (248 or higher).
02 hex
Illegal function code
The function code specified in the parameter is illegal.
03 hex
Data length overflow
There are more than 94 data bytes.
04 hex
Serial communications mode
error
The Modbus-RTU Easy Master function was executed when the
serial communications mode was not the Modbus-RTU Easy Master Mode or when the option board is not equipped.
80 hex
Response timeout
A response was not received from the slave.
81 hex
Parity error
A parity error occurred.
82 hex
Framing error
A framing error occurred.
83 hex
Overrun error
An overrun error occurred.
84 hex
CRC error
A CRC error occurred.
85 hex
Incorrect confirmation address
The slave address in the response is different from the one in the
request.
86 hex
Incorrect confirmation function
code
The function code in the response is different from the one in the
request.
87 hex
Response size overflow
The response frame is larger than the storage area (92 bytes).
88 hex
Exception response
An exception response was received from the slave.
89 hex
Service being executed
A service is already being executed (reception traffic congestion).
8A hex
Execution canceled
Executing the service has been canceled.
8F hex
Other error
Other FINS response code was received.
12
The Modbus-RTU command set in the DM fixed allocation words for the Modbus-RTU Easy Master
is automatically sent when the Modbus-RTU Master Execution Bit is turned ON. The results (normal
or error) will be given in corresponding flags.
Bit
A640
02
Port
• Built-in RS-232C port of
CP1E N-type CPU Unit
with 20, 30 or 40 I/O
Points
01
Contents
Modbus-RTU Master Execution Error Flag
ON: Execution error.
OFF: Execution normal or still in progress.
Modbus-RTU Master Execution Normal Flag
ON: Execution normal.
OFF: Execution error or still in progress.
00
Modbus-RTU Master Execution Bit
Turned ON: Execution started
ON: Execution in progress.
OFF: Not executed or execution completed.
A641
02
Serial option port of CP1E
N-type CPU Unit with 30 or
40 I/O Points
01
Modbus-RTU Master Execution Error Flag
ON: Execution error.
OFF: Execution normal or still in progress
Modbus-RTU Master Execution Normal Flag
ON: Execution normal.
OFF: Execution error or still in progress.
00
Modbus-RTU Master Execution Bit
Turned ON: Execution started
ON: Execution in progress.
OFF: Not executed or execution completed.
CP1E CPU Unit Software User’s Manual(W480)
12-13
12-4-3 Setting and Word Allocation
Related Auxiliary Area Words and Bits
Word
12-4 Modbus-RTU Easy Master Function
Error Codes
12 Serial Communications
12-4-4 Programming Examples
A bobbin winder on a spinning machine will be used in the following example.
The speed of the bobbin winder must be controlled as the thread is wound because the speed of the
thread is constant.
Constant thread speed
Fast rotation
Slow rotation
Speed
Stopped
Contact A
Contact B Contact C
Contact Z
The target speed is changed according to inputs from multiple contacts. Acceleration and deceleration
are controlled using the acceleration and deceleration of an inverter.
Wiring Examples
The CP1E and OMRON 3G3MV Inverter are connected using RS-485 for frequency and start/stop control.
CP1E N-type CPU Unit
with 30 I/O Points
CP1W-CIF11/12
RS-422A/485 Option Board
50 m max.
Symbol
Control circuit
terminal block
(communications
terminals)
CP1W-CIF11/12
RS-422A/485 Option Board
12-14
CP1E CPU Unit Software User’s Manual(W480)
12 Serial Communications
12-4 Modbus-RTU Easy Master Function
CP1W-CIF11/12 Settings
Set the DIP switch as shown in the following table
(Back)
CPU Unit connector
DIP switch for operation settings
No.
ON / OFF
Description
1
Terminating resistance selection
Setting
ON
Connects terminating resistance
2
2/4-wire selection
ON
2-wire connections
3
2/4-wire selection
ON
2-wire connections
OFF
Always OFF
5
RS control for RD
ON
Enabled
6
RS control for SD
ON
Enabled
12-4-4 Programming Examples
−
4
12
3G3MV Settings
Set the DIP switch as follows:
• SW2, pin 1 : ON (terminating resistance connected) Terminating resistance for RS422/485
communications
• Set the following parameters.
No.
Name
Setting
Description
n003
RUN command selection
2
RS-422/485 communications is enabled.
n004
Frequency reference selection
6
Frequency reference through RS-422/RS-485
n019
Acceleration time 1
5.0
n020
Deceleration time 1
5.0
n151
RS-422/485 communications
timeover detection selection
1
Detect timeouts, detect fatal errors, and the Inverter
decelerates to a stop using deceleration time 1 (default).
n152
RS-422/485 communications
frequency reference/display
unit selection
1
Select the unit for communications of frequency
references and frequency monitoring data. Unit: 0.01Hz
(default).
n153
RS-422/485 communications
Slave address
1
Slave address (unit number), unit number 1
n154
RS-422/485 communications
baud rate selection
2
Communications baud rate: 9,600 bps (default)
n155
RS-422/485 communications
parity selection
0
Even parity
n156
RS-422/485 communications
send wait time
10
Sets the response wait time for request messages
received from the master. 10 ms (default).
n157
RS-422/485 communications
RTS control selection
0
RTS control enabled (default)
CP1E CPU Unit Software User’s Manual(W480)
Acceleration time in seconds
Deceleration time in seconds
12-15
12 Serial Communications
PLC Setup
Click the Built-in RS232C Port or Serial Option Port Tab in the PLC Settings Dialog Box.
Built-in RS232C Port or Serial Option Port Tab Page
Parameter
Communications
Settings
Settings
Set the Modbus communications settings to match those of the
Inverter.
If the Inverter is set to 9,600 bps, one stop bit, and no parity, select
the Custom Option and set the baud rate to 9,600.
Set the format to 8,1,E.
12-16
Mode
Select Modbus Easy Master.
Response Timeout
Set the default value of 0×100 ms.
CP1E CPU Unit Software User’s Manual(W480)
12 Serial Communications
12-4 Modbus-RTU Easy Master Function
Programming Example
D01206
Stop operation when communications start.
RUN command (0: Stop)
Frequency reference:00.00Hz
D01207
12
A640
12-4-4 Programming Examples
Contact A
D01206
RUN command (1: Start)
Frequency reference: 60.00Hz(1770 Hex)
D01207
Contact B
D01206
RUN command (1: Start)
Frequency reference: 55.00Hz(157C Hex)
D01207
Contact C
D01206
RUN command (1: Start)
Frequency reference: 50.00Hz(1388 Hex)
D01207
Contact Z
D01206
RUN command (0: Stop)
Frequency reference: 00.00Hz
D01207
Start and continue Modbus communications from
1 second after turning ON the power supply.
SET
A640.00
Modbus-RTU Master Execution Bit
Modbus-RTU Master Execution Normal Flag
CP1E CPU Unit Software User’s Manual(W480)
12-17
12 Serial Communications
Flags for Modbus-RTU Easy Master for Built-in RS-232C Port
A640.00 Execution Bit
A640.01 Execution Normal Flag
A640.02 Execution Error Flag
(1)
(2)
(3)
(1)Turn ON A640.00 (Execution Bit) to send command data stored starting at D1200. For details, refer
to DM Area Data on page 12-19.
Words
Built-in RS-232C Port
D1200
Bits
00 to 07
Setting
Command
08 to 15
D1201
Slave address (00 to F7 hex)
Reserved (Always 00 hex.)
00 to 07
Function code
08 to 15
Reserved (Always 00 hex.)
D1202
00 to 15
Number of communications data bytes (0000 to
005E hex)
D1203 to D1249
00 to 15
Communications data (94 bytes max.)
Precautions for Correct Use
The Execution Bit will automatically turn OFF. Do not turn OFF the bit through the ladder.
(2)When a command has been sent successfully, A640.01 (Execution Normal Flag) will turn ON, and
the response data will be stored starting from D1250.
Words
Built-in RS-232C Port
D1250
Bits
00 to 07
08 to 15
D1251
D1252
Setting
Response
Slave address (01 to F7 hex)
Reserved (Always 00 hex.)
00 to 07
Function code
08 to 15
Reserved
00 to 07
Error code
08 to 15
Reserved (Always 00 hex.)
D1253
00 to 15
Number of response bytes (0000 to 03EA hex)
D1254 to D1299
00 to 15
Response data (92 bytes max.)
(3)If a communications error occurs, A640.02 (Execution Error Flag) will turn ON, and the error code
will be stored in D1252.
12-18
CP1E CPU Unit Software User’s Manual(W480)
12 Serial Communications
DM Fixed Allocation Words for Modbus-RTU Easy Master
DM Area data in words D1201 to D1205 are set before the execution of the ladder program.
D1206 and D1207 do not need to be set. They are modified by MOV instructions, and are used to
change, start, and stop frequency references.
Built-in RS-232C Port: Command
Setting
Slave
address
Function
code
Communications
data bytes
Communications data: D1203 to D1249 (maximum)
94 bytes (47 words) max.
12-4 Modbus-RTU Easy Master Function
DM Area Data
12
Address
Data for next reigister
(e.g. set 60.0 Hz (0258
hex) for register 0002
(frequency reference))
Inverter slave
address: 1 hex
Inverter data write:
10 hex
Data for starting register
(e.g. set 0001 hex for register 0001
(RUN command, see below))
Use the 9 bytes from the upper byte
of D1203 to the upper byte of D1207
Attached data size in bytes:
4 (4 bytes from lower byte of D1205
to upper byte of D1207)
Number of registers written:
2 (data for registers 0001 and 0002)
Register number for starting data write:
0001 (Specifies to start writing data to
Inverter starting at register 0001.)
RUN Command (Register 0001) Allocation and Details for Inverter 3G3MV
Bit No.
Setting
0
RUN command (1: Start)
1
Normal/reverse rotation (1: Reversed)
2
External error (1: EF0)
3
Error reset (1: Error reset)
4
Multifunction input 1 (1: ON)
5
Multifunction input 2 (1: ON)
6
Multifunction input 3 (1: ON)
7
Multifunction input 4 (1: ON)
8
Multifunction input 5 (1: ON)
9
Multifunction input 6 (1: ON)
10
Multifunction input 7 (1: ON)
11 to 15
(Not used.)
For this example, only the RUN command (bit 00) will be used.
• With the Modbus-RTU Easy Master, a CRC-16 checksum does not need to be set in the DM Area,
because it is calculated automatically.
CP1E CPU Unit Software User’s Manual(W480)
12-19
12-4-4 Programming Examples
Value
12 Serial Communications
12-5 Serial PLC Links
Serial PLC Links can be used only with the CP1E N-type CPU Unit.
12-5-1 Overview
Serial PLC Links enable exchanging data between CP1E N-type CPU Units, CP1E/CP1H CPU Units,
or CJ1M CPU Units without using special programming. The serial communications mode is set to
Serial PLC Links. Up to 9 PLCs can be linked.
Configuration
Connecting CP1E, CP1L, CP1H, or CJ1M CPU Units 1:N (8 Nodes Maximum)
CP1E N-type CPU Unit (Polling Unit)
RS-422A/485 Option Board
RS-422A/485
Shared data
CJ1M CPU Unit
(Polled Unit)
CP1L
CPU Unit
(Polled Unit)
CP1E N-type
CPU Unit
(Polled Unit)
8 nodes maximum
Connecting CP1E, CP1L, CP1H, or CJ1M CPU Units 1:1
CP1E N-type
CPU Unit
(Polling Unit)
Shared data
RS-232C or RS422A/485
CP1E or
CP1L CPU
Unit (Polled
Unit)
Precautions for Correct Use
With the CP1E CPU Units, a Programmable Terminal (PT) cannot be included in a Serial PLC
Link.
12-20
CP1E CPU Unit Software User’s Manual(W480)
12 Serial Communications
12-5-2 Flow of Operation
Wiring communications
2
PLC Setup
3
12-5 Serial PLC Links
1
Connect the CP1E CPU Unit and the CP1E or other
CPU Units using RS-232C or RS-422A/485 ports.
Set Built-in RS232C Port or Serial Option Port in the
PLC Setup and transfer the PLC Setup from the CXProgrammer to the CP1E CPU Unit. (Set the serial communications mode to Serial PC Link (Master) or Serial
PC Link (Slave) and set the communications conditions,
link words, and PLC Link method.)
12
Start communications
Both serial ports cannot be used for PLC Links at the same time.
If both serial ports are set for PLC Links (either as polling or polled nodes), a PLC Setup setting
error (nonfatal error) will occur and the PLC Setup Setting Error Flag (A402.10) will turn ON.
12-5-3 PLC Setup
Settings at the Polling Unit
CP1E CPU Unit Software User’s Manual(W480)
12-21
12-5-2 Flow of Operation
Precautions for Correct Use
12 Serial Communications
Built-in RS232C Port or Serial Option Port Tab Page
Parameter
Setting
Communications Settings Set the communications settings to the same values as the connected
PLCs.
If the connected PLCs are set to 115,200 bps, two stop bits, and even
parity, select the Custom Option, set the baud rate to 115200. Set the format to 7,2,E.
Mode
Select PC Link (Master).
Link Words
Set to 10 (default) for the Master only. 10 words (default)
PC Link Mode
Select All or Master.
NT/PC Link Max.
Set the highest unit number of the connected slaves.
Settings at the Polled Unit
Built-in RS232C Port or Serial Option Port Tab Page
12-22
Parameter
Setting
Communications Settings
Set the communications settings to match those of the connected PLC.
If the connected PLC is set to 115,200 bps, two stop bits, and even parity, select the Custom Option and set the baud rate to 115200. Set the
format to 7,2,E.
Mode
Select PC Link (Slave).
PC Link Unit No.
Set the unit number (0 to 7).
CP1E CPU Unit Software User’s Manual(W480)
12 Serial Communications
12-5-4 Operating Specifications
Item
Specifications
CP1E, CP1H, CP1L, CJ1M
Baud rate
38,400 bps, 115,200 bps
Applicable serial ports
Built-in RS-232C ports and serial option ports
Both ports cannot be used for Serial PLC Links at the same time. If both
ports are set for Serial PLC Links (either as polling node or polled node), a
PLC Setup setting error (nonfatal error) will occur and the PLC Setup Setting
Error Flag (A402.10) will turn ON.
Connection method
RS-422A/485 or RS-232C connection via RS-422A/485 Option Board or
RS232C port.
Words allocated in CIO Area
Serial PLC Link Words: CIO 200 to CIO 289 (Up to 10 words can be
allocated for each CPU Unit.)
Maximum number of Units
9 Units max., comprising 1 Polling Unit and 8 Polled Units.
Link methods (data refresh
methods)
Complete link method or Polling Unit link method
Data Refresh Methods
The following two methods can be used to refresh data.
• Complete link method
• Polling Unit link method
CP1E CPU Unit Software User’s Manual(W480)
12-23
12
12-5-4 Operating Specifications
Applicable PLCs
12-5 Serial PLC Links
Serial PLC Links can be used for both built-in RS-232C ports and serial option ports for N-type CPU
Units with 30 or 40 I/O Points. However, two serial ports cannot be used simultaneously for Serial PLC
Links.
12 Serial Communications
Complete Link
The data from all nodes in the Serial PLC Links are reflected in both the Polling Unit and the Polled
Units.
The only exceptions are the addresses of Polled Units that are not present in the network. These
data areas are undefined in all nodes.
Example: Complete Link Method, Highest Unit Number: 3
In the following diagram, Polled Unit No. 2 is a Unit not present in the network, so the area allocated
for Polled Unit No. 2 is undefined in all nodes.
Po l l i n g U n i t
Po l l e d U n i t N o. 0
Local area
Polling Unit
Po l l e d U n i t N o. 3
Po l l e d U n i t N o. 1
Polling Unit
Polling Unit
Polled Unit No. 0
Local area
Polled Unit No. 0
Polled Unit No. 0
Polled Unit No. 1
Polled Unit No. 1
Local area
Polled Unit No. 1
Undefined
Undefined
Undefined
Undefined
Polled Unit No. 3
Polled Unit No. 3
Polled Unit No. 3
Local area
(Not used)
(Not used)
(Not used)
(Not used)
(Not used)
(Not used)
(Not used)
(Not used)
(Not used)
(Not used)
(Not used)
(Not used)
(Not used)
(Not used)
(Not used)
(Not used)
Example for Ten Link Words (Maximum Number of Words)
Each CPU Unit (either CP1E, CP1L, CP1H, or CJ1M) sends data to the same words in all other
CPU Units for the Polling Unit and all Polled Units. Data is sent between the words that are allocated
to the Polling Unit and Polled Units according to unit numbers.
CP1E N-type CPU Unit
(Polling Unit)
Serial PLC Link Words
12-24
CP1E N-type CPU Unit
(Polled Unit No. 0)
Serial PLC Link Words
CP1L CPU Unit
(Polled Unit No. 1)
Serial PLC Link Words
Example: CJ1M CPU Unit
(Polled Unit No. 2)
Serial PLC Link Words
CIO 200 to 209
CIO 200 to 209
CIO 3100 to 3109
CIO 3100 to 3109
No.0 CIO 210 to 219
No.0 CIO 210 to 219
No.0 CIO 3110 to 3119
No.0 CIO 3110 to 3119
No.1 CIO 220 to 229
No.1 CIO 220 to 229
No.1 CIO 3120 to 3129
No.1 CIO 3120 to 3129
No.2 CIO 230 to 239
No.2 CIO 230 to 239
No.2 CIO 3130 to 3139
No.2 CIO 3130 to 3139
No.3 CIO 240 to 249
No.4 CIO 250 to 259
No.3 CIO 240 to 249
No.4 CIO 250 to 259
No.3 CIO 3140 to 3149
No.3 CIO 3140 to 3149
No.4 CIO 3150 to 3159
No.4 CIO 3150 to 3159
No.5 CIO 260 to 269
No.6 CIO 270 to 279
No.5 CIO 260 to 269
No.6 CIO 270 to 279
No.5 CIO 3160 to 3169
No.5 CIO 3160 to 3169
No.6 CIO 3170 to 3179
No.6 CIO 3170 to 3179
No.7 CIO 280 to 289
No.7 CIO 280 to 289
No.7 CIO 3180 to 3189
No.7 CIO 3180 to 3189
CP1E CPU Unit Software User’s Manual(W480)
12 Serial Communications
Polling Unit Link Method
The data for all the Polled Units in the Serial PLC Links are reflected in the Polling Unit only, and
each Polled Unit reflects the data of the Polling Unit only.
The areas allocated for Polled Units not present in the network are undefined in the Polling Unit only.
Example: Polling Unit Link Method, Highest Unit Number: 3
In the following diagram, Polled Unit No. 2 is a Unit not participating in the network, so the corresponding area in the Polling Unit is undefined.
Polled Unit No. 0
Polled Unit No. 1
Polled Unit No. 3
Local area
Polling Unit
Polling Unit
Polling Unit
Polled Unit No. 0
Local area
Local area
Local area
Polled Unit No. 1
(Not used)
(Not used)
(Not used)
Undefined
(Not used)
(Not used)
(Not used)
Polled Unit No. 3
(Not used)
(Not used)
(Not used)
(Not used)
(Not used)
(Not used)
(Not used)
(Not used)
(Not used)
(Not used)
(Not used)
(Not used)
(Not used)
(Not used)
(Not used)
(Not used)
(Not used)
(Not used)
(Not used)
12
12-5-4 Operating Specifications
Polling Unit
Example for Ten Link Words (Maximum Number of Words)
The CPU Unit that is the Polling Unit (either CP1E, CP1H, CP1L, or CJ1M) sends its data (CIO 200
to CIO 209) to the same words (CIO 200 to CIO 209) in all other CPU Units.
The Polled Units (either CP1E, CP1H, CP1L, or CJ1M) send their data (CIO 210 to CIO 219) to consecutive sets of 10 words (CIO 210 to CIO 289) in the Polling Unit.
CP1E N-type CPU Unit
(Polling Unit)
CP1E N-type CPU Unit
(Polled Unit No. 0)
CP1L CPU Unit
(Polled Unit No. 1)
Example: CJ1M CPU Unit
(Polled Unit No. 2)
Serial PLC Link Words
Serial PLC Link Words
Serial PLC Link Words
Serial PLC Link Words
CIO 200 to 209
CIO 200 to 209
CIO 3100 to 3109
CIO 3100 to 3109
No.0
CIO 210 to 219
CIO 210 to 219
CIO 3110 to 3119
CIO 3110 to 3119
No.1
CIO 220 to 229
No.2
CIO 230 to 239
No.3
CIO 240 to 249
No.4
CIO 250 to 259
No.5
CIO 260 to 269
No.6
CIO 270 to 279
No.7
CIO 280 to 289
CP1E CPU Unit Software User’s Manual(W480)
12-5 Serial PLC Links
The advantage of the Polling Unit link method is that the addresses allocated for the local Polled Unit
data are the same in each Polled Unit, allowing data to be accessed using common ladder programming.
12-25
12 Serial Communications
Allocated Words
Complete Link Method
Address
Link words
CIO 200
Serial PLC
Link Area
CIO 289
1 word
2 words
3 words
to
10 words
Polling Unit
CIO 200
CIO 200 to
201
CIO 200 to
202
CIO 200 to
209
Polled Unit
No. 0
CIO 201
CIO 202 to
203
CIO 203 to
205
CIO 210 to
219
Polled Unit
No. 1
CIO 202
CIO 204 to
205
CIO 206 to
208
CIO 220 to
229
Polled Unit
No. 2
CIO 203
CIO 206 to
207
CIO 209 to
211
CIO 230 to
239
Polled Unit
No. 3
CIO 204
CIO 208 to
209
CIO 212 to
214
CIO 240 to
249
Polled Unit
No. 4
CIO 205
CIO 210 to
211
CIO 215 to
217
CIO 250 to
259
Polled Unit
No. 5
CIO 206
CIO 212 to
213
CIO 218 to
220
CIO 260 to
269
Polled Unit
No. 6
CIO 207
CIO 214 to
215
CIO 221 to
223
CIO 270 to
279
Polled Unit
No. 7
CIO 208
CIO 216 to
217
CIO 224 to
226
CIO 280 to
289
Not used.
CIO 209 to
289
CIO 218 to
289
CIO 227 to
289
1 word
2 words
3 words
---
Polling Unit Link Method
Address
Link words
CIO 200
Serial PLC
Link Words
CIO 289
12-26
to
10 words
Polling Unit
CIO 200
CIO 200 to
201
CIO 200 to
202
CIO 200 to
209
Polled Unit
No. 0
CIO 201
CIO 202 to
203
CIO 203 to
205
CIO 210 to
219
Polled Unit
No. 1
CIO 201
CIO 202 to
203
CIO 203 to
205
CIO 210 to
219
Polled Unit
No. 2
CIO 201
CIO 202 to
203
CIO 203 to
205
CIO 210 to
219
Polled Unit
No. 3
CIO 201
CIO 202 to
203
CIO 203 to
205
CIO 210 to
219
Polled Unit
No. 4
CIO 201
CIO 202 to
203
CIO 203 to
205
CIO 210 to
219
Polled Unit
No. 5
CIO 201
CIO 202 to
203
CIO 203 to
205
CIO 210 to
219
Polled Unit
No. 6
CIO 201
CIO 202 to
203
CIO 203 to
205
CIO 210 to
219
Polled Unit
No. 7
CIO 201
CIO 202 to
203
CIO 203 to
205
CIO 210 to
219
Not used.
CIO 202 to
289
CIO 204 to
289
CIO 206 to
289
---
CP1E CPU Unit Software User’s Manual(W480)
12 Serial Communications
Related Auxiliary Area Bits and Words
Built-in RS-232C Port
Address
Details
A393.00 to
A393.07
When built-in RS-232C port is
being used in NT link mode, the bit
corresponding to the Unit performing communications will be ON. Bits
00 to 07 correspond to unit numbers 0 to 7, respectively.
ON: Communicating
OFF: Not communicating
Read
Turn ON this bit to restart built-in
RS-232C port.
Read/write
Built-in RS-232C Port
Restart Bit
A526.00
Read/write
Refresh timing
• Cleared when power is turned ON.
• Turns ON the bit corresponding to the unit number
of the Polled Unit that is communicating via built-in
RS-232C port in NT link mode or Serial PLC Link
mode.
• Bits 00 to 07 correspond to unit numbers 0 to 7,
respectively.
• Cleared when power is turned ON.
• Turn ON to restart built-in RS-232C port.
Note
A528.00 to
A528.07
When an error occurs at built-in RS232C port, the corresponding error
bit is turned ON.
Bit 0: Not used.
Bit 1: Not used.
Bit 2: Parity error
Bit 3: Framing error
Bit 4: Overrun error
Bit 5: Timeout error
Bit 6: Not used.
Bit 7: Not used.
Read/write
The bit is automatically turned OFF by the
system when restart processing has been
completed.
• Cleared when power is turned ON.
• When an error occurs at built-in RS-232C port, the
corresponding error bit is turned ON.
• The flag is automatically turned OFF by the system
when built-in RS-232C port is restarted.
• In NT link mode, only bit 05 (timeout error) is
enabled.
• In Serial PLC Link mode, only the following bits are
enabled.
Errors at the Polling Unit:
Bit 05: Timeout error
Errors at Polled Units:
Bit 05: Timeout error
Bit 04: Overrun error
Bit 03: Framing error
Serial Option Port
Name
Serial Option Port
Communicating
with Polled Unit
Flags*
Serial Option Port
Restart Flags
Address
Details
A394.00 to
A394.07
When serial option port is being
used in NT link mode, the bit corresponding to the Unit performing
communications will be ON. Bits 00
to 07 correspond to unit numbers 0
to 7, respectively.
ON: Communicating
OFF: Not communicating
Read
Turn ON this bit to restart serial
option port.
Read/write
A526.01
Read/write
Refresh timing
• Cleared when power is turned ON.
• Turns ON the bit corresponding to the unit number
of the Polled Unit that is communicating via serial
option port in NT link mode or Serial PLC Link
mode.
• Bits 00 to 07 correspond to unit numbers 0 to 7,
respectively.
• Cleared when power is turned ON.
• Turn ON to restart serial option port.
Note
Serial Option Port
Error Flags
A528.08 to
A528.15
When an error occurs at serial
option port, the corresponding
error bit is turned ON.
Bit 8: Not used.
Bit 9: Not used.
Bit 10: Parity error
Bit 11: Framing error
Bit 12: Overrun error
Bit 13: Timeout error
Bit 14: Not used.
Bit 15: Not used.
Read/Write
The bit is automatically turned OFF by the
system when restart processing has been
completed.
• Cleared when power is turned ON.
• When an error occurs at serial option port, the corresponding error bit is turned ON.
• The flag is automatically turned OFF by the system
when serial option port is restarted.
• In NT link mode, only bit 13 (timeout error) is
enabled.
• In Serial PLC Link mode, only the following bits are
enabled.
Errors at the Polling Unit:
Bit 13: Timeout error
Errors at Polled Units:
Bit 13: Timeout error
Bit 12: Overrun error
Bit 11: Framing error
* In the same way as for the existing 1:N NT Link, the status (communicating/not communicating) of the Polled Unit
in Serial PLC Links can be checked from the Polling Unit (CPU Unit) by reading the Built-in RS-232C Port Communicating with Polled Unit Flag (A393.00 to A393.07 for unit numbers 0 to 7) or the Serial Option Port Communicating with Polled Unit Flag (A394.00 to A394.07 for unit numbers 0 to 7).
CP1E CPU Unit Software User’s Manual(W480)
12-27
12
12-5-4 Operating Specifications
Built-in RS-232C Port
Error Flags
12-5 Serial PLC Links
Name
Built-in RS-232C Port
Communicating with
Polled Unit Flags*
12 Serial Communications
12-5-5 Example Application
Operation
The present temperature information is exchanged between the boilers. This information is used to
adjust the temperature control of one boiler depending on the status of the other boilers and for monitoring individual boilers.
Boiler A
Boiler B
Boiler C
Wiring Example
Boiler A: CP1E (Polling Unit)
CP1W-TS101
Temperature
Sensor Unit
CP1E N-type
CPU Unit
Boiler B: CP1E (Polled Unit No. 0)
CP1E N-type
CPU Unit
CP1W-TS101
Temperature
Sensor Unit
CIO 2, CIO 3
Boiler C: CP1E (Polled Unit No. 1)
CP1W-TS101
Temperature
Sensor Unit
CP1E N-type
CPU Unit
CIO 2, CIO 3
Two Pt100 Sensor Inputs
CIO 2, CIO 3
Two Pt100 Sensor Inputs
CP1W-CIF11
RS-422A/485
Option Board
CP1W-CIF11
RS-422A/485
Option Board
Two Pt100 Sensor Inputs
CP1W-CIF11
RS-422A/485
Option Board
CP1W-CIF11 RS422/485 Option Board DIP Switch Settings
(Back)
CPU Unit connector
DIP switch for operation
settings
12-28
Terminating resistance selection
Polling
Unit
ON
Polled
Polled
Description
Unit No. 0 Unit No. 1
OFF
ON
PLCs at both ends must have terminating resistance connected.
2-wire or 4-wire selection
2-wire or 4-wire selection
−
RS control selection for RD
RS control selection for SD
ON
ON
OFF
OFF
ON
ON
ON
OFF
OFF
ON
No.
Settings
1
2
3
4
5
6
ON
ON
OFF
OFF
ON
2-wire
2-wire
Always OFF
Control disabled
Control enabled
CP1E CPU Unit Software User’s Manual(W480)
12 Serial Communications
PLC Setup
Item
Boiler A (Polling Unit) Boiler B (Polled Unit No. 0) Boiler C (Polled Unit No. 1)
Communications Settings Custom
115200bps
Parameters
7.2.E (default)
Mode
PC Link (Master)
Link words
10 (default)
−
−
PC Link Mode
ALL
12-5 Serial PLC Links
Baud Rate
PC link (Slave)
−
−
NT/PC Link Max.
1
−
−
PC Link Unit No.
−
0
1
12
Programming Example
Serial PLC
Link Areas
Boiler A
CP1E (Polling Unit)
Boiler B
CP1E (Polled Unit No.1)
Boiler C
CP1E (Polled Unit No. 0)
CIO 0
CIO 1
CIO 2
CIO 3
Input Bits
Input Bits
Input Bits
A_Temperature data 0
A_Temperature data 1
B_Temperature data 0
B_Temperature data 1
C_Temperature data 0
C_Temperature data 1
CIO 100
Output Bits
CIO 200
CIO 201
A_Temperature data 0
A_Temperature data 1
A_Temperature data 0
A_Temperature data 1
A_Temperature data 0
A_Temperature data 1
CIO 209
CIO 210
CIO 211
B_Temperature data 0
B_Temperature data 1
B_Temperature data 0
B_Temperature data 1
B_Temperature data 0
B_Temperature data 1
CIO 219
CIO 220
CIO 221
C_Temperature data 0
C_Temperature data 1
C_Temperature data 0
C_Temperature data 1
C_Temperature data 0
C_Temperature data 1
Output Bits
Output Bits
CIO 299
Ladder Diagram
Boiler A
CP1E N-type CPU Unit
(Polling Unit)
Transfer CIO 2 and CIO 3 to
CIO 200 and CIO 201 using a
BLOCK TRANSFER instruction.
CP1E CPU Unit Software User’s Manual(W480)
Boiler B
CP1E N-type CPU Unit
(Polled Unit No. 0)
Transfer CIO 2 and CIO 3 to
CIO 210 and CIO 211 using a
BLOCK TRANSFER instruction.
Boiler C
CP1E N-type CPU Unit
(Polled Unit No. 1)
Transfer CIO 2 and CIO 3 to
CIO 220 and CIO 221 using a
BLOCK TRANSFER instruction
12-29
12-5-5 Example Application
Data in the Serial PLC Link Areas are transferred using data links by the Serial PLC Link and without
using any special programming. The ladder program is used to transfer the data that needs to be
linked to the data link area.
12 Serial Communications
12-6 Connecting the Host Computer
(Not Including Support Software)
Host computers can be connected using this method only with the CP1E N-type CPU Unit.
12-6-1 Overview
Commands are sent from a host computer (not including Support Software) to the CP1E CPU Unit to
read and write data. The serial communications mode is set to Host Link.
Precautions for Correct Use
Support Software such as the CX-Programmer cannot use the Host Link protocol. Use Peripheral USB port instead.
Command flow
Host computer
→ PLC
Command type
Host link
command
(C Mode)
Host link command
Communications method
Create frame
in the host
computer
and send the
command to
the PLC.
Receive the
response.
FINS command
(with Host Link
header and
terminator) sent.
FINS
Host Link
header
Host Link
terminator
Configuration
Application
Directly connect the host computer in a 1:1 or 1:N system.
Use this
method when
communicating
primarily from
the host computer to the
PLC.
OR
Command
Directly connect the host computer in a 1:1 system or 1:N
system.
OR
Command
Use these
methods when
communicating
primarily from
the host computer to PLCs
in the network.
Remarks
−
The FINS command must be
placed between
a Host Link
header and terminator and
then sent by the
host computer.
12-6-2 Flow of Processing
12-30
1
Communications wiring
2
PLC Setup
3
Program from host
Connect the computer and CP1E CPU Unit using
RS-232C ports.
Set the PLC Setup (select Host Link for the serial
communications mode and set the communications
conditions) and transfer the PLC Setup from the
CX-Programmer to the CP1E CPU Unit.
Send the following commands from the host computer.
• C-mode commands
• FINS commands
CP1E CPU Unit Software User’s Manual(W480)
12 Serial Communications
The outline of command/response format and each command are listed below.
For the details of the host link commands and FINS commands, refer to Communication Instructions
Reference Manual (Cat.No.W342).
List of C Mode Commands
C mode commands (host link commands) are shown below.
Type
I/O memory
read
Header code
Name
Function
CIO area read
Read the specified words from the specified words
of CIO area
RH
Holding area read
Read the specified words from the specified words
of Holding area (H)
RC
Timer and Counter PV area read
Read the specified present values of timer and
counter from the specified words
RG
Timer and Counter Completion Flag
read
Read the specified Completion Flag of timer and
counter from the specified words
RD
DM area read
Read the specified words from the specified words
of DM area (D)
RJ
Auxiliary area read
Read the specified words from the specified words
of Auxiliary area (A)
WR
CIO area write
Write the specified source words from the specified
words of CIO area in the unit of word
WH
Holding area write
Write the specified source words from the specified
words of Holding area (H) in the unit of word
WC
Timer and Counter PV area write
Write the specified source words from the specified
words of Timer and Counter present value area in
the unit of word
WD
DM area write
Write the specified source words from the specified
words of DM area (D) in the unit of word
WJ
Auxiliary area write
Write the specified source words from the specified
words of Auxiliary area (A) in the unit of word
MS
CPU Unit status read
Read the CPU Unit operating conditions (operation
mode, forced set/reset, fatal error)
SC
Status change
Change the operation mode of CPU Unit
MF
Error information read
Read the occurring error information of CPU Unit
(fatal error, non-fatal error)
KS
Force-set
Force-set the specified 1 bit
KR
Force-reset
Force-reset the specified 1 bit
FK
Multi-bit force-set/reset
Force-set, force-reset and release the specified
multiple bits
KC
All bits release
Release the forced status all at once
Model code
read
MM
Model code read
Read the model code of CPU Unit
Test
TS
Test
Directly return 1 block sent from the host computer
Program
area access
RP
Program area read
Read all the contents of the CPU Unit's user program using the machine language (object) level
WP
Program area write
Write all the machine languages (objects) sent
from the host computer into the user program area
of the CPU Unit
I/O memory
write
CPU Unit
status
related
Forceset/reset
CP1E CPU Unit Software User’s Manual(W480)
12-31
12
12-6-3 Command/response Format and List of Commands
RR
I/O memory
write
12-6 Connecting the Host Computer (Not
Including Support Software)
12-6-3 Command/response Format and List of Commands
12 Serial Communications
Type
Header code
I/O memory
area mixed
read
Name
Function
QQMR
I/O memory area mixed read registra- Register the I/O memory words or bits that need to
tion
read into the table
QQIR
I/O memory area mixed registration
Read all of the I/O memory area words and bits
that were registered
Abort (command only)
Interrupt the operation that being processed using
the host link command, and return to the initial status after abortion
Initial (command only)
Initialize the transmission control sequence for all
the host link unit numbers
Command undefined error (response
only)
Response when the command's header code cannot be broken
XZ
Host link
communication processing
**
IC
List of FINS commands
FINS commands are shown below.
Type
I/O memory
area access
Parameter
area access
Program
area access
Command
code
Name
Function
01
01
I/O memory area read
Read the contents of continuous I/O memory area
01
02
I/O memory area write
Write the contents of continuous I/O memory area
01
03
I/O memory area write all at once
Replenish the specified ranges of I/O memory area
with the same data
01
04
I/O memory area mixed read
Read the contents of discontinuous I/O memory
area
02
01
Parameter area read
Read the contents of continuous parameter area
02
02
Parameter area write
Write the contents of continuous parameter area
(unable to execute in MONITOR or RUN mode)
02
03
Parameter area write (clear) all at
once
Replenish the specified ranges of parameter area
with the same data
03
06
Program area read
Read UM (User Memory) area
03
07
Program area write
Write UM (User Memory) area
03
08
Program area clear
Clear the specified ranges of UM (User Memory)
area
Operation
mode
change
04
01
Operation mode change (Operation
start)
Change the operation mode of CPU Unit to RUN or
MONITOR mode
04
02
Operation mode change (Operation
stop)
Change the operation mode of CPU Unit to PROGRAM mode
System configuration
read
05
01
CPU Unit information read
Read CPU Unit information
Status read
06
01
CPU Unit status read
Read the status information of CPU Unit
06
20
Cycle time read
Read cycle time (MAX, MIN, AVERAGE)
07
01
Time information read
Read present year, month, day of the month, hour,
minute, second, day of the week
07
02
Time information write
Change present year, month, day of the month,
hour, minute, second, day of the week
Message
display
related
09
20
Message read/cancel
Read FAL and FALS
Access right
related
0C
01
Access right obtainment
Obtain the access right when it is free
0C
02
Access right forced obtainment
Obtain the access right whether or not the access
right of other units is obtained
0C
03
Access right release
Release the access right being obtained and set it
free
Time information
access
12-32
CP1E CPU Unit Software User’s Manual(W480)
12 Serial Communications
Command
code
Name
Function
Error log
related
21
01
Error removal
Remove the occurring error and error message
21
02
Error log read
Read error log information
Debugging
related
21
03
Error log pointer clearance
Clear all the pointer of error log to zero
23
01
Force-set/reset
Force-set, force-reset and release (unable to specify multi-bit)
23
02
All bits release
Release the forced status of all bits
12-6 Connecting the Host Computer (Not
Including Support Software)
Type
12
12-6-3 Command/response Format and List of Commands
CP1E CPU Unit Software User’s Manual(W480)
12-33
12 Serial Communications
12-34
CP1E CPU Unit Software User’s Manual(W480)
Other Functions
13
This section describes PID temperature control, clock functions, DM backup functions,
security functions.
13-1 PID Temperature Control . . . . . . . . . . . . . . . . . . . . . . . . . . . . . . . . . . . . . . . 13-2
13-1-1
13-1-2
13-1-3
Overview . . . . . . . . . . . . . . . . . . . . . . . . . . . . . . . . . . . . . . . . . . . . . . . . . . . . 13-2
Flow of Operation . . . . . . . . . . . . . . . . . . . . . . . . . . . . . . . . . . . . . . . . . . . . . 13-3
Application Example . . . . . . . . . . . . . . . . . . . . . . . . . . . . . . . . . . . . . . . . . . . 13-4
13-2 Clock . . . . . . . . . . . . . . . . . . . . . . . . . . . . . . . . . . . . . . . . . . . . . . . . . . . . . . . 13-7
13-3 DM Backup Function . . . . . . . . . . . . . . . . . . . . . . . . . . . . . . . . . . . . . . . . . . 13-8
13-3-1
13-3-2
Backing Up and Restoring DM Area Data . . . . . . . . . . . . . . . . . . . . . . . . . . . 13-8
Procedure . . . . . . . . . . . . . . . . . . . . . . . . . . . . . . . . . . . . . . . . . . . . . . . . . . 13-10
13-4 Security Functions . . . . . . . . . . . . . . . . . . . . . . . . . . . . . . . . . . . . . . . . . . . 13-12
13-4-1
Ladder Program Read Protection . . . . . . . . . . . . . . . . . . . . . . . . . . . . . . . . 13-12
CP1E CPU Unit Software User’s Manual(W480)
13-1
13 Other Functions
13-1 PID Temperature Control
PID temperature control can be used with any model of CP1E CPU Unit.
13-1-1 Overview
The CP1E CPU Unit supports PID instructions with the autotuning function. Ladder programs can be
written to perform PID temperature control.
• Temperature
input:
Input from Temperature Sensor Unit to words in the Input Area.
• PID control:
Execute using the PIDAT instruction in ladder program.
The PIDAT instruction is used in combination with the TPO instruction
(TIME-PROPORTIONAL OUTPUT) to perform time-proportional control.
• Control output:
To connect an SSR, connect a 24-V power supply to the transistor output and
output voltage pulses.
Ladder program
PIDAT
S
S: Input word
C
C: First parameter word
D
D: Output word
TPO
S
S: Input word
C
C: First parameter word
R
R: Pulse output bit
Temperature Sensor Unit
Model with Thermocouple: CP1W-TS001/002
Model with Platinum Resistance Thermometer: CP1W-TS101/102
CP1E
PID
Time-proportional
transistor output
Temperature Sensor
SSR
Additional Information
The sampling cycle set for a PIDAT instruction is between 10 ms to 99.99 s in increments of
10 ms. The actual calculation cycle is determined by the relationship with cycle time. Refer to the
CP1E CPU Unit Instructions Reference Manual (Cat. No. W483) for the PIDAT instruction.
13-2
CP1E CPU Unit Software User’s Manual(W480)
13 Other Functions
13-1-2 Flow of Operation
Setting the Temperature
Sensor Unit
Wiring I/O
3
Setting PIDAT and TPO
instructions parameters
4
Executing the PIDAT instruction
5
Autotuning
6
Starting PID control
• Connect the temperature sensor to the Temperature Sensor Unit.
• Connect the SSR to the transistor output.
Set parameters with the MOV instruction or other
instructions.
Execute the PIDAT instruction.
13
13-1-2 Flow of Operation
2
Set the temperature range with the rotary switch on
the front panel.
13-1 PID Temperature Control
1
Execute autotuning for the PID constants.
Start PID control.
Inputting the Temperature Sensor’s PV to PIDAT Instructions
Temperature Sensor Unit
• Setting the Temperature Range
Set the temperature range with the rotary switch on the front panel of the Temperature Sensor
Unit. If the rotary switch is set to 1 for a CP1W-TS001 Temperature Sensor Unit, the temperature
range is 0.0 to 500.0°C.
• Temperature Data Storage Format
Temperature data is automatically stored in words in the Input Area allocated to the Temperature
Sensor Unit as an Expansion Unit using four-digit hexadecimal.
Example: 100°C is stored as 0064 hex.
• When the range code is a decimal number to one decimal point, the value is multiplied by a
factor of 10 and converted to a hexadecimal number without a sign, then stored as binary
data.
Example: 500.0°C multiplied by 10 is 5000 decimal. This is converted to 1388 in hexadecimal
and stored.
• If the temperature is negative, it is stored as signed hexadecimal.
Example: -200°C is stored as FF38 hex.
PIDAT Instruction
The PIDAT instruction treats the PV as unsigned hexadecimal data (0000 to FFFF hex). Signed data
cannot be used, so if the temperature range includes negative values, apply scaling with the APR
instruction.
CP1E CPU Unit Software User’s Manual(W480)
13-3
13 Other Functions
Autotuning Procedure
Automatically Executing Autotuning When PIDAT Is Executed
To automatically autotune the PID constants, turn ON the AT Command Bit when the PIDAT instruction is executed.
1
Set the PID parameter in words C to C+10. Word C is specified by the second operand.
Example: Place the set value (SV) in C and place the input range in bits 08 to 11 of C+6. Turn
ON bit 15 of C+9 (AT Command Bit).
2
Turn ON the PIDAT instruction’s input condition.
The PIDAT instruction will execute autotuning. When it has finished, the AT Command Bit (bit 15
in C+9) will turn OFF. At the same time the proportional band (C+1), integral constant (C+2),
and derivative constant (C+3) calculated by autotuning will be stored and PID control will be
started.
Executing Autotuning for Other Conditions When PIDAT Is Executed
Here, the AT Command Bit is left OFF when the PIDAT instruction is being executed. Later it is
turned ON by some other condition to start autotuning.
1
2
3
Set the PID parameter in words C to C+10. Word C is specified by the second operand.
Example: Place the set value (SV) in C, the proportional band in C+1, the integral constant in
C+2, the derivative constant in C+3, and the input range in bits 08 to 11 of C+6. Turn OFF bit 15
of C+9 (AT Command Bit).
Turn ON the PIDAT instruction’s input condition. PID control will be started with the specified
PID constants.
Turn ON bit 15 in C+9 (the AT Command Bit) while the input condition for the PID instruction is
ON. Autotuning will be performed. When it has finished, the AT Command Bit (bit 15 in C+9) will
turn OFF. The proportional band (C+1), integral constant (C+2), and derivative constant (C+3)
calculated by autotuning will be stored and PID control will be started with those PID constants.
13-1-3 Application Example
System Configuration
K thermocouple
Controlled device
Inputs connected to terminal
blocks CIO 0 and CIO 1
Inputs connected to
terminal block CIO 2
CP1E CPU Unit with 30 I/O
Points
CP1W-TS001
Temperature Sensor Unit
100.00
Transistor output
COM
+
Control
device
(SSR)
Heater
-
Temperature Stored in CIO 2 in
the Input Area
input
terminals
• A K thermocouple is used for the temperature input. Use a CP1W-TS001 Temperature Sensor Unit
(thermocouple input).
13-4
CP1E CPU Unit Software User’s Manual(W480)
13 Other Functions
• The Temperature Sensor Unit’s temperature input PV is stored in CIO 2.
• The control output is the transistor output used to control the heater through the SSR using time-proportional control.
• The PIDAT sampling cycle is 1 second.
• When W0.00 turns ON, autotuning is immediately executed and PID control is started with the PID
constants calculated by autotuning.
Ladder Programming Example for an Input Range of -200 to 1300°C for a K
Thermocouple
The CP1W-TS001 Temperature Sensor Unit is used with an input type of K -200 to 1300°C (set the
rotary switch to 0). The decimal values -200 to 1300°C are converted to signed hexadecimal data (FF38
to 0514 hex) and stored in CIO 2 in the Input Area.
Specify 16-bit signed data (bit 11: ON, bit 10: OFF)/Number
of coordinates in data table: 1 (bits 0 to 7: #00 hex)
C:D500
W0.00
APR
C
D500
S
2
D
D600
C+2:D502
#0000
C+3:D503
+1300
C+4:D504
#1FFF
Minimum manipulated variable input: -200 decimal
(#FF38 hex)
Minimum value in PID input range: #0000 hex
Maximum manipulated variable input: 1300 decimal
(#0514 hex)
Maximum value in PID input range: #1FFF hex
PV
Scale PV to
within #0000 to
#1FFF hex
&1966
Set value: 160˚C (set as calculated value: 1966)
C+1:D101
&1
Proportional band: 0.1%
PIDAT
C+2:D102
&1
Integral time: 0.1 s
D600
C+3:D103
&1
Derivative time: 0.1 s
C+4:D104
&100
Sampling period: 1 s
C+5:D105
#0002
C+6:D106
#0595
Reverse operation (bit 00: OFF)/PID constants updated each
time a sample is taken while the input condition is ON (bit 01:
ON)/2-PID parameter α = 0.65 (bits 04 to 15: #000 hex)
C+7:D107
#0000
C+8:D108
#0000
C
D100
D
D200
MV
TPO
S
-200
D200
C
D300
D
100.00
MV
C:D100
C+9:D109
#8000
C+10:D110
#0005
Input/Output: 13 bits (bits 00 to 03, 08 to 11: #5 hex)/Integral
and derivative constants: Time designation (bits 04 to 07: #9
hex)/Manipulated variable limit control: No (bit 12: OFF)
AT execution (bit 15: ON)/AT Calculation Gain = 1.00
(bits 0 to 11: #000 hex)
C+11:D111
Pulse output
~
S
#0800
C+1:D501
Work Area
Limit-cycle Hysteresis = 0.05% (approximately 0.8˚C)
C+40:D140
W1.00
When autotuning is completed, the content of D109 is automatically overwritten
by #0000 hex and the calculated PID constants are input to D101 to 103.
W1.00
RSET
100.00
Manipulated variable range: 13 bits (bits 0 to 3: #5 hex)/
Input type: Manipulated variable (bits 4 to 7: #1 hex),
always read input (bits 8 to 11: #3 hex)/Output limit
disabled (bits 12 to 15: #0 hex)
C:D300
#0315
C+1:D301
&2000
Control cycle: 20.00 s
C+2:D302
&0
No upper output limit
C+3:D303
&0
No lower output limit
~
C+4:D304
Work Area
C+6:D306
CP1E CPU Unit Software User’s Manual(W480)
13-5
13
13-1-3 Application Example
However, the PIDAT instruction can only handle unsigned hexadecimal data as the PV. The value is
thus converted from the range FF38 to 0514 to the PIDAT instruction input range of 0000 to 1FFF hex
(0 to 8191) using the APR instruction.
13-1 PID Temperature Control
• Control cycle: 20 s
13 Other Functions
Description
• When W0.00 turns ON, the work area in D111 to D140 is initialized (cleared) according to the
parameters set in D100 to D110. After the work area has been initialized, autotuning is started
and the PID constants are calculated from the results from changing the manipulated variable.
After autotuning has been completed, PID control is executed according to the calculated PID
constants set in D101 to D103. The manipulated variable is output to D200. The manipulated variable in D200 is divided by the manipulated variable range using the TPO instruction. This value is
treated as the duty factor which is converted to a time-proportional output and output to
CIO100.00 as a pulse output.
• When W0.00 turns OFF, PID is stopped and CIO100.00 turns OFF.
• When W0.00 is ON, the Thermocouple’s PV (-200 to 1300) is scaled to the PIDAT instruction input
range (#0 to #1FFF hex). The set values must be input according to the scaled PV. For example, if
the PV is 160°C, it is set as [8191/(1300+200)] × (160+200) = 1966].
13-6
CP1E CPU Unit Software User’s Manual(W480)
13 Other Functions
13-2 Clock
The clock can be used only with the CP1E N-type CPU Unit.
The current data is stored in the following words in the Auxiliary Area.
Name
Address
Clock data
Function
The seconds, minutes, hour, day of month, month, year, and day of
week are stored each cycle.
A351.00 to A351.07
Seconds: 00 to 59 (BCD)
A351.08 to A351.15
Minutes: 00 to 59 (BCD)
A352.00 to A352.07
Hour: 00 to 23 (BCD)
A352.08 to A352.15
Day of the month: 01 to 31 (BCD)
A353.00 to A353.07
Month: 01 to 12 (BCD)
A353.08 to A353.15
Year: 00 to 99 (BCD)
A354.00 to A354.07
Day of the week:
13-2 Clock
A351 to A354
13
00: Sunday, 01: Monday, 02: Tuesday, 03: Wednesday,
04: Thursday, 05: Friday, 06: Saturday
Additional Information
The clock cannot be used if a battery is not installed or the battery voltage is low.
Related Auxiliary Area Bits and Words
Name
Address
Contents
Start-up Time
A510 and A511
The time at which the power was turned ON
(day of month, hour, minutes, and seconds).
Power Interruption Time
A512 and A513
The time at which the power was last interrupted
(day of month, hour, minutes, and seconds).
Power ON Clock Data 1
A720 to A722
Power ON Clock Data 2
A723 to A725
Power ON Clock Data 3
A726 to A728
Consecutive times at which the power was turned
ON (year, month, day of month, hour, minutes, and
seconds). The times are progressively older from
number 1 to number 10.
Power ON Clock Data 4
A729 to A731
Power ON Clock Data 5
A732 to A734
Power ON Clock Data 6
A735 to A737
Power ON Clock Data 7
A738 to A740
Power ON Clock Data 8
A741 to A743
Power ON Clock Data 9
A744 to A746
Power ON Clock Data 10
A747 to A749
Operation Start Time
A515 to A517
The time that operation started (year, month, day
of month, hour, minutes, and seconds).
Operation End Time
A518 to A520
The time that operation stopped (year, month, day
of month, hour, minutes, and seconds).
Time-related Instructions
Name
Mnemonic
Function
CALENDAR ADD
CADD
Adds time to the calendar data in the specified words.
CALENDAR SUBTRACT
CSUB
Subtracts time from the calendar data in the specified words.
CLOCK ADJUSTMENT
DATE
Changes the internal clock setting to the setting in the specified source words.
CP1E CPU Unit Software User’s Manual(W480)
13-7
13 Other Functions
13-3 DM Backup Function
This section describes the function that saves specified words from the DM Area in the built-in
EEPROM backup memory.
13-3-1 Backing Up and Restoring DM Area Data
Overview
The contents of the DM Area (D) will become unstable if the power supply is interrupted for longer than
the backup time of the built-in capacitor (50 hours for an E-type CPU Unit, 40 hours for an N-type CPU
Unit without a Battery). The contents of the specified words in the DM Area data can be backed up from
RAM to the built-in EEPROM backup memory during operation by turning ON a bit in the Auxiliary Area.
The number of DM Area words to back up is specified in the Number of CH of DM for backup Box in the
PLC Setup. If the Restore D0- from backup memory Check Box is selected in the PLC Setup, the
backup data will automatically be restored to RAM when the power is turned back ON so that data is
not lost even if power is interrupted.
CP1E CPU Unit
A751.15 (DM Backup Save Start Bit) turned ON.
Built-in EEPROM Backup
Memory
Built-in RAM
DM Area (D)
Data
backed up.
DM backup data
D0
~
Specified number
of words
Data
restored.
D (n-1)
Specify the number of words
starting from D0 in the
Number of CH of DM for
backup Box in the Startup
Data Read Area in PLC
Setup.
DM backup data is restored to the RAM when power supply is turned ON
again if the Restore D0- from backup memory Check Box is selected in the
Startup Data Read Area in the PLC Setup.
Conditions for Executing Backup
Specified words starting from D0 in the built-in RAM can be saved to the built-in EEPROM backup
memory by turning ON A751.15. (These words are called the DM backup words and the data is
called the DM backup data.) A751.15 (DM Backup Save Start Bit) can be used in any operating
mode (RUN, MONITOR, or PROGRAM mode).
Words that can be Backed Up
• E-type CPU Units: D0 to D1499
• N-type CPU Units: D0 to D6999
13-8
CP1E CPU Unit Software User’s Manual(W480)
13 Other Functions
Number of Words to Back Up
The number of words to back up starting from D0 is set in the Number of CH of DM for backup Box
in the Startup Data Read Area in the PLC Setup.
Restoring DM Backup Data to the Built-in RAM When Power is Turned ON
The DM backup data will be read from the backup memory even if the Clear retained memory area
(HR/DM/CNT) Check Box is selected in the PLC Setup.
Related Auxiliary Area Bits
Name
DM Backup Save
Start Bit
Address
A751.15
Description
The number of words in the DM Area specified in the Number of CH of
DM for backup Box in the Startup Data Read Area in the PLC Setup
are saved from the built-in RAM to the built-in EEPROM backup memory when this bit is turned ON.
If this bit is turned ON and OFF while the DM Backup Save Flag
(A751.14) is ON, it will be ignored and the data will not be backed up
again. To backup the data again, make sure that A751.14 is OFF and
then turn ON A751.15. A751.15 is turned OFF when the power supply
is turned ON.
DM Backup Save
Flag
A751.14
This flag turns ON when A751.15 is turned ON to start the saving
operation. This flag stays ON while data is being saved and turns OFF
when finished.
Use this flag to confirm when the DM backup operation has been completed.
The flag is turned OFF when the power supply is turned ON.
DM Backup
Restore Failed
Flag
A751.11
This flag turns ON if the DM backup data could not be restored correctly. If this flag turns ON, data will not be read from the built-in
EEPROM backup memory to the RAM.
For example, if power was interrupted while data was being backed up,
the DM Area data would not be backed up properly and the next time
power is turned ON, the DM backup data will not be restored. If this
happens, this flag will be turned ON.
If the number of the backed up DM area words is different from the
Number of CH of DM for backup in the PLC Setup, this flag will be
turned ON.
This flag turns OFF in the following cases:
• Data is successfully restored from the built-in EEPROM backup
memory to the RAM when the power supply is turned ON.
• All memory is cleared.
CP1E CPU Unit Software User’s Manual(W480)
13-9
13
13-3-1 Backing Up and Restoring DM Area Data
This bit will not automatically turn OFF again if the bit turns ON. Design
the ladder program so that this bit is turned ON and OFF again using
upwardly differentiated bits.
13-3 DM Backup Function
The DM backup data can be restored to the built-in RAM when power is turned ON by selecting the
Restore D0- from backup memory Check Box in the Startup Data Read Area in the PLC Setup.
13 Other Functions
13-3-2 Procedure
Perform the following procedure to save the DM data to the built-in EEPROM backup memory during
operation or while stopped.
1
2
Check the Restore D0- from backup memory Check Box in the Startup Data Read Area of the
PLC Setup from the CX-Programme.
Also, set the number of words to be backed up starting from D0 in the Number of CH of DM for
backup Box. Transfer the PLC Setup to the CPU Unit and turn ON the power supply.
Turn ON A751.15 (DM Backup Save Start Bit) from the CX-Programmer, a Programmable Terminal (PT), or a ladder program.
The specified number of words in the DM Area starting from D0 will be backed up to the built-in
EEPROM backup memory.
• Using a Ladder Program
A751.15
Execution condition
Execution Bit is turned ON to start backup.
DM Backup Save
Start Bit
One cycle
DM Backup Save
Start Bit
(A715.15)
DM Backup Save
Flag
(A751.14)
ON
OFF
ON
OFF
Backup started
Backup finished
When the saving operation has been completed, A751.14 (DM Backup Save Flag) will turn OFF.
13-10
CP1E CPU Unit Software User’s Manual(W480)
13 Other Functions
Precautions for Safe Use
Precautions for Correct Use
• To prevent operation from starting if the DM backup data is not restored correctly when the
power supply is turned ON, insert the following instructions into the ladder program to generate a fatal error.
13-3 DM Backup Function
Power Interruptions during Backup
The BKUP indicator on the front of the CPU Unit will be lit when DM Area data is being saved to
the built-in EEPROM backup memory.
Do not turn OFF the power supply to the PLC while the indicator is lit. If the power supply to the
PLC is turned OFF while the BKUP indicator is lit, data will not be backed up. In this case, the
DM Backup Restore Failed Flag (A751.11) will turn ON when the power supply is turned ON
again. Therefore, the backup data will not be restored to the DM Area. Transfer the data from the
CX-Programmer to the DM Area again.
13
A751.11
DM Backup Restore Failed Flag
Generates a user-defined
fatal error
10
#0000
• To ensure concurrency between DM backup data and the contents of the DM Area in the
RAM, use exclusive processing in the ladder program so that contents of the DM Area words
in the RAM that are set to be backed up are not changed during a backup operation.
DM Backup Save Flag
A751.14
Programming to change the
contents of DM Area words
that are set to be backed up
DM Area words that are set to be backed up will
not be changed during a backup operation to
ensure concurrency between DM backup data
and words in the DM Area in the RAM.
• Data can be written up to 1,000,000 times to the built-in EEPROM backup memory. Data cannot be written once this limit is exceeded. If writing fails, A315.15 (Backup Memory Error Flag)
will turn ON.
Additional Information
Confirming Completion of DM Area Backup
If user programs or the parameter area is being saved to the backup memory using operations
from the CX-Programmer, the backup operation will not be executed immediately even if
A751.15 (DM Backup Save Start Bit) is turned ON. A751.14 (DM Backup Save Flag) will remain
ON during this time and turn OFF when the DM backup operation has been completed. You can
confirm the completion of DM backup by checking to see if the DM Backup Save Flag (A751.14)
has been turned OFF.
CP1E CPU Unit Software User’s Manual(W480)
13-11
13-3-2 Procedure
FALS
13 Other Functions
13-4 Security Functions
The Security function can be used with any model of CP1E CPU Unit.
13-4-1 Ladder Program Read Protection
Read Protection
With the CX-Programmer, it is possible to set read protection using a password for the whole ladder
program.
When the program is read-protected using a password, it is not possible to display or edit any of the ladder programs using the CX-Programmer unless the password is entered in the Disable Password Dialog Box from the CX-Programmer.
This enables improved security for PLC data in equipment.
Setting Protection
1
Right-click the PLC in the project tree to open the Protection Tab Page of the PLC Properties.
Properties
13-12
2
Set any password.
3
Select Protection-Setting from the PLC Menu.
4
Confirm that the setting item is checked, then click the OK button.
CP1E CPU Unit Software User’s Manual(W480)
13 Other Functions
Protection Release Procedure
1
13-4 Security Functions
Go online and select Protection Release Password from the PLC
menu.
The Release Read Protection Dialog Box will be displayed.
13
2
Auxiliary Area Bits Related to Password Protection
Name
UM Read Protection
Status
Bit
address
A99.00
Description
Indicates whether or not the whole ladder programs are read-protected.
Status after
mode
change
Hold
Startup
hold
settings
Hold
OFF: UM read protection is not set.
ON: UM read protection is set.
CP1E CPU Unit Software User’s Manual(W480)
13-13
13-4-1 Ladder Program Read Protection
Enter the registered password.
If the password is incorrect, the
message shown on the right will be
displayed, and protection will not be
released.
13 Other Functions
13-14
CP1E CPU Unit Software User’s Manual(W480)
Programming Device Operations
This section describes the use of the CX-Programmer to create a ladder programs to
operate the CP1E, transfer the program to the CP1E, and debug the program. It also
describes other basic functions of the CX-Programmer.
14-1 Programming Devices Usable with the CP1E. . . . . . . . . . . . . . . . . . . . . . . 14-2
14-2 Overview of CX-Programmer . . . . . . . . . . . . . . . . . . . . . . . . . . . . . . . . . . . . 14-3
14-2-1
14-2-2
14-2-3
CX-Programmer . . . . . . . . . . . . . . . . . . . . . . . . . . . . . . . . . . . . . . . . . . . . . . . 14-3
CX-Programmer Flow from Startup to Operation . . . . . . . . . . . . . . . . . . . . . . 14-3
Help . . . . . . . . . . . . . . . . . . . . . . . . . . . . . . . . . . . . . . . . . . . . . . . . . . . . . . . . 14-6
14-3 Creating a Ladder Program . . . . . . . . . . . . . . . . . . . . . . . . . . . . . . . . . . . . . 14-7
14-3-1
14-3-2
14-3-3
Inputting a Ladder Program . . . . . . . . . . . . . . . . . . . . . . . . . . . . . . . . . . . . . . 14-7
Saving and Reading Ladder Programs. . . . . . . . . . . . . . . . . . . . . . . . . . . . . 14-14
Editing Ladder Programs . . . . . . . . . . . . . . . . . . . . . . . . . . . . . . . . . . . . . . . 14-15
14-4 Connecting Online to the CP1E and Transferring the Program . . . . . . . 14-18
14-4-1
14-4-2
14-4-3
14-4-4
Connecting Online . . . . . . . . . . . . . . . . . . . . . . . . . . . . . . . . . . . . . . . . . . . .
Changing Operating Modes . . . . . . . . . . . . . . . . . . . . . . . . . . . . . . . . . . . . .
Transferring a Ladder Program and the PLC Setup . . . . . . . . . . . . . . . . . . .
Starting Operation . . . . . . . . . . . . . . . . . . . . . . . . . . . . . . . . . . . . . . . . . . . .
14-18
14-19
14-20
14-21
14-5 Online Monitoring and Debugging . . . . . . . . . . . . . . . . . . . . . . . . . . . . . . 14-23
14-5-1
14-5-2
14-5-3
Monitoring Status . . . . . . . . . . . . . . . . . . . . . . . . . . . . . . . . . . . . . . . . . . . . . 14-23
Force-set/Reset Bits . . . . . . . . . . . . . . . . . . . . . . . . . . . . . . . . . . . . . . . . . . . 14-25
Online Editing . . . . . . . . . . . . . . . . . . . . . . . . . . . . . . . . . . . . . . . . . . . . . . . . 14-26
CP1E CPU Unit Software User’s Manual(W480)
14-1
14
14 Programming Device Operations
14-1 Programming Devices Usable with
the CP1E
The Programming Devices that can be used with the CP1E are listed in the following table.
Compatible
CX-Programmer
versions
Product
Model
CX-Programmer
for CP1E
WS02-CXP
C3
Version 1.0 or
higher
CX-Programmer
(CX-One)
WS02-CXP
C1-V8
Version 8.2 or
higher
(See note.)
Support
for Smart
Input
Saved program file
extension
Unit version 1.0
Supported
.CXE
Described in this
section.
Unit version 1.0
Not
supported
.CXP
Refer to the CX-Programmer Operation
Manual (Cat. No.
W446)
Unit version of
CP1E CPU Unit
Reference
Note To use CX-Programmer version 8.2 with a CP1E CPU Unit, the CX-One version 3 auto-update must be
installed or refer to OMRON’s Web page www.fa.omron.co.jp for details.
Precautions for Correct Use
• This section describes the unique applications and functions of the CX-Programmer for CP1E.
In the remainder of this section, “CX-Programmer” refers to the CX-Programmer for CP1E.
• When using the full version of CX-Programmer provided in CX-One, refer to the CX-Programmer Operation Manual (Cat. No. W446).
• A Programing Console cannot be used for the CP1E. Use the CX-Programmer for CP1E.
Using CX-Programmer for CP1E and CX-Programmer (CX-One) at the Same
Time
The CX-Programmer (CX-One) and the CX-Programmer for CP1E can be installed on the same
computer and both applications can run at the same time.
Using Project Files Saved with the CX-Programmer (.CXP) on the
CX-Programmer for CP1E
The CX-Programmer for CP1E cannot open a .CXP project created on the CX-Programmer
(CX-One). Use programming from a project saved in a .CXP file on the CX-Programmer for CP1E
according to the following procedure.
1
2
Start the CX-Programmer (CX-One) and CX-Programmer for CP1E together.
Copy the rungs of the program to be used from the Ladder Programming Window of the CX-Programmer (CX-One), and paste them into the CX-Programmer for CP1E.
Files created with the CX-Programmer for CP1E (.CXE) can be opened with CX-Programmer
version 8.2 and higher.
14-2
CP1E CPU Unit Software User’s Manual(W480)
14 Programming Device Operations
14-2 Overview of CX-Programmer
This section describes the preparations that must be completed before a ladder program can be created, including connecting the CP1E to the computer and installing the USB driver.
The CX-Programmer is a programming application for creating the ladder programs that are executed in
a CP1E CPU Unit.
In addition to ladder program creation, the CX-Programmer also has functions that are needed to set up
and operate the CP1E, including functions for debugging ladder programs, displaying addresses and
present values, monitoring, setting the connected PLC, programming, and monitoring.
The CX-Programmer has fewer sub-menus, making it relatively simple.
The installation of the CX-Programmer is described in 4-1-5 Installing the Software in the CP1E CPU
Unit Hardware User’s Manual (Cat. No. W479).
For details on the operation of the CX-Programmer, refer to the CX-Programmer Online Help.
14
The flow of using the CX-Programmer from startup through starting PLC operation is shown below.
Start CX-Programmer for CP1E
2
Create new project
3
Create program
4
Save program
5
Connect online to the CP1E
6
Change operating mode
7
8
Transfer program/PLC system
settings
Restart the CP1E
CP1E CPU Unit Software User’s Manual(W480)
Select Start - Programs - OMRON - CX-One - CX-Programmer
for CP1E - CX-Programmer for CP1E.
Select CP1E in the Change PLC Dialog Box.
Example: Press the C Key to input a NC input condition.
Select File - Save As.
Select PLC - Work Online.
Select PLC - Operating mode - Program.
Select PLC - Transfer - Transfer [PC PLC].
Once turn OFF the power supply to the CP1E CPU Unit, then turn
ON again.
14-3
14-2-1 CX-Programmer
14-2-2 CX-Programmer Flow from Startup to Operation
1
14-2 Overview of CX-Programmer
14-2-1 CX-Programmer
14 Programming Device Operations
9
Start operation
CP1E CPU Unit operation will start.
Start CX-Programmer
Select Start - Programs - OMRON - CX-One - CX-Programmer for CP1E.
The CX-Programmer will start.
The title display will appear, followed by the Main Window.
Names and Functions of Parts of the Main Window
This section describes the names and functions of each part of the Main Window of the CX-Programmer.
For details on the functions and operation of CX-Programmer, refer to the CX-Programmer Online Help.
Main Window
Title Bar
Displays the name of the project.
14-4
CP1E CPU Unit Software User’s Manual(W480)
14 Programming Device Operations
Main Menu
Displays the menus from which commands are selected.
Toolbar
Displays the icons for executing commands.
Project Tree and Project Workspace
Used to manage programs and settings.
14-2 Overview of CX-Programmer
Sections
Allow ladder programming to be split up into a number of parts.
Ladder Section Window
A window that is used to create and edit ladder programs.
I/O Comment Bar
Displays the name, address, value, and I/O comment of the symbol selected with the cursor.
Output Window
Displays messages, such as search results and errors.
Status Bar
Displays information such as the PLC name, online/offline status, and position of the active cell.
Ladder Section Window
14
14-2-2 CX-Programmer Flow from Startup to Operation
1
2
4
3
4
Rung Number
Program Address
Rung Header
If a rung is incomplete, a red line will be displayed on the right side of the rung header.
Bus Bar
CP1E CPU Unit Software User’s Manual(W480)
14-5
14 Programming Device Operations
14-2-3 Help
The CX-Programmer Help describes all the operations of CX-Programmer. It provides an introduction
to the various windows and panes and describes basic operations, ladder program creation, and monitoring. It also describes each of the instructions, including operand notation and contents.
Accessing CX-Programmer Help
Press the F1 Key from the CX-Programmer.
The Help Window will be displayed.
Accessing the CX-Programmer Instruction Reference
For an explanation of an instruction used in ladder programming, refer to the CX-Programmer Instruction Reference.
Displaying the Instruction Reference from the Main Menu of the
CX-Programmer
Select Instruction Reference - CP1E from the Help Menu.
The CX-Programmer Instruction Reference Window will be displayed.
Displaying the Instruction Reference while Creating a Ladder Program
While creating an instruction in a ladder program in Smart Input Mode, press the F1 Key to display
the Instruction Reference page for the instruction being edited.
Accessing the CP1E I/O Memory Reference
To check the CP1E I/O memory address map from the CX-Programmer, select I/O Memory Reference
from the Help Menu.
14-6
CP1E CPU Unit Software User’s Manual(W480)
14 Programming Device Operations
14-3 Creating a Ladder Program
This section describes the use of CX-Programmer to create a ladder program.
This section shows how to input a ladder program for an example application using the CX-Programmer
commands.
Creating a New Project
To use the CX-Programmer, the first step is to create a new project. To create a new project, we must
specify the PLC type and CPU Unit model for which the ladder program and data to be created will be
used.
1
14
14-3-1 Inputting a Ladder Program
2
Select New from the File Menu.The
Change PLC Dialog Box will be displayed.
The CP1E will already be selected
as the Device Type.
CP1E CPU Unit Software User’s Manual(W480)
14-3 Creating a Ladder Program
14-3-1 Inputting a Ladder Program
14-7
14 Programming Device Operations
3
4
5
Click the Settings Button.
The PLC Type Settings Dialog Box
will be displayed.
Select a CPU Unit model in the CPU
Type box, and then click the OK Button. The PLC Type Settings Dialog
Box will close.
Confirm that “USB” is displayed as
the network type, and then click the
OK Button.
The Change PLC Dialog Box will
close, and the Main Window will be
displayed for a new project.
Additional Information
If “USB” is not displayed for the network type, refer to 4-2-2 Installing the USB Driver in the CP1E
CPU Unit Hardware User’s Manual (Cat.No.479), and check that the USB driver has been
installed correctly.
14-8
CP1E CPU Unit Software User’s Manual(W480)
14 Programming Device Operations
Entering NO and NC Input Conditions
• For a NO input condition using the LD instruction, press the L or C Key and select LD. For an OR
input condition, press the O or W Key and select OR.
• For a NC input condition, press the L or / Key, and then select LD NOT. For an OR NOT input condition, press O or X and select OR NOT.
14-3 Creating a Ladder Program
• Press the Enter Key, and then enter the address.
Inputting a NO Input Condition
1
Press either the L or C Key. “LD
0.00” will be displayed.
14
14-3-1 Inputting a Ladder Program
2
Press the Enter Key.
“Bit (1/1)” will be displayed and
“0.00” will be displayed in reverse
video.
3
If the address is not CIO 0.00, input
the correct address from the keyboard. For example, input “0.02.”
To select an Auxiliary Area bit*,
press the Down Cursor Key to move
the cursor to the Auxiliary Area List,
press the Enter Key, and then select
a bit from the list.
* Condition Flag or previously registered Auxiliary Area bit.
4
Press the Enter Key.
This completes inputting the LD
instruction.
CP1E CPU Unit Software User’s Manual(W480)
14-9
14 Programming Device Operations
Additional Information
• The following instruction variations can be input.
• Upward differentiation (@)
• Downward differentiation (%)
• Immediate refreshing (!)
Example: Immediate refreshing (!) specified.
The symbols indicating these instruction variations will be added to the beginning of the instruction whenever they are input regardless of whether the cursor is before (example: |LD), in the
middle (example:L|D), or at the end (example: LD|) of the instruction.
• After an instruction has been entered, the variation can be changed as follows.
• @: Upward differentiation
• %: Downward differentiation
• !: Immediate refreshing
• Shift + 0: No differentiation
Inputting an OUTPUT Instruction
• To input an OUTPUT instruction, press the O Key and select OUT.
• To input an OUTPUT NOT instruction, press the O or Q Key, and then select OUT NOT.
• Press the Enter Key, and then enter the address.
Input Example
1
Press the O Key.
“OUT 100.00” will be displayed.
2
Press the Enter Key.
An OUTPUT instruction will be displayed with “100.00” in reverse
video.
14-10
CP1E CPU Unit Software User’s Manual(W480)
14 Programming Device Operations
3
Press the Enter Key.
This completes inputting the OUTPUT instruction.
Inputting Instructions
A mnemonic can be entered directly as a character string.
When you enter the first letter, a list of candidate mnemonics will be displayed. Use the Up Cursor and
Down Cursor Keys to move up and down through this list, and then press the Enter Key to make a
selection. Then, input the operands.
14
Example: TIM Instruction
Press the T Key.
14-3-1 Inputting a Ladder Program
1
A list of instructions beginning with T
will be displayed.
2
Press the Enter Key.
“Timer number (1/2)” will be displayed, and “0” will be displayed in
reverse video.
3
Input the timer number.
For example, input “3” and then
press the Enter Key.
4
Input the timer set value.
For example, input “10.”
CP1E CPU Unit Software User’s Manual(W480)
14-3 Creating a Ladder Program
4
For an address other than CIO
100.00, input the address from the
keyboard. Here, “100.02” has been
input.
14-11
14 Programming Device Operations
5
Press the Enter Key.
This completes inputting the TIM
instruction.
Copying Rungs Using the Automatic Address Increment Function
When rungs are copied and then pasted, it is possible to automatically increment the addresses by the
specified number when pasting the rungs.
Example: When the following rung is copied, the bit addresses can be incremented by +16, and the
word address can be incremented by +10 when pasting the rung.
1
Select the above rung and then select Address Increment Copy from the Edit Menu.
The following dialog box will be displayed.
2
In the Offset Area set the Bit Field to 16 and the CH Field to 10 for this example.
Click the Paste Button.
As shown below, the addresses are automatically incremented and the rung is pasted as the
next rung.
14-12
CP1E CPU Unit Software User’s Manual(W480)
14 Programming Device Operations
Addresses are
automatically incremented
when the rung is pasted.
Automatic Creation of Symbol Names and I/O Comments
If there are symbol names or I/O comments in the rung that was copied, executing the Address
Increment Copy Command will automatically create symbol names and I/O comments.
14-3 Creating a Ladder Program
· Bits:
Example: Incrementing by +16 Bits (One Word)
Example: CIO 0.00 is incremented to CIO 1.00.
· Words:
Example: Incrementing by +10 Words
Example: D100 is incremented to D110.
• Automatic Symbol Name Creation
14
Example:
The symbol name LAMP_Blue_1 is automatically
created from the symbol name LAMP_Blue.
14-3-1 Inputting a Ladder Program
Example:
The symbol name Sensor02 is automatically
created from the symbol name Sensor01.
Automatically
incremented.
Example:
The symbol name ALARM_1 is automatically
created from the symbol name ALARM.
• Automatic I/O Comment Creation
Any number at the end of
an I/O comment is
incremented by 1.
When there are no numbers in the I/O
comment, sequential numbers starting
from 1 will be added after an underbar.
Automatically incremented.
• Automatic Creation Rules
By default, automatic creation is governed by the following rules.
Target
Symbol names
Automatic creation rule
Increment the numbers
found from tail.
Description
The symbol name is searched for a number starting from the
end, and any number that is found is incremented by 1.
If no number is found, an underbar and a sequential number
starting from 1 are appended.
I/O comments
Increment the numbers
found from tail.
The I/O comment is searched for a number starting from the
end, and any number that is found is incremented by 1.
If no number is found, an underbar and a sequential number
starting from 1 are appended.
CP1E CPU Unit Software User’s Manual(W480)
14-13
14 Programming Device Operations
Other rules may also be applicable.
Click the Advanced Button to select options. The options are enabled when the Paste Button is
clicked.
Target
Symbol names
Automatic creation rule
Description
Increment the numbers found
from head.
The symbol name is searched for a number starting from
the beginning, and any number that is found is incremented by 1.
If no number is found, an underbar and a sequential
number starting from 1 are appended.
I/O comments
Assign a new number to the
end of the symbol name.
And underbar and sequential number, starting from 1,
are appended to the end of the symbol name.
Increment the numbers found
from head.
The I/O comment is searched for a number starting from
the beginning, and any number that is found is incremented by 1.
If no number is found, an underbar and a sequential
number starting from 1 are appended.
Assign a new number to the
end of the I/O comment.
An underbar and a sequential number starting from 1
are appended to the end of the I/O comment.
Attach same I/O comment.
The same I/O comment is used for the copy.
14-3-2 Saving and Reading Ladder Programs
Always save the ladder program that you have created. This section describes how to check, save, and
read a ladder program.
Checking a Ladder Program for Errors
You can check for errors in a program by compiling it.
1
Select Compile All PLC Programs
from the Program Menu.
Compiling will start. Once compiling
has been completed, the results of
the program check will be displayed
in the Output Window.
14-14
CP1E CPU Unit Software User’s Manual(W480)
14 Programming Device Operations
2
If an error was found, double-click
the error message displayed in the
Output Window.
The cursor will move to the location
of the error. Correct the ladder program as required.
14-3 Creating a Ladder Program
Note When there is more than one error,
press the Shift + J keys to search
for errors in order.
Saving a Ladder Program
Once created, a ladder program must be saved. Ladder programs are saved in projects.
1
Select Save As from the File Menu.
The Save CX-Programmer File Dialog Box will be displayed.
14-3-3 Editing Ladder Programs
2
14
Specify the save location, input the
file name, and then click the Save
Button.
The CX-Programmer project file will
be saved.
14-3-3 Editing Ladder Programs
A ladder program can be edited in the CX-Programmer. Also, I/O comments and rung comments can
be input.
Inputting and Editing I/O Comments
Inputting an I/O Comment with the Ladder Editor
In Smart Input Mode, an I/O comment can be input after an operand has been input using the Comment Dialog Box.
Note The Comment Dialog Box shown above is displayed only when the Show with comment dialog Option is
selected on the Options - Diagrams Dialog Box. The Options - Diagrams Dialog Box is accessed by selecting Options from the Tools Menu.
CP1E CPU Unit Software User’s Manual(W480)
14-15
14 Programming Device Operations
Inputting by Editing I/O Comments
Multiple I/O comments can be input or changed from an address list.
1
Select Edit I/O Comment from the
Edit Menu.
The I/O Comment Editing Window
will be displayed.
2
14-16
Input I/O comments or double-click
the address for which the I/O comments are to be changed. Inputting
the I/O comment will be enabled, so
input the I/O comment.
CP1E CPU Unit Software User’s Manual(W480)
14 Programming Device Operations
Inputting Rung Comments
Comments can be added to rungs in the program.
1
14-3 Creating a Ladder Program
2
Double-click the header of the rung
to which a comment is to be
attached.
The Rung Properties Dialog Box will
be displayed.
Input a comment into the Comment
Field on the General Tab Page.
14
14-3-3 Editing Ladder Programs
3
Close the Rung Properties Dialog
Box.
The input rung comment will be displayed in the ladder program.
CP1E CPU Unit Software User’s Manual(W480)
14-17
14 Programming Device Operations
14-4 Connecting Online to the CP1E and
Transferring the Program
This section describes how to make an online connection between the CX-Programmer and the CP1E,
and then transfer a ladder program to the CP1E.
14-4-1 Connecting Online
To enable transferring programs from the CX-Programmer to the CP1E, it is first necessary to place the
CX-Programmer online with the CP1E.
Online is the state in which communications is possible between the computer and the CP1E.
CX-Programmer
Go online and then transfer the program.
CP1E
1
2
3
14-18
Open the project containing the program to be transferred from the CX-Programmer.
Select Work Online from the PLC
Menu of the CX-Programmer.
A dialog box to confirm going online
will be displayed.
Click the Yes Button.
CP1E CPU Unit Software User’s Manual(W480)
14 Programming Device Operations
Additional Information
If it is not possible to establish an online connection, check the PLC type setting and the communications settings. To check them, double-click New PLC1 [CP1E] Offline in the project tree. For
details on these settings, refer to Creating a New Project in 14-3-1 Inputting a Ladder Program.
14
14-4-2 Changing Operating Modes
14-4-2 Changing Operating Modes
The operating mode can be changed to PROGRAM mode.
The procedure for changing to PROGRAM mode is given below.
1
Select Operating Mode - Program
from the PLC Menu.
A dialog box to confirm changing the
operating mode will be displayed.
2
Click the Yes Button.
The operating mode will be changed.
The operating mode is displayed in
the project tree.
Additional Information
Change to PROGRAM mode before transferring the PLC Setup and ladder program.
CP1E CPU Unit Software User’s Manual(W480)
14-4 Connecting Online to the CP1E and Transferring the Program
Once the online connection has
been established, the color of the
Ladder Section Window will change
to light gray.
14-19
14 Programming Device Operations
14-4-3 Transferring a Ladder Program and the PLC Setup
A ladder program created with the CX-Programmer can be transferred to the CP1E.
1
2
3
Change to PROGRAM mode, select Operating Mode - Program from the PLC Menu, and then
click the Yes Button.
Select Transfer - Transfer [PCPLC]
from the PLC Menu. The Download
Options Dialog Box will be displayed.
Click the OK Button.
A dialog box to confirm the transfer
will be displayed.
To transfer the PLC Setup, select the
Settings Check Box.
Additional Information
For details on the transfer options, refer to the CX-Programmer Online Help.
14-20
CP1E CPU Unit Software User’s Manual(W480)
14 Programming Device Operations
5
14-4 Connecting Online to the CP1E and Transferring the Program
4
Click the Yes Button.
A confirmation dialog will be displayed. Click the Yes Button.
The transfer will start and the Download Dialog Box will be displayed.
6
Click the OK Button.
This completes transferring the ladder program.
14
14-4-4 Starting Operation
14-4-4 Starting Operation
To start operation, turn ON the power or change the operating mode to RUN mode.
Precautions for Correct Use
Operation will not be started when the power is turned ON if the PLC Setup is set so that the
PLC enters PROGRAM mode at startup.
Use the following procedure to change the operating mode to RUN mode. To perform trial operation for
debugging or adjustments, change the operating mode to MONITOR mode.
Precautions for Safe Use
Always confirm the safety of the controlled system before changing to MONITOR or RUN mode.
CP1E CPU Unit Software User’s Manual(W480)
14-21
14 Programming Device Operations
1
Select Operating Mode - Run from
the PLC Menu.
A dialog box to confirm changing the
operating mode will be displayed.
2
Click the Yes Button.
The CP1E will change to RUN
mode, and operation will start.
Additional Information
PROGRAM mode cannot be changed to MONITOR or RUN mode when the user program, PLC
Setup settings and DM area data in the CPU Units are being backed up. Change the operating
mode after the backup is completed.
14-22
CP1E CPU Unit Software User’s Manual(W480)
14 Programming Device Operations
14-5 Online Monitoring and Debugging
This section describes how to use CX-Programmer to monitor and debug a ladder program.
Displaying Execution Status
It is possible to display the execution status of a ladder program. This enables checking the execution of
the ladder program.
Change the CP1E’s operating mode to MONITOR mode to display the execution status.
The execution status of the ladder program will be displayed.
14-5 Online Monitoring and Debugging
14-5-1 Monitoring Status
14
The Ladder Section Window can be split. This enables displaying multiple locations within a ladder program so that you can check them at the same time.
1
1
CP1E CPU Unit Software User’s Manual(W480)
14-23
14-5-1 Monitoring Status
Displaying the Execution Status for More than One Location
14 Programming Device Operations
Window Frames
You can drag the frames in the window to display different views of the program in the Ladder Section Window. The window can be split into up to four sections.
Monitoring Specified Addresses
You can specify addresses to check bit status and word contents.
1
2
While online, select Window - Watch Window from the View Menu.
Input an address.
The bit status or word contents will
be displayed. For BOOL data, 0 indicates OFF.
Additional Information
• When entering an address, place a period between the word address and bit number. For
example, to input the address of bit 04 in CIO 0, input “0.04.”
• An address can be input by dragging it from the Ladder Section Window and dropping it into
the Watch Window. By dragging and dropping the header of a rung, all of the addresses on
that rung can be input.
14-24
CP1E CPU Unit Software User’s Manual(W480)
14 Programming Device Operations
14-5 Online Monitoring and Debugging
14-5-2 Force-set/Reset Bits
Bits that can be Force-set/Reset
• I/O bits
• Word Area bits (W)
• Timer Completion Flags
• Holding Area Bits (H)
• Counter Completion Flags
Precautions for Safe Use
Always check the safety of the system before force-setting or force-resetting a bit and before
releasing forced status.
Force-setting
Force-setting a bit.
1
2
Set the CP1E operating mode to either MONITOR or PROGRAM mode.
Move the cursor to an input condition for the input bit that is to be
force-set.
CP1E CPU Unit Software User’s Manual(W480)
14-25
14
14-5-2 Force-set/Reset Bits
Input bits can be controlled from CX-Programmer regardless of input status from the input devices. This
is used to establish input and output conditions when performing trial operation, or to see the effect of
establishing conditions when debugging.
14 Programming Device Operations
3
Right-click and select Force - On.
The input bit will be force-set. A
symbol indicating the force-set status will be displayed at the input condition.
Additional Information
• Select On to turn ON a bit and Off to turn OFF a bit.
• To cancel forced status, select Cancel.
14-5-3 Online Editing
About Online Editing
A ladder program running on the CP1E can be edited online.
This can be done while the CPU Unit is in MONITOR mode or PROGRAM mode.
Using the CX-Programmer, it is possible to either change part of a ladder program running on the CPU
unit, or make an addition to the program.
Online editing is used to make minor changes to the ladder program without actually stopping the operation of the CPU Unit.
Precautions for Correct Use
• When a ladder program has been changed using online editing, the cycle time of the CPU Unit
may increase by one or more cycles, or it may not be possible to read an input signal.
• Major changes, such as moving a rung, copying, inserting, or deleting, should be done offline
and then the program should be transferred to the CP1E again.
• After completing online editing, the results of editing are backed up to backup memory (built-in
EEPROM), resulting in a longer cycle time. While this is being done, the BKUP indicator will be
lit, and the CX-Programmer will indicate the progress.
• An increase of one cycle will be 16ms maximum daring online editing and 8% of cycle time
during back up.
14-26
CP1E CPU Unit Software User’s Manual(W480)
14 Programming Device Operations
Online Editing Procedure
4
Change the CP1E’s operating mode to MONITOR or PROGRAM mode.
14-5 Online Monitoring and Debugging
1
2
3
Click the header of the rung to be edited.
Select Online Edit - Begin from the
PLC Menu.
The gray color will be cleared from
the Ladder Section Window to indicate that the ladder program can be
edited.
14
Edit the ladder program.
14-5-3 Online Editing
5
Select Online Edit - Send
Changes from the PLC Menu.
The edited rung will be transferred
to the CP1E.
CP1E CPU Unit Software User’s Manual(W480)
14-27
14 Programming Device Operations
14-28
CP1E CPU Unit Software User’s Manual(W480)
pp
Appendices
A-1-1
A-1-2
Read-only Words . . . . . . . . . . . . . . . . . . . . . . . . . . . . . . . . . . . . . . . . . . . . . . . A-2
Read/Write Words . . . . . . . . . . . . . . . . . . . . . . . . . . . . . . . . . . . . . . . . . . . . . A-17
A-2 Response Performance . . . . . . . . . . . . . . . . . . . . . . . . . . . . . . . . . . . . . . . . A-26
A-2-1
A-2-2
A-2-3
I/O Response Time . . . . . . . . . . . . . . . . . . . . . . . . . . . . . . . . . . . . . . . . . . . . A-26
Interrupt Response Time . . . . . . . . . . . . . . . . . . . . . . . . . . . . . . . . . . . . . . . . A-28
Serial PLC Link Response Performance . . . . . . . . . . . . . . . . . . . . . . . . . . . . A-29
A-3 PLC Operation for Power Interruptions . . . . . . . . . . . . . . . . . . . . . . . . . . . A-30
CP1E CPU Unit Software User’s Manual(W480)
A-1
App
A-1 Auxiliary Area Allocations by Address . . . . . . . . . . . . . . . . . . . . . . . . . . . . A-2
Appendices
A-1
Auxiliary Area Allocations by
Address
The following table lists the data provided in the Auxiliary Area in order of the addresses of the data.
A-1-1
Read-only Words
Address
Name
Words
Function
Settings
Bits
A0
10-ms Incrementing
Free Running Timer
This word contains the system timer
used after the power is turned ON.
Status
after
mode
change
Status at
startup
Write
timing
Retained
Cleared
Every 10 ms
after power is
turned ON
Retained
Cleared
Every 100 ms
after power is
turned ON
Retained
Retained
When protection is set or
cleared
A value of 0000 hex is set when the
power is turned ON and this value is
automatically incremented by 1 every
10 ms. The value returns to 0000 hex
after reaching FFFF hex (655,350 ms),
and then continues to be automatically
incremented by 1 every 10 ms.
Related
flags,
settings
Note The timer will continue to be
incremented when the operating
mode is switched to RUN mode.
Example: The interval can be counted
between processing A and processing B without requiring timer instructions. This is achieved by calculating
the difference between the value in A0
for processing A and the value in A0
for processing B. The interval is
counted in 10 ms units.
A1
100-ms Incrementing
Free Running Timer
This word contains the system timer
used after the power is turned ON.
A value of 0000 hex is set when the
power is turned ON and this value is
automatically incremented by 1 every
100 ms. The value returns to 0000 hex
after reaching FFFF hex (6,553,500
ms), and then continues to be automatically incremented by 1 every
100 ms.
Note The timer will continue to be
incremented when the operating
mode is switched to RUN mode.
Example: The interval can be counted
between processing A and processing B without requiring timer instructions. This is achieved by calculating
the difference between the value in A0
for processing A and the value in A0
for processing B. The interval is
counted in 100 ms units.
A99
00
UM Read Protection
Status
Indicates whether all of the ladder programs in the PLC are read-protected.
OFF: UM not
read-protected
ON: UM
read-protected.
A-2
CP1E CPU Unit Software User’s Manual(W480)
Appendices
Address
Name
Words
Function
Settings
When an error has occurred, the error
code, error contents, and error's time
and date are stored in the Error Log
Area. Information on the 20 most
recent errors can be stored.
Each error record occupies 5 words;
the function of these 5 words is as follows:
First word: Error code (bits 0 to 15)
First word + 1: Error contents (bits 0 to
15)
First word + 2: Minutes (upper byte),
Seconds (lower byte)
First word + 3: Day of month (upper
byte), Hours (lower byte)
First word + 4: Year (upper byte),
Month (lower byte)
Error code
Error contents:
Address of Aux. Area
word with details or
0000 hex if there is
no related word.
Bits
A100
to
A199
Error Log Area
Write
timing
Retained
Retained
Refreshed
when error
occurs.
Related
flags,
settings
A500.14
A300
A400
Seconds: 00 to 59,
BCD
Minutes: 00 to 59,
BCD
Hours: 00 to 23,
BCD
Day of month: 01 to
31, BCD
Month: 01 to 12,
BCD
Year: 00 to 99,
BCD
App
11
First Cycle Flag
ON for one cycle after PLC operation
begins (after the mode is switched
from PROGRAM to RUN or MONITOR, for example).
ON for the first cycle
ON
Cleared
12
Step Flag
ON for one cycle when step execution
is started with STEP. This flag can be
used for initialization processing at the
beginning of a step.
ON for the first cycle
after execution of
STEP.
Cleared
Cleared
14
Task Started Flag
When a task switches from WAIT or
INI to RUN status, this flag will be
turned ON within the task for one cycle
only.
ON: ON for first cycle
(including transitions
from WAIT and IN)
Cleared
Cleared
Cleared
Cleared
A-1-1 Read-only Words
A200
Status at
startup
A-1 Auxiliary Area Allocations by Address
Note 1 The data will be unstable if the
capacitor becomes discharged.
2 Errors generated by FAL(006)
and FALS(007) will also be
stored in this Error Log.
3 The Error Log Area can be
reset from the CX-Programmer.
4 If the Error Log Area is full (20
records) and another error
occurs, the oldest record in
A100 to A104 will be cleared,
the other 19 records are
shifted down, and the new
record is stored in A195 to
A199.
5 In an E-type CPU Unit, the
data will be for 1:01.01 on
Sunday January 1, 2001.
Status
after
mode
change
OFF: Other
Note The only difference between this
flag and A200.15 is that this flag
also turns ON when the task
switches from WAIT to RUN status.
15
First Task Startup
Flag
ON when a task is executed for the
first time. This flag can be used to
check whether the current task is
being executed for the first time so that
initialization processing can be performed if necessary.
ON: First execution
A262
and
A263
Maximum Cycle Time
These words contain the maximum
cycle time since the start of PLC operation. The cycle time is recorded in
32-bit binary. The upper digits are in
A263 and the lower digits are in A262.
0 to FFFFFFFF:
A264
and
A265
Present Cycle Time
These words contain the present cycle
time. The cycle time is recorded in
32-bit binary. The upper digits are in
A265 and the lower digits are in A264.
0 to FFFFFFFF:
CP1E CPU Unit Software User’s Manual(W480)
OFF: Not executable
or not being executed for the first
time.
−
−
−
−
0 to 429,496,729.5 ms
(0.1-ms units)
0 to 429,496,729.5 ms
(0.1-ms units)
A-3
Appendices
Address
Name
Words
Function
Bits
A270
and
A271
High-speed Counter 0
PV
Contains the PV of high-speed
counter 0. A271 contains the upper 4
digits and A270 contains the lower 4
digits.
Settings
Status
after
mode
change
Status at
startup
Cleared
• Cleared when operation starts.
Write
timing
Related
flags,
settings
• Refreshed
each cycle
during the
overseeing
processes.
• Refreshed
when PRV
instruction
is executed
to read the
PV.
A272
and
A273
High-speed Counter 1
PV
Contains the PV of high-speed
counter 1. A273 contains the upper 4
digits and A272 contains the lower 4
digits.
Cleared
• Cleared when operation starts.
• Refreshed
each cycle
during the
overseeing
processes.
• Refreshed
when PRV
instruction
is executed
to read the
PV.
A274
00
High-speed Counter 0
Range 1 Comparison
Condition Met Flag
01
High-speed Counter 0
Range 2 Comparison
Condition Met Flag
02
03
These flags indicate whether the PV is
within the specified ranges when
high-speed counter 0 is being operated in range-comparison mode.
Cleared
• Cleared when operation starts.
• Refreshed
when PRV
instruction
is executed
to read the
results of
range comparison.
• Cleared when range comparison
table is registered.
High-speed Counter 0
OFF: PV not in range
Range 3 Comparison
Condition Met Flag
ON: PV in range
High-speed Counter 0
Range 4 Comparison
Condition Met Flag
04
• Refreshed
each cycle
during the
overseeing
processes.
High-speed Counter 0
Range 5 Comparison
Condition Met Flag
05
High-speed Counter 0
Range 6 Comparison
Condition Met Flag
08
High-speed Counter 0
Comparison
In-progress Flag
This flag indicates whether a comparison operation is being executed for
high-speed counter 0.
Cleared
Refreshed
when comparison operation starts or
stops.
Cleared
Refreshed
when an overflow or underflow occurs.
Cleared
Setting used
for high-speed
counter, valid
during counter
operation.
Cleared when operation starts.
OFF: Stopped.
ON: Being executed.
09
High-speed Counter 0
Overflow/Underflow
Flag
This flag indicates when an overflow or
underflow has occurred in the
high-speed counter 0 PV. (Used with
the linear mode counting range only.)
• Cleared when operation starts.
• Cleared when PV is changed.
OFF: Normal
ON: Overflow or underflow
10
High-speed Counter 0
Count Direction
This flag indicates whether the
high-speed counter 0 is currently
being incremented or decremented.
The counter PV for the current cycle is
compared with the PV in last cycle to
determine the direction.
OFF: Decrementing
ON: Incrementing
A-4
CP1E CPU Unit Software User’s Manual(W480)
Appendices
Address
Words
Bits
A275
00
Name
Function
High-speed Counter 1
These flags indicate whether the PV is
within the specified ranges when
high-speed counter 1 is being operated in range-comparison mode for
upper and lower limits.
Range 1 Comparison
Condition Met Flag
01
High-speed Counter 1
02
High-speed Counter 1
Range 3 Comparison
Condition Met Flag
03
Status
after
mode
change
Status at
startup
Cleared
Related
flags,
settings
• Refreshed
each cycle
during overseeing process.
• Refreshed
when PRV
instruction
is executed
to read the
comparison results
for the corresponding
counter.
• Cleared when operation starts.
• Cleared when range comparison
table is registered.
OFF: PV not in range
ON: PV in range
High-speed Counter 1
Range 4 Comparison
Condition Met Flag
04
Write
timing
A-1 Auxiliary Area Allocations by Address
Range 2 Comparison
Condition Met Flag
Settings
High-speed Counter 1
Range 5 Comparison
Condition Met Flag
05
High-speed Counter 1
Range 6 Comparison
Condition Met Flag
08
High-speed Counter 1
Comparison
In-progress Flag
This flag indicates whether a comparison operation is being executed for
high-speed counter 1.
Refreshed
when comparison operation starts or
stops.
Cleared
Refreshed
when an overflow or underflow occurs.
Cleared
Setting used
for high-speed
counter, valid
during counter
operation.
Cleared
When program error
occurs.
• Cleared when operation starts.
OFF: Stopped.
App
Cleared
ON: Being executed
High-speed Counter 1
Overflow/Underflow
Flag
This flag indicates when an overflow or
underflow has occurred in the
high-speed counter 1 PV. (Used with
the linear mode counting range only.)
A-1-1 Read-only Words
09
• Cleared when operation starts.
• Cleared when the PV is changed.
OFF: Normal
ON: Overflow or underflow
10
High-speed Counter 1
Count Direction
This flag indicates whether the
high-speed counter 1 is currently
being incremented or decremented.
The counter PV for the current cycle is
compared with the PV in last cycle to
determine the direction.
OFF: Decrementing
ON: Incrementing
A294
Task Number when
Program Stopped
This word contains the task number of
the task that was being executed when
program execution was stopped
because of a program error.
Cyclic tasks: 0000
Interrupt tasks: 8000
to 800F (task 0 to 15)
Cleared
A298/
A299
Note A298 and A299 contain the program address where program
execution was stopped.
CP1E CPU Unit Software User’s Manual(W480)
A-5
Appendices
Address
Words
Bits
A295
08
Name
Function
Instruction Processing
Error Flag
This flag and the Error Flag (ER) will
be turned ON when an instruction processing error has occurred and the
PLC Setup has been set to stop operation for an instruction error. CPU Unit
operation will stop and the ERR/ALM
indicator will light when this flag goes
ON.
Status
after
mode
change
Settings
ON: Error Flag ON
Cleared
Status at
startup
Cleared
OFF: Error Flag OFF
Write
timing
When program error
occurs.
Indirect DM BCD
Error Flag
This flag and the Access Error Flag
(AER) will be turned ON when an indirect DM BCD error has occurred and
the PLC Setup has been set to stop
operation an indirect DM BCD error.
(This error occurs when the content of
an indirectly addressed DM word is
not BCD although BCD mode has
been selected.) CPU Unit operation
will stop and the ERR/ALM indicator
will light when this flag goes ON.
A294,
A298/
A299
PLC
Setup
(Operation when
instruction error
has
occurred)
Note The task number where the error
occurred will be stored in A294
and the program address will be
stored in A298 and A299.
09
Related
flags,
settings
ON: Not BCD
Cleared
Cleared
OFF: Normal
When program error
occurs.
A294,
A298/
A299
PLC
Setup
(Operation when
instruction error
has
occurred)
Note The task number where the error
occurred will be stored in A294
and the program address will be
stored in A298 and A299.
A295
10
Illegal Access Error
Flag
This flag and the Access Error Flag
(AER) will be turned ON when an illegal access error has occurred and the
PLC Setup has been set to stop operation an illegal access error. (This
error occurs when a region of memory
is accessed illegally.) CPU Unit operation will stop and the ERR/ALM indicator will light when this flag goes ON.
ON: Illegal access
occurred
Cleared
Cleared
OFF: Normal condition
When program error
occurs.
A294,
A298/
A299
PLC
Setup
(Operation when
instruction error
has
occurred)
The following operations are considered illegal access:
• Reading/writing the system area
• Indirect DM BCD error (in BCD
mode)
Note The task number where the error
occurred will be stored in A294
and the program address will be
stored in A298 and A299.
11
No END Error Flag
ON when there isn’t an END instruction in each program within a task.
CPU Unit operation will stop and the
ERR/ALM indicator will light when this
flag goes ON.
ON: No END
Cleared
Cleared
A294,
A298/
A299
OFF: Normal condition
Note The task number where the error
occurred will be stored in A294
and the program address will be
stored in A298 and A299.
12
Task Error Flag
ON when a task error has occurred. A
task error will occur when there is no
program allocated to the task.
ON: Error
OFF: Normal
Cleared
Cleared
A294,
A298/
A299
Note The task number where the error
occurred will be stored in A294
and the program address will be
stored in A298 and A299.
A-6
CP1E CPU Unit Software User’s Manual(W480)
Appendices
Address
Name
Words
Bits
A295
13
Differentiation Overflow Error Flag
Function
The allowed value for Differentiation
Flags which correspond to differentiation instructions has been exceeded.
CPU Unit operation will stop and the
ERR/ALM indicator will light when this
flag goes ON.
Settings
ON: Error
Status
after
mode
change
Status at
startup
Write
timing
Related
flags,
settings
Cleared
A294,
A298/
A299
Cleared
Cleared
A294,
A298/
A299
Cleared
Cleared
A294,
A298/
A299
A294
Note The task number where the error
occurred will be stored in A294
and the program address will be
stored in A298 and A299.
14
Illegal Instruction
Error Flag
ON when a program that cannot be
executed has been stored. CPU Unit
operation will stop and the ERR/ALM
indicator will light when this flag goes
ON.
ON: Error
UM Overflow Error
Flag
ON when the last address in UM (User
Memory) has been exceeded. CPU
Unit operation will stop and the
ERR/ALM indicator will light when this
flag goes ON.
ON: Error
A298
Program Address
Where Program
Stopped
These words contain the program
address of the instruction where program execution was stopped due to a
program error.
Lower digits of the
program address
Cleared
Cleared
A299
Program Address
Where Program
Stopped
Note A294 contains the task number
of the task where program execution was stopped.
Upper digits of the
program address
Cleared
Cleared
When an error occurs, the Error Log
Pointer is incremented by 1 to indicate
the location where the next error
record will be recorded as an offset
from the beginning of the Error Log
Area (A100 to A199).
00 to 14 hex
Retained
Retained
Retained
Retained
Cleared
Cleared
15
(Lower digits)
OFF: Normal
OFF: Normal
A-1 Auxiliary Area Allocations by Address
Cleared
OFF: Normal
App
(Upper digits)
Error Log Pointer
Refreshed
when error
occurs.
A500.14
Cleared
Refreshed
when a
non-fatal error
occurs.
A402.00,
A424
Cleared
Refreshed
when a
non-fatal error
occurs.
A402.00
Note 1 The data will be unstable if the
capacitor becomes
discharged.
2 The Error Log Pointer can be
cleared to 00 by turning
A500.14 (the Error Log Reset
Bit) ON.
3 When the Error Log Pointer
has reached 14 hex (20 decimal), the next record is stored
in A195 to A199 when the
next error occurs.
A310
Manufacturing Lot
Number, Lower Digits
A311
Manufacturing Lot
Number, Upper Digits
The manufacturing lot number is
stored in 6 digits hexadecimal. X, Y,
and Z in the lot number are converted
to 10, 11, and 12, respectively.
Examples:
Lot number 01805
A310 = 0801, A311 = 0005
Lot number 30Y05
A310 =1130, A311 = 0005
A315
13
Option Board Error
Flag
ON when the Option Board is removed
while the power is being supplied.
CPU Unit operation will continue and
the ERR/ALM indicator will flash.
Note OFF when the error has been
cleared.
15
Backup Memory Error
Flag
ON when writing to the built-in
EEPROM backup memory fails. CPU
Unit operation will continue and the
ERR/ALM indicator will flash.
Note OFF when the error has been
cleared.
CP1E CPU Unit Software User’s Manual(W480)
A-7
A-1-1 Read-only Words
A300
Appendices
Address
Name
Words
Function
Bits
A316
to
A317
High-speed Counter 2
PV
Contains the PV of high-speed
counter 2.
Settings
Status
after
mode
change
Status at
startup
Cleared
• The PV is cleared when operation
starts.
A317 contains the upper 4 digits and
A316 contains the lower 4 digits.
A318
to
A319
High-speed Counter 3
PV
Contains the PV of high-speed
counter 3.
Cleared
• The PV is cleared when operation
starts.
00
High-speed Counter 2
Range 1 Comparison
Condition Met Flag
01
High-speed Counter 2
Range 2 Comparison
Condition Met Flag
02
High-speed Counter 2
Range 3 Comparison
Condition Met Flag
03
These flags indicate whether the PV is
within the specified ranges when
high-speed counter 2 is being operated in range-comparison mode for
upper and lower limits.
• Refreshed
each cycle
during the
overseeing
processes.
• Refreshed
each cycle
during the
overseeing
processes.
• Refreshed
when PRV
instruction
is executed
to read PV.
Cleared
• Refreshed
each cycle
during the
overseeing
processes.
• Refreshed
when PRV
instruction
is executed
to read the
results of
range comparison.
• Cleared when operation starts.
• Cleared when range comparison
table is registered.
OFF: PV not in range
ON: PV in range
High-speed Counter 2
Range 4 Comparison
Condition Met Flag
04
Related
flags,
settings
• Refreshed
when PRV
instruction
is executed
to read PV.
A319 contains the upper 4 digits and
A318 contains the lower 4 digits.
A320
Write
timing
High-speed Counter 2
Range 5 Comparison
Condition Met Flag
05
High-speed Counter 2
Range 6 Comparison
Condition Met Flag
08
High-speed Counter 2
Comparison
In-progress Flag
This flag indicates whether a comparison operation is being executed for
high-speed counter 2.
Cleared
Refreshed
when comparison operation starts or
stops.
Cleared
Refreshed
when an overflow or underflow occurs.
Cleared
Setting used
for high-speed
counter, valid
during counter
operation.
• Cleared when operation starts.
OFF: Stopped.
ON: Being executed.
09
High-speed Counter 2
Overflow/Underflow
Flag
This flag indicates when an overflow or
underflow has occurred in the
high-speed counter 2 PV. (Used with
the linear mode counting range only.)
• Cleared when operation starts.
• Cleared when PV is changed.
OFF: Normal
ON: Overflow or underflow
10
High-speed Counter 2
Count Direction
This flag indicates whether the
high-speed counter 2 is currently
being incremented or decremented.
The counter PV for the current cycle is
compared with the PV in last cycle to
determine the direction.
OFF: Decrementing
ON: Incrementing
A-8
CP1E CPU Unit Software User’s Manual(W480)
Appendices
Address
Words
Bits
A321
00
Name
Function
High-speed Counter 3
These flags indicate whether the PV is
within the specified ranges when
high-speed counter 3 is being operated in range-comparison mode for
upper and lower limits.
Range 1 Comparison
Condition Met Flag
01
High-speed Counter 3
02
High-speed Counter 3
Range 3 Comparison
Condition Met Flag
03
Status
after
mode
change
Status at
startup
Cleared
Related
flags,
settings
• Refreshed
each cycle
during overseeing process.
• Refreshed
when PRV
instruction
is executed
to read the
results of
range comparison.
• Cleared when operation starts.
• Cleared when range comparison
table is registered.
OFF: PV not in range
ON: PV in range
High-speed Counter 3
Range 4 Comparison
Condition Met Flag
04
Write
timing
A-1 Auxiliary Area Allocations by Address
Range 2 Comparison
Condition Met Flag
Settings
High-speed Counter 3
Range 5 Comparison
Condition Met Flag
05
High-speed Counter 3
Range 6 Comparison
Condition Met Flag
A321
08
High-speed Counter 3
Comparison
In-progress Flag
This flag indicates whether a comparison operation is being executed for
high-speed counter 3.
Refreshed
when comparison operation starts or
stops.
Cleared
Refreshed
when an overflow or underflow occurs.
Cleared
Setting used
for high-speed
counter, valid
during counter
operation.
Cleared
• Refreshed
each cycle
during the
overseeing
processes.
• Cleared when operation starts.
OFF: Stopped.
App
Cleared
ON: Being executed
High-speed Counter 3
Overflow/Underflow
Flag
This flag indicates when an overflow or
underflow has occurred in the
high-speed counter 3 PV. (Used with
the linear mode counting range only.)
A-1-1 Read-only Words
09
• Cleared when operation starts.
• Cleared when the PV is changed.
OFF: Normal
ON: Overflow or underflow
10
High-speed Counter 3
Count Direction
This flag indicates whether the
high-speed counter is currently being
incremented or decremented. The
counter PV for the current cycle is
compared with the PV in last cycle to
determine the direction.
OFF: Decrementing
ON: Incrementing
A322
to
A323
High-speed Counter 4
PV
Contains the PV of high-speed
counter 4.
• The PV will be cleared at the start of
operation.
A323 contains the upper four digits
and A322 contains the lower four digits.
A324
to
A325
High-speed Counter 5
PV
Contains the PV of high-speed
counter 5.
• The PV is cleared when operation
starts.
A325 contains the upper 4 digits and
A324 contains the lower 4 digits.
CP1E CPU Unit Software User’s Manual(W480)
• Refreshed
when PRV
instruction
is executed
to read PV.
Cleared
• Refreshed
each cycle
during the
overseeing
processes.
• Refreshed
when PRV
instruction
is executed
to read PV.
A-9
Appendices
Address
Words
Bits
A326
00
Name
Function
High-speed Counter 4
These flags indicate whether the PV is
within the specified ranges when
high-speed counter 4 is being operated in range-comparison mode for
upper and lower limits.
Range 1 Comparison
Condition Met Flag
01
High-speed Counter 4
Range 2 Comparison
Condition Met Flag
02
High-speed Counter 4
Range 3 Comparison
Condition Met Flag
03
Settings
Status
after
mode
change
Status at
startup
Cleared
Related
flags,
settings
• Refreshed
each cycle
during the
overseeing
processes.
• Refreshed
when PRV
instruction
is executed
to read the
results of
range comparison.
• Cleared when operation starts.
• Cleared when range comparison
table is registered.
OFF: PV not in range
ON: PV in range
High-speed Counter 4
Range 4 Comparison
Condition Met Flag
04
Write
timing
High-speed Counter 4
Range 5 Comparison
Condition Met Flag
05
High-speed Counter 4
Range 6 Comparison
Condition Met Flag
A326
08
High-speed Counter 4
Comparison
In-progress Flag
This flag indicates whether a comparison operation is being executed for
high-speed counter 4.
Cleared
Refreshed
when comparison operation starts or
stops.
Cleared
Refreshed
when an overflow or underflow occurs.
Cleared
Setting used
for high-speed
counter, valid
during counter
operation.
• Cleared when operation starts.
OFF: Stopped.
ON: Being executed.
09
High-speed Counter 4
Overflow/Underflow
Flag
This flag indicates when an overflow or
underflow has occurred in the
high-speed counter 4 PV. (Used with
the linear mode counting range only.)
• Cleared when operation starts.
• Cleared when PV is changed.
OFF: Normal
ON: Overflow or underflow
10
High-speed Counter 4
Count Direction
This flag indicates whether the
high-speed counter is currently being
incremented or decremented. The
counter PV for the current cycle is
compared with the PV in last cycle to
determine the direction.
OFF: Decrementing
ON: Incrementing
A-10
CP1E CPU Unit Software User’s Manual(W480)
Appendices
Address
Words
Bits
A327
00
Name
Function
High-speed Counter 5
These flags indicate whether the PV is
within the specified ranges when
high-speed counter 5 is being operated in range-comparison mode.
Range 1 Comparison
Condition Met Flag
01
High-speed Counter 5
02
03
Status
after
mode
change
Status at
startup
Cleared
• Cleared when operation starts.
OFF: PV not in range
Range 3 Comparison
Condition Met Flag
ON: PV in range
High-speed Counter 5
Range 4 Comparison
Condition Met Flag
04
Related
flags,
settings
• Refreshed
each cycle
during overseeing process.
• Refreshed
when PRV
instruction
is executed
to read the
results of
range comparison.
• Cleared when range comparison
table is registered.
High-speed Counter 5
Write
timing
A-1 Auxiliary Area Allocations by Address
Range 2 Comparison
Condition Met Flag
Settings
High-speed Counter 5
Range 5 Comparison
Condition Met Flag
05
High-speed Counter 5
Range 6 Comparison
Condition Met Flag
08
High-speed Counter 5
Comparison
In-progress Flag
This flag indicates whether a comparison operation is being executed for
high-speed counter 5.
Refreshed
when comparison operation starts or
stops.
Cleared
Refreshed
when an overflow or underflow occurs.
Cleared
Setting used
for high-speed
counter, valid
during counter
operation.
Cleared
Written at the
start of operation
• Cleared when operation starts.
OFF: Stopped.
App
Cleared
ON: Being executed
High-speed Counter 5
Overflow/Underflow
Flag
This flag indicates when an overflow or
underflow has occurred in the
high-speed counter 5 PV. (Used with
the linear mode counting range only.)
A-1-1 Read-only Words
09
• Cleared when operation starts.
• Cleared when the PV is changed.
OFF: Normal
ON: Overflow or underflow
A327
10
High-speed Counter 5
Count Direction
This flag indicates whether the
high-speed counter is currently being
incremented or decremented. The
counter PV for the current cycle is
compared with the PV in last cycle to
determine the direction.
OFF: Decrementing
ON: Incrementing
A339
to
A340
Maximum Differentiation Flag Number
These words contain the maximum
value of the differentiation flag numbers being used by differentiation
instructions.
CP1E CPU Unit Software User’s Manual(W480)
See
Function
column.
A295.13
A-11
Appendices
Address
Name
Words
Function
Settings
Bits
A351
to
A354
Calendar/Clock Area
(N-type
CPU
Unit
only)
These words contain the CPU Unit’s
internal clock data in BCD. The clock
can be set from the CX-Programmer,
with the DATE instruction, or with a
FINS command (CLOCK WRITE,
0702).
Status
after
mode
change
Status at
startup
Write
timing
Retained
Retained
Written every
cycle
Retained
Cleared
Refreshed
when error
occurs.
Related
flags,
settings
A351.00 to A351.07:
Seconds (00 to 59)(BCD)
A351.08 to A351.15:
Minutes (00 to 59)(BCD)
A352.00 to A352.07:
Hours (00 to 23)(BCD)
A352.08 to A352.15:
Day of the month (01 to 31)(BCD)
A353.00 to A353.07:
Month (01 to 12)(BCD)
A353.08 to A353.15:
Year (00 to 99)(BCD)
A354.00 to A354.07:
Day of the week (00 to 06)(BCD)
00: Sunday
01: Monday
02: Tuesday
03: Wednesday
04: Thursday
05: Friday
06: Saturday
Note 1 The data will be unstable if the
capacitor becomes discharged. Write the ladder program and design the overall
system to handle any problems that might occur if this
data becomes unstable.
2 In an E-type CPU Uint, or if
the clock data is not set for an
N-type CPU Unit, the data will
be for 1:01.01 on Sunday January 1, 2001.
A360
to
A391
01
to
15
Executed FAL Number Flags
The flag corresponding to the specified FAL number will be turned ON
when FAL is executed. Bits A360.01 to
A391.15 correspond to FAL numbers
001 to 511.
ON: That FAL was
executed
OFF: That FAL
wasn’t executed
A402.15
Note The flag will be turned OFF
when the error is cleared.
A-12
CP1E CPU Unit Software User’s Manual(W480)
Appendices
Address
Words
Bits
A392
04
05
Function
Built-in RS-232C Port
Error Flag (CP1E
N-type CPU Unit only)
ON when an error has occurred at the
built-in RS-232C port. (Not valid in NT
Link mode.)
ON: Error
Built-in RS-232C Port
Send Ready Flag
(No-protocol mode)
(CP1E N-type CPU
Unit only)
ON when the built-in RS-232C port is
able to send data in no-protocol mode.
ON: Able-to-send
Built-in RS-232C Port
Reception Completed Flag (No-protocol mode) (CP1E
N-type CPU Unit only)
ON when the built-in RS-232C port
has completed the reception in no-protocol mode.
ON: Reception completed
• When the number of bytes was
specified: ON when the specified
number of bytes is received.
Settings
Status
after
mode
change
Status at
startup
Write
timing
Retained
Cleared
Refreshed
when error
occurs.
Retained
Cleared
Written after
transmission
Retained
Cleared
Written after
reception
Retained
Cleared
Retained
Cleared
Retained
Cleared
Written after
transmission
Retained
Cleared
Written after
reception
Retained
Cleared
OFF: No error
OFF: Unable-to-send
Related
flags,
settings
A-1 Auxiliary Area Allocations by Address
06
Name
OFF: Reception not
completed
• When the end code was specified:
ON when the end code is received
or 256 bytes are received.
07
Built-in RS-232C Port
Reception Overflow
Flag (No-protocol
mode) (CP1E N-type
CPU Unit only)
ON when a data overflow occurred
during reception through the built-in
RS-232C port in no-protocol mode.
ON: Overflow
OFF: No overflow
App
• When the number of bytes was
specified: ON when more data is
received after the reception was
completed but before RXD was executed.
12
13
14
A392
15
Serial Option Port
Communications
Error Flag (CP1E
N-type CPU Unit with
30 or 40 I/O Points
only)
ON when a communications error has
occurred at the Serial Option port.
(Not valid in NT Link mode.)
ON: Error
Serial Option Port
Send Ready Flag
(No-protocol Mode)
(CP1E N-type CPU
Unit with 30 or 40 I/O
Points only)
ON when the Serial Option port is able
to send data in no-protocol mode.
ON: Able-to-send
Serial Option Port
Reception Completed Flag (No-protocol mode) (CP1E
N-type CPU Unit with
30 or 40 I/O Points
only)
ON when the Serial Option port has
completed the reception in no-protocol
mode.
ON: Reception completed
Serial Option Port
Reception Overflow
Flag (No-protocol
mode) (CP1E N-type
CPU Unit with 30 or
40 I/O Points only)
ON when a data overflow occurred
during reception through Serial Option
port in no-protocol mode.
• When the number of bytes was
specified: ON when the specified
number of bytes is received.
A-1-1 Read-only Words
• When the end code was specified:
ON when more data is received
after the end code was received but
before RXD was executed.
ON when 257 bytes are received
before the end code.
OFF: No error
OFF: Unable-to-send
OFF: Reception not
completed
• When the end code was specified:
ON when the end code is received
or 256 bytes are received.
• When the number of bytes was
specified: ON when more data is
received after the reception was
completed but before RXD was executed.
ON: Reception completed
OFF: Reception not
completed
• When the end code was specified:
ON when more data is received
after the end code was received but
before RXD was executed.
ON when 257 bytes are received
before the end code.
CP1E CPU Unit Software User’s Manual(W480)
A-13
Appendices
Address
Words
Bits
A393
00
to
07
Name
Function
Settings
Status
after
mode
change
Built-in RS-232C Port
Polled Unit Communications Flags (CP1E
N-type CPU Unit only)
The corresponding bit will be ON when
the built-in RS-232C port is communicating with NT Link mode or Serial
PLC Link mode.
ON: Communicating
Retained
Cleared
Refreshed
when there is
a normal
response to
the token.
Retained
Cleared
Refreshed
when data is
received.
Retained
Cleared
Refreshed
when there is
a normal
response to
the token.
Status at
startup
OFF: Not communicating
Bits 0 to 7 correspond to Units 0 to 7.
A394
Write
timing
Related
flags,
settings
00
to
15
Built-in RS-232C Port
Reception Counter
(No-protocol Mode)
(CP1E N-type CPU
Unit only)
Indicates (in binary) the number of
bytes of data received when the
built-in RS-232C port is in no-protocol
mode.
00
to
07
Serial Option Port
Polled Unit Communications Flags (CP1E
N-type CPU Unit with
30 or 40 I/O Points
only)
The corresponding bit will be ON when
the Serial Option port is communicating with NT link mode.
Serial Option Port
Reception Counter
(No-protocol Mode)
(CP1E N-type CPU
Unit with 30 or 40 I/O
Points only)
Indicates (in binary) the number of
bytes of data received when the Serial
Option port is in no-protocol mode.
Retained
Cleared
Refreshed
when data is
received.
Error code
When a non-fatal error (user-defined
FALS or system error) or a fatal error
(user-defined FALS or system error)
occurs, the 4-digit hexadecimal error
code is written to this word.
Cleared
Cleared
Refreshed
when error
occurs.
Cleared
Cleared
Refreshed
when error
occurs.
A314
Cleared
Cleared
Refreshed
when error
occurs.
A400
Cleared
Cleared
Refreshed
when the
cycle time
exceeds maximum.
PLC
Setup
(Cycle
time
monitoring time)
00
to
15
A400
ON: Communicating
OFF: Not communicating
Bits 0 to 7 correspond to Units 0 to 7.
Note When two or more errors occur
simultaneously, the highest error
code will be recorded.
A401
00
Other Fatal Error Flag
ON when a fatal error that is not
defined for A401.01 to A401.15
occurs. Detailed information is output
to the bits of A314.
OFF: No other fatal
error
ON: Other fatal error
Note There are no errors that affect
this flag at this time. This flag is
reserved by the system.
06
FALS Error Flag
(fatal error)
ON when a fatal error is generated by
the FALS instruction. The CPU Unit
will stop operating and the ERR/ALM
indicator will light.
ON: FALS executed
OFF: FALS not executed
The corresponding error code will be
written to A400. Error codes C101 to
C2FF correspond to FALS numbers
001 to 511.
Note This flag will be turned OFF
when the FALS errors are
cleared.
08
Cycle Time Too Long
Flag
(fatal error)
ON if the cycle time exceeds the maximum cycle time set in the PLC Setup
(the cycle time monitoring time). CPU
Unit operation will stop and the
ERR/ALM indicator on the front of the
CPU Unit will light.
OFF: Cycle time
under max.
ON: Cycle time over
max.
Note This flag will be turned OFF
when the error is cleared.
A-14
CP1E CPU Unit Software User’s Manual(W480)
Appendices
Address
Name
Words
Bits
A401
09
Program Error Flag
(fatal error)
Too Many I/O Points
Flag
(fatal error)
Settings
ON when program contents are incorrect. CPU Unit operation will stop and
the ERR/ALM indicator on the front of
the CPU Unit will light. The task number where the error occurred will be
stored in A294 and the program
address will be stored in A298 and
A299. The type of program error that
occurred will be stored in A295.08 to
A295.15. Refer to the description of
A295 for more details on program
errors.
ON: Error
ON when the number of Expansion
Units and Expansion I/O Units
exceeds the limit, when the number of
words allocated to these Units
exceeds the limit, are mounted.
ON: Error
Status
after
mode
change
Status at
startup
Write
timing
Related
flags,
settings
Cleared
Cleared
Refreshed
when error
occurs.
A294,
A295,
A298 and
A299
Cleared
Cleared
Refreshed
when error
occurs.
A407
Cleared
Cleared
Refreshed
when error
occurs.
A404
Cleared
Cleared
Refreshed
when error
occurs.
A403.00
to
A403.08,
A403.09
Cleared
Cleared
Refreshed
when error
occurs.
A315
Cleared
Cleared
Refreshed
when error
occurs.
PLC
Setup
(Detect
Battery
Error)
OFF: No error
OFF: No error
CPU Unit operation will stop and the
ERR/ALM indicator on the front of the
CPU Unit will light.
14
ON in the following cases:
ON: Error
(fatal error)
• When an error occurs in a data
transfer between the CPU Unit and
a Expansion Unit or Expansion I/O
Unit. If this happens, 0A0A hex will
be output to A404.
OFF: No error
App
I/O Bus Error Flag
A402
00
04
Memory Error Flag
ON when an error occurred in memory.
ON: Error
(fatal error)
CPU Unit operation will stop and the
ERR/ALM indicator on the front of the
CPU Unit will light. The location where
the error occurred is indicated in
A403.00 to A403.08, and A403.09 will
be turned ON if there was an error
during automatic transfer at startup.
This flag will be turned OFF when the
error is cleared. The automatic
transfer at startup error cannot be
cleared without turning OFF the PLC.
OFF: No error
Other Non-Fatal Error
Flag
ON when a non-fatal error that is not
defined for A402.01 to A402.15
occurs. Detailed information is output
to the bits of A315.
OFF: No other
non-fatal error
ON if the CPU Unit’s battery is disconnected or its voltage is low and the
Detect Battery Error setting has been
set in the PLC Setup.
ON: Error
Battery Error Flag
(non-fatal error)
The CPU Unit will continue operating
and the ERR/ALM indicator on the
front of the CPU Unit will flash.
ON: Other non- fatal
error
OFF: No error
• This flag can be used to control an
external warning light or other indicator to indicate that the battery
needs to be replaced.
• This flag will be turned OFF when
the error is cleared.
CP1E CPU Unit Software User’s Manual(W480)
A-15
A-1-1 Read-only Words
CPU Unit operation will stop and the
ERR/ALM indicator on the front of the
CPU Unit will light. This flag will be
turned OFF when the error is cleared.
15
A-1 Auxiliary Area Allocations by Address
11
Function
Appendices
Address
Words
Bits
A402
10
Name
Function
PLC Setup Error Flag
ON when there is a setting error in the
PLC Setup. The CPU Unit will continue operating and the ERR/ALM indicator on the front of the CPU Unit will
flash. The location of the error will be
written to A406.
(non-fatal error)
Settings
ON: Error
Status
after
mode
change
Status at
startup
Write
timing
Related
flags,
settings
Cleared
Cleared
Refreshed
when error
occurs.
A406 CH
Cleared
Cleared
Refreshed
when error
occurs.
A360 to
A391,
A400
Cleared
Cleared
Refreshed
when error
occurs.
A401.15
Cleared
Cleared
Refreshed
when error is
detected.
OFF: No error
Note This flag will be turned OFF
when the error is cleared.
15
FAL Error Flag
(non-fatal error)
ON when a non-fatal error is generated by executing FAL. The CPU Unit
will continue operating and the
ERR/ALM indicator on the front of the
CPU Unit will flash.
ON: FAL error
occurred
OFF: FAL not executed
The bit in A360 to A391 that corresponds to the FAL number specified in
FALS will be turned ON and the corresponding error code will be written to
A400. Error codes 4101 to 42FF correspond to FAL numbers 001 to 2FF (0
to 511).
Note This flag will be turned OFF
when the error is cleared.
A403
00
to
08
Memory Error Location
When a memory error occurs, the
Memory Error Flag (A401.15) is
turned ON and one of the following
flags is turned ON to indicate the
memory area where the error occurred
ON: Error
OFF: No error
A403.00: Ladder program
A403.04: PLC Setup
When a memory error occurs, the
CPU Unit will continue operating and
the ERR/ALM indicator on the front of
the CPU Unit will flash.
Note The corresponding flag will be
turned OFF when the error is
cleared.
10
A404
Backup Memory Error
Flag
ON when the built-in EEPROM backup
memory is physically destroyed.
ON: Error
I/O Bus Error Details
Contains information on I/O bus
errors. The CPU Unit will stop operating and the ERR/ALM indicator on the
front of the CPU Unit will light.
0A0A hex: Expansion Unit error
Cleared
Cleared
Refreshed
when error is
detected.
A401.14
Refreshed
when error
occurs.
A401.11
OFF: No error
Note A401.04 (I/O Bus Error Flag) will
turn ON.
A407
13
to
15
Too Many I/O Points,
Cause
The 3-digit binary value of these bits
indicates the cause of the Too Many
I/O Points Error.
010: Too many
Expansion Unit and
Expansion I/O Unit
words
Cleared
Cleared
A424
00
to
15
Error Option Board
Flags
The bit corresponding to the option
slot turns ON when an error occurs in
an Option Board (A315.13 will be ON).
ON: Error
Cleared
Cleared
00
to
02
Expansion Unit and
Expansion I/O Unit
Error Flags
ON when an error occurs in a
CP-series Expansion Unit or Expansion I/O Unit.
Retained
Cleared
A353.13
OFF: No error
Bit 01: Option slot 2
A436
OFF: No error
ON: Error
A436.00: 1st Unit
A436.01: 2nd Unit
A436.02: 3rd Unit
A436.03: 4th Unit
A436.04: 5th Unit
A436.05: 6th Unit
Note CP1W-TS002/TS102/AD041/DA0
41/32ER/32ET/32ET1 are each
counted as two Units.
A-16
CP1E CPU Unit Software User’s Manual(W480)
Appendices
Address
Words
Name
Function
Number of Connected
Units
Stores the number of Expansion Units
and Expansion I/O Units connected as
a hexadecimal number.
Settings
Bits
A437
Status
after
mode
change
Status at
startup
Write
timing
0000 to 0007 hex
Retained
Cleared
0000 to FFFF hex
Cleared
Cleared
Written after
the interrupt
task with the
max. processing time is
executed.
8000 to 800F hex
Cleared
Cleared
Written after
the interrupt
task with the
max. processing time is
executed.
Related
flags,
settings
A440
Max. Interrupt Task
Processing Time
Contains the Maximum Interrupt Task
Processing Time in units of 0.1 ms.
Note This value is cleared when PLC
operation begins.
A441
Interrupt Task with
Max. Processing
Time
Contains the task number of the interrupt task with the maximum processing time. Hexadecimal values 8000 to
800F correspond to task numbers 00
to 0F. Bit 15 is turned ON when an
interrupt has occurred.
A-1 Auxiliary Area Allocations by Address
Note This information is valid only
when a Too Many I/O Points
error has occurred.
CP1W-TS002/TS102/AD041/DA0
41/32ER/32ET/32ET1 are each
counted as two Units.
Note This value is cleared when PLC
operation begins.
App
A-1-2
Read/Write Words
Name
Words
Bits
A500
12
13
14
IOM Hold Bit
Function
Settings
Turn ON this bit to preserve the status
of the I/O Memory when shifting from
PROGRAM to RUN or MONITOR
mode or vice versa.
ON: Retained
Forced Status Hold
Bit
Turn ON this bit to preserve the status
of bits that have been force-set or
force-reset when shifting from PROGRAM to MONITOR mode or vice
versa. Always use this bit together with
the IOM Hold Bit (A500.12), i.e., turn
them ON at the same time.
ON: Retained
Error Log Reset Bit
Turn this bit ON to reset the Error Log
Pointer (A300) to 00.
OFF to ON: Clear
Status
after
mode
change
Status at
startup
Retained
Not
retained
Refreshed
when power is
turned ON.
Retained
Not
retained
Refreshed
when power is
turned ON.
Retained
Cleared
Retained
Cleared
Retained
Cleared
OFF: Not retained
OFF: Not retained
Note 1 The contents of the Error Log
Area itself (A100 to A199) are
not cleared.
2 This bit is automatically reset
to 0 after the Error Log Pointer
is reset.
15
Output OFF Bit
Turn this bit ON to turn OFF all outputs
from the CPU Unit, CP-series Expansion Units, and CP-series Expansion
I/O Units. The INH indicator on the
front of the CPU Unit will light while
this bit is ON.
Write
timing
Related
flags,
settings
A100 to
A199,
A300
Note This bit is cleared when the
power supply is turned OFF.
A508
09
Differentiate Monitor
Completed Flag
ON when the differentiate monitor condition has been established during
execution of differentiation monitoring.
Note This flag will be cleared to 0
when differentiation monitoring
starts.
CP1E CPU Unit Software User’s Manual(W480)
ON: Monitor condition established
OFF: Not yet established
A-17
A-1-2 Read/Write Words
Address
Appendices
Address
Name
Words
A510
to
A511
Function
Settings
Bits
−
Startup Time
(CP1E
N-type
CPU
Unit
only)
These words contain the time at which
the power was turned ON. The contents are updated every time that the
power is turned ON. The data is stored
in BCD.
Status
after
mode
change
Status at
startup
Write
timing
See Function column.
Retained
See
Function
column.
Refreshed
when power is
turned ON.
See Function column.
Retained
Retained
Written at
power
interruption.
0000 to FFFF hex
Retained
Retained
Refreshed
when power is
turned ON.
Related
flags,
settings
A510.00 to A510.07: Second (00 to
59)
A510.08 to A510.15: Minute (00 to 59)
A511.00 to A511.07: Hour (00 to 23)
A511.08 to A511.15: Day of month (01
to 31)
Note 1 The data will be unstable if the
capacitor becomes
discharged.
2 In an E-type CPU Unit, or if
the clock data is not set for an
N-type CPU Unit, the data will
be for 1:01.01 on Sunday January 1, 2001.
A512
to
A513
−
Power Interruption
Time
(CP1E
N-type
CPU
Unit
only)
These words contain the time at which
the power was interrupted. The contents are updated every time that the
power is interrupted. The data is
stored in BCD.
A512.00 to A512.07: Second (00 to
59)
A512.08 to A512.15: Minute (00 to 59)
A513.00 to A513.07: Hour (00 to 23)
A513.08 to A513.15: Day of month (01
to 31)
Note 1 These words are not cleared
at startup.
2 The data will be unstable if the
capacitor becomes
discharged.
3 In an E-type CPU Unit, or if
the clock data is not set for an
N-type CPU Unit, the data will
be for 1:01.01 on Sunday January 1, 2001.
A514
−
Number of Power
Interruptions
Contains the number of times that
power has been interrupted since the
power was first turned ON. The data is
stored in binary. To reset this value,
overwrite the current value with 0000.
Note The data will be unstable if the
capacitor becomes discharged.
A-18
CP1E CPU Unit Software User’s Manual(W480)
Appendices
Status
after
mode
change
Status at
startup
Write
timing
See at left.
Retained
Retained
See at left.
See at left.
Retained
Retained
See at left.
OFF to ON: Restart
Retained
Cleared
OFF to ON: Restart
port
Retained
Cleared
Address
Words
A515
to
A517
Name
Function
Operation Start Time
The time that operation started as a
result of changing the operating mode
to RUN or MONITOR mode is stored
here in BCD.
Settings
Bits
−
(CP1E
N-type
CPU
Unit
only)
Related
flags,
settings
A-1 Auxiliary Area Allocations by Address
A515.00 to A515.07: Seconds (00 to
59)
A515.08 to A515.15: Minutes (00 to
59)
A516.00 to A516.07: Hour (00 to 23)
A516.08 to A516.15: Day of month (01
to 31)
A517.00 to A517.07: Month (01 to 12)
A517.08 to A517.15: Year (00 to 99)
Note 1 The previous start time is
stored after turning ON the
power supply until operation is
started.
2 The data will be unstable if the
capacitor becomes
discharged.
3 In an E-type CPU Unit, or if
the clock data is not set for an
N-type CPU Unit, the data will
be for 1:01.01 on Sunday January 1, 2001.
−
Operation End Time
(CP1E
N-type
CPU
Unit
only)
The time that operation stopped as a
result of changing the operating mode
to PROGRAM mode is stored here in
BCD.
App
A518
to
A520
A-1-2 Read/Write Words
A518.00 to A518.07: Seconds (00 to
59)
A518.08 to A518.15: Minutes (00 to
59)
A519.00 to A519.07: Hour (00 to 23)
A519.08 to A519.15: Day of month (01
to 31)
A520.00 to A520.07: Month (01 to 12)
A520.08 to A520.15: Year (00 to 99)
Note 1 If an error occurs in operation,
the time of the error will be
stored. If the operating mode
is then changed to
PROGRAM mode, the time
that PROGRAM mode was
entered will be stored.
2 The data will be unstable if the
capacitor becomes
discharged.
3 In an E-type CPU Unit, or if
the clock data is not set for an
N-type CPU Unit, the data will
be for 1:01.01 on Sunday
January 1, 2001.
A526
00
01
Built-in RS-232C Port
Restart Bit (CP1E
N-type CPU Unit only)
Turn ON this bit to restart the built-in
RS-232C port.
Serial Option Port
Restart Bit (CP1E
N-type CPU Unit with
30 or 40 I/O Points
only)
Turn ON this bit to restart the Serial
Option port.
Note This bit is turned OFF automatically when the restart processing
is completed.
Note This bit is turned OFF automatically when the restart processing
is completed.
CP1E CPU Unit Software User’s Manual(W480)
A-19
Appendices
Status
after
mode
change
Address
Words
Bits
A528
00
to
07
Name
Function
Built-in RS-232C Port
Error Flags (CP1E
N-type CPU Unit only)
These flags indicate what kind of error
has occurred at the built-in RS-232C
port.
• They are automatically turned OFF
when the built-in RS-232C port is
restarted.
• Only bit 5 (timeout error) is valid in
NT Link mode.
• Serial PLC Link Polling Unit:
Bit 05: ON for timeout error.
Serial PLC Link Polled Unit:
Bit 03: ON for framing error.
Bit 04: ON for overrun error.
Bit 05: ON for timeout error.
Settings
Bits 00 and 01: Not
used.
Status at
startup
Retained
Cleared
Retained
Cleared
Retained
Cleared
Retained
Cleared
Write
timing
Related
flags,
settings
Bit 02: ON for parity
error.
Bit 03: ON for framing error.
Bit 04: ON for overrun error.
Bit 05: ON for timeout error.
Bits 06 and 07: Not
used.
These bits can be cleared by the
CX-Programmer.
08
to
15
Serial Option Port
Error Flags (CP1E
N-type CPU Unit with
30 or 40 I/O Points
only)
These flags indicate what kind of error
has occurred at Serial Option port.
Bits 08 and 09: Not
used.
• They are automatically turned OFF
when Serial Option port is restarted.
Bit 10: ON for parity
error.
• Only bit 5 (timeout error) is valid in
NT Link mode.
Bit 11: ON for framing error.
• Serial PLC Link Polling Unit:
Bit 13: ON for timeout error.
Serial PLC Link Polled Unit:
Bit 11: ON for framing error.
Bit 12: ON for overrun error.
Bit 13: ON for timeout error.
Bit 12: ON for overrun error.
These bits can be cleared by the
CX-Programmer.
A529
A531
A-20
FAL/FALS Number for
System Error Simulation
00
High-speed Counter 0
Reset Bit
01
High-speed Counter 1
Reset Bit
02
High-speed Counter 2
Reset Bit
03
High-speed Counter 3
Reset Bit
04
High-speed Counter 4
Reset Bit
05
High-speed Counter 5
Reset Bit
Bit 13: ON for timeout error.
Bits 14 and 15: Not
used.
Set a dummy FAL/FALS number to
use to simulate the system error using
FAL or FALS.
0001 to 01FF hex:
FAL/FALS numbers
1 to 511
Note When FAL or FALS is executed
and the number in A529 is the
same as the one specified in the
operand of the instruction, the
system error given in the operand of the instruction will be generated instead of a user-defined
error.
0000 or 0200 to
FFFF hex: No
FAL/FALS number
for system error simulation. (No error will
be generated.)
When the reset method is set to
Phase-Z signal + Software reset, the
corresponding high-speed counter's
PV will be reset if the phase-Z signal is
received while this bit is ON.
When the reset method is set to Software reset, the corresponding
high-speed counter's PV will be reset
in the cycle when this bit turns ON.
CP1E CPU Unit Software User’s Manual(W480)
Appendices
Address
Name
Words
Bits
A617
00
Built-in RS232C PortCommunication Settings
Function
Display the present communication
settings of the built-in RS232C
port.Reflect the PLC Setup when
power is turned ON.
01
Settings
Parity
Status
after
mode
change
Write
timing
Retained
See
Function
column.
Refreshed
when power is
turned ON.
Retained
See
Function
column.
Refreshed
when power is
turned ON.
Retained
See
Function
column.
Refreshed
when power is
turned ON.
Retained
See
Function
column.
Refreshed
when power is
turned ON.
Retained
See
Function
column.
Refreshed
when power is
turned ON.
Retained
See
Function
column.
Refreshed
when power is
turned ON.
Retained
See
Function
column.
Refreshed
when power is
turned ON.
Retained
See
Function
column.
Refreshed
when power is
turned ON.
Retained
See
Function
column.
Refreshed
when power is
turned ON.
Retained
See
Function
column.
Refreshed
when power is
turned ON.
Retained
See
Function
column.
Refreshed
when power is
turned ON.
Retained
See
Function
column.
Refreshed
when power is
turned ON.
0: Even
1: Odd
Parity
0: Yes
1: No
02
Stop bit
0: 2 bits
1: 1 bit
03
Data length
0: 7 bits
1: 8 bits
04
Start bit
0: 1 bit (fixed)
08
to
11
Communication
speed
0 hex: Default (9600)
3 hex: 1200
Related
flags,
settings
A-1 Auxiliary Area Allocations by Address
Status at
startup
4 hex: 2400
App
5 hex: 4800
6 hex: 9600
7 hex: 19200
8 hex: 38400
A-1-2 Read/Write Words
9 hex: 57600
A hex: 115200
12
to
15
Communication
mode
0 hex: Default (Host
Link)
2 hex: NT link (1: N)
3 hex: Non-protocol
5 hex: Host Link
7 hex: Serial PLC
Link (Slave)
8 hex: Serial PLC
Link (Master)
9 hex: Modbus-RTU
Easy Master
A618
00
SerialOption PortCommunication Settings
Display the present communication
settings of the serial option
port.Reflect the PLC Setup when
power is turned ON.
01
Parity
0: Even
1: Odd
Parity
0: Yes
1: No
02
Stop bit
0: 2 bits
1: 1 bit
03
Data length
0: 7 bits
1: 8 bits
04
Start bit
0: 1 bit (fixed)
CP1E CPU Unit Software User’s Manual(W480)
A-21
Appendices
Status
after
mode
change
Address
Name
Words
Bits
A618
08
to
11
SerialOption PortCommunication Settings
Function
Display the present communication
settings of the serial option
port.Reflect the PLC Setup when
power is turned ON.
Settings
Communication
speed
Status at
startup
Write
timing
Retained
See
Function
column.
Refreshed
when power is
turned ON.
Retained
See
Function
column.
Refreshed
when power is
turned ON.
Retained
Cleared
Retained
Cleared
Retained
Cleared
Retained
Cleared
Retained
Cleared
Retained
Cleared
0 hex: Default (9600)
Related
flags,
settings
3 hex: 1200
4 hex: 2400
5 hex: 4800
6 hex: 9600
7 hex: 19200
8 hex: 38400
9 hex: 57600
A hex: 115200
12
to
15
Communication
mode
0 hex: Default (Host
Link)
2 hex: NT link(1: N)
3 hex: Non-protocol
5 hex: Host Link
7 hex: Serial PLC
Link (Slave)
8 hex: Serial PLC
Link (Master)
9 hex: Modbus-RTU
Easy Master
A640
00
01
02
A641
00
01
02
A-22
Built-in RS-232C Port
Modbus-RTU Easy
Master Execution Bit
(CP1E N-type CPU
Unit only)
Turn ON this bit to send a command
and receive a response for the built-in
RS-232C port using the Modbus-RTU
easy master function.
Turned ON: Execution started
Note This bit will be turned OFF automatically by the system when
communications have been completed.
OFF: Not executed
or execution completed.
Built-in RS-232C Port
Modbus-RTU Easy
Master Normal End
Flag (CP1E N-type
CPU Unit only)
ON when one command has been
sent and the response received for
the built-in RS-232C port using the
Modbus-RTU easy master function.
ON: Execution normal.
Built-in RS-232C Port
Modbus-RTU Easy
Master Error End Flag
(CP1E N-type CPU
Unit only)
ON when an error has occurred in
communications for the built-in
RS-232C port using the Modbus-RTU
easy master function.
ON: Execution error.
Serial Option Port
Modbus-RTU Master
Execution Bit (CP1E
N-type CPU Unit with
30 or 40 I/O Points
only)
Turn ON this bit to send a command
and receive a response for Serial
Option port using the Modbus-RTU
easy master function.
Turned ON: Execution started
Note This bit will be turned OFF automatically by the system when
communications have been completed.
OFF: Not executed
or execution completed.
Serial Option Port
Modbus-RTU Master
Execution Normal
Flag (CP1E N-type
CPU Unit with 30 or
40 I/O Points only)
ON when one command has been
sent and the response received for
Serial Option port using the Modbus-RTU easy master function.
ON: Execution normal.
Serial Option Port
Modbus-RTU Master
Execution Error Flag
(CP1E N-type CPU
Unit with 30 or 40 I/O
Points only)
ON when an error has occurred in
communications for Serial Option port
using the Modbus-RTU easy master
function.
ON: Execution error.
ON: Execution in
progress.
OFF: Execution error
or still in progress.
DM Area
words for
built-in
RS -232C
port
Modbus
-RTU
Easy
Master:
D01200
to
D01299
OFF: Execution normal or still in
progress.
The error code is output to D01252 in
the DM fixed allocation words for Modbus-RTU Easy Master.
ON: Execution in
progress.
OFF: Execution error
or still in progress.
DM Area
words for
built-in
RS -232C
port
Modbus
-RTU
Easy
Master:
D01300
to
D01399
OFF: Execution normal or still in
progress.
The error code is output to D01352 in
the DM fixed allocation words for Modbus-RTU Easy Master.
CP1E CPU Unit Software User’s Manual(W480)
Appendices
Address
Name
Words
Function
Settings
Bits
Status
after
mode
change
Status at
startup
Write
timing
Analog Adjustment 1
PV
Stores the value set on analog
adjuster 1 as a hexadecimal value.
0000 to 00FF hex
Retained
Cleared
A643
Analog Adjustment 2
PV
Stores the value set on analog
adjuster 2 as a hexadecimal value.
0000 to 00FF hex
Retained
Cleared
A720
to
A722
Power ON Clock Data
1
These words contain the time at which
the power was turned ON one time
before the startup time stored in words
A510 to A511.
See at left.
Retained
Retained
Written when
power is
turned ON.
See at left.
Retained
Retained
Written when
power is
turned ON.
See at left.
Retained
Retained
Written when
power is
turned ON.
See at left.
Retained
Retained
Written when
power is
turned ON.
(CP1E
N-type
CPU
Unit
only)
A-1 Auxiliary Area Allocations by Address
A642
Related
flags,
settings
A720.00 to A720.07: Seconds (00 to
59)
A720.08 to A720.15: Minutes (00 to
59)
A721.00 to A721.07: Hour (00 to 23)
A721.08 to A721.15: Day of month (01
to 31)
A722.00 to A722.07: Month (01 to 12)
A722.08 to A722.15: Year (00 to 99)
A723
to
A725
Power ON Clock Data
2
A726
to
A728
A723.00 to A723.07: Seconds (00 to
59)
A723.08 to A723.15: Minutes (00 to
59)
A724.00 to A724.07: Hour (00 to 23)
A724.08 to A724.15: Day of month (01
to 31)
A725.00 to A725.07: Month (01 to 12)
A725.08 to A725.15: Year (00 to 99)
Power ON Clock Data
3
(CP1E
N-type
CPU
Unit
only)
A729
to
A731
(CP1E
N-type
CPU
Unit
only)
A-1-2 Read/Write Words
(CP1E
N-type
CPU
Unit
only)
These words contain the time at which
the power was turned ON two times
before the startup time stored in words
A510 to A511.
App
Note 1 All of the clock data from
A720 to A749 is cleared if the
capacitor becomes
discharged.
2 In an E-type CPU Unit, or if
the clock data is not set for an
N-type CPU Unit, the data will
be for 1:01.01 on Sunday January 1, 2001.
These words contain the time at which
the power was turned ON three times
before the startup time stored in words
A510 to A511.
A726.00 to A726.07: Seconds (00 to
59)
A726.08 to A726.15: Minutes (00 to
59)
A727.00 to A727.07: Hour (00 to 23)
A727.08 to A727.15: Day of month (01
to 31)
A728.00 to A728.07: Month (01 to 12)
A728.08 to A728.15: Year (00 to 99)
Power ON Clock Data
4
These words contain the time at which
the power was turned ON four times
before the startup time stored in words
A510 to A511.
A729.00 to A729.07: Seconds (00 to
59)
A729.08 to A729.15: Minutes (00 to
59)
A730.00 to A730.07: Hour (00 to 23)
A730.08 to A730.15: Day of month (01
to 31)
A731.00 to A731.07: Month (01 to 12)
A731.08 to A731.15: Year (00 to 99)
CP1E CPU Unit Software User’s Manual(W480)
A-23
Appendices
Status
after
mode
change
Status at
startup
Write
timing
See at left.
Retained
Retained
Written when
power is
turned ON.
See at left.
Retained
Retained
Written when
power is
turned ON.
See at left.
Retained
Retained
Written when
power is
turned ON.
See at left.
Retained
Retained
Written when
power is
turned ON.
See at left.
Retained
Retained
Written when
power is
turned ON.
Address
Words
A732
to
A734
Name
Function
Power ON Clock Data
5
These words contain the time at which
the power was turned ON five times
before the startup time stored in words
A510 to A511.
Bits
(CP1E
N-type
CPU
Unit
only)
A735
to
A737
Power ON Clock Data
6
Power ON Clock Data
7
(CP1E
N-type
CPU
Unit
only)
A-24
These words contain the time at which
the power was turned ON seven times
before the startup time stored in words
A510 to A511.
A738.00 to A738.07: Seconds (00 to
59)
A738.08 to A738.15: Minutes (00 to
59)
A739.00 to A739.07: Hour (00 to 23)
A739.08 to A739.15: Day of month (01
to 31)
A740.00 to A740.07: Month (01 to 12)
A740.08 to A740.15: Year (00 to 99)
Power ON Clock Data
8
(CP1E
N-type
CPU
Unit
only)
A744
to
A746
These words contain the time at which
the power was turned ON six times
before the startup time stored in words
A510 to A511.
A735.00 to A735.07: Seconds (00 to
59)
A735.08 to A735.15: Minutes (00 to
59)
A736.00 to A736.07: Hour (00 to 23)
A736.08 to A736.15: Day of month (01
to 31)
A737.00 to A737.07: Month (01 to 12)
A737.08 to A737.15: Year (00 to 99)
(CP1E
N-type
CPU
Unit
only)
A741
to
A743
Related
flags,
settings
A732.00 to A732.07: Seconds (00 to
59)
A732.08 to A732.15: Minutes (00 to
59)
A733.00 to A733.07: Hour (00 to 23)
A733.08 to A733.15: Day of month (01
to 31)
A734.00 to A734.07: Month (01 to 12)
A734.08 to A734.15: Year (00 to 99)
(CP1E
N-type
CPU
Unit
only)
A738
to
A740
Settings
These words contain the time at which
the power was turned ON eight times
before the startup time stored in words
A510 to A511.
A741.00 to A741.07: Seconds (00 to
59)
A741.08 to A741.15: Minutes (00 to
59)
A742.00 to A742.07: Hour (00 to 23)
A742.08 to A742.15: Day of month (01
to 31)
A743.00 to A743.07: Month (01 to 12)
A743.08 to A743.15: Year (00 to 99)
Power ON Clock Data
9
These words contain the time at which
the power was turned ON nine times
before the startup time stored in words
A510 to A511.
A744.00 to A744.07: Seconds (00 to
59)
A744.08 to A744.15: Minutes (00 to
59)
A745.00 to A745.07: Hour (00 to 23)
A745.08 to A745.15: Day of month (01
to 31)
A746.00 to A746.07: Month (01 to 12)
A746.08 to A746.15: Year (00 to 99)
CP1E CPU Unit Software User’s Manual(W480)
Appendices
Address
Words
A747
to
A749
Name
Function
Power ON Clock Data
10
These words contain the time at which
the power was turned ON ten times
before the startup time stored in words
A510 to A511.
Settings
Bits
(CP1E
N-type
CPU
Unit
only)
See at left.
Status
after
mode
change
Status at
startup
Write
timing
Retained
Retained
Written when
power is
turned ON.
Related
flags,
settings
A751.11
DM Backup Restore
Failed Flag
ON when DM backup data could not
be restored normally. If this flag turns
ON, data will not be restored from the
built-in EEPROM backup memory to
RAM.
Retained
Cleared
A751.14
DM Backup Save Flag
ON when A751.15 is turned ON to
start the saving operation. This flag
stays ON while data is being saved
and turns OFF when finished.
Retained
Cleared
A751.15
DM Backup Save
Start Bit
Saving the specified words from the
DM Area in RAM to the built-in
EEPROM backup memory is started
when this bit is turned ON.
Retained
Cleared
ON: Start saving.
A-1 Auxiliary Area Allocations by Address
A747.00 to A747.07: Seconds (00 to
59)
A747.08 to A747.15: Minutes (00 to
59)
A748.00 to A748.07: Hour (00 to 23)
A748.08 to A748.15: Day of month (01
to 31)
A749.00 to A749.07: Month (01 to 12)
A749.08 to A749.15: Year (00 to 99)
App
OFF: Execution normal or still in
progress.
A-1-2 Read/Write Words
This bit will not turn OFF automatically
even when saving the data has been
completed.
If this bit is turned ON and OFF while
the DM Backup Save Flag (A751.14)
is ON, it will be ignored and the data
will not be backed up again.
Note Select the Restore D0- from
backup memory Check Box and
set the number of DM Area
words to back up in the Number
of CH of DM for backup Box in
the PLC Setup before using this
bit.
CP1E CPU Unit Software User’s Manual(W480)
A-25
Appendices
A-2
Response Performance
A-2-1
I/O Response Time
The I/O response time is the time it takes from when an input turns ON, the data is recognized by the
CPU Unit, and the ladder programs are executed, up to the time for the result to be output to an output
terminal.
The length of the I/O response time depends on the following conditions.
• Timing of Input Bit turning ON.
• The cycle time
Minimum I/O Response Time
The I/O response time is shortest when data is retrieved immediately before I/O refresh of the CPU Unit.
The minimum I/O response time is calculated as follows:
Minimum I/O response time = Input ON delay + Cycle time + Output ON delay
Note The input and output ON delays depend on the type of terminals used on the CPU Unit or the model number
of the Unit being used.
:I/O refresh
Inputs:
Input ON delay
(Status read to
the CPU Unit.):
Cycle time
Instruction
execution
Cycle time
Instruction
execution
Output ON delay
Outputs:
Minimum I/O
Response Time
Maximum I/O Response Time
The I/O response time is longest when data is retrieved immediately after I/O refresh period of the
CPU Unit.
The maximum I/O response time is calculated as follows:
Maximum I/O response time = Input ON delay + (Cycle time × 2) + Output ON delay
:I/O refresh
Inputs:
Input ON delay
(Status read to
the CPU Unit.):
Cycle time
Instruction
execution
Cycle time
Instruction
execution
Instruction
execution
Output ON delay
Outputs:
Maximum I/O Response Time
A-26
CP1E CPU Unit Software User’s Manual(W480)
Appendices
Calculation Example
Conditions:
Input ON delay: 1 ms (normal input 0.08 to 0.11 with input constant set to 0 ms)
Output ON delay: 0.1 ms (transistor output)
Cycle time: 20 ms
Minimum I/O response time = 1 ms + 20 ms + 0.1 ms = 21.1 ms
Maximum I/O response time = 1 ms + (20 ms × 2) + 0.1 ms = 41.1 ms
Input Constant Setting
Increasing the input constants slowers the input response time and reduces the effects of chattering
and noise. Decreasing the input constants fasters the input response time and allows reception of
shorter input pulses (but the pulse width must be longer than the cycle time).
Input response time
Input response time
Inputs
Inputs
App
I/O refresh
I/O refresh
CPU Unit
Pulses shorter than the input
response time are not received
CPU Unit
A-2-1 I/O Response Time
PLC Setup
Name
Input Constant Settings
A-2 Response Performance
Input constant setting can be set in the PLC Setup.
Description
Input Constants
Setting
00 hex: 8 ms
Default
00 hex (8 ms)
10 hex: No filter (0 ms)
12 hex: 1 ms
13 hex: 2 ms
14 hex: 4 ms
15 hex: 8 ms
16 hex: 16 ms
17 hex: 32 ms
Note The input constants of CP1W-40EDR/EDT/EDT1 are always 16ms regardless of the settings.
CP1E CPU Unit Software User’s Manual(W480)
A-27
Appendices
A-2-2
Interrupt Response Time
Interrupt Response Time for Input Interrupt Tasks
The interrupt response time for input interrupt tasks is the time taken from when a built-in input has
turned ON (or OFF) until the input interrupt task has actually been executed.
The length of the interrupt response time for input interrupt tasks depends on the total of the hardware interrupt response time and software interrupt response time.
Item
Hardware interrupt
response time
Software interrupt
response time
Interrupt response time
Upward differentiation: 50 µs
Downward differentiation: 50
µs
Minimum: 70 µs
Maximum: 160 µs + Wait
time*
Counter 0,1,2 interrupts
−
−
Counter 3,4,5 interrupts
−
−
Minimum: 120 µs
Minimum: 150 µs
Maximum: 230 µs + Wait
time*
Maximum: 670 µs + Wait
time*
* The wait time occurs when there is competition with other interrupts. As a guideline, the wait time will be 0 to
2 ms.
Note Input interrupt tasks can be executed during execution of the user program, I/O refresh, peripheral servicing,
or overseeing. (Even if an instruction is being executed, execution of the instruction will be stopped to execute the interrupt task.)
The interrupt response time is not affected by the above processing operations during which the interrupt
inputs turns ON.
Input interrupts, however, are not executed during execution of other interrupt tasks even if the input interrupt
conditions are satisfied. Instead, the input interrupts are executed after the current interrupt task has completed execution and the software interrupt response time has elapsed.
The interrupt response time of input interrupt tasks is calculated as follows:
Interrupt response time = Input ON delay + Software interrupt response time
Inputs:
Input ON delay
(Interrupt signal
acknowledged.):
Ready to acknowledge
next interrupt signal
Software interrupt response time
Interrupt task
execution:
Interrupt response
time for input
interrupt task
Ladder program
execution time
Return time
from input
interrupt task
Cyclic task execution (main
program):
The time from when execution of the input interrupt task is completed until
execution of the cyclic task is resumed is 24 μs.
A-28
CP1E CPU Unit Software User’s Manual(W480)
Appendices
Interrupt Response Time for Scheduled Interrupt Tasks
The interrupt response time for scheduled interrupt tasks is the time taken from after the scheduled
time specified by the MSKS instruction has elapsed until the interrupt task has actually been executed.
The length of the interrupt response time for scheduled interrupt tasks is 0.1 ms max.
There is also an error of 10 µs in the time to the first scheduled interrupt (1.0 ms min.).
Scheduled interrupt time
Internal timer:
Software interrupt response time
Scheduled
interrupt task:
A-2 Response Performance
Note Scheduled interrupt tasks can be executed during execution of the ladder program (even while an instruction
is being executed by stopping the execution of an instruction), I/O refresh, peripheral servicing, or overseeing.
The processing operation in which the scheduled interrupt occurs does not affect the interrupt processing
time.
Scheduled interrupts, however, are not executed during execution of other interrupt tasks even if the interrupt
conditions are satisfied. Instead, the interrupts are executed in order of priority after the current interrupt task
has completed execution and the software interrupt response time has elapsed.As a guideline, the wait time
will be 0 to 2ms.
App
Precautions for Correct Use
The scheduled task will not be executed while the CPU Unit suspends operation for online editing.
Serial PLC Link Response Performance
The response times for CPU Units connected via a Serial PLC Link (polling unit to polled unit or polled
unit to polling unit) can be calculated as shown below.
Note A PT cannot be used in the Serial PLC Link.
• Maximum I/O response time (not including hardware delay) =
Polling unit cycle time + Communications cycle time + Polled unit cycle time + 4 ms
• Minimum I/O response time (not including hardware delay) =
Polled unit communications time + 0.8 ms
Number of participating polled unit nodes
The number of polled units to which links have been established within the
maximum unit number set in the polling unit.
Number of nonparticipating polled
unit nodes
The number of polled units not participating in the links within the maximum unit
number set in the polling unit.
Communications cycle
time (ms)
Polled unit communications time × Number of participating polled unit nodes +
10 × Number of non-participating polled unit nodes + 20 × Number of polled unit
nodes
Polled unit
communications
time (ms)
• Communications time set to Standard:
0.4 + 0.286 × [(No. of polled units + 1) × No. of link words × 2 + 12]
• Communications time set to Fast:
0.4 + 0.0955 × [(No. of polled units + 1) × No. of link words × 2 + 12]
CP1E CPU Unit Software User’s Manual(W480)
A-29
A-2-3 Serial PLC Link Response Performance
A-2-3
Appendices
A-3
PLC Operation for Power
Interruptions
Overview of Operation for Power Interruptions
Power Supply Voltage Drop
If the power supply voltage falls below the specified value (85% of rated voltage) while the CPU Unit
is in RUN or MONITOR mode, operation will be stopped and all outputs will be turned OFF.
Detection of Momentary Power Interruptions
The system will continue to run if the momentary power interruption lasts less than 10 ms (2ms for
DC power supply). If power is interruped for longer than 10 ms (2ms for DC power supply), a
momentary power interruption will be detected or undetected. If the momentary power interruption is
detected, the CPU Unit will be stopped and outputs will be turned OFF.
Below 85% of rated voltage
10ms
0
Supply
voltage
0 to 10 ms max.
(0 to 2ms max. for
DC power supply)
Time
Momentary power
interruption not detected
Operation continues
10 ms min.
(2ms min. for DC power supply)
Supply
voltage
Operation will continue or stop
depending on whether a
momentary power interruption
is detected.
Automatic Recovery
Operation is automatically restarted when the power supply voltage is restored.
A-30
CP1E CPU Unit Software User’s Manual(W480)
Appendices
Power OFF Timing Chart
Operation always stopped at this point
Power supply
voltage: 85%
Power OFF
detected signal
Program execution
status
Power OFF Detection Time
AC: 10ms
DC: 2ms
Cyclic task or interrupt task
Stop
CPU Unit reset signal
The time from when the power supply voltage drops to 85% or less the rated voltage until the
power interruption is detected.
Power Holding Time:
The maximum amount of time (fixed at 1 ms) that 5 V will be held internally after power shuts
OFF.
Description of Operation
The power interruption will be detected if the 100 to 240 VAC power supply falls below 85% of the
minimum rated voltage for the power OFF detection time (10 ms minimum for AC power supply and
2ms minimum for DC power supply, not fixed).
The CPU reset signal will turn ON and the CPU Unit will be reset immediately.
Instruction Execution for Power Interruptions
The power OFF detection time of CP1E CPU Units is 10 ms minimum for AC power supply and 2ms
minimum for DC power supply. If the power interruption is detected when operating in RUN or MONITOR mode, the instruction currently being executed will be stopped and then the CPU Unit will be reset.
Malfunction Countermeasures
If only a couple of Expansion I/O Units or Expansion Units are connected to the CPU Unit resulting in a
light power supply circuit load and a small current consumption, the time required by the CPU Unit to
detect a power interruption will be longer. For this reason, inputs may be incorrectly identified as being
OFF if external power supply used for an input turns OFF before the power interruption is detected. If
an external NC contact input is used or the ladder program counts the number of ON to OFF transitions,
a malfunction may occur if the external power supply turns OFF.
CP1E CPU Unit Software User’s Manual(W480)
A-31
App
Power OFF Detection Time:
A-3 PLC Operation for Power Interruptions
Holding time for 5 V internal
power supply after power OFF
detection: 1 ms
Power OFF detection
Appendices
Power supply
voltage: 85%
Power OFF detected
Power OFF
detected singal
Power OFF detection time
AC: 10 ms min.
DC: 2 ms min.
Program execution
status
Cyclic task or interrupt task
CPU reset signal
External power supply
input
Input signal to CP1E
If the external power supply input turns
OFF before the power interruption is
detected, the CPU Unit will read the
input as being OFF
The following diagram shows an example countermeasure for this situation.
• Wiring
Emergency stop input
100 VAC
L1 L2
External power
supply input
COM 0.00 0.01
CP1E
• Ladder Program
Emergency
stop input
0.00
Emergency stop
release input
External power supply
input (Enables
emergency stop output.) Emergency
stop output
0.01
Emergency
stop output
A-32
CP1E CPU Unit Software User’s Manual(W480)
Index
Symbols
*D(Specifying indirect addresses
in BCD Mode)...................................................4-13, 5-12
@D(Specifying indirect addresses
in Binary Mode)................................................4-13, 5-12
Numerics
CX-Programmer for CP1E
Help ........................................................................14-6
Cycle time ......................................................................3-2
I/O response time .................................................. A-26
Interrupt response time ......................................... A-28
Cycle time response performance .............................. A-26
Cyclic refreshing ..........................................................4-15
1:N NT Links .......................................................12-3, 12-5
D
A
Data formats ................................................................4-13
Data Memory Area................................................5-3, 5-11
Data refresh method ..................................................12-23
Differential phase input (4×).........................................11-7
DM Area capacity...........................................................1-2
DM backup function .....................................................13-8
Access Error Flag(P_AER) .......................................... 5-19
Allocated words
CPU Unit .................................................................. 6-3
Expansion I/O Unit ................................................... 6-4
Allocating functions to built-in input terminals ................ 8-6
Allocating functions to built-in output terminals.............. 8-7
Allocations for Expansion I/O Units................................ 6-4
Allocations for Expansion Units ..................................... 6-6
Always OFF Flag(P_Off) .............................................. 5-19
Always ON Flag(P_On)................................................ 5-19
Automatic I/O comment creation................................ 14-13
Automatic symbol name creation ............................... 14-13
Auxiliary Area........................................................5-4, 5-17
B
Backing up memory ....................................................... 3-5
Backup ......................................................................... 5-12
Backup area ............................................................. 3-5
I/O memory backup time .......................................... 3-7
Backup memory ....................................................3-6, 13-8
Backup time ................................................................... 1-2
Bit addresses ................................................................. 5-5
Built-in EEPROM .......................... 2-2, 2-3, 3-6, 5-12, 13-8
Built-in RAM ............................................................2-2, 2-3
Built-in RS-232C Port..................................................... 7-5
C
C Mode command.............................................12-4, 12-30
Carry Flag(P_CY) ........................................................ 5-19
CIO Area .................................................................5-2, 5-7
Allocation.................................................................. 6-2
Circular (Ring) mode(high-speed counter)................... 11-9
Clock function .............................................................. 13-7
Clock Pulses .........................................................5-4, 5-21
Communications settings........................................7-5, 7-8
Condition Flags .....................................................5-4, 5-19
Constants..................................................................... 4-16
Counter Area.................................................................. 5-4
Resetting or maintaining ........................................ 5-16
Types ...................................................................... 5-15
Counter Completion Flags ............................................. 5-4
Counter PVs................................................................... 5-4
Counting ranges........................................................... 11-8
CPU Unit
I/O allocation ............................................................ 6-3
Internal memory ....................................................... 2-2
Memory areas and stored data ................................ 2-3
Operating modes...................................................... 3-3
Operation.................................................................. 3-2
CTBL instruction ........................................................ 11-18
CP1E CPU Unit Software User’s Manual(W480)
E
End code(No-protocol communications) ......................12-8
Equals Flag(P_EQ) ......................................................5-19
Error Flag(P_ER) .........................................................5-19
E-type CPU Unit.............................................................1-2
Execute process settings ...............................................7-3
F
FINS command .................................................12-4, 12-30
Forced set/reset .........................................................14-25
Functions allocation
Selecting functions in the PLC Setup .......................8-4
Specifying method....................................................8-4
G
Global symbols ..............................................................4-6
Greater Than Flag(P_GT)............................................5-19
Greater Than or Equals Flag(P_GE) ...........................5-20
H
High-speed counter interrupts...........................11-2, 11-12
Application example .............................................11-24
Functions allocation................................................11-4
PLC Setup ...................................................11-3, 11-14
Related Auxiliary Area..........................................11-23
Specifications .........................................................11-6
Writing the ladder program..........................11-5, 11-14
High-speed counter settings ........................................7-11
High-speed counters
Counting ranges .....................................................11-8
Frequency measurement......................................11-11
Pulse input methods...............................................11-7
Reading the present value ...................................11-10
Reset method .........................................................11-9
Holding Area ...........................................................5-3, 5-9
Host Link ...........................................................12-4, 12-30
Host Link command ..........................................12-4, 12-30
I
I/O allocation ..................................................................6-2
CPU Unit ..................................................................6-3
Expansion I/O Unit ...................................................6-4
Expansion Unit .........................................................6-6
I/O memory .............................................................3-3, 5-2
Index-1
Backup time ............................................................. 3-7
I/O memory Areas ................................................... 5-6
Initializing method .................................................... 3-8
I/O refresh ..................................................................... 3-2
I/O refresh timing......................................................... 4-15
I/O response time ........................................................ A-26
Immediate refresh ....................................................... 4-15
Increment pulse input .................................................. 11-7
Indirect addressing ...................................................... 5-12
INI instruction ............................................................ 11-19
Input constant................................................................ 7-4
Input constant setting .................................................. A-27
Input interrupts ............................................................ 10-5
Functions allocation ............................................... 10-5
PLC Setup ............................................................. 10-4
Writing the ladder program .................................... 10-5
Input-differentiated instructions ................................... 4-11
Instructions
Basic understanding ................................................ 4-8
Execution conditions.............................................. 4-10
Operands ................................................................. 4-9
Specifying addresses ............................................ 4-12
Variations ............................................................... 4-10
Internal memory ............................................................ 2-2
Interrupt input settings................................................. 7-12
Interrupt response time ............................................... A-28
Interrupt task ............................................................. 10-11
Interrupt task priority and order of execution............. 10-13
Interrupt task with maximum
processing time (A441CH) ..................................... 10-13
Interrupts
Input interrupts....................................................... 10-3
Precautions.......................................................... 10-13
Scheduled interrupts............................................ 10-10
Types ..................................................................... 10-2
Interrupts functions
Interrupt response time.......................................... A-28
IORF instruction(I/O refresh) ....................................... 4-15
L
Ladder program
Editing.................................................................. 14-15
Input....................................................................... 14-7
Saving and reading.............................................. 14-14
Transferring.......................................................... 14-18
Writing ................................................................... 14-7
Less Than Flag(P_LT) ................................................. 5-20
Less than or Equals Flag(P_LE) ................................. 5-20
Linear mode(high-speed counter) ............................... 11-8
Local symbols................................................................ 4-6
M
Maximum interrupt task processing time(A440CH)... 10-13
Memory areas and stored data ..................................... 2-3
Modbus-RTU Easy Master .......................................... 12-3
DM fixed allocation words........................... 5-12, 12-12
Error codes .......................................................... 12-13
Programming examples ....................................... 12-14
Related Auxiliary Area ......................................... 12-13
Monitor mode ................................................................ 3-3
Monitoring and debugging......................................... 14-23
Forced set/reset................................................... 14-25
Monitoring status ................................................. 14-23
Online editing....................................................... 14-26
MSKS instruction.............................................. 10-6, 10-11
Index-2
N
Negative Flag(P_N) ..................................................... 5-20
Non-differentiated instructions..................................... 4-10
No-protocol communications .............................. 12-3, 12-8
PLC Setup ............................................................. 12-9
Related Auxiliary Area ......................................... 12-10
Not Equal Flag(P_NE)................................................. 5-20
N-type CPU Unit............................................................ 1-2
Number of connected Units........................................... 6-3
O
Online editing ............................................................ 14-26
Operands....................................................................... 4-9
Operating mode at startup............................................. 7-3
Operating modes
Changing method .................................................... 3-3
Operating modes and operation .............................. 3-4
The retaining of I/O memory when changing........... 3-4
Operation for power interruptions ................................ A-30
Timing Chart .......................................................... A-31
Output interrupts.......................................................... 10-2
Overflow Flag(P_OF)................................................... 5-20
P
P_AER(Access Error Flag).......................................... 5-19
P_CY(Carry Flag)........................................................ 5-19
P_EQ(Equals Flag) ..................................................... 5-19
P_ER(Error Flag)......................................................... 5-19
P_GE(Greater Than or Equals Flag)........................... 5-20
P_GT(Greater Than Flag) ........................................... 5-19
P_LE(Less than or Equals Flag) ................................. 5-20
P_LT(Less Than Flag) ................................................. 5-20
P_N(Negative Flag) ..................................................... 5-20
P_NE(Not Equal Flag)................................................. 5-20
P_OF(Overflow Flag)................................................... 5-20
P_Off(Always OFF Flag) ............................................. 5-19
P_On(Always ON Flag) ............................................... 5-19
P_UF(Underflow Flag)................................................. 5-20
Peripheral servicing ....................................................... 3-2
Phase-Z signal + software reset.................................. 11-9
PID temperature control .............................................. 13-2
PIDAT instruction ......................................................... 13-3
PLC Setup ..................................................................... 7-2
Communications settings.................................. 7-5, 7-8
Execute process settings......................................... 7-3
High-speed counter settings .................................. 7-11
Input constant .......................................................... 7-4
Interrupt input settings ........................................... 7-12
Settings.................................................................... 7-3
Startup data read setting ......................................... 7-3
Startup mode setting ............................................... 7-3
Timing and interrupt settings ................................... 7-3
Precautions
Ladder programming precautions.......................... 4-22
Precautions for using interrupts ........................... 10-13
Special program sections ...................................... 4-22
Program capacity ................................................... 1-2, 4-3
Program mode............................................................... 3-3
Program-free communications with PTs...................... 12-5
PLC Setup and PT system settings ....................... 12-6
Programmer device ..................................................... 14-3
Programming ................................................................. 4-2
PRV instruction.......................................................... 11-11
Pulse + Direction input ................................................ 11-8
CP1E CPU Unit Software User’s Manual(W480)
Pulse input methods .................................................... 11-7
Q
Quick-response inputs ................................................... 9-2
Functions allocation ................................................. 9-4
PLC Setup ................................................................ 9-3
Writing the ladder program....................................... 9-4
R
Range comparison..........................................11-12, 11-17
Read protection.......................................................... 13-12
Run mode ...................................................................... 3-3
S
Scheduled interrupts .................................................. 10-10
Writing the ladder program................................... 10-11
Sections ..................................................................4-2, 4-6
Security function ........................................................ 13-12
Self-diagnosis ................................................................ 3-2
Serial communications
Connecting the host computer ............................. 12-30
Modbus-RTU Easy Master ........................12-10, 12-11
No-protocol communications
with general components .................................... 12-8
Program-free communications with PTs ................ 12-5
Serial PLC Links................................................... 12-20
Types of communication......................................... 12-3
Serial Option Port........................................................... 7-8
Serial PLC Link response performance ...................... A-29
Serial PLC Links ...............................................12-3, 12-20
Allocated words .................................................... 12-26
Data refresh method ............................................ 12-23
Example application ............................................. 12-28
PLC Setup ............................................................ 12-21
Related Auxiliary Area.......................................... 12-27
Software reset............................................................ 11-10
Specifying addresses................................................... 4-12
Specifying offsets for addresses .................................. 4-19
Startup data read setting ............................................... 7-3
Step ladder program sections ...................................... 4-23
Subroutines...........................................................4-2, 4-22
Symbols
Global symbols......................................................... 4-6
Local symbols .......................................................... 4-6
T
Target value comparison.................................11-12, 11-15
Tasks.......................................................................4-2, 4-6
Timer Area ..................................................................... 5-3
PV refresh method ................................................. 5-14
Resetting or maintaining ........................................ 5-14
Types ...................................................................... 5-13
Timing and interrupt settings.......................................... 7-3
U
Underflow Flag(P_UF) ................................................. 5-20
Up/Down pulse input.................................................... 11-7
V
Variations ..................................................................... 4-10
W
Word address................................................................. 5-5
Work Area ...............................................................5-3, 5-8
CP1E CPU Unit Software User’s Manual(W480)
Index-3
Index-4
CP1E CPU Unit Software User’s Manual(W480)
Revision History
A manual revision code appears as a suffix to the catalog number on the front cover of the manual.
Cat. No. W480-E1-01
Revision code
Revision code
01
Date
March 2009
Revised content
Original production
CP1E CPU Unit Software User’s Manual(W480)
Revision-1
Revision-2
CP1E CPU Unit Software User’s Manual(W480)
OMRON Corporation
Industrial Automation Company
Control Devices Division H.Q.
Automation & Drive Division
Automation Department 1
Shiokoji Horikawa, Shimogyo-ku,
Kyoto, 600-8530 Japan
Tel: (81) 75-344-7084/Fax: (81) 75-344-7149
Regional Headquarters
OMRON EUROPE B.V.
Wegalaan 67-69-2132 JD Hoofddorp
The Netherlands
Tel: (31)2356-81-300/Fax: (31)2356-81-388
OMRON ELECTRONICS LLC
One Commerce Drive Schaumburg,
IL 60173-5302 U.S.A.
Tel: (1) 847-843-7900/Fax: (1) 847-843-7787
Authorized Distributor:
OMRON ASIA PACIFIC PTE. LTD.
No. 438A Alexandra Road # 05-05/08 (Lobby 2),
Alexandra Technopark, Singapore 119967
Tel: (65) 6835-3011/Fax: (65) 6835-2711
OMRON (CHINA) CO., LTD.
Room 2211, Bank of China Tower,
200 Yin Cheng Zhong Road,
PuDong New Area, Shanghai, 200120, China
Tel: (86) 21-5037-2222/Fax: (86) 21-5037-2200
OMRON Industrial Automation Global: www.ia.omron.com
© OMRON Corporation 2009 All Rights Reserved.
In the interest of product improvement,
specifications are subject to change without notice.
Printed in Japan
Cat. No. W480-E1-01
0309