1
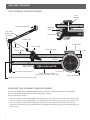
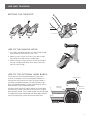
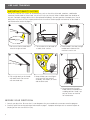
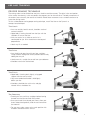
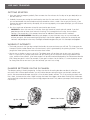
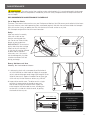
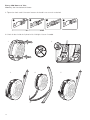
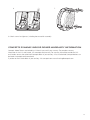
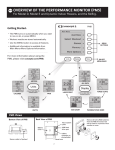
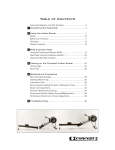
USE MANUAL
dynamic
indoor rower
2
concept2.com
TABLE OF CONTENTS
USE & TRAINING
The Dynamic Indoor Rower . . . . . . . . . . . . . . . . . . . . . . . . . . . . 4
Leveling the Dynamic Indoor Rower . . . . . . . . . . . . . . . . . . . . . 4
Setting the Flexfoot . . . . . . . . . . . . . . . . . . . . . . . . . . . . . . . . . . 5
Use of Handle Hook . . . . . . . . . . . . . . . . . . . . . . . . . . . . . . . . . . 5
Use of the Optional Wind Shield . . . . . . . . . . . . . . . . . . . . . . . . 5
Important Safety Notes . . . . . . . . . . . . . . . . . . . . . . . . . . . . . . . 6
Before Your First Row . . . . . . . . . . . . . . . . . . . . . . . . . . . . . . . . 6
Proper Rowing Technique . . . . . . . . . . . . . . . . . . . . . . . . . . . . . 7
Getting Started . . . . . . . . . . . . . . . . . . . . . . . . . . . . . . . . . . . . . 8
Workout Intensity . . . . . . . . . . . . . . . . . . . . . . . . . . . . . . . . . . . 8
Damper Settings on the Flywheel . . . . . . . . . . . . . . . . . . . . . . . 8
USING THE PERFORMANCE MONITOR (PM) . . . . . . . . . . . . . . . 9
MAINTENANCE . . . . . . . . . . . . . . . . . . . . . . . . . . . . . . . . . . . . . . 11
WARRANTY . . . . . . . . . . . . . . . . . . . . . . . . . . . . . . . . . . . . . . . . 13
Serial Number Location
The label is located on the inner
left side of the front leg/monitor
arm assembly (the leg that
attaches to the monitor arm).
RECORD YOUR SERIAL NUMBER HERE
IMPORTANT NOTE:
For additional information about Concept2,
complete warranty details, or to register to
receive product updates, please visit
concept2.com/registration.
1015
3
USE AND TRAINING
THE DYNAMIC INDOOR ROWER
Seat
bungee
Performance Monitor
Generator
Cable
Front Leg/
Monitor Arm
Assembly
Generator
Handle Hook
Wind Shield
Seat
Foot Carriage
Drive Cord
Front Seat Stop
Rail Assembly
Front Foot Stop
Rear Foot Stop
Rear Seat Stop
Damper
Foot Connector
to drive cord
Front Foot Leveling Screws
Flywheel
Return Mechanism Box
(Return Tension Shock Cord inside)
Casters for transport
Shuttle Channel (Drive Cord System inside)
LEVELING THE DYNAMIC INDOOR ROWER
The Dynamic Indoor Rower should be approximately level for the moving components to work properly.
Use the front foot leveling screws to fine tune the level as follows:
Have a friend watch you row:
• If the seat tends to stretch the bungee more to the front of the machine than the rear while rowing, raise
the front of the Dynamic Indoor Rower by turning both front foot leveling screws clockwise several turns.
• If the seat tends to stretch the bungee more to the rear of the machine than the front while rowing,
lower the front of the Dynamic Indoor Rower by turning both front foot leveling screws counter-clockwise
several turns.
4
USE AND TRAINING
SETTING THE FLEXFOOT
1
2
3
USE OF THE HANDLE HOOK
1. The handle should be placed in the foot carriage handle
hook whenever the machine is not in use.
2. Before you row, secure your feet in the foot carriage,
then grasp the handle from the handle hook.
3. When finishing a training session, secure the handle in
the foot carriage handle hook, then remove your feet
from the foot carriage.
USE OF THE OPTIONAL WIND SHIELD
The clear plastic Wind Shield located on the top of the
flywheel is an optional accessory designed to deflect air
coming from the flywheel away from the rower’s body. If
you prefer the additional breeze, the Wind Shield can be
easily removed by bending it slightly and pulling the tabs at
either end out of the flywheel enclosures.
Using the Wind Shield will slightly reduce the current drag
factor setting, making it feel like you’re rowing in a slightly
lower damper setting. The flywheel damper may be adjusted
as needed to maintain the desired feel. More about damper
setting and drag factor can be found at concept2.com.
Wind Shield
Flywheel
enclosure
Flywheel
enclosure
5
USE AND TRAINING
IMPORTANT SAFETY NOTES
Use of this machine with a worn or weakened part, such as the chain, drive cord, sprockets, cord/handle
connector, handle u-bolt or shock cord, may result in injury to the user. When in doubt about the condition of
any part, Concept2 strongly advises that it be replaced immediately. Use only genuine Concept2 parts. Use of
other parts may result in injury or poor performance of machine. Perform proper maintenance as described in
the Maintenance section on page 11.
11
1.Do not use if drive cord shows
excessive signs of wear
4
4.Pull straight back on the handle
with both hands. Do not row
with one hand only.
3
2
2.The machine must be used on
a stable, level surface.
5
3.Place handle in the foot carriage
handle hook whenever the
machine is not in use.
6
5.Keep children, pets and fingers
away from the seat and rail
assembly, seat rollers, all chains
and the drive cord.
6.Do not leave the Dynamic
Indoor Rower unattended in a
standing position. Stand it up
only for access to machine
for maintenance.
BEFORE YOUR FIRST ROW
1. Consult your physician. Be sure that it is not dangerous for you to undertake a strenuous exercise program.
2. Carefully review the rowing technique information on page 7. Improper technique such as extreme layback or
jumping off the seat can result in injury.
6
USE AND TRAINING
PROPER ROWING TECHNIQUE
The rowing stroke can be divided into two parts: the drive and the recovery. The drive is the work portion
of the stroke; the recovery is the rest portion that prepares you for the next drive. The body movements of
the recovery are essentially the reverse of the drive. Blend these movements into a smooth continuum to
create the rowing stroke.
To view a video demonstrating proper rowing technique, watch Precision on the Dynamic at concept2.com/technique.
The Catch
• Arms are straight; head is neutral; shoulders are level
and not hunched.
• Upper body is leaning forward from the hips with the
shoulders in front of the hips.
• Shins are vertical, or as close to vertical as is
comfortable for you. Shins should not move beyond
perpendicular.
• Heels may lift as needed.
The Drive
• Start the drive by pressing with your legs, and then
swing the back through the vertical position before finally
adding the arm pull.
• Hands move in a straight line to and from your abdomen.
• Shoulders remain low and relaxed.
The Finish
• Upper body is leaning back slightly, using good
support from the core muscles.
• Legs are extended and handle is held lightly
below your ribs.
• Shoulders should be low with wrists and grip
relaxed. Wrists should be flat.
The Recovery
• Extend your arms until they straighten before leaning
forward from the hips towards the flywheel.
• Once your hands have cleared your knees, allow your
knees to bend and gradually slide the seat forward on
the monorail.
• For your next stroke, return to the catch position with
shoulders relaxed and shins vertical.
7
USE AND TRAINING
GETTING STARTED
1. Start your exercise program gradually. Row no more than five minutes the first day to let your body adjust to
the new exercise.
2. Gradually increase your rowing time and intensity over the first two weeks. Do not row at full power until
you are comfortable with the technique and have rowed for at least a week. Like any physical activity, if you
increase the volume and intensity too rapidly, fail to warm up properly, or use poor technique, you will increase
the risk of injury.
3. Aim for a stroke rate of between 24 and 30 spm (strokes per minute).
WORKOUT 1: Start with a row of 3-5 minutes. then take a break to stretch and walk around. If you feel
good, do up to four of these short intervals of rowing. That’s enough for the first day. You can repeat
workout 1 for several days. Visit concept2.com/start for additional information and first workouts.
MONITOR YOUR PROGRESS: Monitoring your progress is one of the best ways to stay motivated and
achieve your goals. We recommend signing up for our free Online Logbook, where you can record all your
workouts and participate in the many challenges offered throughout the year. Visit concept2.com/logbook.
WORKOUT INTENSITY
• The harder you push with your legs and pull the handle, the more resistance you will feel. This is because the
Concept2 Dynamic Indoor Rower uses wind resistance, which is generated by the spinning flywheel. The faster
you get the wheel spinning, the more resistance there will be.
• You can row as hard or as easy as you wish. The indoor rower will not force you to row at any set intensity
level. It is up to you. As you put more effort into your rowing, you will achieve a faster pace, produce more
watts, and burn more calories. All of these outputs will be measured and displayed by the Performance Monitor
(PM). Keep your goals in mind. For example, if your goal is to burn a lot of calories, it is more important to row
for a long time than to row hard. If you row too hard, you won’t last as long.
DAMPER SETTINGS ON THE FLYWHEEL
The damper setting is like bicycle gearing. It affects the feel of the rowing but does not directly affect the
resistance. With a little experimentation, you will find the damper setting that gives you the best workout and
results. We recommend a damper setting of 3–5 for the best aerobic workout. This is the setting that feels most
like a sleek, fast boat on the water. Higher settings feel more like a bigger, slower boat. Rowing with the damper
setting too high can be detrimental to your training program because it may reduce your output and increase your
risk of injury.
up for slower
8
down for faster
OVERVIEW OF THE PERFORMANCE MONITOR (PM5)
For Model D, Model E and Dynamic Indoor Rowers, and the SkiErg.
Getting Started:
• The PM5 will power up when you start to row or ski, or press MENU.
• Use the MENU button to access all features.
• Before your first workout, set the correct date and time to ensure your results are associated
with the proper date. It is not possible to edit the dates and times of past workouts.
• Visit concept2.com/PM5 for more information.
Row or ski without a pre-set distance or time. The PM5 will begin recording
your workout data when you take your first stroke. Your results will be
saved if you row/ski longer than one minute and press MENU.
Set your own time, distance or interval, or choose from a selection of
pre-programmed standard or custom workouts.
Have fun with your workout and try a game!
Memory
View workout results. (Displays “USB LogBook” if USB flash drive is in
use and recognized by PM5.)
Access additional functions and information.
Recording Your Workout Results
Recording workout data helps you track progress and participate in our incentive programs. There are several ways to record results,
including our free Online Logbook, which allows you to take part in challenges and rank your best results against others. You can enter
results manually at concept2.com/logbook, or upload them from the following storage locations:
PM5 Memory—The PM5 memory records your recent results. To upload results, use the free Concept2 Utility software.
concept2.com/utility
ErgData—This free iOS and Android compatible app allows you to display additional data on your device, record results, and
upload results to your online logbook. concept2.com/ergdata
USB Flash Drive—Use a USB flash drive with your PM5 to record your results instead of storing them in PM5 memory.
concept2.com/usbflashdrive To upload results, use the free Concept2 Utility software. concept2.com/utility
Firmware
Firmware is the internal software that runs your Performance Monitor. Your PM5 comes pre-installed with the latest firmware, however,
new and improved versions are offered regularly. The free Concept2 Utility Software makes it easy to update your PM5 with the latest
firmware version at any time. Visit concept2.com/pm5firmware.
9
PM5 Menu Map
(Visit concept2.com/PM5 for more information.)
Sample Display
Strokes per minute (s/m).
Total elapsed time.
Pace (in time) per 500m (calculated each stroke).
Your pace is the amount of time it takes to row
or ski 500m. A smaller time is faster.
Total meters rowed or skied.
Average pace (in time) per
500m. This is the average
for your entire workout.
Heart rate
(Optional. Requires additional chest belt.)
Memory
Projected meters in 30 minutes if the current
average pace is maintained.
Split meters. The number
of meters rowed or skied in
a given distance or time. In
Just Row / Just Ski splits are
five minutes long.
MENU
Push to power up the PM, display the
previous menu or save workout results.
DISPLAY
Push at any time to change display between All Data, Force
Curve, Paceboat/Pace Skier, Bar Chart, and Large Print.
UNITS
Push at any time to change units between Meters
(m), Pace (time/500m), Watts and Calories (cal).
PM5 Views
Remove D Cell (LR20)
batteries from the PM5
if monitor will not be
used for a period of four
months or more.
Back View of PM5
USB flash drive port
D
D
Race system jacks (2)
USB-B
Battery cover
Bottom View of PM5
Reset button
USB cable (optional)
to computer or
phone/tablet
Sensor cable
to flywheel
More Information
Using a Heart Rate Monitor:
The PM5 will receive and display heart
rate data directly from a Bluetooth Smart,
Suunto™, Garmin® or ANT+™ HR chest belt.
See More Options for set up.
WARNING! Heart rate monitoring systems may be inaccurate. Over-exercising
may result in serious injury or death. If you feel faint, stop exercising immediately.
10
Cleaning the PM
Use a cloth lightly dampened with water
only. Do not spray with a cleaner or leave
in the rain.
Troubleshooting
Visit concept2.com/pm5.
MAINTENANCE
WARNING: The safety level of the machine can be maintained only if it is examined regularly for damage
and wear. Replace defective components immediately to ensure safety and performance or keep machine out of
use until repair.
RECOMMENDED MAINTENANCE SCHEDULE
On a Regular Basis
Firmware is the internal software that runs your Performance Monitor. Your PM comes pre-installed with the latest
firmware, however, new and improved versions are offered regularly. We offer free software called the Concept2
Utility that makes it easy to update your PM with the latest firmware version at any time.
Visit concept2.com/pm5firmware for more information.
Daily:
Wipe seat and rail assembly
clean with a cloth or nonabrasive scouring pad after
use. Do not use mineral acids,
bleach or coarse abrasives.
IMPORTANT: To ensure the
quality feel of the foot carriage
rollers on the rail assembly, it
is vital that this area be cleaned
on both sides of monorail
after every use. If this area is
not cleaned regularly, the foot
stretcher movement will feel
bumpy and rough.
Every 50 Hours of Use
Weekly for Institutional Users:
1.Lubricate the chain with a teaspoon of purified mineral
oil, 3-IN-ONE® oil, or 20W motor oil. Apply oil to a paper
towel, and rub the paper towel along entire length of chain.
Wipe off the excess. Repeat if needed. Do not clean the
chain with any kind of cleaner or solvent, e.g. WD-40®.
2.Inspect drive cord for wear. The drive cord is a single
cord that is connected to the handle on one end
and the foot carriage on the other end. Inspect the
entire length of the drive cord for wear, including the
section that is inside the shuttle channel, by pulling
the handle all the way out.
1
2
New cord
pull handle out
t2.com
IC
AM
DYN
g
pendin
|
concep
patent
Acceptable wear.
Still usable.
Excessive wear.
Replace cord.
11
Every 250 Hours of Use
Monthly for Institutional Users:
1.Tighten the shock cord if the return force on the handle is not as much as desired.
1
3
2
4
2.Check for dust inside the flywheel with a flashlight. Vacuum if needed.
1.
2.
3.
12
4.
5.
6.
7.
3.Check screws for tightness, including those used for assembly.
CONCEPT2 DYNAMIC INDOOR ROWER WARRANTY INFORMATION
Concept2 Indoor Rowers are backed by a limited 2 year and 5 year warranty. For complete warranty
information in the U.S. and Canada, visit concept2.com/warranty. For warranty information outside the U.S.
and Canada, contact the authorized Concept2 dealer in your territory. A list of authorized Concept2 dealers can
be found at concept2.com/international.
If you do not find a local dealer in your territory, visit concept2.com or email [email protected].
13