1
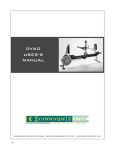
INSTRUCTION MANUAL FOR THE
PERFORMANCE MONITOR 2 (PM2)
INSTALLING AND USING
THE PM2 HEART RATE INTERFACE
March 2002
PM2HRM
®
MORRISVILLE, VERMONT USA
EMAIL:[email protected]
WEB:WWW.CONCEPT2.COM
©2002 Concept2, Inc.
OVERVIEW OF PM2 OPERATION
Your Concept2 Indoor Rower is equipped with a PM2, the second generation of our electronic
Performance Monitor. We have designed the PM2 to be as friendly as possible while making
several powerful functions available to you.
There are three levels of operation:
LEVEL I
LEVEL II
LEVEL III
1
Automatic operation: Like the original PM, the PM2 has
an automatic mode which will monitor your workout without
requiring you to use any buttons at all. You will also find it very
easy to use the DISPLAY button to change the output units
displayed. (See page 2)
Preset Workouts and Recall: To introduce more variety
into your exercise program, you can can set up four different
kinds of workouts on the PM2: preset time duration, preset
distance, timed intervals, and distance intervals. After you have
finished a workout, you can use RECALL to view your performance. All Level II functions have labeled buttons. (See page 3)
Extra Functions: Advanced users can take advantage of
these extra functions: two odometers (resettable and nonresettable), splits to be measured and displayed during your
workout at an interval of your choice; drag factor display; and
PM2 self-test. Extra functions are activated using button combinations which are described on page 6.
USING THE PERFORMANCE MONITOR (PM2)
LEVEL I. Automatic Operation
A. GETTING STARTED
▲
TIME
SPM
Your OUTPUT FOR EACH STROKE:
how hard you pulled on the last stroke. This is
displayed in a choice of three units:
PACE/500 METERS: how long it
would take you to row 500 meters if you
kept rowing at that same pace. The smaller
the number, the faster you are going.
HEARTRATE
CALORIES/HOUR: the rate at which
you were burning calories during the last
▲
stroke. It displays the approximate number
of calories you would burn in an hour if you
If you have the
kept rowing at that pace. The larger the
OPTIONAL HEART
number, the faster you are going.
RATE interface* attached
WATTS: the power you exerted during
and are wearing a chest
the last stroke, in watts. The larger the
belt, this display will show
number, the faster you are going.
your heart rate in beats per
minute. For Heart Rate
Interface installation, see
pages 7 and 8.
/500 M INT
METERS
▲
Your TOTAL OR CUMULATIVE
OUTPUT since you started rowing.
This is displayed in a choice of 4 units:
AVERAGE PACE: what your
average pace per 500 meters has
been since you started.
METERS: the number of
meters you have rowed since you
started.
CALORIES: the approximate
number of calories you have
burned since you started.
WATTS: your average power
output in watts since you started.
Your STROKE RATE or cadence in Strokes
per Minute (SPM), updated every stroke. Aim
for somewhere between 20 and 30 spm.
▲
Your ELAPSED TIME:
how long you have been
rowing.
▲
All you need to do is get on and row. The PM2 will automatically come on and begin to display information about
your performance. Here is what the displays are showing:
*For more information see
pages 7 - 10. To order your Heart
Rate Interface, call Concept2 toll
free at 1.800.245.5676.
Pace & Meters
TIME
B. Display Options
Now try pressing the DISPLAY button. Each time
you press it, the display changes, cycling through
the choices shown at right.
• You can choose any of these displays
to watch while you row.
• You can change the display any time
during your workout.
SPM
/500 M
DISPLAY
DISPLAY
METERS
/500 m
HEARTRATE
/500 m
➔
➔
WATT
WATT
➔
➔
CAL
CAL
Watts
Pace & Average Pace
TIME
TIME
SPM
/500 M
WATTS
Display
Options
AVE /500 M
SPM
WATTS
HEARTRATE
HEARTRATE
A WORD ABOUT CALORIES:
/500 m
➔
WATT
TIME
SPM
WATT
➔
This formula assumes a person of 175 pounds
(80 kg.) and a base rate of 300 cal/hour to move
your body through the rowing motion at 30
strokes/minute.
DISPLAY
Calories
/500 m
➔
Calories = (4x ave. watts/1.1639)+300 cal/hour x
time rowed (in hours).
DISPLAY
➔
Due to the differences in body weight and
efficiency, calories on the PM2 are only an
approximation of calories burned by the person
rowing. The formula used in the PM2 is as
follows:
CAL
CAL
CAL/HR
CAL
HEARTRATE
2
LEVEL II. PRESET WORKOUTS & RECALL
Example #1:
PRESET TIME
45 minute row
A. Setting Up Workouts
It is easy to set up a variety of workouts on your PM2. Specifically, you can set up:
• A single work session of preset time duration.
• A timed interval workout (alternating work time and rest time).
• A single work session of preset distance.
ON/OFF
• A distance interval workout (alternating work distance and rest time).
All of these types of workouts can be set up using these buttons:
TIME
REST: Press this
button to set the
rest time for an
interval workout.
▲
▲
/500 M
AVE
▲
OK
▲
SET DIGITS: Press this button
to move right to the next digit when
setting time or distance for workouts.
Press this button
to increase the
value of the blinking digit when setting
time or distance for workouts.
SPM
/500 M
▲
▲
RECALL: After
you have finished a
workout, you can
use RECALL to view
your performance.
METERS: Press
this button to set
the distance duration of a work
piece or distance
intervals.
▲
ON/OFF: Press this
button to turn the PM2
on or off. The PM2 will
come on automatically
when you start to row
and will turn itself off
after four minutes of
inactivity.
T I M E : Press
this button to set
the time duration
of a work piece
or work intervals.
▲
READY:Press this
button when you
have finished setting
up your workout and
are ready to row.
TIME
DISPLAY: You
can press this
button at any time
before, during or
after your workout
to change your
choice of display
units. These
choices include:
• average pace
• projected meters
or time
• elapsed meters
or time
• watts & calories
TIME
x2
x1
x5
SET DIGITS
Projected Finish Display: When you are rowing one of these pre-set workouts,
you will have an additional display option in the lower left field: Projected Finish Time or
Distance. If you are rowing a preset distance, this display will show your projected
finish time if you keep up your present pace. If you are rowing a preset time, this
display will show your projected finish distance if you keep up your present pace. To
see Projected Finish, simply press the DISPLAY button to cycle through the options
until the word “PROJ” is displayed above the time or distance.
TIME
READY
OK
B. Sample Workouts:
The sample workouts on these two pages are designed to help you
become familiar with this capability of your PM2. We encourage you to
set them up on your own PM2 as you read through the instructions.
They are also good workouts to try once you have learned proper
rowing technique and built up your time rowing on the Indoor Rower.
3
TIME
SPM
/500 M
AVE
/500 M
Example #2:
PRESET DISTANCE
5000 meter row
Example #3:
TIME INTERVALS
10 x 1 minute hard/
1 minute easy
ON/OFF
ON/OFF
ON/OFF
TIME
SPM
TIME
/500 M
AVE
Example #4:
DISTANCE INTERVALS
5 x 500 meters
with 2 minutes rest
TIME
SPM
SPM
/500 M
/500 M
/500 M
AVE
METERS
AVE
/500 M
TIME
SET DIGITS
/500 M
METERS
SET DIGITS
METERS
METERS
TIME
x3
x1
x5
SET DIGITS
REST
SET DIGITS
REST
SET DIGITS
METERS
REST TIME
READY
READY
OK
OK
REST TIME
In examples 3 & 4:
The interval number will
be displayed in the upper
right corner during the
rest interval.
READY
OK
METERS
METERS
TIME
SPM
SPM
SPM
/500 M INT
/500 M
REST TIME
AVE
/500 M
AVE
/500 M
/500 M
You are now ready to row. You may change display now, during or after your workout.
4
C. Using Recall
After you have finished a workout, you can use RECALL to view your performance
during each split or interval of your workout.
The first press of the RECALL button displays the end of workout information for your
workout. Each successive press of the RECALL button shows the next earlier split or
interval until either the last split has been displayed or there is no more memory available (maximum storage is 20 splits or intervals). The word “SPLIT” will appear on the
screen to indicate that you are viewing split information as opposed to end of workout
information. Default splits are: two minutes for timed workouts and 500 meters for
distance workouts. See next section to set custom splits.
NOTE: Your workout results will remain in the PM2 memory until
another workout is started, even if the PM2 is turned off.
Tips:
• The
button works the same as RECALL. It shows the next earlier split or interval.
• The
button shows the next later split or interval.
• The DISPLAY button can be used during split recall to view splits in various units.
• Pressing REST during split recall shows splits in cumulative mode. This is indicated to
the user by “CU” in the center display field. Press REST again to exit CU mode.
• HEART RATE box shows your heart rate at the end of that interval or split
• SPM box shows your average strokes per minute for the interval or split.
RECALL DISPLAY CHART
Type of Workout
Splits Taken
Recall Display
TIME
automatic
count up mode
every two minutes
(or custom split interval if set)
AVE
SPM
/500 M
HEARTRATE
TIME
preset timed
workout
every two minutes
(or custom split interval if set)
AVE
SPM
/500 M
HEARTRATE
METERS
TIME
preset distance
workout
every 500 meters
(or custom split interval if set)
AVE
SPM
/500 M
HEARTRATE
preset timed
intervals
TIME
at end of each time interval
SPM
/500 M INT
METERS
HEARTRATE
METERS
SPM
preset distance
intervals
at end of each distance interval
/500 M INT
AVE
/500 M
HEARTRATE
5
LEVEL iii. Extra Functions (for Advanced Users)
All of the PM2 buttons except the ON/OFF button have extra functions which are activated
when you press and hold down the READY button. These special functions include:
• Two Odometers: one is resettable (trip odometer) and one is not resettable.
• Split Intervals: you can set the PM2 to measure splits at intervals which you set. Each
split will be saved for recall after you finish and can be displayed for six seconds while
you row.
• Drag Factor: you can set the PM2 to display the drag factor which it calculates during
the rundown of the flywheel.
• PM2 Display Test
BUTTON SEQUENCES & DESCRIPTIONS OF EXTRA FUNCTIONS:
DRAG FACTOR
SPLITS
Custom Splits (time)
Hold READY
down
OK
TIME
▲
On/Off
OK
then
press
to have a drag factor displayed in the lower right display window.
Repeating this button sequence will turn off the drag factor
display. The drag factor is most helpful if you row on Concept2
Indoor Rowers in different locations and want to be sure the
resistance setting is the same. Check the drag factor on your
“home” machine, and then adjust the damper on the “away”
machine until you get the same drag factor. Typical range for
drag factor on the Indoor Rower is: 103 (damper setting 1)-223
(damper setting 10). When PM2 powers up or resets, the drag
factor display will be off by default.
Note: When a heart rate monitor is being worn, HR will override
the drag factor and will always be displayed.
PM2
DISPLAY
TEST
then RECALL
press
DISPLAY
/500 m
OK
▲
Hold
down
READY
OK
then
press
➔
▲
WATT
▲
to have splits displayed during your
workout. Repeating this button
sequence will turn off the split
display during your workout. When
the PM2 powers up, splits are off
by default.
REST
➔
Hold READY
down
OK
METERS
to set a distance interval for split
measurement. Use the SET DIGITS
buttons to set the split distance. Then
press READY when done.
Note: your custom split interval will
not be retained through a power
down. Default value is 500 meters.
to set a time interval for split
measurement. Use the SET DIGITS
buttons to set the split time. Then
press READY when done. Note: your
custom split interval will not be
retained through a power down.
Default value is two minutes.
Splits
then
press
▲
then
press
Custom Splits (distance)
READY
▲
Hold READY
down
OK
Hold
down
CAL
to perform a self-test including all
segments test. Press ON/OFF to end
the test.
TWO ODOMETERS
Not Resettable
Hold
down
READY
OK
then
press
SET DIGITS
to display cumulative distance rowed.
This odometer is not resettable.
Distance is in kilometers and is only
displayed when READY and
are
being pressed.
Resettable
READY
Hold
then SET DIGITS
down
press
OK
to display a resettable record of distance
rowed. At 99,999 it rolls over to 00,000.
Press RECALL to reset to 0. Press
READY or ON/OFF to get out of this
function.
This equipment has been tested and found to comply with the limits for a Class B digital device, pursuant to Part 15 of the FCC rules. These
limits are designed to provide reasonable protection against harmful interference in a residential installation. This equipment generates, uses
and can radiate radio frequency energy and if not installed and used in accordance with the instructions, may cause harmful interference to
radio communications. However, there is no guarantee that interference will not occur in a particular installation. If this equipment does cause
harmful interference to radio or television reception, which can be determined by turning the equipment off and on, the user is encouraged
to try to correct the interference by one or more of the following measures:
• Reorient or relocate the receiving antenna.
• Increase the separation between the equipment and the receiver.
• Connect the equipment into an outlet on a circuit different from that to which the receiver is connected.
• Consult the dealer or an experienced radio/TV technician for help.
6
THE OPTIONAL PM2
HEART RATE INTERFACE
Installing on
Model B
4.
PN 1761
1.
5.
2.
6.
If signal is not picked up, place the receiver on the
floor under the middle of the monorail.
OFF
3.
7
7.
THE OPTIONAL PM2
HEART RATE INTERFACE
Installing on
Model C
PN 1761
4.
21"/53 cm
5.
1.
*B.
For machines built after 7-1-95
*A.
2.
For machines
built before 7-1-95
6.
Route wire through
framelock.
OFF
*B.
*A.
*A. Routing for machines built before Oct.1, 1997.
*B. Routing for machines built after Oct.1, 1997.
7.
3.
Note for storage: Before you disconnect monorail from front end, remove
receiver from VELCRO© patch and remove cable from framelock area.
8
How To Wear Your POLAR™ (or POLAR compatible) Heart Rate Monitor
1. WET THE ELECTRODES
Wet the electrodes (the two grooved rectangular areas
on the underside of the Belt Transmitter) thoroughly with
water or saliva.
2. SECURE THE BELT TRANSMITTER
Center the Belt Transmitter flat against your skin, as high
under the Pectoral Muscles (breasts) as is comfortable.
The Belt Transmitter should fit snugly and comfortably
and allow for normal breathing.
3. ROW!!
Your heart rate will be displayed in the lower right display
in all PM2 display modes.
NOTE: It sometimes takes a few minutes of exercise to
achieve a consistent Heart Rate signal.
Precautions
• Thoroughly wipe your Polar Belt Transmitter dry
after each use.
Read heart
rate here.
• Do not store in a non-breathable or plastic bag
where moisture may become trapped. Store in a
warm dry place.
• Do not expose your HRM to direct sunlight,
extreme heat above 50˚ Celsius (122˚ Fahrenheit)
or extreme cold below -10˚ Celsius (14˚ Fahrenheit).
• Do not bend or stretch the electrode strips on
your Belt Transmitter, especially when storing.
Troubleshooting
What if the heart rate reading is erratic or totally absent?
NOTE: Occasionally the Heart Rate Monitor will pick up
bad data for a number of reasons. When the PM2
recognizes bad data, the display will go blank rather
than show the bad data. It will take five seconds or
longer to re-establish and display accurate readings.
1. Repeat the electrode wetting procedure as described
above. The electrodes must be wet to pick up accurate
heart rate readings.
2. Make sure the transmitter is centered with electrodes
flat against your skin, as high under the pectoral
muscles as is comfortable.
3. Wash your belt transmitter with mild soap and water, if
you have not been doing so regularly.
4. Make sure your Receiver is within the proper range to
receive transmission (1 meter/3 feet from your chest
belt).
5. Check the connection on the back of the PM2 where
the receiver cable plugs in. Check the connection
between the cable and the receiver.
6. If you are exercising within range of strong electro-
9
magnetic signals the heart rate readings may elevate
to abnormal levels. Common sources of electromagnetic signals are televisions, computers, cars, TV
antennas, high voltage power lines and motor driven
exercise equipment.
7. Signals from more than one Belt Transmitter within
the transmission range (1 meter/3 feet) may also
cause incorrect readings. Check your surroundings
and move away from the source of interference if
possible.
NOTE: Two Indoor Rowers with Heart Rate hardware
must be at least four feet (1.22 meters) apart to avoid
interference.
If further troubleshooting assistance is
needed, call Concept2 at 1.800.245.5676.
Monitoring Heart Rate
To Determine Training Intensity
Exercise Duration
and Frequency
Medical authorities use the term “target zone” to
describe the amount of physical activity which is enough
to achieve fitness but not too much to exceed safe
limits. This target zone is the level of activity which
produces a heart rate of from 70-85% of the maximum
attainable heart rate during all-out effort. (A rough
formula for estimating your maximum heart rate is to
subtract your age from 220.) Put in simple terms, your
own heart rate can be used as a “speedometer” that
tells you how much exercise your body needs for
optimal physical fitness.
Fitness experts advise that workouts should last approximately 30 to 40 minutes and be done at least three
times a week. Your workouts should be spread throughout the week to let your body recover properly. Polar
heart rate monitors guide you through your workout
giving you continuous ECG-accurate heart rate readings.
NOTE:
Before beginning any type of exercise
program, consult your doctor if you are over 35 years of
age, have not been following a regular exercise program,
smoke, have high blood pressure or high cholesterol, or
use a pacemaker.
Heart rate in beats per minute
The following Target Range Chart, provided by Polar
Electro, Inc., is based on averages and can only be used
as a guideline. For more accurate information, consult
your doctor.
TARGET ZONE EXERCISE PATTERN (40-year-old person)
Max
182
85% maximum
155
TARGET ZONE
130
120
100
FAT BURNING ZONE
55% maximum
Heart rate in beats per minute
Resting
200
180
160
140
120
100
80
Warm Up
5–10 min.
Target Zone Exercise
20–30 min.
Cool Resting
Down
5–10 min
Start Exercise
INCR
EAS
ED P
ERF
ORM
ANC
E ZO
IMPR
NE
OV E D
FITNE
SS ZO
NE
WEIGH
T MAN
AGEM
ENT ZO
NE
MODERATE A
CTIVITY ZONE
Begin each workout slowly and give your body a chance
to warm up at least five minutes below your target zone.
Gradually increase the intensity of your exercise until
you are in your target zone. Remain in your target zone
for 20 to 30 minutes. Gradually reduce the intensity of
your exercise and let your heart rate fall below your
target zone with a five minute cool down period.
20 25 30 35 40 45 50 55 60 65
Age
TARGET RANGE CHART
When you begin your exercise program, try to stay at
the lower end of your target zone. As your fitness level
improves, vary your exercise duration and intensity.
Choose your target zone according to your personal
fitness goals. If your goal is weight management, high
intensity, hard exercise is not necessary to burn fat
effectively. (See the WEIGHT MANAGEMENT ZONE)
Exercising in the INCREASED PERFORMANCE ZONE
(Above 85% of your maximum heart rate) is only necessary for competitive athletes.
DISCLAIMER
The material in this manual is for information purposes only.
The product it describes is subject to change without notice.
Neither Polar Electro Inc. or Polar Electro Oy makes any
representations or warranties with respect to this manual or,
except as stated in the warranty, with respect to the product
described herein. In no event shall either Polar Electro Inc. or
Polar Electro Oy be liable for any damages, direct or incidental,
consequential or special, arising out of or related to the use of
this manual or the products described herein.
Copyright © 1997 Polar Electro Inc.
The charts and information in this section have been reprinted with permission from Polar Electro, Inc.
10
Care and Maintenance
Service
NOTE: Any service done by a party other than Polar
Electro Inc. or a Polar authorized service center during
the warranty period voids the warranty.
• Carefully pack your Receiver and Belt Transmitter in a
shipping carton so that it is protected from shipping
damage.
The Belt Transmitter consists of an elastic chest belt
and integral molded transmitter with electrodes which
automatically activates when properly wetted and
secured around your chest. The transmitter will shut off
automatically when removed, however, sweat and
moisture can keep the Belt Transmitter activated so it is
important to wipe it dry after each use.
• Include a proof of purchase (a receipt or photocopy).
Clean the Belt Transmitter with mild soap and water
regularly to remove any perspiration residue. Do not
use abrasives or chemicals such as steel wool or alcohol
in cleaning as they can cause permanent damage to the
electrodes.
Belt Transmitter Battery: The estimated battery life is
2500 hours of use. When your Belt Transmitter Battery
is depleted, contact Polar Electro Inc. or a Polar Electro
Inc. authorized service center to obtain a replacement.
• Include a single sheet of paper stating why your HRM
is being returned for repair. Print your name, address
and daytime telephone number.
• During the warranty period the product will be repaired or replaced, at Polar’s option, without charge
by Polar Electro Inc. or a Polar Electro Inc. authorized
service center. There is a charge to cover the return
shipping and handling charge of warranty repairs (this
is not a repair charge). Additional shipping charges
are required for warranty repairs returned to destinations outside the United States.
• Ship postage prepaid to:
Polar Electro Inc.
370 Crossways Park Drive
Woodbury, NY 11797-2050
U.S Toll-Free: 1.800.227.1314
Canadian Toll-Free: 1.888.918.5043
• All HRM’s are returned to the owner by regular UPS
(Polar Electro Inc. will not ship to post office boxes).
Priority shipping requests require additional fees.
Limited One Year Warranty
Non-commercial Applications
Polar Electro, Inc. warrants to the original consumer that the
product will be free from defect in material or workmanship from
the period of date of purchase indicated below:
• One piece (inclusive of battery)
waterproof Transmitter/Belt (PE40) ------- 2 years or 2500 hrs.
• Plug in Receiver ----------------------------------------------------------- 1 year
Commercial Applications
Polar warrants to the original consumer that the products will be
free from defect in material or workmanship for 90 days from the
date of purchase.