1
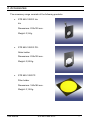
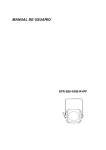
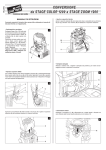
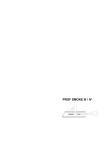
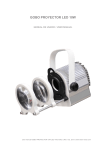
USER MANUAL STR 650-1000 R+PF Index 1. General description............................................................................. 3 1.1.Characteristics ......................................................................... 3 1.2.Technical data ......................................................................... 4 1.3.Photometric data...................................................................... 5 1.4.Dimensions .............................................................................. 6 2. Accessories ........................................................................................ 7 3. Installation .......................................................................................... 8 3.1.Power supply connection ......................................................... 9 3.2.Colour filter installation............................................................. 9 3.3.Gobo holder and iris installation............................................... 9 4. Operation.......................................................................................... 11 4.1.Aperture angle adjustment..................................................... 11 4.2.Zoom ..................................................................................... 11 5. Maintenance ..................................................................................... 12 5.1.Regular cleaning.................................................................... 12 5.2.Lamp replacement ................................................................. 12 5.3.Lens replacement .................................................................. 13 6. Most common problems.................................................................... 14 Statement of compliance ....................................................................... 15 User manual STR 650-1000 R+PF 2 1. General description THEATRE lighting family of Strong is composed of a set of projectors for 650W or 1000W lamps. For this reason they are appropriate in facilities where high-power lighting is required, for instance: theatres, showrooms, etc. STR 650-1000 R+PF is a profile projector. Moreover, this range includes some accessories which increase the functions of the projectors. 1.1. Characteristics High-performance lamp by aspheric lens. Zoom plus plano-convex lens for aperture and focus selection. Aperture and focus adjustment by heat-resistant side knobs. Front cassette for filter holder and protection grille. Direct access to accessories (iris and gobo holder). Made of aluminium profiles and iron plate. Painted with black ovendried epoxy. Four cold-laminated steel blades (profile) are included with the projector Lamp not included. STR 650-1000 R+PF reference is 21000010. User manual STR 650-1000 R+PF 3 1.2. Technical data Power supply Lamps Lamp holder Aperture angle Single-phase 230V 50Hz T-12 650W // T-11 1000W Gx9,5 Aluminium reflector Minimum: 14º // Maximum: 41º Plane +3,5 Ø150 mm Plane +6,5 Ø100 mm Plane +4 Ø100 mm Aspheric Ø60 mm 99,9 quality, Ø100 mm Power supply cable 3x1,5mm2 1metro Lenses Maximum projector temperature 160 ºC Minimum distance to objects 2 m (at the light beam) Maximum room temperature 40 ºC Weight Dimensions User manual 10 Kg. 565x220x220 mm STR 650-1000 R+PF 4 1.3. Photometric data Distancia proyección Ángulo de abertura Lámpara Diámetro Fig. 1: Light beam Projection distance [m] Lamp [W] 650 3 1000 650 5 1000 User manual Luminance [lx] Aperture angle [º] Diameter [cm] Centre Round 10 (minimum) 63 (maximum) 73 257 3711 570 2148 116 10 (minimum) 73 5663 2774 63 (maximum) 257 841 137 10 (minimum) 63 (maximum) 203 455 760 208 173 35 10 (minimum) 203 1107 311 63 (maximum) 455 340 51 STR 650-1000 R+PF 5 1.4. Dimensions 1 2 10 4 3 11 12 5 6 7 8 9 14 13 Fig. 2 1. Fastening knob 6. Secondary fixing ring 11. Filter holder groove 2. Filter holder fastener 7. Iris/portagobos groove 12. Zoom knob 3. Handle 8. Rear lid 13. Knob groove 4. Front lid screw 9. Rear lid fastener 14. Focal adjustment nut 5. Front lid 10. Focusing knob User manual STR 650-1000 R+PF 6 2. Accessories The accessory range consists of the following products: STR 650-1000 R Iris: Iris Dimensions: 222x125 mm. Weight: 0,3 Kg. STR 650-1000 R PG: Gobo holder Dimensions: 225x125 mm. Weight: 0,25 Kg. STR 650-1000 PF: Filter holder Dimensions: 180x185 mm. Weight: 0,15 Kg. User manual STR 650-1000 R+PF 7 3. Installation ATTENTION: Before touching the spotlight surface, be sure that it has not been working recently due to the high temperatures of the projector while working because you risk burning yourself. For the same reason, fix the projector away from inflammable surfaces. First of all, you must be sure that the distance between the projector and the closest object in the light beam should be greater than 2 meters. Otherwise, the object could reach high temperatures which could damage it. It is also recommended placing the projector at 0,2 meters of any object around it. As well, do not put the unit closed to objects which could emit heat such as heaters and radiators. The unit is not prepared for working in wet environments (relative humidity greater than 90%). So it can not work under raining conditions. It must be positioned for not interfering with its proper ventilation. This projector is equipped with a handle (see 3 at figure 2) to allow to fast it at tube structures and surfaces. The projector handle can be turned and braked by a knob that allows the proper orientation of the device. The spotlight must be fixed at a point completely stable and capable of supporting the weight of the equipment (6 kg) via the handle, attaching it to this point with the anchor holes. Always use M12 steel screws to set the spotlight. Once the projector is hanging, vertical inclination can be adjusted by the lateral fastening knob (see 1 in figure 2). Unscrew it to orientate the projector and screw it when you consider that the light beam is correct. User manual STR 650-1000 R+PF 8 Additionally, the unit includes a ring which is used as secondary clamp (see 6 in figure 2). This extra fixing system is installed by passing a steel safety cable through the ring and around a bar, joining both ends of the cable. 3.1. Power supply connection During handling and installation of the unit disconnect it from the current. The spotlight is power supplied when connecting the supply hose to a 230volt 50-hertz single phase mains with ground. Before connecting the spotlight you must be sure that the voltage supplied is correct. 3.2. Colour filter installation WARNING: Use colour filters suitable for the temperatures that can reach this lighting projector. This projector incorporates a holder for colour filters (see 11 in figure 2). To install a filter, move the filter holder fastener (see 2 in figure 2) by pushing it laterally and insert the colour filter in front of the safety grille so that it is placed between the inner grooves. Finally, proceed closing the filter holder lid in the same way as for the opening. 3.3. Gobo holder and iris installation Gobo holder and/or iris can be installed easily in this spotlight (see the Accessories section). Firstly, insert the desired gobo into the holder. Either gobo holder or iris installation is performed in the same way. To proceed with it insert the accessory into the groove for this purpose (see 7 in figure 2). It is supported in the proper position. User manual STR 650-1000 R+PF 9 Turn on the projector and check the effect correctness, which can be adjusted by zooming and adjusting the light beam (for details see Operation section). User manual STR 650-1000 R+PF 10 4. Operation The projector can be positioned manually varying the inclination. To do this, loosen the fastening knob (see 1 in figure 2) and position it by holding the back plastic handle (see 14 in figure 2). Be careful not to touch the metal parts because the focus can reach high temperatures. To fix it again, turn the fastening knob clockwise until fixed it. 4.1. Aperture angle adjustment The beam angle, and consequently the diameter projected by the light beam, can be changed manually through the focusing knob placed on one side of the projector (see 10 in figure 2). First, turn left to loosen it. Then slide it along the guide (marked with numbers from 1 to 12 for more precision) forward or backward until the beam of light is adequate. Then, turn the knob clockwise to lock into this position. 4.2. Zoom The light beam can be changed manually through the zoom knob placed on one side of the projector (see 12 in figure 2) which is opposite to the focusing knob. First, turn left to loosen it. Then slide it along the guide (marked with numbers from 1 to 5 for more precision) forward or backward until the beam of light is adequate. Then, turn the knob clockwise to lock into this position. User manual STR 650-1000 R+PF 11 5. Maintenance WARNING: Before touching the projector surface make sure that it has not been on recently because it can operate at high temperatures with a risk of burns. 5.1. Regular cleaning To prevent the growth of dust and dirt which may impair the proper operation of the equipment, it should be cleaned regularly. For cleaning it, use a soft, slightly and damp cloth (if the equipment is very dirty, apply a little liquid detergent to the cloth). WARNING: Do not use solvents or products containing alcohol. Make sure that no liquid get inside the equipment. The lens cleaning must be made with a soft cloth. Water may be used but dry it with a dry cloth to remove all traces of water and dust. 5.2. Lamp replacement Before proceeding to change the lamp, make sure that the spotlight has not been running recently because it could be hot; if so let it cool for a few minutes. To begin with the lamp replacement, turn the rear lid fastener (see 9 in figure 2) 180º and pull it so that the rear cover (see 8 in figure 2) will slide allowing you to see inside the projector where is the lamp. Carefully remove the lamp from the socket, holding it by the plastic part. WARNING: Do not touch the glass of the lamp because it could affect the service life of the product. If during the installation you touch the lamp glass, wipe with a cloth moistened with alcohol. User manual STR 650-1000 R+PF 12 When you remove the lamp replace with a new one of the same characteristics (Gx9.5 lamp holder). Then, reinsert, first the pins, the lamp into the socket by pushing. Make sure the lamp is properly held. Finally, slide the front cover in order to close it and rotate the rear lid fastener 180º, while pushing it toward the rear surface of the projector, until you hear a "click" which means that is fixed. Connect the spotlight and check that the lamp is functioning properly. 5.3. Lens replacement Firstly, unscrew the front lid screw (see 4 in figure 2) and remove the front cover of the projector (see 5 in Figure 2). Inside there are two lenses: the zoom one (in front of the lamp) and the beam adjustment lens (furthest from the lamp). Adjust the position of the latter one for making it accessible (see Aperture angle adjustment section). Unscrew the screws which hold the lens and the metal bracket to the movable part of the projector. Then the bracket and the lens can be removed. Replace it and insert the new lens and the support at its original position. Screw it to the mobile structure of the projector and make sure it is properly held. Finally close the upper cover (see 5 in figure 2) and screw it (see 4 in figure 2). User manual STR 650-1000 R+PF 13 6. Most common problems Problem Usual Cause Unit does not start Solution No current reaching the unit Check mains connections Lamp does not work Replace the lamp following the instructions of Maintenance If the problem persists despite these measures, please contact to FRESNEL’s Technical Service Department. Tel: (+34) 93 274 54 28 Tel: (+34) 93 360 02 30 Fax: (+34) 93 274 47 47 If you want to do without this product, do not mix it with the ordinary waste. There are specific methods and systems for dividing electronic and electromagnetic used products that are described in 2002/96/EC directive, which is in force in the European Community countries. User manual STR 650-1000 R+PF 14 FRESNEL S.A. DC-01 STATEMENT OF COMPLIANCE DATE: 01/01/12 We declare that the product: Mark: STRONG Models: STR 650-1000 R+PF Year of construction: 2012 Conforms to the following EC directives: 2006/95/EC: In relation to the safety requirements for material intended for use within specific voltage limits. 2004/108/EC: In relation to the electromagnetic compatibility of equipment, systems and installations. Sole administrator Ángel Torrecillas Redón Barcelona, January 1st of 2012 Fresnel S.A. C/ Potosí 40 08030 Barcelona Spain Tel: +34 93 360 02 30 Fax: +34 93 274 47 47 [email protected] http://www.strong.es User manual STR 650-1000 R+PF 15