1
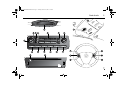
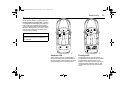
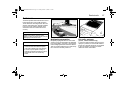
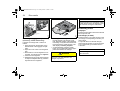
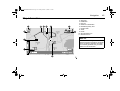
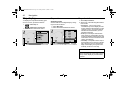
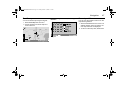
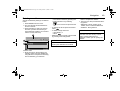
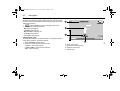
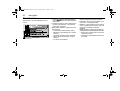
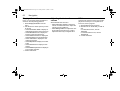
93USSPSEINFOM05.book Page 1 Tuesday, March 16, 2004 3:31 PM
1
User Manual
Saab Infotainment Systems
Saab Audio
Saab Infotainment
Saab Infotainment Plus
Radio/audio
Disc media
Navigation
Index
© Saab
Automobile AB 2004
Service Readiness, Saab Automobile AB, Trollhättan, Sweden
Printed in Sweden
4
6
8
11
31
39
65
93USSPSEINFOM05.book Page 2 Tuesday, March 16, 2004 3:31 PM
2
Introduction
This User Manual describes how to use the
Saab Infotainment System in the Saab 9-3.
There are three models. These have different control panels and are all specially
designed for the cabin of the Saab 9-3:
We recommend that you read the appropriate sections of this manual before using the
system for the first time and that you keep
this manual in the car for future reference.
For information regarding warranty conditions, refer to the Warranty and Service
Book supplied with your car.
Saab Audio
Saab
Infotainment
Saab
Infotainment
Plus
There are a number of different amplifier
and loudspeaker alternatives.
This manual covers all the standard and
optional Infotainment equipment that can be
fitted in your car. There may be some differences between markets and to meet
national legal requirements.
WARNING
WARNING texts warn against the danger
of injury if the specified instructions are
not followed.
NOTICE
NOTICE texts warn of potential damage
to your car if the recommendations are
not followed.
USER TIP
USER TIP texts provide you, the reader,
with useful information about the use and
function of the system.
Since the policy at Saab Automobile AB is
one of continual improvement, we retain the
right to incorporate modifications and to
alter specifications during production without prior notice.
If you have any queries concerning your car,
its equipment, the warranty conditions or
the like, your Saab dealer will be pleased to
help.
Best wishes,
Saab Automobile AB
All work on the infotainment system must be carried out at a Saab workshop.
Saab does not accept liability for any damage
caused by the fitting of spare parts, exchange
parts or accessories that are not approved by
Saab Automobile AB.
The specifications, design particulars and illustrations included in the User Manual are not binding and are not always totally true to life.
93USSPSEINFOM05.book Page 3 Tuesday, March 16, 2004 3:31 PM
3
Security lock
Button functions
Cleaning the unit
The infotainment system has an electronic
security lock. The security lock requires all
units to have been installed by a Saab
dealer. The units are checked each time the
car is used to ensure that they are installed
in the correct car.
If you wish to install a unit at a later date or
wish to transfer a unit to another car, you
must contact a Saab dealer.
Functions related to road safety will continue to work even if the security lock has
been tripped. The audio system will however be rendered inoperable until correctly
installed by a Saab dealer.
The majority of buttons on the control panel
control a number of functions. The length of
time that the button is pressed determines
which function is selected.
Wipe the SID display and control panel display clean with a soft, dry cleaning cloth.
"Touch":
less than 0.2 s
"Normal Press":
0.2 s - 1.2 s
"Press and hold":
more than 1.2 s
USER TIP
"Normal press" is referred to in the text as
"press".
NOTICE
• Spraying cleaner or other fluid directly
onto the unit can damage the mechanical parts.
• Do not touch or point at the display
with sharp or pointed objects as this
can cause scratches.
• Do not knock or jolt the unit as this can
damage it.
93USSPSEINFOM05.book Page 4 Tuesday, March 16, 2004 3:31 PM
4
Saab Audio
Saab Audio
System overview
The Saab Audio system consists of a main
unit comprising a radio. A CD player and CD
changer for the cabin (in-dash) are available
as accessories/options and a CD changer
for the luggage compartment is available as
an accessory.
The Saab Audio system can be operated
using the steering wheel controls (certain
variants only) and the control panel.
The control panel is linked to the Saab Information Display (SID), which is located
above the main unit in the instrument panel.
1 Saab Information Display (SID) Displays text/characters and
information.
2 VOL - Turns audio system on/off.
Adjusts volume and balance.
3 TRE - Adjusts treble.
4 BAS - Adjusts bass.
5 FAD - Adjusts balance between front
and rear loudspeakers.
6 1-6 - Preset buttons for radio stations.
Select discs in CD changer (1-6).
7 SEEK - Tuning, CD rapid play and CD
track change.
8 SELECT - Navigates in lists/menus
under "Settings" in SID.
9 SETTINGS - Activates "Settings" in SID.
10 CD - Activates CD player/changer.
11 SCAN - Samples each track on a CD or
available radio stations.
12 AS - Automatically tunes and stores
radio stations.
13 TP - Traffic program on/off.
14 FM/AM - Activates the radio and
changes the frequency band.
15 Disc slot - Slot for inserting CDs.
16 Eject - Ejects CDs.
17 Hands-free microphone
18 SEEK - Tuning, CD rapid play and CD
track change.
19 NXT - Changes the radio preset or disc
in the CD changer.
20 Phone - No function on U.S./CA cars.
21 SRC - Changes between Radio and CD.
22 VOL - Adjusts volume.
23 PTT (Push-To-Talk) - No function on
U.S./CA cars.
93USSPSEINFOM05.book Page 5 Tuesday, March 16, 2004 3:31 PM
Saab Audio
5
93USSPSEINFOM05.book Page 6 Tuesday, March 16, 2004 3:31 PM
6
Saab Infotainment
Saab Infotainment
System overview
The Saab Infotainment system consists of a
main unit comprising a radio. A CD player
and CD changer for the cabin (in-dash) are
available as accessories/options and a CD
changer for the luggage compartment is
available as an accessory.
The infotainment system can be operated
using the steering wheel controls and the
control panel.
The control panel is linked to the Saab Information Display (SID), which is located
above the main unit in the instrument panel.
1 Saab Information Display (SID) Displays text/characters and
information.
2 VOL - Turns audio system on/off.
Adjusts volume and balance.
3 SEEK - Tuning, CD rapid play and CD
track change.
4 TRE - Adjusts treble.
5 BAS - Adjusts bass.
6 FAD - Adjusts balance between front
and rear loudspeakers.
7 Keypad - Radio station presets and for
entering letters and numbers. Selects
discs in the CD changer (1-6).
8 Control panel display - Main display
window of infotainment system.
9 MAIN - Returns to the main menu.
10 BACK - Goes back in the menu structure and deletes characters.
11 SELECT - Navigates in lists/menus and
confirms selections.
12 PHONE - No function on U.S./CA cars.
13 CD - Activates CD player/changer.
14 SCAN - Samples each track on a CD or
available radio stations.
15 AS - Automatically tunes and stores
radio stations.
16 TP - Traffic program on/off.
17 FM/AM - Activates the radio and
changes the frequency band.
18 Disc slot - Slot for inserting CDs.
19 Eject - Ejects CDs.
20 Hands-free microphone
21 SEEK - Tuning, CD rapid play and CD
track change.
22 NXT - Changes radio preset and disc in
CD changer.
23 Phone - No function on U.S./CA cars.
24 SRC - Changes between Radio and CD.
25 VOL - Adjusts volume.
26 PTT (Push-To-Talk) - No function on
U.S./CA cars.
93USSPSEINFOM05.book Page 7 Tuesday, March 16, 2004 3:31 PM
Saab Infotainment
7
93USSPSEINFOM05.book Page 8 Tuesday, March 16, 2004 3:31 PM
8
Saab Infotainment Plus
Saab Infotainment
Plus
The Saab Infotainment Plus system consists of a main unit comprising a radio and
navigation unit. A CD player and CD
changer for the cabin (in-dash) are available
as accessories/options and a CD changer
for the luggage compartment is available as
an accessory.
The infotainment system can be operated
using the steering wheel controls and the
control panel.
The control panel is linked to the Saab
Information Display (SID), which is located
above the main unit in the instrument panel.
Display settings
1
Î System Î Display Information
2 Select between night time and two
other colour schemes.
3 Finish with Done.
System overview
1 Saab Information Display (SID) Displays text/characters and
information.
2 VOL - Turns audio system on/off.
Adjusts volume and balance.
3 AUDIO - Activates the audio settings
menu.
4 TP - Traffic program on/off.
5 FM/AM - Activates the radio and
changes the frequency band.
6 AS - Automatically tunes and stores
radio stations.
7 CD - Activates CD player/changer.
8 PHONE - No function on U.S./CA cars.
9 NAV - Activates the navigation system.
10 Keypad - Radio station presets and for
entering letters and numbers. Selects
discs in the CD changer (1-6).
11 Control panel display - Main display
window of infotainment system.
12 MAIN - Returns to the main menu.
13 SEEK - Tuning, CD rapid play and CD
track change.
14 BACK - Goes back in the menu structure and deletes characters.
15 SELECT - Navigates in lists/menus and
confirms selections.
16 Disc slot - Slot for inserting CDs.
17 Eject - Ejects CDs.
18 Hands-free microphone
19 SEEK - Tuning, CD rapid play and CD
track change.
20 NXT - Changes radio preset and disc in
CD changer.
21 Phone - No function on U.S./CA cars.
22 SRC - Changes between Radio and CD.
23 VOL - Adjusts volume.
24 PTT (Push-To-Talk) - No function on
U.S./CA cars.
93USSPSEINFOM05.book Page 9 Tuesday, March 16, 2004 3:31 PM
Saab Infotainment Plus
9
93USSPSEINFOM05.book Page 10 Tuesday, March 16, 2004 3:31 PM
10
Saab Infotainment Plus
(This page has been left blank.)
93USSPSEINFOM05.book Page 11 Tuesday, March 16, 2004 3:31 PM
Radio/audio
11
Radio/audio
Radio _______________
Radio settings ________
Audio settings ________
Sound system ________
Technical data ________
Antennas ____________
13
20
23
25
26
27
93USSPSEINFOM05.book Page 12 Tuesday, March 16, 2004 3:31 PM
12
Radio/audio
Switching the audio
system on and off
The audio system is switched
on:
• By pressing the VOL knob.
• When the ignition is switched from LOCK
to OFF (if the audio system was on when
the remote control was last removed from
the ignition switch).
The audio system is switched
off:
• By pressing the VOL knob.
• When the remote control is removed from
the ignition.
• One hour after the ignition was switched
off, if the remote control has not been
removed.
• One hour after a button was last pressed
if the audio system was switched on without the remote control in the ignition.
USER TIP
If the audio system is switched on without
the remote control in the ignition switch,
the system will be switched off after one
hour.
Sound controls
Bass
Volume
Adjust the bass setting by pressing the BAS
button to extend the knob, then turning it.
Press in the knob to lock the setting.
By turning the VOL knob to the desired
volume.
Balance
1 Adjust the balance between left and
right-hand speakers by pulling out and
turning the VOL knob.
2 Release the knob to return to volume
adjustment.
Saab Infotainment Plus
1
Î Balance
2 Turn SELECT to adjust the balance.
3 Press SELECT to save the sound
setting.
Treble
Adjust the treble setting by pressing the
TRE button to extend the knob, then turning
it. Press in the knob to lock the setting.
Fader
Adjust the balance between front and rear
speakers by pressing the FAD button to
extend the knob, then turning it. Press in the
knob to lock the setting.
Saab Infotainment Plus
1
Î Audio Settings
2 Turn SELECT to adjust the selected
sound control.
3 Press SELECT to save the sound
setting.
93USSPSEINFOM05.book Page 13 Tuesday, March 16, 2004 3:31 PM
Radio/audio
Radio
USER TIP
Press FM/AM to turn on the radio. When the
radio is active, the frequency band, selected
preset and station name or frequency are
shown on the SID. Example:
FM1
Frequency band
3
Selected preset button
MEGAPOL
Name of radio station
If you are listening to another sound
source, you can turn on the radio by
pressing the SRC button on the steering
wheel.
Switch off the radio by pressing VOL to
switch off the audio system or by pressing
CD or SRC to start CD playback.
If the car has the Saab Infotainment or Saab
Infotainment Plus system, the radio can
also be switched off from the menu:
Î Radio Î Radio Off
13
Selecting a radio station
Selecting a preset station
Press the desired preset button.
You can also press the NXT button on
the steering wheel to select the next preset
station.
Selecting a frequency band
Press FM/AM to scroll between FM1, FM2
and AM. The selected frequency band is
shown on the display.
If the car has the Saab Infotainment or Saab
Infotainment Plus system, the frequency
band can also be changed from the menu:
Î Radio Î Change Band/Band
93USSPSEINFOM05.book Page 14 Tuesday, March 16, 2004 3:31 PM
14
Radio/audio
Tuning a station
Fine tuning
Storing stations
Automatic tuning
Touch SEEK to adjust the frequency in
steps of 0.02 MHz.
Storing the present station
Press SEEK to initiate automatic tuning.
A chime indicates that the system has
switched to automatic tuning. The radio
searches for the closest strong signal and
stops at that frequency.
Manual tuning
Press and hold SEEK to start manual
tuning. The changing frequency is shown on
the SID. Release the button to stop at the
desired frequency.
Scanning radio stations
To listen to each radio station within a frequency band for 10 seconds, press SCAN.
SCAN will appear on the SID.
Press SCAN once again to halt scanning
and select the radio station that is currently
playing.
If your car has the Saab Infotainment Plus
system, select Scan via the menu:
Store the current radio station by pressing
and holding the desired preset button.
A chime will sound once the station has
been stored.
Î Radio Î Scan
Preset buttons
(Saab Infotainment/Saab Infotainment Plus)
Preset buttons
(Saab Audio)
93USSPSEINFOM05.book Page 15 Tuesday, March 16, 2004 3:31 PM
Radio/audio
15
AutoStore (AS)
Switching AS on and off
Displaying a list of presets
AutoStore (AS) provides an additional frequency band that can be used to search for
and store stations automatically when you
are in an area in which you are unfamiliar
with the radio stations and their frequencies.
The function can be used for both FM and
AM bands.
Press and hold the AS button to initiate a
search for the strongest stations within the
current frequency band. A chime indicates
that the system has switched to AutoStore
mode.
Each time the system finds and stores a station, the number on the SID will increase. If
the radio cannot find a sufficient number of
stations, the remaining preset buttons will
be left empty. If one of these empty buttons
is pressed, **** will appear on the display.
Press the AS button to switch AS mode on
and off. AS is shown on the SID when the
function is on. When you deselect the mode,
the radio returns to the station and frequency band that were selected before AS
was activated.
With the Saab Infotainment or Saab Infotainment Plus system, you can view a list of
stored preset stations accessible with the
preset buttons. You can also select a radio
station from this list.
1
Î Radio Î Preset List
2 To select a radio station, mark the station in the list.
Empty slots in the preset station list are
marked by ****.
93USSPSEINFOM05.book Page 16 Tuesday, March 16, 2004 3:31 PM
16
Radio/audio
Program type (PTY)
USER TIP
The following features, Program Type
and Traffic Program (see page 22), which
may not work in your area, function only
with FM broadcasts. The audio system in
your Saab is equipped with an advanced
system allowing information from broadcasters to be transmitted visually, as text
together with the audio signal. This information is then decoded by the radio and
made available for several new and
unique features. The RBDS or Radio
Broadcast Data Service, operates in the
FM band only, and the information transmitted is supplied exclusively by participating broadcasters. Saab has no control
over the accuracy of the data or information. Please refer to the following pages
regarding specific descriptions and operation of these functions.
Coverage by local broadcasters may be
limited at this time, but as the technology
and benefits grow, you will find the audio
system in your Saab is equipped to take
advantage of this service.
The PTY function (Program TYpe) requires
programs broadcast on the FM band to
include a code for program type (e.g.
News). When the function is active, the
radio will monitor the selected program type
in the background, even if you are listening
to a different sound source (CD or other FM/
AM station). Program type can be selected
and activated irrespective or which sound
source is currently active.
A list of all current program types can be
found on page 17.
Switching PTY on and off
Saab Audio
Î Program Type
• To switch PTY on, mark PTY on.
• To switch PTY off, select PTY off.
Saab Infotainment
Î Radio Î Program Type
• To switch PTY on, mark On.
• To switch PTY off, select Off.
Saab Infotainment Plus
Î Radio
• To switch PTY on, mark PTY.
• To switch PTY off, deselect PTY.
93USSPSEINFOM05.book Page 17 Tuesday, March 16, 2004 3:31 PM
Radio/audio
Checking and changing program
type
Current program types
Nostalgia
Saab Audio
1
Î Program Type
2 To check or change the program type,
select PTY on.
3 From the list, select the desired program
type and press SELECT.
+ the
selected program type will be displayed
on the SID. The radio then searches for
a program of the selected type.
News
Saab Infotainment
1
Î Radio Î Program Type
2 To check or change the program type,
select On. A list is displayed in which the
current program type is checked.
3 Select the desired program type from
the list and press SELECT to change to
this. The radio then searches for a program of the selected type.
Soft Rock
PTY
Saab Infotainment Plus
1
Î Radio Î PTY Select
2 Select the desired program type from
the list. The PTY selection is shown at
the bottom of the display and the radio
searches for a program of that type.
Soft
Information
Sports
Talk
Rock
Classic Rock
Adult Hits
Top 40
Country
Oldies
Jazz
Classical
Rhytm & Blues
Soft R & B
Foreign. Lang.
Religious Music
Religious Talk
Personality
Public
College
Weather
17
93USSPSEINFOM05.book Page 18 Tuesday, March 16, 2004 3:31 PM
18
Radio/audio
Program type broadcasts
If you have selected the Sport program type
and a sports program starts, the current
sound source will be interrupted by this
sports broadcast.
The SID will display
and the station
sending the sports program. After the
broadcast, the audio system will return
automatically to the sound source selected
previously.
PTY
Cancelling a program type
broadcast
To hear the selected program type
only
If you wish to cancel the current program
type broadcast, press TP or SRC (steering
wheel control). The audio system will then
return to the previously selected sound
source.
Press FM/AM or CD to select a sound
source directly.
If you do not wish to listen to the audio
system but still wish to hear a certain program type:
1 Switch on the audio system.
2 Activate the PTY function.
3 Turn the volume right down.
93USSPSEINFOM05.book Page 19 Tuesday, March 16, 2004 3:31 PM
Radio/audio
PTY Alarm
The alarm program type is always activated.
It is used by public authorities and emergency services to broadcast information
regarding major incidents and disasters.
PTY Alarm broadcasts are given highest
priority and these will therefore interrupt
other radio broadcasts or CD playback.
During an alarm broadcast the SID will
display:
Alarm!
Press TP/SRC to cancel.
This message disappears at the end of the
alarm announcement if you do not manually
interrupt the announcement.
If you are in the middle of a phone conversation (if equipped with OnStar), this will be
interrupted by the alarm announcement.
19
Interrupt priorities
The priority given to functions that can interrupt the current radio broadcast or CD playback is as follows:
1 PTY Alarm (highest priority).
2 Traffic announcement.
3 Other program types.
For instance, a PTY broadcast (e.g. News)
will interrupt the current radio broadcast or
CD playback, a traffic announcement will
interrupt a PTY broadcast, and so on. At the
end of the current broadcast, the system will
return to the preceding function.
93USSPSEINFOM05.book Page 20 Tuesday, March 16, 2004 3:31 PM
20
Radio/audio
Radio settings
WARNING
Setting should be made when the car is
stationary so that attention to traffic is not
reduced, increasing the likelihood of an
accident.
Rolling advertisements
Some radio stations present rolling advertisements on the SID. If your car has the
Saab Infotainment or Saab Infotainment
Plus system, these advertisements are also
shown on the control panel display.
Saab Audio
1
Î Radio Settings
• To allow rolling advertisements, deselect PS.name Freeze.
• To prevent rolling advertisements from
being displayed, check PS.name
Freeze.
2 Select Done to confirm.
3 Press SETTINGS or select Exit to exit
the menu.
Saab Infotainment/Saab Infotainment
Plus
1
Î Radio Î Radio Settings
• To allow rolling advertisements, deselect PS-name Freeze.
• To prevent rolling advertisements from
being displayed, check PS-name
Freeze.
2 Select Done to confirm and return to the
main radio menu.
USER TIP
Rolling advertisements can only be
prohibited for activated preset stations.
93USSPSEINFOM05.book Page 21 Tuesday, March 16, 2004 3:31 PM
Radio/audio
Adjusting frequency steps
If the car is shipped from Europe to North
America, the radio’s frequency steps will
require adjustment since these differ in
these two parts of the world.
When the frequency step setting is
changed, any station presets will be erased
and replaced by default frequencies.
To activate the new settings: Switch off the
audio system, lock the car and wait a couple
of seconds. Then unlock the car and turn the
audio system back on.
Saab Audio
1
Î Radio Settings
2 Press and hold FM/AM for more than
3 seconds.
• To select EU-mode, check
EU mode.
• To select US-mode, check
US mode.
3 Select Yes to confirm the setting.
Saab Infotainment/Saab Infotainment
Plus
Î Radio Î Radio Settings.
1
2 Press and hold FM/AM for more than
3 seconds.
• To select EU-mode, check EU mode.
• To select US-mode, check US mode.
3 Select Yes to confirm the setting.
21
93USSPSEINFOM05.book Page 22 Tuesday, March 16, 2004 3:31 PM
22
Radio/audio
Traffic Program (TP)
Traffic announcements
Cancelling a traffic announcement
If you have activated the Traffic Program
function (TP), the radio will automatically
play traffic announcements, including
announcements from radio stations other
than that currently playing. You are in effect
giving traffic announcements highest priority and these will interrupt the current radio
broadcast or CD playback.
When a traffic announcement is transmitted, the current sound source is interrupted
and the SID briefly displays:
To cancel the current traffic announcement,
press TP or the SRC button on the steering
wheel. The audio system will return to the
previous sound source. Press FM/AM or CD
to select a sound source directly.
Switching TP on and off
Use the TP button to turn the TP function on
and off. When TP is on,
is shown at the
bottom of the SID.
The radio station you are listening to when
you press TP may not be able to transmit
traffic announcements, in which case the
following will appear on the SID:
.
This message is displayed for 5 seconds. If
you should wish to hear traffic announcements, press TP while the message shown
above is displayed. The radio will then
search for a station that transmits traffic
announcements. The following will be
shown on the SID while this search is in
progress:
.
If you do not press the TP button, the radio
will stay tuned to the original station.
TP
No TP
TP Seek
Traffic Announcement
Press TP/SRC to cancel.
This message disappears at the end of the
announcement if you do not manually interrupt the announcement.
During an announcement the SID displays
(Traffic Announcement) and the station
identity or frequency. The volume may also
be raised to a preset level (refer to "Volume
for traffic and alarm announcements" on
page 23).
At the end of the traffic announcement, the
audio system will return to the sound source
and volume that were selected prior to the
interruption.
TA
To hear traffic announcements only
To hear traffic announcements only and
mute the audio system:
1 Switch on the audio system.
2 Activate TP.
3 Turn the volume down.
93USSPSEINFOM05.book Page 23 Tuesday, March 16, 2004 3:31 PM
Radio/audio
Audio settings
Saab Audio
1
Î Audio Settings Î
TA/Alarm Volume
WARNING
Settings should be made when the car is
stationary so that attention to traffic is not
reduced, increasing the likelihood of an
accident.
Volume for traffic and alarm
announcements
Set the minimum volume for traffic and
alarm announcements.
If the radio volume is lower than the set minimum volume when the broadcast is interrupted for a traffic or alarm announcement,
the volume will be raised. If the current
volume is higher, no change will be made.
2 Turn SELECT to adjust the volume.
3 Press SELECT to save the setting.
Saab Infotainment
Î System Î Audio Settings Î
1
TA/Alarm volume
2 Turn SELECT to adjust the volume
3 Press SELECT to save the setting.
Saab Infotainment Plus
1
Î More Options Î
TA/Alarm volume
2 Turn SELECT to adjust the volume.
3 Press SELECT to save the setting.
23
Volume for selected program
type broadcasts
Set the minimum volume for broadcasts of
the selected program type.
If the radio volume is lower than the set minimum volume when the broadcast is interrupted for the selected program type, the
volume will be raised. If the current volume
is higher, no change will be made.
Saab Audio
1
Î Audio Settings Î
PTY volume
2 Turn SELECT to adjust the volume.
3 Press SELECT to save the setting.
Saab Infotainment
1
Î System Î Audio Settings Î
PTY Volume
2 Turn SELECT to adjust the volume.
3 Press SELECT to save the setting.
Saab Infotainment Plus
Î More Options Î PTY Volume
1
2 Turn SELECT to adjust the volume.
3 Press SELECT to save the setting.
93USSPSEINFOM05.book Page 24 Tuesday, March 16, 2004 3:31 PM
24
Radio/audio
Max. start volume
Set the maximum volume permitted for
radio and CD playback when the audio
system is turned on.
If the volume was higher than the set start
volume when the audio system was last
switched off, the volume will be lowered the
next time the audio system is switched on.
If the volume was lower, no change will be
made.
Saab Audio
1
Î Audio Settings Î
Max Start Volume
2 Turn SELECT to adjust the volume.
3 Press SELECT to save the setting.
Saab Infotainment
1
Î System Î Audio Settings Î
Max Start Volume
2 Turn SELECT to adjust the volume.
3 Press SELECT to save the setting.
Saab Infotainment Plus
Î More Options Î
1
Max Start Volume
2 Turn SELECT to adjust the volume.
3 Press SELECT to save the setting.
Speed dependent volume
compensation
As vehicle speed increases, the noise level
in the cabin also increases. To avoid having
to change the volume constantly you can let
the audio system increase and decrease
the volume (and bass level) as the speed of
the car increases and decreases.
Select one of four settings:
• High (maximum compensation)
• Normal (medium compensation)
• Low (low compensation)
• Off (no compensation).
Saab Audio
Î Audio Settings Î Speed
1
Dependent
2 Turn SELECT to adjust the volume.
3 Press SELECT to save the setting.
Saab Infotainment
Î System Î Audio Settings Î
1
Speed Dependent
2 Turn SELECT to adjust the volume.
3 Press SELECT to save the setting.
Saab Infotainment Plus
Î More Options Î Speed
1
Dependent
2 Turn SELECT to adjust the volume.
3 Press SELECT to save the setting.
93USSPSEINFOM05.book Page 25 Tuesday, March 16, 2004 3:31 PM
Radio/audio
25
Sound system
There are two models of audio system: the
Premium 150 and Prestige 300. Loudness
is controlled automatically by the audio system, boosting the highest and lowest frequency ranges to enhance the sound image
when the volume is set to a low level. Sound
reproduction is therefore excellent whatever the volume setting.
USER TIP
In the 9-3 Convertible, the rear loudspeakers are located in the side trim of
the rear seat.
Premium 150
Prestige 300
The Premium 150 has 7 loudspeakers:
three in the fascia (the center speaker further enhances the sound image), two in the
parcel shelf and one in each front door.
The Prestige 300 sound system has 13
loudspeakers: five in the fascia (the center
speaker further enhances the sound
image), one in each front door and four in
the parcel shelf. There are also two subwoofers that reproduce the lowest bass
tones.
93USSPSEINFOM05.book Page 26 Tuesday, March 16, 2004 3:31 PM
26
Radio/audio
Technical data
Tone controls
Bass __________ ±12 dB at 60 Hz
Treble _________ ±12 dB at
10,000 Hz
Power output
Premium 150____ 150 W at 1% THD
and 13.5 V
Prestige 300 ____ 300 W at 1% THD
and 13.5 V
Frequency range
Premium 150____ 40 – 11,000 Hz
(±3 dB)
Prestige 300 ____ 25 – 17,000 Hz
(±3 dB)
Radio module
Radio system____ PLL dual-synthesizer tuner*
RBDS receiver
Number of presets:
FM ____________ 3 x 6 (Saab Audio)
3 x 12
AM ____________ 2 x 6 (Saab Audio)
2 x 12
Frequency range:
FM ____________ 87.9 – 107,9 MHz
MW ___________ 530 – 1710 kHz
Tuning steps
Automatic tuning _ FM 200 kHz
MW 10kHz
Manual tuning ___ FM 200 kHz
MW 10 kHz
Distortion (FM)___ <0.5%
Specifications in accordance with EIA Interim Standard.
THD = Total Harmonic Distortion
93USSPSEINFOM05.book Page 27 Tuesday, March 16, 2004 3:31 PM
Radio/audio
27
Antennas
The audio system has two antennas: one for
FM reception and one for AM reception.
These antennas are integrated in the rear
window and windscreen. (Certain variants
may have a rod antenna instead of the
antennas in the rear window and windscreen.)
NOTICE
Refrain from placing hard or sharp
objects on the rear parcel shelf, to avoid
damaging the antenna wires.
USER TIP
• Roof loads can negatively affect telecommunication and GPS reception.
• If sun film is fitted to the rear window,
it must be a pure-plastic variety to
maintain good radio reception. Ensure
that the film does not contain any
metal.
Multipath propagation
Diversity antenna
Multipath propagation occurs when radio
waves from an FM transmitter are reflected
by a large building, or the like, causing them
to arrive slightly later than the direct waves.
This can create interference to radio reception. See also "Diversity antenna".
(option, certain markets only)
To improve radio reception when the topography is a problem, a second FM antenna,
known as a diversity antenna, can be fitted
in the rear window. Consult your Saab
dealer for further information.
93USSPSEINFOM05.book Page 28 Tuesday, March 16, 2004 3:31 PM
28
Radio/audio
Shadow effect
Cross modulation
Radio waves, FM/AM
Because FM radio waves travel in straight
lines from the transmitter, a shadow effect
can occur when tall buildings or hills
obstruct the propagation path from the
transmitter to the car.
When the radio is tuned to a weak transmitter in the vicinity of a stronger one, the car’s
antenna will receive a signal from both.
Such interference may cause the unwanted
broadcast to be heard faintly in the background.
FM radio waves radiate in straight lines from
the transmitter. Because such waves do not
follow the curvature of the Earth, their
strength becomes weaker the further they
travel. That is why a large number of transmitters is needed to provide good reception.
AM waves, on the other hand, are reflected
off the ionosphere, thus greatly extending
their range.
93USSPSEINFOM05.book Page 29 Tuesday, March 16, 2004 3:31 PM
Radio/audio
Sources of FM interference
Sources of AM interference
Interference to FM reception can be caused
by the electrical systems in other vehicles,
particularly if the signal from the transmitter
is weak.
AM reception is prone to interference, e.g.
from electrical systems on other vehicles,
high-tension power lines and lightning.
29
93USSPSEINFOM05.book Page 30 Tuesday, March 16, 2004 3:31 PM
30
Radio/audio
(This page has been left blank.)
93USSPSEINFOM05.book Page 31 Tuesday, March 16, 2004 3:31 PM
Disc media
31
Disc media
CD player/changer ____
Portable player _______
Error codes __________
32
37
38
93USSPSEINFOM05.book Page 32 Tuesday, March 16, 2004 3:31 PM
32
Disc media
CD player/changer
Activating disc media
Switching disc media off
(CD changer (cabin), option/accessory.
CD changer (luggage compartment),
accessory.)
Activate the CD player/changer by loading
a CD or pressing CD or the SRC button on
the steering wheel if a disc is already
loaded.
Playback starts with track 1 and the SID
displays:
The CD player/changer is switched off if you
press VOL to switch off the audio system, or
press FM/AM or SRC to change to the radio.
With the Saab Infotainment or Saab Infotainment Plus system, you can also switch
off the CD player/changer by selecting CD
Off from the menu.
NOTICE
• We advise against the use of writable
CDs in your audio system, as in
certain cases these types of CD are
only suitable for home use and can
therefore cause operational problems
(overheating) when played on the
car’s audio system.
• CD singles (8 cm) can be played in the
CD player. It is however not recommended to use these in a CD changer.
• The CD changer accepts six CDs.
The
symbol is a trademark of Philips and Sony.
With the Saab Infotainment or Saab Infotainment Plus system, you can also activate
the CD player/changer by selecting CD from
the menu.
93USSPSEINFOM05.book Page 33 Tuesday, March 16, 2004 3:31 PM
Disc media
Changing disc media
Loading a disc
The CD button switches between the CD
player and CD changer (if fitted).
If the car has the Saab Infotainment or Saab
Infotainment Plus system, and the car has a
CD player and CD changer, you can switch
between these from the menu:
1
Î CD Î Change Media
2 From the menu, select the desired disc
media. The alternatives available
depend on the equipment in your car.
CD player
To load a CD, insert the disc label-side up
into the slot and allow the mechanism to
load it automatically. Playback will start from
the first track.
If the disc is wrong-side-up, it will be ejected
automatically.
Once all the tracks have been played, the
CD player will restart from track 1.
33
CD changer (in-dash)
(option/accessory)
If a disc is loaded in a slot, the corresponding button on the CD changer will be illuminated.
To load a disc:
1 Press the button (1-6) on the CD
changer corresponding to the slot into
which you wish to load the disc (choose
a button that is not illuminated). The SID
will display:
2 Wait until the loading mechanism is
ready to accept the disc. The lamp under
the loading slot will shine green. The SID
will display:
.
3 Insert the disc label-side up into the slot
and allow the mechanism to load it automatically. The SID will display:
If the disc is wrong-side-up, it will be
ejected automatically.
Once all the tracks on one CD have been
played, playback of the next CD will start (if
more than one disc is loaded).
Please wait. .
Insert CD
Loading..
93USSPSEINFOM05.book Page 34 Tuesday, March 16, 2004 3:31 PM
34
Disc media
NOTICE
Always keep the cover completely closed
to keep dust out of the CD changer. Dust
can cause the changer to malfunction.
Removing a disc
CD player
Press the EJECT button to the left of the CD
slot to eject the CD.
CD changer (in-dash)
CD changer (luggage compartment)
(accessory, certain variants only)
Load the CD changer with 1-6 discs as
follows:
1 Open the panel in the side trim on the
left-hand side of the luggage compartment.
2 Open the cover over the CD magazine
fully.
3 Press EJECT. The CD magazine is now
exposed. The SID shows:
.
4 Lift out the CD magazine.
5 Withdraw one CD tray at a time and load
or swap the CD (label-side up). Slide the
tray back into the magazine.
No magazine
6 Carefully press the magazine home into
the CD changer and close the cover
fully. Note the position of the magazine
for loading. It may take several seconds
for the changer to check the CDs. The
SID displays:
7 To start playback, press the preset
button (1-6) corresponding to the appropriate CD loaded in the changer.
Checking magazine
WARNING
Take care when opening the CD magazine cover. The unit above the CD
changer may be hot.
Press the button (1-6) under the slot on the
CD changer corresponding to the disc you
wish to eject.
To eject all discs from the CD changer,
press and hold a button on the CD changer
(1-6) corresponding to a loaded slot for
3 seconds.
USER TIP
The CD changer is locked while the car
alarm is armed.
93USSPSEINFOM05.book Page 35 Tuesday, March 16, 2004 3:31 PM
Disc media
Selecting and changing discs
in CD changer
The preset buttons (1-6) on the control
panel correspond to discs 1-6 in the CD
changer.
Change discs by pressing the appropriate
preset button.
Selecting and changing tracks
Rapid play
To change to a preceding or following track,
press SEEK. The track number is displayed
on the SID.
If you wish to restart playback from the
beginning of the current track press SEEK
(left arrow).
To change to the preceding track, press
SEEK twice in succession.
With the Saab Infotainment or Saab Infotainment Plus system, you can change
tracks from the menu:
Press and hold SEEK to initiate rapid play of
the current track. If you hold the button
depressed for more than 5 seconds, the
speed of rapid play increase.
Release the button to cease rapid play.
Î CD Î Change Track
Preset buttons
(Saab Infotainment/Saab Infotainment Plus)
Preset buttons
(Saab Audio)
35
Track scan
(Saab Audio and Saab
Infotainment only)
Press SCAN to listen to the first 10 seconds
of each track on a CD. Press SCAN once
more to cancel the scan and select the track
that is currently playing.
If the car has a CD changer, track scan will
continue with the next CD once all the tracks
on the first CD have been scanned.
93USSPSEINFOM05.book Page 36 Tuesday, March 16, 2004 3:31 PM
36
Disc media
Random playback
You can let the CD player/changer play
tracks in a random order, i.e. not in numerical order. If the car has a CD changer, this
will pick tracks from all the loaded CDs.
Saab Audio
Î Random
• To activate random playback, mark
Random on.
• To play tracks in numerical order, mark
Random off.
Saab Infotainment
Î CD Î Random
• To activate random playback, mark On.
• To play tracks in numerical order, mark
Off.
Saab Infotainment Plus
Î CD
• To activate random playback, mark
Random.
• To play tracks in numerical order, deselect Random.
CD text
If the car has the Saab Infotainment Plus
system, you can view the CD title and track
name.
Î CD
• To switch CD text on, check CD Text.
• To turn CD text off, deselect CD Text.
USER TIP
CD text is dependent on the CD. Not all
CDs provide CD text information.
93USSPSEINFOM05.book Page 37 Tuesday, March 16, 2004 3:31 PM
Disc media
Portable player
USER TIP
There is a recess on each side of the storage compartment which will accept the
lead from the portable play so that you
can close the lid without damaging the
lead.
WARNING
Place the portable player where it cannot
be thrown around and cause personal
injury in the event of a collision.
AUX input
(option, certain variants only)
If the car has an AUX input in the storage
compartment between the front seats, you
can connect a portable player, such as an
MP3 player, to the audio system.
Adjust the sound settings using the control
panel or the steering wheel controls. To
change tracks, fast forward, etc., use the
controls on the portable player.
37
AUX input in the storage compartment
between the front seats.
Connecting and activating a
portable player
1 Connect the player to the jack in the
centre console.
2
Î CD Î Change Media Î
AUX Input
93USSPSEINFOM05.book Page 38 Tuesday, March 16, 2004 3:31 PM
38
Disc media
Error codes
WARNING
The CD player is a Class 1 laser product
• Service and repair work must only be
carried out by authorized technicians.
• If the casing is damaged, hazardous
laser radiation can occur.
The audio system has a built-in diagnostics
function. If a fault is detected, a error code
is generated to help workshop technicians
to diagnose the fault. Below are the codes
for some faults that you might be able to
rectify yourself. If an error code persists
after you have taken the appropriate action,
contact a Saab workshop.
NOTICE
All work on the infotainment system must
be carried out at a Saab workshop.
NOTICE
Proceed with care if rectifying a fault. If in
doubt, contact a Saab workshop.
Error code
Possible cause
Action
CD error.
The CD cannot be read due to dirt or Carefully wipe away dust and dirt from the playing surface with a soft,
scratches.
clean, dry cloth.
CD eject error.
The CD is stuck.
Check that nothing is obstructing the disc slot and preventing the CD
from ejecting.
93USSPSEINFOM05.book Page 39 Tuesday, March 16, 2004 3:31 PM
Navigation
39
Navigation
(option/accessory certain variants only)
Introduction __________
DVDs _______________
Navigation System
Components ________
System Overview _____
Quick guide __________
Map information ______
Map display __________
New route____________
POI icons ____________
Guidance ____________
Editing a route________
Stored routes_________
Settings _____________
FAQ ________________
40
41
42
43
44
45
46
48
52
54
58
60
61
64
93USSPSEINFOM05.book Page 40 Tuesday, March 16, 2004 3:31 PM
40
Navigation
Introduction
WARNING
Safety first!
• The use of the navigation system
does not free the driver from responsibility. It is more important to follow
traffic regulations than the suggested
route!
• Traffic regulations and the current traffic situation always take precedence
over the directions provided by the
navigation system. The driver must
observe the highway code applicable
to that place.
• For safety reasons, most functions are
inhibited while the vehicle is in motion.
How the navigation system
works
The integrated navigation system uses the
Global Positioning System (GPS). GPS
uses signals from satellites that orbit the
earth.
The car’s electronics incorporate direction
and speed sensors that, along with GPS
and the digital maps, are used to calculate
the position of the vehicle.
Reception of the GPS signal can be disrupted and sometimes interrupted:
– between high-rise buildings and in parking garages.
– when travelling through tunnels, along
tree-lined alleys or between high-sided
vehicles,
– during thunderstorms or heavy precipitation,
– if the GPS antenna is blocked by a roof
load,
– if the satellites are switched off for maintenance or repairs.
The digital road map
In order to plan a route, the navigation
system not only needs to know the position
of the car but also requires a digital road
map of the destination and roads. Such digital maps are stored on the DVD.
Due to local conditions and incomplete
data, route calculation errors can arise. The
calculated route can differ from actual conditions since the data on the DVD dates
from the release data of the disc.
USER TIP
We recommend the use of the most
current version of the digital map for navigation.
Contact your Saab dealer for up-to-date
road maps.
93USSPSEINFOM05.book Page 41 Tuesday, March 16, 2004 3:31 PM
Navigation
DVDs
Caring for DVDs
The Saab Navigation System is housed in
the luggage compartment. See the illustration on page 42.
• Do not store DVDs in direct sunlight or
heat.
41
• Do not touch the playing surface. Hold
the disc by its outer edge or by holding
one finger on the outer edge and inserting
one finger into the hole.
Changing DVD
1 Press EJECT to eject the DVD.
2 Insert the new DVD. The disc will be fed
in automatically.
USER TIP
• Do not use chemical cleaning products.
Contact your Saab dealer for up-to-date
maps and new DVDs.
WARNING
The DVD player is classified as a Class 1
Laser Product.
• Service and repair work must only be
carried out by authorized technicians.
• If the casing is damaged, hazardous
laser radiation can occur.
• Carefully wipe away dust and dirt from the
playing surface (side without label) using
a clean, soft, dry cloth. Wipe in straight
lines from the centre of the disc to the outside.
93USSPSEINFOM05.book Page 42 Tuesday, March 16, 2004 3:31 PM
42
Navigation
Navigation System Components
1. Saab Information Display (SID)
Displays guidance information. See
page 55 for a description of the SID.
2. Saab Navigation System
The navigation unit that reads the digital
road map information on the DVD. See
page 41 for how to change DVDs.
3. Antenna
Receives GPS signals. Bear in mind that
roof loads can negatively affect reception.
4. Control panel
The navigation system’s main unit. Information shown on the display can be controlled
using the buttons and dials on the control
panel and using the steering wheel controls.
5. Steering wheel controls
Control certain functions from the steering
wheel, improving safety.
93USSPSEINFOM05.book Page 43 Tuesday, March 16, 2004 3:31 PM
Navigation
System Overview
43
1. NAV
Go to the main navigation menu or the current guidance if guidance is active.
2. MAIN
Return to the main menu to select
Navigation.
3. SELECT
Mark options in menus, lists and indexes.
Turn clockwise to scroll down a list and anticlockwise to scroll up a list. Press the dial to
confirm your selection.
4. BACK
Exit menus, go back in the menu structure
and delete characters.
5. VOL
Adjust the volume of verbal instructions
while these are being read.
6. Keypad
Scroll and zoom maps, enter letters and
select presets and tabs. Keypad functions
are indicated on the tab on the left of the
screen.
7. VOL +/Adjust the volume of verbal instructions
while these are being read.
93USSPSEINFOM05.book Page 44 Tuesday, March 16, 2004 3:31 PM
44
Navigation
Quick guide
New route
The quick guide covers the most common
ways to operate the navigation system.
Entering an address
System Overview
NAV - Go to the main navigation menu or
the current guidance if guidance is active.
SELECT - Mark options in menus, lists and
indexes. Turn clockwise to scroll down a list
and anticlockwise to scroll up a list. Press
the dial to confirm your selection.
BACK - Exit menus, go back in the menu
structure and delete characters.
Keypad - Select preset destinations and
tabs, scroll and zoom maps, enter letters
and numbers.
WARNING
• Traffic regulations and the current traffic situation always take precedence
over the directions provided by the
navigation system. Inattentiveness
increases the risk of an accident!
• For safety reasons, most functions are
inhibited while the vehicle is in motion.
1
Î New Route Î Address or
Î Navigation Î New Route Î
Address
2 The most recently entered address is
shown on the list.
3 Select the field you wish to change on
the menu. Enter the address by selecting characters and letters with SELECT.
(If this is the first time you have entered
an address, you must first select a country and town.)
4 Enter the remaining address details.
5 Your selected address is now shown on
the display.
6 Select Guidance from the menu to start
guidance.
Selecting points of interest
Î New Route Î Point Of Interest
1
or
Î Navigation Î New Route Î
Point Of Interest
2 Select Car Position if the destination is
close to the car’s present position.
3 Select the type of interest from the
menu.
4 Select the destination from the list.
5 Select Guidance to start guidance.
Route settings
E.g. avoid highways
1 From the main menu, select Settings Î
Route Criteria.
2 Check the box for Avoid Highways.
3 Select Done.
Guidance
USER TIP
If the New Route option is not available on
the main menu, guidance for an earlier
route is in progress. Switch off guidance
by selecting Stop Guidance.
To switch to guidance, if guidance is active,
press:
or
Î Navigation
If guidance is not active you must start
guidance.
93USSPSEINFOM05.book Page 45 Tuesday, March 16, 2004 3:31 PM
Navigation
Map information
1
2
3
4
5
6
7
8
9
10
11
45
Car icon
Waypoint
Destination
POI icon
Distance to destination
Estimated journey time
North pointer
Scale
Route
GPS reception icon
Manoeuvre icon
USER TIP
Due to continual changes to the road
network and traffic regulations, the digital
map is not always complete. The maps
are constantly updated. Ask your Saab
dealer for more information.
93USSPSEINFOM05.book Page 46 Tuesday, March 16, 2004 3:31 PM
46
Navigation
Map display
Map scale
To display the map without starting guidance for a route, proceed as follows:
Changing scale
1
Î View map or
Î Navigation Î View map
2 Press Menu to activate the menu.
Zoom in and out of the digital map by changing the scale as follows:
1 Select Map Scale.
2 Select the desired scale from the list.
Map orientation
1 Select Map Orientation.
2 Select one of the following alternatives
from the list:
• Heading Up - The car icon points
towards the top of the display and the
map is oriented in the direction you are
currently moving. A compass pointer
indicates in which direction you are
travelling (optional).
• North Up - The map is oriented with
north at the top of the display and the
map automatically scrolls up, down and
to the sides. The car icon remains in the
centre of the display.
• Fixed Map - The position of the map is
fixed and the car icon moves on the display. When the car icon reaches the
edge of the display, the system automatically scrolls to a new map.
USER TIP
If the map scale is 4 miles or more, the
map is automatically shown with north at
the top of the display to provide a better
overview.
93USSPSEINFOM05.book Page 47 Tuesday, March 16, 2004 3:31 PM
Navigation
Scroll map
You can scroll the map using the keypad:
1 Select Scroll Map from the menu.
2 Use the keypad to scroll the map and
zoom in and out.
For help on keypad functions, select Keypad
Definition.
Keypad
47
Current position
You can view the position of the car on the
map without guidance.
1 Select Car Position from the menu. The
address location of the car and the current map reference are displayed.
2 To return to the map view, select Done.
93USSPSEINFOM05.book Page 48 Tuesday, March 16, 2004 3:31 PM
48
Navigation
New route
Navigation presets
Selecting using the keypad
Create a route by selecting a destination
using the following menu options:
Selecting from the list
If you are in the main navigation menu, you
can also select one of your presets using the
keypad.
1
or
Î Navigation
2 Use the keypad (1-12) to choose a
preset destination. Guidance will start
automatically.
Î New Route or
Î Navigation Î New Route
• Navigation Presets - Select a preset, e.g.
home, work or the shops.
• Address - Specify an address by looking
in an address index. An address consists
of a country, town, street, street number
and possibly an intersection.
• Last 10 Routes - Select one of the 10 last
routes used.
• Stored Routes - Select a destination from
a stored route.
• Point Of Interest - Select a point of interest
as the destination.
• On Map - Select a destination using the
map.
USER TIP
If the New Route option is not available on
the main menu, guidance for an earlier
route is still in progress. Switch off the
active guidance by selecting Stop Guidance.
By selecting navigation presets from your
preset list, you can check and edit the route
before guidance starts.
1 Select Navigation Presets from the
menu.
2 Select the preset from the list under the
Navigation Presets tab. A menu with the
following options appears:
• View Route - Display the route as a list
with your destination and any waypoints.
• Edit Route - Edit an existing route.
Delete, move or add new addresses.
• Guidance - Start guidance.
USER TIP
A navigation preset can consist of a route
with one address (destination only) or
several addresses (destination +
waypoints). For how to set navigation
presets, see page 59.
93USSPSEINFOM05.book Page 49 Tuesday, March 16, 2004 3:31 PM
Navigation
Entering an address
Specify an address by looking in an address
index.
1 Select Address from the menu.
2 The most recently entered address is
shown on the list.
3 Select the field you wish to change on
the menu. (If this is the first time you
have entered an address, you must first
select a country and town.)
5 To confirm your selection, move the
cursor down to the list by pressing and
holding SELECT or by selecting
.
You can now choose an option from the
list.
• To change the list of special characters
select
.
• To delete a single character:
• press BACK, or
• select
.
• Delete the entire contents of the text field
by pressing and holding BACK.
USER TIP
The letters that are available are determined by the addresses on the DVD.
Address index
4 Enter the name in the text field (1) by
selecting a letter from the alphabet (2)
using SELECT. The options in the list (3)
are now limited by your selection.
49
6 Repeat the procedure for the remaining
lines to complete the address.
7 The menu now also provides the following options:
• Edit Route - Edit an existing route.
Delete, move or add new addresses.
• Guidance - Start guidance.
USER TIP
Certain town and street names can occur
more than once in a country. In such
cases, a further dialogue box is
displayed, in which you can specify the
address.
93USSPSEINFOM05.book Page 50 Tuesday, March 16, 2004 3:31 PM
50
Navigation
Last 10 routes
Stored routes
Select one of the 10 last routes used.
1 Select Last 10 Routes from the menu.
2 A list of the last 10 routes is displayed
with the most recent first.
Select a destination from a stored route.
1 Select Stored Routes from the menu.
2 A list of stored routes will appear. The
routes are sorted in alphabetical order.
List of the last 10 routes
3 Select the route from the list using
SELECT.
4 A menu with the following options
appears:
• View Route - Display the route as a list
with your destination and any waypoints.
• Edit Route - Edit an existing route.
Delete, move or add new addresses.
• Guidance - Start guidance.
List of stored routes
3 Select a route from the list with SELECT.
Routes are listed under tabs in alphabetical order. Use the keypad to change
tabs. Once you have chosen a route, a
menu with the following options will
appear:
• View Route - Display the route as a list
with your destination and any waypoints.
• Edit Route - Edit an existing route.
Delete, move or add new addresses.
• Guidance - Start guidance.
93USSPSEINFOM05.book Page 51 Tuesday, March 16, 2004 3:31 PM
Navigation
Point Of Interest (POI)
Select a Point Of Interest as the destination.
1 Select Point Of Interest from the menu.
2 Select how you wish to search for the
address. Choose one of the following
menu options:
• Current Position - Search for a destination close to your present position.
• Destination - Search for a destination
starting from a preset destination.
• Other Location - Search for a destination in another location by specifying
the address in one of the following
ways:
• Navigation Presets (see page 48)
• Address (see page 49)
• Last 10 Routes (see page 50)
• Stored Routes (see page 50)
• On Map (see page 53)
• Name Search - Search for the name of
the destination.
3 Select the category of destination from
the Point Of Interest type list.
51
4 If you choose Name Search, you can limit
the search area by selecting:
• Region - Enter the country to limit the
name search to a certain country.
• Town - Enter the town to limit the
name search to a town.
5 Enter the name in the text field (1) by
selecting a letter from the alphabet (2)
using SELECT. The options in the list (3)
are now limited by your selection.
Name search
6 If you choose one of the other options,
select a tab to view the addresses sorted
by:
• By Dist, with the closest (as the crow
files) address first.
• In alphabetical order.
By destination
7 Mark an address in the list and press
SELECT to display the following menu:
• POI Information - Display the information available about the destination.
• View On Map - View the position of the
destination on the map.
• Edit Route - Edit an existing route.
Delete, move or add new addresses.
• Guidance - Start guidance.
93USSPSEINFOM05.book Page 52 Tuesday, March 16, 2004 3:31 PM
52
Navigation
POI icons
Airport
Exhibition Or Conference Center
Park & Ride
Amusement Park
Ferry Terminal
Parking Garage
Auto Repair
Gas Station
Parking Lot
Automobile Association
Golf Course
Parks & Recreation
Bank
Grocery Store
Police Station
Border Crossing
Historical Monument
Car Rental
Bus Station
Hospital/Polyclinic
Rest Area
ATM
Hotel/Motel
Restaurant
Business Facility
Library
Saab Dealer
Casino
Light Rail Station
School
City Hall
Marina
Shopping Center
Community Center
Museum
Ski Resort
Court House
City Center
Stadium/Arena
93USSPSEINFOM05.book Page 53 Tuesday, March 16, 2004 3:31 PM
Navigation
Theater
Tourist Attraction
Tourist Information
Destination on map
Select a destination using the map.
1 Select On Map from the menu.
2 The map shows your present location
with a cross.
Train Station
University/College
Winery
Destination on map
53
3 Select the destination (move the cross
on the map) using the keypad. You can
also use the keypad to zoom in and out
on the map, see page 46.
4 Confirm you selection of destination by
pressing 0 on the keypad, or press
SELECT and select Address from the
menu.
5 Once you have selected an address, the
following menu options are displayed:
• Return to Map - Return to the map and
select another destination.
• Edit Route - Edit an existing route.
Delete, move or add new addresses.
• Guidance - Start guidance.
93USSPSEINFOM05.book Page 54 Tuesday, March 16, 2004 3:31 PM
54
Navigation
Guidance
Î Navigation or select Guidance in
the navigation main menu.
The navigation system uses the following
functions to guide you along your route:
• Verbal instructions
• Guidance on the SID
• Guidance on the control panel display
USER TIP
If guidance is inactive the Guidance menu
option will not be offered. To start guidance, you must create a new route or
select a stored route.
Route calculation can take several
seconds.
WARNING
Traffic regulations and the current traffic
situation always take precedence over
the directions provided by the navigation
system. Inattentiveness increases the
risk of an accident!
Verbal instructions
By using verbal instructions to guide you on
your route, you can be sure to find the right
way while still keeping your attention on the
traffic.
Changing the volume of verbal
instructions
While a verbal instruction is being read,
adjust the volume with the volume dial or
VOL +/- steering wheel control.
For further information on how to adjust the
instruction volume, see page 61.
93USSPSEINFOM05.book Page 55 Tuesday, March 16, 2004 3:31 PM
Navigation
Guidance on the SID
The navigation system employs the SID to display directions and
distance.
SID
Shown below are some examples of the information that can be displayed on the SID:
Prepare for a
right turn.
Exit. Righthand traffic.
Gentle left turn U-turn ahead.
ahead.
Right-hand
traffic.
Destination/
Waypoint.
Continue on
the current
road.
Roundabout.
Right-hand
traffic.
55
The SID is also used to show the direction (bearing) to the destination if the car is on a road that is not on the digital map. The following
symbols show the position of the destination in relation to the car:
Behind the
car.
In front of
the car.
To the left
of the car.
93USSPSEINFOM05.book Page 56 Tuesday, March 16, 2004 3:31 PM
56
Navigation
Guidance on the control panel display
Symbols
Guidance can adapted so that it is clear for the user. You can change
the view, zoom in and out and orient the map and display the current
address and position.
1
or select Guidance from the navigation main menu.
2 Press Menu to activate the menu.
• Map Scale, see page 46.
• View Mode, see page 56.
• Map Orientation, see page 46.
• Scroll Map, see page 47.
• Car Position, see page 47.
Changing the view
The map can be shown in a number of ways, to change the map view
mode during guidance, proceed as follows:
1 Select View Mode from the menu.
2 Select one of the alternatives from the list.
• Symbols - Show only symbols.
• Symbols & Map - Show symbols and map.
• Map - Show only map.
1
2
3
4
Name of next road.
Symbol for next manoeuvre.
Distance to next road.
Current road.
93USSPSEINFOM05.book Page 57 Tuesday, March 16, 2004 3:31 PM
Navigation
Symbols and map
Map
57
Intersection zoom
USER TIP
When Intersection Zoom is active, the system zooms in on the next
manoeuvre on the map. For how to activate intersection zoom,
see page 62.
93USSPSEINFOM05.book Page 58 Tuesday, March 16, 2004 3:31 PM
58
Navigation
Editing a route
Adding an address
Edit an existing route. Delete, move or add
new addresses.
1 Press
twice Î Edit Route or
select Edit Route from the navigation
main menu.
2 The destination and waypoints of a route
are displayed.
Add one or more waypoints to a route.
You can add a waypoint to an existing route
by adding an address.
1 Select Add Address from the menu.
2 From the menu, select how you wish to
add the address:
• Navigation Presets (see page 48)
• Address (see page 49)
• Last 10 Routes (see page 50)
• Stored Routes (see page 50)
• Point Of Interest (see page 51)
• On Map (see page 53)
USER TIP
Destination and waypoints
Mark the address you wish to change and
select one of the following menu options:
• Delete Address - Delete the selected
address from the route. Confirm with Ok.
• Move Address - Change the order of the
route (if the route consists of more than
one address). Select a new position in the
list of addresses with SELECT.
• Add Address - Add a waypoint to an existing route.
• Store Route - Save changes.
• Guidance - Start guidance.
You can have a maximum of
11 addresses per route. If the memory is
full, this is shown on the display.
3 Once you have added an address, an
updated action list for the route that
includes the new address will be displayed.
Adding an address
4 Select the position for the new address
in the list with SELECT.
93USSPSEINFOM05.book Page 59 Tuesday, March 16, 2004 3:31 PM
Navigation
Storing a route
1 Select Store Route from the menu.
2 Select from the following menu options:
• Route Name - name the route.
• Navigation Presets - make the stored
route a preset.
• Store - save a route.
3 Enter the name of the route in the text
field using the list of the alphabet.
• Use
and
in the text field.
to move the cursor
• Select
to move the cursor in the
text field with SELECT.
• Select
characters.
to change the list of special
• Select
to switch between upper
and lower-case letters.
• To delete, select
or press BACK.
• To confirm, select Ok.
When you use the keypad to enter letters:
Press the appropriate button once for the
first letter, twice for the second letter, three
times for the third letter, and so on.
USER TIP
Alphabet
You can store a maximum of 40 routes. If
the memory is full, this is shown on the
display. You are then given the option to
delete existing routes.
59
4 Select Navigation Presets from the menu
to make the stored route a navigation
preset.
5 Select a slot in the presets list by choosing a slot and pressing SELECT.
6 Finish by saving the route by selecting
Store.
USER TIP
You can save a maximum of
12 navigation presets. If the memory is
full, this is shown on the display. You are
then given the option to delete existing
navigation presets.
93USSPSEINFOM05.book Page 60 Tuesday, March 16, 2004 3:31 PM
60
Navigation
Stored routes
Start guidance for, edit and delete stored
routes.
Stored routes
1 Press
twice Î Stored Routes or
select Stored Routes from the navigation
main menu.
2 Select the route you wish to edit from the
list and press SELECT. The following
menu options appear:
• Delete route - Delete a single route or all
stored routes.
• To delete the selected route, select
Selected. In the following box, confirm
with Yes.
• To delete all stored routes, select All
Stored. In the following box, confirm
with Yes.
• To cancel, press BACK.
• Edit Route - Change the selected route.
Mark an address and press SELECT.
• Properties - Show route properties, e.g. if
the route is a navigation preset.
• Guidance - Start guidance for an existing
route. If guidance for an earlier route is in
progress, the following message
appears:
Route guidance is active. Do you want to
replace the current route with the new one?
• Select Yes to replace the current route
with the new route.
• Select No to retain guidance for the current route.
93USSPSEINFOM05.book Page 61 Tuesday, March 16, 2004 3:31 PM
Navigation
Settings
Here, you can make settings for functions
such as route calculation, instruction
volume and graphic presentation.
Select Settings from the navigation main
menu.
• Route Criteria (see page 61)
• Display Information (see page 62)
• Volume (see page 62)
• POI Icons (see page 62)
• Factory Settings (see page 63)
• Reset Positioning (see page 63)
Changing route criteria
Set criteria for route calculation.
For example, you may wish to avoid ferries
for motorways.
1 Select Route Criteria from the menu.
2 Check one of the two alternatives:
• Fast Route for short journey time.
• Short Route for short distance.
Route criteria icons
Quick route
Short route
Permit motorways
Avoid motorways
3 Check one or more of the following alternatives:
• Avoid Highways to avoid motorways.
• Avoid Ferries to avoid ferries.
• Avoid Tolls to avoid toll roads.
4 Finish with Done.
USER TIP
Even if you have chosen to avoid motorways, ferries and suchlike, the system
may all the same suggest taking such a
route if other alternatives are unrealistic.
Permit ferries
Avoid ferries
Permit toll roads
Avoid toll roads
61
93USSPSEINFOM05.book Page 62 Tuesday, March 16, 2004 3:31 PM
62
Navigation
Display information
Here, you can specify what information is
shown on the map during guidance.
1 Select Display Information from the
menu.
2 Use SELECT to check options you wish
to choose.
• Check Intersection Zoom to display an
enlarged image of the next manoeuvre.
• Check Manoeuvre Icon to display the
location of the next manoeuvre.
• Check Distance To Dest. to display the
estimated distance to the destination.
• Check Travel time to display the estimated journey time.
• Check Map Scale to display the current
scale.
• Check North Arrow to display a north
pointer.
• Check GPS Reception Icon to display an
icon for GPS reception.
3 Confirm with Done.
Adjusting the instruction
volume
Select Volume from the menu.
• Select Instruction Volume to adjust the
volume of verbal instructions. Adjust the
volume by turning SELECT.
• Select Background Vol. to adjust the maximum background volume (e.g. radio).
Adjust the volume by turning SELECT.
POI icons
Specify here which POI icons are to be displayed on the map. For a complete list of
POI icons, refer to page 52.
1 Select POI Icons from the menu.
2 Mark the icons in the list that you wish to
see.
• To select all the icons, choose
Select All.
• To deselect all the icons, choose
Deselect All.
3 Confirm with Done.
93USSPSEINFOM05.book Page 63 Tuesday, March 16, 2004 3:31 PM
Navigation
Factory settings
You can at any time reset the system to the
factory settings:
1 Select Factory Settings from the menu.
2 Select Yes to reset all settings or No to
cancel.
USER TIP
The settings for your saved routes are not
affected if you decide to reset the system
the factory settings.
Resetting positioning
WARNING
The accuracy of positioning will initially be
poor after resetting. Bear in mind that traffic regulations and the current traffic situation always take precedence over the
directions provided by the navigation
system.
If the position of the car on the map is incorrect, such as after changing tyres, the
system updates automatically. In exceptional cases, if the position of the car
remains incorrect after driving some distance with GPS reception, you can reset the
positioning function.
63
1 Select Reset Positioning from the menu.
2 Select Yes to reset positioning or No to
cancel.
3 Lock the car with the remote control. The
car must be locked for at least 1 minute
to activate the update.
USER TIP
See page 64 for the most common
reasons why the position of the car is
displayed incorrectly.
93USSPSEINFOM05.book Page 64 Tuesday, March 16, 2004 3:31 PM
64
Navigation
FAQ
• The map doesn’t show what’s actually
there, why? Due to continuous construction work, changes to the road network
and suchlike, the digital maps are not
always complete. For more information,
contact your Saab dealer.
• The position of the car is incorrect
after it having been towed or transported, why? If the car has been transported, such as on a train or ferry, or if GPS
reception has not been possible, it can
take up to 30 minutes to calculate the
position of the car.
• The system doesn’t calculate the
quickest/shortest route, why? Experience and local knowledge can sometimes produce a better route than that
calculated by the system.
• The position of the car on the map is
wrong, why? GPS reception can be disrupted. Local conditions and/or incomplete data can cause calculation errors.
• The position of the car on the map is
wrong after the battery is reconnected,
why? If the power supply to the GPS
antenna has been cut, it may take up to
30 minutes before the system can receive
GPS signals and calculate the correct
position of the car.
• The position of the car on the map is
wrong after the tires have been changed, why? The system automatically
recalibrates after a tyre change. The time
required for this varies depending on the
type of road and speed of the car.
• Do I need to start the car to use the
navigation system? No, you only need
to insert the remote control.
93USSPSEINFOM05.book Page 65 Tuesday, March 16, 2004 3:31 PM
Index
Index
Current position __________________ 47
Current program types ____________ 17
A
Activating disc media _____________
Adding an address, Navigation ______
Adjusting frequency steps __________
Adjusting the instruction volume _____
Antennas _______________________
Audio settings ___________________
AutoStore (AS) __________________
B
Bass __________________________ 12
C
Caring for DVDs _________________ 41
CD changer _____________________ 32
CD changer (cabin) _______________ 33
CD player ______________________ 32
CD player, loading discs ___________ 33
CD text ________________________ 36
Changing a route _________________ 58
Changing DVD __________________ 41
Changing route criteria ____________ 61
Cleaning the unit __________________ 3
Connecting a portable player _______ 37
L
Last 10 routes ___________________ 50
Loading CDs ____________________ 33
Loading discs, CD changer (luggage
compartment) __________________ 34
D
32
58
21
62
27
23
15
65
Display information _______________ 62
DVD map _______________________ 41
M
E
Editing a route ___________________ 58
Entering an address, Navigation _____ 49
Error codes, disc media ____________ 38
N
F
Fader __________________________
FAQ, Navigation _________________
Fine tuning ______________________
Frequency band _________________
Map display _____________________ 46
Map information __________________ 45
Map orientation __________________ 46
Map scale ______________________ 46
12
64
14
13
Name Search, Navigation __________ 51
Navigation System Components _____ 42
New route ______________________ 48
P
G
Guidance _______________________ 54
Guidance on the SID ______________ 55
Guidance, control panel display _____ 56
POI icons _______________________ 62
POI icons list ____________________ 52
Point of interest (POI) _____________ 51
Portable player __________________ 37
Preset buttons, CD _______________ 35
Preset buttons, Radio _____________ 14
Preset list, Radio _________________ 15
93USSPSEINFOM05.book Page 66 Tuesday, March 16, 2004 3:31 PM
66
Index
Presets, Navigation _______________ 48
Program type (PTY) ______________ 16
PTY Alarm ______________________ 19
Q
Quick guide, Navigation ___________ 44
R
Radio settings ___________________
Radio/audio _____________________
Random playback ________________
Rapid play ______________________
Removing CDs __________________
Rolling advertisements, Radio ______
Route criteria icons _______________
Route settings ___________________
20
11
36
35
34
20
61
61
S
Scanning radio stations ____________ 14
Scroll map ______________________ 47
Security lock _____________________ 3
Selecting a radio station ___________ 13
Selecting and changing tracks ______ 35
Selecting POI icons _______________ 62
Selecting/changing discs, CD changer 35
Settings, Navigation ______________ 61
Sound controls, Audio _____________ 12
Sound system ___________________ 25
Speed dependent volume
compensation __________________ 24
Start volume, Audio _______________ 24
Stored routes _________________ 50, 60
Storing a route ___________________ 59
Storing stations __________________ 14
Switching disc media off ___________ 32
Switching the audio system off ______ 12
Switching the audio system on ______ 12
System Overview ________________ 43
T
Technical data, Radio/audio ________
Track scan ______________________
Traffic program (TP) ______________
Treble _________________________
Tuning a station __________________
26
35
22
12
14
V
Verbal instructions, Navigation ______ 54
Volume for traffic and alarm
announcements _________________ 23
Volume, verbal instructions _________ 62
93USSPSEINFOM05.book Page 67 Tuesday, March 16, 2004 3:31 PM
Notes
Notes
67
93USSPSEINFOM05.book Page 68 Tuesday, March 16, 2004 3:31 PM
68
Notes
93USSPSEINFOM05.book Page 69 Tuesday, March 16, 2004 3:31 PM
Notes
69
93USSPSEINFOM05.book Page 70 Tuesday, March 16, 2004 3:31 PM
70
Notes
93USSPSEINFOM05.book Page 71 Tuesday, March 16, 2004 3:31 PM
Notes
71
93USSPSEINFOM05.book Page 72 Tuesday, March 16, 2004 3:31 PM
72
Notes