1
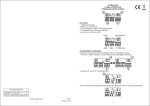
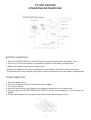
DT 500P PRINTER
OPERATING INSTRUSTIONS
BATTERY INSERTION
1. With the POWER SWITCH in the OFF position press and slide down the battery cover.
2. Put in 4 pcs of AA size batteries in polarities as shown in the battery compartment.
3. Slide up the battery cover until it clicks closed.
- Always use batteries of the same manufacturer and replace all batteries at the same time,
- If the printer will not be used for a long time, remove the batteries from the battery compartment.
PAPER INSERTION
1. Open the paper cover.
2. Cut the end portion of the roll of thermal paper straight.
3. Turn on the printer.
4. Insert the end portion of the paper into the paper insertion slot in the correct way .
5. Keep pressing the PAPER ADVANCING SWITCH until the end of paper is 2-3 cm out from the
printer.
6. Put the roll of paper into the paper compartment and close the paper cover.
1
- NEVER pull paper from the reverse direction, this may damage the printer. For replacing the roll of
paper before it is used up, first tear off the paper and press the PAPER ADVANCING SWITCH until
all the remaining paper is out.
- Do not touch the paper on the right side as it may cause poor printing.
- Always store the paper rolls in a cool, dry place and keep away from direct sunlight.
CONNECTION TO PRINTER
1. Insert both plugs of the connecting cord to the printer and stopwatch with the power of the printer
turned off. Always hold the plug as illustrated . Either plug can be inserted into either jack. Be sure
that both jacks are inserted all the way in the stopwatch and printer.
2. After use, turn off the power of the printer, then remove the plugs. After removing the plug from the
stopwatch, remember to insert the rubber cap to the jack to keep it away from dust and moisture.
OPERATION IMMEDIATE PRINT-OUT
1. After connecting the stopwatch to the printer, slide the power switch to ON; the paper will advance
by 1 line.
2. Slide the PRINT MODE SWITCH to the TOP position. Only the SPLIT or SPEED (depending on
whether the stopwatch is in CHRONO or SPEED mode) will be printed. If this switch is slid to the
DOWN position, both LAP and SPLIT or LAP and SPEED will be printed. ( In SPEED mode, if B is
pressed while the previous record is still being printed, that SPEED record cannot be printed in
real time. The memories still record the full data for recall or upload.)
3. Press button A of the stopwatch to start the race. The YEAR, MONTH and DATE, START together
with the CHRONO mode will be printed. The time unit in the SPEED distance setting is minutes (H
for hour and S for seconds).
4. Press A button to stop.
UPLOAD PRINT-OUT
Apart from doing the print-out while the stopwatch is taking the LAP times, the print-out can be done
by uploading from the memories after the race. This can be done by pressing C button until UPLOAD
ALL is displayed, connect the printer and turn on the power, then press A to start upload. In this print
mode the respective LAP/SPLIT or LAP/SPEED times together with their AVERAGE and FASTEST
times are printed. To print out only a particular race, press B when UPLOAD ALL is displayed to go to
that particular race and press A to print-out.
2
Remarks:
- Do not pull out the paper when the printer is not in operation.
- Do not print if there is no paper in the printer.
- Keep the printer from high moisture or dusty environment.
- Do not subject the printer to violent shocks.
- Do not put the printer under direct sunlight or near high temperature. The case may be deformed
or damaged.
- Do not wipe the case with a cloth moisturized with chemicals. This may discolor or deteriorate the
printer.
- Keep the jack away from moisture.
- Remember to turn off the power switch if the printer is not in operation to avoid battery
consumption.
- Replace the batteries when the printing slows down, getting poor, light or messy print-outs,
paper not advanced normally or cannot be printed.
www.digisportinstruments.com
3