1
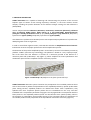
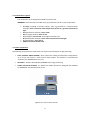
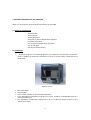
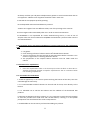
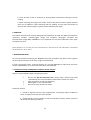
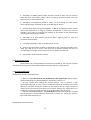
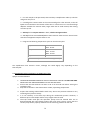
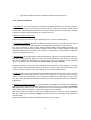
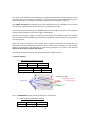
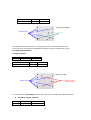
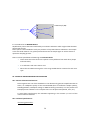
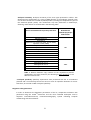
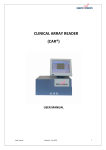
CLART® PneumoVir CHARACTERIZATION OF VIRUSES CAUSING HUMAN RESPIRATORY INFECTIONS VIA GENOMIC IDENTIFICATION FOR IN VITRO DIAGNOSIS 1 CLART® PneumoVir CLART® PneumoVir is under protection of patent family corresponding to International PCT Patent Application WO2009144497, which comprises national and regional members in different territories, including granted patents in Europe, Mexico and Russia, and patent applications under prosecution in Brazil and Canada. CLART®, CLART-Strip®, CAR®, SAICLART®, AUTOCLART® and PNEUMOVIR® are registered Trademarks of GENOMICA. For more information, please refer to the web site www.genomica.com GENOMICA, S.A.U. Parque Empresarial Alvento, Edificio B Calle Vía de los Poblados, 1 – 1ª planta 28033 Madrid, Spain www.genomica.com Version 11 July 2015 2 TABLE OF CONTENTS: 1. KEY TO SYMBOLS 2. PROTOCOL DESCRIPTION 3. KIT COMPONENTS AND STORAGE 4.1. Extraction reagents 4.2. Amplification reagents 4.3. Visualization reagents 4.4. Other components 4. MATERIALS REQUIRED NOT PROVIDED 4.1. Reagents and materials 4.2. Equipment 5. RECOMMENDATIONS AND HANDLING PROCEDURES 5.1. General recommendations 5.2. Precautions for the extraction and addition of extracted material to the amplification tube 5.3. Precautions for amplification 5.4. Precautions for visualization 6. SAMPLING 7. WORKING PROTOCOL 7.1. Extraction of genetic material of viruses associated with respiratory infections 7.2. Automatic extraction 7.3. Amplification reaction 7.4. Visualization of amplified product on CLART-Strip® (CS) 7.4.1. Manual visualization 7.4.2. autoclart® visualization 8. RESULTS READING 9. RESULTS INTERPRETATION 10. TECHNICAL AND OPERATIONAL SPECIFICATIONS 11. BIBLIOGRAPHY 3 1. GLOSSARY Check handling instructions Expiration date Medical Device for In Vitro Diagnostics Lot 25ºC Store at room temperature 20ºC 8ºC Store between 4ºC to 8ºC 4ºC -18ºC Store between –30ºC to –18ºC - 30ºC 4 2. PROTOCOL DESCRIPTION CLART® PneumoVir kit is capable of detecting and characterizing the presence of the 19 most frequent types of human viruses causing respiratory infections, in the most common clinical samples, including the specific detection of the Influenza subtype causing the new Influenza A (H1N1/2009). Viruses analyzed include: Adenovirus; Bocavirus; Coronavirus; Enterovirus (Echovirus); Influenza virus A (subtypes H3N2 human, H1N1 human, B, C and H1N1/2009); Metapneumovirus (subtypes A and B); Parainfluenza virus 1, 2, 3, and 4 (subtypes A y B); Rhinovirus; Respiratory Syncitial Virus type A (VSR-A); Respiratory Syncitial Virus type B (VSR-B). Virus detection is performed via RT-PCR (reverse transcriptase PCR) amplification of a specific 120330 bp fragment of the viral genome. In order to avoid false negative results, each PCR tube includes an Amplification Internal Control. Its detection ensures the proper performance of the amplification process. The detection of the product amplified by PCR is carried out by means of a low-density microarray platform: CLART® (Clinical Arrays Technology). The platform is based on a very simple principle, but at the same time cost effective. It consists on a microarray printed at the bottom of a microtiter plate well (CLART-Strip® -CS) (Figure 1), which simplifies the entire hybridization and visualization process when compared to classic microarray systems. Figure 1. CLART-Strip® -CS platform in the form of an 8-well strip. CLART® PneumoVir detection system is based on the precipitation of an insoluble product at those sites of the microarray where the hybridization of the amplified products by specific probes takes place. During RT-PCR, amplified products are labeled with biotin. After amplification, they hybridize with their respective specific probes that are immobilized on the array and then incubated with a streptavidin-peroxidase conjugate. The conjugate binds via streptavidin with the biotin present in the amplified products (which are also bound to their specific probes), while in the presence of o-dianisidine, the peroxidase activity of the conjugate induces the appearance of an insoluble product which precipitates at the hybridization sites of the microarray (Figure 2). 5 Figure 2: Diagram of the visualization method. Probes, immobilized on the surface, capture their complementary biotin-labeled amplified products. With the help of the biotin, the conjugate binds, in this case streptavidin-HRP (HorseRadish Peroxidase). Thanks to the HRP action, the o-dianisidine substrate produces a precipitation on the hybridization site. 6 3. KIT COMPONENTS AND STORAGE CLART® PneumoVir kit contains sufficient reagents for the extraction and analysis of 16, 48 or 96 clinical samples. Reagents included in the kit have been grouped in various packages, depending on the temperature they should be stored at. When storage recommendations are observed, all reagents remain stable until the kit expiration date. 3.1. Extraction reagents The extraction-purification kit is shipped at -20ºC and it should be stored at this temperature until its use. • • • • SEML (extraction solution). Once thawed, it should be stored at 4ºC and used within 8 days. SD (Dilution solution). Store at –20º or 4ºC. IP (Isopropanol). Store at -20ºC. DE (70% Ethanol). Store at -20ºC. 3.2. Amplification reagents They are shipped and stored at -20ºC. • Ready-to-use amplification tubes. They contain 43 µL of reaction mixture. Only thaw on ice the exact number of amplification tubes to be used, and store the rest of them at -20ºC. Two types of amplification tubes are shipped: Mix 1 (colorless tube) for the amplification of the Coronavirus; Metapneumovirus (subtypes A and B); Parainfluenza virus 1, 2, 3 and 4 (subtypes A and B) and RSV-A. WARNING!: The enzyme mixture should be added before the introduction of the extracted genetic material. - Mix 2 (green tube): for the amplification of Adenovirus; Bocavirus; Enterovirus (Echovirus); Influenza virus A, B C y New FluA H1N1/2009; Metapneumovirus, Rhinovirus y VRS-B. WARNING!: The enzyme mixture should be added before the introduction of the extracted genetic material. - • Enzyme mixture (this is a mixture of the RT (retrotranscriptase) enzyme and DNA polymerase). Ready to use. Store at -20ºC. Note: The kit package includes a self-adhesive and irreversible temperature indicator; the appearance of a reddish color on the visualization window indicates that, at a certain moment, products have exceeded storage temperature of –20oC and they should not be used. 7 3.3. Visualization reagents The visualization kit is shipped and should be stored at 4ºC. WARNING: Once received, the CLART-Strip® (CS) should be stored at room temperature. • • • • • • • CS strips (including all specific probes). They are provided in a sealed thermal envelope. Store it closed at room temperature (25oC max.), protected from direct light. SH (Hybridization Solution). Store at 4ºC. DC (Conjugate Diluent). Store at 4ºC. CJ (Conjugate). Store at 4ºC. Centrifuge once before use. RE (Development Solution). Store at 4ºC and protected from light. TL (Wash Buffer). Store at 4ºC. Adaptor and lid for 8-well strips. 3.4. Other components The following components are required for the capture and subsequent image processing: • CAR® (CLINICAL ARRAY READER): which allows the reading and automatic interpretation up to 12 CS, that means, a total amount of 96 samples. This platform is manufactured exclusively for GENOMICA kits use only. • SAICLART®: software developed by GENOMICA for image processing. • CLART® PneumoVir Software: It is specific for CLART® PneumoVir, designed and validated by GENOMICA. Installed and ready to use. Figure 3. CAR® (CLINICAL ARRAY READER) 8 4. MATERIALS REQUIRED BUT NOT PROVIDED Below you can find a list of all materials required but not provided. 4.1. Reagents and materials - Distilled water. - Saline solution. - Disposable gloves. - Filter tips or positive displacement pipettes. - Crushed ice container. - 1.5 ml autoclaved Eppendorf type tubes. - 1.5 ml tube grids. - 0.5 ml/0.2 ml tube holder. 4.2. Equipment • autoclart® (Figure 4).The following equipment is needed for the automatic visualization phase. It enables the automatic visualization of up to 12 CS that means a total amount of 96 samples. Figure 4. autoclart® • • • • • Microcentrifuge. Thermocycler. Laminar flow chamber for the extraction laboratory. Three adjustable micropipettes ranging from 1-20 µl, 20-200 µl, and 200-1000 µl for the extraction laboratory. One adjustable micropipette ranging from 1-20 µl, to add the enzyme mixture to the amplification tubes. 9 • • • • • One adjustable micropipette ranging from 1-20 µl, to add the genetic material to the amplification tubes. Three adjustable micropipettes ranging from 1-20 µl, 20-200 µl, and 200-1000 µl for the visualization laboratory. Heating block with agitation, adjustable temperatures (25ºC, 30ºC, 50ºC, 53ºC and 59ºC). Interchangeable blocks compatible with 1.5 ml Eppendorf Tubes and 96-Wells Microtiter Plate. Vortex. Vacuum system. 5. RECOMMENDATIONS AND HANDLING PROCEDURES Very important in order to avoid contamination! Read carefully before initiating the assay. 5.1. General recommendations 1. This assay should be performed in FOUR physically separated AREAS, in order to avoid sample contamination with the previously amplified product. Separate working materials should be available in each area (pipettes, tips, tubes, grids, gloves, etc.) which should never be used outside these areas. • Pre-PCR extraction area: DNA/RNA extraction occurs in this area. A laminar flow hood should be used. • Pre-PCR area for the preparation of the amplification tubes. In this area, the enzyme mixture is added to the amplification tubes. It is recommended to use a laminar flow hood. • Pre-PCR area for the addition of the extracted material. In this area, the extracted DNA/RNA is added to the amplification tubes where the enzyme mixture has been previously introduced. A laminar flow hood should be used. • Post-PCR area: Amplification and visualization of the amplified product are carried out in this area. 2. Always use gloves. It is recommended to change gloves quite frequently while it is mandatory to change them prior to start working in each of the above-mentioned areas. New gloves should be used for the preparation of the amplification tubes and every time DNA/RNA is added to them. 3. Clean working areas (laboratory benches, hoods, grids, pipettes) thoroughly with 10% diluted bleach following every sample batch processing; it is mandatory to disinfect all working areas in case of contamination. When using Thermoshaker or Themocycler, it’s highly recommended to clean prior and after their use. 10 4. Always use filter tips and positive displacement pipettes to avoid contamination due to micropipettes. A different set of pipettes should be used in each area. 5. Discard the micropipette tip after pipetting. 6. Use disposable and autoclaved laboratory material. 7. Never mix reagents from two different tubes, even if they belong to the same lot. 8. Close reagent tubes immediately after use in order to avoid contamination. 9. GENOMICA is not responsible for results obtained using this kit, in case of use of samples other than those indicated or DNA/RNA extracted with a protocol other than the one indicated herein. 5.2. Precautions for the extraction and addition of extracted material to the amplification tube 1. Use globes. 2. Clean working surfaces of cabinets with a 10% diluted bleach solution. 3. Turn on the laminar flow and UV light at least 20 minutes before extraction. Turn off the UV light when it is working inside the cabinet. 4. The preparation of the samples before extraction must be made inside the cabinet. 5.3 Precautions for amplification • Place the amplification tubes in the thermocycler when the block is above 90 º C. Thereby minimizing possible nonspecific amplifications due to incubation below the annealing temperature. 5.4. Precautions for visualization 1. Avoid the pipette tip or the vacuum system touching the bottom of the tube, since this could damage the microarray. 2. It is recommended to add all solutions to the wall side of the CS; never directly to the bottom. 3. It is advisable not to add the SH solution until the addition of the denatured PCR products. 4. Following incubation with the CJ solution, it is very important to wash the CS thoroughly to avoid any residues that could react with the RE solution, resulting in a non-specific precipitation that could lead to false result interpretations. 5. Avoid bubbles on the microarray surface when adding any solution. 11 6. Clean the back of the CS externally to avoid possible interferences during the results reading. 7. When visualizing the image in the reader, confirm that position markers appear and that there are no bubbles or spots interfering with the reading. You may clean the bottom of the tube with cellulose paper or gently tap the tube with your finger. 6. SAMPLING The CLART® PneumoVir kit has been designed and validated to be used with DNA extracted from respiratory samples: nasopharyngeal lavage and exudated, pharyngeal exudated and broncoalveolar lavage (BAL). GENOMICA is not responsible for the results obtained if other types of samples are used. Store samples at 4° C if they are to be processed in a time less than 12h. Otherwise it should be stored frozen at -20 or -80° C. 7. WORKING PROTOCOL An incorrect performance during the DNA/RNA extraction procedure may lead to false negative results. Especial attention at this step is highly recommended. In order to optimize results, a minimal amount of 5-10 ng/μl DNA/RNA is required as extraction output, independently if it is performed manually or automatically. 7.1. Manual Extraction of DNA/RNA of different clinical samples Specific recommendations before initiating extraction: • • • • Work in the pre-PCR extraction area, always using a laminar flow hood and following the recommendations mentioned in section 5.1 and 5.2. Keep samples on ice and well separated. Add reagents in the indicated order. Do not use saline solution for swabs. Extraction protocol: 1. Include a negative control in each sample batch, consisting of 200 µl of RNA-free water, and process like the rest of the samples. 2. Pipette 200 µl of clinical sample. In case of swabs with transport media, vortex for 30 seconds and then pipet 200 µl. 12 3. Add 600 µl of SEML (liquid sample extraction solution). Wait until the solution thaws and turns clear before using it. Mix by inverting the tubes several times and allow 15 min. at room temperature. 4. Add 600 µl of isopropanol (stored at -20ºC); mix by inverting the tubes several times and centrifuge, preferably at 4ºC, at 13.000 rpm for 20 min. 5. Remove supernatant using a micropipette. A 1000 µl micropipette can be used to remove the supernatant, as long as a smaller micropipette is used at the end, for example a 20 µl one, for removing the residues at the bottom of the tube without removing the precipitate by mistake. 6. Add 1000 µl of 70% ethanol (stored at -20ºC). Agitate gently to clean the precipitate at the bottom. 7. Centrifuge preferably at 4ºC, at 13,000 rpm for 15 min. 8. Remove the supernatant carefully as indicated at step 4. Allow the sample to dry under the hood for 15 or 20 min. until there are no ethanol residues left. Prior to resuspending the sample, confirm that there are no ethanol residues left. 9. Resuspend in 20 μl of Dilution solution. 7.2 Automatic Extraction Please follow the recommendations and protocol provided by the extractor supplier and check if the extracted material fulfills CLART® PneumoVir protocol’s requirements. 7.3. RT-PCR amplification Amplification-specific recommendations: • Work in the pre-PCR area for the amplification tubes preparation, always using a hood and following the recommendations mentioned in section 5.1. • Be very careful when adding the enzyme mixture, since it contains a high percentage of glycerol. This way, if you introduce the pipette tip too deep, the mixture adheres to the walls causing the addition to the reaction tube of a larger amount of mixture than the necessary and some loss of enzyme volume; this could result in an insufficient enzyme volume for the rest of the amplification tubes of the kit. • Add the extracted DNA/RNA in the pre-PCR area ,always working under the hood and following the recommendations mentioned in section 5.2. During the process, keep tubes separate and on ice. Amplification reaction protocol: 13 1. For each sample to be processed, thaw and keep 2 amplification tubes (a colorless and green one) on ice. 2. Centrifuge the reaction tubes in the microcentrifuge for a few seconds, so that all liquid can accumulate at the bottom of the tube. In case there are no microcentrifuge adaptors available for reaction tubes, larger tubes can be used instead, after having cut their cap off. 3. Add 2 μl of the enzyme mixture in both, colorless and green tubes. 4. Add 5 µl of the extracted RNA/DNA to both reaction tubes and mix several times with the micropipette. Keep the tubes on ice. 5. Program the following temperature cycles on the Thermocycler: 1 cycle 45ºC 45 min. 95ºC 15 min. 45 cycles 95ºC 0.5 min. 50ºC 1.5 min. 68ºC 1.0 min. 1 cycle 68ºC 10 min. 4ºC continuously until tube collection (optional) The amplification lasts around 5 hours, although this could slightly vary depending on the Thermocycler. 7.4. Amplified product visualization on CLART-Strip® (CS) Specific recommendations: 1. THE BELOW DESCRIBED PROTOCOL SHOULD ALWAYS BE USED IN THE POST-PCR AREA. NEVER TAKE THE AMPLIFIED PRODUCT IN THE PRE-PCR AREA. 2. Ensure that the Thermomixer has been at 59 ºC at least 60 min before starting the incubation time. 3. Keep the SH solution in the thermomixer at 59ºC, hybridizing temperature. 4. Prepare the washing solution before each assay. Do not use previous solutions or any remaining from previous assays. 5. It is not necessary to use filter tips during the visualization process. However, a different tip for each sample and for every reagent must be used. 6. The 8-tip combs used with the aspiration pumps must be cleaned after use or decontaminated with 10% bleach solution after each assay. Please, ensure that the vacuum pump worKs properly and does not left remaining volumes on the well. 14 7. Aspirate the different solutions completely without touching the array. 7.4.1. Manual visualization 1. Denaturation: use the Thermocycler to denature the amplified products. For this step, place the tubes in the Thermocycler and incubate at 95ºC for 8 min. Program 10 minutes so that after 8 minutes have elapsed amplified products can continue at 95ºC. Remove the tubes from the 95ºC incubation and place them immediately in a container with ice. 2. Diluted TL Solution preparation: Prepare 10 mL/strip of fresh TL solution by diluting 1mL TL into 9 mL distilled water. 3. CS preliminary washing: Add 200 µl of diluted TL Solution to every array and invert the tube 10 to 15 times. Discard the diluted TL Solution using a pipette or preferably a vacuum system. This step is necessary in order to wash already packaged tubes, before adding the sample. The tube should not contain washing solution residues; for this reason, residual volumes in the caps should be aspirated with a vacuum system. Under no circumstances, should tubes be allowed to dry out for a long period of time. 4. Hybridization: Once PCR products have been denatured, add 100 µl of tempered SH solution in each well, avoiding foaming. Add 3 µl of each denatured amplification tube (colorless and green one) to the CLART-Strip®. Resuspend several times to mix with the SH Solution, without touching the array. Incubate in the Thermoblock for 1 hour at 59ºC, agitating at 550 rpm. Following incubation, remove the tubes and discard the SH Solution using a pipette or a vacuum system. Program the Thermoblock at 30ºC and leave it running so that it can be used later on step 6. You can remove the lid from the Thermoblock so that it can cool down quicker. 5. Washing: Wash every well of the CS twice with 200 µl diluted TL Solution and mix 10 to 15 times with the pipette. Discard the diluted TL Solution using a pipette or a vacuum system, leaving a volume. In case the Thermoblock has not reached a temperature of 30ºC when you get to this step, leave the tubes filled with diluted TL Solution until the Thermoblock reaches the necessary temperature. 6. Blocking and adding conjugate: It is recommended to centrifuge the CJ solution for 10 seconds before use. Then, prepare the diluted CJ solution. To this end, mix in a tube 1 mL of DC solution with 7,5 µl of CJ solution for each strip. When stored at 4ºC, the diluted CJ Solution remains stable within 4 hours after its preparation. Do not use once this time has elapsed. Add 100 µl of diluted CJ Solution to each well. Incubate for exactly 15 minutes at 30ºC, agitating at 550 rpm. Following this incubation, rapidly discard the solution out of the well using a pipette or vacuum system. Lower the temperature of the Thermoblock to 25ºC for its use at step 9. 15 7. Triple Washing: Wash three times with 200 µl of diluted TL Solution to every well and mix it 10 to 15 times; then, discard the solution using a pipette or vacuum system. If such washing is not performed rapidly, it can cause an illegible signal during reading. 8. Development with RE Solution: Remove the TL solution, add 100 µl of RE solution to each well of the CS and incubate for 10 minutes at 25ºC in the Thermoblock without agitating. WARNING! It is very important to use the Thermoblock without agitating and read the samples immediately after incubation. 9. Remove the RE Solution using a pipette or vacuum system. The microarray should be dry. 10. CAR® (CLINICAL ARRAY READER): place the plate normally on the tray and the CAR® will take and analyse the arrays automatically. 7.4.2. autoclart® visualization 1. Denaturation: Place the amplification tubes in the thermocycler when this has reached 95ºC and incubate the tubes for 10 min. Not to exceed 10 min time of denaturation to prevent the tubes are opened and contamination may occur. Remove the tubes from the 95ºC incubation and place them immediately on ice. 2. Switch on the autoclart®unit and follow the instructions described on the screen: 3. Closet the door and press the knob. 4. Select Run at the main menu. 5. Select the assay PneumoVir test among those listed. 6. Select the well of the strip where run should start: A1, or E1 in case the first 4 wells have been already processed. 7. Select the amount of samples to be processed. With autoclart®user can process from 4 up to 96 samples per run, in any case, samples should be multiples of four. 8. Confirm that number of samples and start up well (A1 or E1) are correct. 9. Place the tips rack (full) on its position. 10. Check that both, tip waste and liquid waste containers are empty. 11. Fill the bottle with 250 ml distilled water. 16 12. Add each reagent to its specific container. autoclart®calculates the specific volumes required according to the amount of samples indicated: - TL (Washing buffer). Volume showed in the display indicates the diluted washing buffer required. In order to prepare the diluted washing buffer please dilute the TL reagent provided 1:10 into distilled water. - SH (Hybridization solution). It is provided ready to use. Add the specified volume in the container once tempered. - CJ (Conjugate). It’s recommended to shortly spin the CJ before use. Display shows final volume of diluted CJ, meaning that each ml indicated on the display should be prepared as follows: 1 ml of DC (Conjugate Diluent) and 5 µl CJ reagent. Vortex the diluted solution in order to mix it properly up. - RE (Developer). Add the RE volume indicated on the display. 13. Close the door and press the knob. The device will start priming the system and cleaning the tips with wáter. Then it will perform the pre-washes of the CS and adding the hybridization solution. Once finished these steps, the device will beep as a signal for pipetting the samples on their specific CS. autoclart®will automatically stop beeping as soon the user opens the door. 14. For adding the samples on the CSs, please remove the plate carefully from autoclart®unit and add 3 µl of each denatured amplification tube (colorless and green one) to the CLART-Strip®. Resuspend several times to mix with the SH Solution, without touching the array. Place the microplate again on the autoclart®. Press the knob again to continue the visualization process. 15. Once finished the visualization process, the autoclart®unit will beep again indicating the end of the run. Please remove the microplate carefully and proceed with the reading step on the CAR. 16. CAR® (CLINICAL ARRAY READER): place the plate normally on the tray and the CAR® will take and analyse the arrays automatically. 8. RESULTS READING Processing of data obtained from each analysis is carried out automatically. The reading and analysis system will present a report indicating the results. The system monitor displays a three-column table; the left column shows the virus species and the subtypes characterized in the micro-array. The central column shows a positive or negative result for each virus species, while the right one shows the validity determined by the DNA/RNA extraction and amplification control. 9. RESULTS INTERPRETATION 17 One of the main drawbacks of the detection by genomic amplification are false negatives, which are mainly due to the presence of inhibitors of the enzyme mixture (RT and DNA polymerase) in those samples where virus detection is going to be performed (hemoglobin, salts, etc). The CLART® PneumoVir kit eliminates such false negatives thanks to the addition of an internal control of the amplification reaction efficiency in the amplification tubes. An incorrect performance during the DNA/RNA extraction procedure may lead to false negative results. Especial attention at this step is highly recommended In every set of analysis a negative extraction control should be included to check that samples have not been contaminated during the extraction, amplification and visualization, thus giving rise to a false positive. When the viruses are present in the sample, there is always a preference to amplify the viral genotypes instead of amplifying the controls. Hence, under certain conditions (i.e. high number copies of one particular virus genotype or when several genotypes are present in the samples) internal controls may not appear (No signal). Considering all these information, we could interpret the reading results as: 1. Positive Samples: 1.1. With positive amplification control Virus Species Result Positive Control Internal Control Control Passed Signal > 0.165 Result Passed CLART-Strip® (CS) Amplification Control (Internal Control) Alignment dots Virus This is a VALID RESULT. Result can be considered as a real positive. 1.2. With negative amplification control Virus Specie Result Positive Control Passed 18 Control Internal Control Signal < 0.165 Result No Signal CLART-Strip®(CS)Strip Alignment dots Virus Even though the Internal Control is not appearing, results can be considered as valid. This is due to the competition among different targets during the amplification process. It is a REAL POSITIVE RESULT. 2. Negative samples Virus Specie Result Negative Control Internal Control Control Passed Signal > 0.165 Result OK CLART-Strip® (CS) Amplification Control (Internal Control) Alignment dots It is considered as a VALID RESULT. In this case result can be considered as a REAL NEGATIVE. 3. Inadequate samples, inhibited. Virus Specie Result Negative Control PCR Inhibited 19 CLART-Strip® (CS) Alignment dots It is considered as an INVALID RESULT. Amplification process has been interfered by an unknown substance which might inhibit the DNA polymerase enzyme. At this point is recommended to verify the presence of any PCR inhibitor substance in the sample or the extracted material. If so, please proceed to extract the sample again or ask the doctor to repeat the sampling process. There are three possibilities of obtaining an Uncertain Result: • Those cases where the three virus replicas are very different from each other (shape and intensities). • In co infections with more than 5 virus. • When the raw absorbance signal is in the range established as uncertain for each virus type. 10. TECHNICAL AND OPERATIONAL SPECIFICATIONS 10.1. Control of known interferences: False negatives are one of the drawbacks in the detection by genomic amplification due to either, an inadequate quality of the extracted DNA (due to insufficient sample quantity, DNA degradation, inadequate storage or DNA loss during extraction) or to the presence of DNA polymerase inhibitors in the samples that are to be processed (alcohol, salts, etc.). To avoid these interferences, the indications appearing in the sections 5, 6 and 7 of this manual must be followed. 10.2. Technical specifications: Processing parameters: 20 Analytical sensitivity. Analytical sensitivity of the virus types presented in Table 1 was determined via amplification of a series of DNA dilutions of recombinant plasmids. Each one of them contains the inserted amplified product (including the complementary part of the detection-specific probe). The visualization step was performed in CLART-Strip®, obtaining results which are summarized in the following table. Viruses associated with respiratory infections Metapneumovirus Coronavirus Influenza virus A (human H1N1, human H3N2, Influenza A H1N1/2009) Influenza virus B Influenza virus C Parainfluenza virus 4 RSV-A RSV-B Adenovirus Bocavirus Enterovirus (Echovirus) Parainfluenza virus 1 Parainfluenza virus 2 Parainfluenza virus 3 Rhinovirus Recombinant plasmid copy Nº per PCR reaction 100 1000 Table 1: Relation between copy numbers of the recombinant plasmid (specified by virus type) necessary for obtaining a 100% sensitivity in the detection of each virus. • Analytical specificity. Specificity experiments were performed with the 17 recombinant plasmids and it was observed that there were no cases of unspecific detection of viruses. Therefore, we consider a 100% analytical specificity. Diagnostic utility parameters In order to determine the diagnostic parameters of the kit, comparative evaluation was performed using the CLART PneumoVir and the most extended techniques used in hospitals: Inmunofluorescense, Inmunochromatography, Q-PCR. Following hospitals collaborating with the evaluation: 21 • • • Microbiology Department of the Germans Trías i Pujol Univertitary Hospital, Badalona. Virology Unit of the Virgen de la Arrixaca Universitary Hospital. Virology Laboratory of the Reims Universitary Hospital (France). Genomic material was extracted from 296 nasopharyngeal lavages, and analyzed for detecting the presence of every single virus in table 2. When both results, alternative method and CLART® PneumoVir, showed same result, result was considered as valid. In case of discrepancies between both methods, sequencing result was considered as valid. In case of no sequencing availability, discrepancies were analyzed with an “in house” Nested PCR followed up by sequencing. Virus RSV A Parainfluenza 1 Parainfluenza 2 Parainfluenza 3 Parainfluenza 4 Coronavirus Metapneumovirus RSV B Adenovirus Enterovirus Influenza A Influenza B Influenza C Rhinovirus Bocavirus New H1N1 RSV PneumoVir Sensitivity Specificity 100,00 100,00 88.24 100 100,00 100,00 100,00 100,00 100,00 100,00 100,00 100,00 86.67 100 100,00 100,00 98,15 99,55 83.33 100 83.33 99.63 87,50 99,63 100,00 100,00 96.55 100 95 100 100,00 100,00 100,00 100,00 Table 2: Diagnostic sensitivity and specificity of CLART® PneumoVir for each virus. 22 11. BIBLIOGRAPHY Heyman PVV, Carper HT, Murphy DD, Platss-Mills TA, Patrie J, McLaughlin AP. Viral infections in relation to age, atopy, and season of admission among children hospitalized for wheezing. J Allergy Clin Immunol. 2004;114: 239-47. Spicuzza L, Spicuzza A, La Rosa M, Polosa R, Di Maria G. New and emerging infectious diseases. Allergy Asthma Proc. 2007; 28 (1):28-34. Boschini A, Longo B, Caselli F, Begnini M, De Maria C, Ansaldi F, Durando P, Icardi G, Rezza G. An outbreak of influenza in a residential drug-rehabilitation community. J med Virol. 2006. 78 (9): 1218-22. Herrera GA, Iwane MK, Cortese M, Brown C, Gershman K, Shupe A, Averhoff F, Chaves SS, Gargiullo P, Bridges CB. Influenza vaccine effectiveness among 50-64-year-old persons during a season of poor antigenic match between vaccine and circulating influenza virus strains: Colorado, United States, 2003-2004. Vaccine. 2007 Jan 2; 25 (1): 154-60. Hammond S, Chenever E, Durbin JE. Respiratory virus infection in infants and children. Pediatr Dev Pathol. 2007 May-Jun; 10 (3): 172-80. Marta Cruz-Cañete, David Moreno-Pérez, Antonio Jurado-Ortiz, Francisco Jesús García-Martín, Juan López-Siles, Laura Olalla-Martín. Enferm Infecc Microbiol Clin 2007; 25: 177–183. M.A. Marcos, M. Camps, J. Puig de la Bellacasa, T. Pumarola, E. Garcia, J. Mensa, A. Torres y M.T. Jiménez de Anta. Enferm Infecc Microbiol Clin 2004; 22: 40–46. Vicente D. Human bocavirus, a respiratory and enteric virus. Emerg Infect Dis. 2007 Apr; 13 (4): 636-7. Coiras MT, Aguilar JC, Garcia ML, Casas I, Perez-Brena P. Simultaneous detection of fourteen respiratory viruses in clinical specimens by two multiplex reverse transcription nested-PCR assays. J Med Virol. 2004 Mar; 72 (3): 484-95. Coiras MT, Perez-Brena P, Garcia ML, Casas I. Simultaneous detection of influenza A, B, and C viruses, respiratory syncytial virus, and adenoviruses in clinical samples by multiplex reverse transcription nested-PCR assay. J Med Virol. 2003 Jan; 69 (1): 132-44. Elliot, A. J., Cross, K. W., Fleming, D. M. Acute respiratory infections and winter pressures on hospital admissions in England and Wales 1990-2005. J. Public Health. (Oxf.) 30, 91-9. Cannon, J. A., Carr. M. J., Yandle, Schaffer. K, Kidnay R., Hosny, G., Doyle, G., Ryan, J., Gunson, R., Collins, T., Carman, W. F., Conell, F., and W. Hall. A low density oligonucleotide microarray for the detection of viral and atypical bacterial respiratory pathogens Journal of Virological 23 Methods Volume 163, Issue 1, January 2010, Pages 17-24. ”Tract Viral infections and Coinfections in Patients with Influenza like Illnesses by use of RTPCR DNA Microarray Systems”. J. Clin. Microbiol. doi:10.1128/JCM.00733-10. “Characterization of viruses causing Human Respiratory Infections via Genomic Identification for in vitro diagnosis. CLINICAL ARRAYS/CLART® PneumoVir .Poster Session at ECCMID 2008, Barcelona. “Myocarditis Caused by Human Parainfluenza Virus in an Immunocompetent Child Initially Associated with 2009 Influenza A (H1N1) Virus”. Journal of Clinical Microbiology, May 2011, p. 2072–2073. “Respiratory viruses in Children Admitted to Hospital Intensive Care Units: Evaluating the CLART® PneumoVir DNA Array”. Journal of Medical Virology 83: 150-155 (2011). “Evaluation of viral co-infections in hospitalized and non-hospitalized children with respiratory infections using microarrays”. Clin Microbiol Infect, 10.1111/1469-0691.12015. “Co-infección viral respiratoria en niños hospitalizados por infección respiratoria aguda y su impacto en la gravedad clínica”. Rev Chil Infect 2012; 29 (2): 169-174. “Broad Respiratory Virus Detection in Infants Hospitalized for Bronchiolitis by Use of a Multiplex RT-PCR DNA Microarray System”. Journal of Medical Virology 84:979–985 (2012). “Detection and genotyping of human respiratory viruses in clinical specimens from children with acute respiratory tract infections”. Rev Esp Quimioter 2013;26(1):47-50 24