1
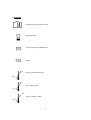
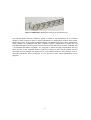
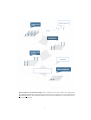
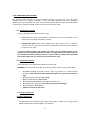
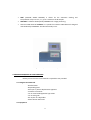
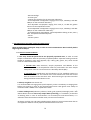
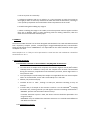
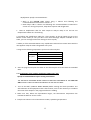
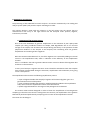
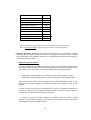
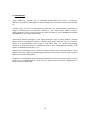
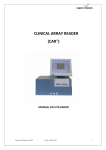
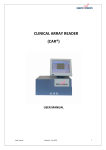
Pneumo CLART bacteria®
DETECTION AND GENETIC IDENTIFICATION OF
BACTERIA CAUSING HUMAN RESPIRATORY INFECTIONS
FOR IN VITRO DIAGNOSIS
1
Pneumo CLART bacteria®
Pneumo CLART bacteria® is under protection of patent family corresponding to International PCT
Patent Application WO2015055768.
CLART®, CLART-Strip®, CAR®, SAICLART® and Pneumo CLART bacteria® are registered Trademarks
of GENOMICA.
For more information, please refer to the web site www.genomica.com
GENOMICA, S.A.U.
Parque Empresarial Alvento, Edificio B
Calle Vía de los Poblados, 1 – 1ª planta
28033 Madrid, Spain
www.genomica.com
Version 4
July 2015
2
TABLE OF CONTENTS:
1. GLOSSARY
2. PROTOCOL DESCRIPTION
3. KIT COMPONENTS AND STORAGE
3.1. Amplification reagents
3.2. Visualization reagents
3.3. Other components
4. MATERIALS REQUIRED BUT NOT PROVIDED
4.1. Reagents and materials
4.2. Equipment
5.
RECOMMENDATIONS AND HANDLING PROCEDURES
5.1. General recommendations
5.2. Precautions for the extraction and addition of extracted material to the
amplification tube
5.3. Precautions for amplification
5.4. Precautions for visualization
6. SAMPLES
7. WORKING PROTOCOL
7.1. Automatic extraction of genetic material
7.2. Amplification reaction
7.3. Visualization of the amplified product
8. READING OF THE RESULTS
9. INTERPRETATION OF THE RESULTS
10. TECHNICAL AND OPERATIONAL SPECIFICATIONS
11. BIBLIOGRAPHY
3
1. GLOSSARY
Attention, see instructions for use
Expiration date
In vitro diagnostic medical device
Batch
25 ºC
Store at room temperature
20 ºC
8ºC
Store at 4ºC to 8ºC
4ºC
-18ºC
Store at –30ºC to –18ºC
- 30ºC
4
2. PROTOCOL DESCRIPTION
Pneumo CLART bacteria® detects the presence principal bacteria causing human respiratory
infections in the following clinical samples: sputum, nasopharyngeal lavage/exudated/aspirated,
broncoalveolar lavage and bronchial suction.
The bacteria detected are detailed in the list below:
•
•
•
•
•
•
•
•
•
•
•
Staphylococcus aureus1, 2
Streptococcus pneumoniae2
Haemophilus influenzae2
Haemophilus spp2
Moraxella catarrhalis2
Mycoplasma pneumoniae
Bordetella pertussis
Bordetella parapertusis
Bordetella bronchiseptica
Bordetella holmesii
Bordetella spp.3
1
Including the detection of the transposon responsible for methicillin resistance appearance,
mecA. MecA presence may be due to the detection of S. aureus, but also any other coagulasenegative staphylococci (CNS) present in the sample. The kit only reports mecA positive in the
presence of S. aureus.
2
These microorganisms may be present in the commensal flora of the patient on a regular basis,
therefore, a positive result obtained for those bacteria, should be assessed taking into account the
previously mentioned circumstances.
3
Bordetella spp. positive result will be just reported in case the software does not have
information enough for subtyping and reporting any of the above mentioned Bordetella species.
Detection is carried out by the specific amplification of each microorganism in the sample,
originating a variable fragment between 150 and 550 base pairs.
In order to avoid false negative results, each PCR matermix includes following controls:
-
Amplification Internal Control. Its detection ensures the proper performance of the
amplification process.
Genomic DNA control. The detection of this fragment confirms the isolation of genetic
material during the extration step.
The detection of the product amplified by PCR is carried out by means of a low-density microarray
platform: CLART® (Clinical Arrays Technology). The platform is based on a very simple principle,
but at the same time cost effective. It consists in a microarray printed at the bottom of a
microtiter plate well, which simplifies the entire hybridization and visualization process when
compared to classic microarray systems. Figure 1 displays a CLART-Strip® or CS of 8 wells.
5
Figure 1. CLART-Strip®-CS platform in the form of an 8-well strip.
The Pneumo CLART bacteria® detection system is based on the precipitation of an insoluble
product in those microarray areas in which hybridization of amplification products with specific
probes takes place. During PCR, amplified products are labelled with biotin. After amplification,
these products are hybridized with their respective specific complementary probes that are
immobilised in specific and well-known microarray areas. Afterwards they are then incubated with
a streptavidine-peroxidase conjugate. The conjugate is bound through streptavidine with the
biotin present in the amplified products (which are bound to their specific probes) and the
peroxidase activity prompts the appearance of a non-soluble product in the presence of the odianisidine substrate, which precipitates on the microarray areas where hybridization occurs
(Figure 2).
6
Figure 2: Diagram of the visualization method. Probes, immobilized on the surface, capture their complementary
biotin-labelled amplified products. With the help of biotin, they bind to the conjugate, in this case streptavidine-HRP
(HorseRadish Peroxidase). The o-dianisidine substrate, by the action of the HRP, produces a precipitate on the area
where hybridization occurs.
7
3.-KIT COMPONENTS AND STORAGE
The Pneumo CLART bacteria® kit contains reagents enough for performing 16 or 48 clinical
samples analysis. The reagents included in the kit have been grouped into various packages,
depending on the temperature at which they should be stored. When storage recommendations
are observed, all reagents should remain stable until kit’s expiration date.
3.1. Amplification reagents
They are shipped and should be stored at -20ºC.
•
PK (Proteinase K 10X). Once thawed, it should be kept on ice and stored at 4ºC.
Once thaw, PK must be used within a month.
•
Amplification tubes (white tube). Ready-to-use. They contain 45 µL of reaction
mixture. Thaw on ice the exact number of amplification tubes that will be used and
keep the rest at -20ºC.
To ensure reagent integrity and product cold chain, the kit package includes a selfadhesive and irreversible temperature indicator; the appearance of a reddish colour on
the visualization window indicates that, at a certain moment, products have exceeded
the storage temperature of –20oC and they should not be used.
3.2. Visualization reagents
The visualization kit is shipped and should be stored at 4ºC.
WARNING: Once received, the CLART-Strip® (CS) should be stored at room temperature.
•
•
•
•
•
•
•
CS strips (including all specific probes). They are provided in a sealed thermal
envelope. Store it closed at room temperature (25oC max.), protected from direct
light.
SH (Hybridization Solution). Store at 4ºC.
DC (Conjugate Diluent). Store at 4ºC.
CJ (Conjugate). Store at 4ºC. Centrifuge once before use.
RE (Development Solution). Store at 4ºC and protected from light.
TL (Wash Buffer). Store at 4ºC.
Adaptor and lid for 8-well strips.
3.3. Otros componentes
3.3 Other components
For the capture and subsequent processing of the image, a reader unit, running a tailor
made software and, the plate adaptor, are required:
8
•
CAR® (CLINICAL ARRAY READER): it allows for the automatic reading and
interpretation of up to 12 CS, i.e., up to a maximum of 96 samples.
•
SAICLART®: software developed by GENOMICA for image processing.
•
Pneumo CLART bacteria® Software: It is specific for Pneumo CLART bacteria® designed
and validated by GENOMICA. Installed and ready to use.
Figure 3. CAR® (CLINICAL ARRAY READER)
4.-MATERIALS REQUIRED BUT NOT PROVIDED
Below you can find a list of all materials required but not provided.
4.1. Reagents and materials
- Distilled water.
- Disposable gloves.
- Filter tips or positive displacement pipettes.
- Crushed ice container.
- 1.5 mL autoclaved Eppendorf type tubes.
- 1.5 mL tube grids.
- 0.5 mL/0.2 mL tube holder.
- Saline solution 0.9% NaCl
4.2. Equipment
9
- Microcentrifuge.
- Thermocycler.
- Laminar flow chamber for the extraction laboratory.
- Three adjustable micropipettes ranging from 1-20 μL, 20-200 μL, and 2001000 μL for the extraction laboratory.
- One adjustable micropipette ranging from 1-20 μL, to add the genetic
material to the amplification tubes.
- Three adjustable micropipettes ranging from 1-20 μL, 20-200 μL, and 2001000 μL for the visualization laboratory.
- Thermoblock with plate adapter, lid and adjustable shaking at 25°C, 30°C y
56°C. Compatible with 96-well plates.
- Vortex.
- Vacuum system.
5.-RECOMMENDATIONS AND HANDLING PROCEDURES
Read carefully before starting the assay in order to avoid contamination! Read carefully before
beginning the technique
5.1. General recommendations
1. This assay should be performed in two physically separated areas, in order to avoid
sample contamination with the previously amplified product. Separate working materials
should be available in each area (pipettes, tips, tubes, grids, gloves, etc.) which should
never be used outside these areas.
1. Pre-PCR area: DNA extraction, sample preparation and addition of the
extracted material to the amplification tubes are performed in this area. Sample
manipulation must be carried out within a biosafety cabinet (BSC).
2. Post-PCR area: Amplification and visualization of the amplified product are
carried out in this area. The material of this area should never come into contact
with the material of the extraction area. Avoid entering the pre-PCR area after
having worked in the visualization area.
2. Always use gloves. See section 5.2.
It is recommended to change gloves quite frequently, and it is mandatory to change gloves
before start working in each of the aforementioned areas. New gloves must always be
used when DNA is added to the amplification tubes.
3. Clean working areas (laboratory cabinets, hoods, grids, pipettes) thoroughly with a 10%
diluted bleach solution after every sample batch processing; it is mandatory to disinfect
all working areas in case of contamination. For thermocyclers and thermomixers, it is
advised to clean them before and after used, in these same conditions.
4. Always use filter tips and positive displacement pipettes to avoid contamination due to
micropipettes. Different sets of pipettes should be used in each area.
10
5. Discard the micropipette tip after pipetting.
6. Use disposable and autoclaved laboratory material.
7. Never mix reagents from two different vials, even if they belong to the same lot.
8. Close reagent tubes immediately after use in order to avoid contamination.
9. GENOMICA is not responsible for the results obtained with the kit if other samples
different to the ones indicated are used.
5.2. Precautions for the extraction and addition of extracted material to the amplification
tube
Most bacteria Pneumo CLART bacteria® detects been present on the skin surface, it
is therefore very important to avoid contamination with these microorganisms. To do that,
follow these precautions:
•
•
•
•
•
•
Use a disinfectant gel or ethanol 70% for cleaning hands and forearms skin. Cover
them with long cuff globes.
Minimize the contact with the external surface of the globes while putting them
on.
Avoid touching both, skin and hair, while manipulating the samples. In case of
touching them, proceed to change the globes.
Clean working surfaces of cabinets with a 10% diluted bleach solution.
Turn on the laminar flow and UV light at least 20 minutes before extraction. Turn
off the UV light when it is working inside the cabinet.
The preparation of the samples before extraction must be made inside the
cabinet.
5.3 Precautions for amplification
• Place the amplification tubes in the thermocycler when the block is above 90 º C.
Thereby minimizing possible nonspecific amplifications due to incubation below
the annealing temperature
5.4 Precautions for visualization
1. Avoid the pipette tip or the vacuum system touching the bottom of the well, since this
could damage the probes printed at the well’s bottom.
2. It is recommended to add all solutions to the wall of the CS well; never directly at the
bottom.
3. It is convenient not to add the SH solution (hybridization solution) until the denatured
products of PCR are ready.
11
4. The array must not remain dry.
5. Following incubation with the CJ solution, it is very important to wash the microarray
thoroughly in order to avoid any residues that could react with the RE solution, resulting in
a non-specific precipitation that could lead to false interpretations of the result.
6. Avoid foaming when adding any reagent.
7. When visualizing the image in the reader, ensure that position markers appear and that
there are no bubbles, fibers or spots interfering with the reading. Otherwise, clean the
outer face of the well with cellulose paper.
6.-SAMPLES
The Pneumo CLART bacteria® kit has been designed and validated to be used with DNA extracted
from respiratory samples: sputum, nasopharyngeal lavage/exudated/aspirated, broncoalveolar
lavage and bronchial suction. GENOMICA is not responsible for the results obtained if other types
of samples are used.
Store samples at 4 ° C if they are to be processed in a time less than 12h. Otherwise it should be
stored frozen at -20 ° C
7.-WORKING PROTOCOL
7.1. Automatic extraction in the NucliSENSTM EasyMag DNA of Biomerieux
•
•
For each series of samples to be analyzed, an extraction negative control (0.9% sodium
chloride) must be included to verify that the samples have not been contaminated
during the extraction, amplification and visualization processes, which might lead to a
false positive result.
For liquid samples transfer 200 μl the sample to an eppendorf tube. For dense samples
add 1 ml of saline buffer, vortex and transfer 200 μl to a 1.5ml tube.
•
Add 50 μl of proteinase K (PK).
•
Incubate 30 min. at 56ºC , shaking it at 550 rpm, otherwise vortexing it every 10
minutes.
Transfer 250 μl of sample to the extractor. Perform it on the NucliSENSTM EasyMag
extraction unit, selecting internal lysis and regular extraction according manufacturer’s
“GENERIC” protocol. Set the elution volume at 25 µl.
•
If another extraction system is used, the elution volume should be optimized in the
range of 20-30 µl.
GENOMICA only has validated this automatic extraction so it could be small difference
with different methods.
7.2. Amplification reaction
12
Amplification-specific recommendations:
• Work in the pre-PCR area, always using a cabinet and following the
recommendations mentioned in section 5.1.
• DNA always adds in cabinet and following the recommendations mentioned in
section 5.1. During the process, keep tubes separate and refrigerated.
1. Thaw an amplification tube for each sample to analyze. Keep on ice and not use
temperatures above 37°C for thawing.
2. Centrifuge the amplification tubes for a few seconds, so that all liquid can get to the
bottom of the tubes (in case you don't have microcentrifuge adaptors available for the
tubes, you can use larger tubes after having cut their cap off).
3. Add 5 μL of the extracted DNA to every amplification tube and mix several times with the
micropipette. Keep the tubes refrigerated at any time.
4. Program the following temperature cycles on the thermocycler:
1 cycle
95ºC 15 min
95ºC 30 sec
45 cycles 59ºC 60 sec
72ºC 60 sec
1 cycle
72ºC 10 min
4ºC continuously until tube collection (optional)
5. Start the program and place the tubes in the thermocycler when the block has exceeded
90ºC.
7.3. Visualization of the product amplified in CLART-Strip® (CS)
Specific recommendations before starting visualization:
THE PROTOCOL DESCRIBED BELOW SHOULD ALWAYS BE PERFORMED IN THE POST-PCR
AREA. DO NOT TAKE THE AMPLIFIED PRODUCT IN THE PRE-PCR AREA.
1. Turn on the CAR® (CLINICAL ARRAY READER) before starting the whole procedure. The
self-calibration of the equipment takes a few minutes, and it is also necessary to introduce
the name of the samples in the program before the reading.
2. Make sure that, before the hybridization begins, the thermomixer temperature has
reached the 56ºC for at least 1 hour.
3. Keep the SH solution in the thermomixer at 56ºC, hybridizing temperature.
13
4. Prepare fresh wash solution before each assay; do not reuse previously prepared solutions
or residues.
5. Use filtered tips different for each well and change it every time a reagent is added.
6. In case of using vacuum pumps equipped with 8-tip comb for aspirating solutions, discard
the combs after each use or decontaminate them with a 10% diluted bleach solution after
every assay. Make sure the pump aspirates properly and does not leave traces at the
bottom of the well.
7. Aspirate the different solutions completely without touching the array.
VISUALIZATION:
1. Denaturation:
Place the amplification tubes in the thermocycler when this has reached 95ºC and
incubate the tubes for 10 min. Not to exceed 10 min time of denaturation to prevent the
tubes are opened and contamination may occur.
Remove the tubes from the 95ºC incubation and place them immediately on ice.
2. Diluted TL solution preparation:
For each CS strip (a total of 8 wells), prepare 10 mL of diluted wash solution by adding 1
mL of TL solution to 9 mL of distilled water, gently stir.
3. Prewash of the CS:
Before beginning the assay, it is necessary to wash the strips by adding 200 µL of diluted
TL solution to each well. Mix it with the multichannel pipette 10 to 15 times, taking into
account that the surface of the array must not be touched. It is advised to carry out this
wash while the amplified samples are being denatured and maintain the wash solution
in the well until samples are going to be added. Discard the diluted TL solution with a
pipette, or preferably with a vacuum pump.
The array must be free from solution residues, although it must never remain dry. Add the
next solution immediately.
4. Hybridization:
Before using the SH solution, it must be heated at 56oC until the complete dilution of the
salts. Once the PCR products have been denatured, add 100 µL of SH solution (prevent
foaming) to each CS well. Next, add 5 µL of denatured PCR product from amplification
tube. Use one array per sample.
Mix it several times, being careful not to touch the bottom of the well. It is recommended
to load each strip independently and separately from the rest to avoid contaminations.
Cover the microtiter plate with the plastic lid provided and incubate in the thermomixer
for 1 hour at 56oC, shaking at 550 rpm.
14
After this incubation, remove the plate from thermoshaker and aspirate the SH solution of
the CS with a pipette or, preferably, with a vacuum pump: The array must be free from
solution residues, although it must never remain dry. Add the next solution immediately.
After incubation set the thermomixer at 30oC, and in motion, so it may be used later in
step 6.
5. Double Wash:
Add 200 µL of diluted TL solution to each CS well, resuspend 10 to 15 times with the
multichannel pipette. Discard the diluted TL solution with a pipette, or preferably with a
multichannel vacuum pump without leaving any residues. Repeat the procedure. This
step must be carried out with different tips for each well in both washes. If having
arrived at this step, the thermomixer has not reached 30oC, the wells are left with TL
solution until the thermomixer reaches the temperature.
6. Blocking and conjugate:
It is recommended to centrifuge the high-affinity CJ solution for 10 seconds before use.
Then, prepare the diluted CJ solution as follows: for each CS strip, mix 1 mL of DC solution
and 7.5 μL of high-affinity CJ solution.
Discard the diluted TL Solution without leaving any residues of the solution and add 100 µL
of diluted CJ solution to each CS well. Incubate for 15 exact minutes in the thermoshaker
at 30oC, shaking at 550 rpm. After this incubation, remove the plate and discard the
solution rapidly with a pipette or a multichannel vacuum pump. Once finished the
incubation, set the thermomixer at 25oC, and in motion, so it may be used later in step 8.
7. Triple Wash:
Add immediately 200 µL of diluted TL solution to each CS well, mixing it 10 to 15 times
with the multichannel pipette and discard the solution completely with the pipette or
vacuum pump. Repeat the procedure two more times.
It is very important to avoid any residues of the CJ solution, since they could react with the
RE Solution generating an unspecified signal.
8. Development with RE solution: Remove the diluted TL solution completely and add 100 µL
of RE solution to each CS well and incubate for 10 minutes at 25oC in the thermomixer
without shaking.
Warning! It is very important to use the thermomixer without shaking.
9. Discard the complete TL solution using a pipette or a vacuum system. The array must
remain dry for the reading.
10. CAR® (CLINICAL ARRAY READER): Place the plate normally on the tray and the CAR® will
take and analyse the arrays automatically.
15
8. READING OF THE RESULTS
The processing of data obtained from each analysis is carried out automatically. The reading and
analysis system (CAR®) will provide a report indicating the results.
The monitor displays a table with two columns; in the left column lists the species that are
characterized in the array. In the right column lists the analytical result: positive, negative,
inconclusive, not valid.
9. INTERPRETACIÓN DE RESULTADOS
One of the main drawbacks of genomic amplification is the utilization of poor quality DNA
samples (for taking insufficient amount of sample, DNA degradation due to an incorrect
storage of the sample, loss of DNA of the sample during extraction) or the presence of DNA
polymerase inhibitors in the samples to be analyzed, thus interfering with the genomic
amplification and resulting in false negatives.
With the Pneumo CLART bacteria® kit, the false negatives are removed by adding an internal
control in the amplification tube, which is indicative of the efficiency of the amplification
reaction.
Also it is included in the tube a genomic DNA extraction control to detect false negatives due
to failures in the extraction.
In every set of analysis a negative extraction control should be included to check that samples
have not been contaminated during the extraction, amplification and visualization, thus giving
rise to a false positive.
The amplification tube contains the following amplification primers:
• A pair of oligonucleotides that amplify a fragment of the human β-globin gene as a
genomic DNA control of the patient.
• A pair of oligonucleotides that amplify a modified plasmid included in the amplification
tube, which is used as amplification control of the PCR reaction.
• Specific oligonucleotides for the targets of the pathogens to be detected.
The reaction tube has been designed in order to favour the amplification of microorganisms
comparing to the other two controls. Among these two controls, the amplification of the genomic
DNA will be performed preferentially comparing to the control of the amplification reaction.
The reason for this design is:
16
Genomic DNA control would only be essential for confirming a negative result, since it informs
you that the DNA extraction from stool sample was conducted successfully, even if there was no
amplification of pathogen
PCR control would only be essential when no amplification in the tube is found, because it will
help to distinguish between an inhibited PCR and a sample where no DNA is present.
There are 3 possible results for a sample:
1. Positive Result: The presence of a certain bacteria in the patient sample.
2. Negative Result: Absence of a certain bacteria in the patient sample.
3. Uncertain result. There are three different possibilities explaining it:
3.1. Uncertain with PCR amplification control inhibited. There might be a problem
affecting the amplification and/or extraction. Process should be re-started from the
extraction step.
3.2. Uncertain with no genomic internal control is due to a failed extraction step. Whole
process should be restarted from extraction step.
3.3. Uncertain with both controls passed. There are two possibilities; those when the dots
replicates on the array are too different from each other, and those that the intensity
of the not-normalized absorbance signal is in the assay detection limit, whose range
has been established specifically by the software for each microorganism.
In both cases, visualization step should be repeated.
10. TECHNICAL AND OPERATIONAL SPECIFICATIONS
10.1 Control of known interferences:
False negatives are one of the drawbacks in the detection by genomic amplification due to
either, an inadequate quality of the extracted DNA (due to insufficient sample quantity,
DNA degradation, inadequate storage or DNA loss during extraction) or to the presence of
DNA polymerase inhibitors in the samples that are to be processed (alcohol, salts, etc.).
To avoid these interferences, the indications appearing in the sections 5, 6 and 7 of this
manual must be followed.
10.2 Technical specifications:
Processing parameters:
• Analytical sensitivity. Analytical sensitivity has been determined by the amplification of
serial dilutions of recombinant plasmids for each one of the mutations detected by the kit.
Each one of them has the amplified product inserted (including the part that is
complementary to the specific detection probes). The visualisation was done in CS, giving
rise to the following results (Table 1):
17
Microorganism
Copies/5ul
Moraxella catharralis
Mycoplasma pneumoniae
Streptococcus pneumoniae
Haemophilus influenzae
mec A
Staphylococcus aureus
Bordetella pertussis
102
10
102
102
102
102
102
Borderella parapertussis
Bordetella holmesii
Bordetella bronchiseptica
102
102
102
Table 1. Relationship of the number of copies of recombinant plasmid necessary to
obtain a sensitivity of 100% in the detection of each one of the microorganisms.
• Analytical specificity. Specificity experiments were carried out in recombinant plasmids
observing that an unspecific detection of other microorganisms different to what is sought
to be determined is not produced. Therefore, it is considered that the technique reaches an
analytical specificity of 100%.
- Diagnostic utility parameters:
In order to determine the diagnostic parameters of the kit, a comparative assessment of
the Pneumo CLART bacteria® kit was carried out against the reference techniques culture
and or PCR. For this evaluation, we collaborated with the following laboratories:
•
•
Department of Microbiology, Trías i Pujol University Hospital, Badalona, Spain.
Department of Microbiology, Ramon y Cajal Universitary Hospital, Madrid, Spain.
The presence of each one of the microorganisms that were detected with the kit was
analyzed from genetic material of respiratorial samples. We analyzed a total of 267
samples.
For each sample, the result was considered true if there is concordance between the
reference technique and the Pneumo CLART bacteria® technique. The discrepancies
between the two techniques were resolved as follows:
- A positive result for the gold standard and negative result for Pneumo CLART
bacteria®: the reference technique is considered like correct data, and it is considered
false negative for Pneumo CLART bacteria®.
18
- A negative result for the reference technique and a positive result for Pneumo CLART
bacteria®: the discrepancy will be discussed by Nested-specific PCR and sequencing. The
result is what is considered as true.
Table. 2. Diagnostic sensitivity and specificity of Pneumo CLART bacteria® kit .
1
(N= 267)
Staphylococcus aureus
Streptococcus pneumoniae
Haemophilus sp./H. influenzae
Moraxella catarrhalis
Bordetella pertussis
Bordetella parapertussis
Gold
standard
63
89
187
77
10
1
Sensitivity(%)
89,7±2,4
89,3±1,7
96,8±0,5
98,7±1,3
100
100
Specificity (%)
99,75±0,25
98,6±0,3
100
100
100
100
PPV (%)
99,1±0,9
96,9±0,6
100
100
100
100
NPV (%)
96,9±0,7
94,9±0,8
93,1±1,1
99,5±0,5
100
100
1
175 Sputum, 12 nasopharyngeal aspirated, 6 bronquial lavage, 69 bronquial
aspirated, 4 nasopharyngeal exudated, 1 respiratorial secretion.
NOTE: Due to the low prevalence there has been no positive samples for the following organisms:
Mycoplasma pneumoniae, Bordetella bronchiseptica and Bordetella holmesii. Therefore failed to
identify the diagnostic sensitivity of the kit for these pathogens. In all cases, the analytical
sensitivity was evaluated by DNA recombinant plasmids and strains of collection (DSMZ collection)
•
Diagnostic specificity:
The technique has been validated with both negative and positive respiratory samples for other
microorganisms not included in the kit, and the results show no cross-reaction with them.
•
Reproducibility and diagnostic repeatability by sample type.
The reproducibility and diagnostic repeatability was processed from sample extraction to
visualization in CS.
%
93.7
88.7
Repeatability (n=58)
Reproducibility (n=53)
19
11. BIBLIOGRAPHY
“Acute Respiratory Infection Due to Chlamydia pneumoniae:Current Status of Diagnostic
Methods”. Swati Kumar and Margaret R. Hammerschlag. Clinical Infectious Diseases 2007; 44:568–
76.
“Limited Utility of Culture for Mycoplasma pneumoniae and Chlamydophila pneumoniae for
Diagnosis of Respiratory Tract Infections”. Rosemary C. She, Andy Thurber, Weston C. Hymas,
Jeffery Stevenson, Janine Langer, Christine M. Litwin and Cathy A. Petti. JOURNAL OF CLINICAL
MICROBIOLOGY, Sept. 2010, p. 3380–3382
“Associations between Pathogens in the Upper Respiratory Tract of Young Children: Interplay
between Viruses and Bacteria” Menno R. van den Bergh, Giske Biesbroek, John W. A. Rossen,
Wouter A. A. de Steenhuijsen Piters, Astrid A. T. M. Bosch, Elske J. M. van Gils, Xinhui Wang,
Chantal W. B. Boonacker, Reinier H. Veenhoven, Jacob P. Bruin, Debby Bogaert, Elisabeth A. M.
Sanders. PLOS ONE, October 2012, 7,10 .
“Diagnóstico microbiológico de las infecciones bacterianas del tracto respiratorio inferior” Juana
Begoña Cacho Calvo, María Antonia Meseguer Peinado, Antonio Oliver Palomo, Jorge Puig de la
Bellacasa, Protocolos SEIMC 2007.
“Diagnóstico microbiológico de las infecciones bacterianas del tracto respiratorio superior” Ninive
Batista Díaz, Ana Bordes Benítez, Oscar Díez Gil, María Lecuona Fernández, Magdalena Lara
Pérez, Protocolos SEIMC 2006.
20