1
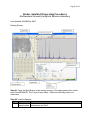
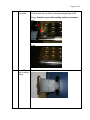
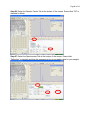
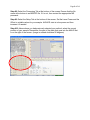
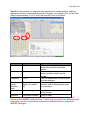
Page 1 of 14
MS-MALDI User’s Manual
Update 11/14/2012
Table of Contents
Safety .............................................................................................................................................. 2
Sample Preparation ......................................................................................................................... 3
Pre-Run Checklist ........................................................................................................................... 4
Bruker Autoflex III Operating Procedures ..................................................................................... 5
Method Information Table ............................................................................................................ 12
IMSERC MS Personnel ................................................................................................................ 14
Page 2 of 14
Safety
1. General Lab Safety Requirements:
All users of the IMSERC facility must review the generic IMSERC guidelines before
starting training. The guideline will be posted by the sign on computer and at
http://pyrite.chem.northwestern.edu/analyticalserviceslab/ASL%20Final%20Guideli
nes.htm
2. Do not run instrument without approval from Saman, Jaekuk or lab TA. Failure to do
so may cause injury, damage the instrument, produce invalid data, and result in
additional fees or removal of IMSERC privileges.
3. Instrument Specific Safety
Hazards
Location on
equipment
Sample to be run
Pinch Hazard
Sample Inlet
PPE required / Hazard Mitigation
Wear gloves and safety goggles
Keep hands clear of sample inlet
once you press insert/eject button.
This is especially true if you notice
the sample holder is misplaced.
Page 3 of 14
Sample Preparation
1. Decide if MALDI is the correct technique for your sample:
2. Choose the matrix for your sample:
3. Obtain an appropriate sample plate (Coin Chip) to spot your sample on. Coin Chips
are available from IMSERC staff for $35. Plates with pre-applied matrix with calibrant
spots (AnchorChip) and matrix-free plates (NALDI) are available (cost is ~
$100/plate or $1/site).
4. Make a solution of approximately 10% sample to matrix by mass. (disregard solvent
for this calculation)
5. Apply solution to plates. (~ 1ul per spot)
6. Dry the sample before coming to IMSERC (solvent must be evaporated).
Page 4 of 14
Pre-Run Checklist
Step Instruction
1
Verify sample is
completely dry on the
sample plate
2
Log on to instrument in
Login system.
Comments
Poor vacuum (poor signal and resolution)
as well as long transfer times will result
from wet samples
3
If needed, log into
computer
Login Name: tof-user
Login Password: youshouldknow
3
Start Flex Control
4
Check status lights on
instrument panel
Log in as tof-user (you don’t need to do
anything)
No password is required
Mains: Green
System: Ready or Warm-up
Target: Access
Page 5 of 14
Bruker Autoflex III Operating Procedures
Northwestern University Analytical Services Laboratory
Last Updated: 8/8/2008 by AWO
Starting Screen:
Step #1: Press the Eject Button in the starting screen (or the large green button on the
side of the MS-MALDI. The Tray will open slowly – Make sure the tray path is not
obstructed.
Step #2: Load the Sample:
Step Instruction
Comments
1
Remove
Always store sample carrier in instrument to ensure that the
sample plate next person can find it
Page 6 of 14
2
Place plate
on carrier
Sample “coin chip” is keyed to only fit one way. Ensure plate
sits flush with the top of the carrier and sample plate is flat.
Wrong: (Sample may scratch sealing surface and cause a
leak)
Right:
3
Load Plate
into Loading
Dock
Right: Carrier flush against back of transfer system
Page 7 of 14
Wrong: Carrier two far forward. Sealing surface can be
scratched
Wrong: Carrier Backward. Error occurs
Step #3: Press the Eject Button in the starting screen (or the large green button on the
side of the MS-MALDI to insert your sample.
Step #4: While sample is loading, click “Select Method” button from the starting screen.
Select the method appropriate for your sample:
The naming convention is for basic operation “RP_(0.5k-4kDa).par”
First character = TOF mode: L = linear / R = Reflectron
Second Character = polarity: P = positive / N = Negative
Third phrase = optimized and calibrated molecular weight range
Step #5: Press “Open” to choose your method.
Page 8 of 14
Step #6: Select the Sample Carrier Tab at the bottom of the screen. Ensure that “Off” is
checked for Mode.
Step #7: Select the Spectrometer Tab at the bottom of the screen. Ensure that
“Deflection” is checked and that the suppress up box is a suitable value for your sample.
Page 9 of 14
Step #8: Select the Processing Tab at the bottom of the screen. Ensure that the file
name at the bottom is an IMSERC file. If it is not, then contact the appropriate MS
personnel.
Step #9: Select the Setup Tab at the bottom of the screen. Set the Laser Power and the
Offset to suitable values for your sample. ALWAYS start at a low power and then
increase it if needed.
Step #10: Above where you had previously selected your method, select the correct
position of your sample. Remember: the part of the plate that goes into the MALDI first
is on the right of the screen. (Image is rotated clockwise 90 degrees)
Page 10 of 14
Step #11: Above where you had previously selected your sample position, select an
appropriate number of shots and frequency of shots for your sample. Also, set the laser
offset to approximately 10-15%. Note: this does NOT turn off the laser.
Parameter
Laser Power
Allowable Values
0-50%
Shots
Any
Frequency
0-200
Sample
Carrier
(Random
walk)
Spectrometer
Shots / spot
Mode (on / partial /
off)
Do not change
Description / Warning
Remember that higher laser power
leads to broad and unresolved
peaks
Sum shots to build signal with lower
power (multiple spectra can be
added)
Use low frequencies to move around
and see changes
If sample is being depleted, use
random walk to automatically move
to a new spot
Settings are optimized for selected
mass ranges
Detection
Use default Window
Zoom in later
Before any parameter is set outside the limits in this table, approval must be
obtained from IMSERC staff members. Failure to do so may cause damage to the
instrument, produce invalid data, and result in additional fees or removal of
IMSERC privileges
Page 11 of 14
Step #12: Press start. Move the crosshairs around the sample (left click with mouse) to
find a good spot. You may also need to change the aforementioned settings. Note: if
you are getting a “hump” near the left of the spectrum, you are likely using too much
laser power.
Step #13: After obtaining a satisfactory spectrum, press add.
Step #14: You may choose to run additional scans, pressing add each time to sum
them. Otherwise, go to File → Save As, and save your data. IMPORTANT: DO NOT
just press Save. This overwrites the prior spectrum, even if it is not yours.
Step #15: Press the Eject Button in the starting screen (or the large green button on the
side of the MS-MALDI.
Step #16: Remove your sample, then insert the plate back into the MS-MALDI. Make
sure for the correct plate loading orientation!!!
Step #17: Press the Eject Button in the starting screen (or the large green button on the
side of the MS-MALDI. (Plate should be inside the MALDI at the end of your session)
Step #18: Take your sample back to your lab and dispose of it there.
Page 12 of 14
Method Information Table
Linear Method Constants
Approximate Mass
<1600
6000
9000
12K
17K
25K
66K
IS1
20
20
20
20
20
20
20
IS2
18.55
18.20
18.10
17.90
17.80
17.80
17.50
Lens
9.0
9.0
9.0
9.0
9.0
9.0
9.0
Delay
0ns
130ns
170ns
190ns
220ns
220ns
240ns
Reflector Method Constants
Approximate Mass
IS1
<1000
19
2000
19
3000
19
6000
19
12K
19
17K
19
IS2
16.90
16.85
16.75
16.60
16.35
16.15
Lens
9.0
9.0
9.0
9.0
9.0
9.0
Delay
0ns
80ns
210ns
230ns
360ns
420ns
Initial Starting Method Constants
Method File Name
IS1
IS2
RP_(0-1kDa)
19
16.72
RP_(0.5k-4kDa)
19
16.53
RP_(3k-6kDa)
19
16.72
LP_(0.5k-4kDa)
20
18.6
LP_(2k-20kDa)
20
18.5
LP_(10k-150kDa)
20
17.85
LP_(30k-300kDa)
20
17.86
RN_(0-1kDa)
19
16.75
RN_(0.5k-4kDa)
19
16.76
RN_(2k-10kDa)
19
17.1
LN_(0.5k-20kDa)
20
18.1
New Methods vs Old Methods
New Methods
RP_(0-1kDa).par
RP_(0.5k-4kDa).par
RP_(0.5k-4kDa)_AnchorChip.par
RP_(0.5k-4kDa)_NALDI.par
RP_(3k-6kDa).par
RP_(3k-6kDa)_AnchorChip.par
LP_(0.5k-4kDa).par
Lens
8.3
8.49
8.55
7.0
8.5
9
9
7.5
8.3
8.55
8.5
Refl.
21
21
21
N/A
N/A
N/A
N/A
21
21
21
N/A
Old Methods
RP_PepMix.par
RP_PepMix.par
RP_NALDI.par
RP_ProtMix.par
LP_PepMix.par
Refl 2
9.7
9.7
9.7
N/A
N/A
N/A
N/A
9.7
9.7
8.4
N/A
Delay
0
0
150
0
150
300
500
0
0
250
150
Page 13 of 14
LP_(2k-20kDa).par
LP_(10k-150kDa).par
LP_(30k-300kDa).par
RN_(0-1kDa).par
RN_(0.5k-4kDa).par
RN_(2k-10kDa).par
LN_(0.5k-20kDa).par
LP_ProtMix.par
LP_66kDa.par
RN_PepMix.par
LN_ClinprotMix.par
LN_PepMix.par
LN_ProtMix.par
Tips for MALDI analysis
- If you observe poor resolution with a linear mode of operation (only), you must
check whether "Turbo" checkbox is checked or not. You can find the option
under Detection Tap>Detector Gain>Turbo. Disable the Turbo checkbox for
better resolution. This option is only good for MW over 50 kDa, enhancing
sensitivity of linear detector by compromising resolution. We found this option
remains enabled regardless of loading a new method if a previous user had
enabled. This will decrease mass resolution significantly for MW below 10 kDa if
enabled.
- For users who analyze proteins above 100 kDa, you may have better sensitivity
by increasing "High Mass Accelerator" up to 8.0 kV under Detection
Tap>Detector Gain>. But mass resolution and S/N ratio will be significantly
decreased as the HMA voltage increases.
- If the baseline increases too high along with increased laser energy, change the
electronic gain to “Regular” under Detection>Electronic Gain>. The default value
is “Enhanced”. You may have better signal sensitivity with “Highest” setting for
MW above 10 kDa by sacrificing signal-to-noise ratio.
Page 14 of 14
IMSERC MS Personnel
Saman Shafaie
Dan Sweeney
Andy Ott
[email protected]
[email protected]
[email protected]