1
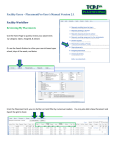
General Users – PlacementPro User’s Manual Version 2.1 All Users: Logging into the TCPS PlacementProSM System Access the TCPS PlacementProSM System either through the Partner Portal or by the direct link provided by the Site Administrator. Users are categorized into four types of users with differing capabilities: General Partner – may search, view data, export, and run reports. Instructor User – General Partner activities plus add and edit students. Educational User – Instructor activities plus request placements, edit some placement components, add students and data, add and edit Instructors. Clinical User - Partner activities plus add placements, make placement decisions, edit all placement components, add and edit preceptors. Administrator – has access to all tools needed to manage clinical placement data and users, import all levels of data, assign PCodes, and assign placement data in the final step of request approval. Based upon your login credentials, your home page will display the tools you need to use the system. The General Partner Home Page is the Search screen. Instructor & Educational User Home Page Student Snapshot Clinical Facility Home Page Student Snapshot Student Search From the Home Page, all users should be able to access the most frequently needed placement data! Instructors, Schools and Facilities can also see the names of students who will be in clinical today or a listing of all students. Schools will see all of their students; facilities will see all students who are assigned to their facility. The Search option below the Student Snapshot allows for a quick search for a student using their name, student ID, or an assigned PCode. This feature is optional for using PlacementPro and requires that schools upload student data. This Manual is for the sole use of TCPS Partners. ©2014 TCPS PlacementPro User’s Manual Version 2.1 2 Searching the Placement Database 1. Click on the Search Button. 2. There are search tips noted on the screen. Using the Search Placements screen, select the various parameters to refine your search based upon Facility, School, and Date. These categories may be expanded or collapsed by clicking on their blue title bar. Hold down the Ctrl Key to make multiple selections within a search parameter. Note that choosing a region will narrow the Facility choices; a Facility will narrow the Unit and Unit Type choices. Status may also be selected to review OPEN, Assigned, and Requests. Choosing no status will display all. Using the Date feature, it is also possible to search by Day of the Week. Click on the Search Placements button to begin your search. TIP: The fewer search parameters, the larger the search result. To specify a school or type of program in your search, click on the School Header to expand the panel for additional search criteria. This Manual is for the sole use of TCPS Partners. ©2014 TCPS PlacementPro User’s Manual Version 2.1 3 Finding a Specific Placement If you know the PCode of a particular placement – such as when a Partner or Instructor has searched for a placement and needs it to be requested – enter it in the PCode box just under Region on the Search screen. Click on Search Placements to find the specific placement in the database. Follow the instructions for Requesting a Placement below. Finding an OPEN placement Always SEARCH FIRST! Search the database for all placements OPEN & ASSIGNED to verify that the placement opportunity that you want is not already assigned to another school or otherwise not available in the system. Remember to multi-select, hold down the Ctrl key while selecting placements with these types of statuses. Be sure and record the PCode of any placement that needs to be requested for your school! This Manual is for the sole use of TCPS Partners. ©2014 TCPS PlacementPro User’s Manual Version 2.1 4 Navigating the Placement Grid All placement data are presented in a grid with specific characteristics displayed in column format. See the Definitions for more information about each column header. You can access the placement grid via a SEARCH or through the PLACEMENTS button. If you did a specific search, the resulting data in the grid will be displayed. If you used the PLACEMENTS button, you have additional control over the type of placement data that is displayed using the Placement Status Menu. Default Data for School Affiliates = ALL OPEN & ASSIGNED Placements in the database. Default Data for Facility Affiliate = All OPEN & ASSIGNED Placements in their facility. Using the Placements Current Menu, you may search all data by status. Placement data may be further sorted A-Z by clicking on the headers and filtered by the various columns with a dropdown arrow. NOTE: Using the filter feature will filter ALL data, not just the data from your search. Use Column headers to sort data from a particular search. Make your selection(s) and then press ENTER to begin the search or refresh the filtered data. The Placement Grid also has controls for pagination on the right of the screen. Filter by selection Column headers may be clicked to sort A-Z, Z-A You may also export your data to Excel by clicking on the Export Button. See Exporting Data for more info! Note the Searching Icon that is displayed while the database is being searched based upon your search criteria. This Manual is for the sole use of TCPS Partners. Use the controls on the left of the screen to move from page to page ©2014 TCPS PlacementPro User’s Manual Version 2.1 5 As an Educational User, the Placement Screen will also show a button to Request a New Placement. This should only be used when the database has been searched for OPEN and ASSIGNED placements that may meet your needs. Facility Users have a button to Add a New Placement. Note the Requests Column. In this column there will be a number if other requests are in the system for an OPEN placement that have not yet been acted upon by the facility. Additional requests can be made, but schools can know that there are other school(s) that have requested the same placement. Be sure and record the PCode of any placement that needs to be requested for your school! Preceptor information may be viewed by clicking on the preceptor name when available in the placement grid. Preceptor information can include: Name Phone/Pager Credentials (BSN, MSN, Certifications, etc.) Length of Professional Experience Email Website/E-Portfolio Specialty(ies) Licensure Facility Unit assignment PCode of placement where preceptor is assigned This Manual is for the sole use of TCPS Partners. ©2014 TCPS PlacementPro User’s Manual Version 2.1 6 Changing your View Depending upon the width of your screen, you may want to rearrange or hide columns in the placement grid that you do not routinely use. To do this, click on Columns link at the top of the placement grid (Not available for Partner users). From the popup, select the columns you wish to see in the grid. You may also drag column titles within the popup window to rearrange the display. Once you have the columns in the order you want, click on OK. The system will hold this view until you change it. You can always return all columns to the display using the reset button. This Manual is for the sole use of TCPS Partners. ©2014 TCPS PlacementPro User’s Manual Version 2.1 7 Reviewing Placements 1. Review placements in the Placement Grid. Refer to the definitions if you need assistance with the various column data that describe the various placements opportunities. 2. You may review the placement in detail by clicking on the VIEW placement icon listed in the Actions Column of the placement grid. The Action Column on the left of the screen differs based upon your user role. View Placement – All Users Update or Request Placement – School and Facility Affiliates Only View Placement Screen The View Placement version of the placement data is designed to print if you need to provide this information to your Educational User to request the placement. This Manual is for the sole use of TCPS Partners. ©2014 TCPS PlacementPro User’s Manual Version 2.1 8 Using the Placement-History Tab Placement Data from the previous term will be available under the Placement Tab and History and is noted in the Placement Grid as Expired Data. You may review this data online – or export to Excel as needed. From the History view, you may review previous requests, denied requests, etc. Clicking on the History button will display ALL historical data regardless of the status. If you use one of the Status SubMenus, you will see only the data for that particular status in the placement grid. Note that the Header changes to Placements ◊HISTORY when historical data is being displayed. There is also a column entitled EXPIRED that will have a dot in the column for any placement that has expired. Note that this column may or may not be visible unless you have it turned on using the Column link (available to all users except Partners). You may download the data into EXCEL to further sort, filter and analyze as desired. This Manual is for the sole use of TCPS Partners. ©2014 TCPS PlacementPro User’s Manual Version 2.1 9 Exporting to Excel Data that you want to Export to Excel should be displayed via the SEARCH Tool or using the Placements Submenus. While you may filter and sort on the screen, changes in screen data based upon sorts and filtering does not export. To Export Specific Data: Use the Search Tool to filter/sort data related to YOUR organization. Once your data has been exported to an Excel spreadsheet, you may sort, filter and analyze as needed. This Manual is for the sole use of TCPS Partners. ©2014 TCPS PlacementPro User’s Manual Version 2.1 10 Getting Help TCPS PlacementPro has been designed to be as intuitive as possible once a user understands the basic workflow outlined in the conceptual framework and has a working knowledge of the various terms and practices. Using the HELP button on the main navigation header, you may also access the full user’s manual as well as specific topical documents to guide you through a specific workflow. There are several HELP documents available including this user guide. Click on the name of the document you would like to review. All documents will open in a new window. Note that this is the location of placement and user grids for data upload. In many of the data input screens, definitions are also provided for terms followed by an information icon This Manual is for the sole use of TCPS Partners. . ©2014 TCPS PlacementPro User’s Manual Version 2.1 11