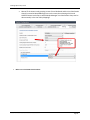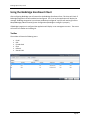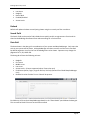
1
BioBridge Lenel OnGuard Quick Start Guide BioBridge Quick Setup Guide Table of Contents Introduction ................................................................................................................................................................ 3 Support ....................................................................................................................................................................... 3 Setting up BioBridge ................................................................................................................................................... 4 Biometric Device Profile ........................................................................................................................................................... 5 Biometric Device(s) ................................................................................................................................................................... 6 BioBridge System Configuration ............................................................................................................................................... 9 Using the BioBridge Enrollment Client ..................................................................................................................... 13 Toolbar.................................................................................................................................................................................... 13 Enroll ....................................................................................................................................................................................... 14 Edit .......................................................................................................................................................................................... 14 Encode Card ............................................................................................................................................................................ 14 Filter ........................................................................................................................................................................................ 14 Refresh .................................................................................................................................................................................... 15 Search Field............................................................................................................................................................................. 15 Data Grid ................................................................................................................................................................................. 15 © Refer to End User License Agreement for Copyright Notice Page 2 BioBridge Quick Setup Guide Introduction BioBridge is an enrollment and synchronization middleware that overlays enrollment and demographic synchronization between MorphoManager and third party data sources. The infrastructure is extensible and supports interfacing to multiple third party systems (one at a time) by the implementation of an interface. BioBridge is not dependent on the underlying technology platform required for integration. Support Please contact your installer for additional support. © Refer to End User License Agreement for Copyright Notice Page 3 BioBridge Quick Setup Guide Setting up BioBridge The following areas of MorphoManager need to be configured as part of the Lenel OnGuard BioBridge setup: • • • • • • Wiegand Profiles Biometric Device Profiles Biometric Device User Policy User Distribution Group BioBridge System Configuration Wiegand Profiles Wiegand Profiles define what information is output over the Wiegand Out interface of the Morpho Biometric Devices when a user is identified. This is most typically used in conjunction with an Access Control System. From Administration tab select Wiegand Profile. Click Add button to create a custom Wiegand profile. The Wiegand formatting used can vary from system to system, but some common formats are listed below. The actual setting of the Wiegand Profile from this list will be done at the User Policy and Biometric Device Profile Level. Please refer to those sections for further details. © Refer to End User License Agreement for Copyright Notice Page 4 BioBridge Quick Setup Guide Biometric Device Profile The Biometric Device Profile will define common settings and parameters for one or more biometric devices. This profile can be applied when adding units into the system from the Biometric Device section of Administration. • • From Administration tab select Biometric Device Profile. Click Add button to create a new Biometric Device Profile. In order to create the most basic profile utilizing biometrics stored on the devices that can be used, simply give the profile a name and click Finish. Please reference the MorphoManager User Manual for more detail on all the various properties that can be assigned to a Biometric Device Profile including the use of smartcards. If you plan on using a Wiegand Profile, you will need to set the Wiegand Profile for the Biometric Device(s) here. The Wiegand Profile you choose for your devices must marry to the one being utilized for your users set in the User Policy section of this guide. © Refer to End User License Agreement for Copyright Notice Page 5 BioBridge Quick Setup Guide Biometric Device(s) A Biometric Device is the device used to verify users and allow access to doors. They record a log of every attempt to gain access. MorphoManager is used to manage user’s access to Biometric Devices. • • • From Administration tab select Biometric Device. Click Add button to create a new Biometric Device. Enter the details for the device including the Hardware Family the device falls into, the IP address, and the Biometric Device Profile. • Once the required details are entered click Finish. Below is a screenshot of how the Biometric Device Screen looks after the configuration and the devices are online. © Refer to End User License Agreement for Copyright Notice Page 6 BioBridge Quick Setup Guide User Policy User polices are used to apply access rights and rules to all members of the group. To Configure BioBridge, MorphoManager’s UserPolicy with an Access Mode “Per User” must be selected. This will create User Distribution Groups (groups of Biometric Devices) that can place the enrolled user into specific devices • • From Administration tab select User Policy. Click Add button to create a new User Policy. If you plan on using a Wiegand Profile, you will need to set it here in order for the users enrolled in this User Policy to have a particular Wiegand Profile. The Wiegand Profile you choose for your users must marry to the one you utilize for your biometric access devices set in the Biometric Device Profile section of this guide. The default User Policy will be set to utilize an authentication mode of Biometric (1: Many). To utilize another authentication mode (such as encoding smartcards) additional User Policies can be created. Please reference the MorphoManager User Manual for more detail on all the various properties that can be assigned to a User Policy including Wiegand Profile, Finger Biometric Enrollment Minimum, Fingers, Access Modes and User Authentication Modes. © Refer to End User License Agreement for Copyright Notice Page 7 BioBridge Quick Setup Guide User Distribution Groups User Distribution Groups are designed to distribute users onto groups of MA readers or MorphoManager Clients. In order to be utilized the user must be in a User Policy that has its Access Mode set to “Per User”. Then the User Distribution Groups will be selectable when creating (or editing) a user. • • From Administration tab select User Distribution Group. Click Add button to create a new User Distribution Group. Below is the screenshot where group will only be placing users on one of the three devices installed on the system. © Refer to End User License Agreement for Copyright Notice Page 8 BioBridge Quick Setup Guide BioBridge System Configuration The last step in the process is to configure BioBridge specifications to Lenel OnGuard. From Administration, select System Configuration. Select the BioBridge Tab in System Configuration. System: From the System drop down menu choose Lenel OnGuard and click the Configure connection button. A BioBridge connection box window will pop up. Fill in all the required fields and click OK © Refer to End User License Agreement for Copyright Notice Page 9 BioBridge Quick Setup Guide NOTE: The DataConduIT Data Source can be set up in Lenel’s System Administration>Additional Hardware>DataConduIT Sources. This will allow failed access attempt events to be reported in OnGuard. (See screenshots for this area of Onguard on the following page). Additionally, if you do not have Single-Sign-On access to Lenel configured please contact Lenel’s helpdesk for support. The DataConduIT Source and DataConduIT Devices both need to be configured in Lenel. The naming of the devices will need to marry to the exact name of the Biometric Device devices in MorphoManager. • Wiegand Profile: Select the Wiegand format in use from the drop down menu. • User Not Found: Decide how MorphoManager should handle any enrolled user if they are no longer found in Lenel OnGuard. This setting determines what action MorphoManager should take when a previously enrolled user is not found in the in Lenel OnGuard. © Refer to End User License Agreement for Copyright Notice Page 10 BioBridge Quick Setup Guide • Disable: The user will remain in MorphoManager, but be in a disabled state. They will NOT be able to gain access through any Biometric Device. Delete: The user will be purged from MorphoManager. • • Access Level Mode: This setting determines how MorphoManager should map Lenel OnGuard users into MorphoManager User Distribution Groups. • Automatic: This mode will automatically match Access Level groups from Lenel OnGuard to the ones created in MorphoManage User Distribution Group if they have the same naming convention. © Refer to End User License Agreement for Copyright Notice Page 11 BioBridge Quick Setup Guide Manual: If the Access Level grouping names of Lenel OnGuard and the User Distribution Group(s) created in MorphoManager are not the same,then selecting which Lenel OnGuard Access Level maps to which MorphoManager User Distribution Group can be done manually in the User Policy Mappings. Make sure to click SAVE when finished!! © Refer to End User License Agreement for Copyright Notice Page 12 BioBridge Quick Setup Guide Using the BioBridge Enrollment Client After configuring BioBridge you will now utilize the BioBridge Enrollment Client. This client will check if BioBridge Integration has been enabled and configured. If it is has not the application will display the message “BioBridge integration has not been enabled and configured” and you will need to go back to MorphoManager/Administration/System Configuration/BioBridge to configure it properly. If BioBridge integration is configured the application will display a user management screen. The screen will consist of a toolbar and a data grid. Toolbar The toolbar will have the following items: Enroll Edit Encode Card Filter Refresh Search Field © Refer to End User License Agreement for Copyright Notice Page 13 BioBridge Quick Setup Guide Enroll Enroll will start the enrollment of the selected user. The enrollment process will be derived from the standard MorphoManager user add/edit wizard with the following pages (For details on the enrollment process please see the User Management section of the MorphoManager User Manual): Authentication Type (Only if more than one mode is configured) 3D Face Selection 3D Face Enrollment Finger Selection Finger Enrollment If a card based authentication method is configured the operator will be prompted if they want to encode a card. Edit Opens the already enrolled user details for viewing or editing. Encode Card Encode card will display an animation of the card being presented to a SDI 011 and wait for the card encoding to complete or be cancelled. Filter Filter will show a popup inline form that allows filtering on the following items: First Name Middle Name © Refer to End User License Agreement for Copyright Notice Page 14 BioBridge Quick Setup Guide Last Name Badge ID Date of Birth Enabled/Disabled Access Levels Refresh Refresh will update the data currently being shown using the currently set filter conditions. Search Field The Search Field can be used to find individual users quickly and/or to migrate users from Lenel On Guard to the BioBridge Enrollment Client without waiting for a cache refresh. Data Grid The data shown in the data grid is a combination of your system and MorphoManager. Only users that exist in your system will be shown. A MorphoManager user does not exist until the user is enrolled. By default pagination is set for the first 25 BioBridge users to be shown. Operators may change the pagination to 25, 50, 100 & 250. The data grid will have the following columns: Badge ID First name Middle name Last name Access Levels – (Comma separated values if more than one) Enrollments (None, Finger, Finger & 3D Face, 3D Face) (Derived from linked MorphoManager User) Disabled- A value of either True or False will be present. Enrolled user will show their MorphoManager details in the “Show Details” panel below the data grid. This area will be blank if the user has not been enrolled. © Refer to End User License Agreement for Copyright Notice Page 15