1
CamGuard Security System
CamGuard Security System Manual
JMC Electron Co.,LTD
CamGuard Security System
Brief Introduction........................................................................... 3
Features ....................................................................................... 3
System Requirements..................................................................... 3
Configuration ................................................................................ 4
Add Camera............................................................................ 4
Device Options ........................................................................ 4
About Alarm.................................................................................. 5
Alarm Actions.......................................................................... 6
Alarm Schedule ....................................................................... 8
Motion detection...................................................................... 9
Video Recording Schedule ............................................................. 10
Remote Options ........................................................................... 11
System Options ........................................................................... 13
Storage ................................................................................ 13
Auto Run .............................................................................. 14
On-Screen Display ................................................................. 14
Network ............................................................................... 15
Others ................................................................................. 16
Skin ........................................................................................... 16
Usage ........................................................................................ 17
Event List Management................................................................. 17
Add-ons: Video Capture ................................................................ 20
Add-ons: Snapshot ...................................................................... 20
Registration ................................................................................ 21
FAQ ........................................................................................... 22
How to confirm version number ............................................... 22
Version of the Direct X ........................................................... 22
How to realize remote access within LAN................................... 22
How to realize remote access within WAN ................................. 24
Local Web service fails to establish interception on 808 Port ........ 26
Unable to connect to remote service server ............................... 27
Network connection modes supported by CamGuard Security System
........................................................................................... 27
How to conduct remote monitoring in the form of webpage.......... 28
How to conduct remote monitoring with mobile phone ................ 30
CamGuard Security System
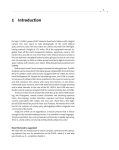
Brief Introduction
CamGuard is a suit of advanced guard against theft and alert system. It
utilizes video frequency capture-facility, such as PC camera, and adopts
advanced picture-discern technique to monitor the locale, as soon as it
detect any abnormity, a loud alert will be given out to scare away the
aggressor, picture or video will be taken to memorize what happened
contemporarily and inform the host by many kinds of methods (Email,
Phone).
Features
1. Supports any video capture device such VFW, WDM.
2. Supports video capture device plug-and-play.
3. Motion Detection.
4. Adjustable motion detection by zone.
5. Adjustable sensitivity.
6. Provides customizable Alerts like Video Recording, Photo Snaps,
Sound Alarms, E-mail Notifications and phone.
7. Schedule Monitoring sessions.
8. Record video/audio with all time, a programmed schedule and motion
Detection.
9. Automatic Space Management while recording. Delete old records
automatically on disk full.
10. Support On Screen Display. Displays date and time on video.
11. Supports history records manager, Supports searching by date.
12. Accessorial tool for recording video.
13. Accessorial tool for capturing the picture.
14. Supports remote video/audio surveillance by WEB BROWSER and
Remote View Client.
15. Supports remote surveillance by Mobile telephone (WAP).
16. Supports multi network modes, include LAN and NAT.
17. Supports running background stealthy.
18. Supports automatic running on system starting, automatic entering
working status and automatic connecting to the network (such as ADSL).
19.Change Skin.
System Requirements
Microsoft Windows 98, Me NT 4.01, 2000, XP or later versions
Microsoft DirectX (no version requirement, but the latest version is
recommended.)
500 MHz CPU
128 MB RAM
At least 20MB disk space for software installation
Microsoft Internet Explorer 5.0 or higher version (to conduct remote
monitoring in the form of webpage)
Support WAP mobile phone (to conduct remote monitoring with mobile
phone)
CamGuard Security System
Configuration
Add Camera
CamGuard is based on Microsoft DirectX technology, It supports video
device with VFW or WDM interface, and can run with low version DirectX.
However for better performance, we advise you to install higher version
DirectX. You can visit http://www.microsoft.com/DirectX to download the newer.
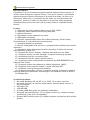
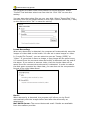
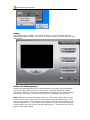
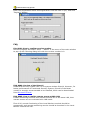
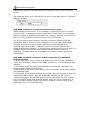
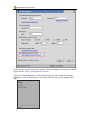
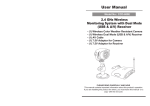
On firstly running, the dialog will be shown
• Video Device
Device: The video device can be used the listed here in your computer,
please choose one for source of video.
Attribute: Display dialog box of the selected video device.
Options: Display and set size and frame rate of the selected video device.
• Audio Device
Device: The audio device can be used the listed here in your computer,
please choose one for source of audio. You can leave it empty.
Attribute: Display dialog box of the selected audio device.
Device Options
CamGuard is based on Microsoft DirectX technology, It supports video
device with VFW or WDM interface, and can run with low version DirectX.
However for better performance, we advise you to install higher version
DirectX. You can visit http://www.microsoft.com/DirectX to download the newer.
Click button "Option" and select "Device Setting" or Right click on preview
window and select "Option - Video Device".
• Video Device
CamGuard Security System
Device: The video device can be used the listed here in your computer,
please choose one for source of video.
Attribute: Display dialog box of the selected video device.
Options: Display and set size and frame rate of the selected video device.
• Audio Device
Device: The audio device can be used the listed here in your computer,
please choose one for source of audio. You can leave it empty.
Attribute: Display dialog box of the selected audio device.
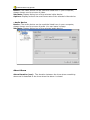
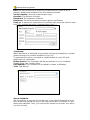
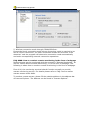
About Alarm
Alarm Duration (sec): The duration between the time when something
abnormal is detected to the time when the alarm is closed.
CamGuard Security System
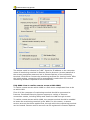
Alarm Actions
CamGuard Security System supports various types of alarm for you to find
out what happen on the locale instantly.
The Alarm Actions currently supported include: "Sound", "Locale
Recording", "Email" and "Telephone". Select and check Alarm Actions to
enable it.
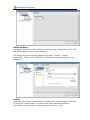
Sound:
When any abnormity is detected, the program will play a stream of sound
to scare the invader away. You can either select the sound effects
provided by the program or select sound files of your own.
CamGuard Security System
The program provides some sound effects for direct selection. Select
"Sound" first and then select one from the list. Click "OK" to save the
setting.
You can also select other files on your own disk. Select "Sound files" first
and then click the file folder button on the right. Select a sound file (*.wav)
on the disk and click "OK" to save the setting.
Locale Recording:
When any abnormity is detected, the program will automatically save the
images or video data on the locale. You can set to save images or video.
In "Locale File Format", you can select to save as "Image (JPEG)" or
"Video". If you select to save as image, a Jpeg image will be saved every
0.5 second from the moment when abnormity is detected until the end of
the alarm. If you select to save as video, then the locale video will be
saved from the moment when abnormity is detected. In order to reduce
the disk space occupied by video data, you can also set the compression
format of the video data saved.
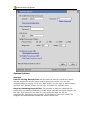
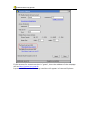
Email:
When abnormity is detected, the program will inform you by Email
automatically with the images before and after the abnormity as
attachment.
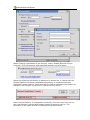
Mail SMTP Server: The server that sends email. Details are available
from the mailbox provider.
CamGuard Security System
Port, the port of the SMTP server to provide service, which is 25 in
general. Details are available from the mailbox provider.
Verify Identity: Account authentication type.
Account: The account of email.
Password: The password of email.
Recipient: The email account to receive alarm notification.
Copy to: If others are required to be notified, their accounts can be input
here. For multiple accounts, separate them with (;).
Telephone:
When abnormity is detected, the program will dial the telephone number
preset through the modem installed on your PC.
To enable the function, you need to install Modem on your PC with
telephone line connected.
Dialup Device: The list shows all dial-up devices on your computer.
Please select your modem here.
Call Number: This number will be called for alarm notification.
Test: Test dialing.
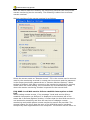
Alarm Schedule
Set the system to monitor the locale only in the specified period of time.
Only within the period set by you will the system give out alarm for any
abnormity detected. Thus, you can set the system to monitor only when
you are on-duty.
CamGuard Security System
First of all, if you want to use this function, you should check and select
the option "Trigger the alarm only in the following periods".
New: To add a new time period.
Modify: To modify the time period currently selected.
Delete: To delete the time period currently selected.
Clear: To delete all time periods.
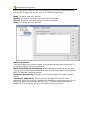
Motion detection
CamGuard Security System allows the monitoring area and sensitivity to
be set according to locale conditions.
Motion Detection Area Setting: Motion detection area can be set and
only in case of abnormity detected in this area will the alarm be triggered.
Edit: To edit the monitoring area.
Detection Sensitivity: This value is the valve value for triggering the
alarm.
Sensitivity Indication: The blue area indicates the current value
detected, while the red line indicates the detection valve value set by you.
When the blue area exceeds the red line, it indicates that the alarm is
triggered. The program will give out beep sound as prompt.
CamGuard Security System
Click the "Edit" button to edit the monitoring area.
The program provides three editing modes: to make rectangular selection
with the mouse, inverse the selected area, and fill up a color block. When
using rectangular selection or color block, you can click the right button of
the mouse to delete the selected area.
Clear: Clear the monitoring area.
Video Recording Schedule
To record video on the locale in the specified time period.
CamGuard Security System
If you want to use this function, you should first check the option "Record
video only in the following time periods" to select it
New: To add a new time period.
Modify: To modify the time period currently selected.
Delete: To delete the time period currently selected.
Clear: To delete all the time periods.
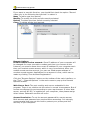
Remote Options
Enable remote service account: Since IP address of your computer will
be changed for some connection modes each time you connect to the
Internet, you need to know the current IP address of your computer each
time you conduct remote access, which is very inconvenient. After you
enable remote service account, you can use fixed access address to
conduct remote access. Application for an account is free, which can be
made by clicking "Free Account Registration".
Click the "Remote Options" button on the toolbar of the main interface, or
the "Tool" - "Remote Options" in the main menu to pop up the Remote
Options window.
Web Server Port: The port used by web server embedded in the
program. There is no need to set this value in normal circumstance. But of
course reconfigure this port according to your requirement. If other Web
server, such as MS IIS, is installed on your computer, then please assign
other values. Otherwise conflict will occur.
Access Permission: To set the account password for remote access.
Both account and password are required when accessing. It is strongly
recommended that you set this item to protect your privacy and the
security of your computer.
CamGuard Security System
Mobile Phone Access Setting: The program supports WAP mobile
phone remote access. You can view the locale historical records on the
phone in the form of images.
Supported Image Format: Please select an image format supported by
your WAP mobile phone. The program will automatically convert the locale
images or historical records to this format according to your selection for
convenient browse on your mobile phone.
If you do not know which kind of format your mobile phone supports, you
can refer to the phone's manual.
Gif
Support 256 colors, Most mobile phones
support it.
PNG
Support true color, Most mobile phones
support it.
Jpeg
An minimum quality loss compress. High
compression ratio, True color.
Wireless Bitmap Format, 1 bit/monochrome
WBMP (all the pixels are only black or white). Most
mobile phones support it.
Image Size: To set the image size when access with WAP mobile phone
according to its screen size.
Remote Access Webpage Address: To display the addresses accessed
from remote in the form of webpage.
Mobile Phone Access Address: To display the address accessed with
mobile phone.
Connection mode: To display the current network connection mode.
Enable Remote Service Account:
CamGuard Security System
System Options
Storage
Path for Saving Record Files: Set the path for saving record files, which
include scheduled record, alarm record, and quick record. You can set
multiple paths for saving. Click the "Add" button on the right to add directory
and click the "Delete" button on the right to delete the selected path.
Days for Retaining Record Files: The number of days for retaining the
record files (including scheduled records, alarm records and quick records) on
the disk. Files saved on the disk for more than the days set will be
automatically deleted by the program. If disk space is less than 100M, the
program will automatically delete the oldest record files.
CamGuard Security System
Auto Run
Launch the program automatically when the system starts: Select this
option to enable auto-run of the program when the system starts and resume
the status before the previous shutdown.
Dialup automatically when the program starts: Select this option to
enable auto dialup to access the Internet according to the parameters set
after the program starts. This setting is suitable for those networks that
require manual dialup to access the Internet. The setting for specific dialup
parameters is the same as that of system dialup.
On-Screen Display
CamGuard Security System
Display Device Name: To display the name of the device on the video or
images captured.
Display Time Stamp: To display the date and time on the video or images
captured.
Font: To set the font of the displayed content.
Network
Internet Connection Mode: It can be set to either "Auto Detection" or
"Direct Network Connection". In general, "Auto Detection" will do. In case
that the program cannot detect out the network type, please set it to "Direct
Network Connection".
Connection Speed: To set network speed. This setting determines the frame
rate provided to the remote monitoring terminal. It should be set according to
actual condition of Internet connection. Otherwise, the effect of viewing
remote monitoring will be influenced.
CamGuard Security System
Others
Display program hot keys: Hot keys will be set to show or hide program.
Skin
CamGuard supports skins.
CamGuard Security System
Usage
After finishing all settings, click "Play" button (or press shortcut key F5),
CamGuard starts to work. You can click "Stop" button (or press shortcut key
F5) to stop.
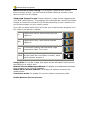
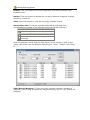
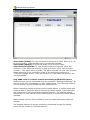
Event List Management
Centralized management for the saved historical records (local scheduled
video recording, alarm records, quick video recording and quick imagecapturing). Click the "Event List Management" button on the main window,
and select "Event List" to pop up the Event List management window.
Date: Options for search by date, they are: "The most recent day" (to list
records of the most recent day for each type of record respectively), "The
most recent week (to list records of the most recent week for each type of
record respectively)", "The most recent month" (to list records of the most
recent month for each type of record respectively), "Customize"(to set the
specific year and month)
CamGuard Security System
Search: Click this button to find corresponding records according to the
conditions set.
Delete: Click this button to delete the currently selected (supports multiple
selection) record file.
View: Click this button to view the currently selected record.
Record Files List: To list the relevant historical records and view
corresponding contents of the selected record by double clicking it.
Icons of records:
local scheduled video recording
alarm record
Remote quick image-capturing and video
recording
Click the selected record with the right button of the mouse to pop up the
menu, with which you can perform operations of "View", "Delete" and "Copy
to …".
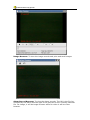
Video Record Browser: To view the video records with the functions of
playback, pause, stop, progress bar drag positioning, and 1X, 2X, 3X and 4X
playback.
CamGuard Security System
Image Browser: To view the image records and print and send images.
Alarm Record Browser: To view the alarm records. The left is the file list
recorded by the alarm and the right is the preview for the currently selected
file. For image, it will be image browser while for video it will be video
browser.
CamGuard Security System
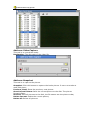
Add-ons: Video Capture
This tool is to record the locale.
Destination: The disk path of the video file.
Add-ons: Snapshot
This tool is to capture the picture.
Snapshot: Click this button to capture the locale picture. It can cut to take at
most 200 piece;
Previous, Next: Show the previous, next picture.
Save Current Picture: Save the current picture to the disk. The picture
format is Bmp;
Save all: Save all pictures to the disk, the file names are the picture order;
Delete Current: Delete the current picture;
Delete all: Delete all pictures.
CamGuard Security System
Registration
Select "Registration" in "About" menu.
CamGuard Security System
Enter the Registration Name and Registration Code we sent to you, and click
"Registry" button.
FAQ
FAQ 0001: How to confirm version number
Run the program and select "Help" - "About" in the menu of the main window
to pop up the following dialog box with the version number in it.
FAQ 0002: Version of the Direct X
CamGuard Security System can run on system without DirectX. However, for
better performance of CamGuard Security System, DirectX of the latest
version is strongly recommended to be installed, which can be downloaded
from Microsoft DirectX.
FAQ 0003: How to realize remote access within LAN
If both monitoring terminal and remote terminal are in the same LAN, then
remote access can be conducted with LAN mode.
First of all, normal functioning of the Local Monitor terminal should be
guaranteed, and remote monitoring service should be launched in the Local
Monitor terminal as well.
CamGuard Security System
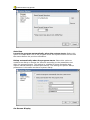
The Setting Window of the remote terminal should be set as follows:
CamGuard Security System
The access mode is selected as "LAN". Input the IP address or the computer
name of monitoring terminal in Remote Service Account. Access password is
the access permission password set in Remote Options of the monitoring
terminal. Click OK to connect the monitoring terminal for viewing locale. After
the initial setting, connection will be automatically made when the remote
monitoring window is opened for the second time.
FAQ 0004: How to realize remote access within WAN
To realize remote access within WAN is a little more complicated than to do
so within LAN.
First of all the computer of monitoring terminal should be connected to
Internet. CamGuard Security System supports a variety of Internet
connection modes, including dialup and small-size LAN through routers.
To realize remote access within WAN, the remote terminal should be enabled
to locate the monitoring terminal in the WAN. For this reason, a remote
service account should be applied first, through which the monitoring terminal
can be located. Remote service account can be registered in Remote Options.
CamGuard Security System
When finishing registration of the account, select "Enable Remote Service
Account", fill in the account and password applied, and click Apply.
When the following information is displayed in status bar, it means that the
Remote Options has been completed successfully. If anything abnormal
happened, please refer to "Local Web service fails to establish interception on
808 port" and "Unable to connect to remote service server"
When Remote Options is completed successfully, the next step is to turn on
the Local Monitor terminal and enable remote monitoring service. The
procedure is the same as that of realizing access within LAN.
CamGuard Security System
After the above steps are finished, the monitoring terminal can now provide
remote monitoring service normally. The following is about how to access
remote terminal.
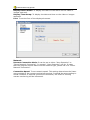
Setting interface of the remote terminal is as follows:
Select the access mode as "Remote access". Fill in the remote service account
used by the monitoring terminal in remote service account and the password
is the access permission password set in “Remote Monitor Options”. When
setting is finished, click OK to connect to the monitoring terminal for viewing
locale. After the initial setting, the connection will be automatically made
when the remote monitoring window is opened for the second time.
FAQ 0005: Local Web service fails to establish interception on 808
Port
When setting remote access, if the message "Local web service fails to
establish interception on 808 port" is displayed on the bottom left of the
status bar in Remote Options window, it means that the local Web service is
not launched successfully and thus the services of webpage remote
monitoring and mobile phone remote monitoring cannot be provided. The
general reason for this is that the port of the local Web server has been
occupied by other applications on the computer. The solution can be either to
CamGuard Security System
assign other ports for the applications or change the port of the local Web
server.
The following figure is the setting for the port of local Web server in “Remote
Options” window.
FAQ 0006: Unable to connect to remote service server
When setting remote access, if the message "Unable to connect to remote
service server" is displayed on the bottom right of status bar in the Remote
Options window, it indicates that either the computer network connection or
the server that provides remote access service is abnormal.
If it is due to abnormal computer network connection, please check its
connection status. If the network connection is normal, then please make
sure the connection is one of those connection modes supported by
CamGuard Security System ("Network connection modes supported by
CamGuard Security System"). If all the above situations are normal, then it is
probably because the server that provides remote account service is
abnormal. Try again later or just contact our customer service directly for
confirmation.
FAQ 0007: Network connection modes supported by CamGuard
Security System
1. Direct connection to the network. Normally this refers to the connection
mode with external IP address after ADSL, modem etc. are connected to the
network;
2. Connection mode within LAN and behind symmetric NAT. Normally this
appears within relatively large LAN.
3. Connection mode within LAN, access Internet through router that supports
and launches UPNP.
4. Connection mode within LAN that connects to Internet through routers not
supporting UPNP function, but has made DMZ mapping on the router or
manual mapping on the network ports used by CamGuard Security System.
Such connection mode sets Internet access mode as "Direct connection" in
order to enable remote monitoring function properly, which is done in the
network section of “System Options”.
CamGuard Security System
5. Wireless connection mode through CDMA/GPRS etc.
Except the fourth connection mode where connection mode is required to be
set as "Direct connection", all other connection modes can be set as "Auto
detection" and the program will determine connection mode automatically
and make corresponding network connection operations.
FAQ 0008: How to conduct remote monitoring in the form of webpage
Remote access can be conducted with the program's "Remote Monitoring", as
well as "Mobile Phone Remote Monitoring", or in the form of webpage. The
following is about how to conduct remote monitoring in the form of webpage.
First of all, the monitoring terminal should function normally to provide
remote monitoring service. For details please refer to FAQ: How to realize
remote access within WAN.
To conduct remote access, please fill the website address in the address bar
of Internet Explorer. The address can be found in “Remote Options”.
CamGuard Security System
If the account for remote service is "guest", then the address of the webpage
will be http://guest.icuy.com:8.
Input a website and the following interface will appear in Internet Explorer:
CamGuard Security System
View locale [Video]: To view the locale in the form of video. When it is run
for the first time, video playback plug-in should be installed.
View locale [Image]: To view the locale in the form of image.
View historical records: To view all alarm historical records. Move the
mouse on "View historical records" to pop up a menu. Click "Recent alarm
records", "This day's alarm records", "All alarm records" to view each of them.
Please note that if the connection mode of the monitoring terminal is
"Transmit through server", then the function of "View historical records" will
not be available.
FAQ 0009: How to conduct remote monitoring with mobile phone
Remote access can be conducted with the program's "Remote Monitoring", as
well as in the form of webpage, or with mobile phone. The following is about
how to conduct remote monitoring with mobile phone.
When conducting remote monitoring with mobile phone, a mobile phone that
supports WAP is required. Before conducting remote access, make sure that
the mobile phone can access WAP webpage properly. For detailed setting
please refer to user manual of the mobile phone or consult the mobile phone
operator.
Mobile phone uses the form of WAP to view the locale and alarm historical
records.
The website address of remote monitoring conducted though the mobile
phone can be located in “Remote Options”.
CamGuard Security System
If the remote service account is "guest", then the address accessed by mobile
phone will be "http://guest.wap.icuy.com:8".
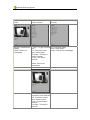
Input the website address on the mobile phone and the following interface
(Different types of mobile phone will have different styles) will appear after
login.
CamGuard Security System
Locale: View the
locale
Recent: View recent
alarm records
All Records: View all alarm
records
Refresh: Refresh the 5. jpg ~ 9. jpg: Record Pre: Previous page
Next: Next page
display
list
Home: Return to homepage
Home: Return to
Pre: Previous page
homepage
Next: Next page
This Day: This day's
alarm records
All day: All alarm
records
Home: Return to
homepage
View records
14. 15. 34 - 5:
Recording time and SN
Pre: Previous record
Next: Next record
Time: Current day's
records
This Day: This day's
records
CamGuard Security System
All day: All records
Home: Return to
homepage
Contact Us
[email protected]
Our website:
http://www.jmc-sz.com